
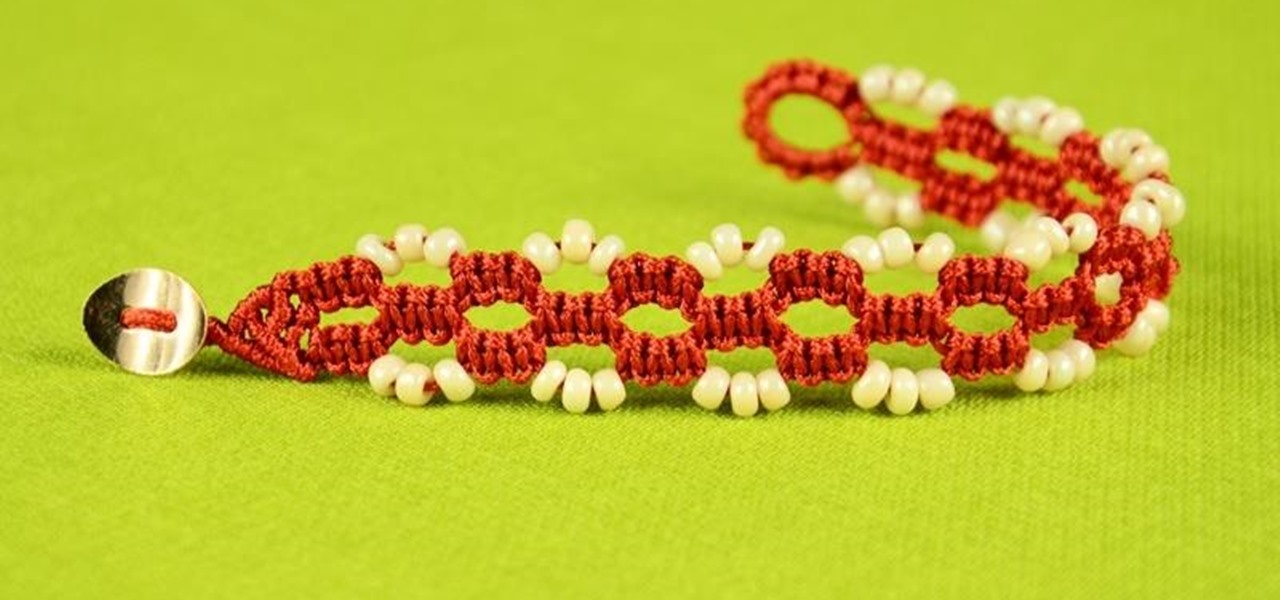
How To: Easy Square Knot Bracelet Tutorial
DIY Easy Square Knot Bracelet with Beads and Button clasp. Easy to make and fun to wear :) a good bracelet for beginners in macrame.

DIY Easy Square Knot Bracelet with Beads and Button clasp. Easy to make and fun to wear :) a good bracelet for beginners in macrame.
G'day Knuckleheads. Todays one minute stud wall framing tip looks at a really easy way of squaring up your stud wall prior to installing a brace. Check it out and let me know what you think. :-)
Let me start by saying something controversial: I despise the gluten-free fad. I think gluten is delicious (I go through at least two loaves of bread a week, with a healthy dose of pretzels and pasta in there as well), and I think many of the health myths surrounding gluten are either fabricated or hyperbolic.
This video tutorial demonstrates how to add beads onto hemp jewelry with square knots.
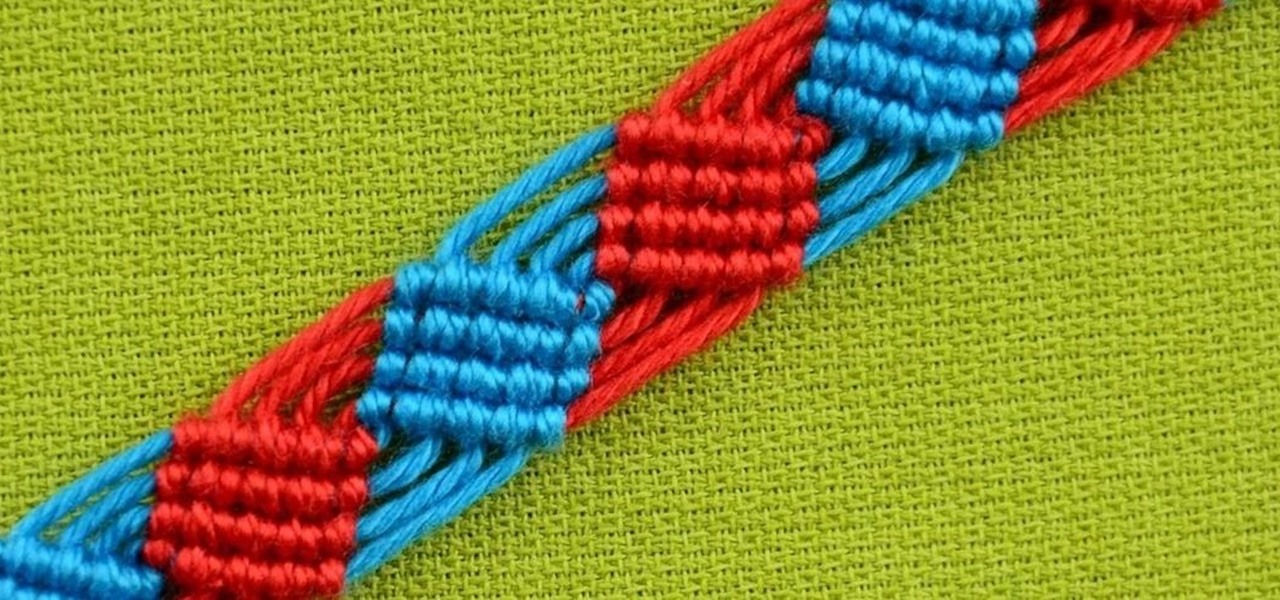
How to make a cool macrame bracelet with squares and triangles. This knotted bracelet has weaving elements. I think Men can also wear this bracelet.
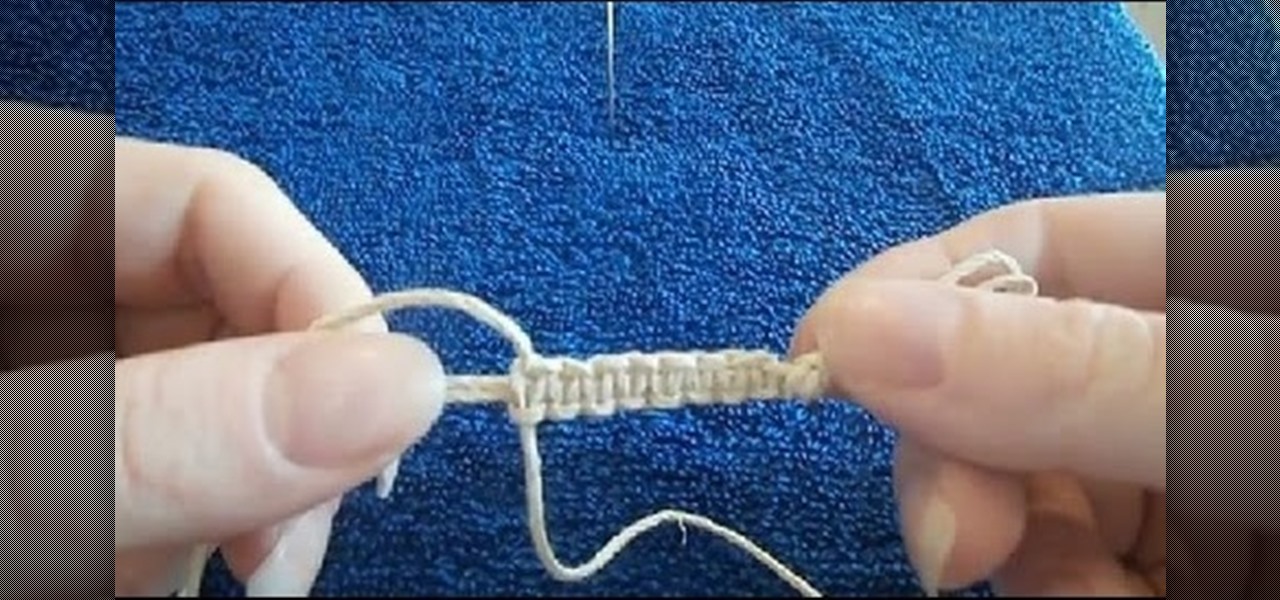
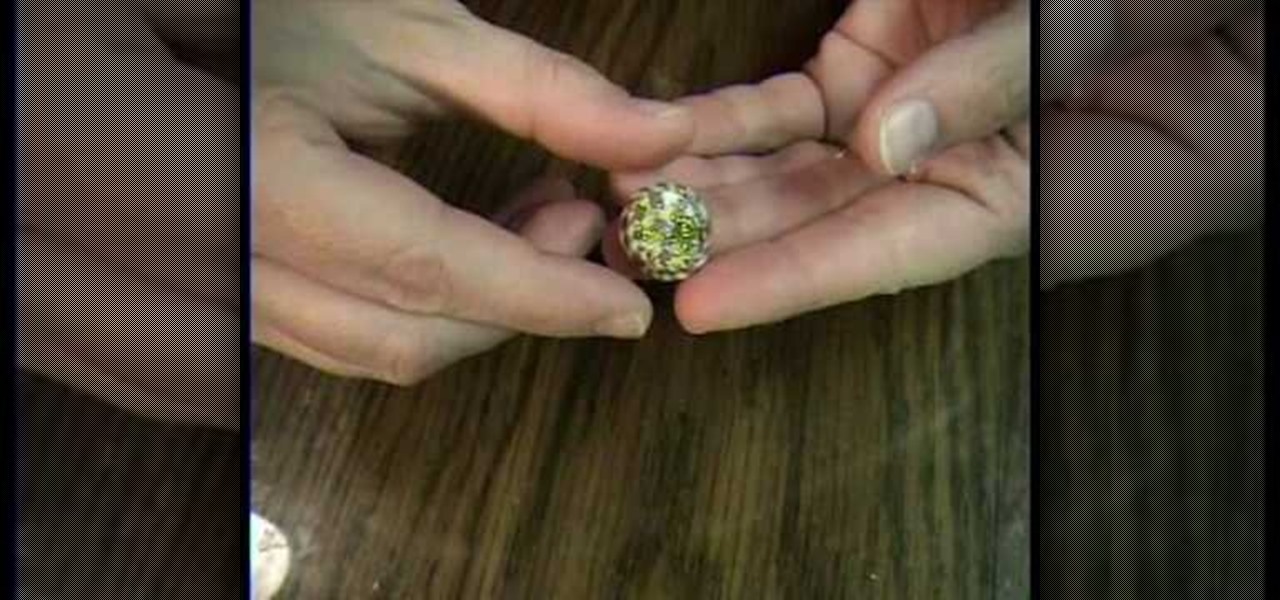
A video tutorial on how to tie a square knot to make hemp macrame jewelry.
To make this bracelet you only need to know how to make a square knot. This is a great bracelet for beginners in macrame.

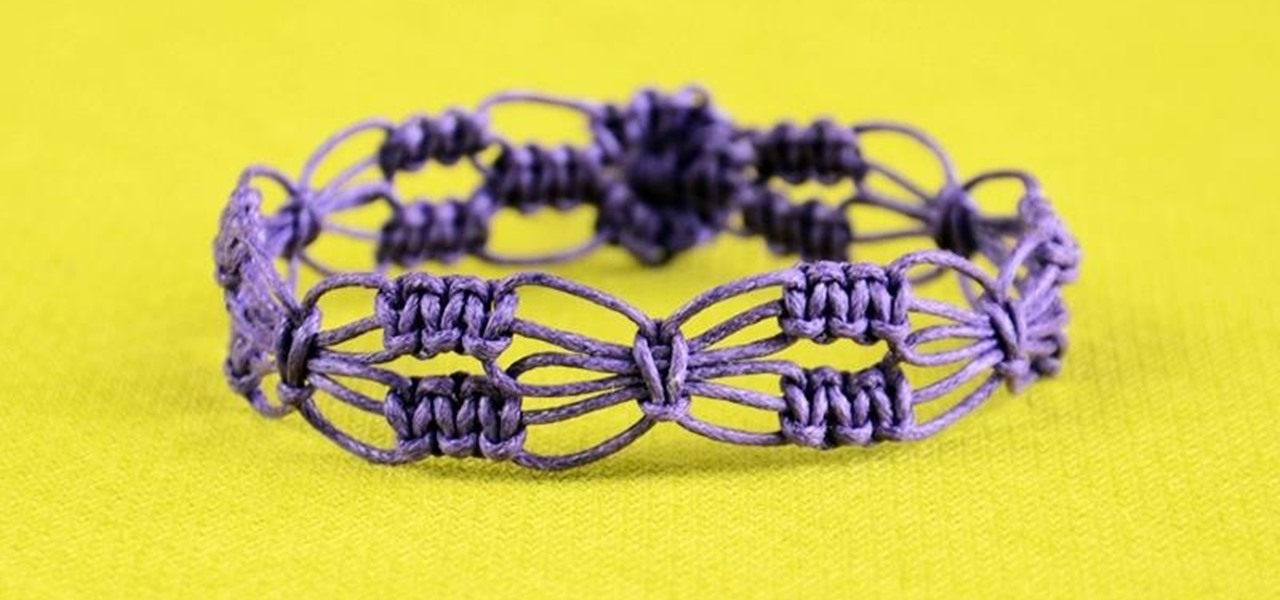
DIY Easy ZigZag Square Knot Loops Bracelet with Button Clasp. This is a good project for children and beginners to learn one of the basic knots frequently used in Macrame.
This bracelet is very easy to make and fun to wear! To make this bracelet you only need to know how to make a square knot and How to braid with four strands. This is a great bracelet for beginners in macrame.
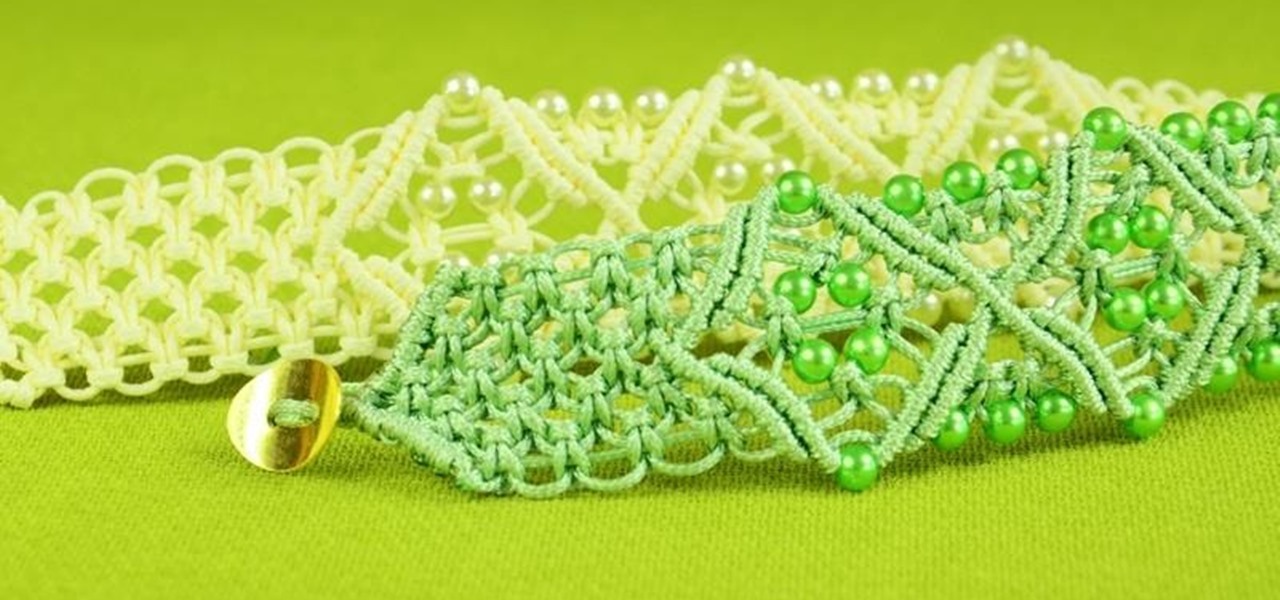
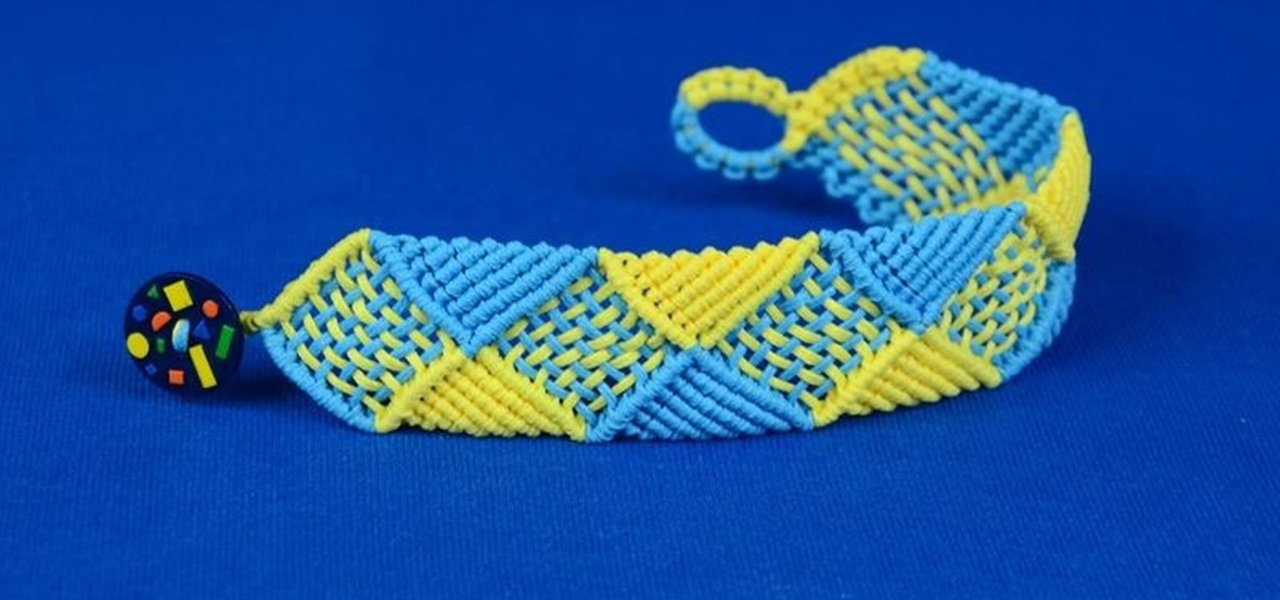
How to make a Square Knot Bracelet with diamonds and beads. This bracelet looks good and its not hard to make.
To make this bracelet you will only need to know how to make a square knot. This is a good bracelet for beginners and it looks very interesting.
To make this bracelet you only need to know a square knot. This Bracelet looks nice from both sides. Good bracelet for beginners.
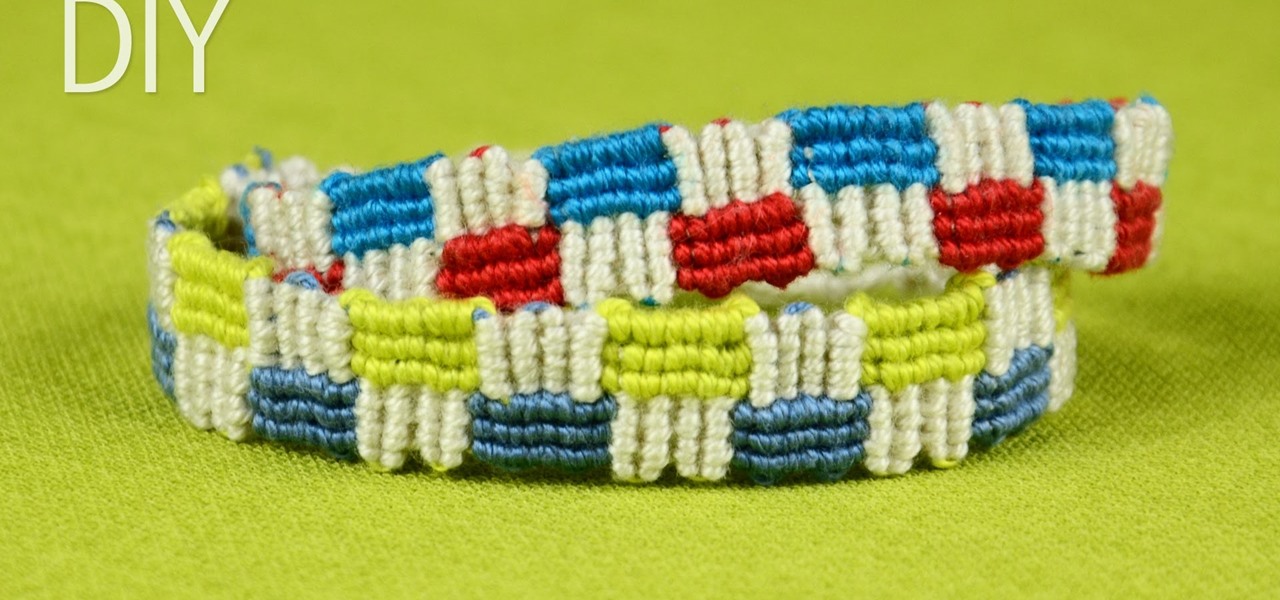
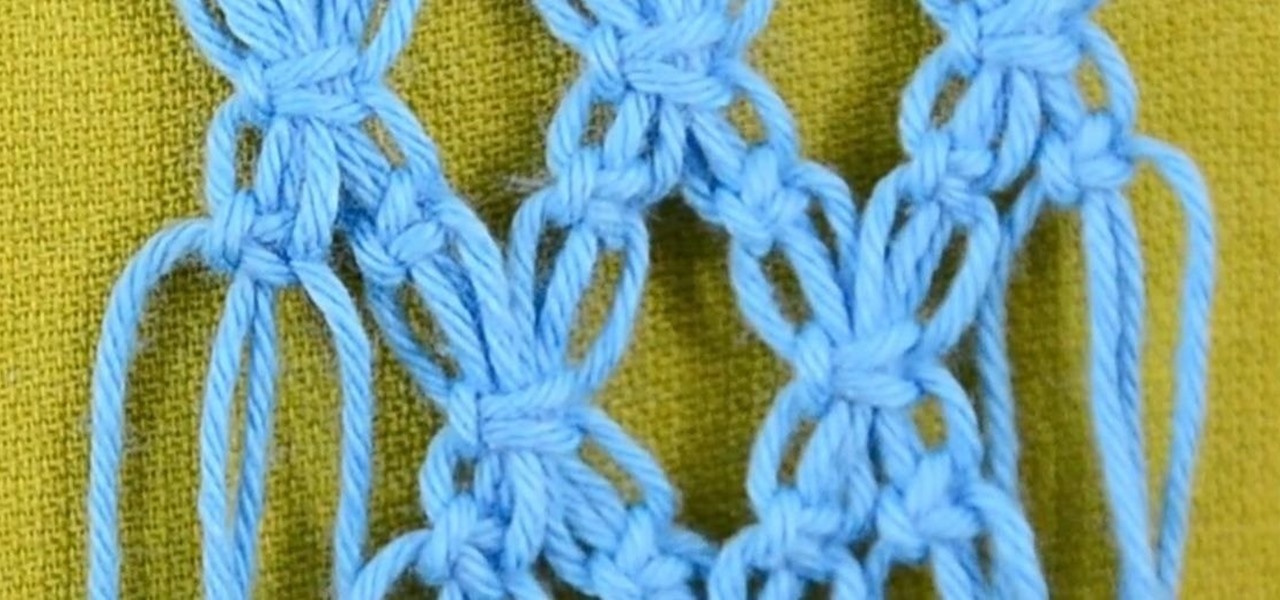
How to Make a Macrame Friendship Bracelet with Squares - Video Tutorial.
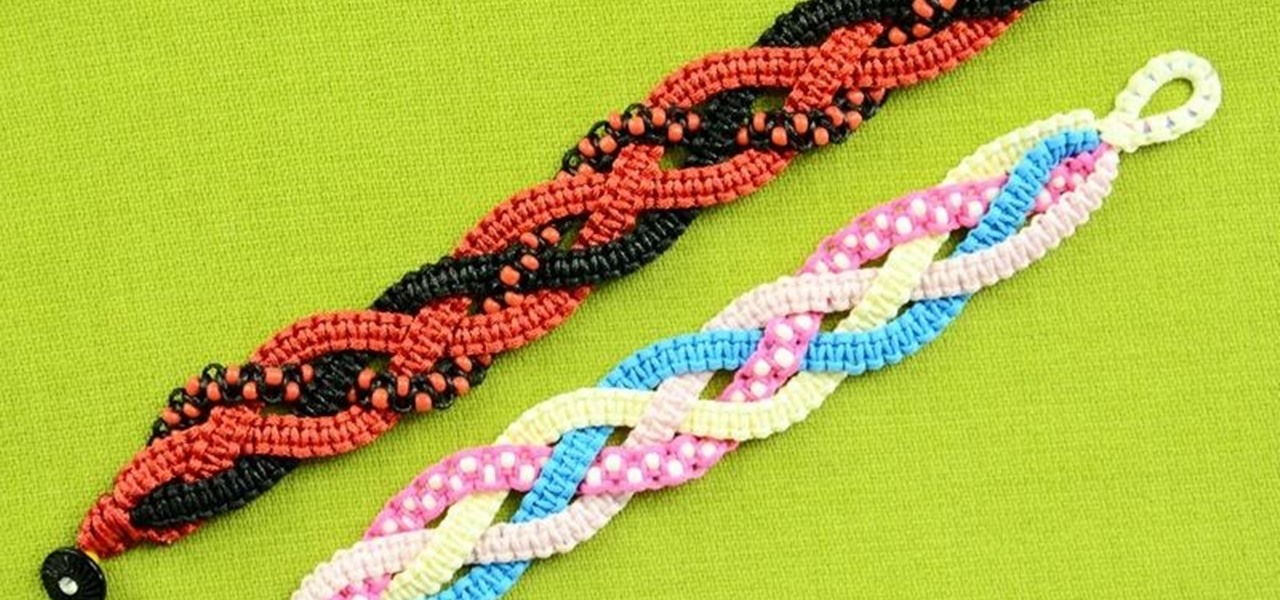
From this Macrame pattern you can make a nice bracelet with squares (Diamonds, Rhombus) you also can make interesting decorations for clothes, towels and other textile products.
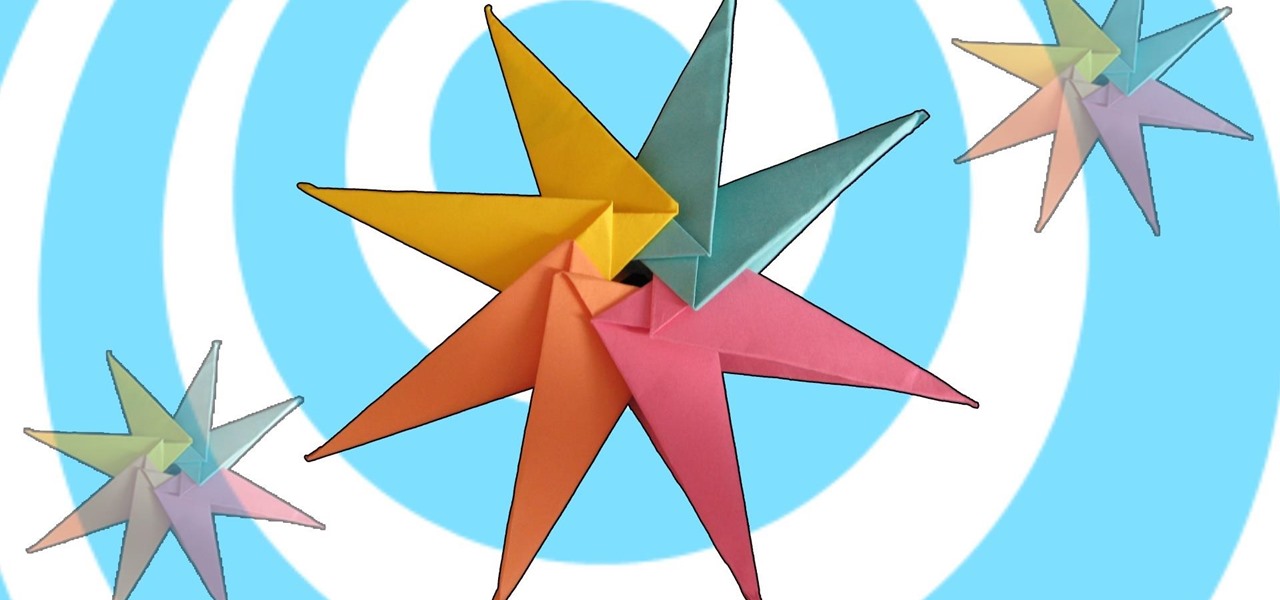
Learn how to make modular origami star with 8 points. What you need to make the origami star: 8 square pieces of paper with different colors
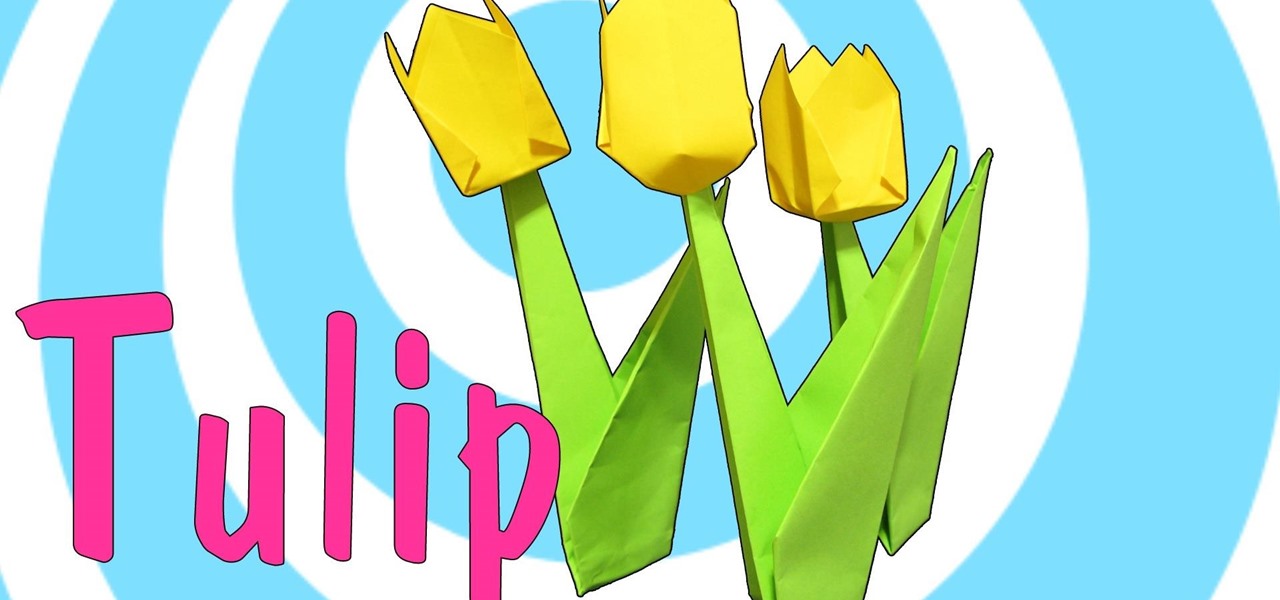
Surprise your loved ones by giving them hand made an origami bouquet of paper tulips. WHAT YOU NEED:
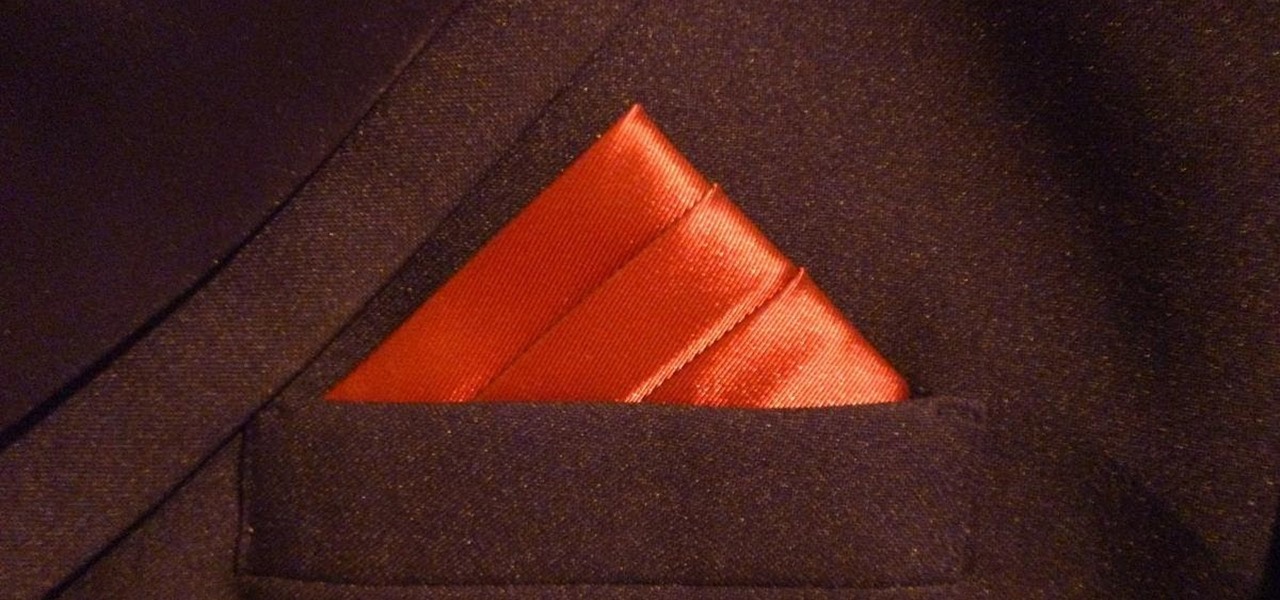
Easy to follow animated how to fold the cool looking 3 stairs pockets square for your suit.
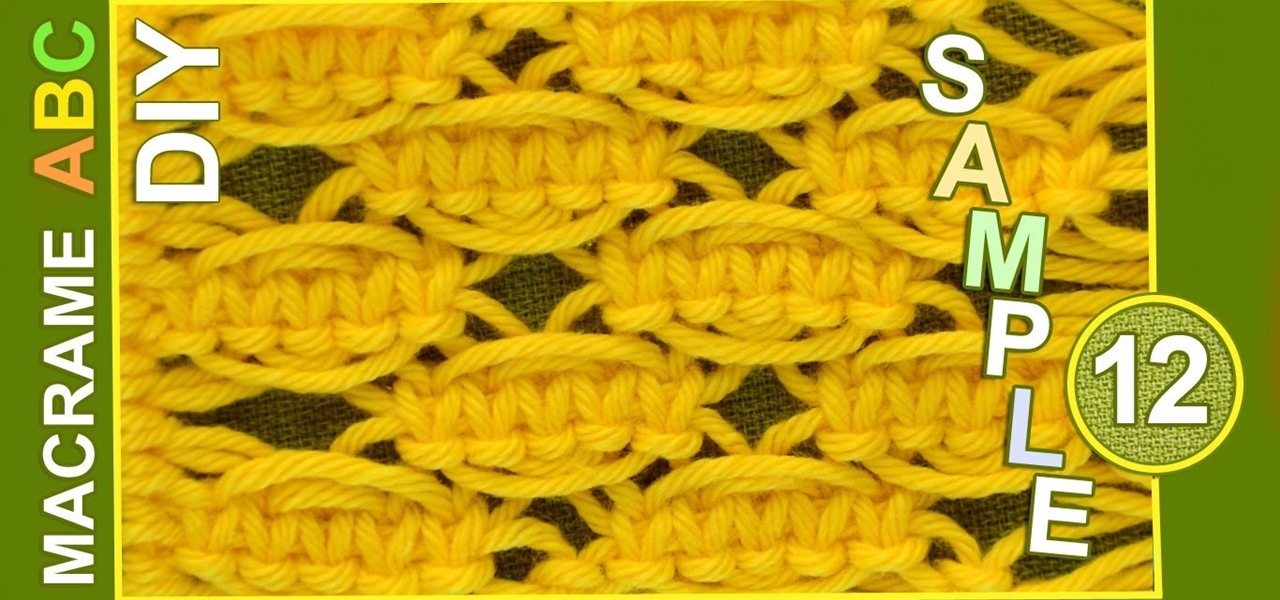
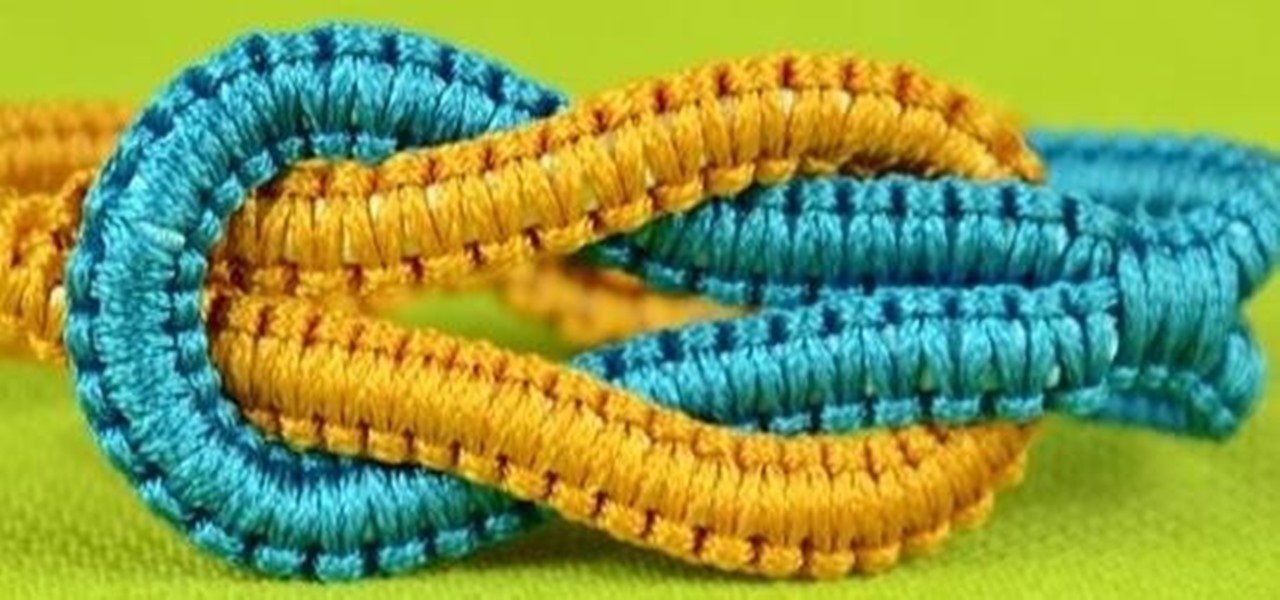
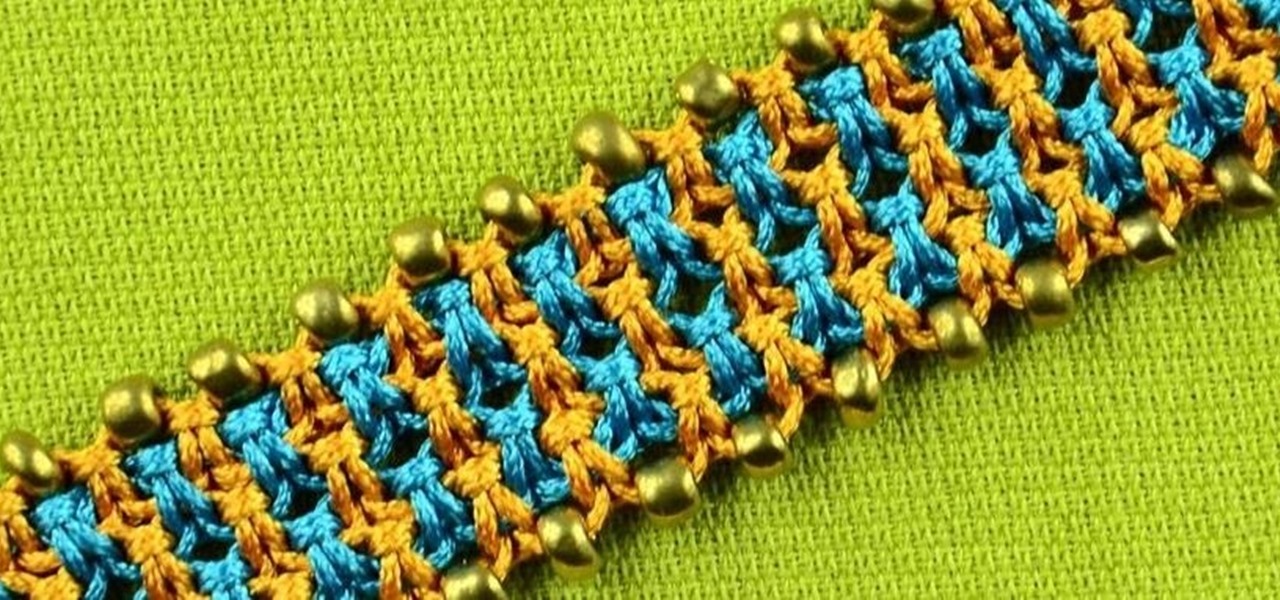
Interesting pattern example for your macrame projects. In this Macrame sample we used Square knot. The square knot is the basis of many designs.
Motif with flower elements. With this motif you can make a jacket or something beautiful. In this Macrame sample are used Square knot. The square knot is the basis of many designs. It is also called a Flat Knot or Reef Knot. If you can only learn one knot, this is the one to learn.
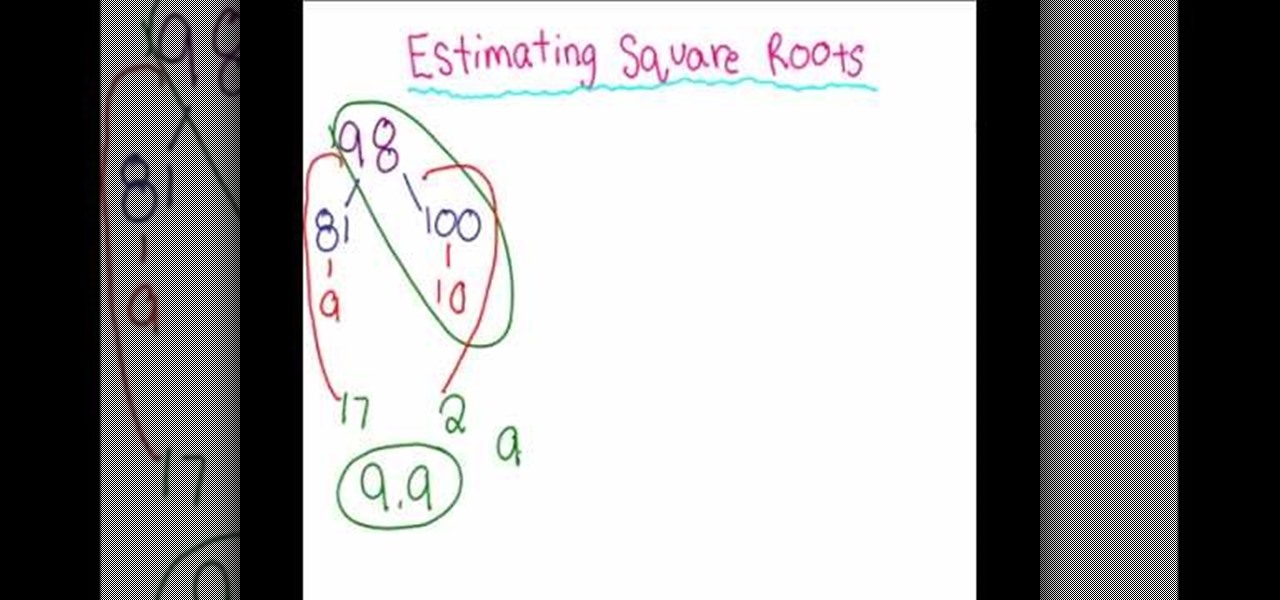
In this how to you will learn how to estimate square roots. You could use this in the real world if you are an engineer or if you are a video game designer. Here is a video to help you understand.
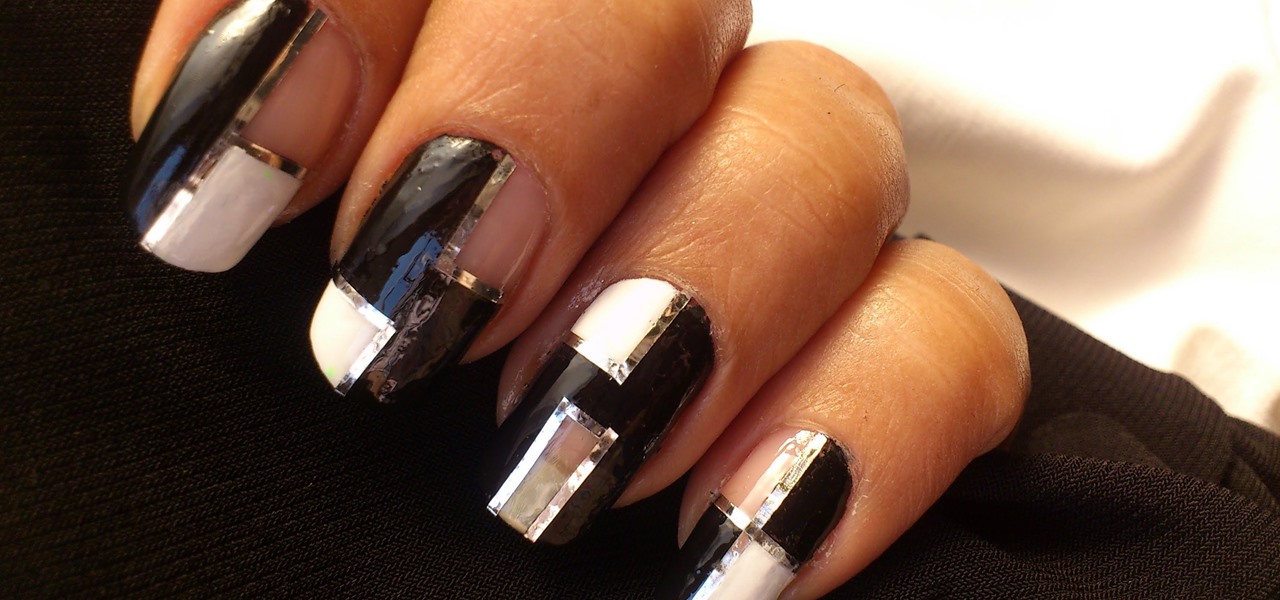
Watch this video to learn how to do this awesome Mod Squares Glass Paint Nails! Video: .
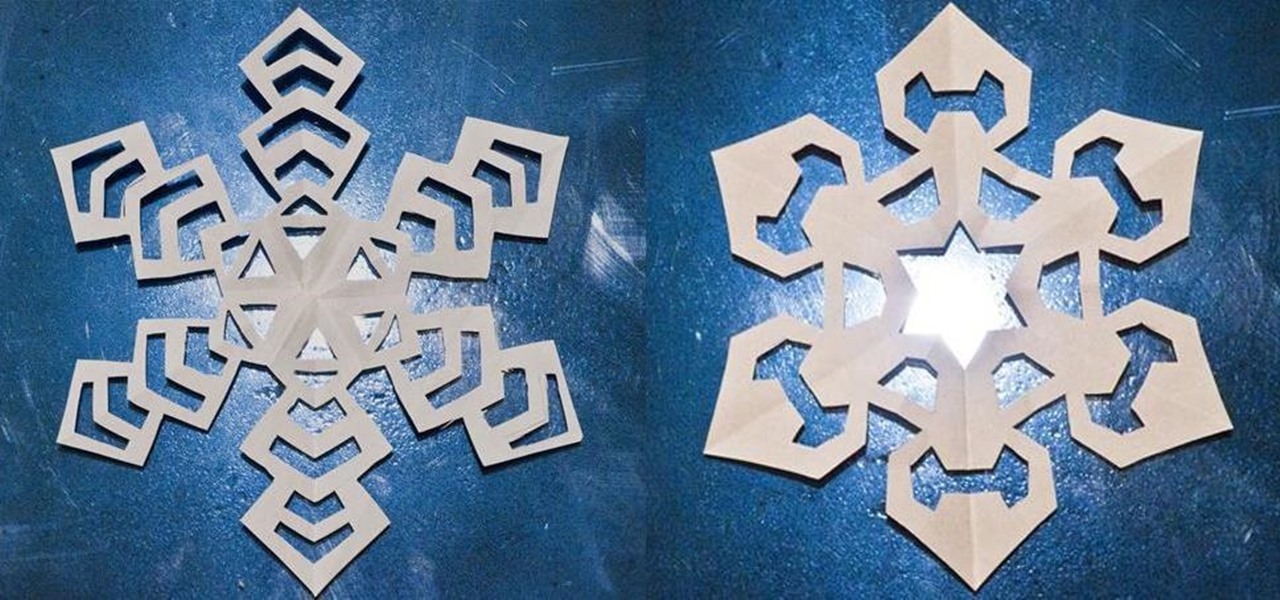
We've all made them. I remember making hundreds of paper snowflakes when I was in elementary school. You take a piece of paper and fold it in half, then fold it in half again. You now have a piece that is one fourth the size of the original. Now you fold it in half diagonally. You then cut slices out of the edges of the paper, and unfold to find that you have created a snowflake. The resulting snowflake has four lines of symmetry and looks something like this: If you fold it in half diagonall...
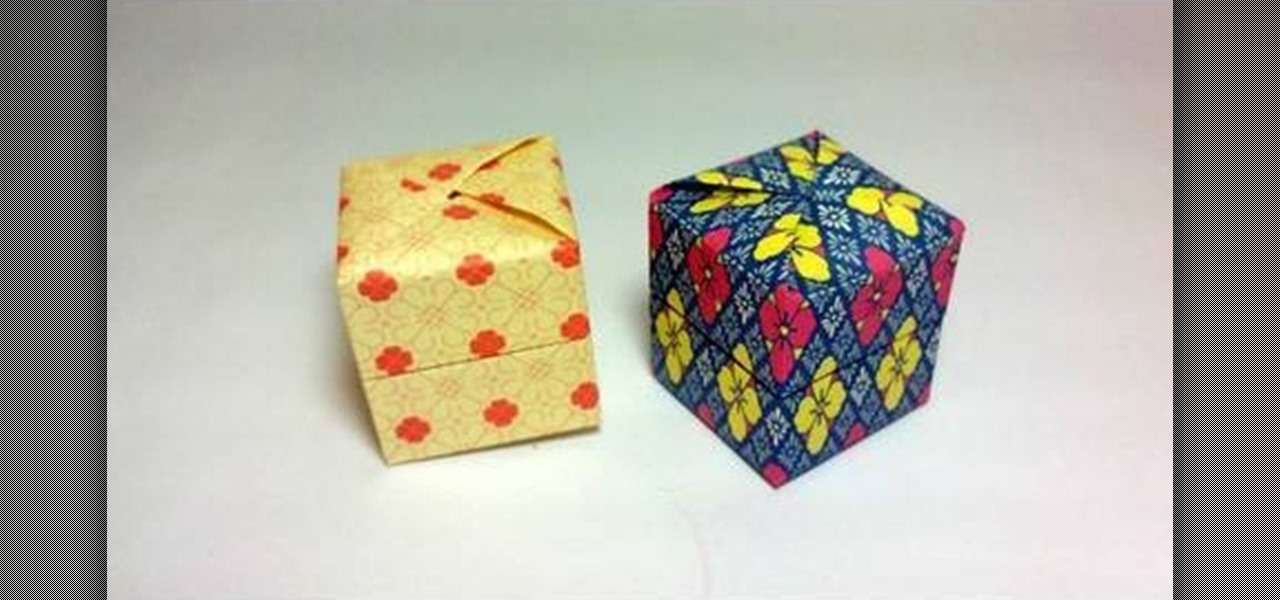
In order to make a Pandora's Box, you first need glossy paper. The paper should basically be in the shape of a square, length 15 cm one side. Then divide the paper into 5ths. Now make 5 such folds on the paper and be sure that every fold is equidistant. Similarly, turn the paper around and start folding it from the other side too, in the same fashion. By doing this you will realize the folds have resulted in equal, similar sized boxes on the paper, 25 in total.
Expand on your knowledge! Trivial Pursuit is a great family game that can also teach you a lot in the process! If you want to learn how to play, check out this video.
Watch this fine art video tutorial to learn how to glaze oil paint over colored pencils. "What you are seeing is a short time lapse of me layering color with illustration markers (prismacolor) and color pencils. I have discovered that using markers and color pencils is a much faster way to build a foundation for a painting (if you could still call it that).

With this tutorial, we learn how to make & decorate the best wishes square cake. After you have rolled the fondant out and shaped it onto the cake, you can do more with it! To make the 'best wishes' cake you can sponge some icing onto the sides of the cake. After this, pipe on icing around the bottom of the cake to cover the exterior. Then, use an icing pen on the top of the cake to write out 'best wishes' in cursive writing. Then, draw on some confetti and continue to decorate the cake how y...

In this tutorial, we learn how to make an origami decorated card. First, you will take your card, make sure it's a busy pattern in colors that you like. After this, you will score the top of the card in the middle to create a small square. After this, cut the square out of the card. Then, close it and stick the piece of origami that you have into the inside of the card where the window opens up. Once this is stuck on, you will be able to close the card but still see the origami in the window,...
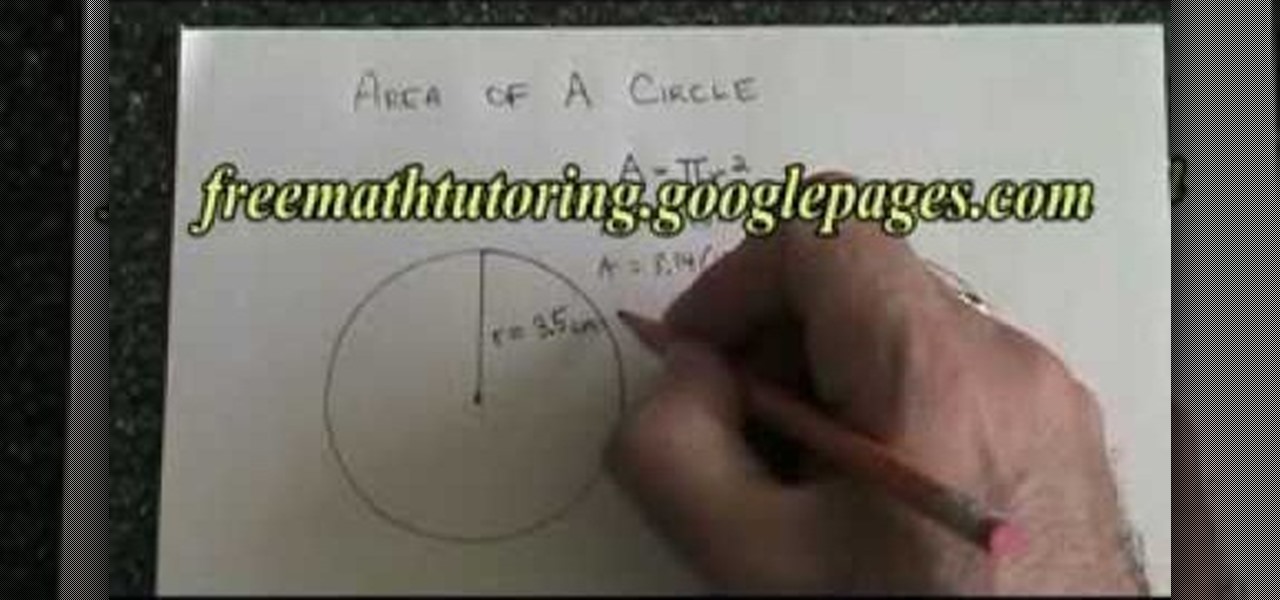
In this tutorial, we learn how to find the area of a circle. First, you will need to know the formula for finding the area of a circle, which is Area=Pi(r)squared. Now, find the radius of the circle in question. After this, fill in the radius to the equation and start to do the math. The area will equal what the radius is, times pie and squared. After you do the math for this, you will have found the area of the entire circle. Make sure you label the number with units, or else your answer wil...
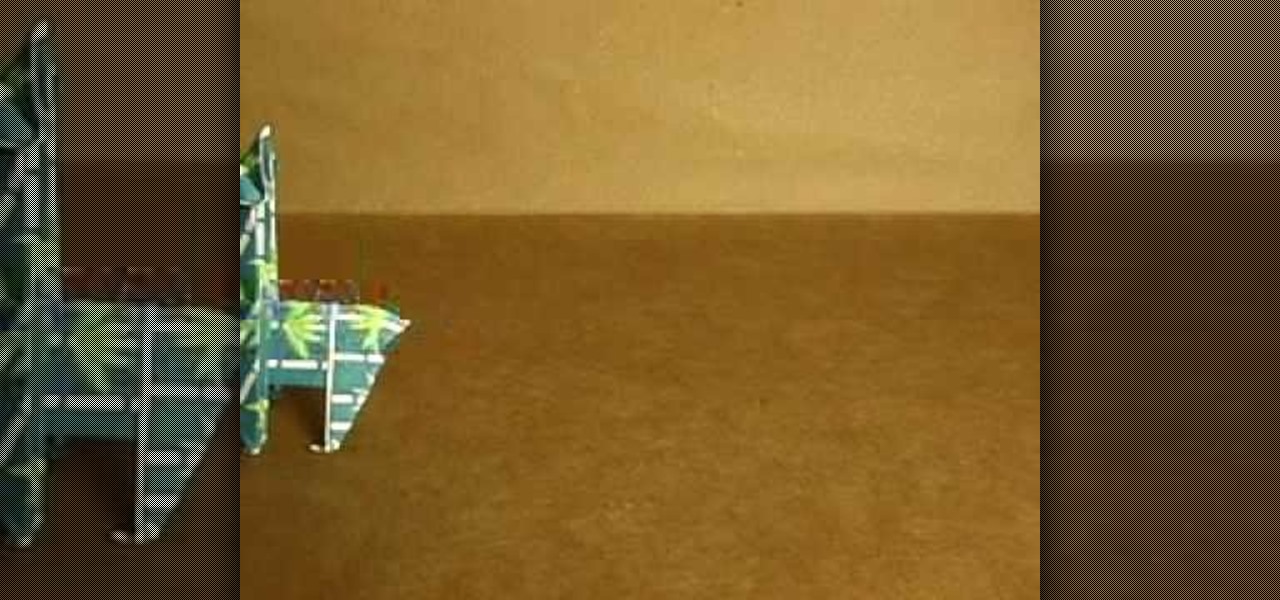
This is a video tutorial in the Arts & Crafts category where you are going to learn how to make origami llamas. Take a square sheet of paper and fold it in half. Open the fold and then fold each half further in halves. The sheet is now divided in to 4 parts. Next fold the outer flaps inwards so that they meet at the center. Flip the folded sheet and fold it in half to make it a square size. Next you fold the top back over itself in a triangular shape. Open up the last fold and watch the video...
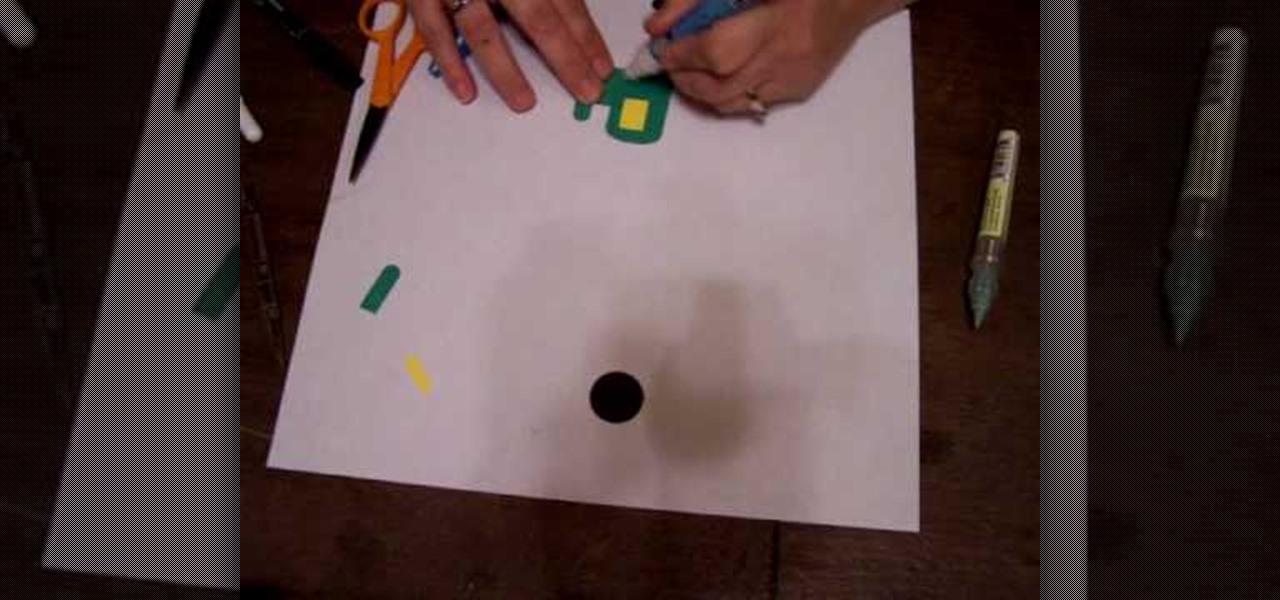
In this tutorial, we learn how to make a Tractor using Stampin' Up punches. First, you will need to punch out a black scallop circle, another black circle, two yellow circles, a yellow square, and four green square shapes. After you have these cut out, you will glue the black scallop circle to the yellow circle so it's underneath. Then, take the green piece and glue it with the other yellows to create the shape of the tractor. Glue the circles at the bottom to make the wheels, then save this ...
In this tutorial, Mat Weber teaches us how to install a basement floor. Start with an insulated subfloor system, top it with cork panels, and then top it with easy to install carpet squares. First, you will install OSB subfloor panels, these will protect against moisture extreme and can be applied directly over concrete. When you have finished installing these, apply cork panels to the top of the subfloor and press down so these don't come up and are packed down hard. When finished with this,...
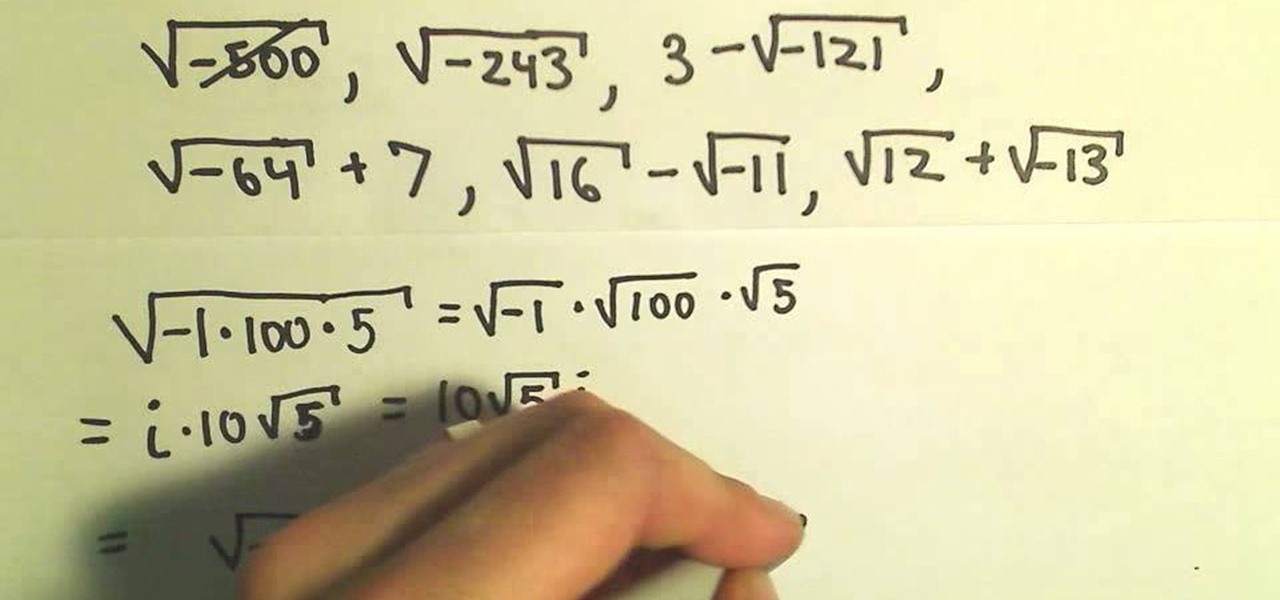
A complex number is half real (a) and half imaginary (bi), just like that Edward Cullen who makes your heart thump realistically but whose sparkly chest makes you wonder if he's something more.
In this Software video tutorial you will learn how to create a vector RSS icon in Illustrator. Open illustrator and open a new document. Select the ‘rounded rectangle tool’ from the rectangle menu. Click and drag to draw a rounded square. Select the gradient fill on the left side and change the color to orange on the right side and make it dark to light from top to bottom. Next grab the corner and turn it around 180 degrees. Move the picture to one side and select the ellipse tool. Draw a...

Take a square piece of paper and fold in half. Open the paper crease from the other side and mark it as previously.
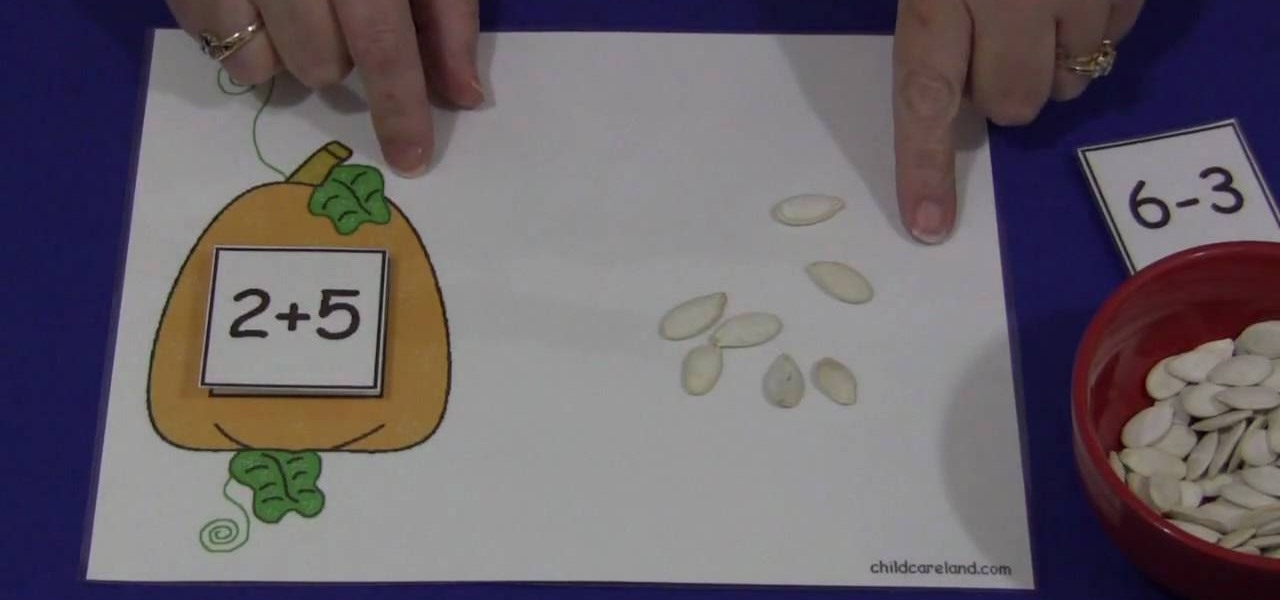
In this video, we are shown how to create and utilize a pumpkin-themed mat and some pumpkin seeds in order to teach young children how to count. Using a mat with a picture of a pumpkin on it, as described in the video, you should have a few squares with numbers on it which the children can put on the mat. Then, using a bowl of pumpkin seeds, have the child pick up the seeds and place them on the mat, having them pick the correct number of seeds as correspond to the number of the square they c...
Take the clay, roll it out to make a pretty thin sheet. Take the square cutter and cut out two pieces from the clay sheet. Meet opposite corners of each square to form a triangular form but squishing only in the middle. Bend slightly outwards the unsquished corners of each triangle for decorative purposes. Place the triangles facing each other with the squished corner overlapping, pressing and joining them in one single piece. Take another little piece of clay and make a small ball with it. P...

Algebra – The Distance Formula.
Learn how to make plastic costume chain mail for all your LARPing and Halloween needs. 1 Purchase enough 12" silver binding coil from the displayed suppliers for your project. 2 Using needle nose pliers, cut the rings as shown in the video. Make sure that there is plenty of overlap so the rings will stay closed. 3 Flatten the edge of the cut rings with your pliers. 4 Start to combine the rings together using the European 4 in 1 weave pattern. 5 Build squares of chain mail following this patte...

Enchant that special birthday boy or girl with a unique origami birthday pop-up card by following this well produced instructional video. 1. All you need is a two sided square piece of colorful wrapping paper to create your origami birthday pop-up card. As long as your paper is square, the finished card can be any size you wish. 2. Make a series of simple sharp folds on both sides, carefully following the video instructions. Pay particular attention to the final intricate folds which create t...
This video host explains how to make different shapes and size of polymer clay and also show that the new extruder is better and less effortless than older one. The host shows a sample how to make a colorful square rod with two types of polymer clay. She also gives some useful tips on how to make different clay shapes and stuff. She also shows which equipment are necessary to make a square shape multicolor rod. If you are looking for ideas to work on with your polymer clay, this video is for ...