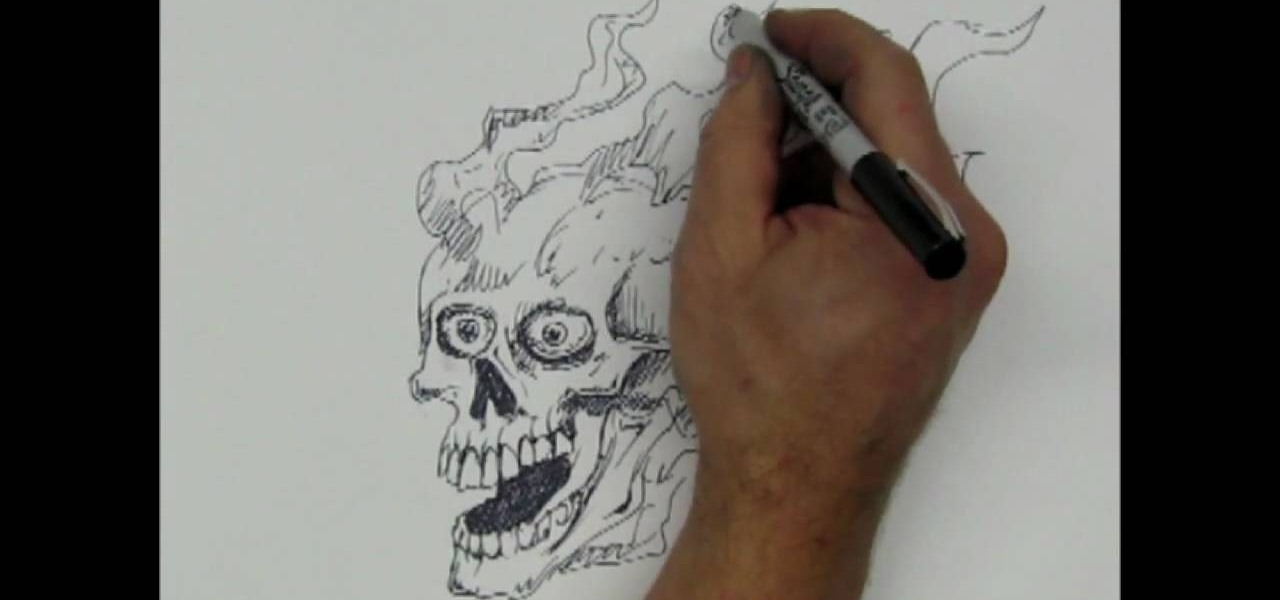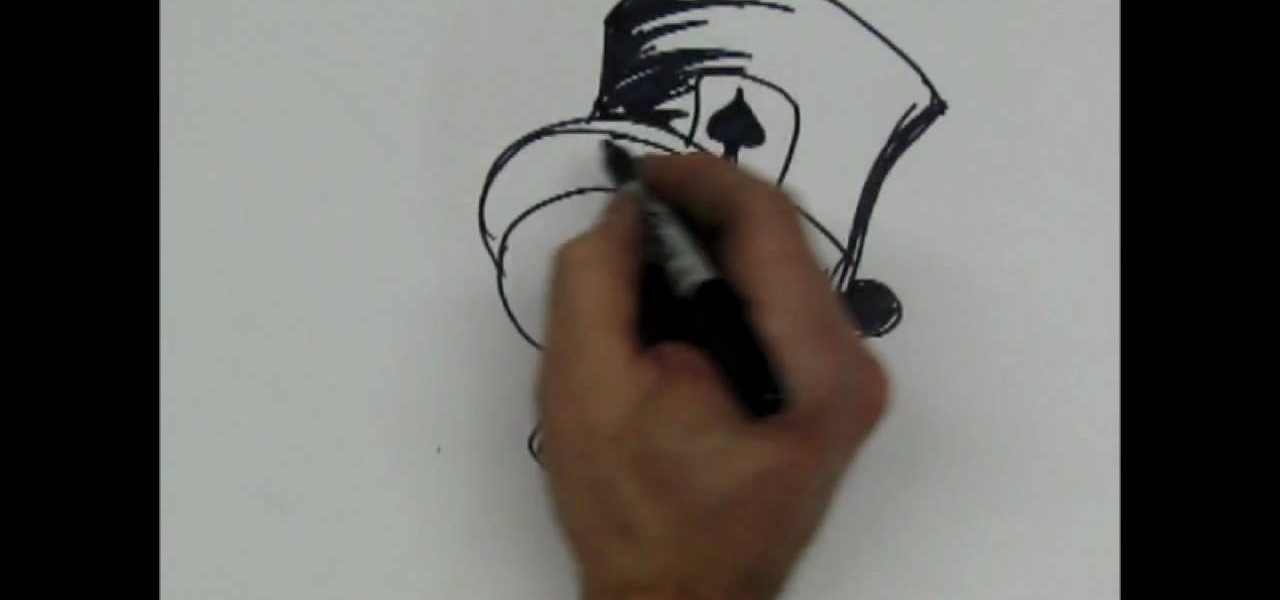
In this tutorial, we learn how to draw a skull with a top hat. First, use a Sharpie marker to draw the nose of the skull and then the eyes. Color these in completely black, since you want be drawing eyeballs in them. After this, draw the skull around it. Draw in the teeth clenched together and then add in lines around the head of the skull to show cracks in the bones. After this, add in additional details around the jaw line and on the head of the skull. When finished, draw on the hat to the ...
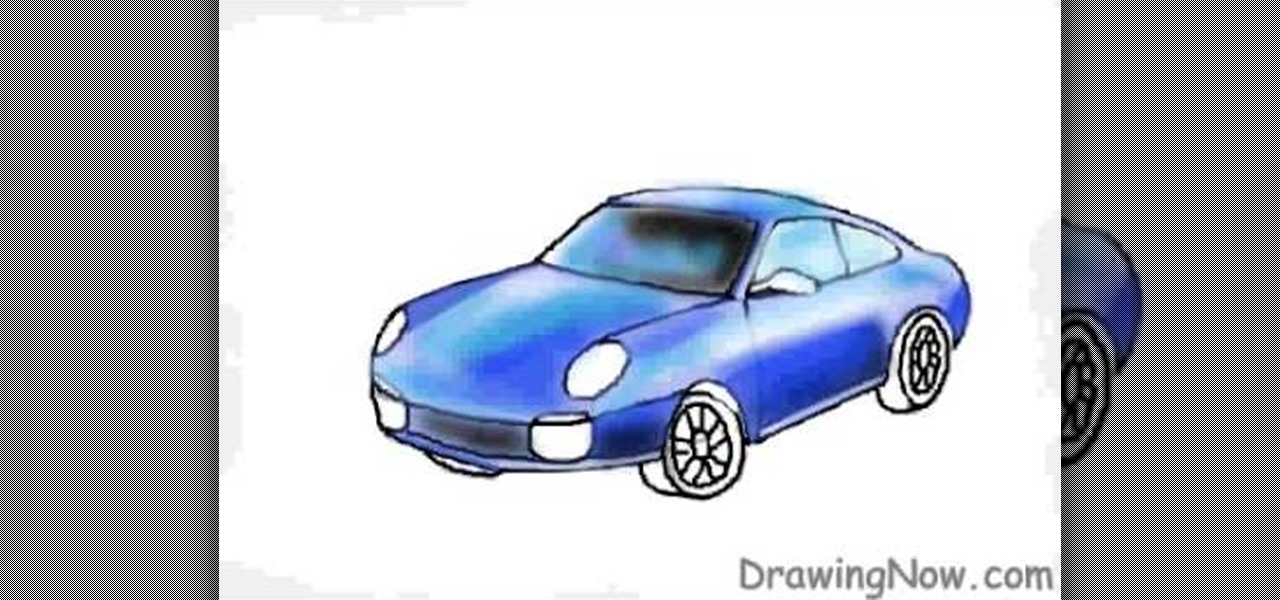
In this video, we learn how to draw a Porsche sports car. Start off by drawing an oval type of shape with lines to make the top of the car. Then, draw in the rest of the outline of the car and add on the wheels and the front of the vehicle as well. From here, you will start to add on the details to the front and sides of the car, as well as on the bottom. Use crosshatching and shading to make it appear realistic. Once the details are on this, use color to add a more in depth look to the car. ...
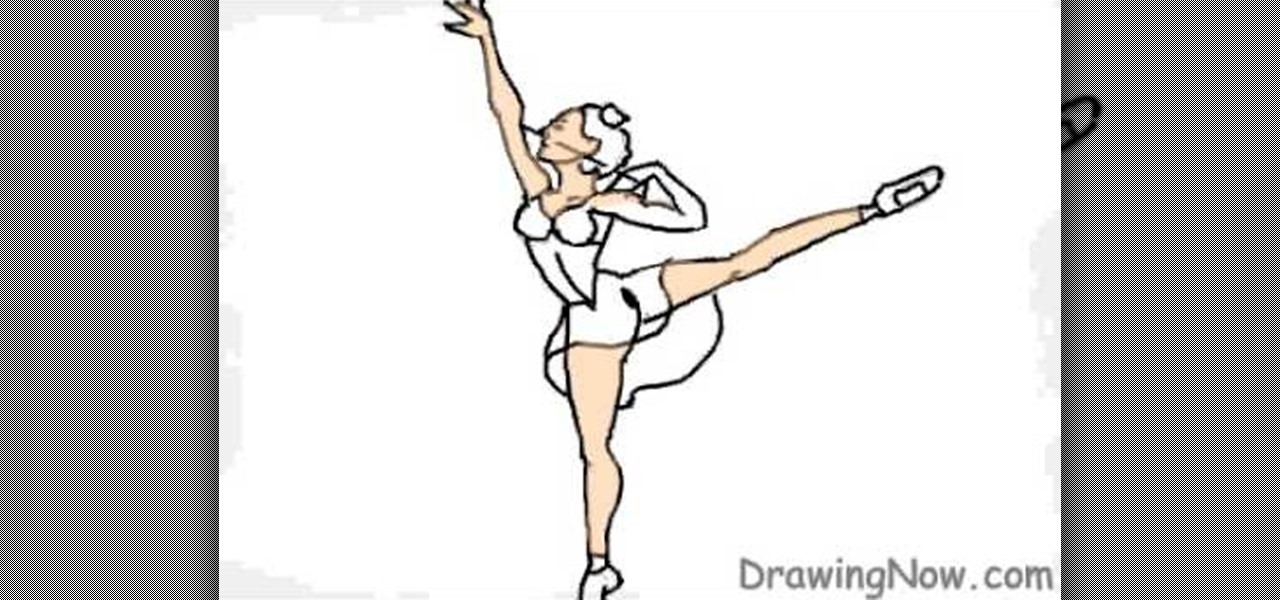
In this tutorial, we learn how to draw a ballerina. Start off by using circles and basic lines to draw the outline of the ballerina's body. Then, use a darker brush to create the body and add in the details of it as well. Draw one leg up in the air, while the ballerina is standing on the other with her arm raised high in the air. Erase any background lines, then start to draw in details of what the ballerina is wearing on her body. Draw in additional details around the figure, then when you a...
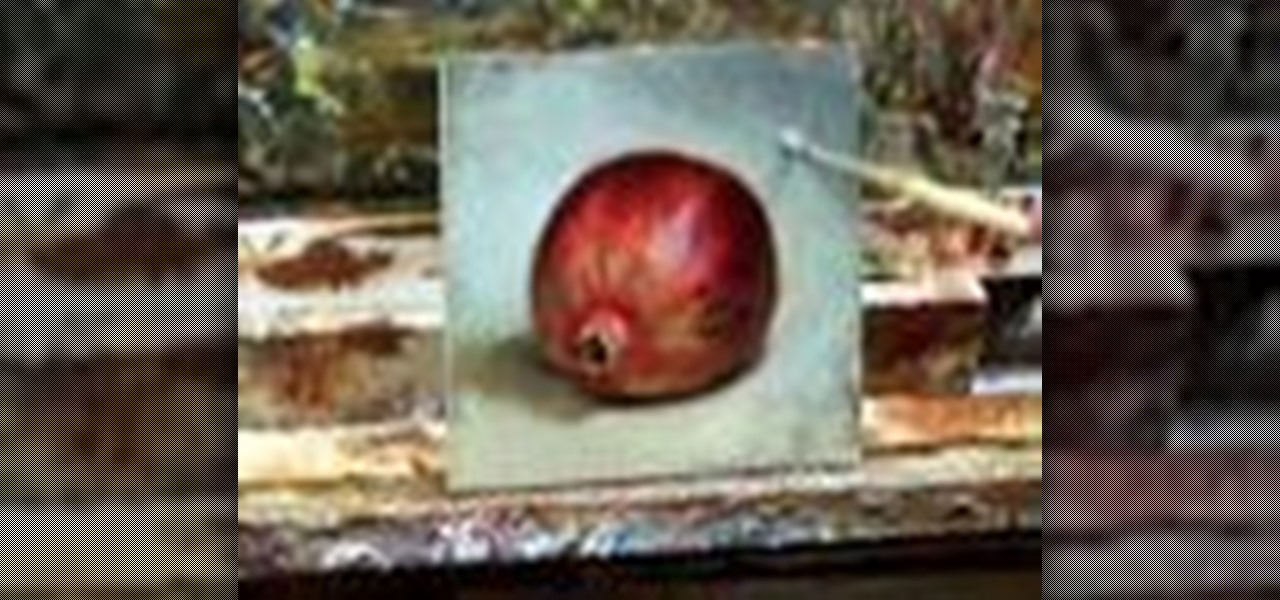
In this tutorial, we learn how to paint a pomegranate. First, paint the circle for the pomegranate. After this, shade the right side with a dark red and the rest with a lighter shade of red. From here, add in a medium red all over the pomegranate and then add another shade over that. From here, start to layer on more additional colors of red to the pomegranate to make it appear more realistic. When finished, paint on the background with whites and grays that are mixed together. Add white to t...
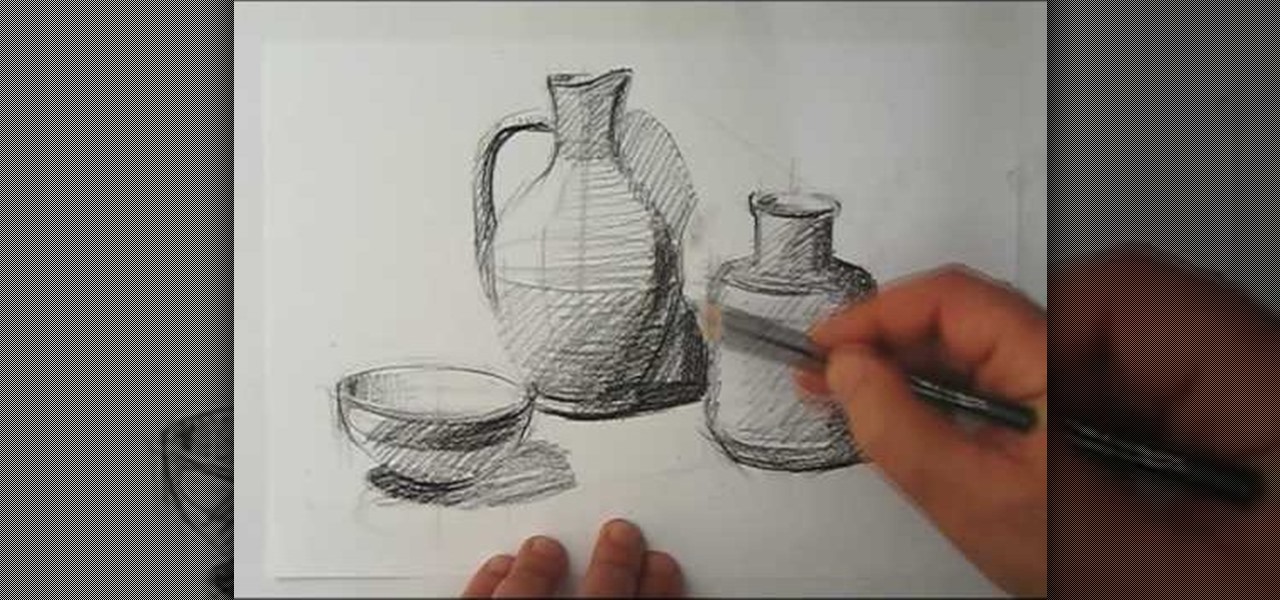
In this tutorial, we learn how to draw a still life. First, you will use the side of the pencil to draw the outline for the still life drawing. After this, continue to draw the outlines for all the objects that are in the model. Start to slowly add in the details, using the light touch of the pencil. As you continue, use the side of your pencil to shade and then use your eraser to blend. Continue to add in additional details as you go, then erase any background lines when needed. Enjoy drawin...
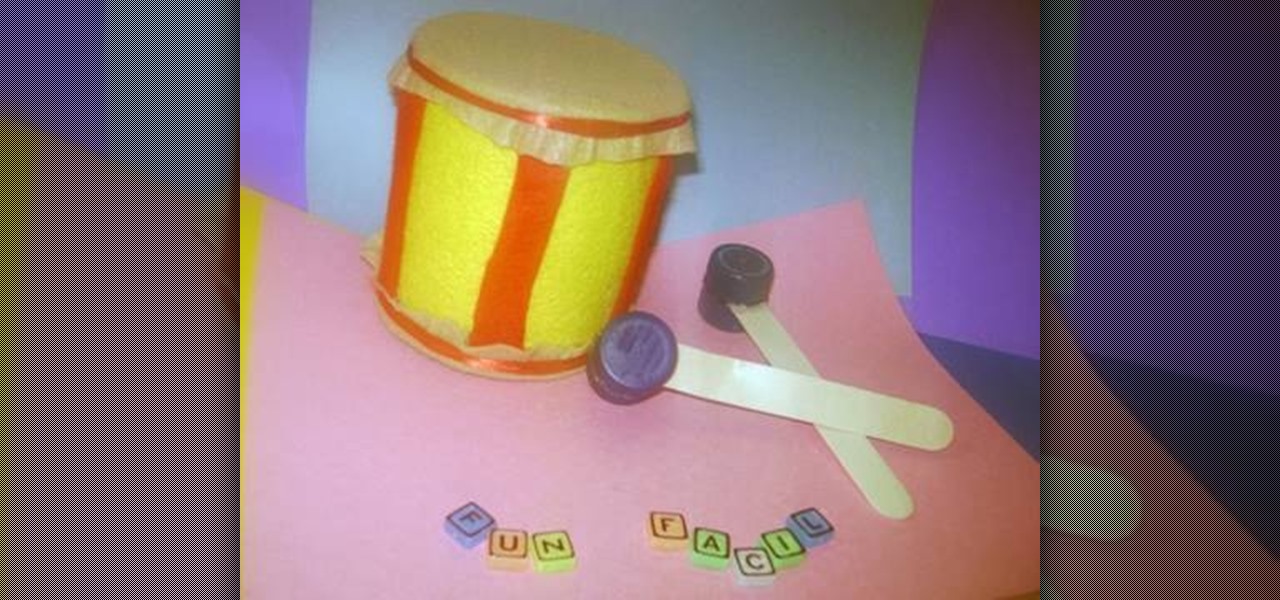
In this tutorial, we learn how to make a toy drum. You will need: felt, recycled tin can, 1 red lace, 4 soda caps, 2 popsicle sticks, glue, and scissors. Cit, cut the felt into a circle and glue it around the tin can. After this, take red felt and cut it into strips, then glue on the side of the tin can so it's striped. When finished, apply glue to the top of the can and then cover with additional pieces of felt. Tie a ribbon around the top and the bottom of the felt on the fan. To make the s...

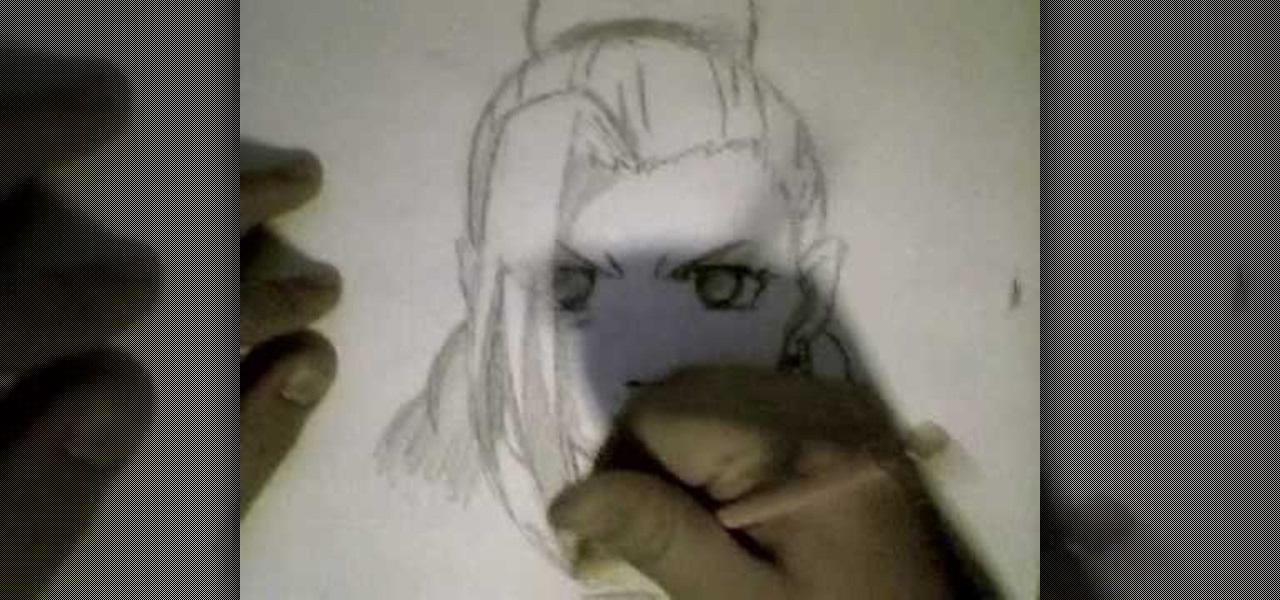
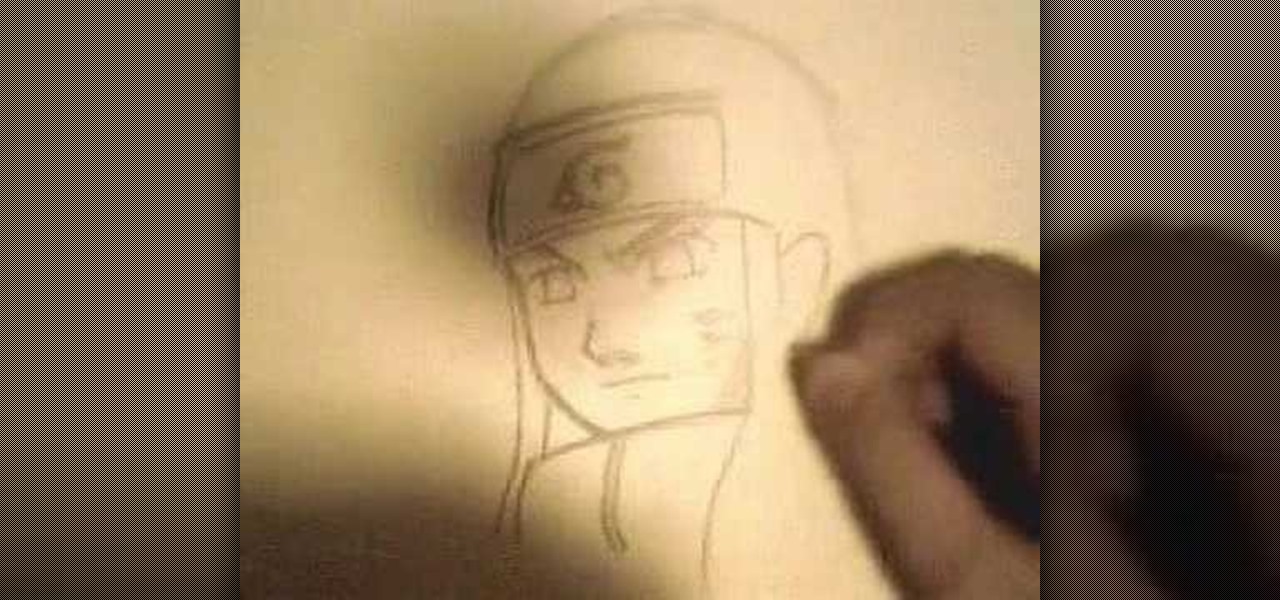
In this video we learn how to draw Neji Shippuuden. First, draw the outline for the head, use lines in the middle of the face to figure out where to place the facial features. After this, use a pencil to draw on the hair around the face and then draw on the headband. From here, add on the details to the hair and then start to add in shading around the face to make it look more realistic. After this, draw in the shoulders on the side and then draw in the rest of the details of the face. Finish...
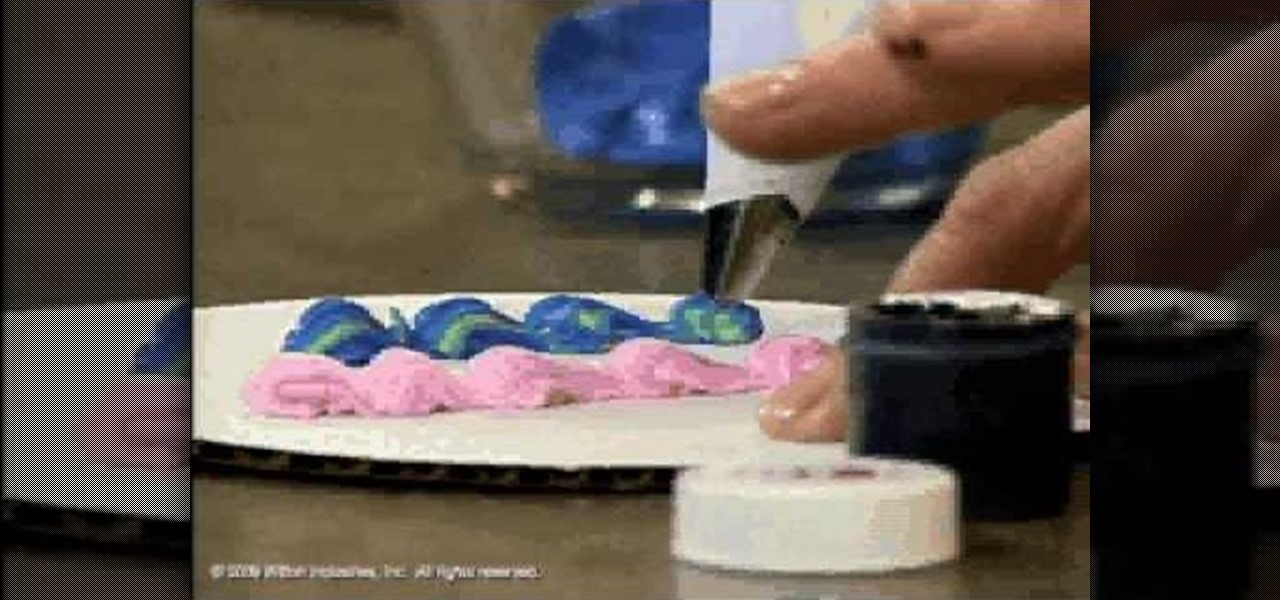
In this tutorial, we learn how to choose the appropriate color for cake decorating. First, spoon your icing into a bowl and then add in a small amount of food coloring. Start to mix this together, then add in additional icing if you want a darker or a brighter color to your icing. Experiment with different colors if you feel comfortable with using different ones. Take a parchment bag and roll it into a full, then stripe up the bag. Then, fill the parchment with some icing and this will create...
In this video, we learn how to draw Ino from Naruto. Start off by drawing a circle for the head, then drawing lines in the middle to create reference for where the facial features will go. After this, draw in the hair on the top of the head along with the eyes, eyebrows, and creases of the eye. Then, draw the jaw line around the face and erase the lines you used for reference. After this, add in additional lines and hair to make it look more realistic. Use shading around the face to show ligh...
In this tutorial, we learn how to draw a skull with a Sharpie. First you will draw the eyes, make sure to draw lots of little lines around them then cross them to create depth. From here, draw the outline to the head and then the nose and the teeth. Make sure to add lines in around the head to show cracking and marks around the head. Use shading to create darker lines along the head and then add in additional details. Make this unique to you, it doesn't have to look one certain way. When fini...
In this tutorial, we learn how to draw a skull. First, draw the outline for the skull. Remember not to draw the hair on the head, because skulls do not have these! After this, you will draw on the cracks to the top of the head and shade around them. From here, draw in black on the inside of the eye sockets. Then, draw the lines around the eye sockets. From here, draw the area for the nose and then the teeth. Next, you will draw in the jaw line and add in additional shading and lines to finish...
In this tutorial, we learn how to draw manga Neji. Start off by drawing the outline of the character. Don't forget to include the parts where the facial features, limbs, and hair are at. From here, you will use a darker pen to draw in the rest of the character. Next, you will start to draw in the additional lines and shading to make the character look more realistic. Once you do this, you can start adding some color! Use any colors that you would like or use the normal colors that are on Neji...
In this video, we learn how to make a cake American beauty rose. First, place your icing into a plastic bag and then place the tip inside of it. From here, you will twist the surface where you are putting your rose and let the icing roll into a round shape. After this, make additional rows of petals until you have the size of flower that you want to create. When finished, you will have a gorgeous rose on your cake or cupcakes! Add in green icing to make leaves on the side of the flower and yo...
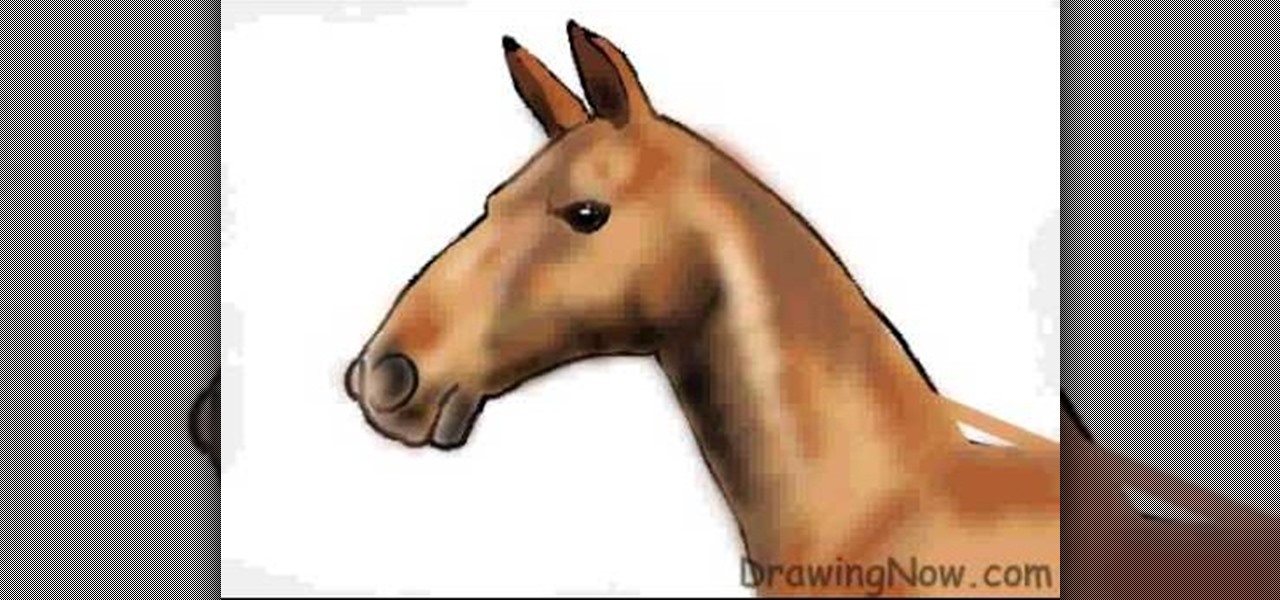
In this tutorial, we learn how to draw the head of a horse. Start out by drawing the outline of the horse's head and the neck. Then, draw in the ears and the details for the nose and the face. Next, color in the horse and then add shading along the sides of the horse and fill in the features with black. Use different colors of brown to show a contrast between the colors on the horse. After this, you will use small lines to create hair on the horse, then add in additional features. Clean up an...
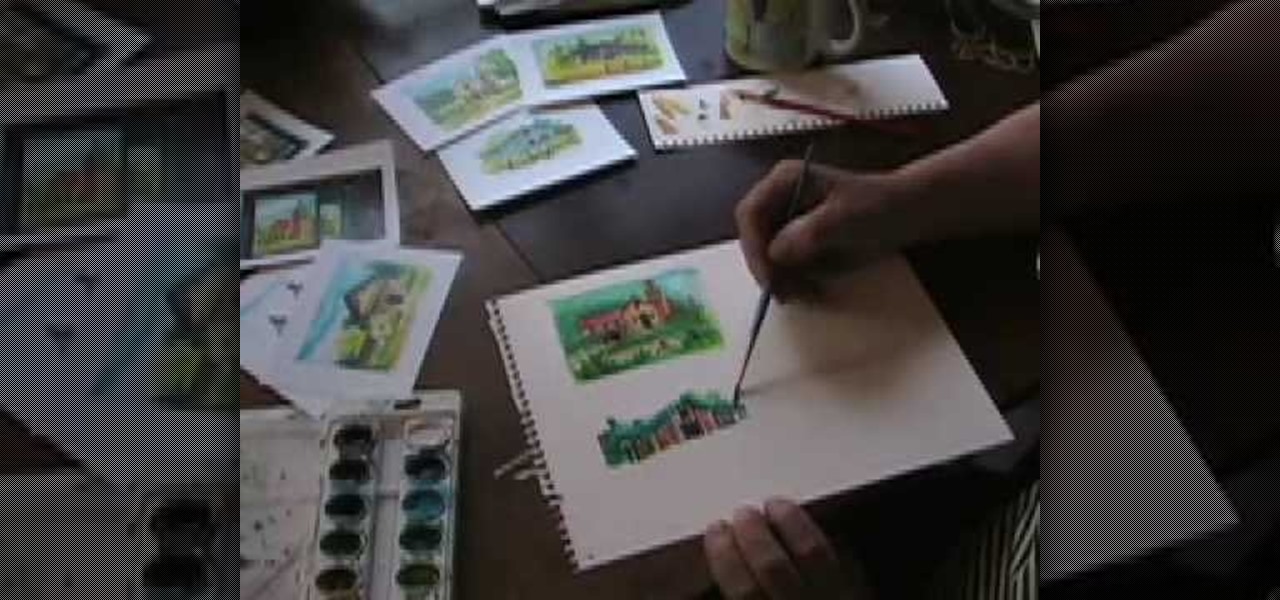
In this video, we learn how to watercolor paint a California barn. To start, you will take a small painted brush and start to paint the outline of the barn. next, you will dip the brush into different colors to create the inside of the barn and the details on the outside of it. Once you're finished painting the barn, start to paint the scenery that is around the barn. Use greens to paint in hills and then paint a fence with animals inside. Continue to add in additional details until you're fi...
In this tutorial, we learn how to draw The Incredibles. Start out by coloring the background orange, yellow, and white. Then, draw the outlines of the bodies for all of the characters in the family. After this, draw in the details, giving them a 3D type of image. Next, you will color in the clothing and add in the fine details for the hair and the face as well. Erase any background lines from the drawing to clean it up, then add in some shading to make it look more realistic. To finish this, ...
In this tutorial, we learn how to add 3D effects and shading to graffiti letters. To start, you will draw a simple letter with a pencil. Then, take one point under the letter in the middle and draw a darker outline. Next, you will draw an outline around the first outline to make it look 3D. Next, you will shade in the area in the middle of the letter and anything that is in between the first letter and the second. After this, you will add in lines and additional detailing to make the letters ...
In this tutorial, we learn how to draw curvy steps using pencil. To start, you will draw a thin horizontal line with a small point on it. After this, you will draw lines out from this, using a ruler to keep them straight. From here, draw your steps on the bottom of the page using the lines to keep them proportioned and in place. Draw them in a triangle wedge shape and then color them in. Shade the bottom and the sides to give them depth and dimension. After this, draw in the area around the s...
In this tutorial, we learn how to draw a human skull. To start, you will use your pencil to draw a light outline of the skull on your paper. After this, you will start to add in more shading and lines throughout the face to make it look like it has depth and contours. From here, you will draw in the teeth and then create the nose and the pits for the eyes. After this, you will start to shade in the sides of the skull darker and then add in any additional details like small cracks on the face....
In this tutorial, we learn how to make fur suit hand paws. First, take your fabric that looks like fur and has a cotton lining. Then, cut out the different pieces you need to create the paw shape. Now, sew the pieces that you cut out onto the fur and then cut it into the shape to fit onto your hand. From here, you will sew this together with a bottom piece, then you can sew the paws together and place it on your hand to wear. Add in any additional details you would like, then wear these where...
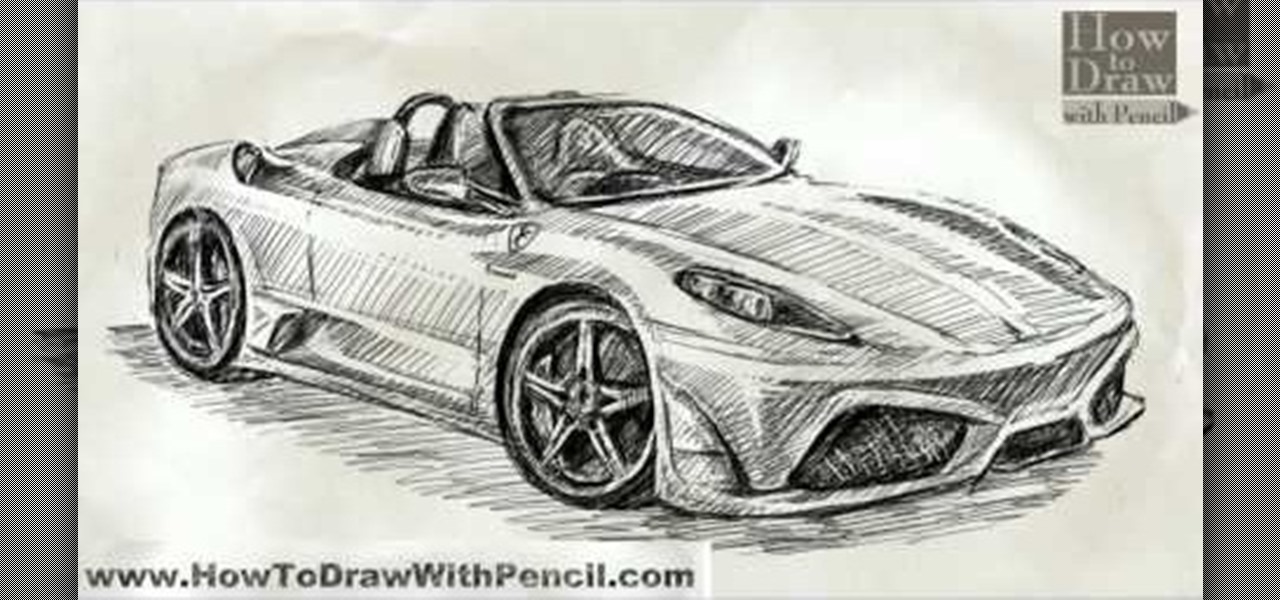
In this tutorial, we learn how to draw a Ferrari Scuderia Spider 16M. Start out by drawing the outline of the vehicle. Make sure you draw in the areas for the tires and the windshield, as well as the other areas of the car. After this, add in shading around the car on all of the sides. Next, start to draw in the details around all of the car. Add in shading and additional lines to make it look more realistic. After this, you will need to use the eraser to erase any unwanted lines that don't b...
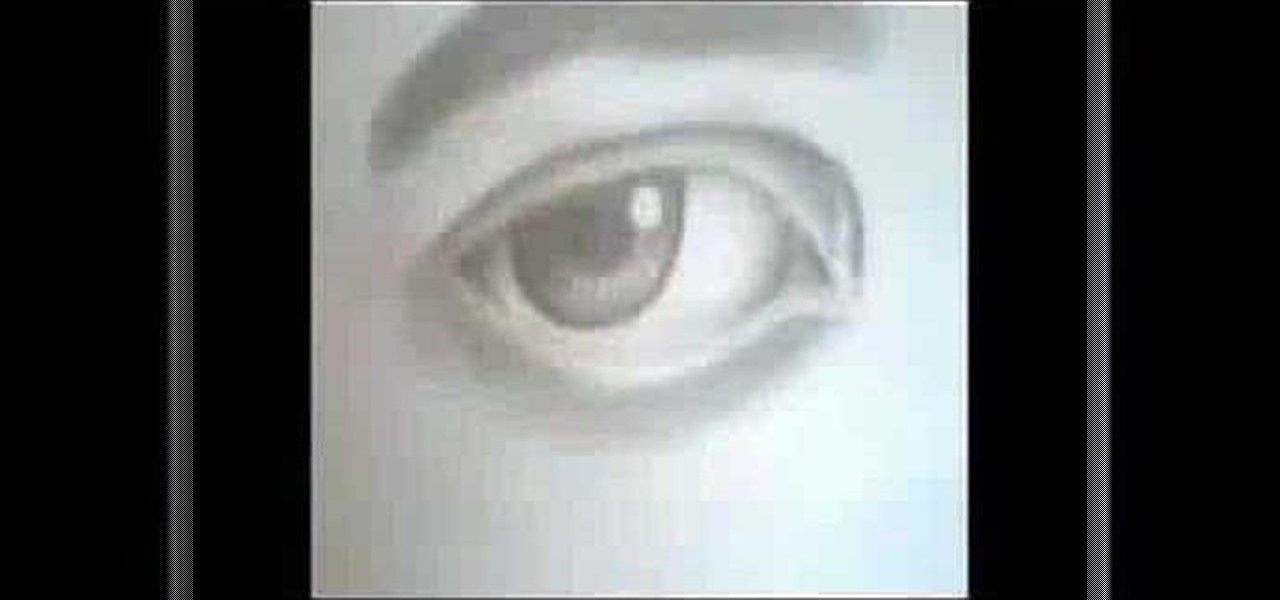
In this video, we learn how to draw a perfect eye. Start out by drawing the outline of the eye, the create the basic shape. After this, draw the crease above the eye and then the inside details of the eye. Darken the pupil, then add in lines around the pupil to show detail. Create a circle eraser mark near the pupil to show the eye having a glare, making it look more glossy. After this, shade in the sides of the eye and underneath where the bottom lash line is. From here, create the eyebrow a...
In this tutorial, we learn how to make your own high waisted skirt. First, you will need to sew the skirt on the sides. After this, you will need to cut some additional fabric that is the same color. Then, you will need to sew the waist of the skirt onto the skirt on the top. Once you have sewed this so there are no frays on the side or on the top, you can wear it! Make sure the fabric is all the same size all the way around. When finished, enjoy wearing this with a simple tank top or dress s...
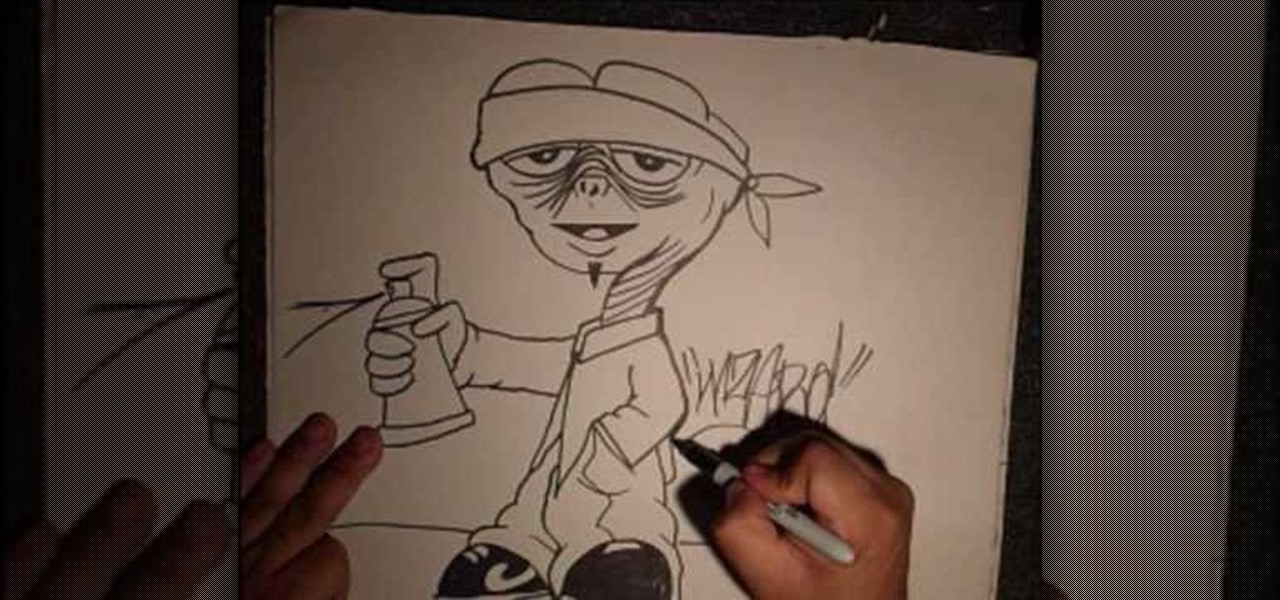
In this tutorial, we learn how to draw a gangster graffiti ET character. Start out by drawing the eyebrows and the hat, then draw down to make the eyes. After this, draw in the details of the eyes, then make the nose and the mouth. From here, create the head and the neck, as well as the rest of the body. Draw on large pants that look baggy on the legs and a large collared shirt. One hand should be in the pocket and the other should be facing out with a finger on a spray paint can. From here, ...
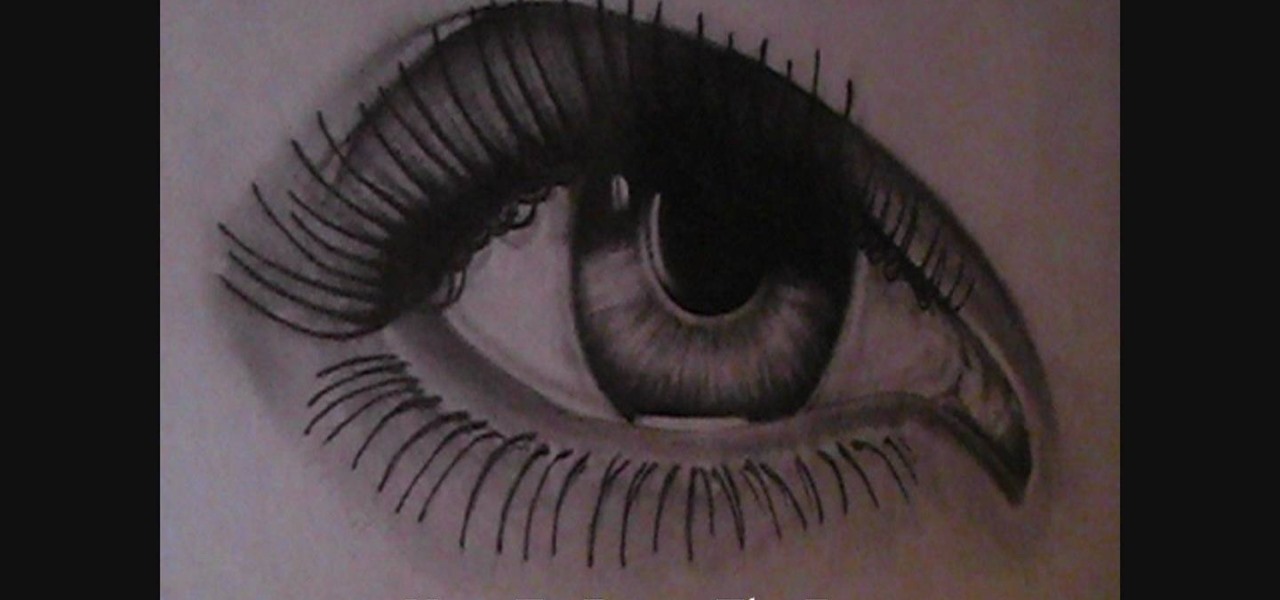
In this tutorial, we learn how to draw an eye. Start out by drawing the outline of the eye, which should be in a football shape. Then, draw the inside of the eye and the outside of it as well. Then, you will start to add in additional details around the eye and the eyelashes. After this, add in the crosshatch inside the eyes and shade in the pupils. Shade around the outside of the eye, then add darker lines for the eyelashes on both the top and the bottom. Add a crease in the eye to make it l...
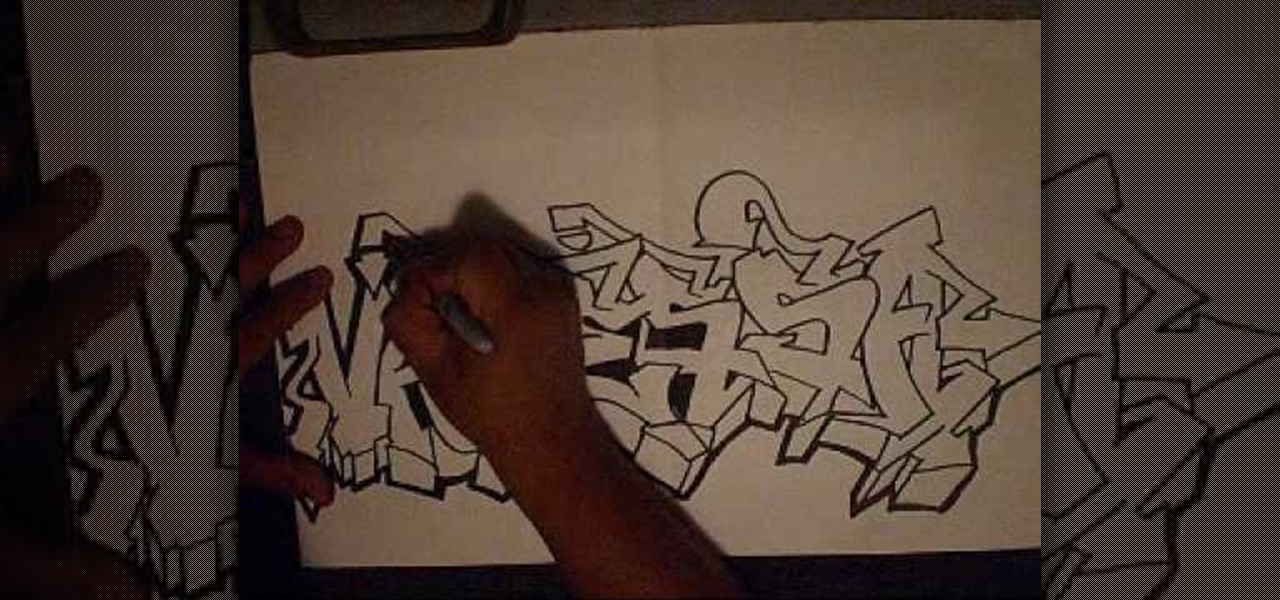
In this video, we learn how to write a name in graffiti letters. Start off by outlining the letters, make sure to draw them thick so they look 3D. Add in different shapes edges to the letters to make them look more like graffiti. Make sure they are all touching and overlapping as well. Then, use the pencil to draw in the areas in between the letters and in the middle of them. Once you do this, you will be able to add in additional lines and shading to each of the individual letters. You can a...
In this tutorial, we learn how to get rid of that smell coming from your shower with Bob Schmidt. First, you will want to clean out your drain pipes to make sure the smell is not coming from there. If the smell is coming back out, you will need to do additional work. If water gets saturated into the base of the shower, then there should be some gravel around it so the water can soak through and go down into the drain pipe. If moisture soaks through the tile grout, then it can bring out the se...
In this video, we learn how to draw an eye step by step. First, draw the curve of the eye on the top and on the bottom. Then, draw in the pupil of the eye and the inner corner of the eye. Use a light touch with the pencil to make the circle in the middle of the eye. Then, draw around it with a bolder line. After this, draw the crease above the eye, then draw shading to show where the crease line is. Next, fill in the pupil and add in a circle to make the eye appear glossy or that light is hit...
In this tutorial, we learn how to draw eyebrows and eye lashes. First, sketch out the basic shape of the eyebrow. Cross edge with a 2B pencil, then blend it in to lighten in and act as a skin tone. Then, draw the actual hair with a B pencil, going upwards with the pencil strokes in the front area. For eyelashes, you will sketch out the outline with a 2H, then draw the eyelid and the hairs for the lashes. Draw in the direction and the shape of the eye to give off the illusion that it's round. ...
In this tutorial, we learn how to make Dutch oven chicken. Ingredients are: 1 whole chicken, 1 chopped onion, 3 tbsp garlic, salt, pepper, cayenne pepper, paprika, Italian seasoning, and 28 oz diced tomatoes. First, melt some butter in a pot and then throw in your chopped onion. Let this heat up, then add in your garlic and other seasonings with it. Once these are combined, stick your chicken on top of them and sprinkle on additional flavorings of your choice. Cook for 1.5 hours on medium wit...
In this tutorial, we learn how to make an over-sized fashion bow fashion accessory. First, take your fabric and cut it to the desired size you want the bow to be. Cut this in a square shape at first, then sew the sides of the square. Then, fold this in half and pull in the middle of the square. Cut this in the middle to make a hole. Then, turn this inside out and push out the edges. Put an additional square of fabric around the square in the middle, then shape it out to be a cute bow to wear ...
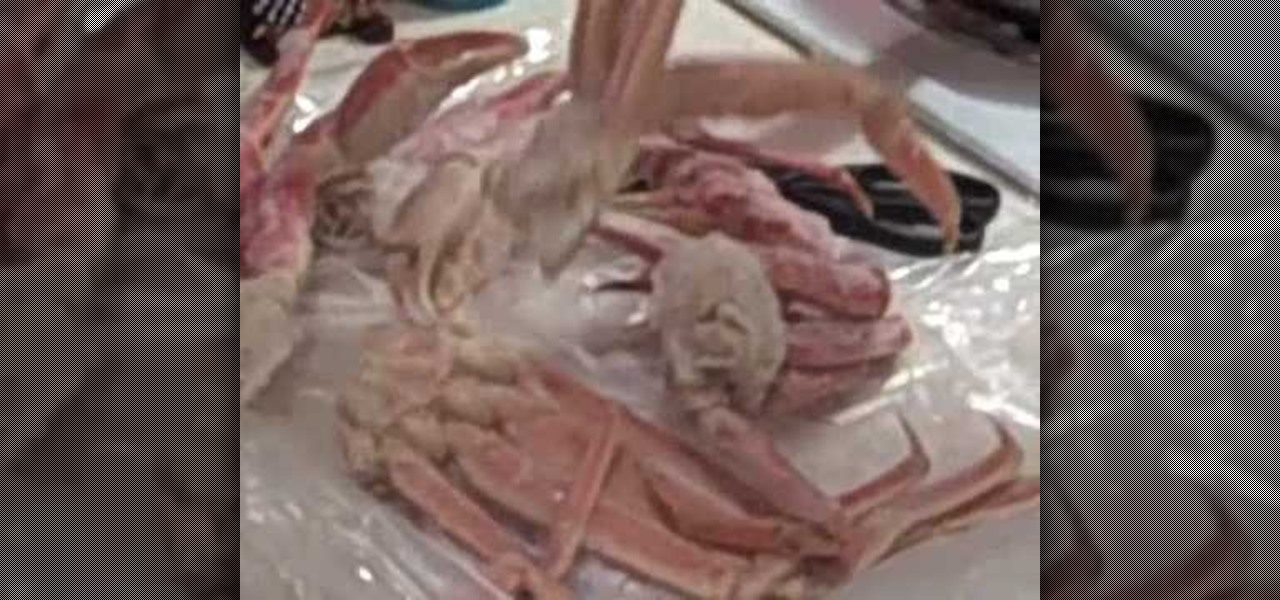
In this tutorial, we learn how to cook some southern-style snow crab legs. First, boil some water with vinegar and lemon juice inside of it. After this, add in more spices to the pot. You can add in veggies, garlic, onions, and whatever else you'd like for your crabs. After you have added all of these in, you will place your snow crab legs inside of the water and close the pot with the cap. Let these boil in the water until they are fully cooked. When they are finished, serve these with addit...
In this tutorial, we learn how to make an eggless pineapple cake. You will need: 1 1/4 c flour, 1/2 c sweetened condensed milk, 1 tsp baking powder, 1/2 tsp baking soda, 1/4 tsp cardamom powder, 1/4 tsp salt, 1/2 c melted butter, and 20 oz can crushed pineapple. First, mix your dry ingredients together. Once you do this, start to add in your melted butter and condensed milk. Add in pineapples to the mixture, then place into a cake pan. Bake in the oven until it's golden brown and a knife come...
In this tutorial, we learn how to draw realistic lips and teeth. First, draw on your outline for the lips and teeth, using a light pencil. Try your best to get it as natural looking as possible. Now, draw in the shadows and the mid-tones for the lips. Also add in reflective lights and draw in the teeth. Add in details to the teeth and use darker lines to separate them. Use dark creases to form the lips and then continue to add in additional details. When you're finished, darken around the mou...
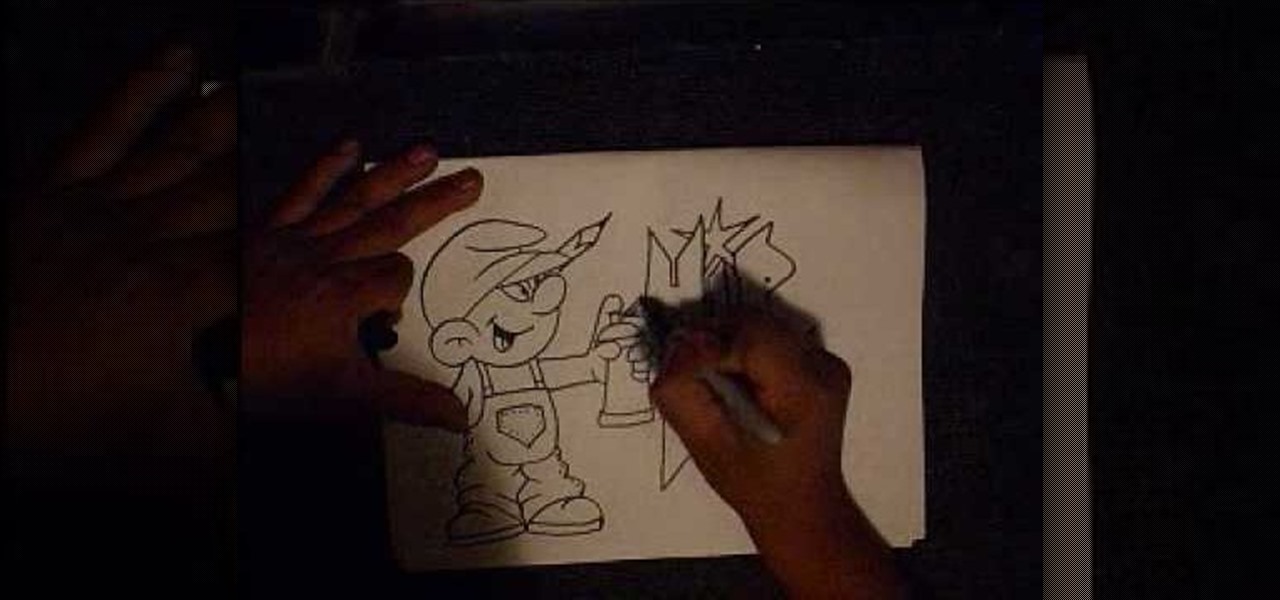
In this tutorial, we learn how to draw a graffiti Smurf character. Start off by drawing the hat for the Smurf, then draw in the ear on the side of the head. Then, draw in the face and start to add in the details. Draw in the mouth, nose, and eyes. After this, draw in the upper body and the clothing that the Smurf is wearing. Add crinkled lines on the edges to make it look like the pants are too big, then draw in the feet, arms, and hands. Draw a spray paint can in the hand of the Smurf, then ...
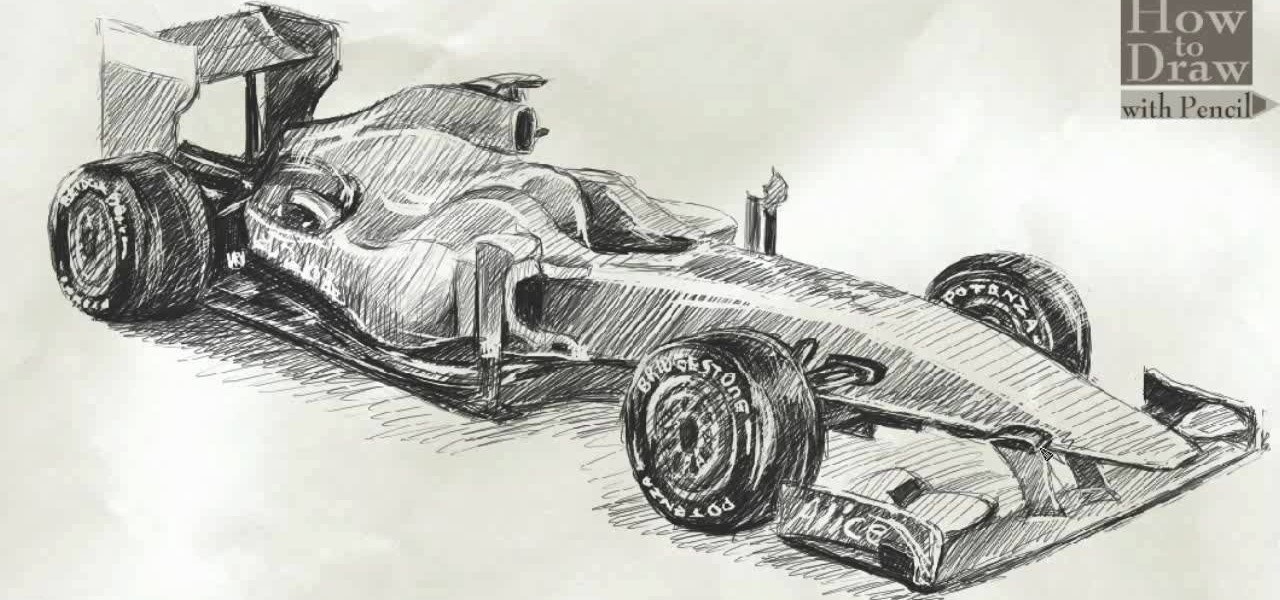
In this video, we learn how to draw a Formula 1 Ferrari F60. Start out by drawing of the car, then start to shade it in. Shade in the wheels and then the rest of the vehicle with a lighter pencil. After this, use the eraser to erase different parts of the car to make it look more realistic. Draw in darker lines with the pencil to make it more shaded. Then, add in shading on the bottom of the car and continue to darken the care until it's completely filled in. Add in writing on the wheels and ...
In this tutorial, we learn how to draw Little Sack Dude. Start out by drawing the outline of the body for the character. After this, draw on the limbs and then add in the details of the face. Once finished, draw in the details of the clothing, then the hands on the character as well. Draw in additional details along the feet and arms, then shade the entire character with the pencil. Once you do this, darken the eyes with the pencils to make them black and then darken the parts of the details ...
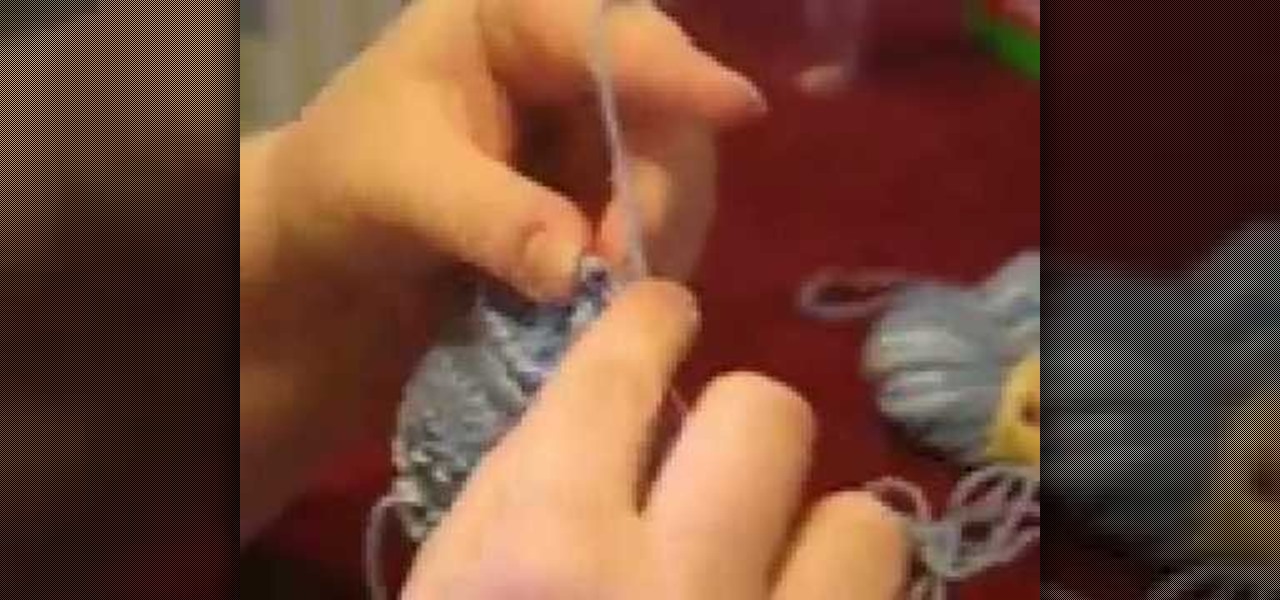
In this tutorial, we learn how to use the I-cord bind off technique. First, you will need to cast on three additional stitches using the cable cast on. Once you have these cast on, you are going to knit two and then knit two together through the back loop. Then, take your three stitches from the right needle and put them back onto the left needle. Then, knit two, then knit two together through the back loop. Slide the stitches back onto the left needle and that's all you have to do. Repeat th...
In this tutorial, we learn how to draw PokŽmon heads. Start out by drawing a circle for the head, then drawing intersecting lines in it to create a reference point for the features of the face. Next, draw the ears coming out of the head and then draw the eyes, nose, and mouth. Once finished, you will need to fill in the eyes so they have the correct look, then add in further details along the face. Make sure to add lines to the edge of the head to make it look like it has fur, then add in any...
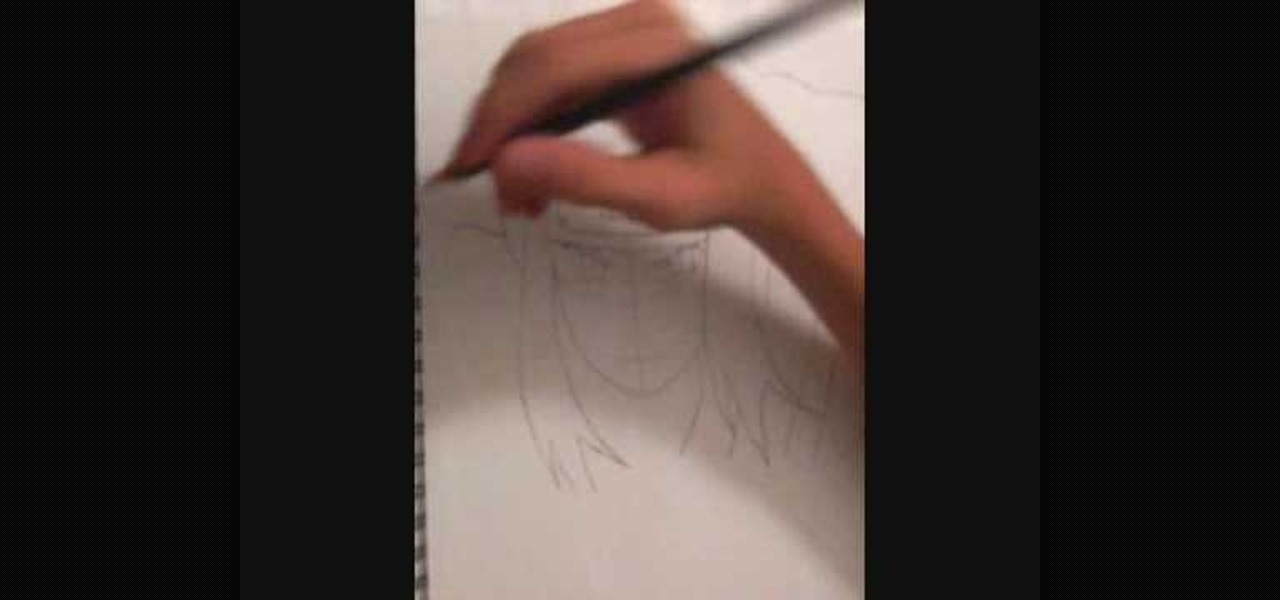
In this tutorial, we learn how to draw wavy manga hair. Start off with your manga face shot and then grab a pencil. Draw in strands of hair on the forehead and create bangs across to the eyebrows. After this, draw down hair on the head going down around the ears and throughout the rest of the head. Use a light touch of the pencil to create most of the strands coming from the root of the head, then use a darker line to create different types of strands. When finished, add in additional details...