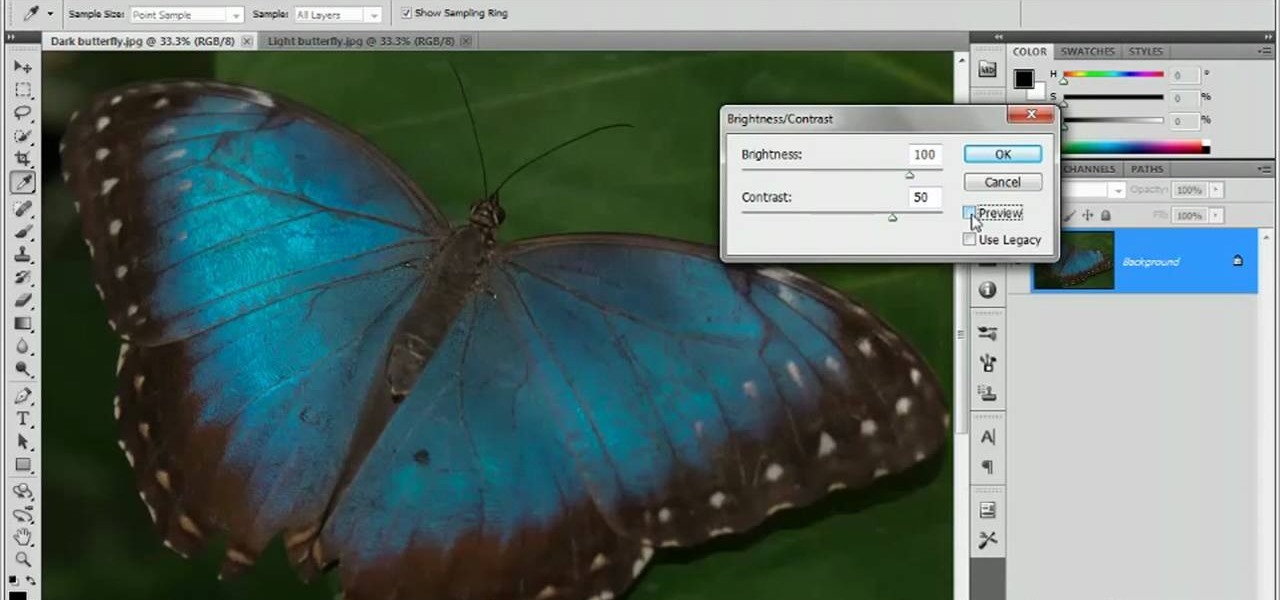
Have a digital image that's a little bit too dark or otherwise lacking in depth? Your fix is just a few mouse clicks away. This free software tutorial will teach you how to use the new Brightness & Contrast tools within Adobe Photoshop CS5. Whether you're new to Adobe's popular image editing software or a seasoned graphic design professional just looking to better acquaint yourself with the unique features of Photoshop CS5, you're sure to find something of value in this free video tutorial.

To create a green screen, open up the program Sony Vegas. Now go to media generators. On the left hand side of your screen there should be a list with the link solid color right in the middle. Click on that and a menu with a variety of different colored boxes will appear. Double click on green. A menu will pop up so that you can adjust the shade of green just by moving the vertical line to the left or right. After choosing the appropriate shade, save the green box as either a video or picture...
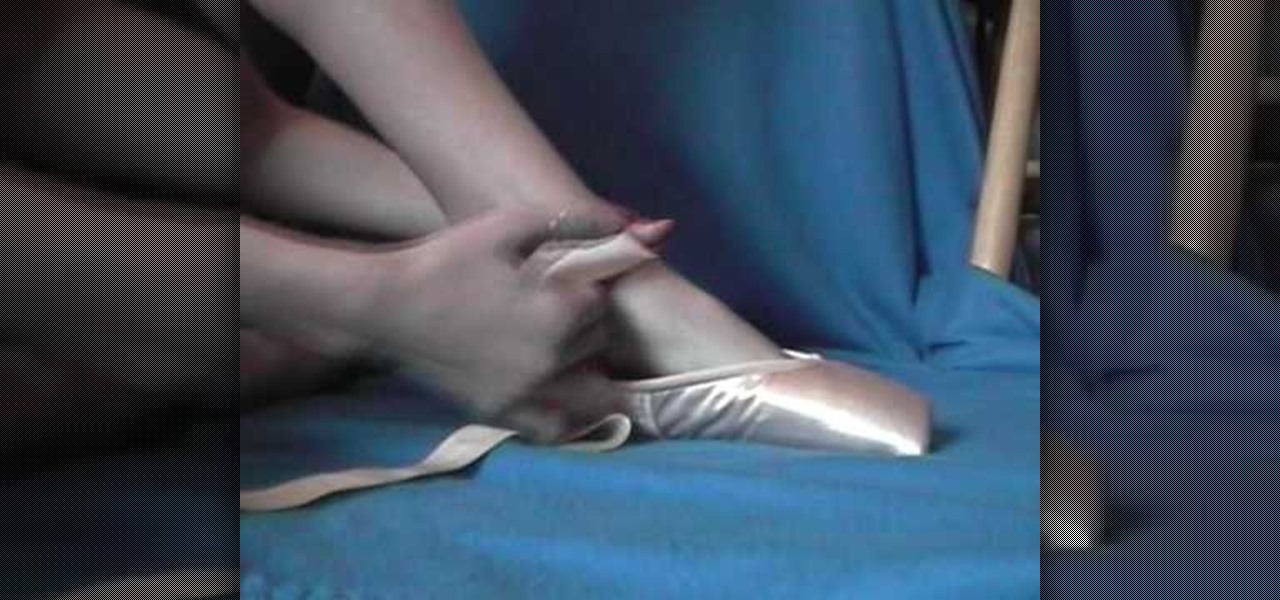
Elizabeth while showing us the way to tie your pointe shoes tells us to put the foot through the elastic first and then put some padding on and then stick your foot inside the shoe. Adjust the ankle part of the shoe properly after stretching the elastic up. You can use the thumb to get the shoe properly in. To tie the ribbon take the right side and take it up to the ankle and not further and same with the other end too. Make the two ends meet at the back of the leg. Then double knot the two o...
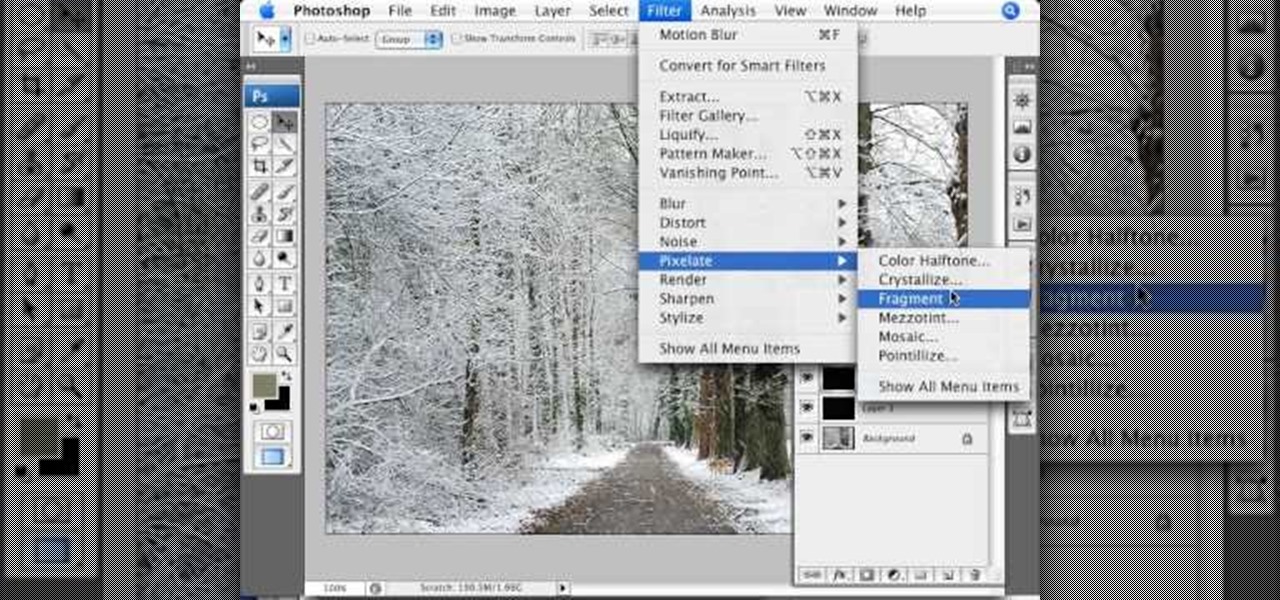
Learn how to simulate snow in your photograph in this video tutorial by photoshopuniverse. For this you'll need a photo depicting winter scenery. Add a new layer, fill it in with black, go to filer noise and add noise as shown using the given amounts. Go to filter effects and add blur to the layer. Go to images and adjust the levels to reduce the snow-flakes as shown. And add some motion blur to it. Change the blend mode to screen, duplicate the layer, rotate the new layer, apply the filter c...
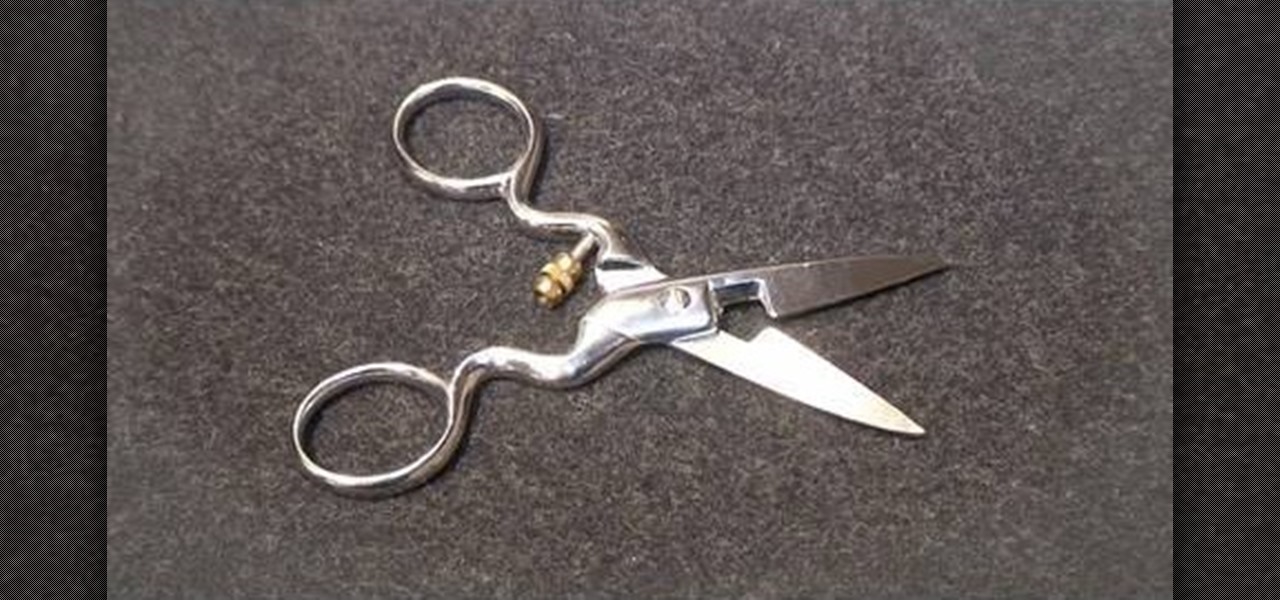
Couture designer Kenneth D. King is an expert in what you would need to fill up your sewing box. Here, he discusses buttonhole scissors. Buttonhole scissors are made for making buttonholes without stretching or damaging the fabric. By watching this video you can learn how to adjust your buttonhole scissors so that you can make different size holes. Make sure to never to use these scissors to cut through paper as it will make the scissors dull and make it a lot harder to cut through fabric.
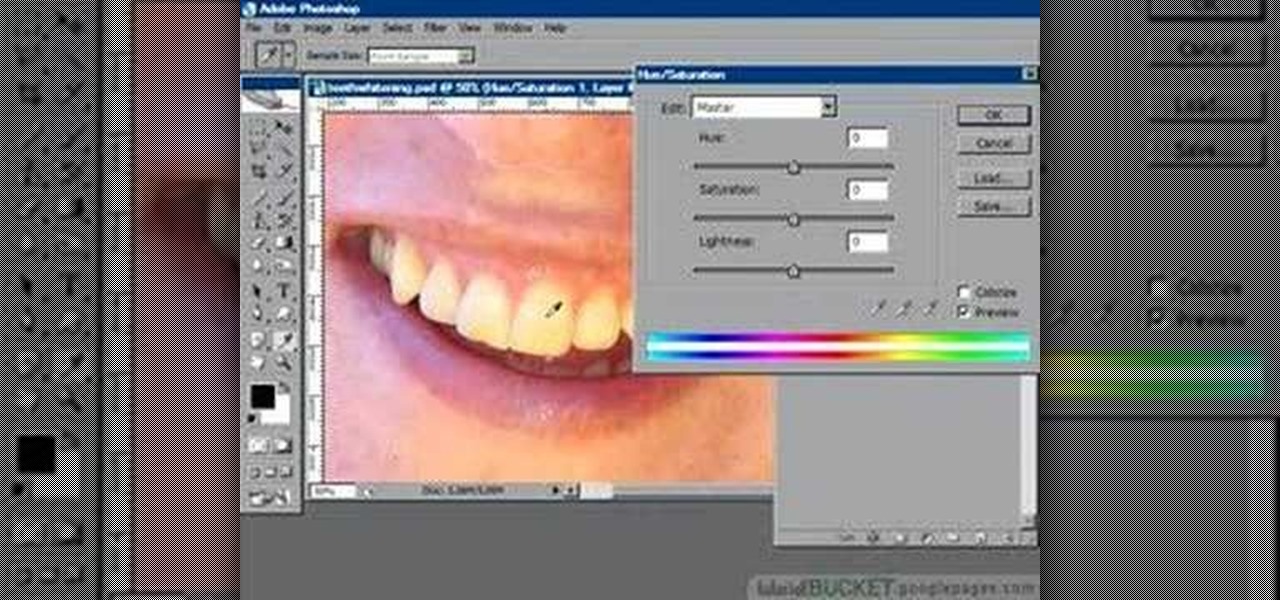
You know that you can edit almost anything in PhotoShop but did you know that you can make your teeth look dramatically whiter with just a few PhotoShop tweaks? Watch this video to learn how to select the teeth that you want to whiten and then how to adjust the hue and saturation of your teeth. Teeth tend to give off a yellow cast in photos even if they are not yellowish in person. You will need to leave a little bit of the yellow to keep your teeth natural looking.

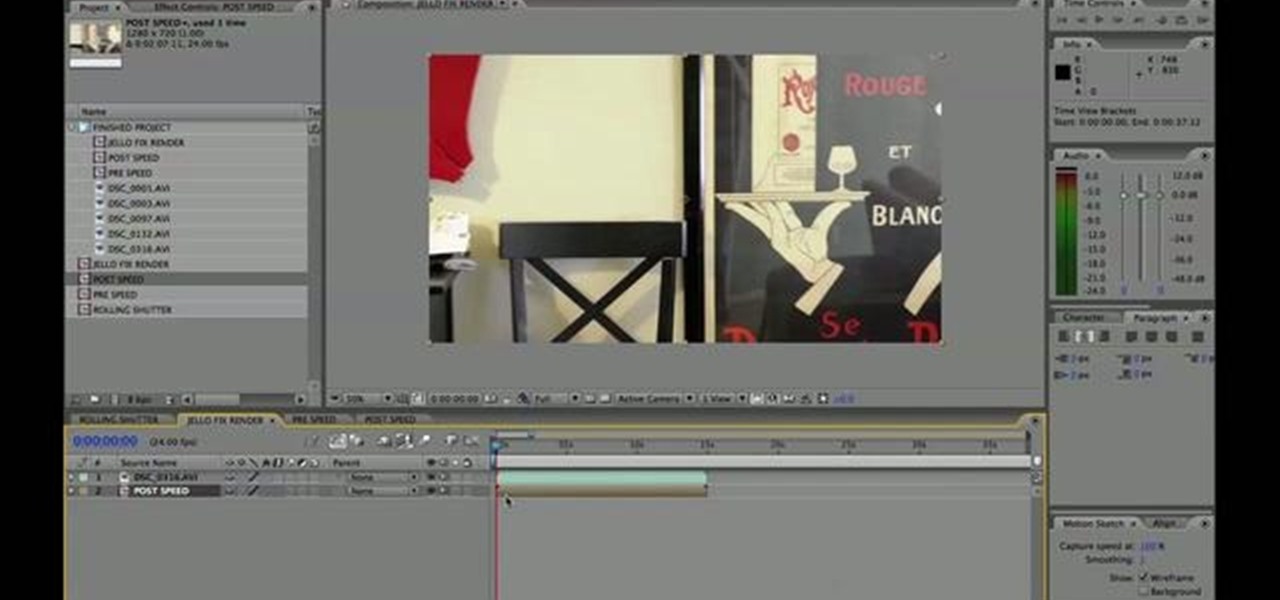
Is your digital SLR camera creating an unintentional "Jello effect"? Well, this is caused by a rolling shutter, which can be fixed in Adobe After Effects. This tutorial serves to help you eliminate your problems on your D-SLR caused by the CMOS's "rolling shutter".
Anuja and Hetal from Show Me the Curry! teaches how to make Garlic (Lasoon) Chutney. Ingredients: 1 cup Dry Shredded Coconut1/4 cup Sesame Seeds4 Dry Red Chilies1 Tbsp. Roasted Salted Peanuts1 bulb Garlic1 tsp. Tamarind Paste, Salt to taste, Roast coconut until golden. Set aside. Roast Sesame Seeds. Set aside. In a food processor, add Roasted Dry Red Chilies and Roasted Peanuts and lightly pulse. Add in the remaining ingredients. Grind. Adjust salt or tamarind and pulse the food processor unt...
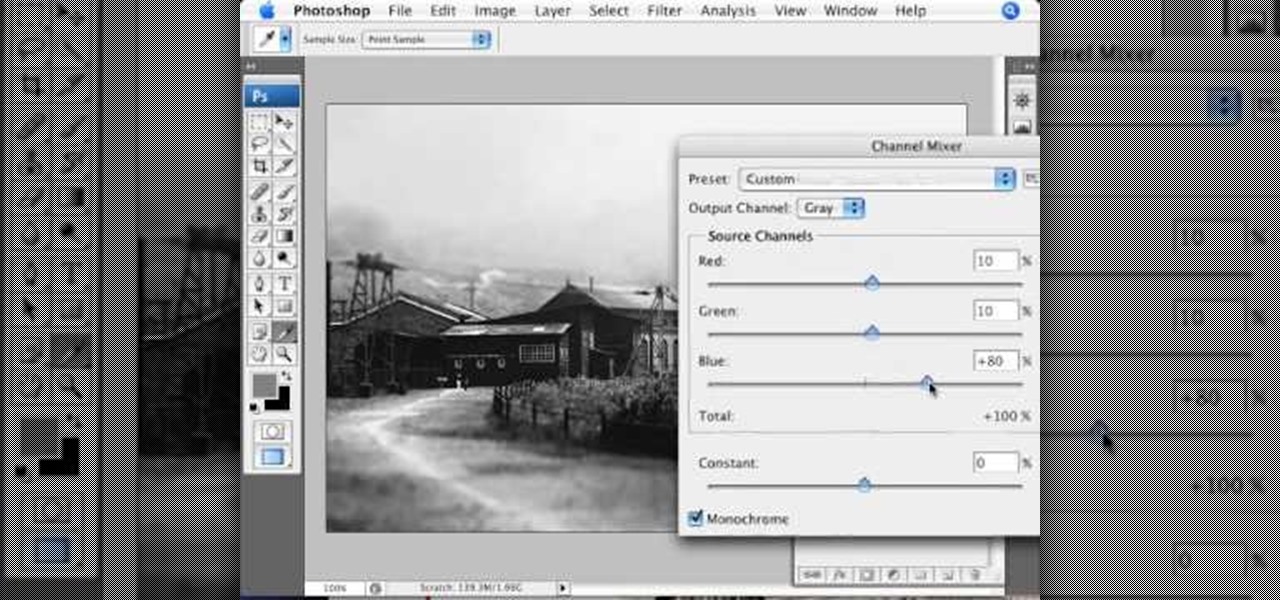
This video demonstrates the split tone effect in Photoshop. A split tone effect makes a picture look more rustic by changing the tones. First, add an adjustment layer to the picture by opening the channel mixer window. Select Monochrome and adjust the RGB values to create a black and white image to your own personal preference. Next, add another layer by opening the color balance window. Here you can change the colors of the light areas by selecting Highlights and changing the color sliders, ...
This video shows you how to use an aspect of Photoshop so that you can fix snapshot pictures that may have gotten an exposure level you did not want. This quick and easy tutorial video shows you how easy it is to adjust the layers in the screen. With different adjustment tricks for the layers to use if you are unsatisfied with the results you are getting. Each video will take moments to do and once saved you can move on to edit any other photos that did not come out with exposures that you wa...
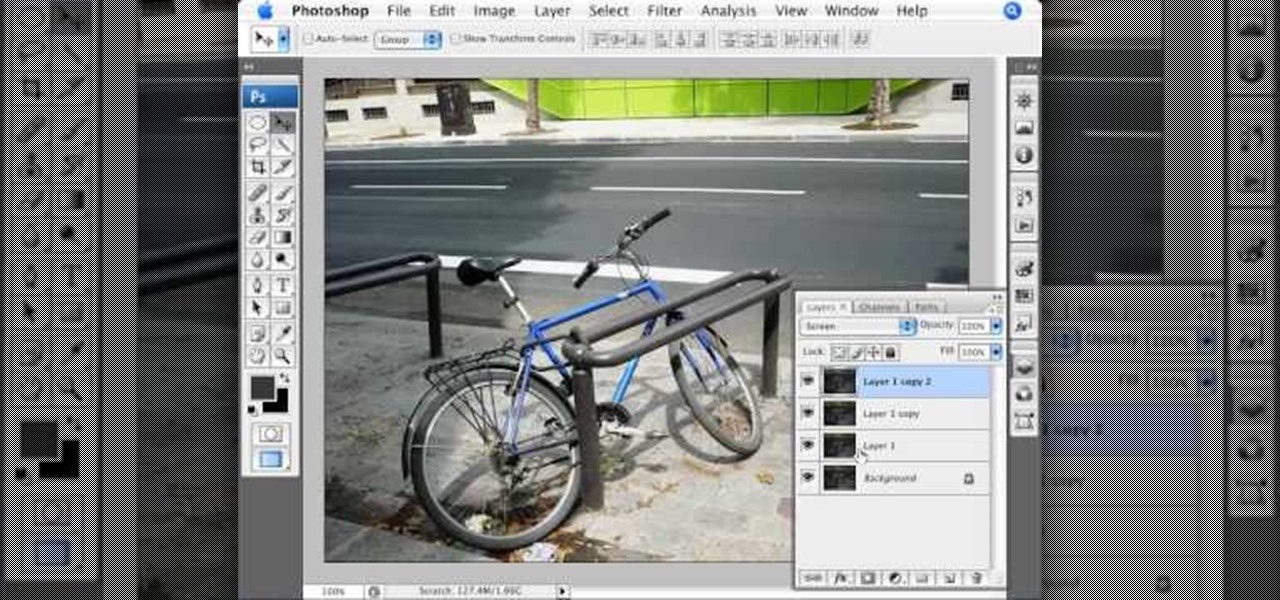
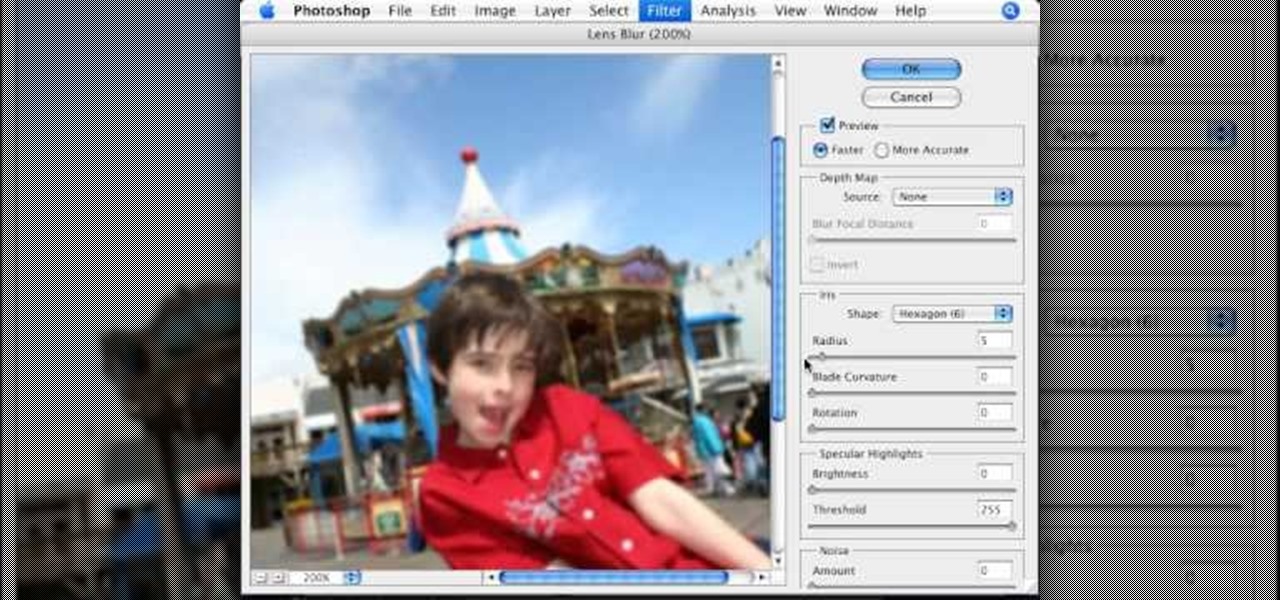
This video tutorial, by photoshopuniverse, shows you how to reduce the depth of field after a photo is taken using Photoshop. This enables you to ensure that your main subject is clearly in focus while the background is out of focus or blurry. First duplicate the layer using the short cut that was mentioned and apply the filter lens blur to the new layer and adjust the radius so that an adequate amount of blurring is achieved. Add a layer mask and bring the subject to focus by selecting the b...
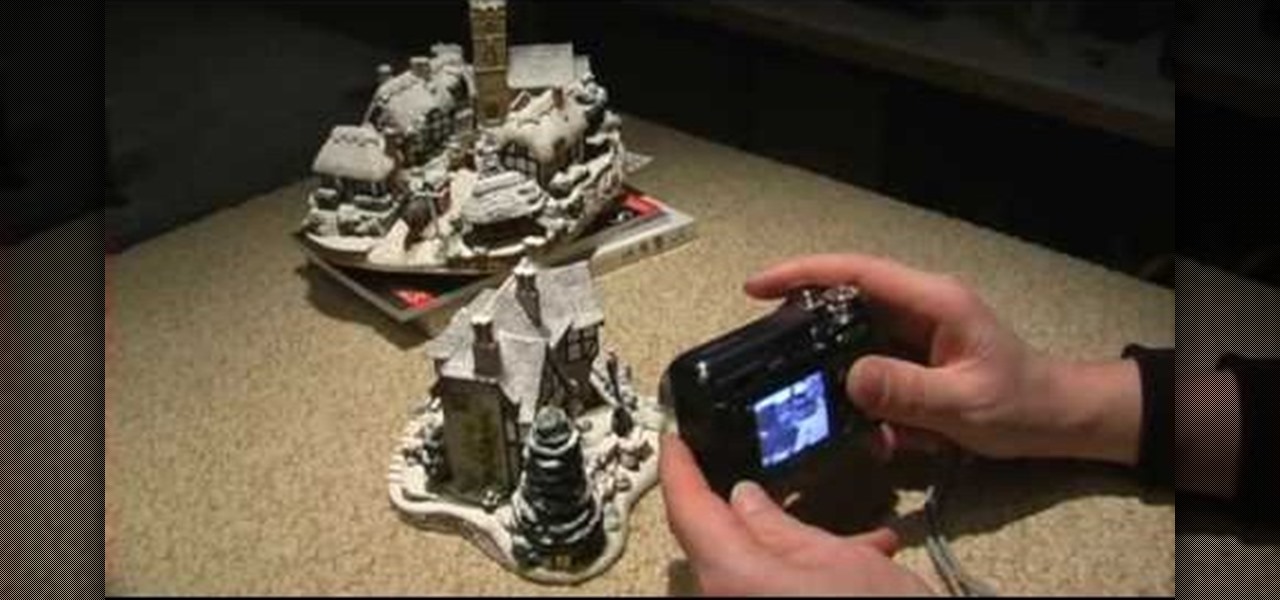
Rick Vanman reveals the secrets to professional video effects using your own computer software. Position your model houses into a setup of your liking. Take a picture of the houses with a digital camera using the macro setting. Edit your picture in Photoshop. Disguise any unwanted objects with the cloning tool. Separate the foreground and the background of the picture into 2 different layers. Film yourself in front of a green screen. Key out the green with your video editing software. Using y...
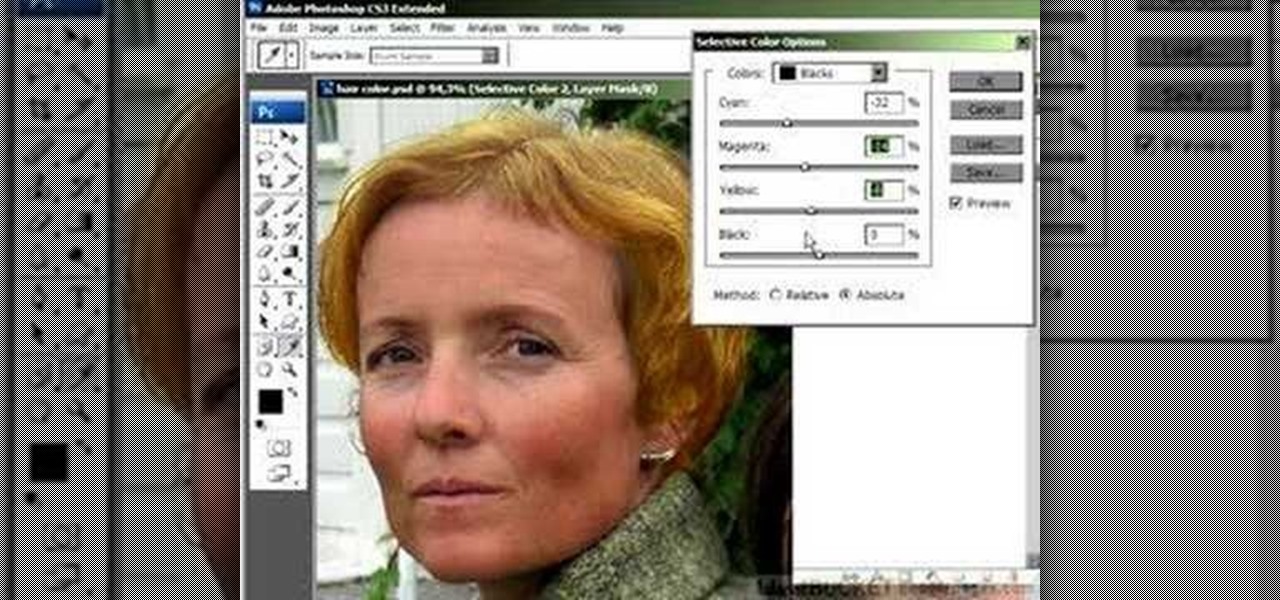
In this Photoshop tutorial the instructor shows how to change the dark hair color to blond. To get this accomplished you need to use a couple of very special techniques. First use the selective adjustment layer and select the outline of the hair. Now use the selective color option and change cyan and magenta settings to about minus forty. Now changing the other yellow color to achieve saturation and black colors to achieve the effect with shadows. Now next change the colors of black so that t...
Tutorial on how to create realistic reflections on Photoshop with the objects. Take a base ball image then open layer pallet and duplicate the base ball layer its shortcut is Ctrl j. Go to image menu adjust the canvas size change height to 200 and anchor to the top then click OK then go to edit select transform change to flip vertical, select move tool then move the base ball vertically down change opacity to four percent. Finally go to filter select blur then motion blur with an angle 90 deg...
Stephanie Valentin will show you how to draw realistic hair in Photoshop. Add a new layer of paint to shape the hair, and do it with a round brush. Create hairs all around the shape with a smudge tool. Then add a new layer and draw a line with a soft round brush and smudge tool. Repeat the last step several times drawing more hair if you want. Add a new layer and add some light with a smudge brush and a round brush. When done, adjust the layer of opacity. Again, add another layer and add ligh...
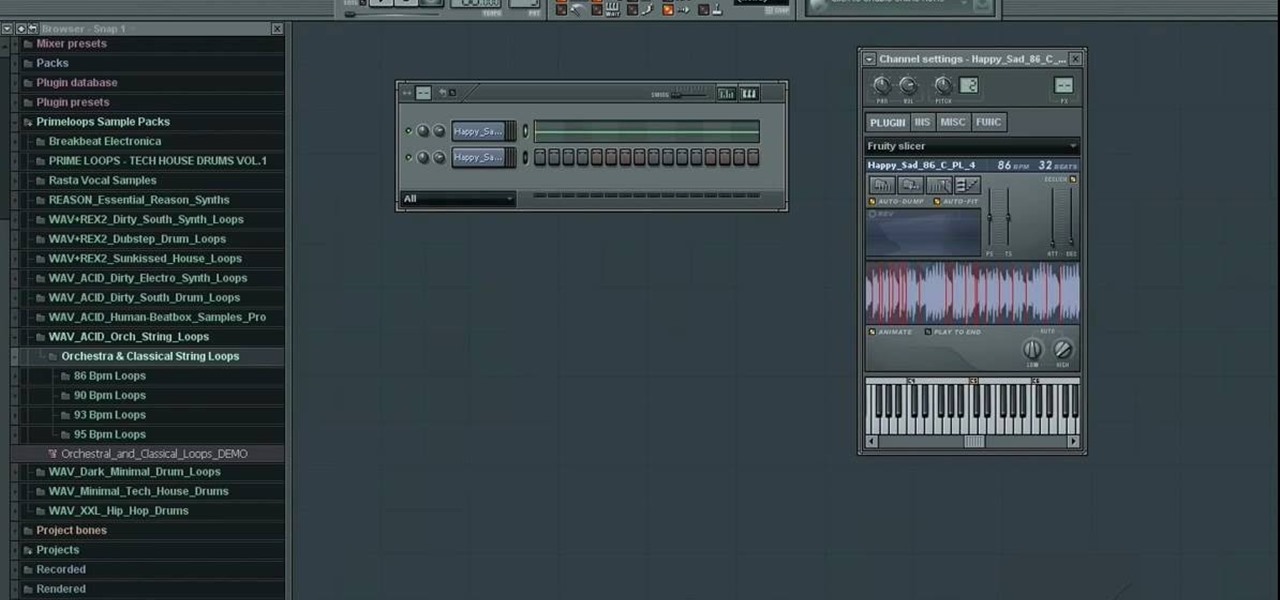
This how to video describes how to use Fruity Loops to chop up orchestral loops and integrate them into your project. First you take a sample and adjust the knobs on the Fruity Loops interface to achieve the desired result. This video is great for anyone who is learning Fruity Loops Studio or simply learning how to create songs from smaller orchestral samples. The video itself lasts about ten minuets and will help you achieve the musical prowess you desire.
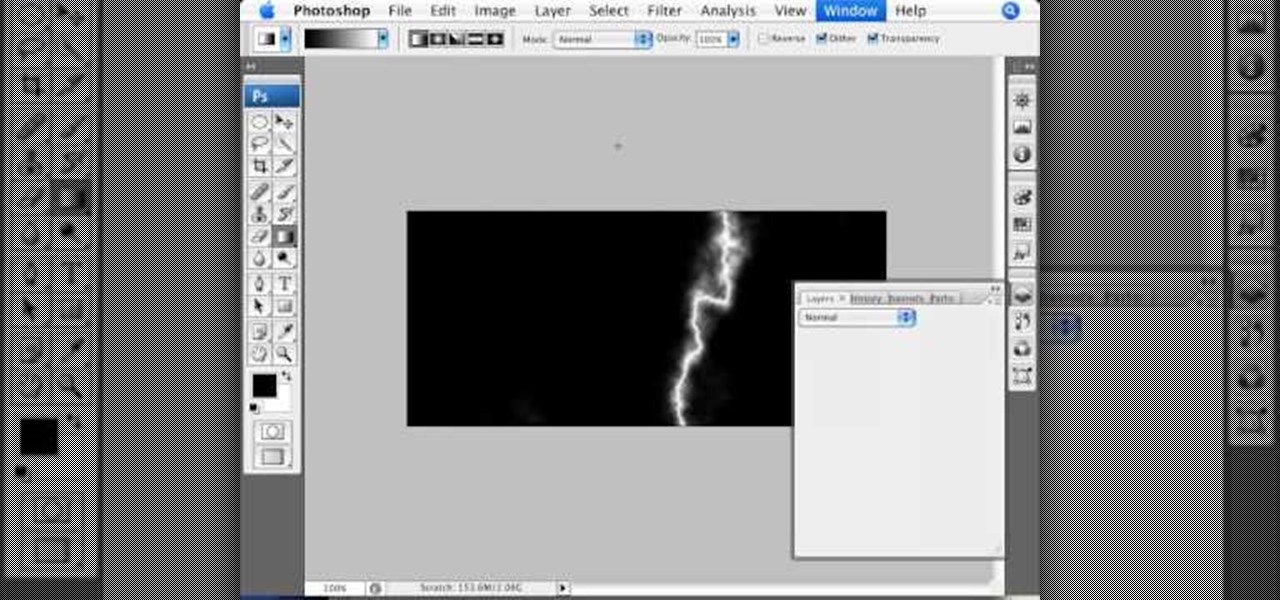
This video by photoshopuniverse shows you how to simulate lightning in a night time scenic photo. For this a night time scene is required. Open the image in Photoshop and create a new layer and with the gradient tool create a gradient as shown from the top left to the bottom right. Apply the filter, difference clouds on the layer and inverse the layer as shown. Exaggerate the lightening by using the adjust levels command. Change the layer mode to stream and tweak the hue and saturation so tha...
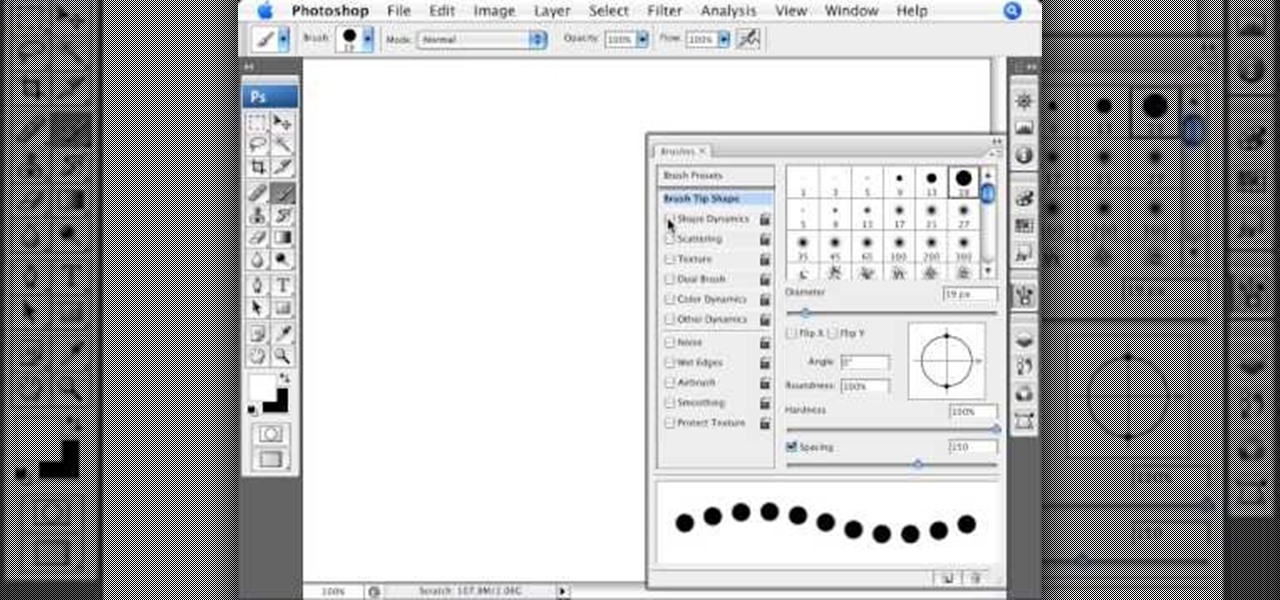
In this tutorial Photoshopuniverse describes how to create dotted lines in Adobe Photoshop using the brush palette. First create a new blank document in Adobe Photoshop. To open brushes palette, go to menu Window - Brushes. By adjusting spacing and hardness of brush under Brush Tip Shapes menu you can draw desirable dotted lines. To get uniform circled dots uncheck Shape Dynamics box. By holding the shift key click and drag to get a straight dotted line. To create bullet holes or perforated h...
Some people are hesitant about changing their resume and editing certain things in or out; they feel it's like cheating. It's not. Changing up your resume is perfectly acceptable as long as you don't lie or make false claims about your history. Tailoring your resume is about putting yourself in a context the company feels will suit them the best.
The Wood Whisperer thinks you have what it takes to be a woodworker. Watch this tutorial to learn about setting up and tuning up a band saw, one of the coolest tools in the shop.
Get started using Adobe After Effects with the help of The New Boston! This beginner's tutorial is bound to answer the many questions you have about the popular digital motion graphics and compositing software. The main purpose of After Effects is for film and video post-production.
Get started using Adobe After Effects with the help of The New Boston! This beginner's tutorial is bound to answer the many questions you have about the popular digital motion graphics and compositing software. The main purpose of After Effects is for film and video post-production.
Craving authentic Indian food? Then tune into this Indian cooking how-to video with Manjula. Follow along with this video lesson as Manjula shows you how to make boondi or bundi ladoo. Boondi or bundi ladoo is a snack time dessert served in most Indian homes. Make some for your home tonight.
Alright MacGyver, for this week's assignment, you're going to need a picture of a chair, and SketchUp. And maybe some duct tape. We're going to show you how to use Photo Match to create a chair component from a digital image in this SketchUp software tutorial. It's one thing to use Photo Match in SketchUp to adjust perspective with buildings, but you can also use it to work with components, as you'll learn in this video.
Forget the Indian take out tonight, watch this how to video and learn how to make a delicious Indian dish. In this video Manjula shows you how to make malai kofta. Malai kofta are dumplings in a creamy gravy, they make a good side dish for any formal dinner party.
Learn how to play "Thinking of You" by Katy Perry, an acoustic guitar tutorial. Follow along with this demonstration, tabs and lyrics here:
Whether you're hiking or hunting, spending time outdoors can also be an opportunity to spend time with man's best friend--your dog! Get tips from this how-to video on spending time with your dog AND keeping her safe.
How much you've actually spent and how much you think you've spent are usually two completely different results, and is especially true on Amazon when it's so easy to click and buy. You might think you've given Amazon a couple thousand over your lifetime, when the fact is that it's three or four times that amount.
The importance of body language is stressed from an early age: watch those around you, and you'll know what they're thinking. While you might be skilled at deciphering the messages of crossed arms, slouched sitting, eye movements, and hand gestures, the key to understanding those around you is a little less obvious.
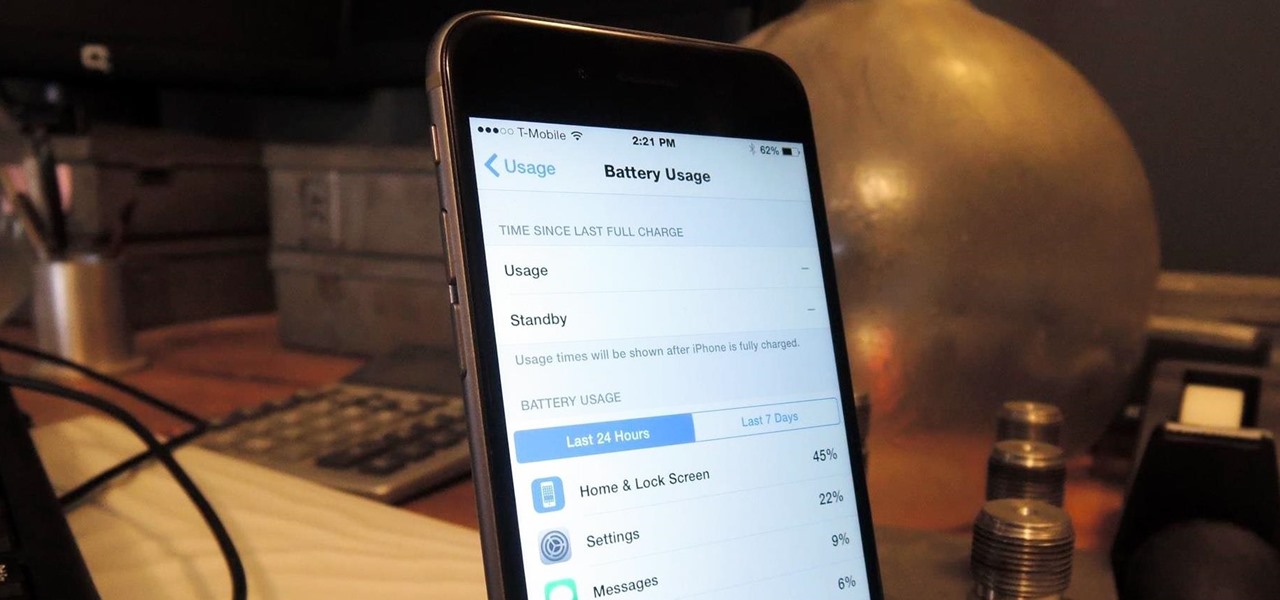
The new iPhone 6 and 6 Plus are supposed to last a lot longer in your pocket with improved battery life, but that doesn't mean that iOS 8 will be that friendly on your older iPhone model. All of those awesome new features could be killing your battery, but with some simple tweaking, your battery life concerns will be a mere afterthought.
If you're one of the lucky people who received the gift of terrible eyesight from your parents at a young age, chances are you ate an awful lot of carrots growing up. Though carrots are one of the top vision-boosting foods, they don't offer fast results.
Apple may have unabashedly lifted their upcoming "Control Center" from Android devices, but visually speaking, it's an awesome take on Quick Settings that would look pretty good on a Samsung Galaxy S3.
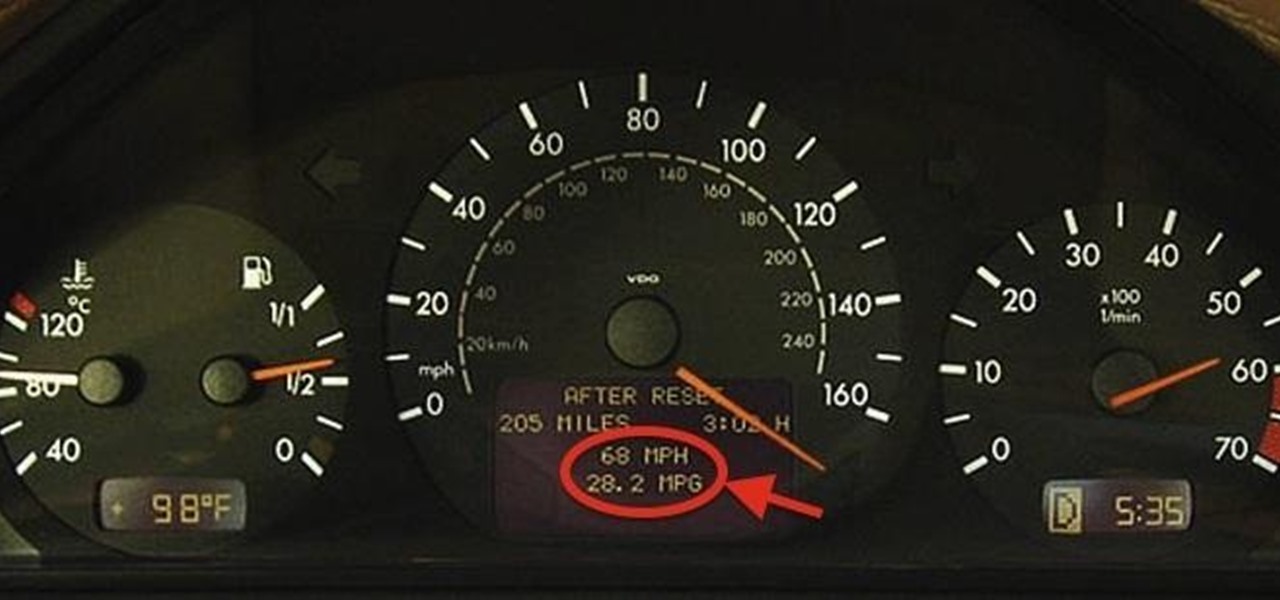
A man once told me to never complain about gas prices. With the average price of regular unleaded gas at $3.34 a gallon, it's hard not to, even if it is the holiday season. Since my car averages about 22 mpg, the man offered me this proposition: "If I offered you $3.34, would you walk 22 miles?"
Step1. Make sure you get your facts straight. Note down the dates, names, and numbers, what was said etc while talking over the phone. It is also essential that when you present your letter of complaint that it is chalked full of facts so that when it reaches a decision maker you may get justice properly. Do not write a novel that is 30 pages. Keep it short and write in bullets. Remember that they are interested in facts only.
Make a Spark frame ripper
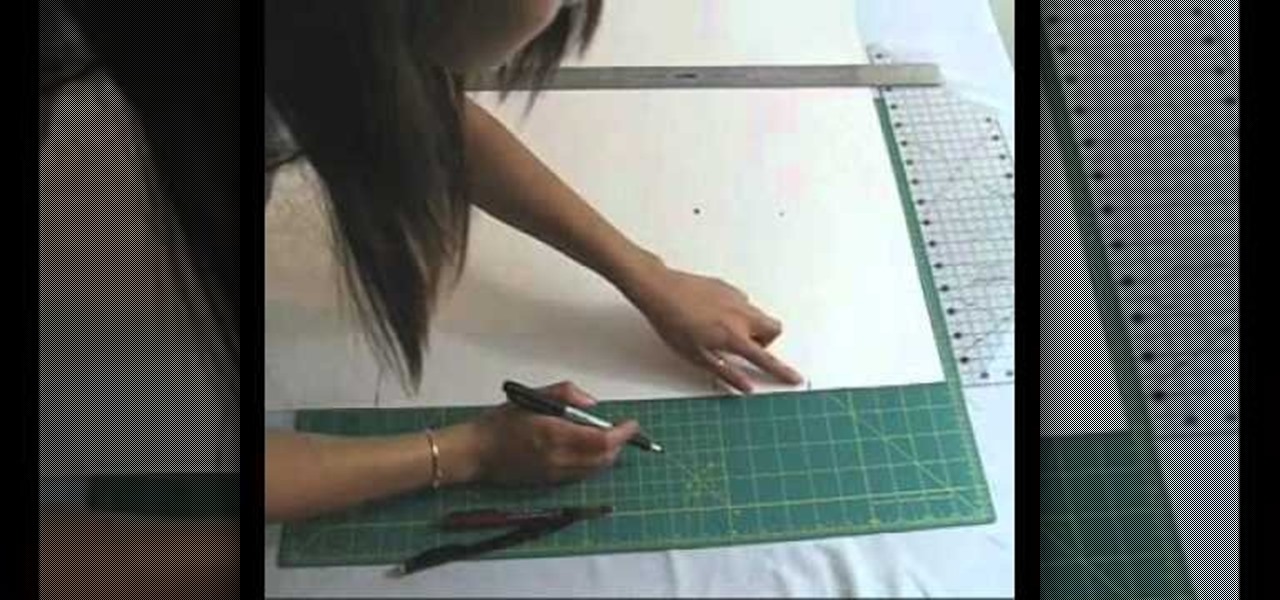
In this tutorial, we learn how to bisect a line segment. First, you need to adjust your compass so the distance from the sharp part and the drawing part is the size of the line. Then, put the sharp part on one side and draw your arc with the pencil. Do this on both sides of the line so your image shows two arcs that intersect each other. Since you have these two intersecting lines, you can draw a line between these to show where the middle of the line would be. Use a ruler to draw this straig...
Want to create your own camera? The simplest one that you can create is a pinhole camera which can be constructed from everyday household items.
First select the pencil tool then click on pencil mode which is located at the bottom of the toolbar, select straighten and draw a line as in the video. Now you can see that the line is automatically adjusted, it will make the round and straight shape in the line depending on how you drew it. Now delete your shapes and select the smooth in pencil mode and draw a line as in the video. Now you can see that the line is automatically smoothed. And finally select the ink in pencil mode and draw a ...
What's the most efficient way to become a fashion designer? By challenging yourself to creating your own clothes from the ground up. And while you probably already know this means cuting, sewing, and embroidering your fabrics, it also means making your own patterns.
In this video tutorial, viewers learn how to use the noise removal tool in Camtasia Studio. Begin by uploading the audio track into the time line. Then select and highlight the region that contains the noise. Now click on Edit and select Audio Enhancements. Under Background noise removal, users are able to select to automatically or manually remove the noise. Once selected, simply click on the Remove Noise button. Users also have the option to adjust the sensitivity. This video will benefit t...