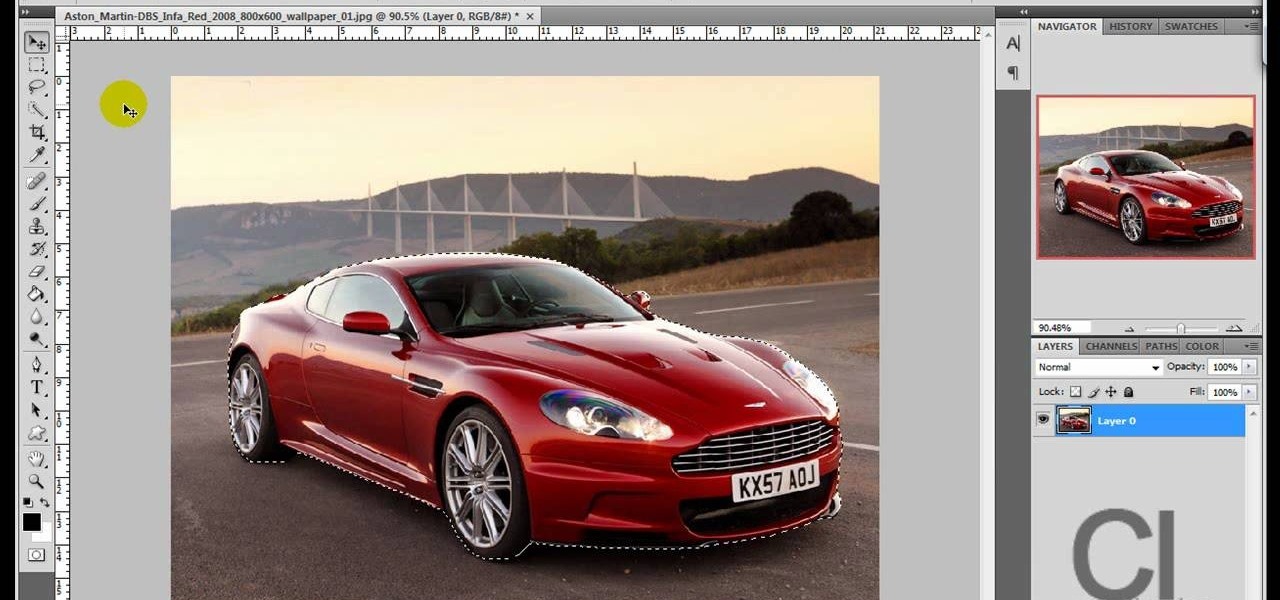
This how to video will show you how to remove blemishes and do other touch ups in Photoshop. First, open the image you want to touch up in the program. Now, choose the polygon tool and select the background of the image. Now, go to adjustments and change the brightness and contrast. You can also add a blur in the filters. Use the smudge tool to touch up any errors from using the blur filter. To fix blemishes, use the patch tool. Select the area you want to fix and drag it to an area of simila...
This how to video shows you how to create wallpaper for your computer desktop. Open Photoshop and create a new file. Change the dimensions to the size of your desktop. Click okay and go to edit and fill. Choose color and select black. Click okay to fill the screen with black. Duplicate the layer. Once this is done, go to filter, render, and lens flare. Make sure the lens flare is in the center. Edit the settings to your liking. Click okay to add the effect on to the image. Go to filter, disto...
This video teaches us to make a photo black and white with coloured parts in Photoshop. This procedure consists of many steps. In the first step, we choose the magnetic lasso tool from the application. This is followed by the second step. In the second step, we draw the contours of the places we want to stay colored in the photo. Press the 'Shift' key to keep the contours selected while drawing contours across multiple places in the image. After drawing the contours, go to step three. Right c...

In this how-to video, you will learn how to make grain textures in Photoshop. First, click add layer mask to an open image. Add a filter to this mask and by going to the texturizer option. Adjust the settings to your liking. Click okay to continue. The mask will make the texture transparent. Go to image adjustments and levels to adjust the intensity of the grain. Click okay to save the settings. Select the layer and then choose the color you want the grain to be. Make sure to lock transparent...

In this how to video, you will learn how to make a reflection in water using Photoshop. First, open the image in Photoshop. Select the crop tool and select the whole photo. Click and drag the lower part down. Select the rectangular marquee tool and select the picture. Click on the selection and select layer via copy. Click the move tool and drag the upper point in the picture to the bottom of the document. Go to filter, blur, and select motion blur. Choose a -90 degree angle with a 35 pixel d...
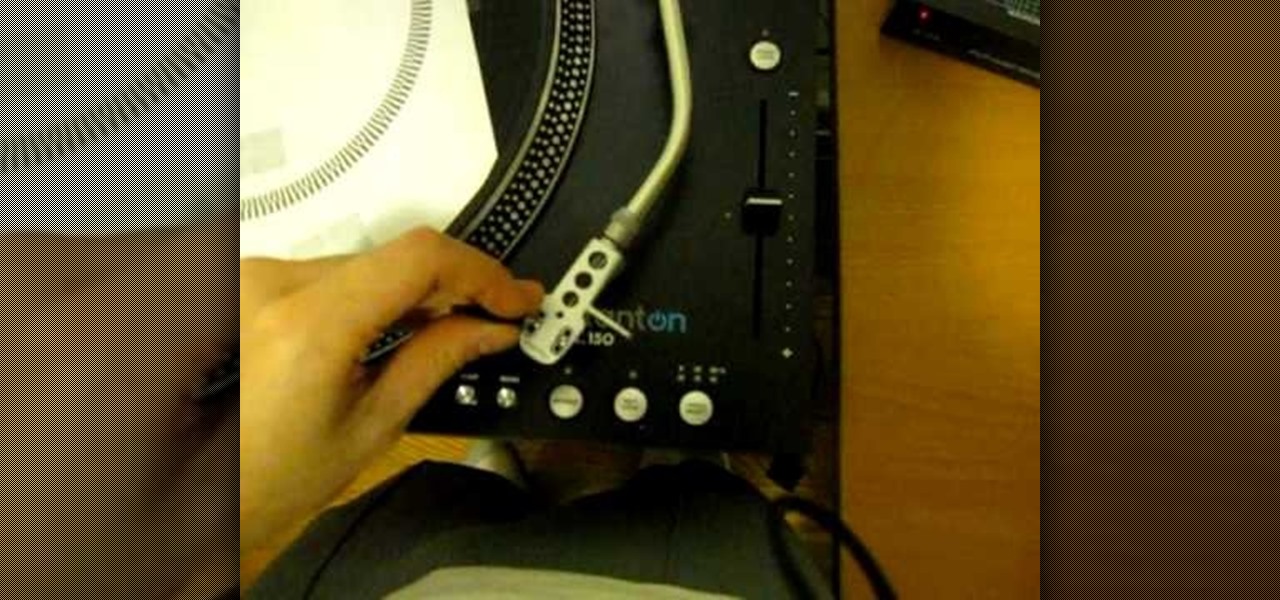
Paul demonstrates to viewers how to properly set up a turntable. Each turntable has the same basic parts, so this tutorial should work for most users. There are several components: the platter is the part that spins and it has a slip mat on top. The tone arm is to the right and it has a head shell and stylus cartridge (needle) mounted on the end. The queueing lever is at the base of the tone arm and it raises and lowers the tone arm base. There is also a VTA (Vertical Tracking Angle) adjustme...

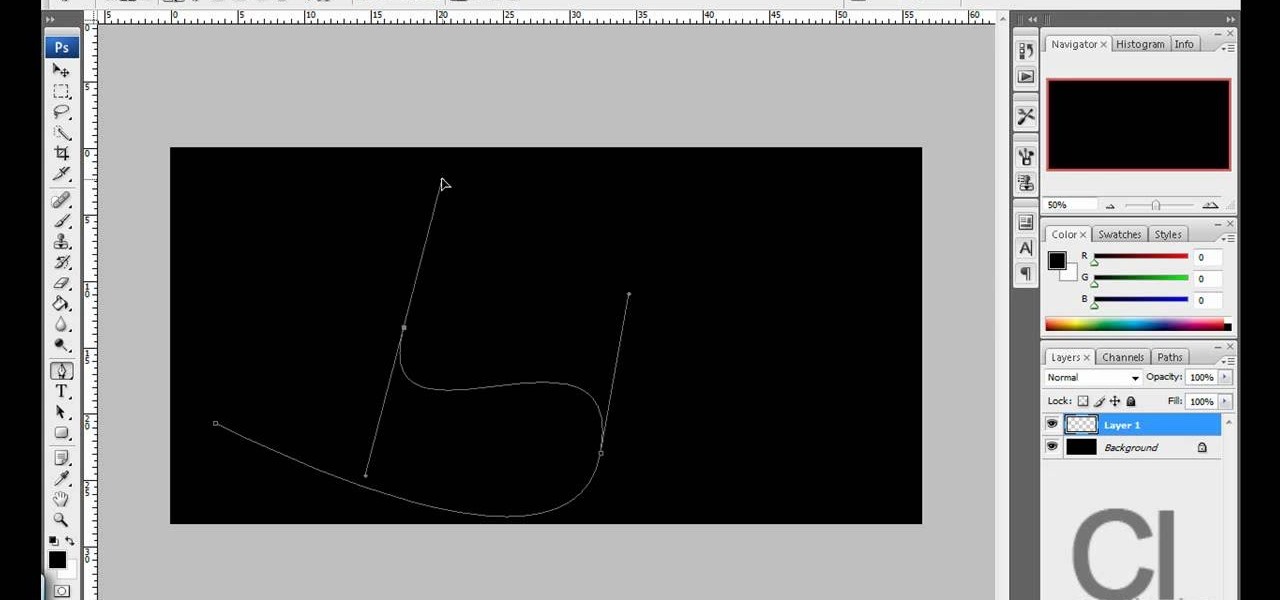
This how to video shows you how to create a nebula star scene in Photoshop. First, create a new image in Photoshop. Fill the background with black. Next, create a new layer and call it stars. Go to filter and select noise. Choose Gaussian and click monochromatic. Click okay to add the noise. Once that is done, go to adjustments and levels. Change the settings so that you have less clutter. Next, make a selection in the middle. Copy and paste it as a new layer. Go to edit and select free trans...
Make light saber glow effects in lsmakerThe author found freeware that helps create light sabers. The freeware is not as good as adobe after effects, but it will serve the purpose. Download the software from the website http://www.lsmaker.uw.hulpage.php?main=lsmaker.html. Extract the folder. Open lsmaker.exe. Save the extracted file to the desktop. Select import. Add either picture or video file. Change the saber color to red. Click ok. The blade needs to be white. In the dialog box change pi...
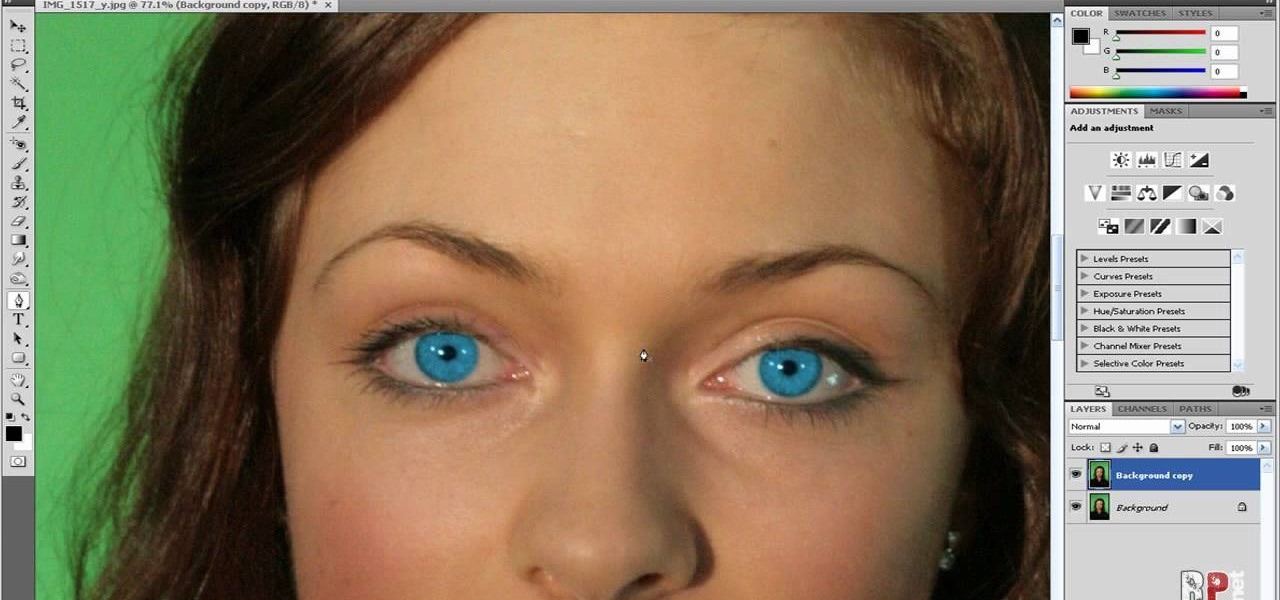
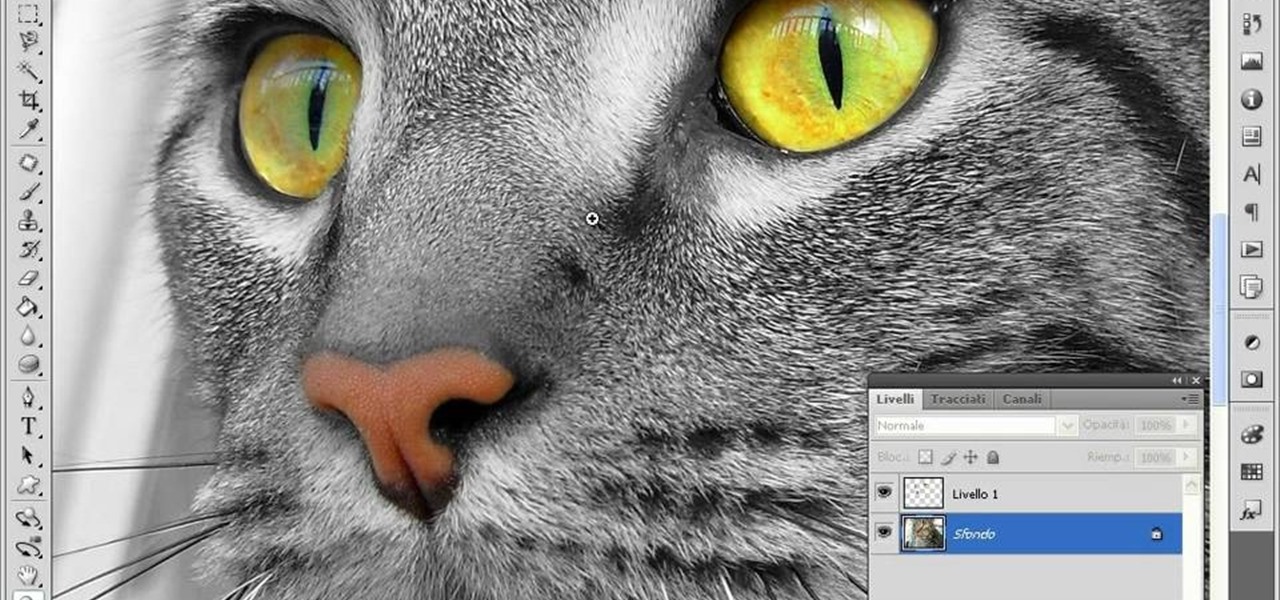
In this how-to video, you will learn how to change eye colors using Adobe Photoshop. First, open the image, Duplicate the background image. Zoom in to one of the eyes and select the pen tool. Set it to paths. Now, go around the iris of the eye. This does not have to be perfect. Click and drag to the other eye and select the other iris as well. Once these are both selected, right click into one of the selections and set the feather radius to about three pixels. Go to Image and Adjustments and ...
It seems like its hard to get as much sleep as we need, doesn't it? Sleep is important and effects how you function throughout the entire day. Follow these tips and you will be on your way to a good night's rest.
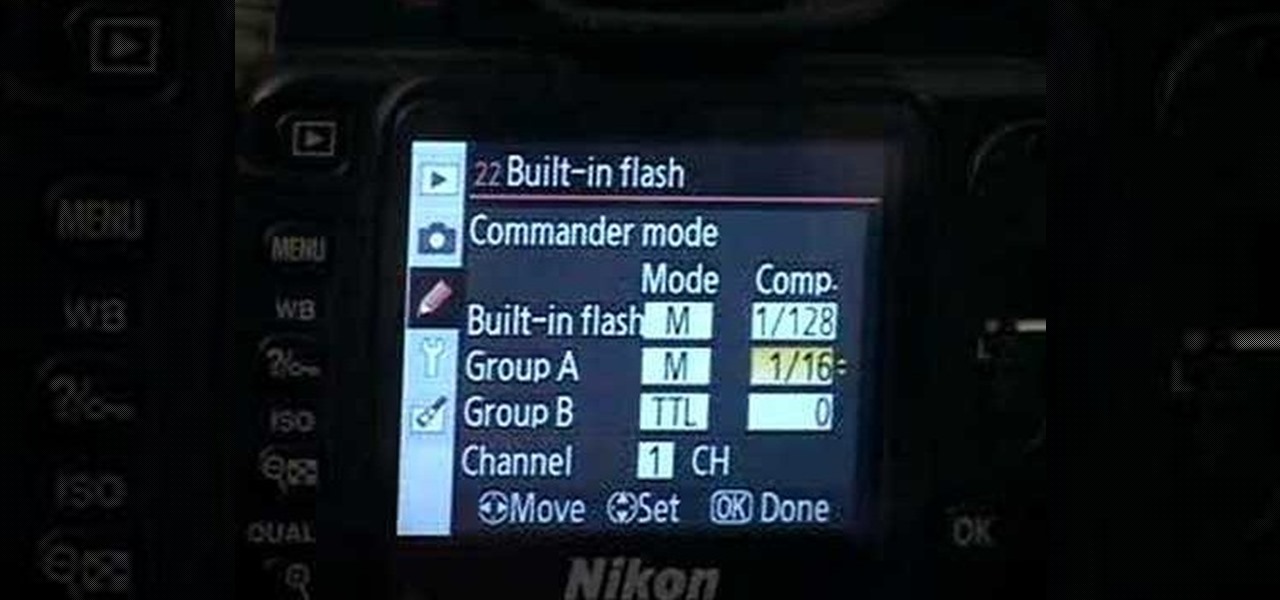
These are the steps required to set your D80's pop-up flash. First, go to the "Custom Shooting Menu." Then you choose #22 on the screen: "Built in Flash." Choose the "Commander Mode" option. The modes that are available for the pop-up flash include TTL, AA (Auto Aperture) M (Manual) and Off (no flash). If you are using an external flash unit, you use either group A or B. The light frequencies and proper settings are related to how much light compensation is needed. +3. 0 is high power, 1. 1 i...
SchizoFilms brings the viewers instructions on how to make an animated GIF in Windows Movie Maker. First open up Movie Maker. You will need to import pictures. To do this, click the button on the top left of the screen that reads 'Import Media'. Find your files here and import them into Movie Maker. Now, you will want to order the pictures in the sequence you want them to show up in. To do this simply drag and arrange them. Now, you can make adjustments for how long you want each to run by dr...
This is a Computers & Programming video tutorial where you will learn how to take screenshots on Mac OS 10. 5. Andrew Grant says there are several ways of doing this. The easiest way is to hold down the Command and Shift key and press 3. You will get a screenshot of the entire desktop. To take a screenshot of a selected area, hold down the Command and Shift key and press 4. The cursor now changes into a target. The figures next to it are the values of the pixels from the left hand top corner....
This video describes how to put eyeshadow on someone in Photoshop CS3 and CS4. 1.First open the Photoshop CS3 or CS4 and open your image in which you want to put eyeshadow.
Use the "Magic Wand" tool to select the color you wish to change. The next step is to open the replace color box. Go to Image > Adjustments > Replace Color. After the Replace Color box is open, you may have to select the color that you want to change in the image. Sometimes, it will automatically select the color you're changing, but sometimes you will have to use the Eyedropper Tool and click a hue of the color you wish to change. After the color is selected in the "Replace Color" box, you c...
This is really cool, you can make these awesome neon glowing lines using your Adobe Photoshop. This is a fun way to make creative and colorful designs and it looks really neat without spending time working on detailed shapes.
StephanieValentin teaches you how to draw a realistic ear in Adobe Photoshop. You create a new document of 1300x1900 pixels and then create 9 layers named L00, L01 and so on until L08. The first layer should be black. On Layer 01 use a soft round brush with a white color, 100 pixels width and 50% opacity. This is the base sketch of the ear. You then apply a gaussian blur of 30 pixels. For Layer 02 you use a soft round brush with a white color, 50 pixels width and 50% opacity. Apply a gaussian...
In this Photoshop tutorial the instructor shows how to do retouching to produce undead skin makeup. This video shows how to make a convincing, undead like, vampire skin make up. First open a image of the face which you want to make it look like undead face. Go to the channels panel and make a selection of just the face with the skin and exclude the rest of the head which includes the hair and other stuff. Now open a new adjustment layer and open the color balance tool. Fist select the mid ton...
Cut your ribbon or lace into two evenly sized pieces. This can easily be done by folding the ribbon or lace in half and cutting it on the fold.
Team Member, Nacelle takes us through the process, showing us how to put a beautiful water feature for your garden which could be the reason for the envy of your friends.
Are you have more bad hair days than good? In this tutorial, learn some ways to tame that unruly do.... Make your crowning glory the envy of all by permanently banishing bad hair days for good.
Sure, you can always use iron-on hem tape to shorten those pants, but maybe it’s time to join the 35 million Americans who can sew—yes, with a needle and thread—a hem.
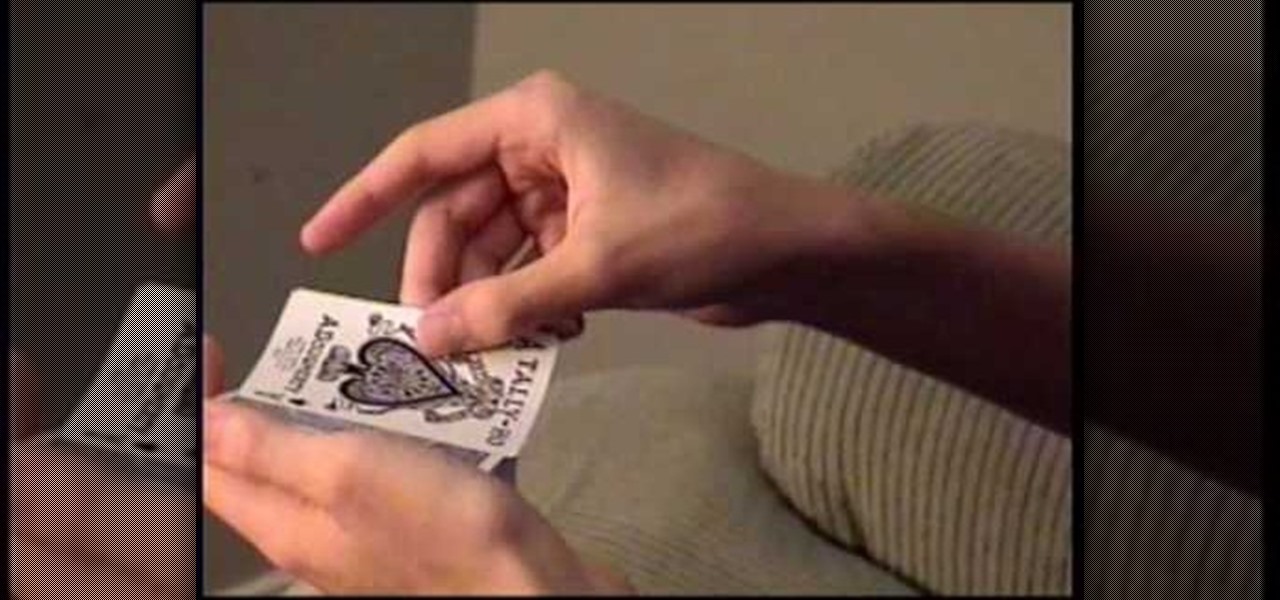
Watch this instructional magic card trick tutorial to learn how to perform the binary routine. This is an original series of user-created moves. There are 9 phases of the Binary Routine, 6 of which are false, and the other 3 are closers that involve a color card change at the end. This video provides instruction on 2 false cuts and 1 closer, along with some possible variations. Just keep in mind, there is room for adjustment with these phases. If you find a better way to do a certain move, th...
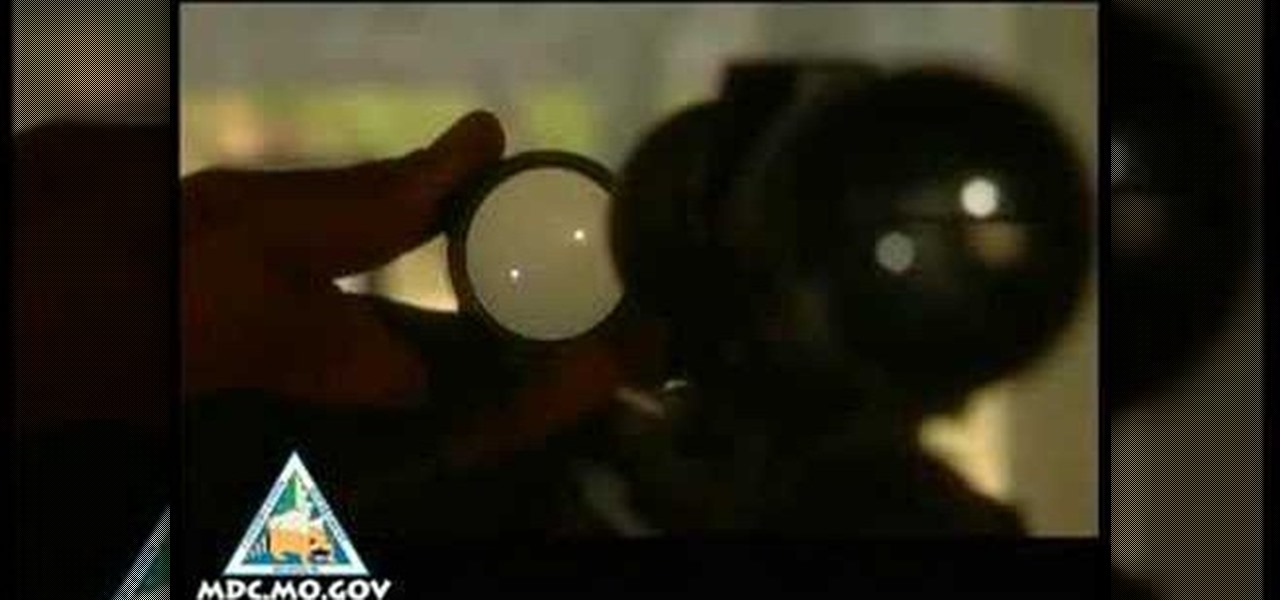
A lot goes into making a hunt successful, and most of it happens before you take to the field--like making sure your rifle is properly sighted in. It's not hard to do if you follow a few simple steps: first, and this is the first step when you do anything with a firearm, make sure it's unloaded. Make sure your scope is properly mounted and the mounting screws are tight. Remove the bolt from the rifle and sight through the barrel to make sure you're lined up with a sight-in target placed at 25...
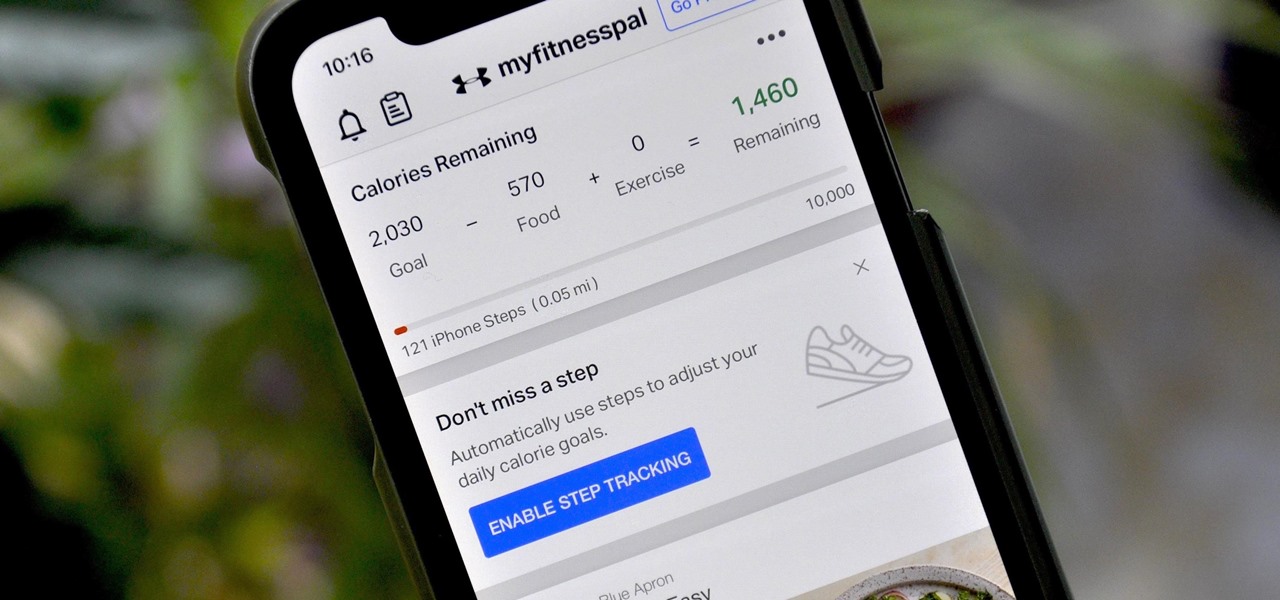
If you're new to MyFitnessPal, it might seem daunting. The app is way more than just a calorie counter, but that's because getting fit is just as much about changing your lifestyle as it is about watching what you eat. So don't let it overwhelm you — there are just a handful of tips you should know to hit the ground running.
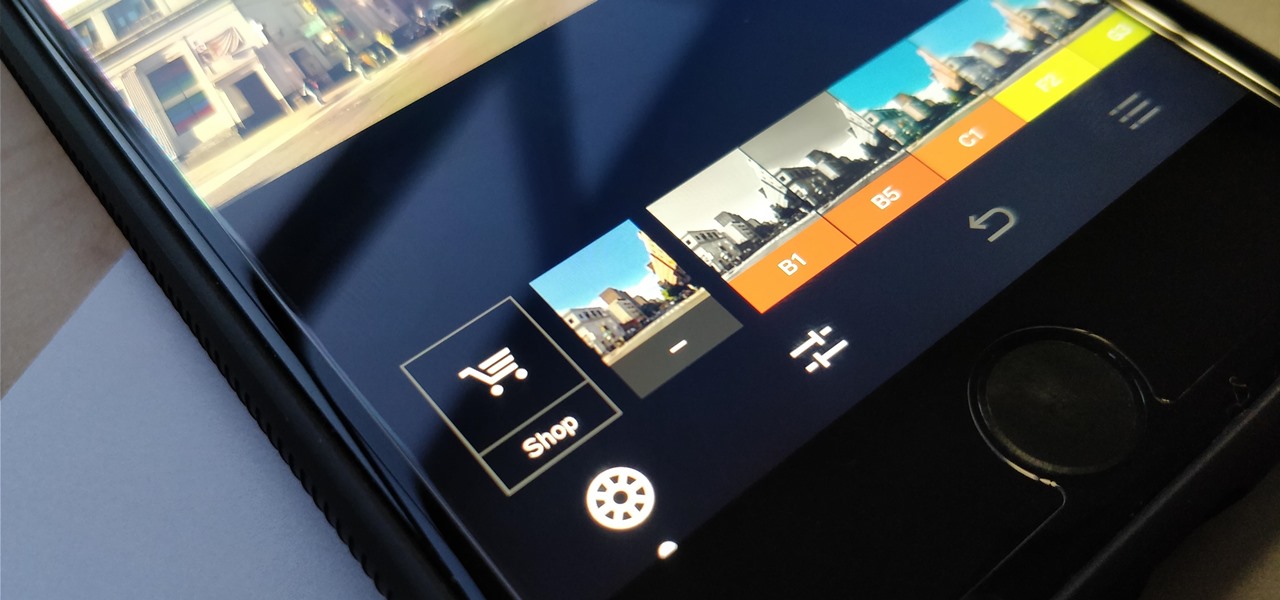
One of the best features VSCO has to offer is its presets, also known as filters — they reduce the labor it takes to make your images look better by applying unique preset edits to each. Presets can make your photo look like it came from a professional studio or a black and white camera from the '70s. Sounds great, right? So, how do you get started?
There are many different ways and many different apps that allow you to censor a racy photo and then share it to Instagram or Facebook. If you're in a time crunch and don't have the time or the patience to deal with something like Photoshop, then Snapseed is a great and easy app that will blur out your raunchy images in a quickie.
This is the ultimate guide to drawing correct human proportions. If you've always had trouble with it in high school art class or in art school, this video condenses all the information into a tight package that's fun and easy to understand. This will uncover all the tricks to human proportions for figure drawings.
Do you love Sloppy Joes but hate using those pre-made Joe packets from the supermarket? Well, you're in luck because in this tutorial, Betty offers up her from scratch Joe recipe. It's still just as messy as the store bought kind, and even more delicious. Kids and adults both love these messy, ooey, gooey sandwiches, so get them ready for your next dinner or BBQ!
This video speaks to everyone who has ever bought anything online, or in fact, anyone who has ever bought anything period. How do you know what you're getting is genuine? Is it a fake product? Is it stolen goods? Is it impure?
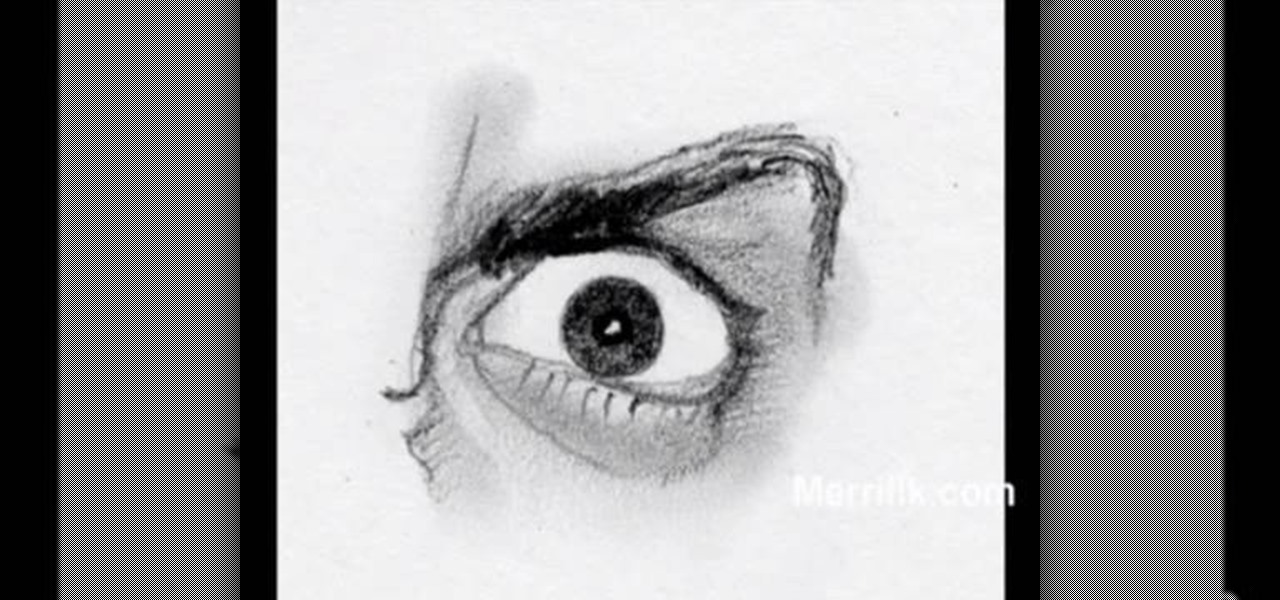
Watch this fine art video tutorial to learn how to master drawing an angry human eye in two minutes.
The camera punch hole on the S10 has gotten our creative juices flowing more than any notch ever could. First, we saw wallpapers that served to camouflage the cutout or even accentuate it. Now, if you want to go the opposite direction and highlight your S10's camera hole, there's an app that turns it into a circular battery meter.
One of the biggest under-the-hood changes in Android 5.0 is a new, robust Camera API. When Lollipop makes its official debut, this API will allow developers to hook into your phone's camera sensor like never before.
On most Android devices, the various volume levels are comprised of either 7 or 15 steps between minimum and maximum. For voice-call volume, alarms, and notifications alike, 7 presses of a volume button will bring you all the way from silent to full-blast. With media controls, you get 15 steps between mute and max.
Known for its easily recognizable filters—and coining the hashtag #nofilter—Instagram has long been an app that focused more on photo posting rather than photo editing. Yet today, Instagram released an upgrade for both Android and iOS users that edges the app towards becoming a full-fledged photo editor.
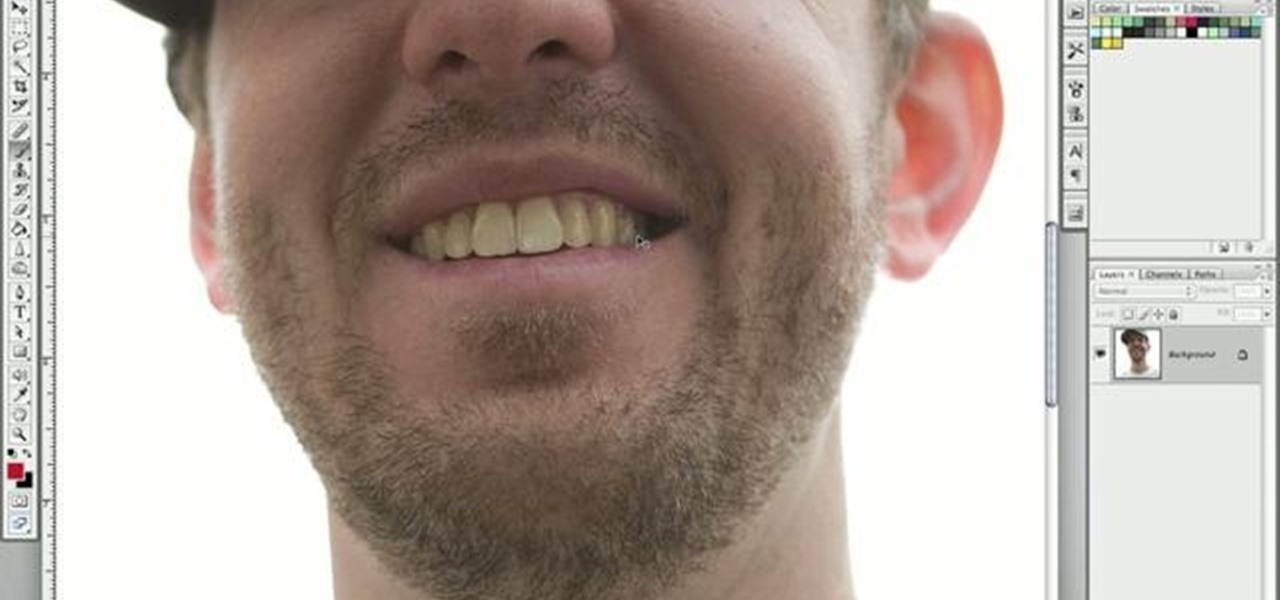
It's not brain surgery, but teeth whitening systems still hits the pocket books hard. However, there is a cheaper alternative to have the whitest teeth in the neighborhood, and it's called Photoshop. With Adobe Photoshop, you can have whiter teeth in seconds! Really. It's definitely the best tooth whitening remedy for those behind the camera lens. But remember… Photoshop is only a digital cure. You still might have to hide that smile in public… or consult a dentist.
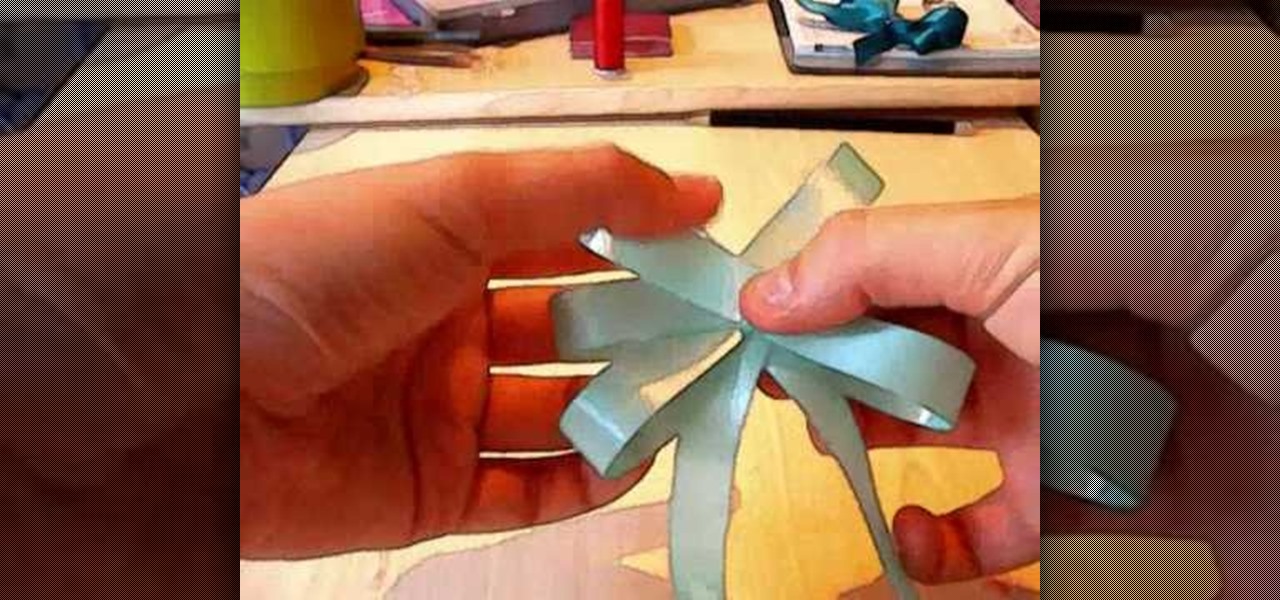
First of all you have to place your thumb or attach a pin on the ribbon such that there is a space of two to three inches left outside. Bend the ribbon back to the center to create your first loop. Now you have to pass the ribbon back underneath the bow. Then you have to again return to the center to create a complete second loop. Now continue passing the ribbon over and under the bow. Now return to the center and then repeat this step to create six loops in total. After this you have to turn...
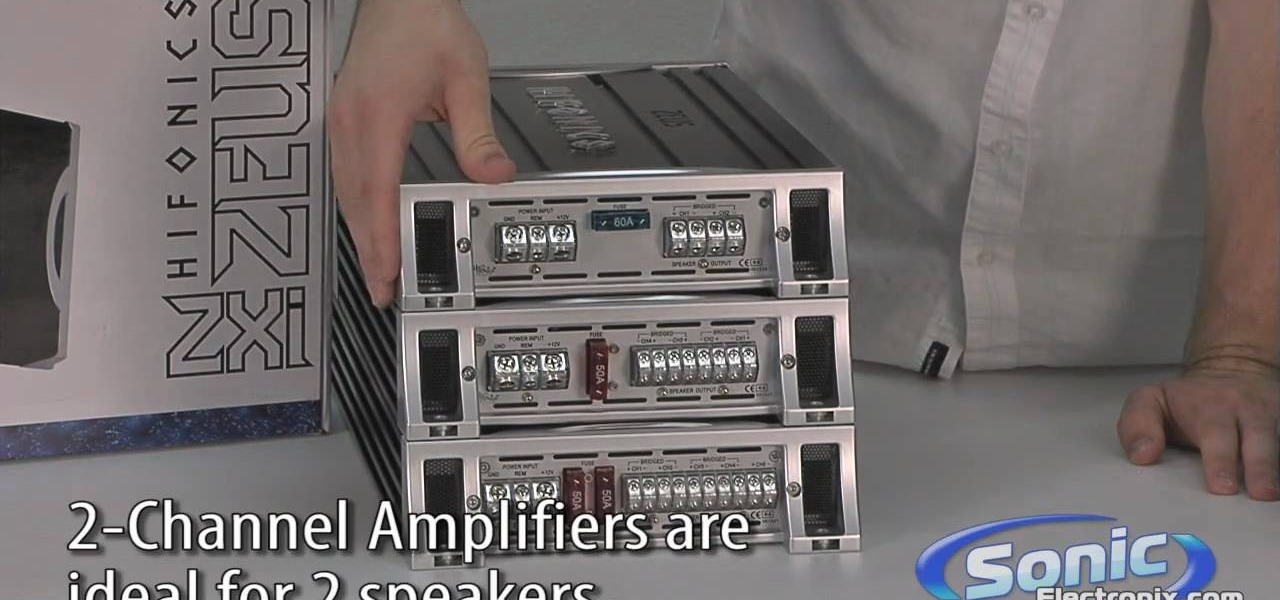
If you just got some banging new subs for the trunk of your car, then you're just about ready for the ultimate car stereo. But what kind of amp are you going to get to power those subwoofer speakers? Learn about the basics of car amplifiers in this video from Sonic Electronix, where they discusses the purpose of a car amplifier, as well as the parts of the amplifier. This includes the terminals, adjustments, types of amplifiers, and amplifier channels. Before putting together your first after...
Mr. Shane Benedict describes the delicate balances necessary to hit that perfect boof every danged time.
If you have a screen recording with distracting UI elements, black borders, and other unneeded visuals, Google Photos can help you crop out all the junk from the video, leaving you with only the important stuff.