This tutorial will show you how to hide files on your computer using an image file. The first step is to get an image file and edit it with Microsoft Paint or Adobe Photoshop. The next step is to save the image file as a jpeg file. Now create a WinRaR archive file and copy the files that you want to hide in the archive. The next step is to open Command Prompt: Click the Start button and click Run. Now enter "cmd" and hit enter. Now just enter the same commands from the video and hit Enter. Fo...

In this video tutorial, viewers learn how to draw the black Spider-man in Adobe Photo-shop. Begin by drawing the shape of Spider-man and then scan it. Now extract the ink from the white page. Then change the ink from black to white. Make the background black. Then fill the entire figure of the character in black color, using the pencil tool. Now create a blue layer over the entire image. Add white to the eyes and center spider symbol. Finish by adding details and a spider web in the backgroun...
In this video tutorial, viewers learn how to use the zoom tool in Adobe Photoshop. To select the zoom tool, click on the magnifying tool in the toolbar. Users are also able to press the "Z" key to select the zoom tool. Once selected, users are able to zoom into the image by left-clicking on the image. Users are then able to select the hand tool to move around the image. To zoom out, right-click on the image. This video will benefit those viewers who use Photoshop to edit images, and would lik...
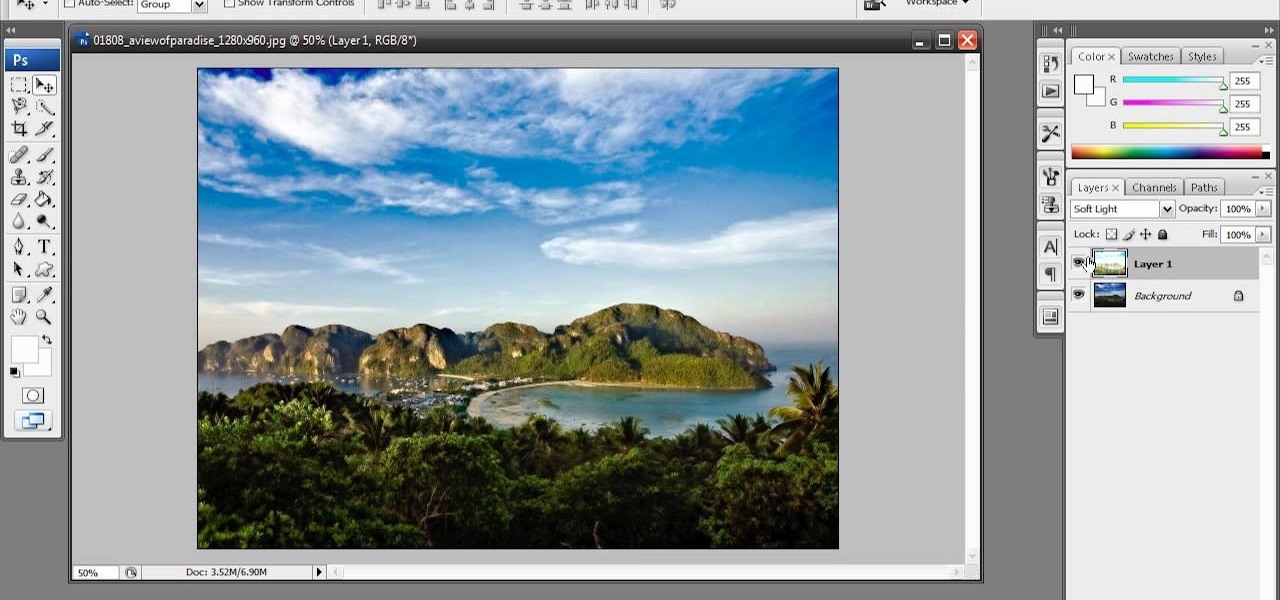
In this video tutorial, viewers learn how to enhance an image in Adobe Photoshop. Begin by duplicating the layer by press the Control and J buttons. Then change the blending mode to Soft Light. Now press the Control and M keys to open Curves, and drag the curves up to brighten the image. Then click on Filter, go to Blur and select Gaussian Blur. Set the Radius at 2.7 pixels and click OK. This video will benefit those viewers who enjoy editing images, and would like to learn how to enhance a p...
Old TV's were not famous for their high-fidelity color, but the brown-saturated look they made standard now evokes a lot of nostalgia among viewers. Because of this, it may behoove you, the filmmaker, to know how to simulate that color effect without having to actually use crappy cameras or televisions. This video will show you how to create an old TV effect while editing using Adobe Premiere Pro CS3. Embrace the nostalgia!

Creating cool background for videos is just one of the many awesome things that you can do using Adobe After Effects to do your effects editing. This three-part video will teach you how to create animated backgrounds and add additional text with flare. The results look very cool, as will your video after your apply these lessons.

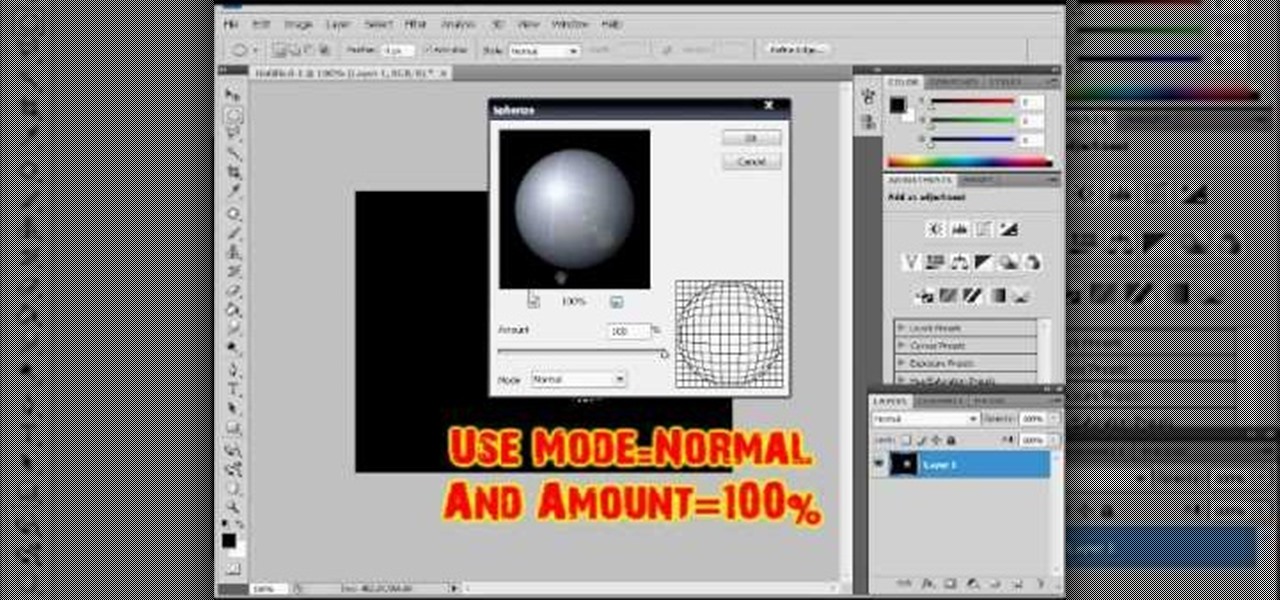
In this video tutorial, viewers learn how to make a shiny glass ball in Adobe Photo-shop. Begin by creating a new document with the default size and a transparent background. Then paint the entire background in black. Now select the marquee tool and create a circle anywhere in the background. Now go to filter, click on Render and select Len Flare. Make the lens flare 105 mm prime with 141% brightness. Then go to Filter, click on Distort and select Spherize. Use normal mode and set the amount ...
In this video tutorial, viewers learn how to make a red-cyan anaglyphic 3D photo, using Adobe Photo-shop. Begin by taking two pictures of the same image. The second picture should be 6,5 cm to the right of the first picture. Now load both images onto Photo-shop and drag the second picture over the first one. Select Layer, click on Blending Option and uncheck Channel R. Place the red on the left side and cyan on the right side. This video will benefit those viewers who photo editing and would ...
In this video tutorial, viewers learn how to create a carbon fiber desktop wallpaper using Adobe Photo-shop. Begin by creating a 20x20 pattern with the rectangle marquee and gradient tool. Then go to Edit, select Define Pattern and name the image. Now create a document with the dimensions of your monitor screen. Then go to Edit, select Fill and select the pattern that you have created. Then go to Filter, select Render, click on lighting effects and configure the image's lighting. This video w...
Popularized by the likes of Andy Warhol, pop art has long been an art genre associated with the glittery excesses of Studio 54 and a modern aesthetic.
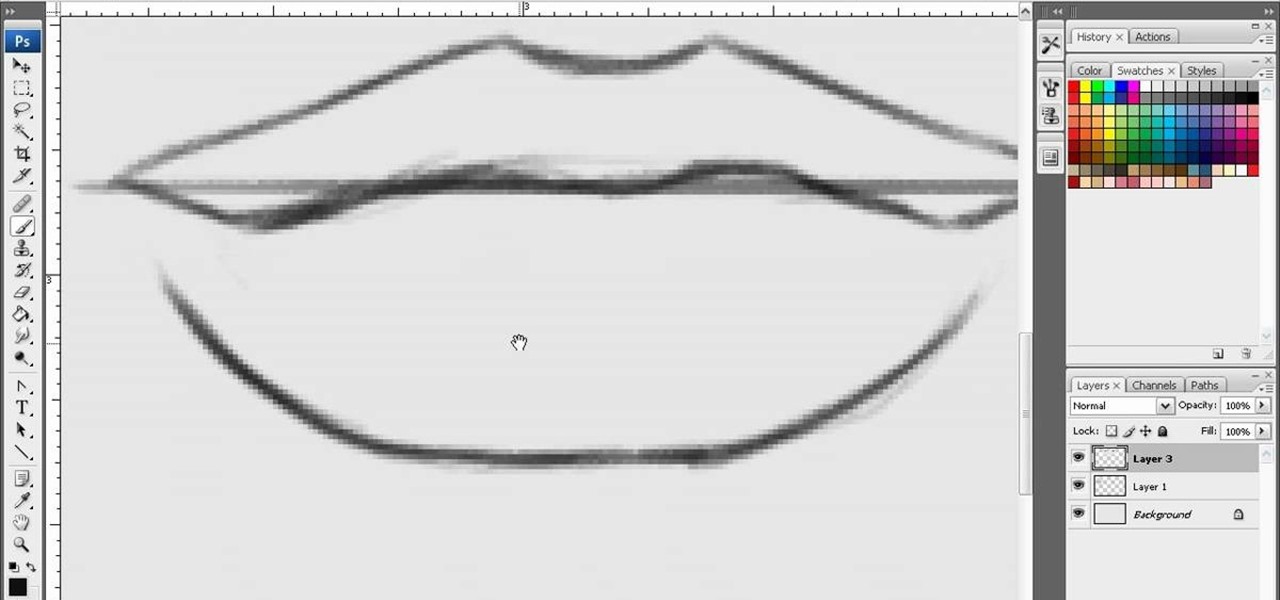
Do you feel that you could use more practice with drawing in Adobe Photoshop? This 2 part video tutorial will show you how to draw beautiful, gorgeous sexy lips in Photoshop. Step by step, ipaintgirls shows you the correct way to draw some appealing, attractive lips with the right tools in Photoshop.
Photoshop is one of the most powerful and widely used program out there on the market. Not only can people use it to make their own photos look better, but they are able to take other pictures and images and enhance them to whichever way they want. That can be seen as both bad and good. Somtimes, to do so it involved using the layers and moving a picture to a new image. In this tutorial, you'll find out how to move a layer to a new image using Photoshop. Enjoy! It's quick, easy, and will be a...
Photoshop is a useful software program that allows its users to make any photo look better or different using a couple of easy techniques. You can turn one of your favorite photos into a comic book, add some clouds in a cloud free sky, and even show you and your favorite celebrity sitting next to each other side by side. In this video you'll be taught the steps of making stencils using the tracing method and brush tool in Adobe Photoshop, version CS3. Enjoy!
An animated GIF is a great addition to any website. By animating your image, you will draw someone's eye to it almost immediately. This is especially useful if you are creating an advertisement or a logo.
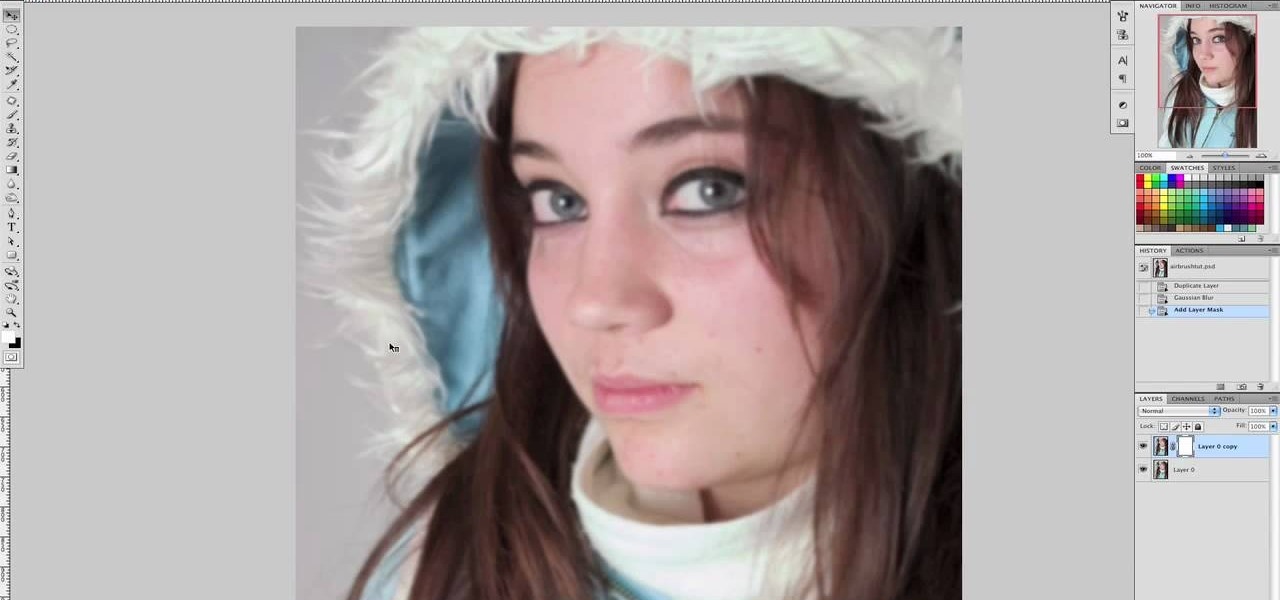
Since the introduction of photoshop, some have argued that the software has led to great strides in perfecting images while others say it gets in the way of natural beauty. Some say touch ups are nothing more than cheap ways to make someone look completely different from what they originally look like in real life. Many well known magazines, movie studios and other froms of media, use photoshop to make some quick touch ups. This video is one of those types and shows you how to airbrush photos...
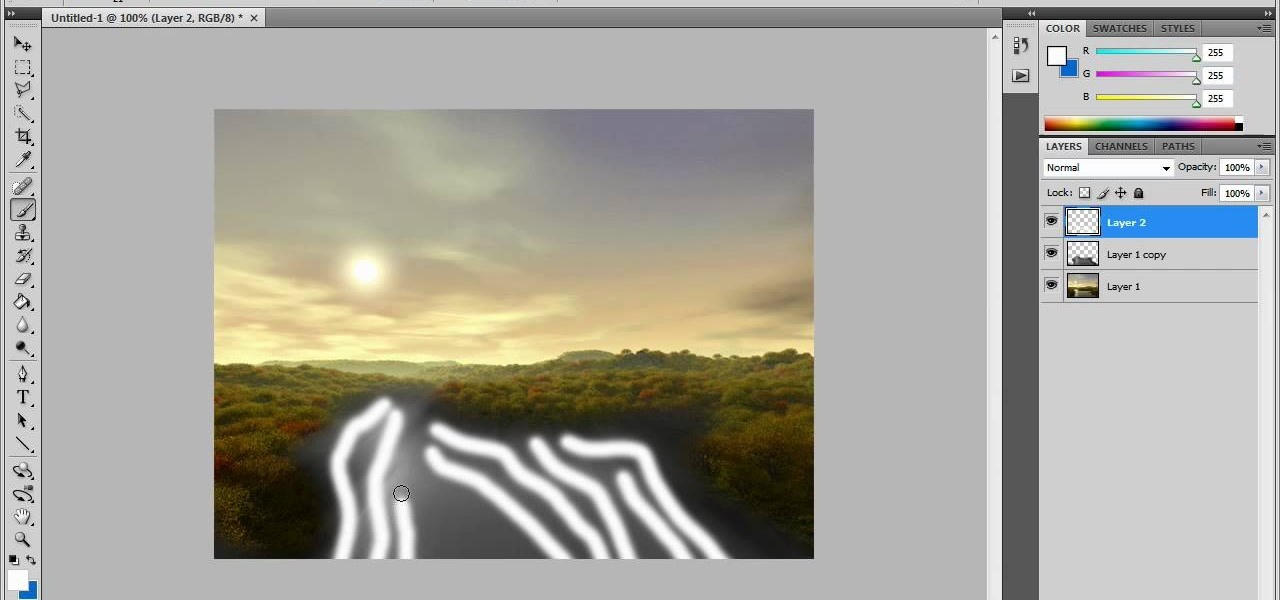
In this video tutorial, viewers learn how to create fog using Adobe Photoshop. Begin by importing the image into the program and duplicate the image. Now go to Filter, select Blur and select Radial Blur. Set the amount to 100, Blur Method to Zoom and Quality to Best. Now select the rectangular marking tool and select the sky. Then open the Hue/Saturation menu and set the Saturation to -100. Use the eraser tool to remove the gray from the edges. Now use the paint tool and paint white streaks o...
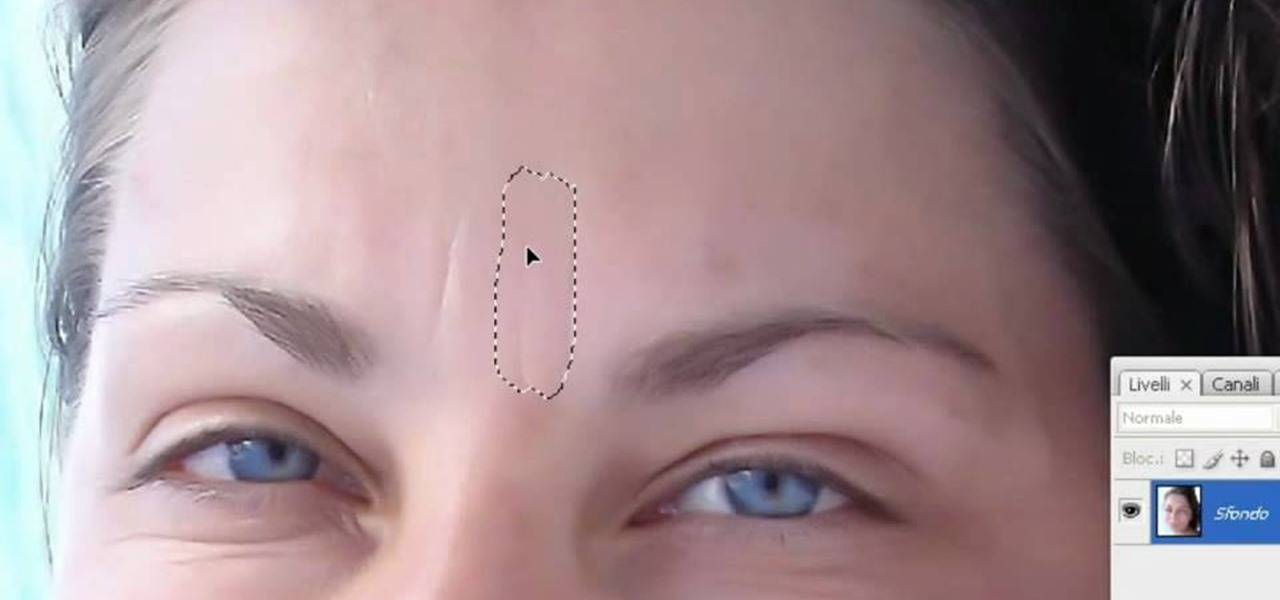
In this video tutorial, viewers learn how to eliminate facial imperfections using Adobe Photoshop. Begin by opening the image in the program. Then select the patch tool. Now draw a circle around the imperfection and then move it to an area of the skin that has no blemished. Continue doing this for all the imperfections. This process can be done to eliminate pimples, moles, blemishes, scars and wrinkles. This video will benefit those viewers who enjoy editing images to enhance them and would l...
In this video tutorial, viewers learn how to add a watermark to an image using Adobe Photoshop. Begin by importing the image into the program. Select the Horizontal Type Mask Tool under the Text tool. Then select the font color, type and size. Now type in the text and click out of it when finished. Then press the Control and J key to open the text into a layer. Click on the layer and select the style. Now finish by editing and customizing the text. This video will benefit those viewers who ha...
In this how to video, you will learn how to re-size an image for printing using Photoshop. First, open the image you want to re-size in the program. Next, go to image and select image size. From here, you will see the current size of the image. You can change the units of the sizing. The resolution is the number of dots printed per inch. De-select re-sample to change the resolution of the image only when printing. 300 is the standard resolution. When you re-size the image, make sure constrain...
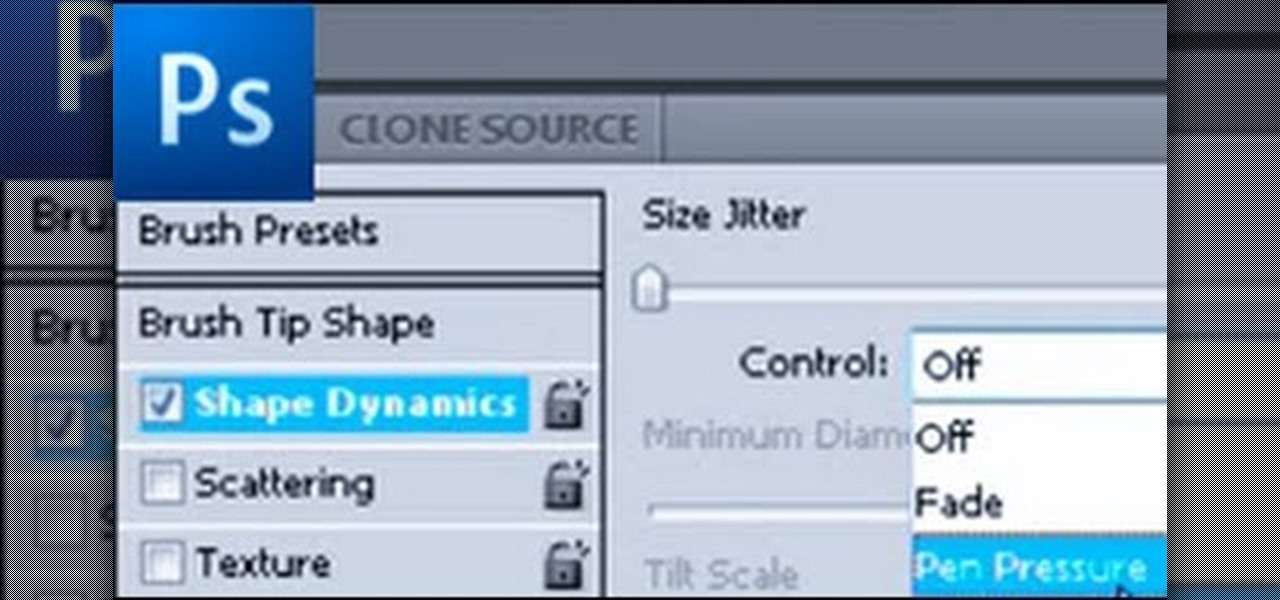
In this brief instructional video sponsored by River City Graphics, the host teaches you how to use the Whack-em Bamboo drawing tablet with Adobe Photoshop software. He begins by showing you how to change your pen's pressure, allowing you to get a thicker or thinner line depending on how how you push down on your pen. He also shows you how to change the color and make your pen give your project a beautiful color gradation, also depending on the pressure you apply to your pen. This video is ve...
In this video tutorial, viewers learn how to apply a digital tattoo using Adobe Photoshop. Begin by adding the image and tattoo image into the program. Then drag the tattoo image over the image. Now in the layer menu, change Normal to Modify. Now re-size the tattoo image to a preferred size (PC: Control and T, Mac: Command and T). Now right-click the tattoo image and select warp. Form the image so that it is perpendicular to the skin and decrease the Opacity. This video will benefit those vie...
In this video tutorial, viewers learn how to import and render footage in Adobe Final Cut Pro. To import files, begin by going to File, select Import and click on Files. Then browse for the file and click Open. Now drag the clips into the time line to edit. To render the footage, begin by selecting it. Then click on Sequence, select Render Selection and click on Both. This video also shows viewers how to cut a clip and add effects. This video will benefit those viewers who are just beginning ...
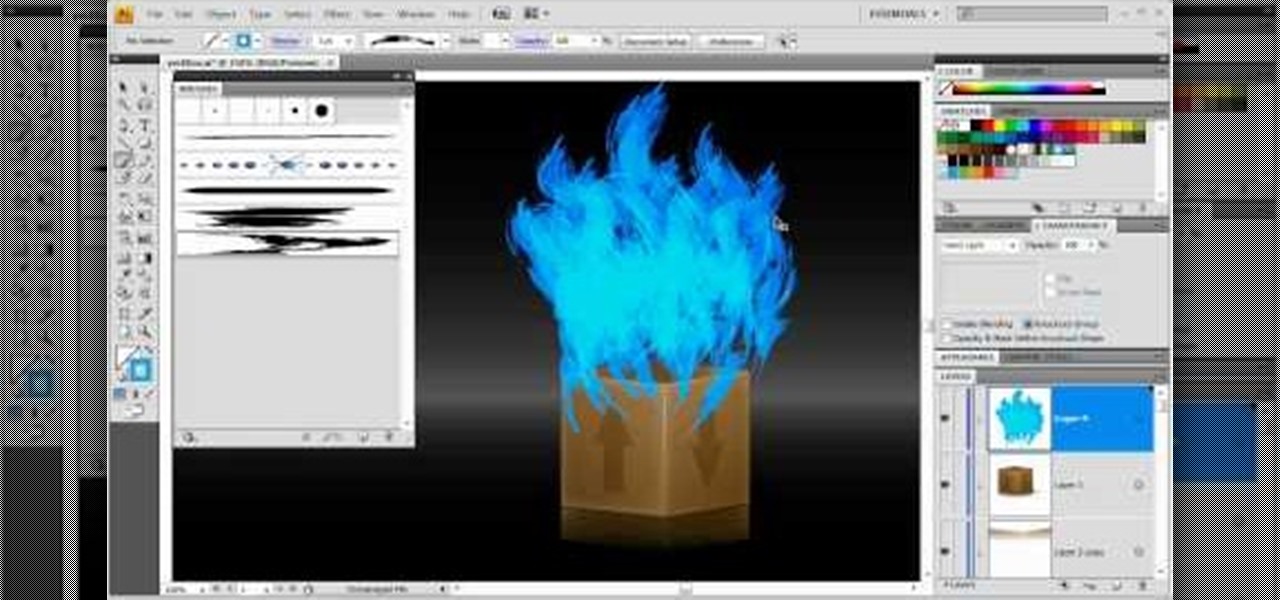
In this video tutorial, viewers learn how to make a real flame text in Adobe Photoshop. Begin by opening a flame image in the program and select the text tool. Type in the text and position it over the flame. Now go to Select and click on Load Selection. Once the selection is created, delete the letter. Then select the marquee tool. Right-click above the selection and select Feather. Now create a new sheet and fill it in black. Using the move tool, drag the selection to the new sheet. Go to F...
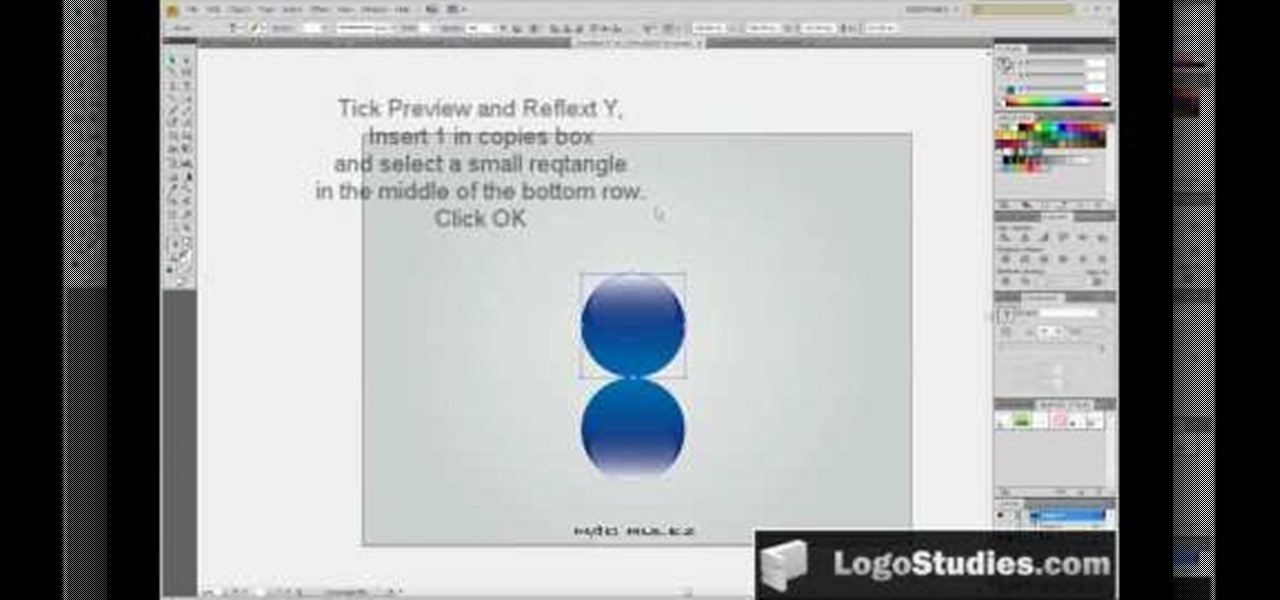
In this video tutorial, viewers learn how to create a 3D sphere and reflection in Adobe Illustrator. Begin by using the ellipse tool and create a circle. Select the black and white gradient, and drag the colors that you want into the gradient panel. Now hold the Alt key and draw a smaller circle inside. Fill it with white/transparent gradient. Select the sphere and go to Object/Group. Now go to Effect/Distort and Transform/Transform. Tick the Preview and Reflect Y, insert 1 copies box and sel...
In this video tutorial, viewers learn how to smooth skin with noise-ware plug-in using Adobe Photoshop. Users will need to first download the plug-in to be able to use it from the menu of the filters. Now modify the values of Noise Level Adjustment and Noise Suppression. Max the Luminance and set the other values to 50%. Click on the preview from above to see the difference. Then use the filter a second time to make a stronger effect. Any small wrinkles can be eliminated with the patch tool. ...
If your graphic requires a little fire, check out this tutorial and learn how to draw very cool looking flames in Illustrator.
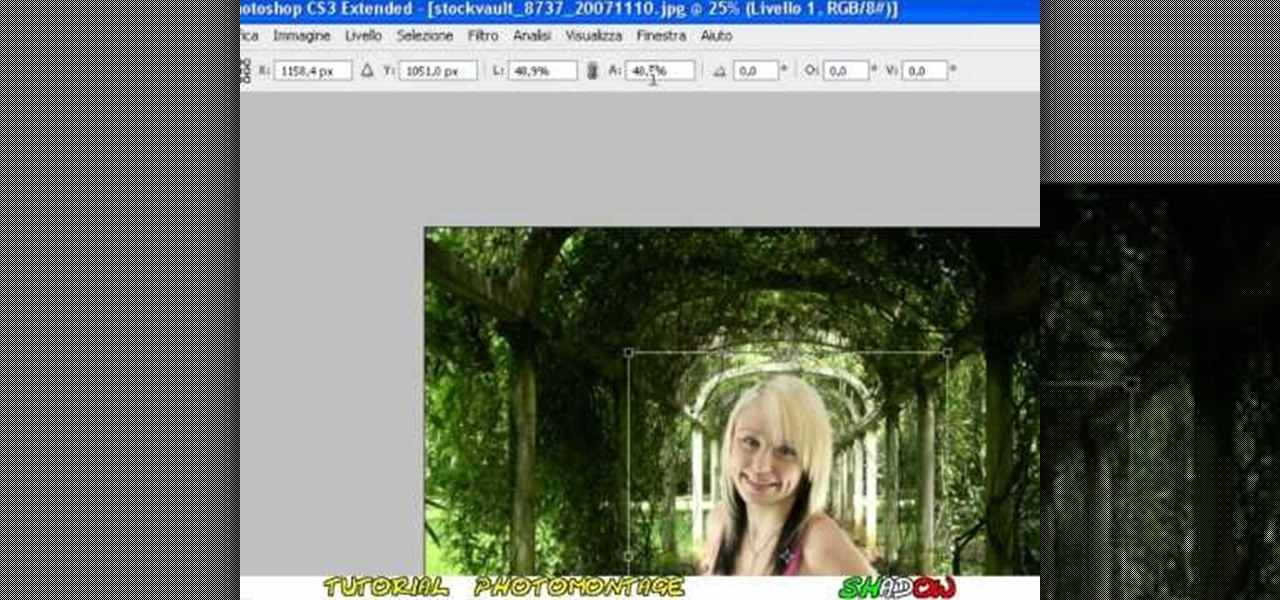
In this video tutorial, viewers learn how to create a photo-montage using Adobe Photoshop. Begin by inserting the images into the program. Then double-click on the montage image to unlock it and select the eraser tool to remove the background. Once the background is removed, select the move tool and move the montage image to the background. To modify the dimensions, go to Edit and select Free Transformation. Hold the Shift key to maintain the proportions. This video will benefit those viewers...
In this video tutorial, viewers learn how to import music from i-Tunes into a Adobe Final Cut Pro project. Begin by right-clicking the song and select Show in Finder. Then drag the song from the Finder into the Final Cut Pro program. Users will not be able to drag songs directly from i-Tunes to Final Cut Pro. If the song is not compatible with Final Cut Pro, right-click and select Show in Finder. Then right0click the song and select Open with Quick time player. Now click on File and select Ex...
In this video, we learn how to make objects transparent in Flash. First, open your object up and convert it to a symbol in Flash. It doesn't matter if it's a graphic or movie clip, just make sure it's a symbol. Next, click on the symbol you just created and go to "properties". Find the section called "color effect" then find the drop down menu. You will see several options, choose "Alpha". Once you do this, you will have the ability to tweak how transparent you want your object to be. Use the...
Here is a simple technique to resize multiple pictures in Photoshop by creating an action, to adjust the image size. The only requirement is for the pictures to more or less the same size. First we go to windows and select action then we open up an image to determine the appropriate size that we require. Then click on the create new action and, give it a name then hit record now go to image the image size resize the image and then save and hit ok .You can see that its still recording your act...
A compelling and quick moving tutorial on making the Windows Vista logo with Adobe Photoshop. The logo can be made quick without going too in depth into some of Photoshop's more advanced features. Starting with a circle a gradient shade is layered over the shape. Two circles are cut out and shaded white to give the circle a 3D feel. Then adding a drop shadow to the entire shape really gives it the logo's appearance. The windows themselves within the logo are cut to shape and copied and moved ...
In this video tutorial, viewers learn how to change the color of eyes using Adobe Photoshop. Begin by selecting the Magnetic Lasso tool and create a selection around the eye. To create a second selection without losing the first one, hold the Shift key. Now go to Image, click on Adjustments and select Hue/Saturation. Now adjust the hue and saturation of the eye to change the color. This video provides a visual demonstration for viewers to easily follow along. This video will benefit those vie...
This video describes how to use Adobe Photoshop CS4 software to create and manipulate text in animated .GIFs. GIF stands for Graphic Interchange Format, a type of image file which allows short animated sequences to be displayed. A preselected scene from a television show is opened as a GIF in Photoshop CS4. Animation window is opened by selecting window then animation. The text tool is selected and a textbox is drawn by clicking and dragging. Photoshop CS4 then applies the text to the frames ...
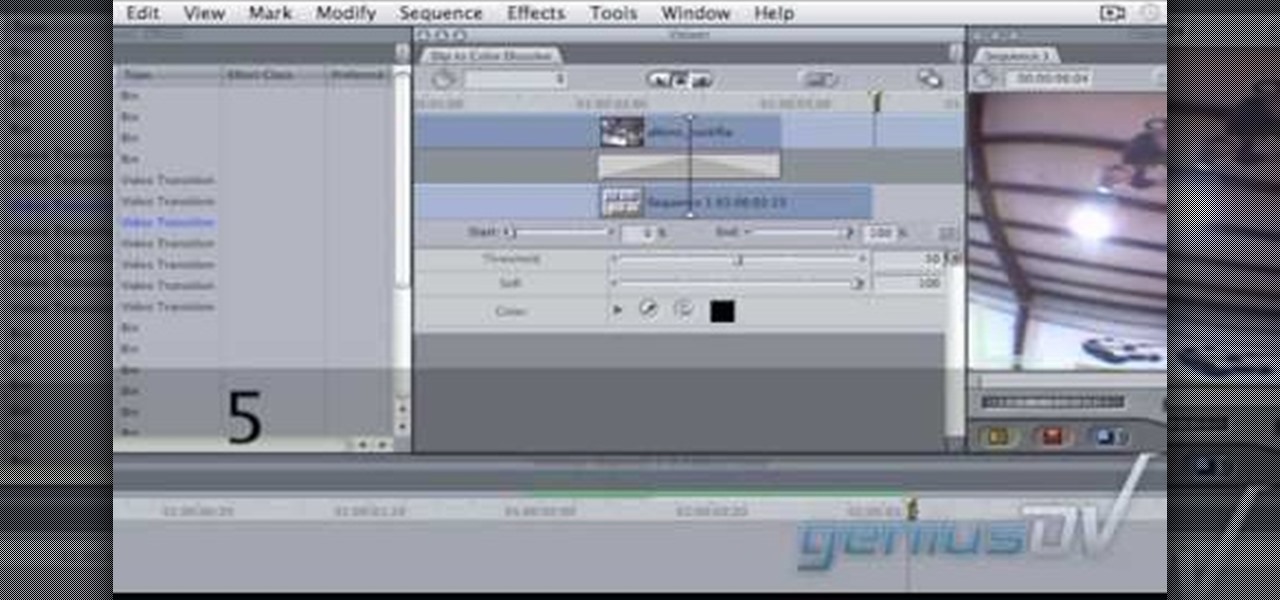
In this video tutorial, viewers learn how to create a freeze-frame effect in Adobe Final Cut Pro. Begin by placing the time line indicator to where you would like to place your freeze-frame. Press Shift and N to create the freeze-frame. The default user preference is 10 seconds. To change it, change the time and click on the insert button to splice the new freeze-frame time into the time line. Now click on the Effects tab and select the Dip to Color Dissolve under Video Transitions and Dissol...
In this video tutorial, viewers learn how to tan an image using Adobe Photoshop. Begin by opening the image in the program and create a new layer. Then select the brush tool and select the tan color. Click OK and apply the color over the areas that are wanted to be tan. Then apply another layer with the same color to darken the image. Finish by configuring the Opacity to a lighter color and blend it to the image, This video will benefit those viewers who enjoy editing images to enhance them a...
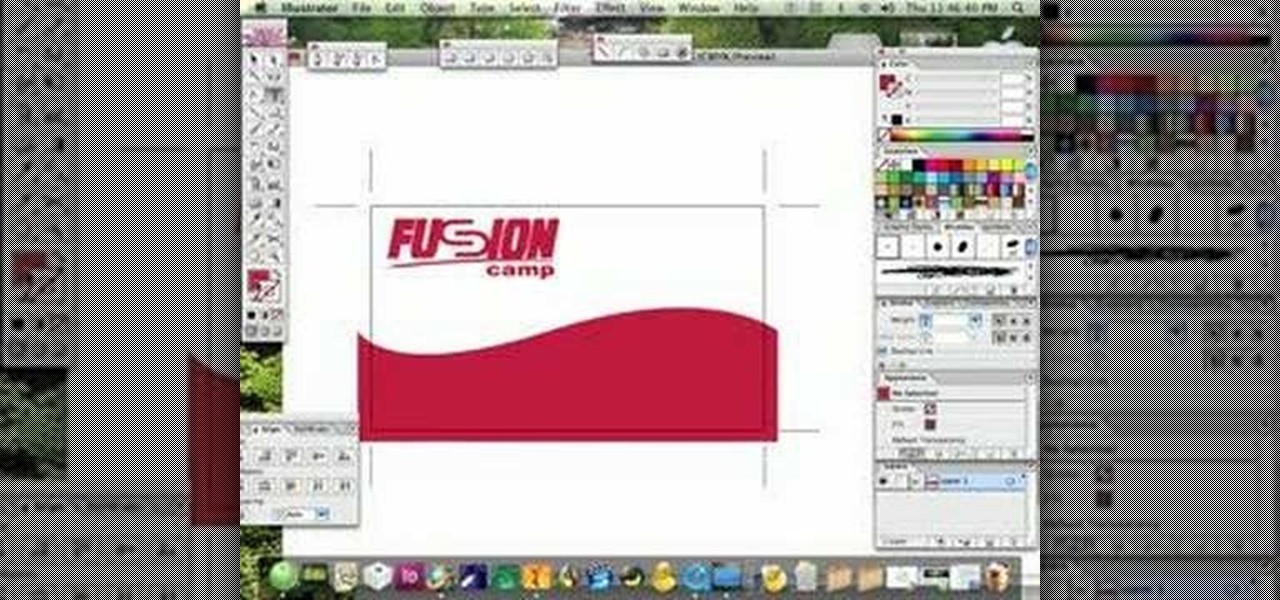
If you’re an entrepreneur or in need of a little more professional marketing then you will need a business card. This video will show you how to create your own business card using Adobe Illustrator. You will need to make sure you are keeping your work with in the standard card size. You can make your own logo or a name title. You will see tips and helpful advice for how to have the best results for your card. You will see an example card which is print ready. Once you get this process down i...
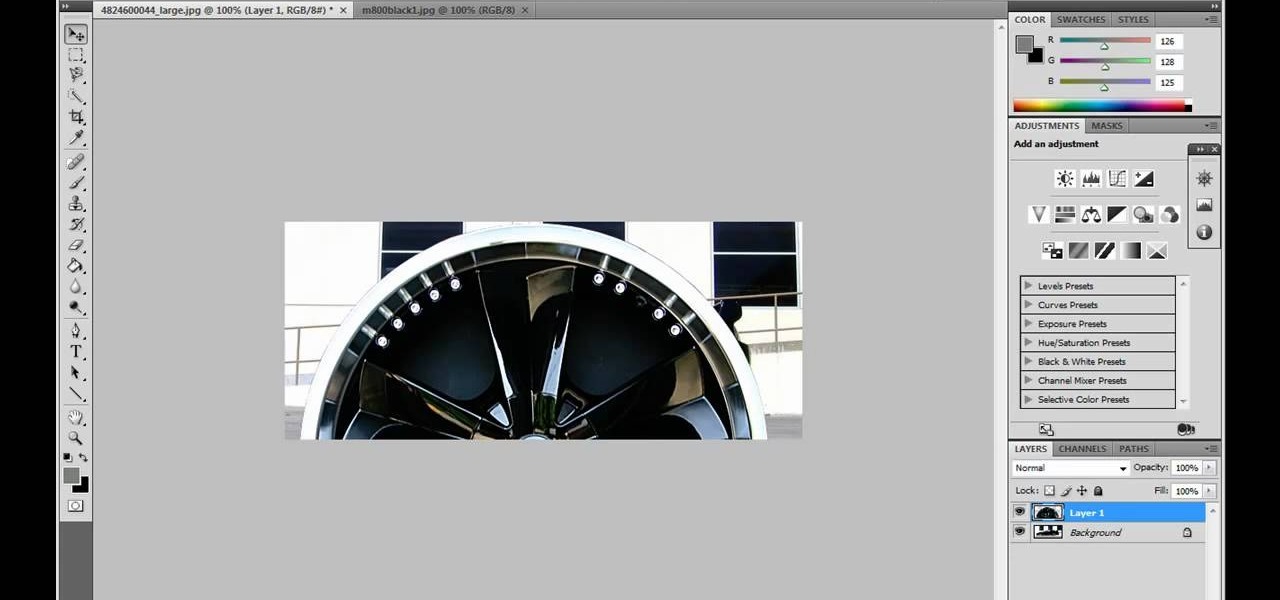
JdudeTutorials shows how to Photoshop the rims of a photo of a car, either for previewing different options for your vehicle or just for fun. Open the photo of the car (preferably shot from the side) in Adobe Photoshop. Open the desired rim photo. On the rim, use the lasso or magnetic lasso tool to select the rim from the background. Then copy the selected area and paste it into the car photo. Select the layer with the rim, select "free transform" and resize the image to fit the car's rim siz...
This video demonstrates the installation of the “Bleeding Cowboys” font. In the description of this video click on the link for ‘The font’ and download it. Go to the downloaded folder and extract the downloaded file. A new icon appears. Go to the start menu, select My computer and select drive C:, open folder Windows, open folder fonts. Copy and paste the extracted font file into this folder. A dialogue box appears for the installation. Click on install and you are ready to use this font. Clo...
This Software video tutorial shows how to create a glass text effect in Photoshop CS3/CS4. Download a free trial version of Photoshop CS4 from Adobe. Open Photoshop, go to ‘file’ and click ‘open’. In the next box, give it a name, select width and height at 90 pixels, background contents to ‘transparent’ and click OK. Select the color palette and choose the background color and click OK. Now open ‘paint bucket tool’ and fill in the color. Then go to ‘text tool’, select the font, size and posit...
This tutorial will focus on how to use the fit image function within Adobe Photoshop. You will utilize this function when you want the pixel width to match between different sized photos in portrait and landscape. First you will select all the photos (you must create a batch action in Photoshop). Next select the fit image option in the file menu under automate. You will need to put the same number into length and width to constrain the proportions of your landscape and portrait photos have th...