Turn heads where ever you go with this gorgeous bombshell makeup look. This look uses the following products MAC Studio Fix Fluid, BE Foundation, Nars Laguna Bronzer, Pleasantry blush, MAC Cream Base in “pearl”, MAC Painterly Paintpot, MAC Black Tied eyeshadow, MAC Wedge eyeshadow, MAC White Frost eyeshadow, MAC Blacktrack Fluidline, Urban Decay 24/7 Eyeliner in “zero”, Clinique High Definition Mascara, NYC Falsies, NYX lipstick in “Heiress”, any frosty pink lipgloss. With the tips from this ...
Watch this instructional photography video that introduces a very important principle (the law of reflection) when applied to photographing shiny objects in the studio.
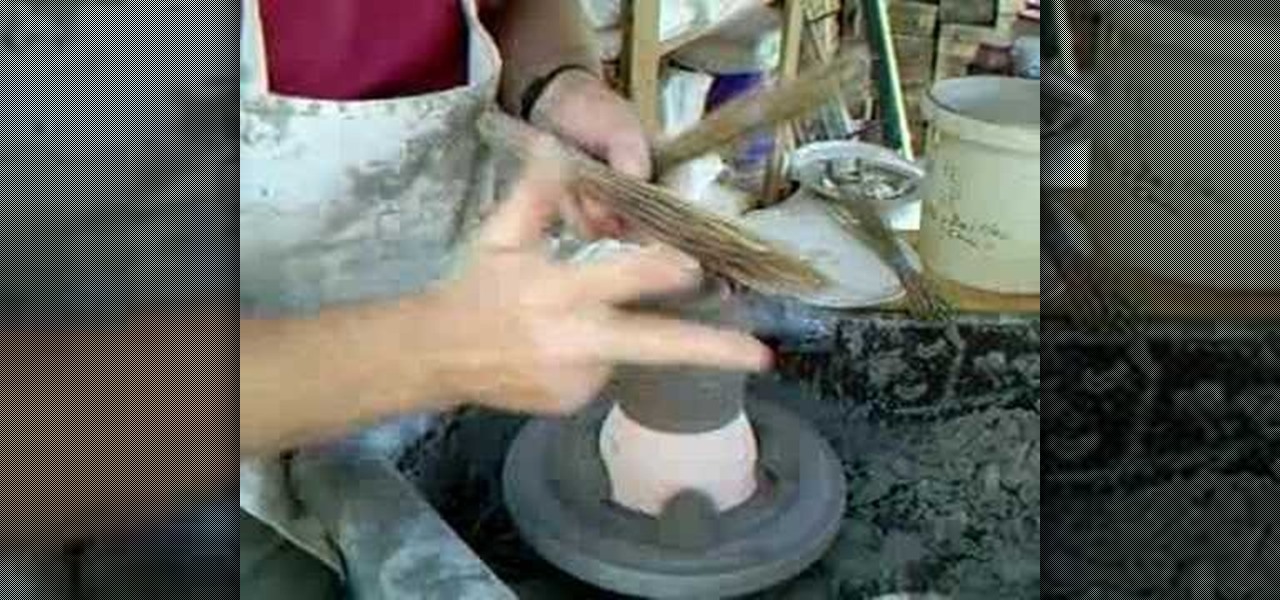
Watch this instructional video with ceramics expert Simon Leach to learn how to trim and glaze Hakeme tea bowls. Leach uses a groggy, toothy clay which contains high iron content. He then adds a white clay slip with Hakeme grass brushes, which provides a thin layer of natural white clay texture, using a scratching technique. The white slip should be applied when the clay is still quite soft. The striking effect of Hakeme ceramics becomes more apparent as the clay dries.

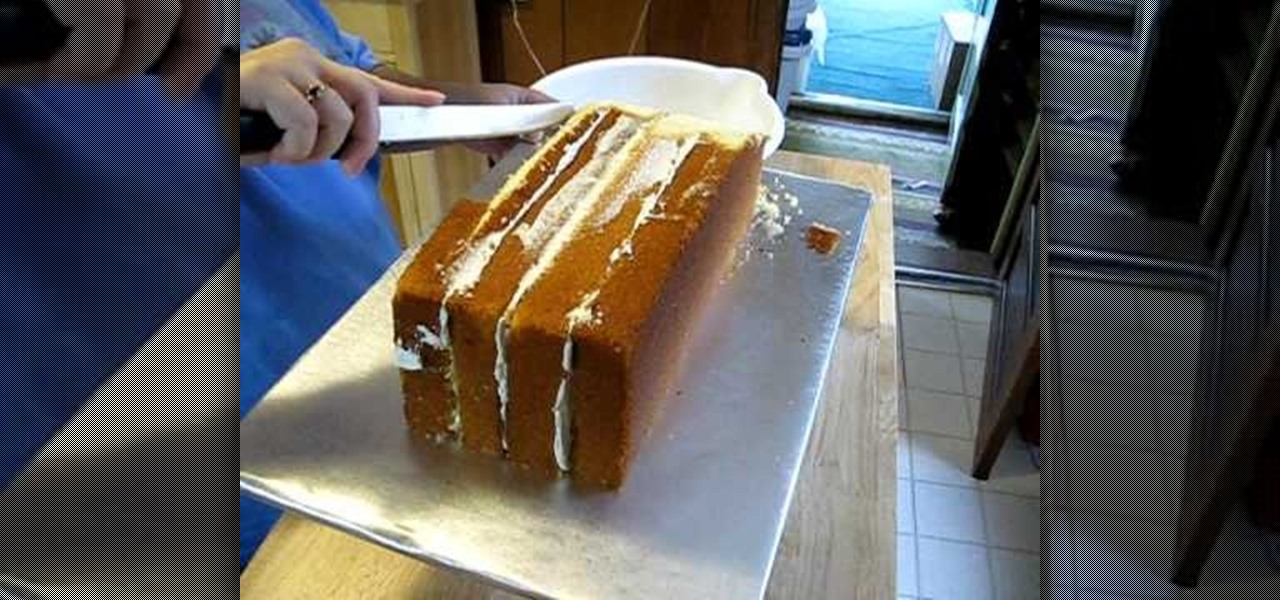
In this video cake decorating tutorial, the instructors take you through the steps of learning how to cover a cake with rolled fondant. To follow these directions, you will need a cake made with whole eggs (as that affects the consistency), buttercream icing, piping gel, a one inch brush, rolled fondant, two fondant smoothers, a rolling pin, powdered sugar, cooking spray, and a mini-pizza cutter. Fondant adds a beautiful and impressive finish to a cake, and is not as difficult to apply as one...

Fingernail ridges are usually a sign of bad health. Horizontal ridges in your nails are caused by trauma to the cuticle as well as by medications or sickness. Meanwhile, verticle ridges are hereditary but can be caused by trauma.
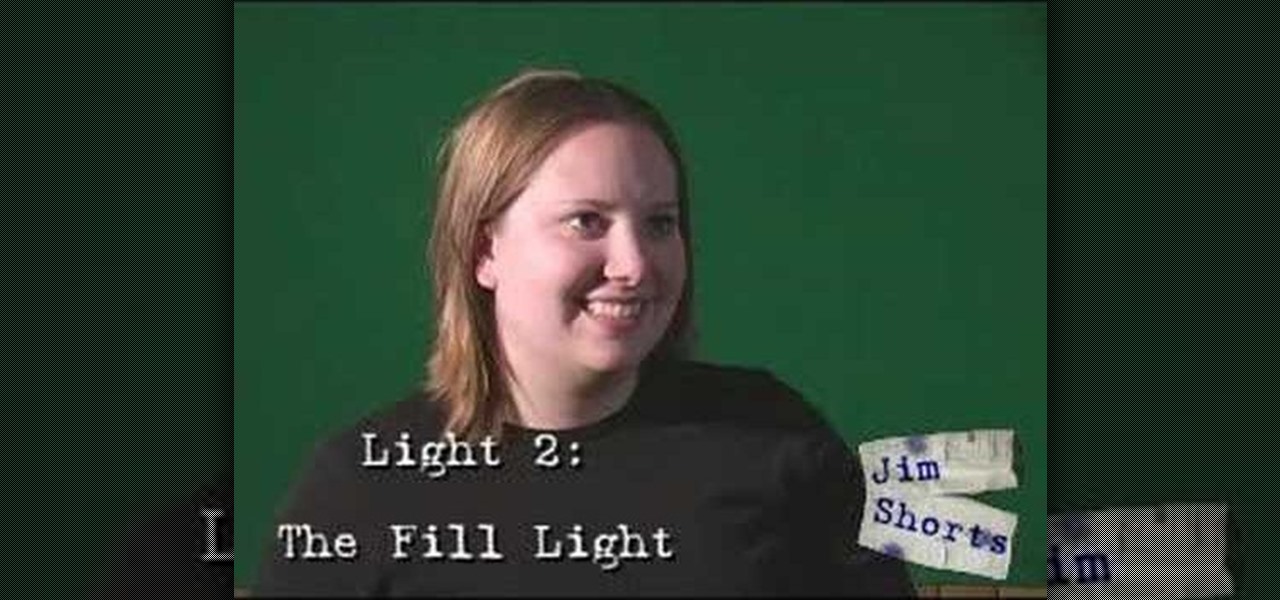
Three point lighting is the standard used to illuminate a subject for amateur film, video, and even theater application.

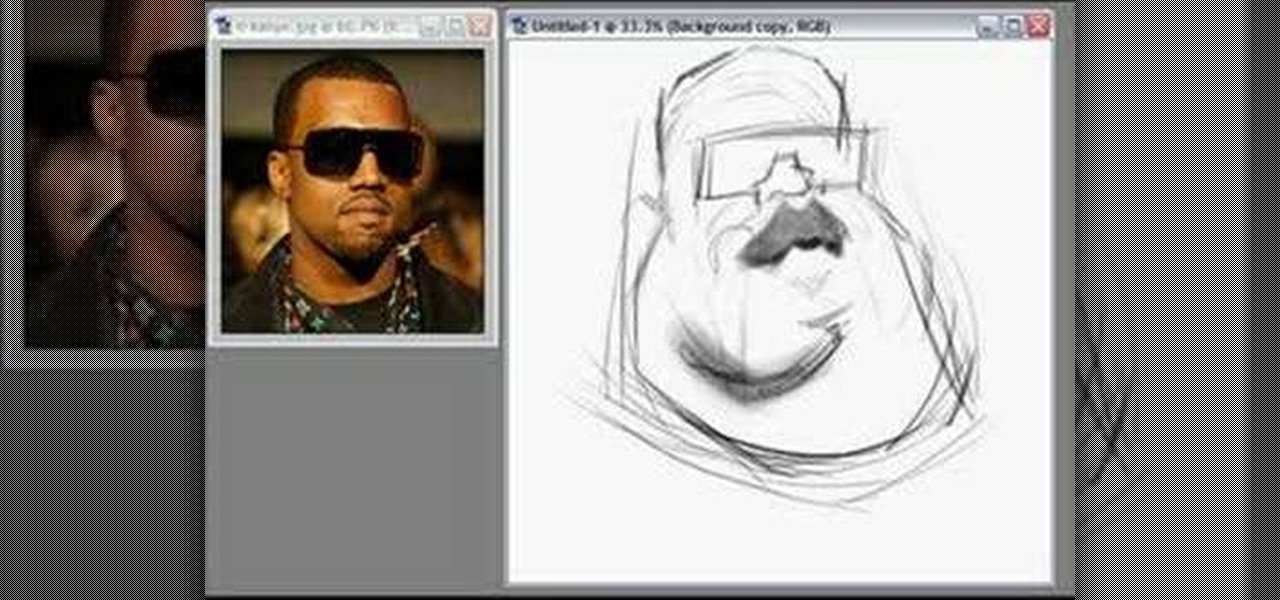
Joe Bluhm shows you how to draw a caricatures of Kanye West in Illustrator. The principles he covers are not related to illustrator but can be applied to other drawing softwares or traditional drawing and painting methods.
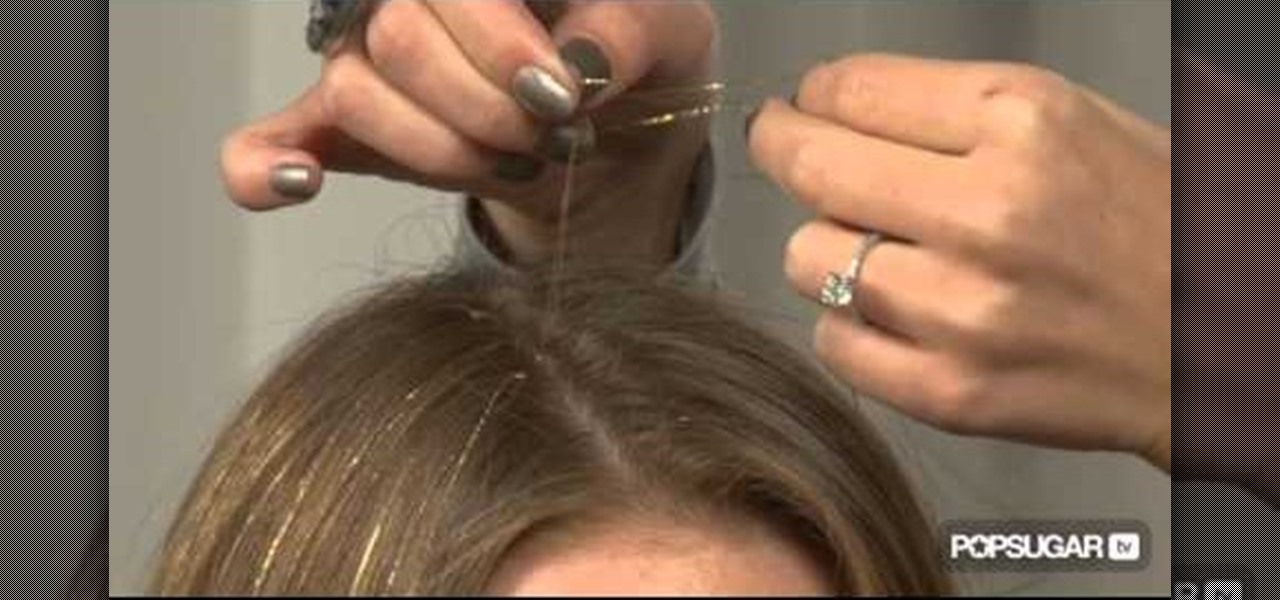
Since the famously bootylicious Beyonce wore blingy, opalescent tinsel in her hair for the 2010 Grammy Awards, tinsel hair has become a cheeky sweet trend in Hollywood fashion.
Want to take control of your web site elements? This tutorial helps you tone down their transparancy or turn it up! Use your CSS opacity ability to get the look you want. Set your text apart from background elements by separately adjusting thier opacity.
It doesn't take much to make "House" hottie Oliva Wilde look gorgeous. But she really does turn things up a notch in her new movie "Tron," in which she plays fierce warrior Quorra. While Wilde may be genetically blessed, we can steal her beautiful night out smoky eyes from the movie.
The holidays are all about turning up the glitz and glamour. And one of the most visible ways of doing so is by creating awesome hair. If you want to seriously wow the crowd at your next Christmas soiree, check out this video to learn how to create two holiday hair looks that are curly and very cute.
With Disney's futuristic video game movie "Tron" arriving in theaters this December, the call for an edgy, avant garde makeup look is now stronger than ever. Take inspiration from Olivia Wilde's warrior woman look and create your own graphic eye.
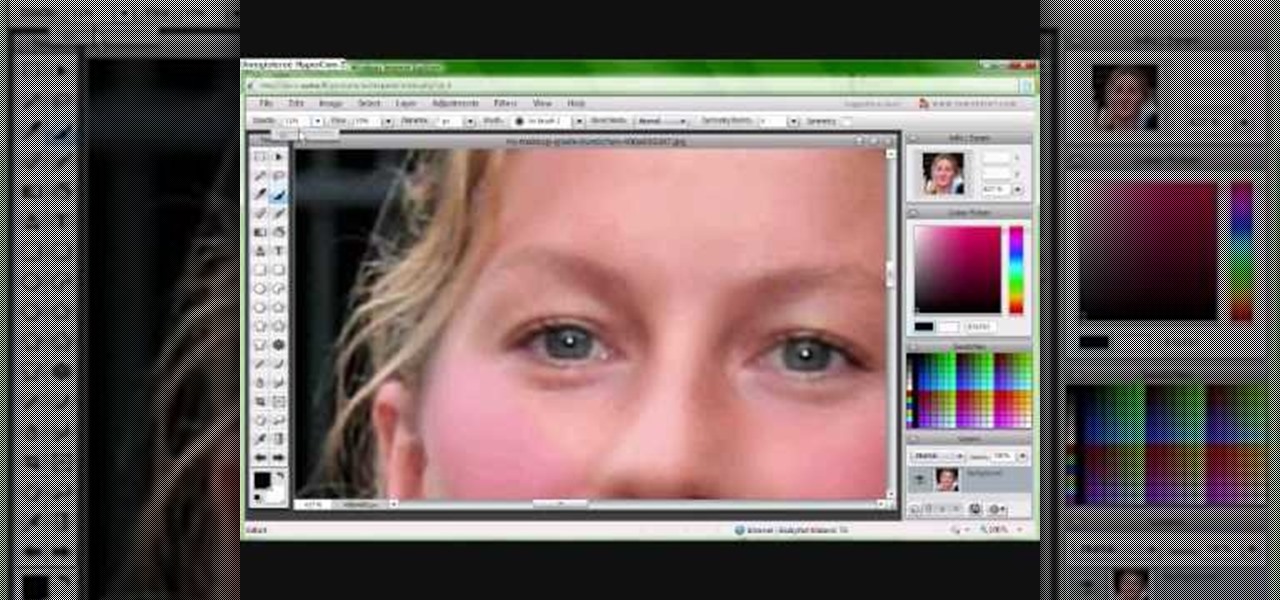
In this tutorial, we learn how to put makeup on photos with Sumo Paint. First, load your photo to this website and then open up the editing options. You will see a display of different colors on the right hand side that you can use to color the photo. On the left hand side are the tools you can use to do different effects to the pictures. Use the smaller drawing tools to apply makeup to the eyes on the photo and make different things appear. When you have finished the photo and adding on diff...
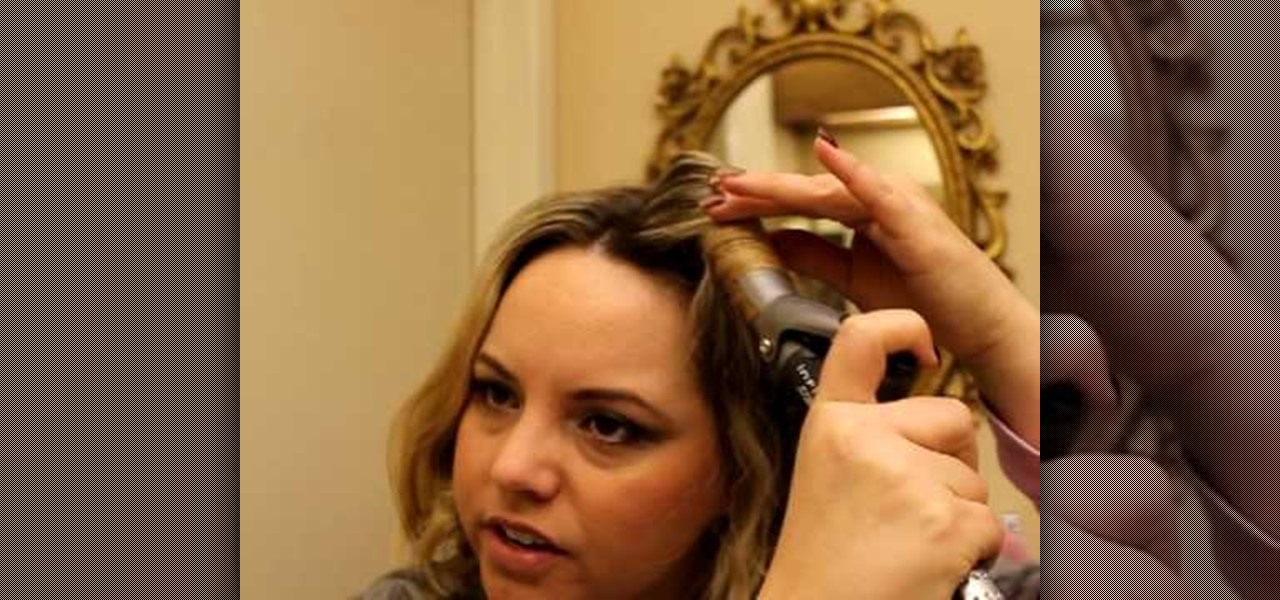
In this video from Bellabern she curls her hair with a curling iron. Section off a piece a piece of hair and use a comb to separate it. Then take the curling iron, put the hair through it and roll all the way up to the scalp while keeping the curling iron moving constantly. Something else you can use is thermal heat spray which will hold the curl. You keep applying this same technique for as many curls as you want on your head. With the bottom pieces of your hair you can curl them a little ou...
In this tutorial, we learn how to make sure your game is really dead. One of the best things is to stay away from the feet, then touch the eyes with the end of your rifle. If there is no reaction at all, then the animal is dead for sure. After this, you will need to attach a validated elk tag to the animal, making sure it's secured. Glue it to the ear using your hands and pressing it down for several seconds. In different states, there are rules and regulations as to where you have to apply t...
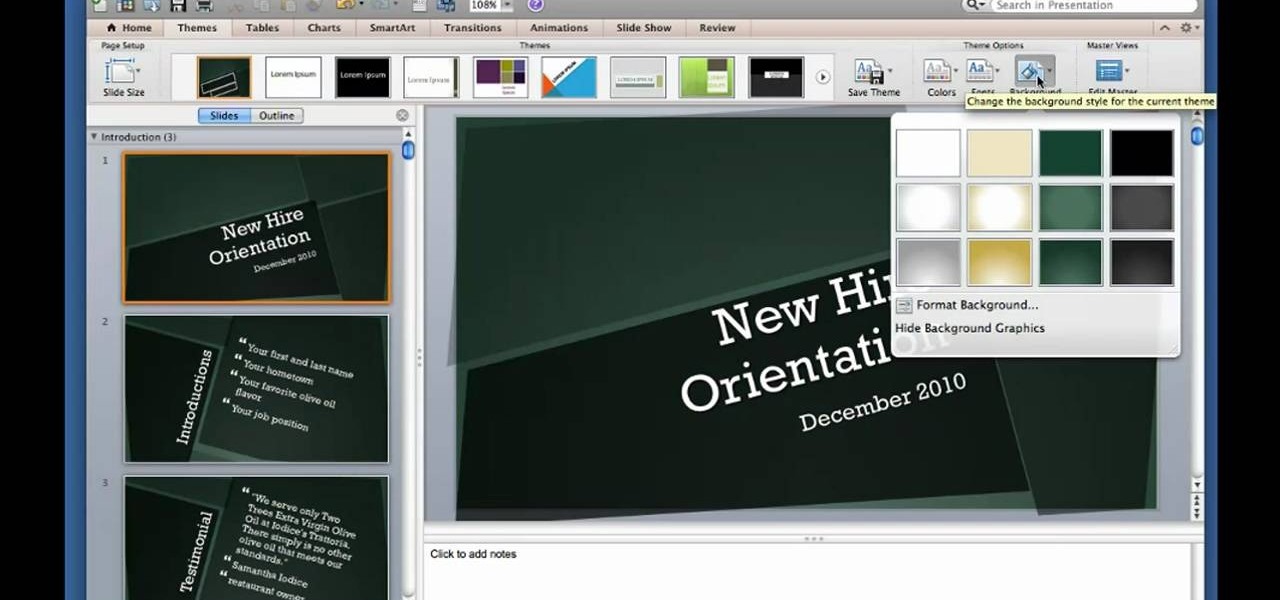
Interested in giving your PowerPoint presentation a personalized look and feel? Try applying a custom theme. This video will show you how it's done. Whether you're new to Microsoft's popular word digital slideshow application, new to MS PowerPoint 2011 or even an expert merely looking to brush up on the fundamentals, you're sure to be well served by this quality video tutorial from the folks at Lynda. For detailed, step-by-step instructions, watch the video.
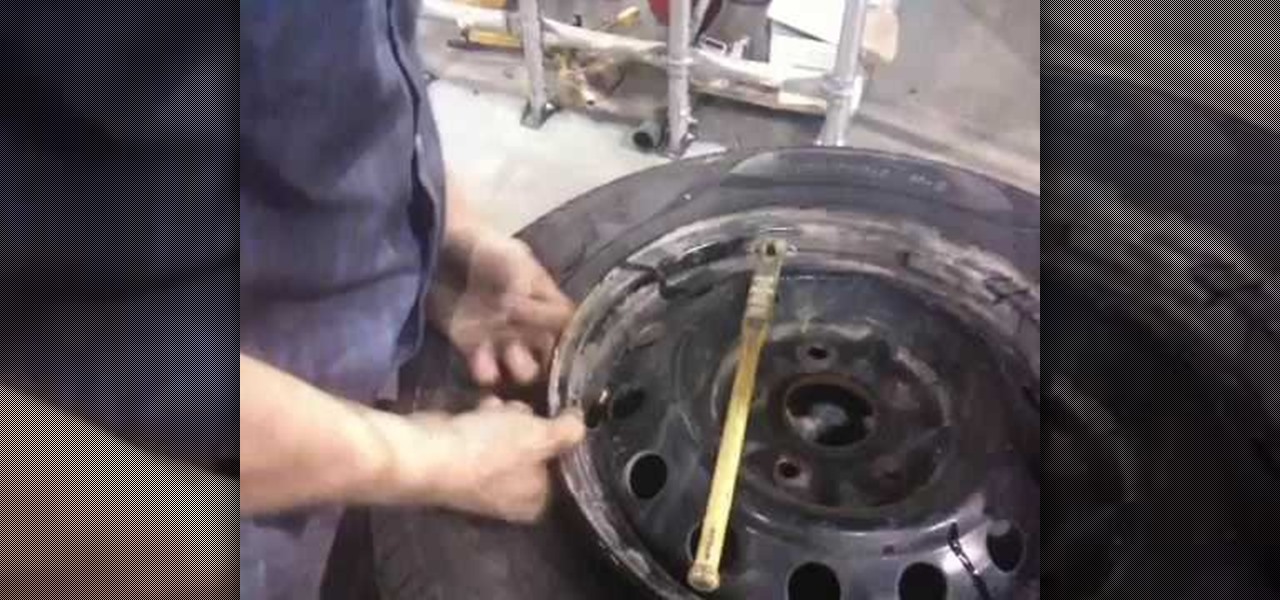
In this tutorial we learn how to change and balance a car tire. First, take the tire and remove the air out of it from all the sides. After this, remove the tire from the wheel. You will need to use a pry bar to help you remove it from the tire completely. It will help out a lot if you have a machine that will do this for you. Then, apply grease around the wheel and put the new tire on. From here, inflate the new tire while on the wheel and it will be ready to install on your vehicle.
In this tutorial we learn how to use an Enzo Milano to get wavy hair. To start, section your hair off so you just have the bottom part of it. Then, you will stick the iron on the root of your hair and wrap your hair around it with your fingers. Then, let this sit on the iron for a few seconds before releasing it. Continue to do this until you finish curling all the sections on the hair. Take off the top section from the clip and then do that layer of hair. When finished, apply hair spray and ...
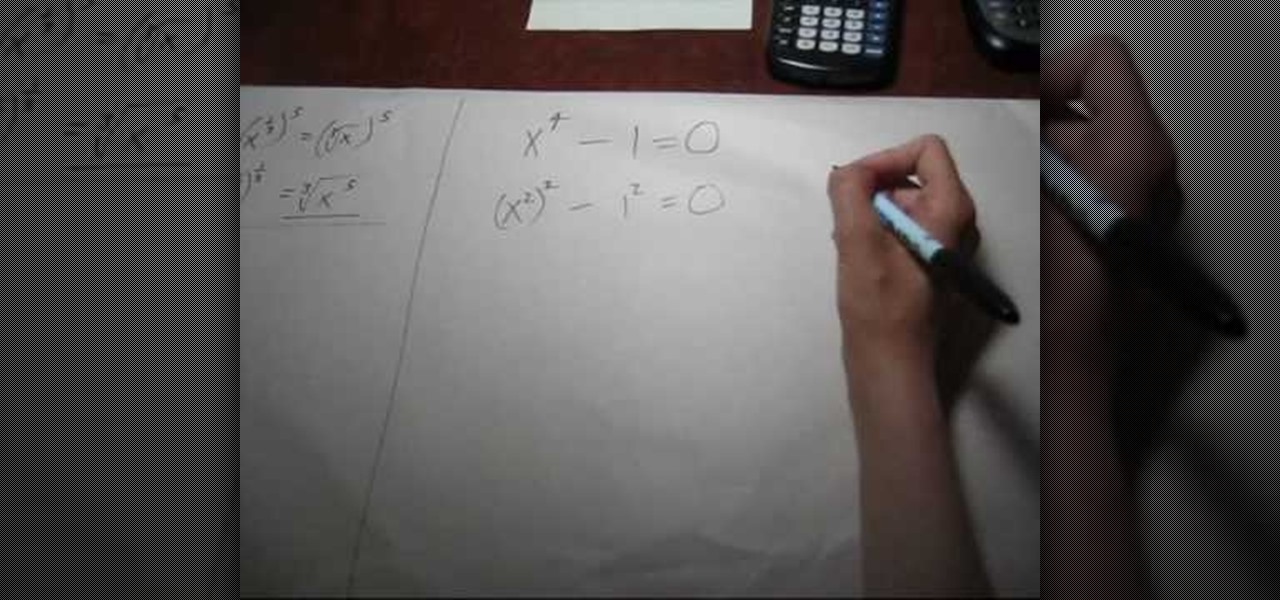
Solving equations involving fractional powers of a variable are not that hard to solve as they sound. In fact, just watch this video to learn a few tips and solving these type of equations will become a little bit easier.
In this tutorial, we learn how to make a Spartan 300 shield. You will need: paper mache, durable cloth, gold spray paint, newspapers, cardboard, nuts and bolts, and the cap to a trash can. After you have these, cut out a large piece of cardboard and place it over the trash can cap in a circle shape. Then, dip newspaper strips into the paper mache mixture and apply it to your shield, taking your time to make it smooth. Let this dry, then cut two strips of cardboard and place it in a 'v' shape ...
In this tutorial, we learn how to tease your hair easily. First, brush your hair back and then grab the hair in the back of the crown of your head. Hair spray all of the hair and then comb it back against the growth, towards the root. After this you need to check to make sure it's enough volume. Your hair will stick up, but that's what you want it to do! After this, grab the hair behind this and do the same process. Continue to do this until you have achieved the look you want. To finish, sim...
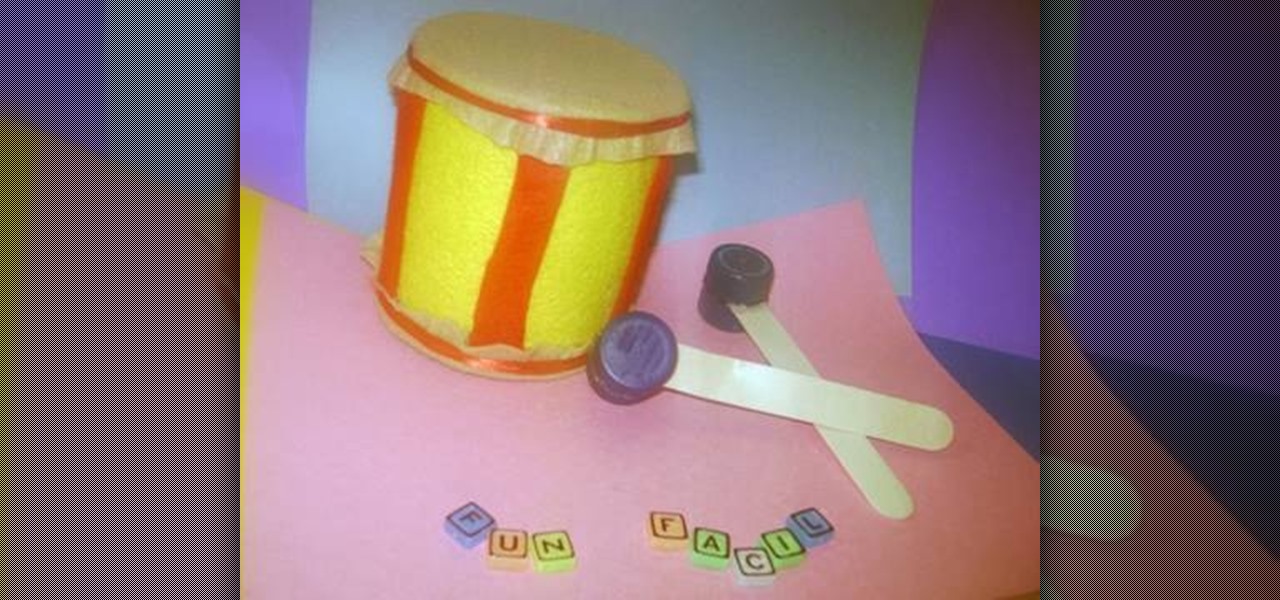
In this tutorial, we learn how to make a toy drum. You will need: felt, recycled tin can, 1 red lace, 4 soda caps, 2 popsicle sticks, glue, and scissors. Cit, cut the felt into a circle and glue it around the tin can. After this, take red felt and cut it into strips, then glue on the side of the tin can so it's striped. When finished, apply glue to the top of the can and then cover with additional pieces of felt. Tie a ribbon around the top and the bottom of the felt on the fan. To make the s...
In this video, we learn how to pierce your lip at home the professional way. First, sit the subject down and put a cloth around their upper body. Then, grab a clamp and place it where you are going to pierce the hole. After this, push the needle through the spaces in the clamp and follow this by sticking in the jewelry. Apply cleaning products into the mouth that are for cleaning the wound specifically. When finished, make sure to take proper care of the piercing and the jewelry as well so it...
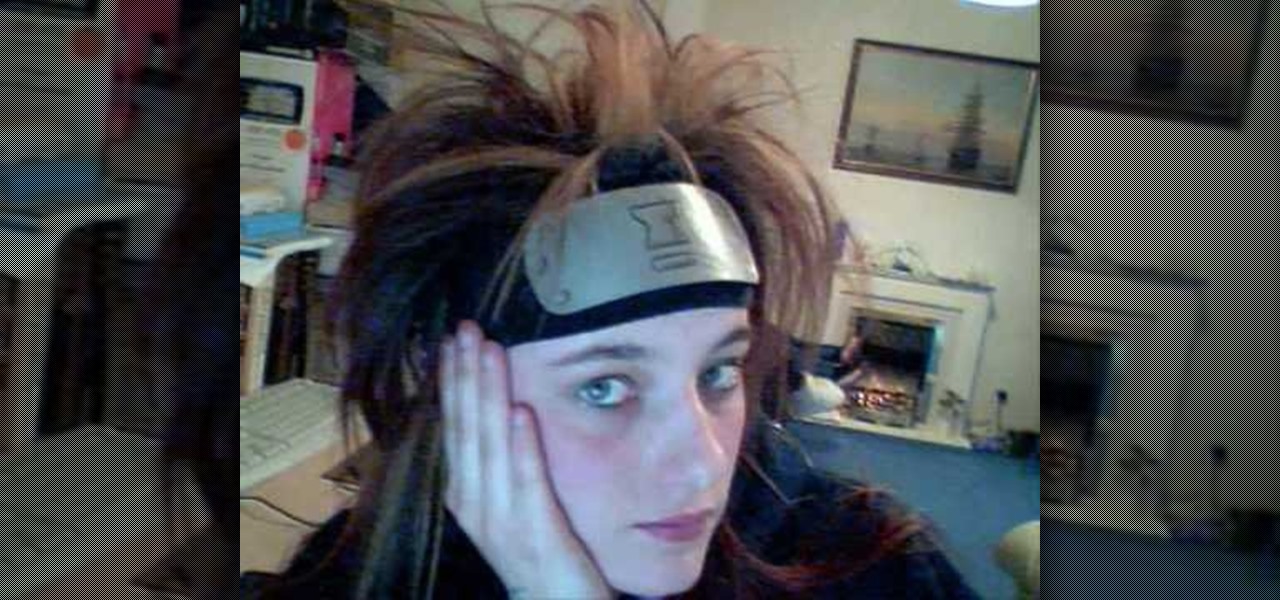
In this video, we learn how to make a decent Naruto headband. First, get a paper plate and figure out how big you want it, draw on the template so you can see it through the paint. Then, apply metallic paint with a paint brush using the template you drew as a guide. Next, you will wait for it to dry and then cut it out. Round the edges like it's a real headband, then draw on the hair band the village insignia. Once finished, glue this to an old sock and wait for it to dry. Then, you can attac...
In this tutorial, we learn how to make & decorate a vintage retro rose romance cake. Start out by rolling out fondant that has been mixed with yellow coloring. Once this is rolled out, you will lay it over the cakes and then cut off the excess fondant from the bottom. Do this on all the layers of the cake until it's fully covered and completely smooth. Then, you will use the same fondant to roll into small flowers that you will apply around the outside of the cakes. Use icing to help the rose...
In this video, we learn how to make a VW beetle cake with buttercream. First, you will need to apply the buttercream icing onto the top of your cake and the sides. After this, you will pile on the other cakes to this with more icing inside of each layer. Then, you will start to cut the cake and it into the shape of the car that you want to make. Use an outline so you can follow it while you are making it so you know exactly how it is formed. Next, you will add in the parts for the wheels, the...
In this tutorial, we learn how to easily install a toilet. When you pull it out of place, there will be black residue on the toilet, scrape this off with a knife. From here, you will need a wax ring and plumber's putty to apply to the toilet. Once this is on the bottom of the toilet, it will help it stay in place and save you a lot of anguish. Now, take the plumber's putty and put it around the edge of the toilet. Now, when you install the toilet it will be sealed to the floor and stay in pla...
In this tutorial, we learn how to make a slit flower frame card. First, gather all your cardstock together in the colors that you would like. Then, take the first one and cut a circle window in it using a blade and a template. Then, punch slits on the outer frame of the window. From here, shade the petals and pull them out from the card to stick out. Then, place a rubber stamp with hearts on the other place of card stock. Then, turn the flower frame over and apply foam tape to the back. From ...
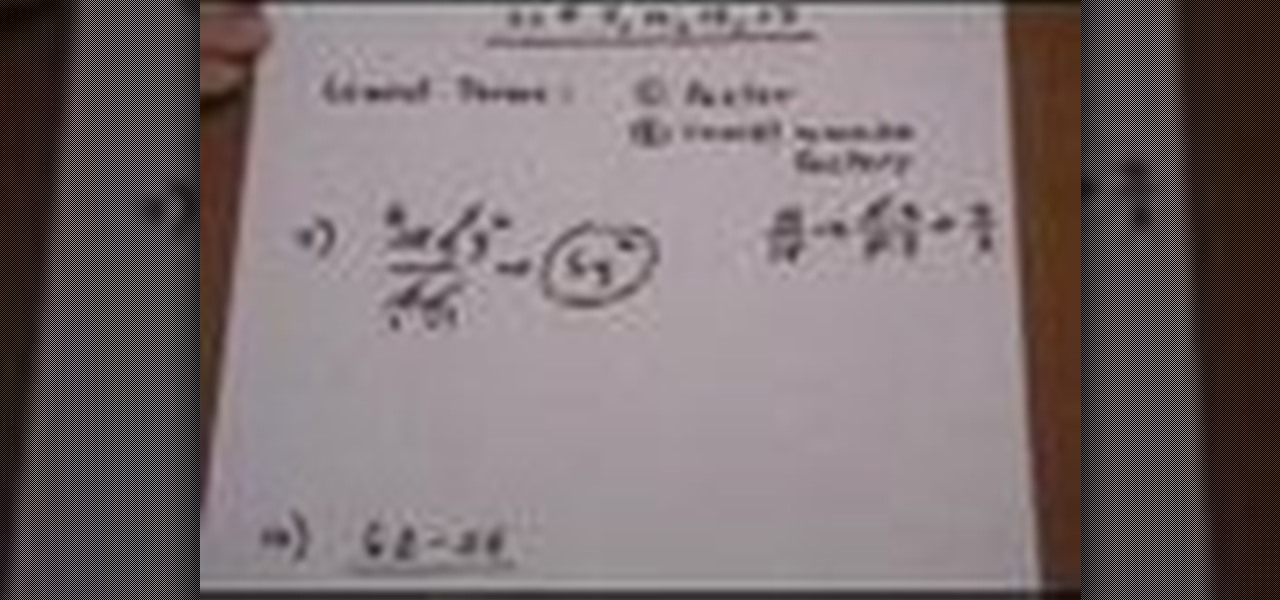
Putting a rational expression in its lowest terms (also called "reduction") is a bit tricky, but it becomes very easy once you know a few tricks.
In this tutorial, we learn how to style short hair for an edgy look. You will need to apply a heat protector on your hair first and then blow dry it. Blow dry it against the grain so you get greater volume and it sticks up more on the back of your head. For the front, blow dry your bangs to one side and then use a straightener to pull them to a side. If you want an even more edgy look, you can make a fauxhawk with your hair, which would involve putting gel in the bangs so it holds up in the a...
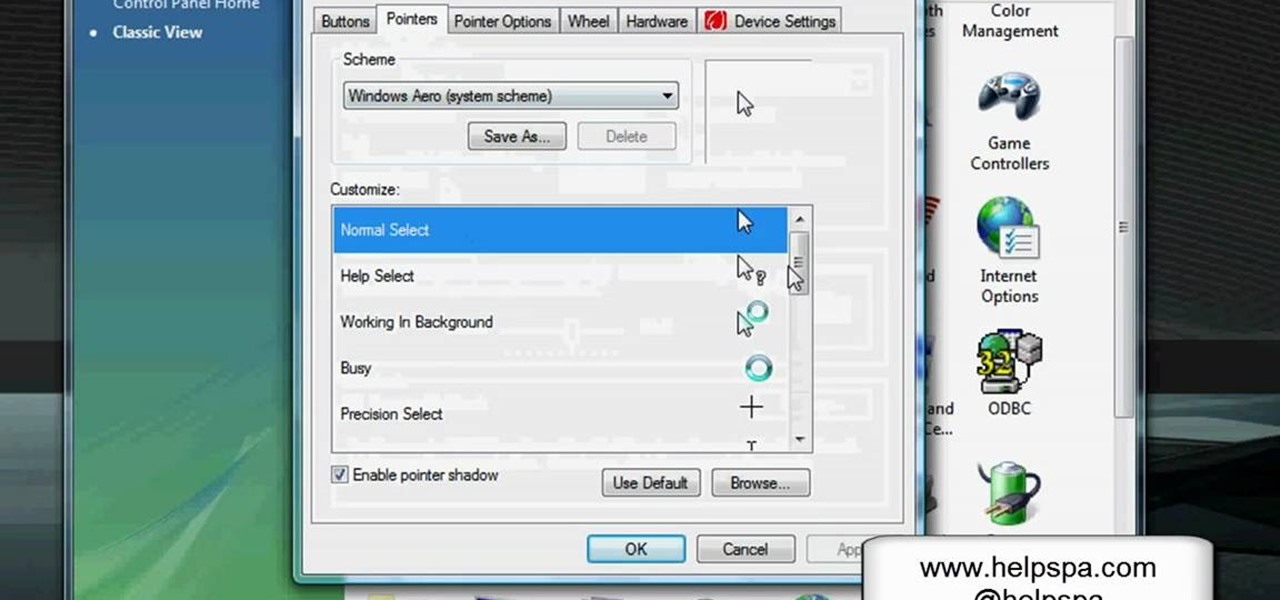
In this video, we learn how to change the mouse sensitivity on Vista. First, you will go to the start menu, then the control menu. From here, scroll down to where it says 'mouse' and double click on that. After this, you will see a section for the double click speed. Change that if you would like. Then, click on the tabs on the top of the window to change the pointers, pointer options, wheel, and hardware. Once you have changed all the options that you want, you will be able to apply them and...
In this video, we learn how to remove ink stains from your American Girl doll. If you get ink marks on your doll it's pretty easy to get off with just some Oxy spot treatment clear. The main ingredient in it is Benzyl Peroxide, which is an acne medicine. After you have this, you will put a little bit of it onto the stain on the doll. Apply this using a Q-Tip and not your finger, to avoid oils. Press this all over the spots on your doll, then cover the spots with plastic wrap. Put the doll in ...
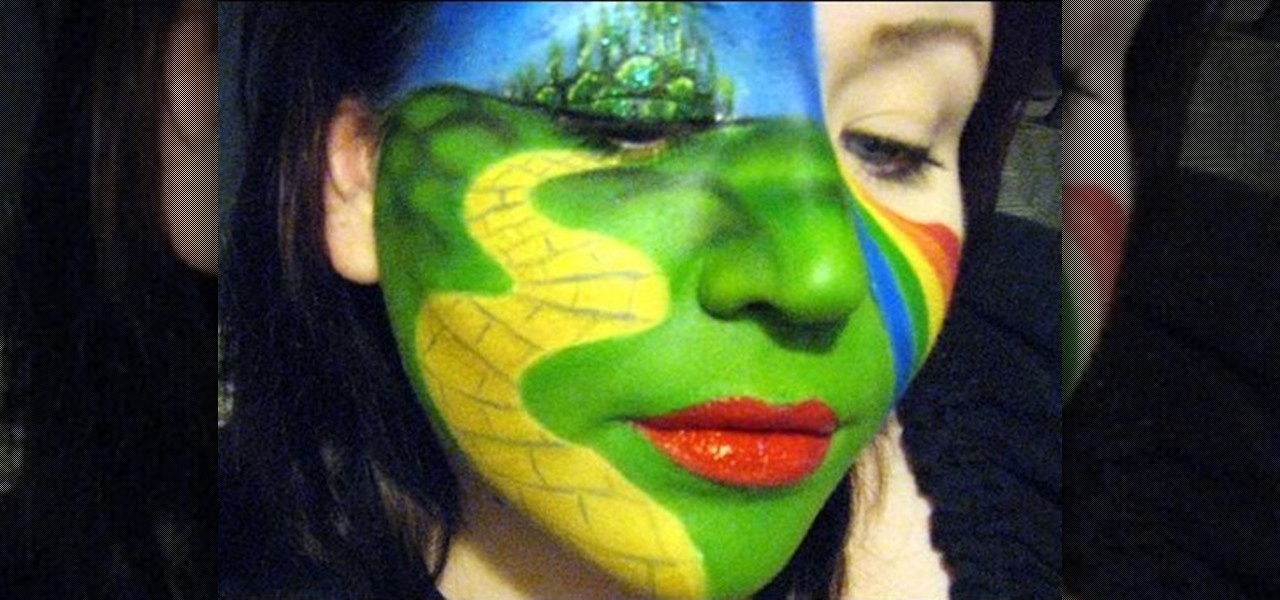
In this video, we learn how to do Wizard of Oz Inspired Makeup for MakeupbyTiffanyD's Co. When you are making this design, you will draw the emerald city on your right eye and then green hill around it. From there, you will draw the yellow brick road going down from your eye to the bottom of your face. The green will mimic the Wicked Witch as well. Your lips will be ruby red for Dorothy's red shoes and then create a rainbow on the other side of the face. Just apply mascara to the other side o...
In this tutorial, we learn how to make a quick stop on a motorcycle. You must reach a speed of 15 mph first. A quick stop means you stop right when you are in the middle of driving, without slowing down first. Close the throttle first, then pull in the clutch. From here, apply both brakes evenly and firmly without locking them up and keep the handlebars straight. Make sure you ride safe and you do this with a helmet on after you have learned the basics of riding a motorcycle. Once you learn t...
In this tutorial, we learn how to skin a deer hide. First, cut into the joint on the back legs. Cut across this, then down through the back side of the leg. Open the leg up with the knife and continue to cut until you see the last joint. After this, you can snap the leg and then repeat this same process for all of the legs. Now, apply pressure to the neck where you want to cut and then skin the stomach area from the inside area. Keep the tip of the knife away from the hide so you don't poke a...
In this video we learn how to decorate a ceramic lamp base with Simon Leach. First, grab a small paint brush and then apply paint to it. Once you have this, start to paint your chosen design onto the pot. Painting a leaf or a plant will be the most appropriate for a large jar or lamp base. Use a brush that will move along the pot and create unique lines. Go all around the pot until your design is finished. Let this dry and then rinse your pot off when you are done. Let your personality shine ...
Girls always want they don't have. We know lots of girls with freckles who prefer to cover them up, which there are those of us who wish we had a few cute ginger spots on our faces.
In this tutorial, we learn how to make 3D nails. You will need: nail glue, nails, glitter, nail polish, tools, and anything else to decorate. To start, paint the nail and then apply small ribbons to them at the top. You can also add in glitter if you would like. Glue the ribbons by using nail glue or super glue. For the rest of the nails, repeat the same process, making all of them look different by adding small pearls, different shapes, and glitter. Let these dry, then you can place them ont...
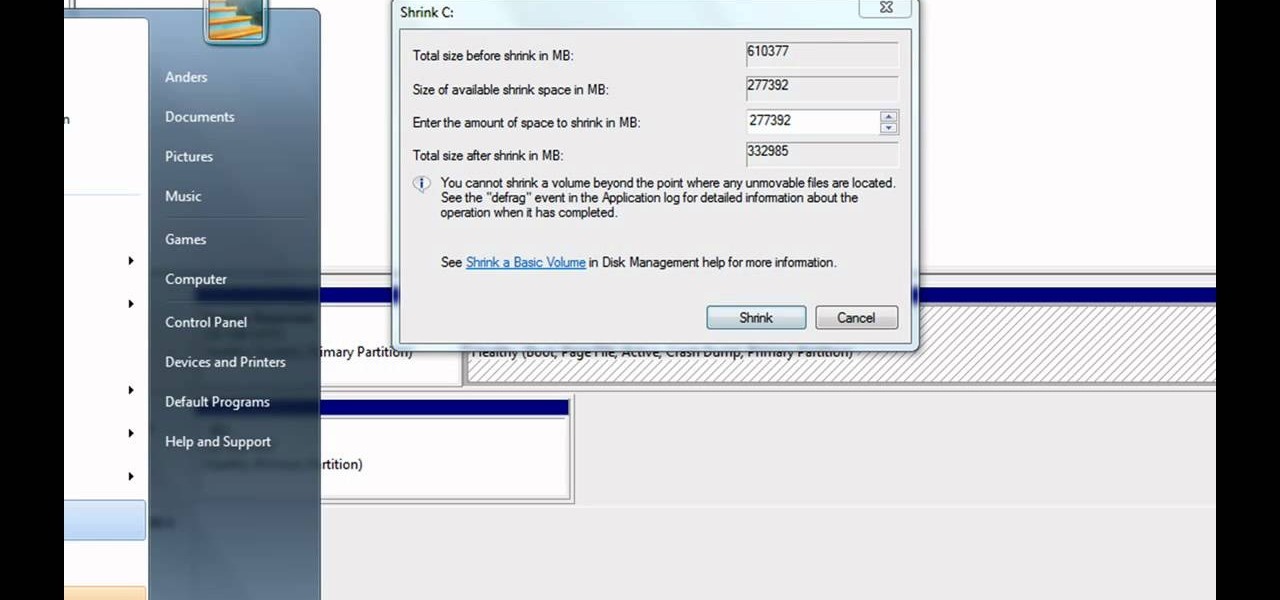
Partitioning simply refers to the process of logically dividing the space on your Hard-disk into different drives. The methods shown in this video only apply to users of Windows Vista and Windows 7 operating systems.
In this video, we learn how to create a bucket drum or protest art. To start, you will grab a large plastic bucket and you will apply take all around the sides of it so it's wrapped up. The tape should be intersecting at the opening of the top of it. Then, use a tie to connect this in with the tape and then size it so it fits around your waist. From here, you will tie the bucket to your waist and then use sticks to beat your new drum. You can stick the sticks to the side where the tape is to ...