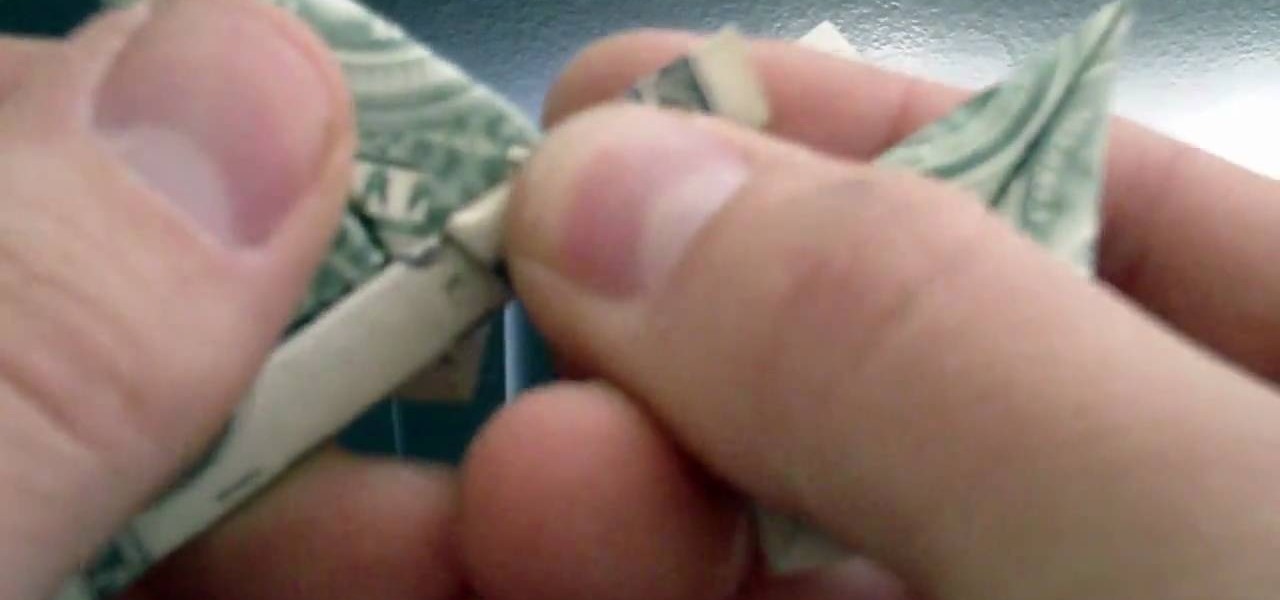
If you've already mastered the crane and the basic origami lucky star, then this five-pointed star is the next logical step to take. Made from a dollar bill, this origami project doesn't even require special materials to assemble.
Interested in burning in docking windows to the left, right or center of your screen? This Windows 7 tutorial will show you how it's done! It's easy! So easy, in fact, that this home-computing how-to can present a complete overview of the process in just over a minute's time. For more information, including detailed, step-by-step instructions, watch this Win 7 user's guide.
Interested in centering icons within the MS Windows 7 taskbar without third-party software? It can be done! And quite easily. So easily, in fact, that this home computing how-to can present a complete, step-by-step overview of the process in about five minutes. For complete instructions, and to get started using this Win 7 trick yourself, take a look.

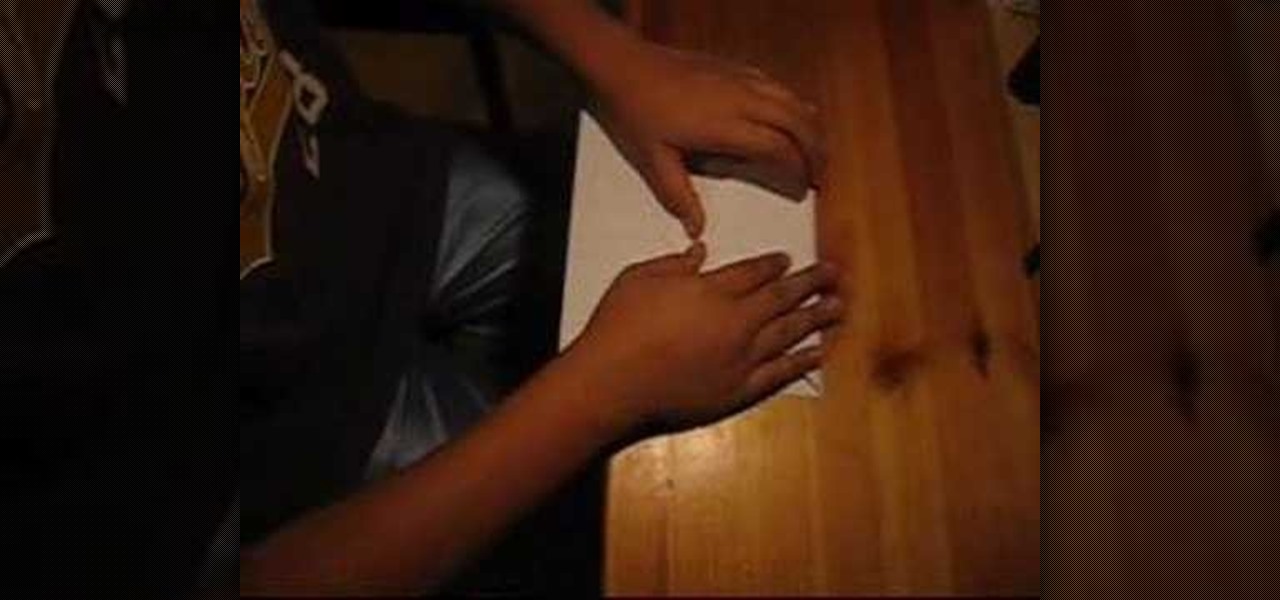
Take a square piece of paper and fold in half. Open the paper crease from the other side and mark it as previously.
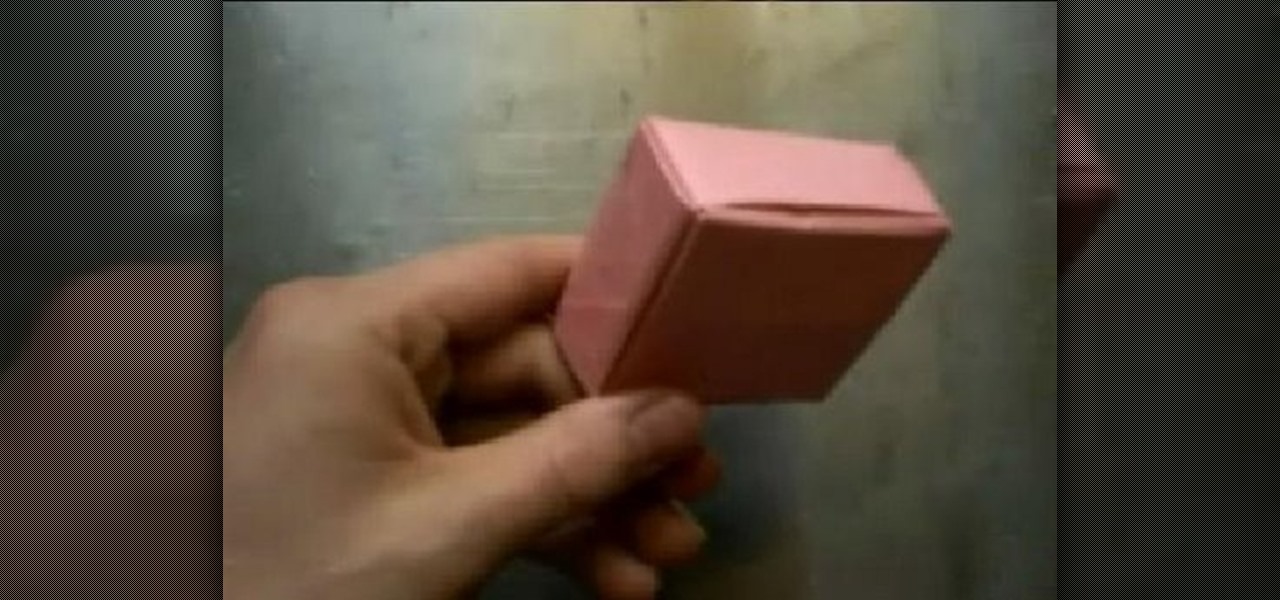
Watch a person fold an origami box. This is an open box, like a drawer, but not like a cube. First step is typical, just make creases between the opposite corners. next step is to fold all four corners to the center point where the first two creases cross. next two opposite flat sides are folded over to the center so the fold is parallel to the sides. then unfold these last two folds, and redo it with the other two perpendicular sides. then unfold everything but two of the corner-to-center fo...
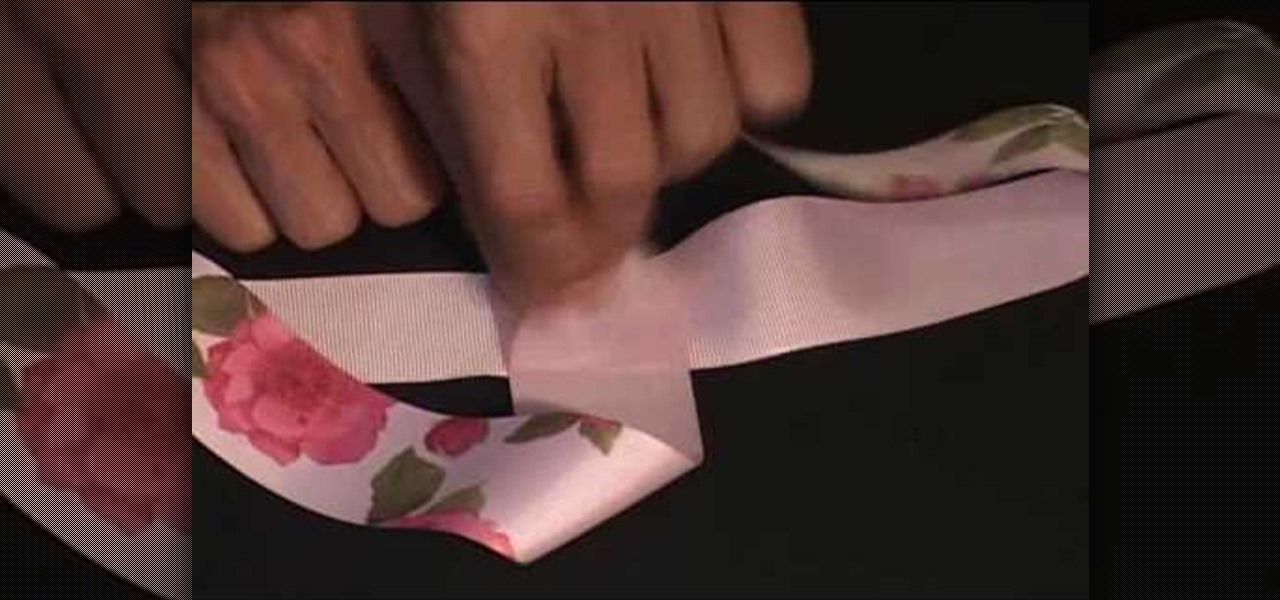
get a long piece of ribbon, put the ends together and make a crease at wear the ribbon folds, that'll be your center point. Now get one end of the ribbon, and without it flipping over, bring the end to the center of the ribbon and lay it perpendicular to the direction of the ribbon. Also bring the other end of the ribbon to the center of the ribbon but from the other direction. Hold the ribbon together using a gator clip. Obtain a piece of string or plastic strip, tie the folded ribbon tightl...

Learn about the L4D2 gameplay for Campaign 1: Dead Center - Atrium. Get the goodies and walk out of the safe house. Turn right and go down the hallway, making another right through the door at the end. You will find yourself back in the mall. Continue on the makeshift walkway, bearing left at the end until you reach an elevator. The blue door across from you is a dead end. For more info, watch the whole gameplay.
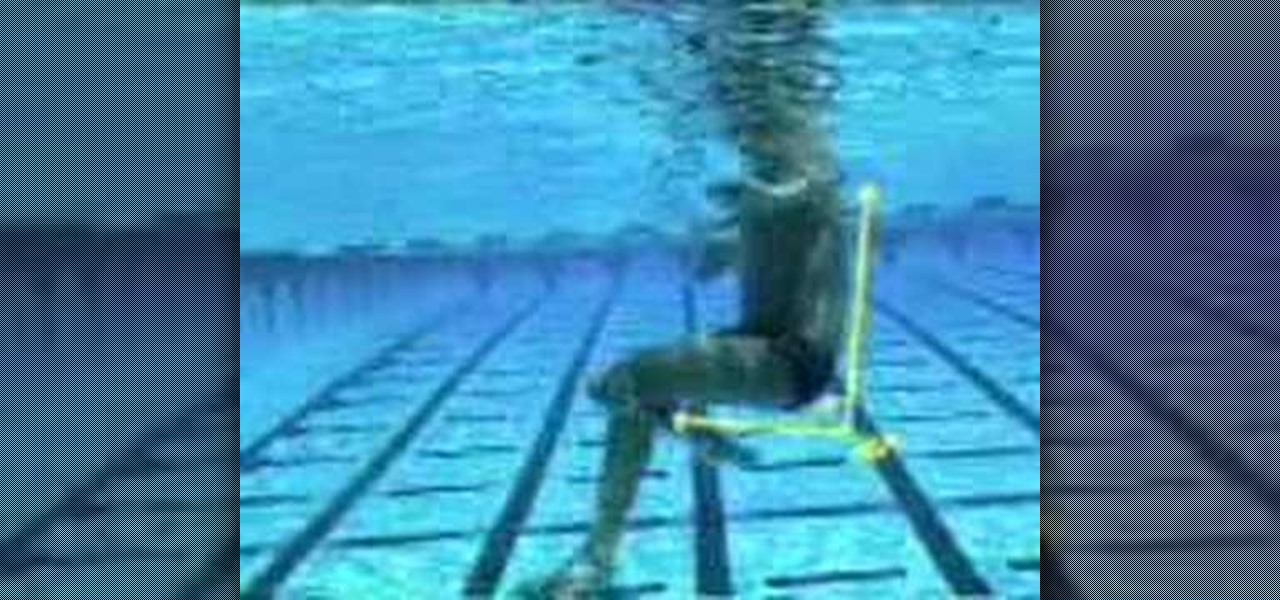
This is the classic water polo body position. You are in a seated chair position, sculling your hands while eggbeater with both legs. This is the position optimal for moving to and from the ball. This is also called the center forward position in water polo.
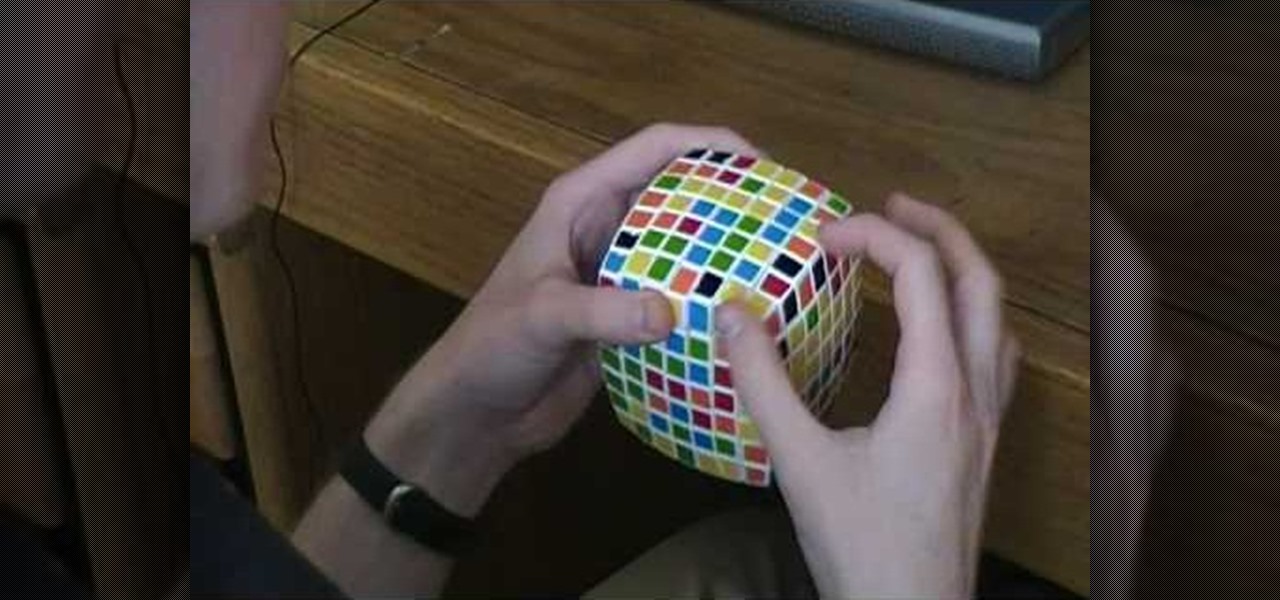
The V-Cube 7 is the grandaddy of all Rubik's Cube style puzzles, and it's on of the hardest puzzles to solve, with its 7x7 sides. If you're having a hard time getting started with the puzzle beast, specifically the 5x5 center, then this video tutorial should help you out. See how to solve the center of the V-Cube 7 puzzle. If you can solve a regular Rubik's Cube, it could help you out, because a lot of the principles are the same.
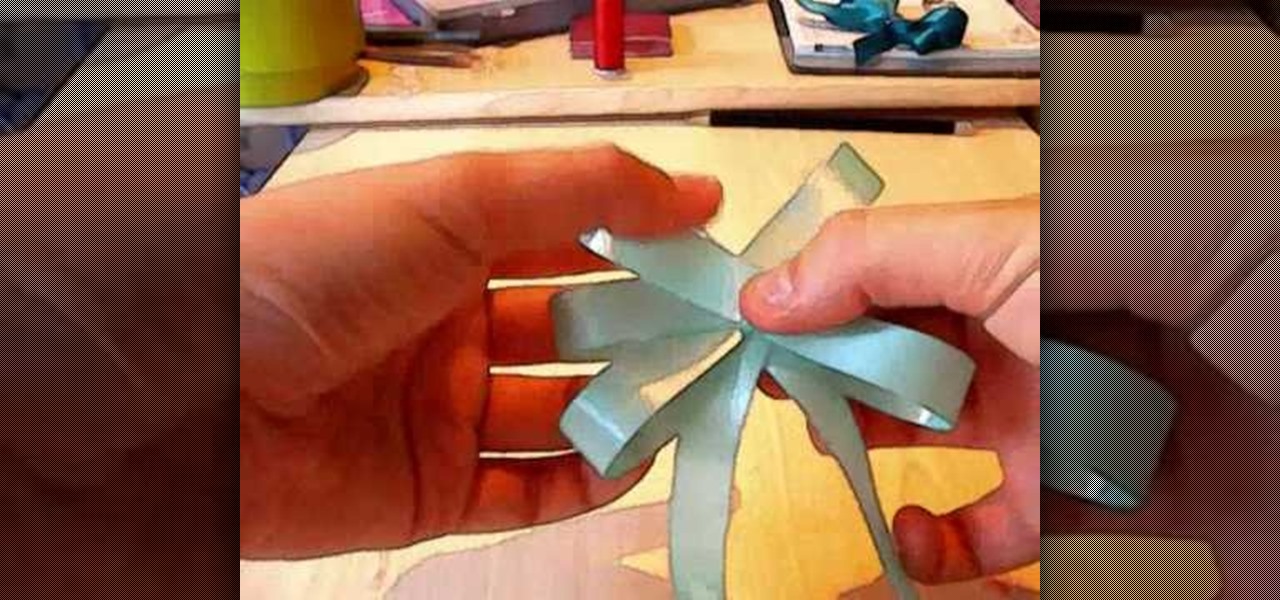
First of all you have to place your thumb or attach a pin on the ribbon such that there is a space of two to three inches left outside. Bend the ribbon back to the center to create your first loop. Now you have to pass the ribbon back underneath the bow. Then you have to again return to the center to create a complete second loop. Now continue passing the ribbon over and under the bow. Now return to the center and then repeat this step to create six loops in total. After this you have to turn...
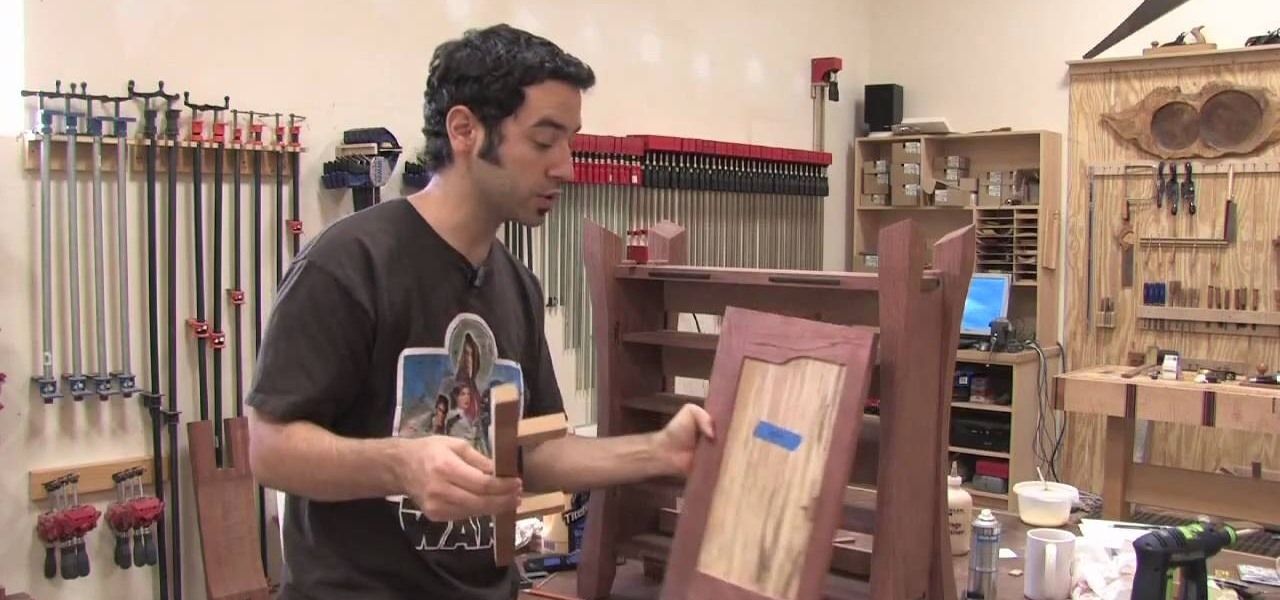
it is essential that a furniture maker or a woodworker know how to find the center of any board. Watch this video tutorial to learn a simple way to find the center of any board. To do this, you will need a straight edge and a pencil.
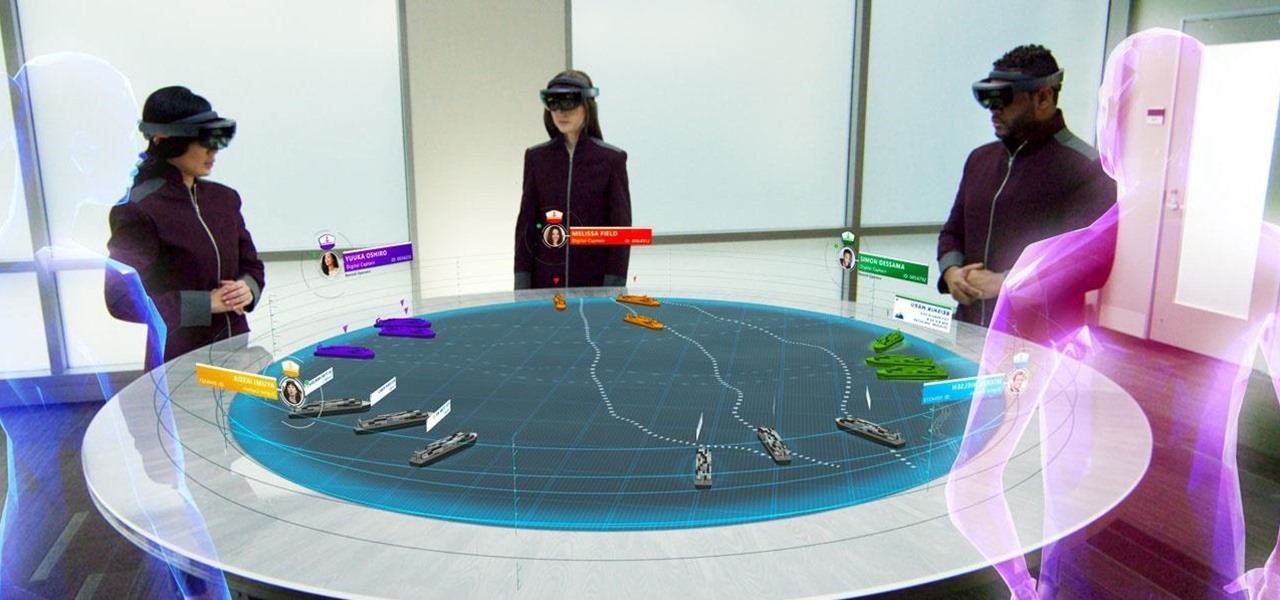
Although the HoloLens is still primarily the domain of developers and researchers, the device is nevertheless on the cutting edge of showing us what will be possible with augmented reality in the coming years. The latest example comes via Microsoft Japan and a new concept video that shows off how the HoloLens will be used in the relatively near future to pilot autonomous ships.
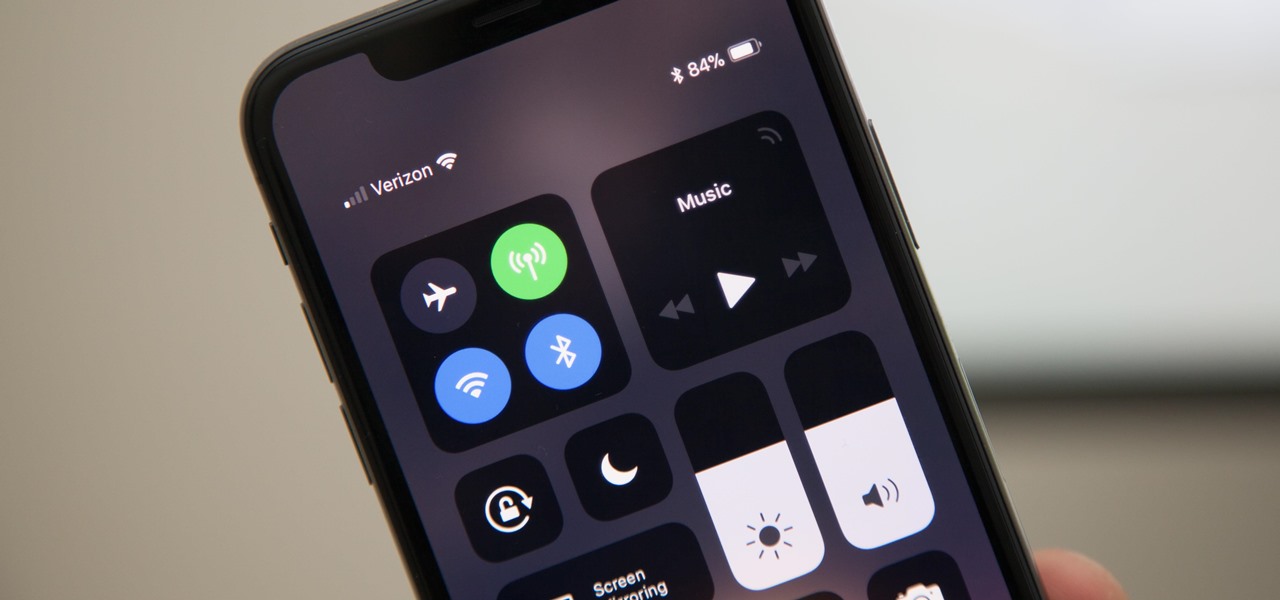
Gestures are a big deal on an iPhone X, XS, XS Max, XR, 11, 11 Pro, and 11 Pro Max. Without a Home button on Apple's super-premium smartphones, several actions had to be mapped to gestures instead, which impacts other areas of the system such as the Control Center.
As summer heats up, new maps from the Centers for Disease Control and Prevention (CDC) gives us our best guess at where Zika-carrying mosquitoes could be hanging out this year in the US.
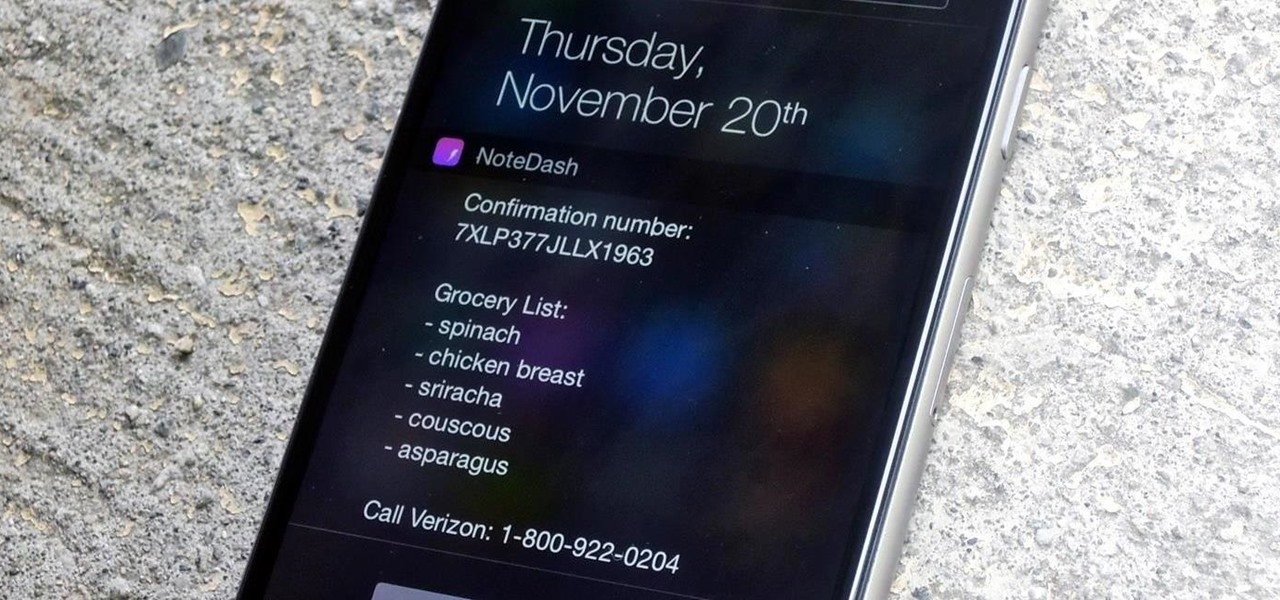
Confirmation numbers, grocery lists, addresses, and phone numbers are all things we need to quickly jot down on our phones, but the thing is, they're never extremely easy to access later. You have to figure out which app you wrote them in, meaning lots of needless searching and scrolling. Even if you use a dedicated note-taking app, those extra steps of actually opening the app to find a UPS tracking number can be an unnecessary pain.
There's been a lot of discussion lately about the practical uses of Google Glass. Sure, you can use them for translating text instantly or further engraining yourself in social media, but how about saving someone's life? That's precisely what Dr. Steven Horng of Beth Israel Deaconess Medical Center has says happened with a recent patient of his. After launching a Google Glass pilot program late last year, the device was seen as a critical factor in saving the life of a patient in January.
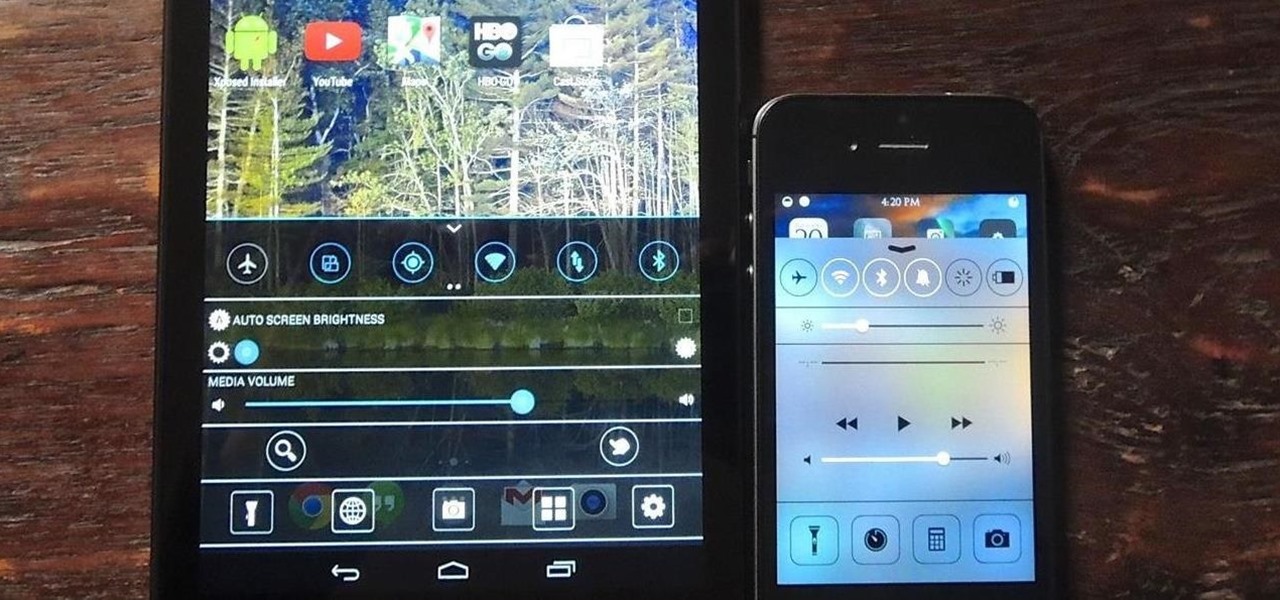
There are two types of tablet users in the world—those who like their quick settings up top, and those who want them on the bottom. I fall into the latter category, and there are a couple of reasons for it.
One of the best things about iOS 7 is the Control Center, which gives you quick access from anywhere on your iPhone to turning on or off Airplane Mode, Wi-Fi, Bluetooth, and more. It also makes it very easy to adjust the brightness of your display, and gives app shortcuts for your Flashlight, Calculator, Timer, and Camera.
Personally, my favorite new feature in iOS 7 is the Control Center. With it, you can very quickly and efficiently access popular and much used settings, such as Wi-Fi, Bluetooth, brightness and more—all with one simple swipe.
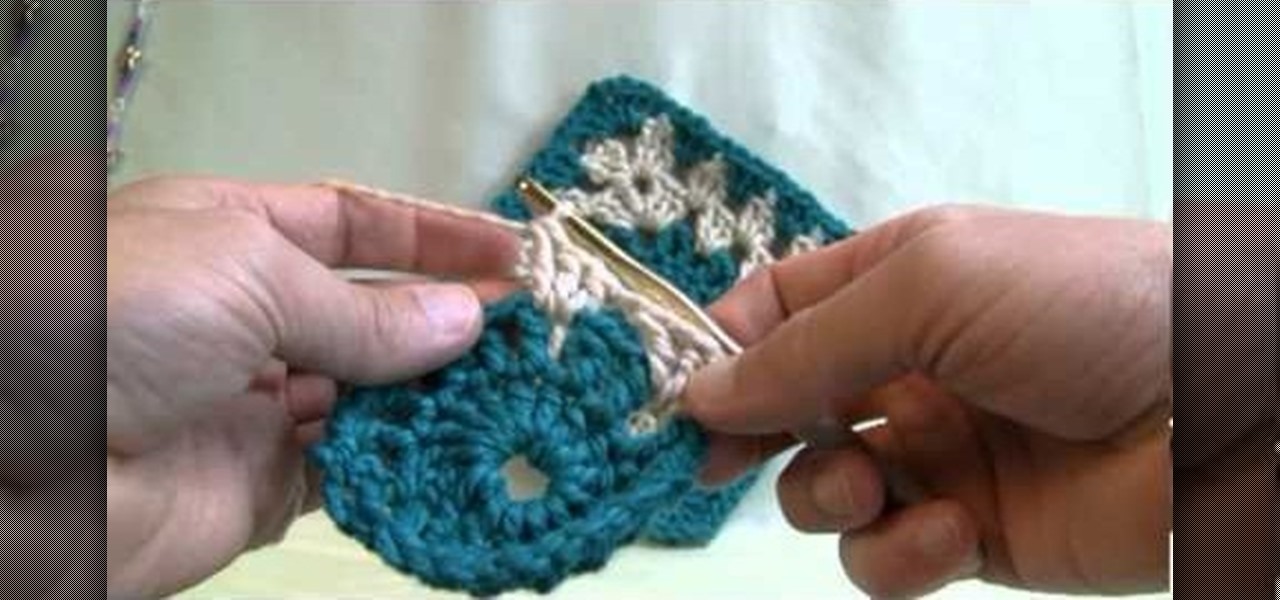
Granny squares are a basic crochet project, which you can use to make doilies, coasters or even connect together to make an afghan or blanket. This tutorial shows you how to make a basic granny square with two separate colors and a circle in the center.
If you're Mitsubishi transmission is acting up, there could be something wrong with the DSM valve body, which is the hydraulic control center located in the engine. This video is super helpful for anybody needing to troubleshoot their valve body. You'll learn how to take the valve body out, and then reinstall it.
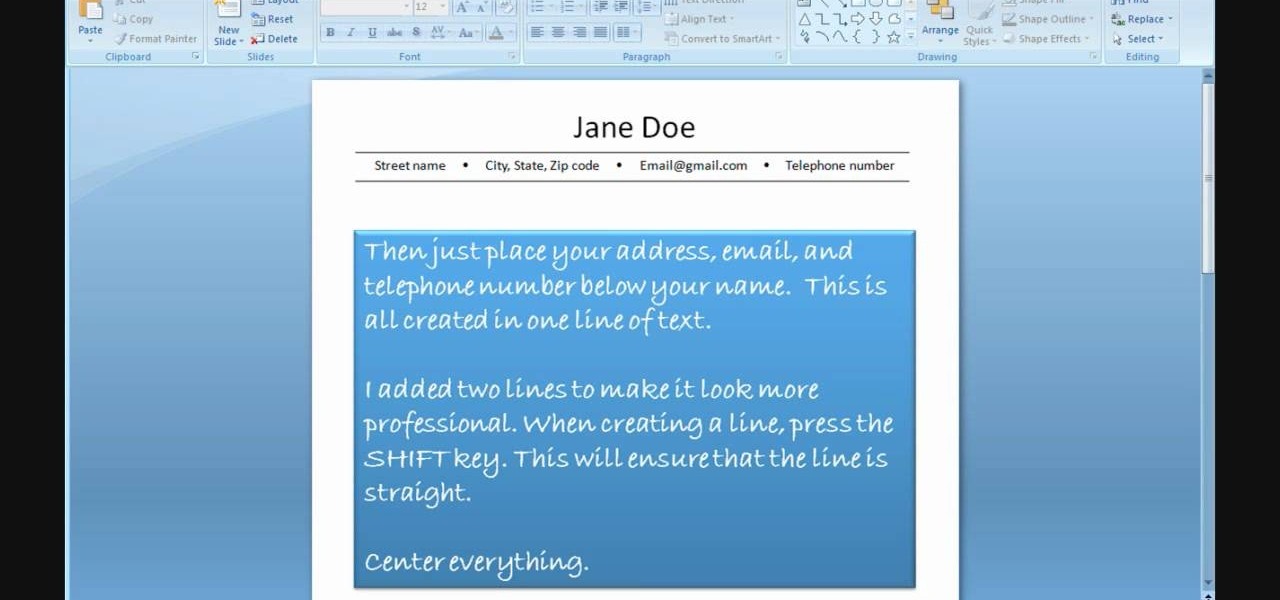
In order to use PowerPoint to create your resume, you will need to select "page setup", in order to change from landscape to portrait. Insert a text box in the center of the page and type your name in it. Next, click on the "format" tab. Next, select your alignment from the alignment center.
In this tutorial, Don McCunn teaches us how to draft a pants sloper. First, measure out the center line of the leg and then draw the center line onto a piece of paper. Now, measure from the waist and mark the measurements along with where you drew the center line. Now, measure down to the hip level and mark this as well, making sure to use the fullest area of the hips. Next, you will need to determine the crotch from the waist to the area where the subject is sitting, then mark it. Use a stan...
In this video tutorial, viewers learn how to make a pinhole lens for a digital camera. The materials required for this project are: a camera body cap, X-acto knife, black tape, small drill bit, sewing needle and sand paper. Begin by marking the center of the body cap . Then drill a hole in the center and punch a tiny hole in the center of the sheet metal. Now cut around the sheet metal and sand it flat. tape the metal piece inside the cap and darken it with ink. This video will benefit those ...
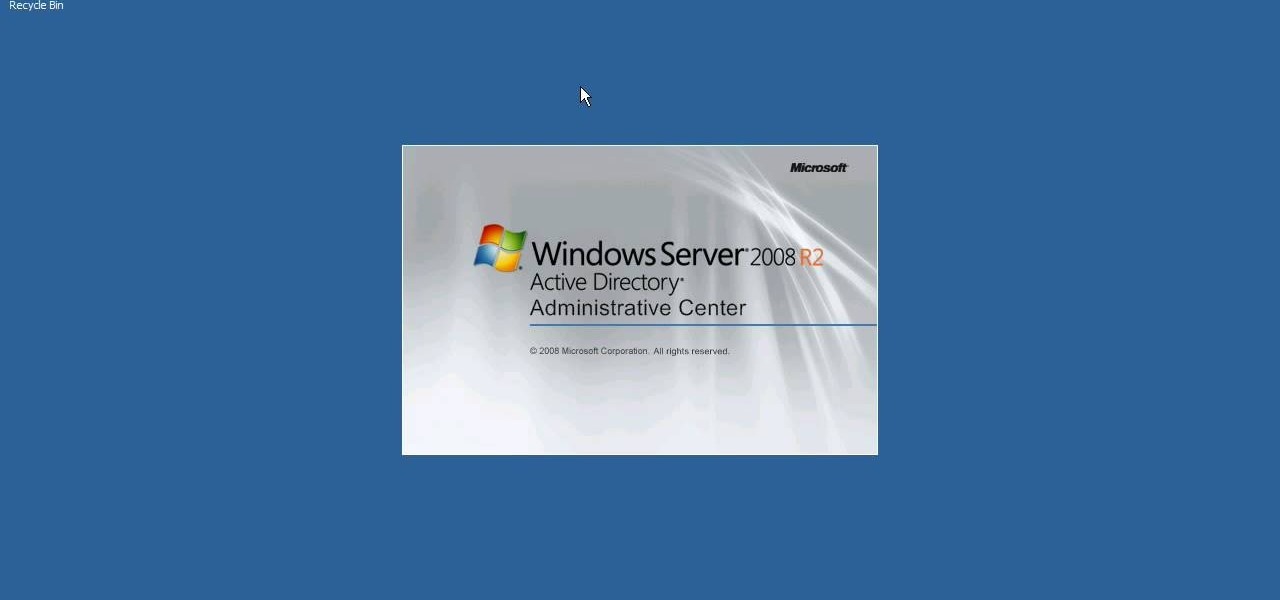
Interested in using the Active Directory Administrative Center on a machine running Windows Server 2008 R2? This clip will show you how it's done. It's simple! So simple, in fact, that this home-computing how-to can present a complete, step-by-step overview of the process in just over three minutes. For more information, including complete, step-by-step instructions, watch this sys admin's guide.
In order to make trendy hair bows for your hair, you will need the following: ribbon, scissors, a hot glue gun, and hair clips or bobby pins.
In order to make a bow headband without doing any glue or sewing, you will need the following: a headband, a hair tie or rubber band, and a piece of ribbon or a belt.
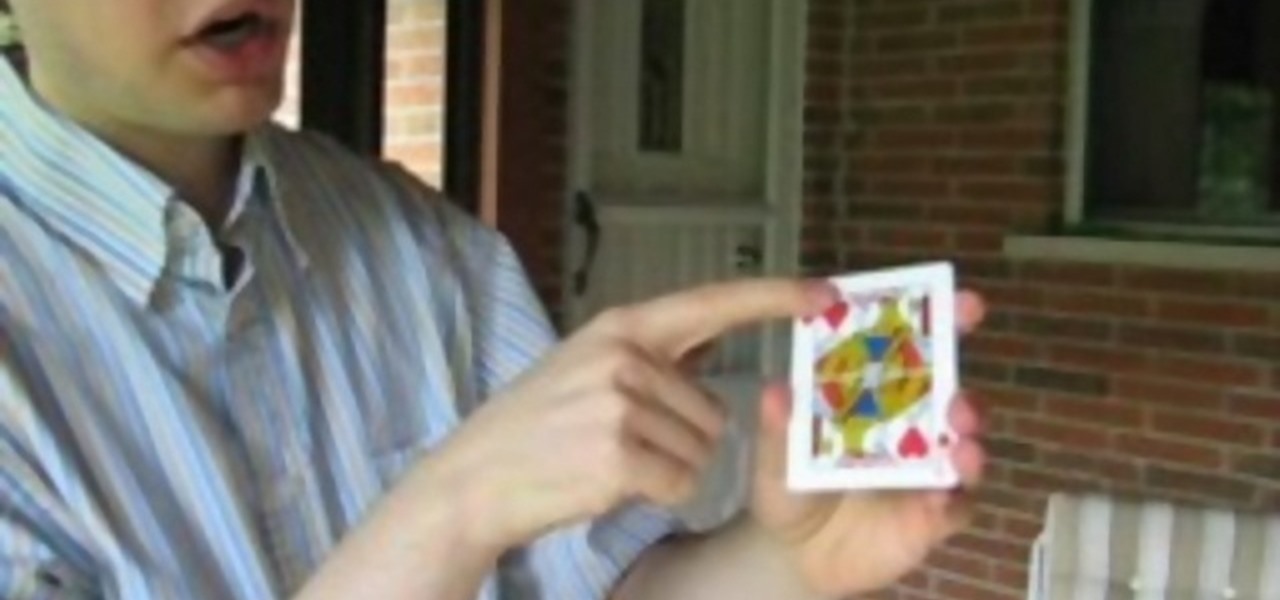
In this Magic & Parlor Tricks video tutorial you will learn how to do the gimmicked card color change trick. For this you will need two cards of different colors; a red card and a black card. Fold each of the cards right in the middle. Then glue the top half of the two cards at the back. The bottom halves of both cards should be free. Now take a third card and attach its face to the bottom halves of the two cards on the outer side. So, when you move the middle flap up or down, the card is goi...
From Hair Hardware, learn how to apply a center knot to finish off your hair bow! Take your hairstyle to the next level and rock a stylin' do with help from this free video! Stop going the easy route: With a little time and effort, you'll walk out the door feeling like you just left a stylist!
This video tells us to measure a 1:12 dollhouse polymer clay plate. You can use a 'MINI MAGLITE FLASHLIGHT' to cut out the clay from some clay that has been rolled out on a platform. Roll the toothpaste cap along the edges of the circular piece of clay. The center of the plate is made by pressing it in the center with a small bottle or the end of a pencil which has a flat base. Cut a smaller circle of clay and put it below the plate to form its base. Press the center of the plate again to sti...
In this Arts & Crafts video tutorial you will learn how to make a diamond folded card. Get a sheet of paper 4x12 inches. Draw a pencil line at the half way mark, that is, at 6inches. Fold one of the lengths to the center pencil line. Do the same to other half of the paper. Open up the sheet and do the same fold in the opposite direction. Open up the paper and flip it over and you will see the diamond fold in the center. Now you fold from each side up to the cross where the diamond begins. Fli...
In this Arts & Crafts video tutorial you will learn how to fold a hexagonal, six-point paper star with origami. Take a hexagonal sheet of paper and fold in half from all corners. Then fold each side inward up to the center point. Open up all the folds. Now fold one side up to the center point. Then fold one corner back over itself and fold the next side of the paper up to the center point. Continue like this for all sides and you will now have a smaller folded hexagon. Then lift up each flap ...
The Wood Whisperer demonstrates how we can install hinges on a cabinet without a tape measure, using relative dimensioning. In this example, we use center lines instead of marking the top and bottom of each piece that needs to line up. Using shims at the bottom and top of the door, we center the door on the cabinet to the desired spot. At this point, it's as simple as marking the center lines where you want your hinges to go on both the door and the cabinet frame. Now we can simply attach our...
This video demonstrates how to make a hexagon from a square paper. Fold a square paper into half horizontally. Fold this rectangle into half again forming a square one-quarter of the original size. Fold the open edge towards the center fold on either side forming a crease. Take the closed corner and fold towards the center crease. Open the center fold and fold it inwards. Fold the corner towards the diagonal edge on both sides, this forms a cone like structure with a paper edge at three-quart...
Ingelton Pottery demonstrates how to throw a chip and dip pottery plate. First, well a ball of clay and put it on a pottery wheel. Use your hands and ample amounts of water to depress the sides of the clay forming an indented rim with a raised center. Use your thumb to define the center hub. Create a thin side to the plate. Wet your hands and press down on the center hub, creating a depression. The plate should now have a two bowls with one sitting inside of the other one. Use a blade to scra...
Follow this video to learn how to make your own paper airplane that can really fly. Acquire a sheet of A4 paper and fold it in half. Afterwards fold two of the edges towards the center line set out when folding. These should be folded in the form of two triangles. After doing so fold them downwards, towards the center line lower down. Fold another two triangles towards the center, one from each side. At this point a small edge will be formed at the tip of the two folds. Simply fold it upwards...
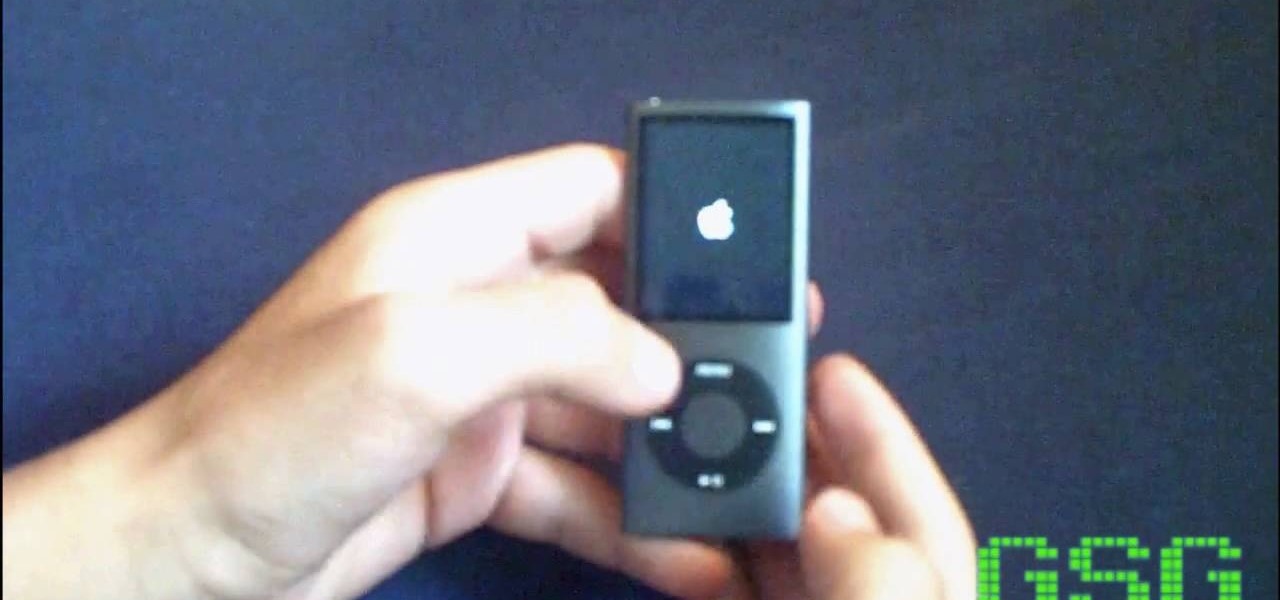
This quick video tutorial will show you how to unfreeze an iPod Nano or Classic. To unfreeze your iPod, do the following: Hold the "Menu" and "Center" button for 10 seconds. Once you see the Apple Icon, hold the "Center" button, and the "Play" button at the same time, for 10 seconds. This should fix the problem, and your iPod is now ready to go.
1: Place paper sideways. Place the paper on the flat surface with the long edges at the top and bottom. 2: Fold long edge to opposite edge and unfold. Fold one long edge to the opposite long edge, crease, then unfold. 3: Fold longs edge to center and unfold. Fold one long edge to meet the center crease you just made. Now do the same with the other long edge, so they both meet in the center. Unfold completely. 4: Fold short edge to opposite edge and unfold Rotate your paper and fold one short ...
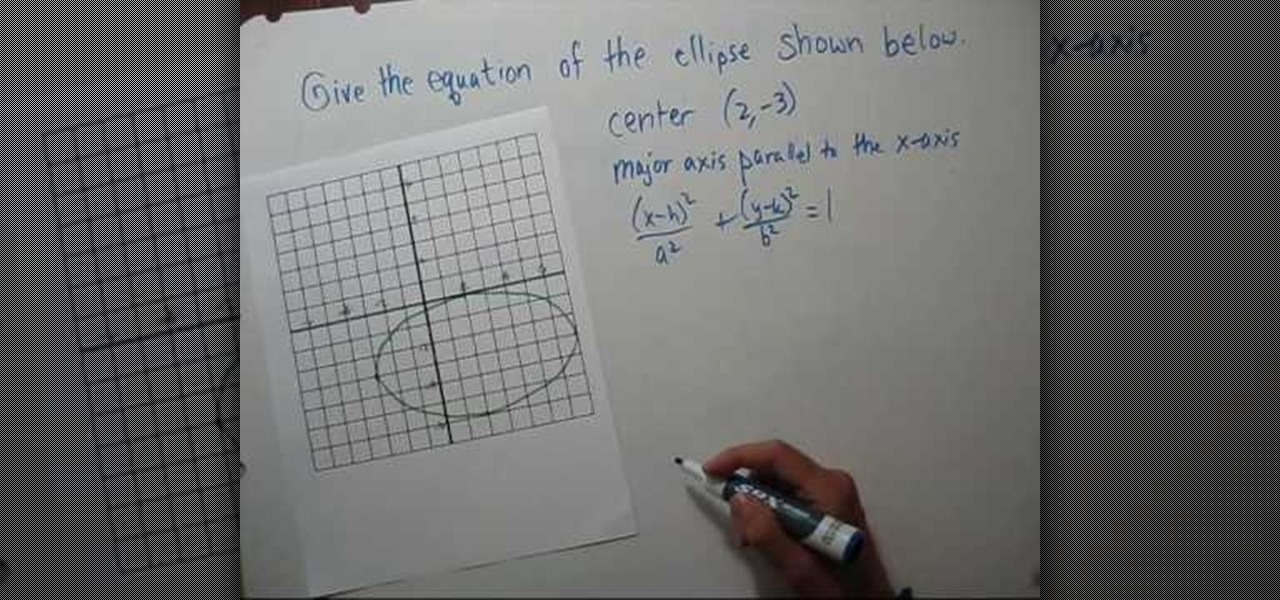
Notes College Algebra teaches you how to find the equation of an ellipse given a graph. You first want to find out the center of the ellipse, which in the video is (2, -3). The major axis is parallel to the X axis. The equation is (x - h) squared/a squared plus (y - k) squared/a squared equals 1. A is the distance from the center to either of the vertices, which is 5 over here. B is the distance from the center to the top or bottom of the ellipse, which is 3. You then use these values to find...
This video give you a step by step in how to cut your mango cheeks, and owszat shows you how to do it. Using careful tactics on the mango, you can see a slight edge. Where you distinguish your mango's center point is where you will be cutting from. Tear off your stem to have a flat relying surface. Cutting about five millimeters from the center point on each side, making one slice that releases your cheek, and doing the same for the other side leaves you with two mango cheeks and the center p...