This video explains how to optimize your Mac, for maximum performance when using Pro Tools. Whether you're new to Digidesign's Pro Tools 8 or simply looking to pick up a few new tips and tricks, you are certain to benefit from this free software video tutorial. For complete instructions, take a look.

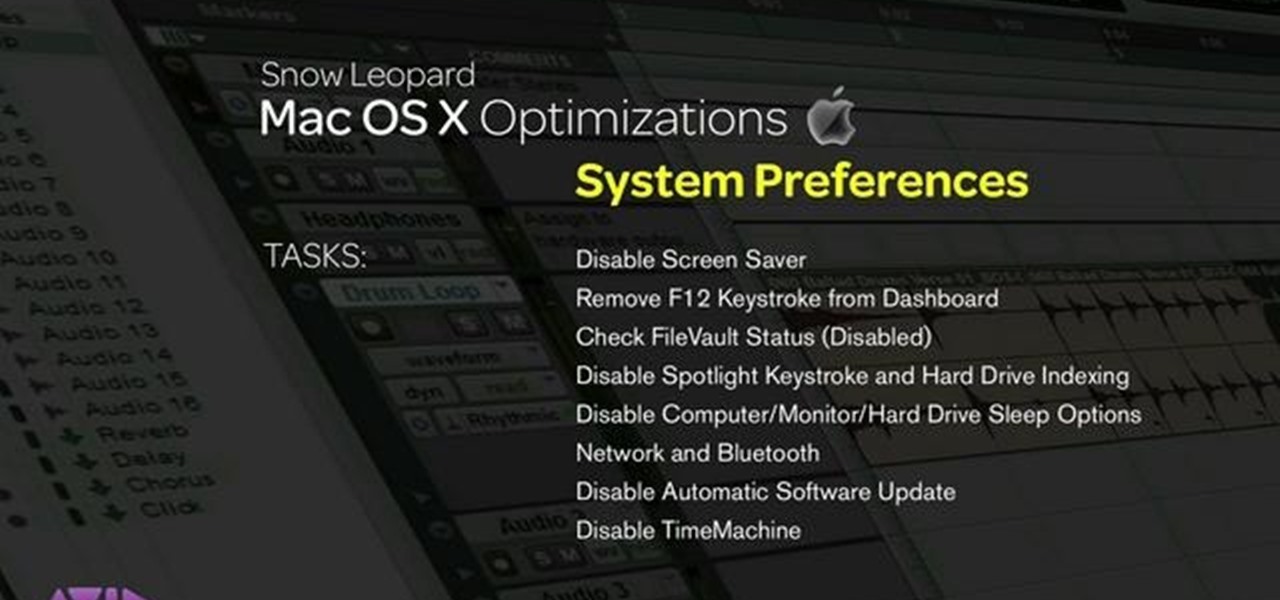
This video describes how to free up system resources on your Mac, resulting in better Pro Tools performance. Whether you're new to Digidesign's Pro Tools 8 or simply looking to pick up a few new tips and tricks, you are certain to benefit from this free software video tutorial. For complete instructions, take a look.
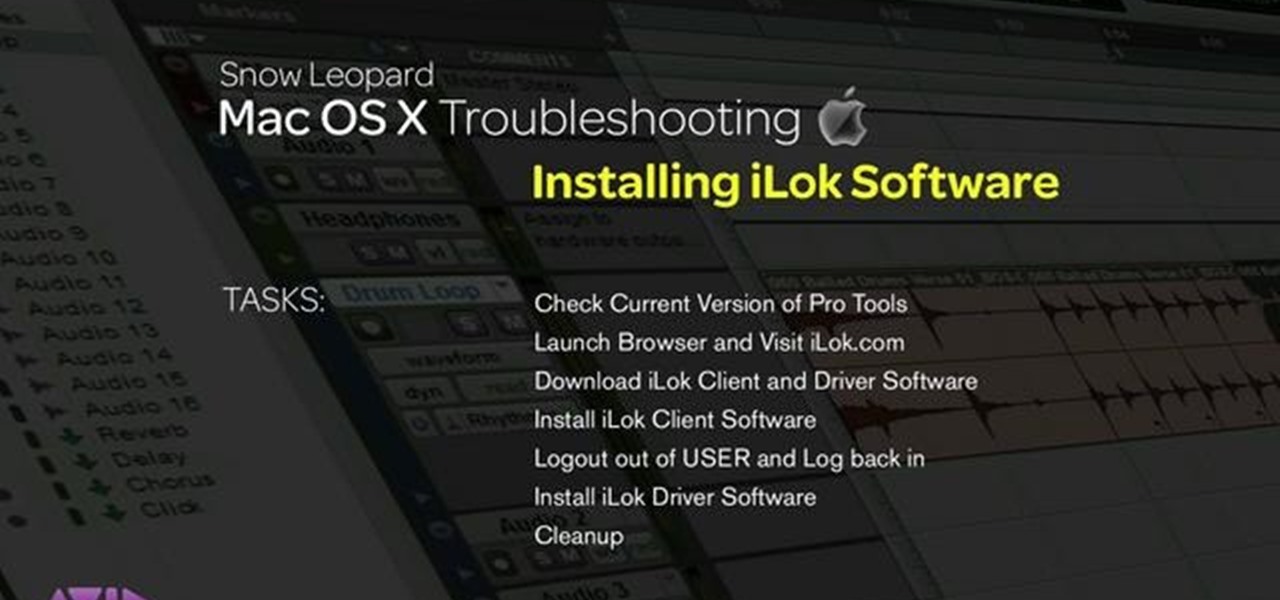
This video explains how installing/re-installing iLok Client, and Driver software, can sometimes be a great troubleshoot for resolving issues with Pro Tools, and the Mac Platform. Whether you're new to Digidesign's Pro Tools 8 or simply looking to pick up a few new tips and tricks, you are certain to benefit from this free software video tutorial. For complete instructions, takea look.

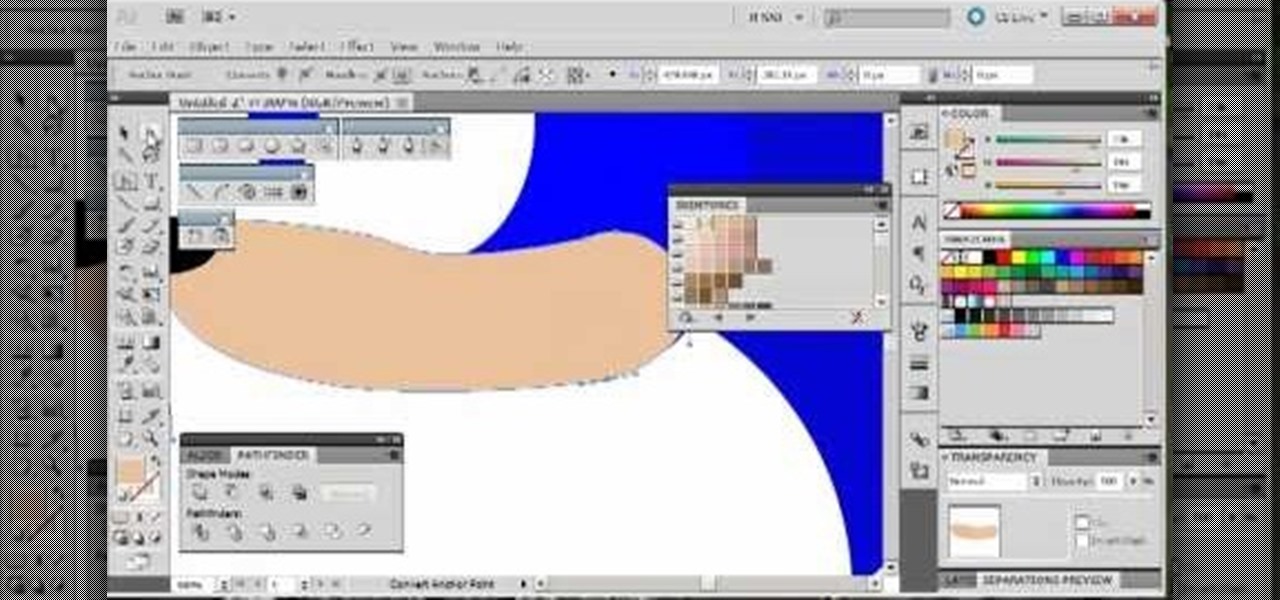
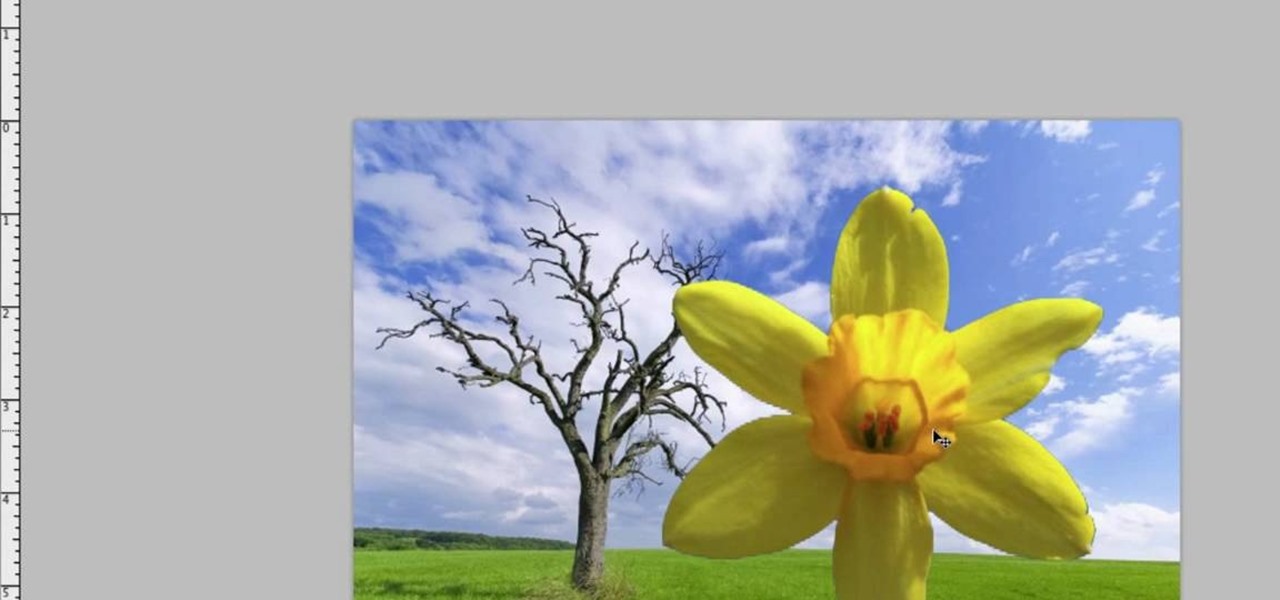
The modest brush tool is one of the deepest, most versatile tools in Photoshop. It's not only a terrific painting tool, but it is also invaluable for masking, as this video demonstrates. Whether you're new to Adobe's popular raster graphics editing software or a seasoned professional just looking to better acquaint yourself with the program and its various features and filters, you're sure to be well served by this video tutorial. For more information, including detailed, step-by-step instruc...

This tutorial presents a general introduction to the basic editing functions and tools available within Blender 2.49 & 2.5. Whether you're new to the Blender Foundation's popular 3D modeling program or a seasoned graphic artist just interested in better acquainting yourself with the application, you're sure to be well served by this free video tutorial. For more information, including detailed instructions, take a look.

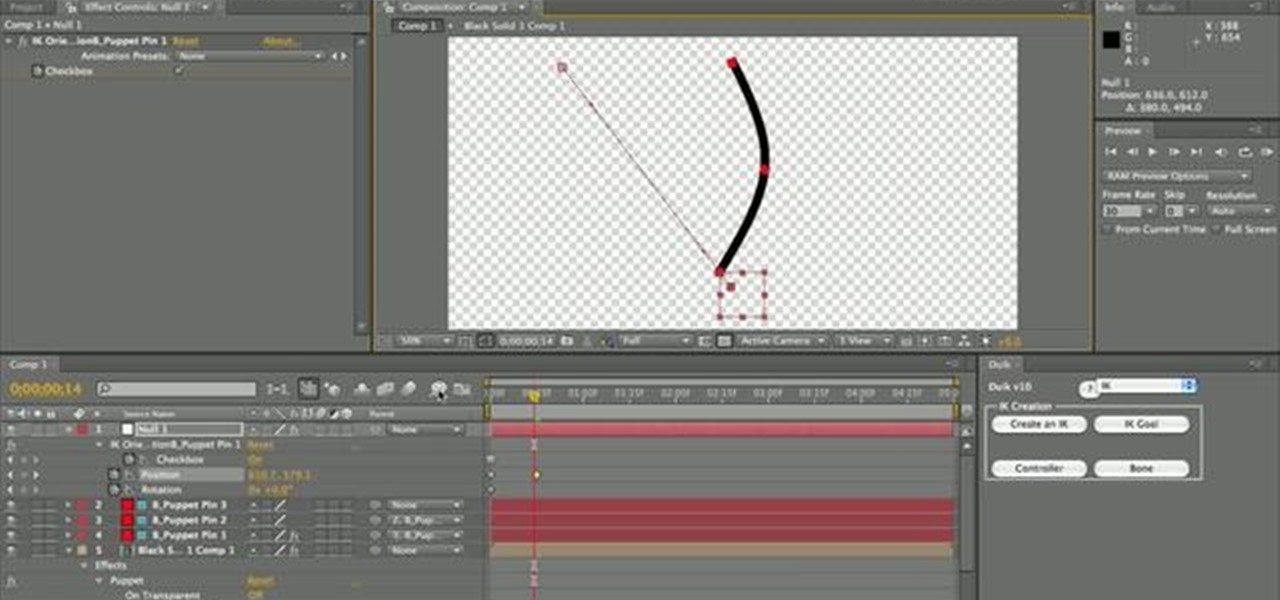
In this tutorial, give a little life to your drawings by using the wiggle expression attached to the puppet tool in Adobe After Effects CS4. This is a cool way to animate your project.

Meet the Blender Loop Cut tool! Whether you're new to the Blender Foundation's popular open-source 3D computer graphics application or are a seasoned digital artist merely on the lookout for new tips and tricks, you're sure to be well served by this free video software tutorial from the folks at CG Cookie. For more information, including step-by-step instructions on how to use the Loop Cut tool in your own Blender projects, take a look!
This clip presents short video overview of the Blender Bridge Modifier tool. Whether you're new to the Blender Foundation's popular open-source 3D computer graphics application or are a seasoned digital artist merely on the lookout for new tips and tricks, you're sure to be well served by this free video software tutorial from the folks at CG Cookie. For more information, including step-by-step instructions on using the Bridge Modifier tool in your own Blender projects, take a look!
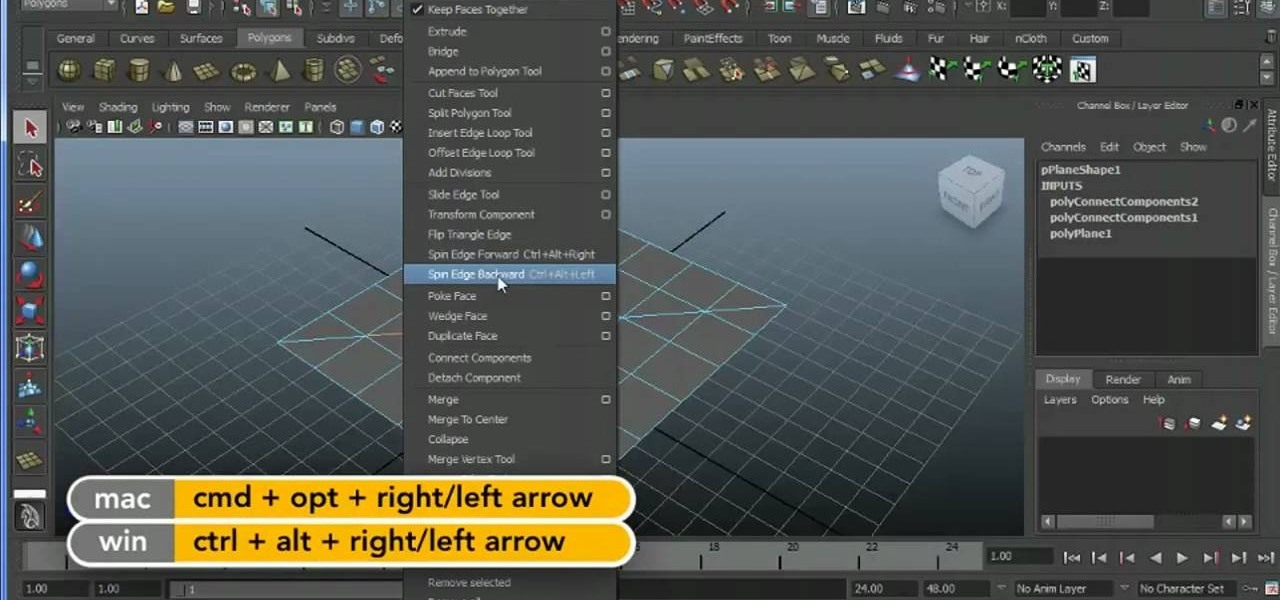
Learn how to take an edge and spin it around a model using Maya 2011's Spin Edge tool. Whether you're new to Autodesk's popular modeling software or a seasoned 3D artist just looking to better acquaint yourself with the Maya 2011 workflow, you're sure to be well served by this video tutorial. For more information, and to get started using the Spin Edge tool in your own Maya 2011 projects, watch this free video guide.
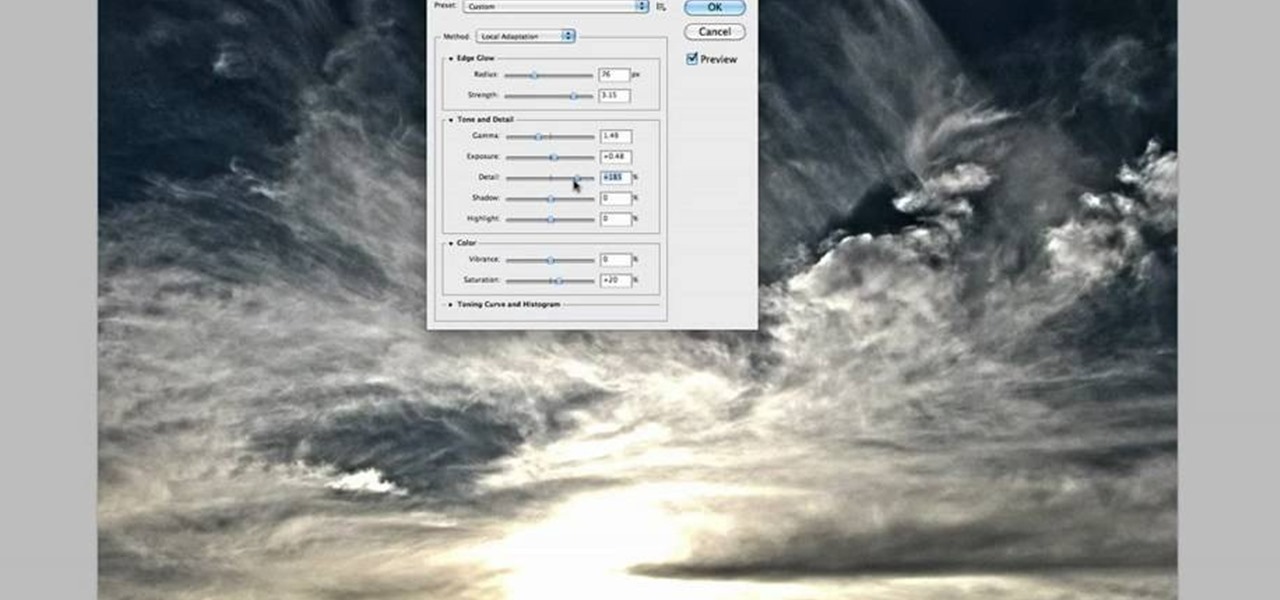
Take full of Photoshop CS5's HDR Toning Adjustment Tool with this free video lesson. Whether you're new to Adobe's Creative Suite or a seasoned graphic design professional after a general overview of Photoshop CS5's most vital new features, you're sure to be well served by this video tutorial from the folks at Brusheezy. In it, you'll learn how to take advantage of Photoshop's new HDR (high dynamic range) Toning Adjustment Tool.
Find out the best ways to use the creep swab in Houdini. An architect in New York came up with a very clever means of distributing various shapes onto a surface using a creep swab. So, if you want to know how it's done, watch this two-part video, which focuses on using the creep tool in conjunction with copy stamping to achieve some unique results in Houdini 9.
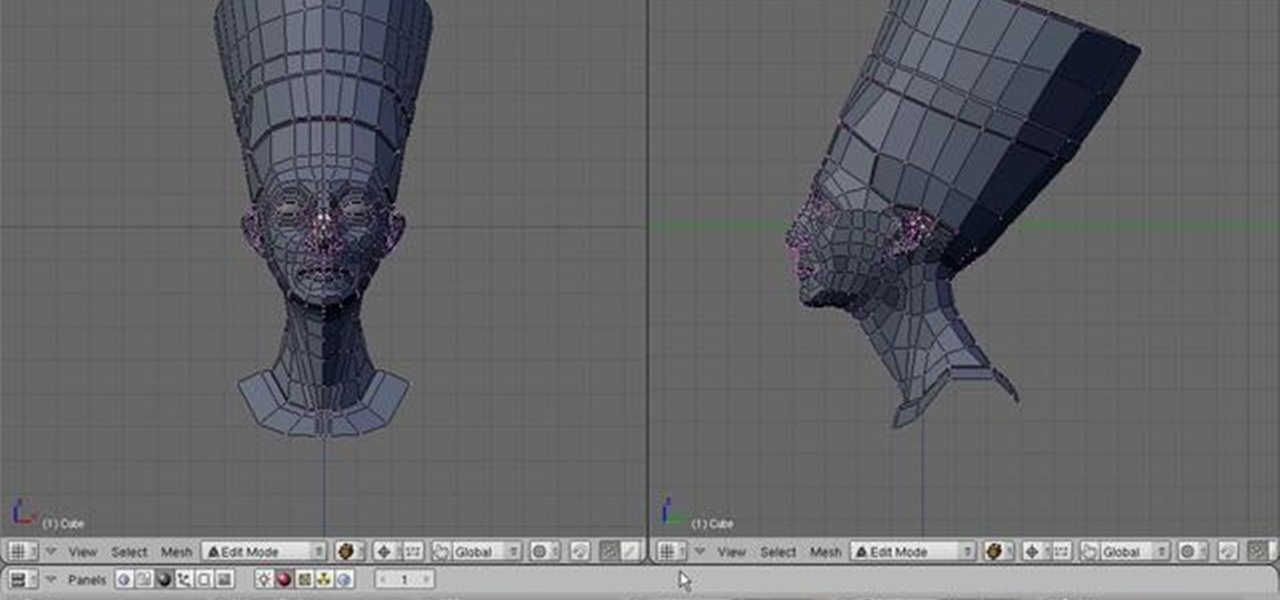
Pixel Perfect is the "perfect" show to help you with your Photoshop skills. Be amazed and learn as master digital artist Bert Monroy takes a stylus and a digital pad and treats it as Monet and Picasso do with oil and canvas. Learn the tips and tricks you need to whip those digital pictures into shape with Adobe Photoshop and Illustrator. In this episode, Ben shows you how to build an Egyptian Pharaoh's room in Photoshop.
Get started using Adobe After Effects with the help of The New Boston! This beginner's tutorial is bound to answer the many questions you have about the popular digital motion graphics and compositing software. The main purpose of After Effects is for film and video post-production.
Go beyond the traditional 3D workflow to an immersive creative experience with the software Modo, created by Luxology. Modo is the next evolution of 3D modeling, painting and rendering for Mac and PC. Modo includes 3D sculpting tools, animation and network rendering, and advanced features such as n-gons and edge weighting.
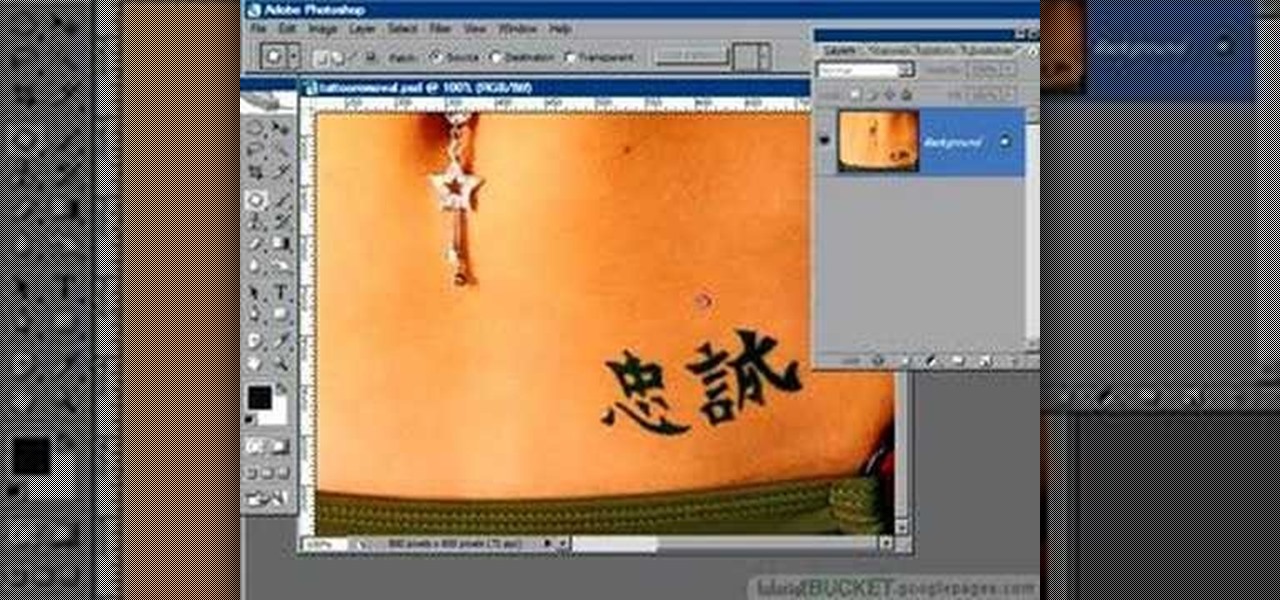
Hidden features of the Patch tool revealed as we wipe out some nasty looking tattoos. Use Photoshop CS4 to fix the tattoos or body scars with the Patch tool. Remove your ugliest mistakes with the Patch Tool, a tutorial from TutorialBucket.
Any hacker worth her salt will need to debug from time to time. One particularly efficient way to check your code is with the RATS code checking tool. In this video, you'll learn how to use the RATS code checking tool for C/C++, PHP and Perl. For a detailed walkthrough on how to use RATS scanner to audit your source code, take a look!
This image editing software tutorial shows you how to use the healing brush tools in Photoshop CS3. Think of them as first aid for your photos! Watch and learn how to use The Clone Stamp, Spot Healing Brush, Healing Brush, and Patch Tool to retouch photos in Photoshop CS3.
This 3D modeling software tutorial shows you how to use the split polygon modeling tool in Maya. Learn how to use the split polygon tool to get full control over adding detail to your polygon object in Maya.
After you've assembled your clips in order, you can fine tune your sequence by trimming the edit points between each clip. This video explains the many tools you can use to make trimming videos easy and precise, including the ripple and roll tools. These tools allow for seamless editing.
By following along with these tutorials, you can learn not only how to draw the popular Nintendo character Sonic the Hedgehog, you will also be able to master many of the basic and intermediate drawing tools available in Adobe Illustrator 5.
This is a quick little tutorial for someone who wants to learn how to do better puppetry or puppet effects in Adobe After Effects. Use the Puppet Tool and the DuIK Tools on your next animation project using inverse kinematics.
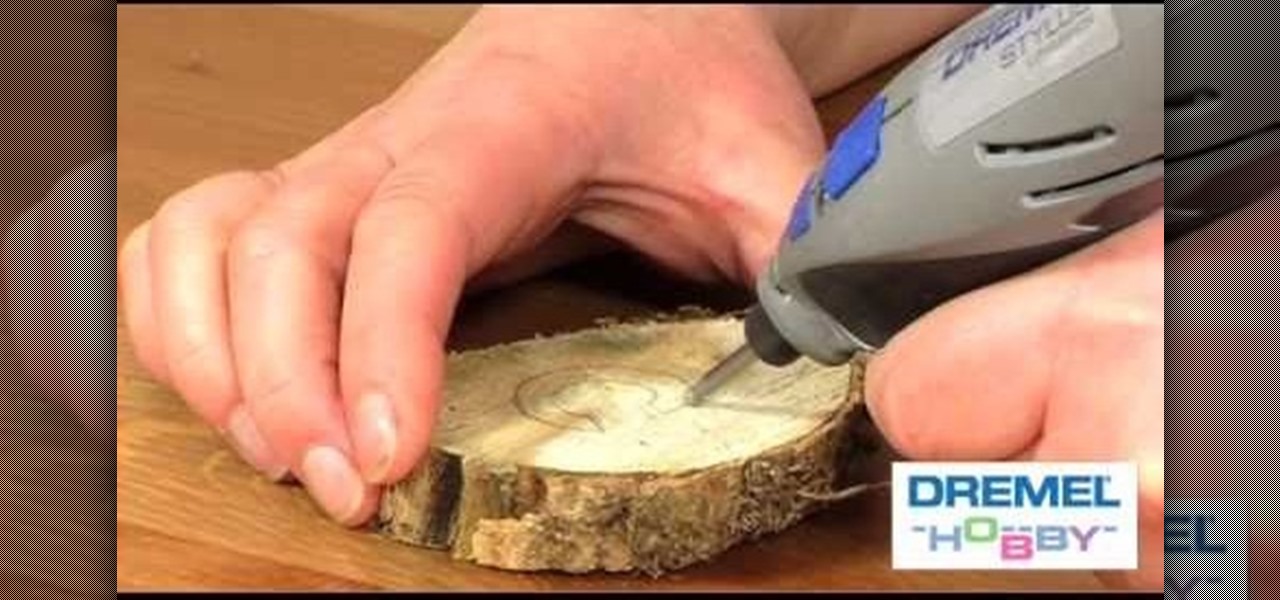
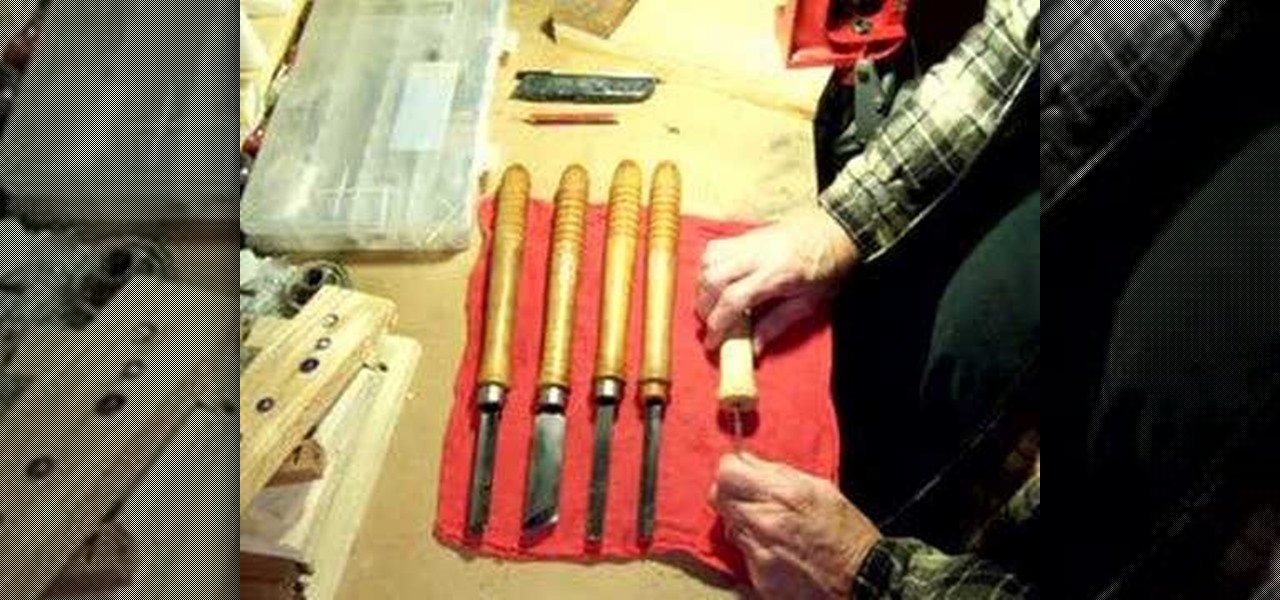
The Dremel Stylus tool is ideal for any wood worker or wood crafter. This versatile and easy to use tool can let you carve or whittle any number of projects out of wood, such as a wooden relief. This video demonstrates how to carve a piece of ivy onto a wooden box.
Tim the tool man Taylor would do his famous grunt in favor of this manly way of carving a pumpking. Rather than use your typical pumpkin carving tools like a mini knife and sharp picks, you'll learn how to employ a faster course of action by using power tools to blast those contours off.
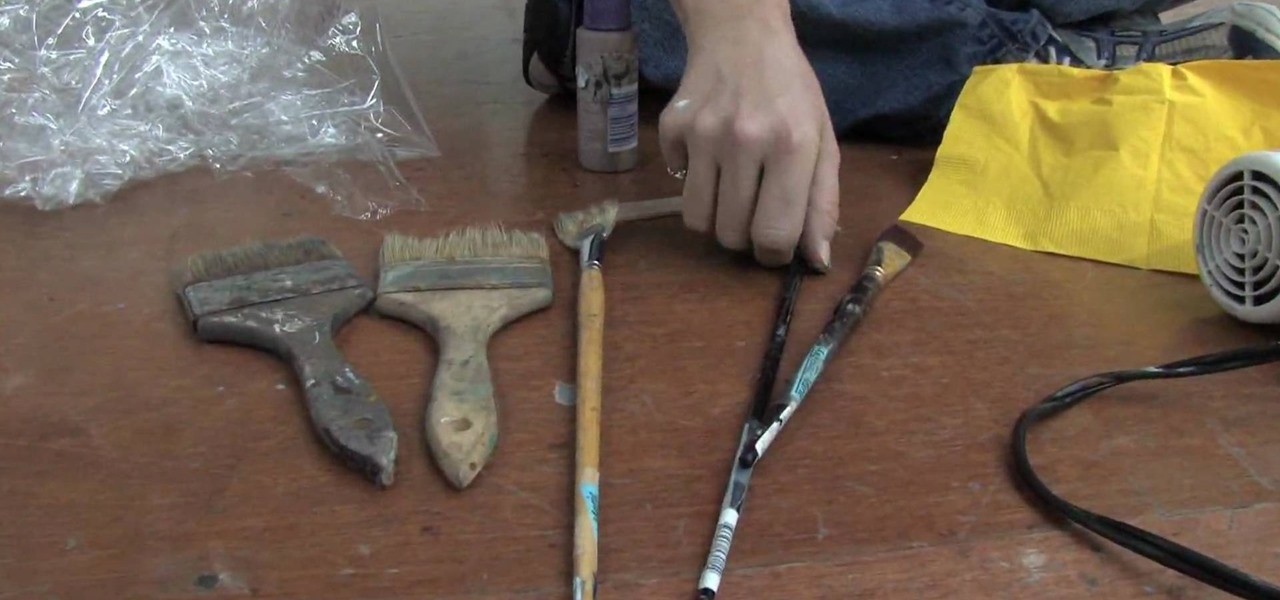
In this tutorial, we learn how to understand artist tools for painting. The first tool is plastic, which can be use for great textures on the painting. Cheap brushes are great for painting in big spaces and fan brushes are great for painting wider widths. A badger hair brush will be best for painting tails on canvas and different types of papers. A synthetic brush is very easy to clean and perfect for oil or acrylic paint. A hair dryer is a tool that is great to speed up the drying time of pa...
In this Software video tutorial you will learn how to use tool shortcuts in Final Cut Pro. To change opacity and the volume limit, click the little mountain button on the bottom and you will have two lines in the clip representing audio lines of two mono tracks. And you also have opacity located above the audio lines. With the help of the slide bar you can set the opacity. To get the pen tool press 'P'. To get out of any tool, press 'A'. To delete the entire audio track, select it, lock, dele...
The great thing about woodworking is the ability to do whatever you want to something using various styles and tools. Whether you're making a bird house or a table, there are plenty of ways that this can be done.
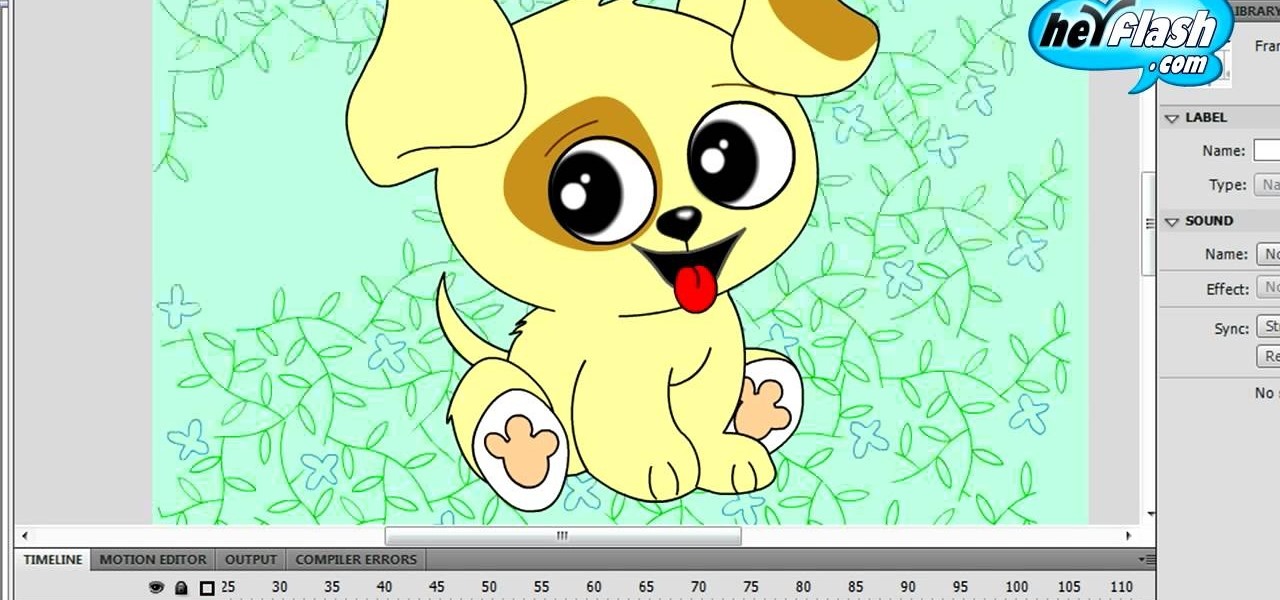
Flash CS4 has a lot of powerful new tools, and if you've used previous versions of the software it can be difficult to figure out how to use the new features. This video explains how to use one of the new features, the Deco tool, to animate cool backgrounds and other parts of an animation. Make sure you're using every Flash tool you have at your disposal!
If you've recently purchased a Kreg Jig, you've probably recieved the plans for bulding certain items, including a work bench. If not, it's okay, you can head to their website for the guide. So, in this tutorial you'll find out how to build a workbench using your Kreg Jig tools. It's a great place to keep your tools and will make life much easier for you whenenever you need something. Enjoy!
In this video, we learn how to use the Cool Noodle Tool to make noodles make from thai coconut, auzzhini, jicama, daikon radish and yellow squash. First, grab a half of a coconut and your noodle tool. Take your tool and scrape the inside of the coconut and you will have coconut noodles in no time! Do this for all of your different vegetables, whichever you prefer. Place all of your vegetable noodles into a large bowl and you can now prepare these with any sauces that you prefer. This tool mak...
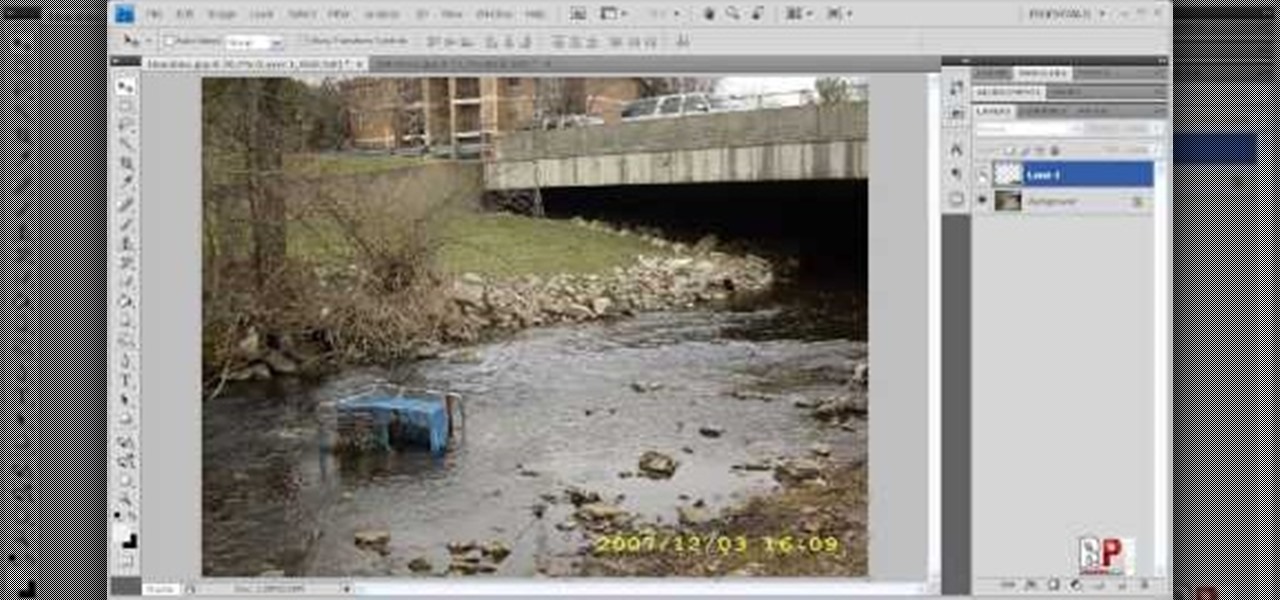
There are various ways to remove the timestamp on your photos using Photoshop. You can use the crop too and crop out the photo, but then you'll lose parts of the photo as well. You can use the patch tool, and draw a border around the date, then drag the date to another area, let go and press ctrl+D. The time will disappear and the area will be patched up with surrounding colors. Another method is to use the spot helium brush tool, and simply just brush over the text, and the spot helium brush...
In this video, learn how to jailbreak your iPhone (Mac or Windows) with a Pwnage tool in order to not get a 1600 error. In order to complete this tutorial, you will need the following downloads:
In this video tutorial, viewers learn how to tie a fly fishing line to the backing. Users will need a nail knot tool. Put the backing into the tool, leaving about 6 inches sticking out. The wrap the line around the tool 5 times, pushing the loops together. Take the end of the line and run it through the groove of the tool. Put the fly line through the other end about 2-3 inches. Then hold the loops in your hand, remove the tool and pull on the backing to tie it. This video will benefit those ...
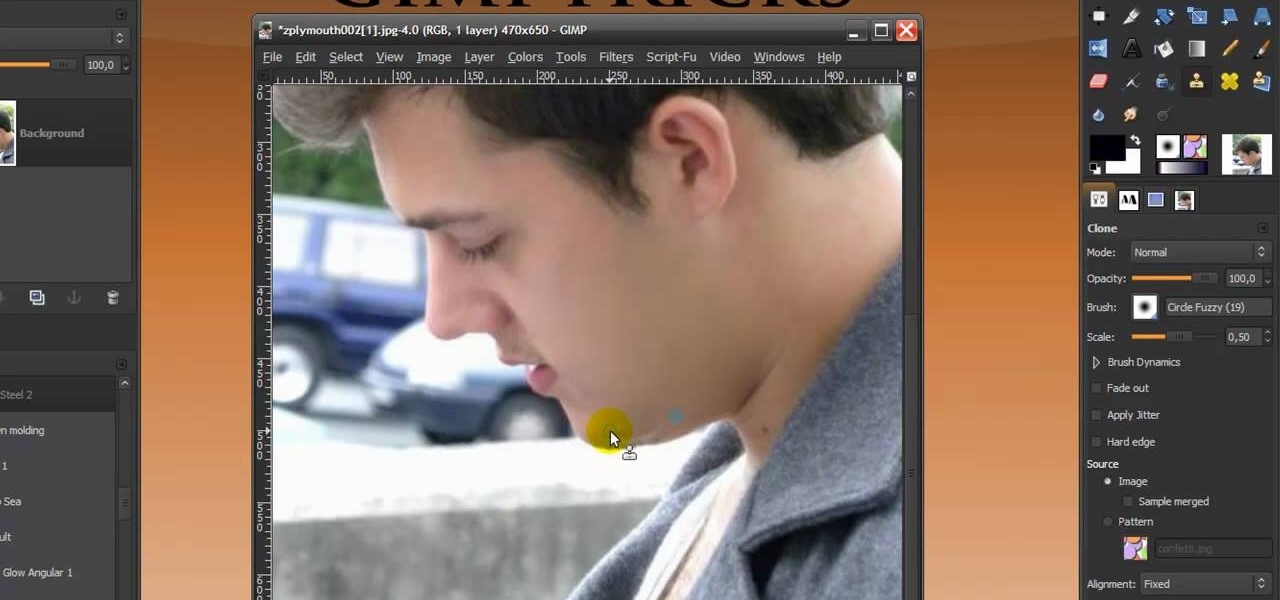
In this Software video you will see how to give someone a shave in GIMP. Learn spot removal, skin smoothening and a makeover or removing a 1 day beard. This is done using the Clone and the Healing tool. To use the Clone tool, select the tool from the right hand panel. Then to select the source skin color, you have to hold ctrl key down and click. Now when you apply it to the area you will get the same shade of the source color. So, you will need to select an area very close to the spot you ar...
In this video the instructor shows you how to mount ISO images. You can use your ISO images of CD or DVD with out burning them on to real disks. Using this you can play a DVD with out a DVD player. Use DVD shrink to extract the copy of ISO image from your DVD. Go to internet and install Daemon tools lite program. After installing you will see an icon in the tray which says daemon tools. Right click on it and select the Virtual Devices option for the menu. Inside it select the virtual drive yo...
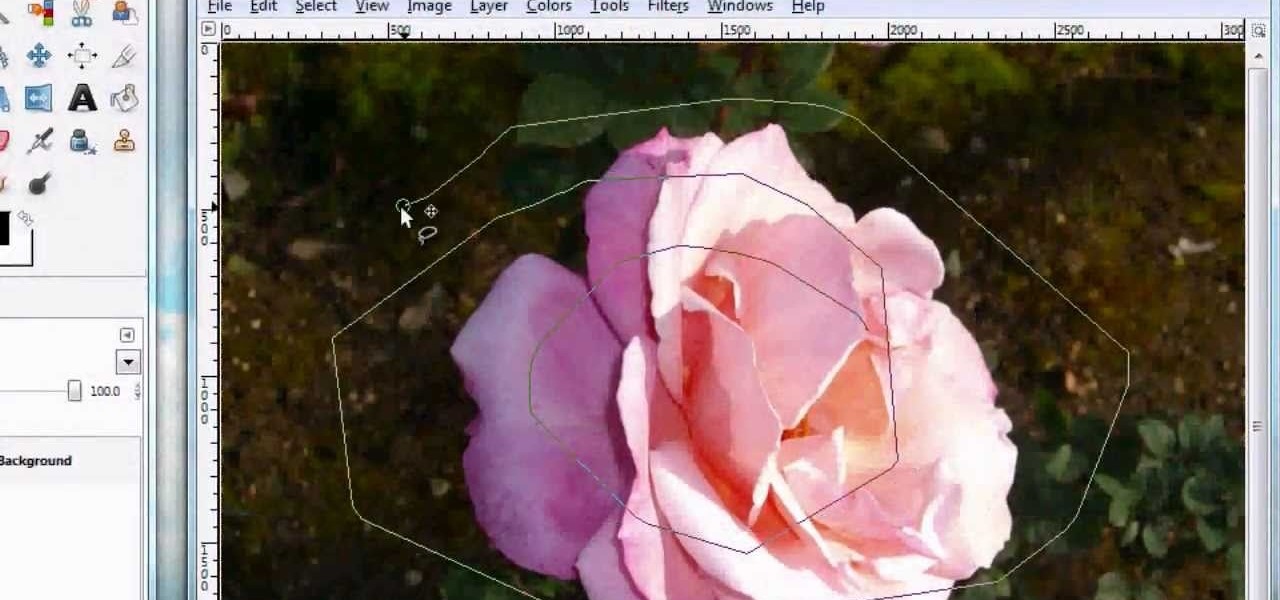
For anyone looking to edit a picture with one or more persons down to just a single person in the picture, you can use GIMP. This video tutorial goes over how to utilize the paths (or pen) tool and foreground select tool. The paths tool allows a person to select a part of an image to create a series of lines, or paths, that allow you to create a path around whatever you want to select in a picture. This item can then be moved and copied to a completely different photo. The foreground select t...
In this tutorial the instructor shows how to use commenting tools in Adobe Acrobat 9. He says that the look and feel of the commenting tools are very similar to the previous version tools which were used to mark and comment documents. He shows how to open the comment button from the menu bar and explains about the options present in there to use the commenting features. He demonstrates many ways to enable comments and markup tool bar in the application. Now he shows about the various ways of ...
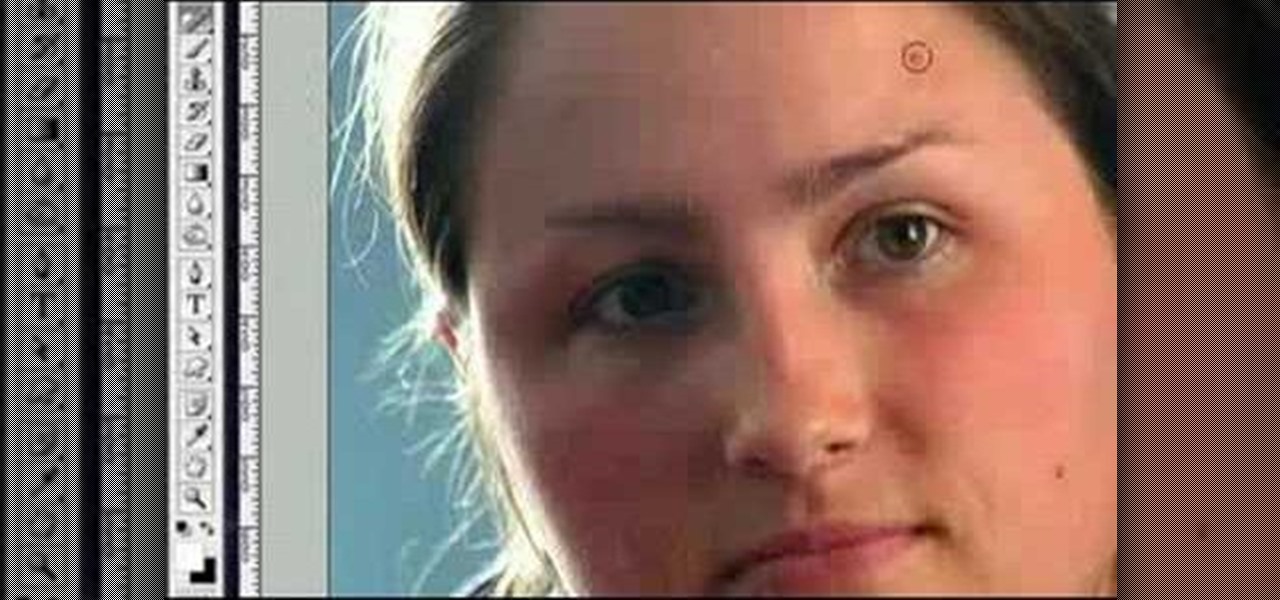
This episode of TUTCAST shows you how to get rid of blemishes in your photos using Photoshop. For this demonstration the patch tool in Photoshop is used to clean the blemish. Use the elliptical marquee tool to select the area including the blemish as shown and then feather the selection using the selection modify feather command. Use the patch tool to patch the area with the blemish and use the clone stamp tool to clean up the unevenness as demonstrated.
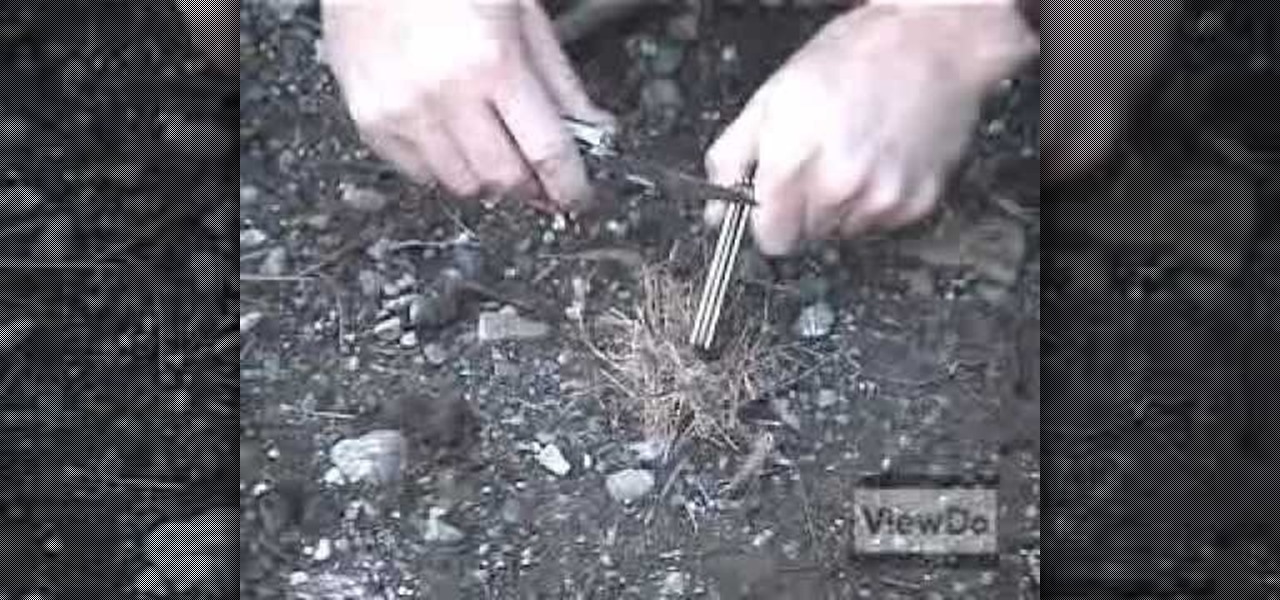
Do you want to learn how to make fire with a magnesium fire tool? Then all you need is a magnesium fire tool and this video. First of all, you need some kindling ready such as dry grass, small leaves, twigs, etc. Create a small pouch for the magnesium strips, then shave small pieces of magnesium into this pouch. Then, use your knife and move it against the flint side of the tool. This will cause a spark, which will catch on fire and the magnesium will assist in allowing this flame to grow. La...
Photo editing expert Chad Troftgruben teaches the viewer how to effectively use the quick selection tool in Adobe Photoshop. In Chad's opinion, the quick selection tool is quite similar to the magic wand tool in the same software, except for one major difference: one can select a particular object, even in a complex picture, simply by holding down the left key of the mouse and moving the pointer over the object. Chad also points out that the quick selection tool saves a lot of time and is ver...
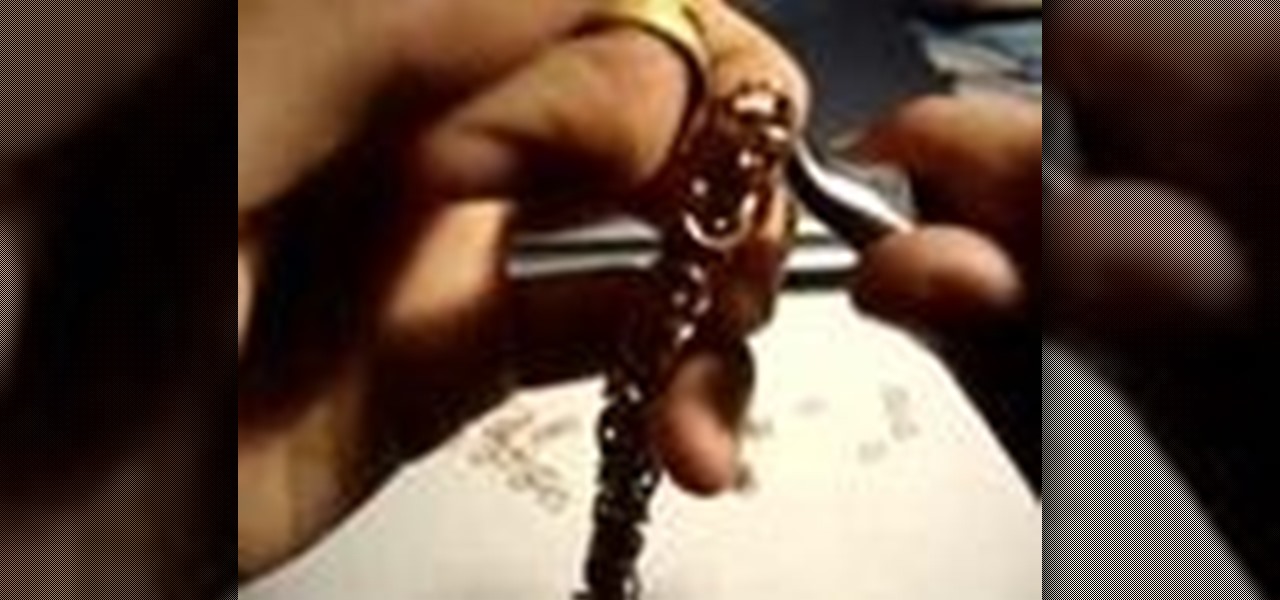
This little ring is a frequently used chainmailing tool. The ring tool substitutes for a pair of pliers, and works for about eighty percent of chainmail patterns. Watch this metalsmithing video to see how the ring tool is used.