Saturated blues plucked from the sultry night sky, warm jewel-toned aureolins that pick up the hues of the desert, and sparkling fuchsias like the colorful wraps and semiprecious jewelry worn by the exotic women of Morocco.
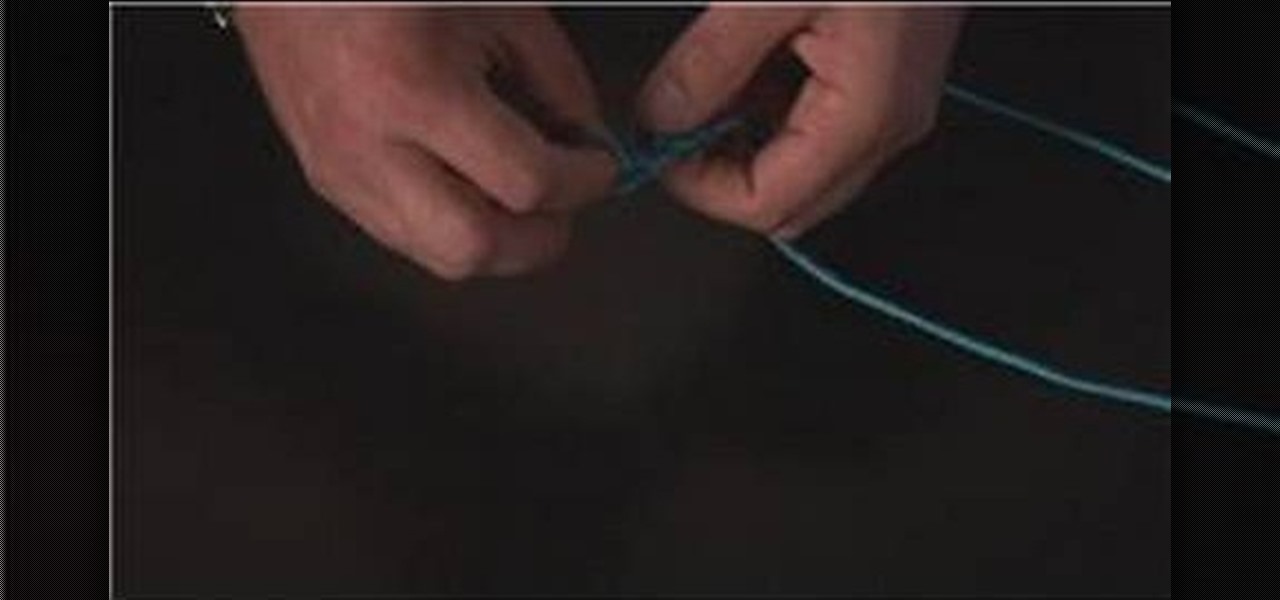
Know your knots! With this free video tutorial, you'll learn how to tie a simple chain jeweler's knot. Chain knots are attractive knots and are used in a lot of jewelry projects. The knot is easy to tie provided, of course, you know how to go about making it. For an easy-to-follow, step-by-step overview of how to tie this useful crafter's knot in a minute's time or less, watch this free video knot tyer's guide.
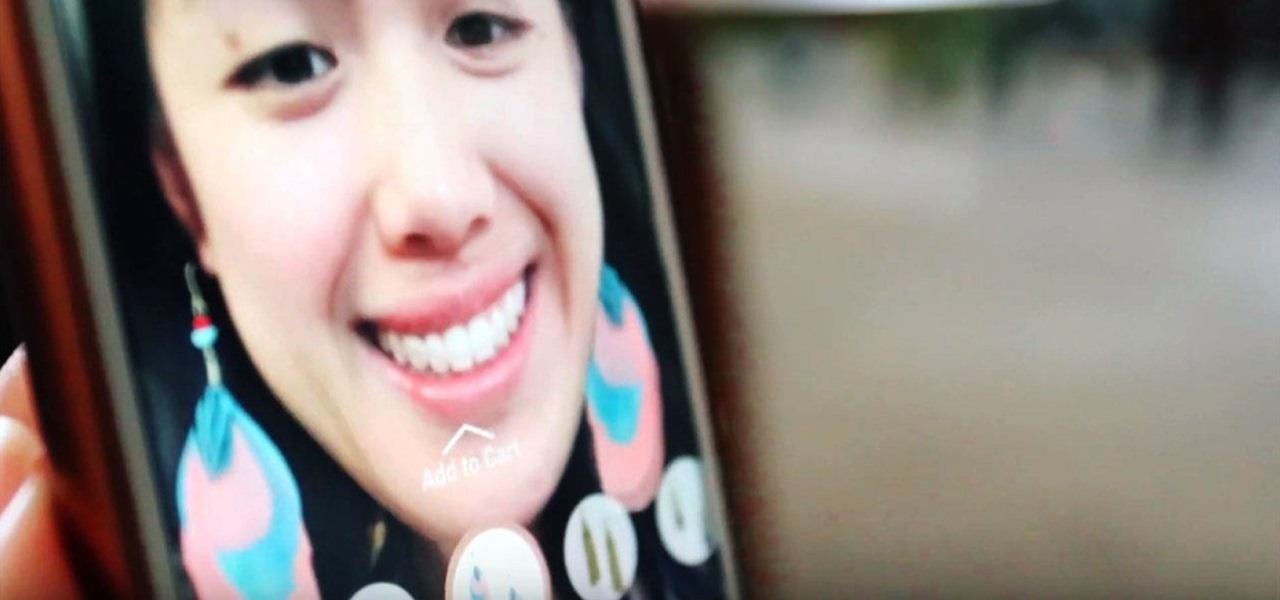
The natural marriage between fashion and augmented reality is charging onward, but not just from the major brands we already know about.
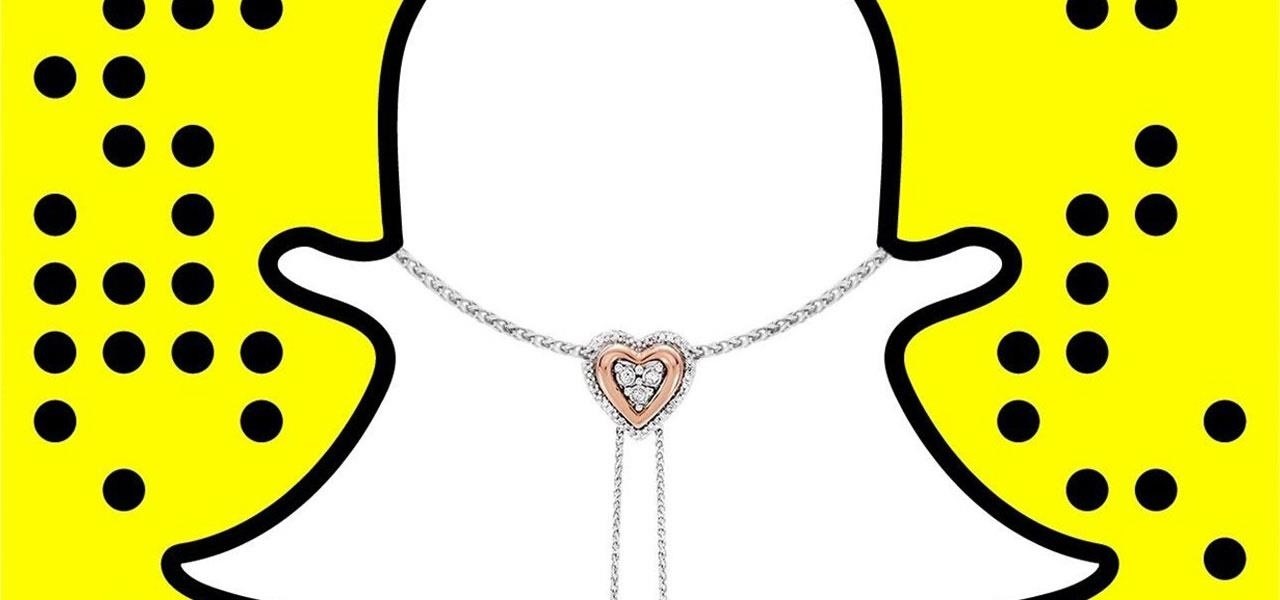
Rabbit ears and dog noses are fun and all, but Kay Jewelers is here to class up Snapchat.
Soups do not have to be limited to winter. Daal soup can be enjoyed anytime of the year. It is so hearty and filling, that we really do not need anything else with it. But if you are one that has to have bread, rice or chapatis, go ahead and do just that! Watch this how to video to learn how to make Indian style daal soup.

If you're looking for survival knots or nautical knots then you've gone to the wrong place. But if you're looking to bolster your oeuvre of fancy, beautiful knots, then you've stumbled upon the right video.

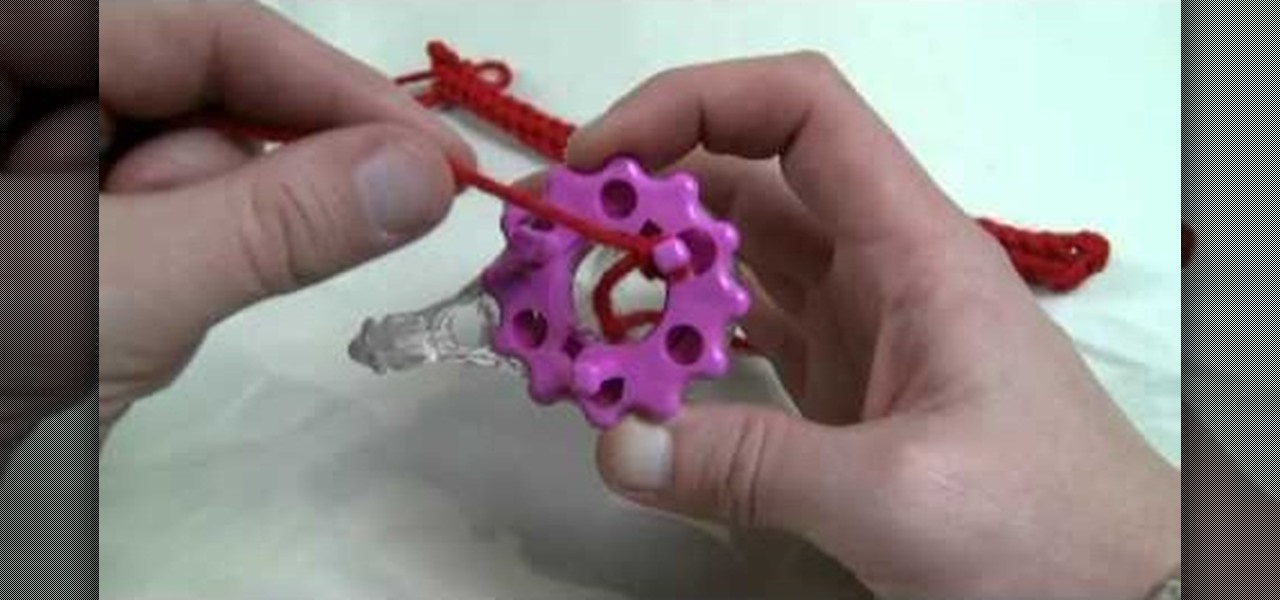
If you've already tried the 3-pegged head on the Clover Wonder Knitter, it's time to try out the 6-pegged one. The Crochet Crowd shows you how to cast on from the 6-knobbed head with ease. This tool is a great way to experiment with your knitting skills!
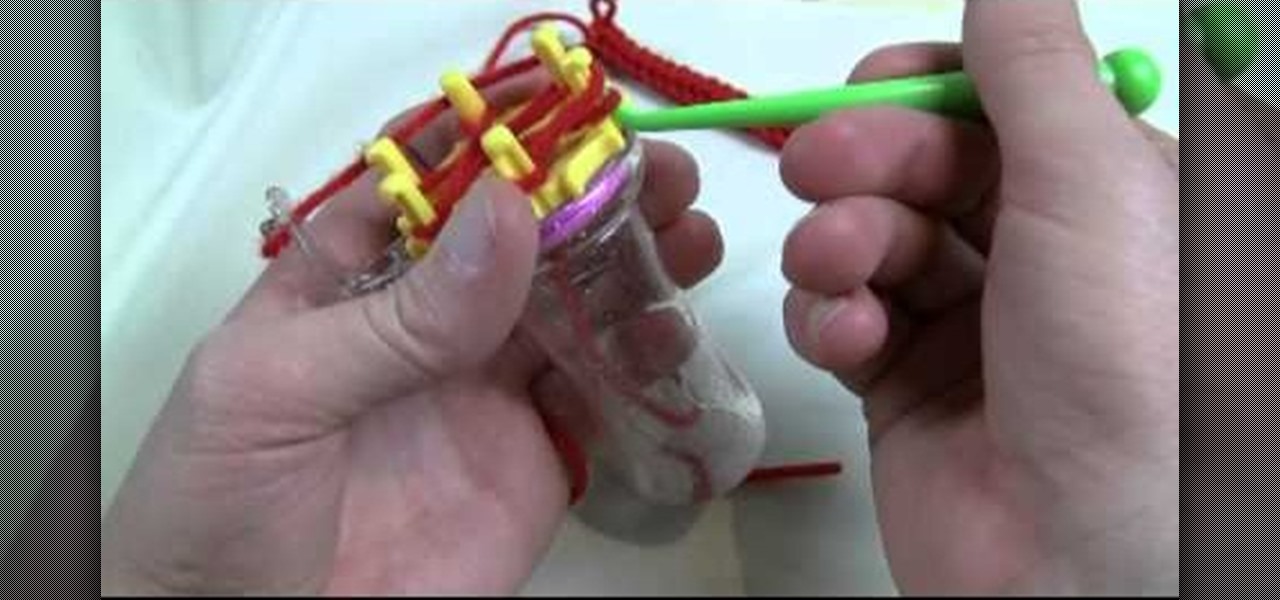
Clover's Wonder Knitter is a nifty little device that comes with a 3- and 6-pegged head. This is a great little device to experiment with and The Crochet Crowd is going to show you how to cast on from the 3-knobbed head. Also, check out the 6-pegged head tutorial.
In this tutorial, we learn how to give personality to your puppets with Paul Louis. Personality is everything when it comes to puppets. Your design should give the puppet a certain type of personality. Create a voice when you put the puppet onto your arm and use it to become a new character. Use different styles of clothing and jewelry accessories to make the character different. Give the puppet the look of the voice you are going to give it. If you want it to look tough, give it a leather ja...
Navigating on your HP TouchSmart 3.0 PC is easy, fun and takes nothing more then your fingers. To click, simply create a single point of precise contact between your finger and the screen. The HP TouchSmart uses optics to determine clicks so avoid leaning on it with your hands, knuckles, large jewelry or the random fly. The screen is not pressure sensitive so pressing harder has no effect. To right click you simply press and hold. For tasks that require multi-touch input use more than one fin...
Chainmail is quite difficult to make, but with this two part tutorial, you will soon be on your way. In these videos, learn how to make a piece of classic chainmail armor at home. Make smaller pieces to use as jewelry or decoration or make a whole suit for a cool knight costume.
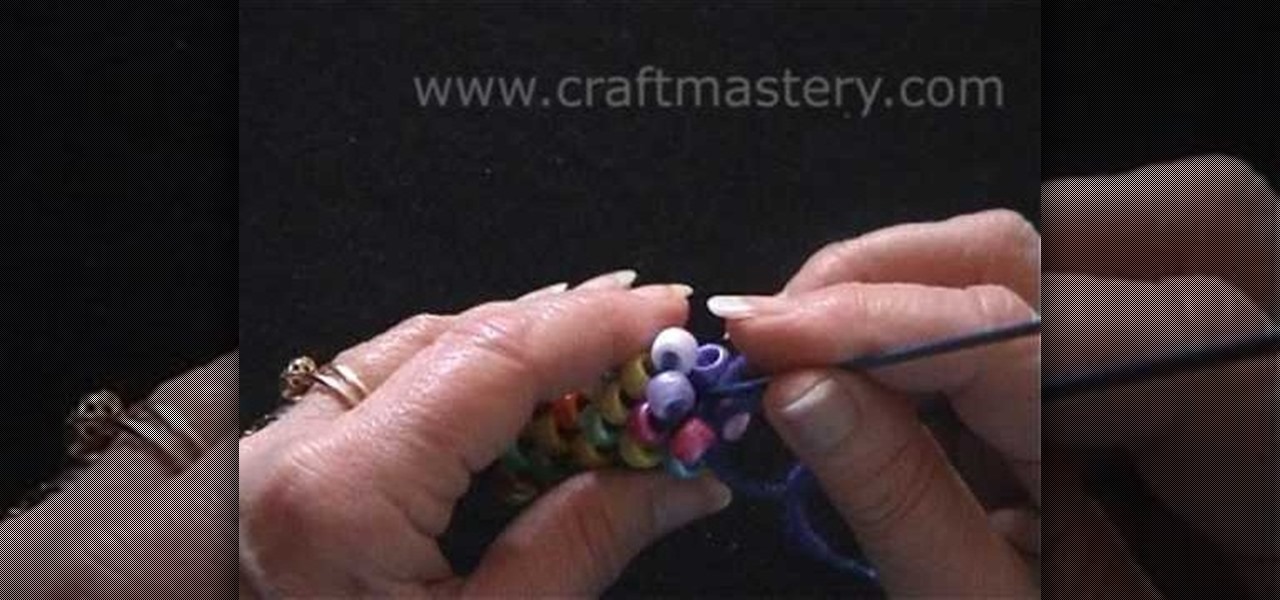
For anyone interested in learning a new jewelry technique, this video tutorial shows how to crochet a bead rope necklace. You can use large pony beads like the video tutorial, or use much smaller beads. The pony beads are suggested for beginners so that you can see what you are doing. To begin, thread all of the beads you will use onto your yarn. You can alternate colors or place them onto the string at random. Both techniques will yield two different effects. Begin with six chains slip stitc...
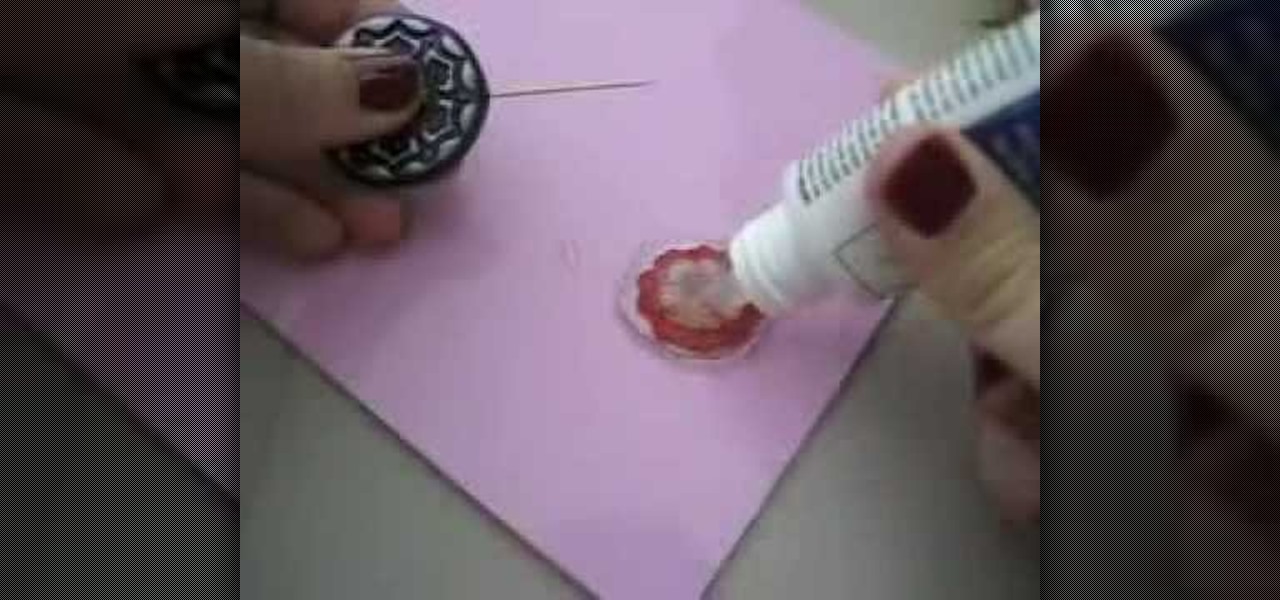
Polymer clay has become a very popular modeling material. This narrator uses magic gloss UV resin and a needle tool for this video. A silicone pad is useful for the mixing process. Once a small amount of resin has been squeezed out, you can sprinkle glitter onto it, spread it out and allow it to cure a little. Once this has happened, a pressed flower can be stuck onto the surface and sandwiched between another layer of Magic Gloss. Once hardened, the flower is encased in the clear layers. Thi...
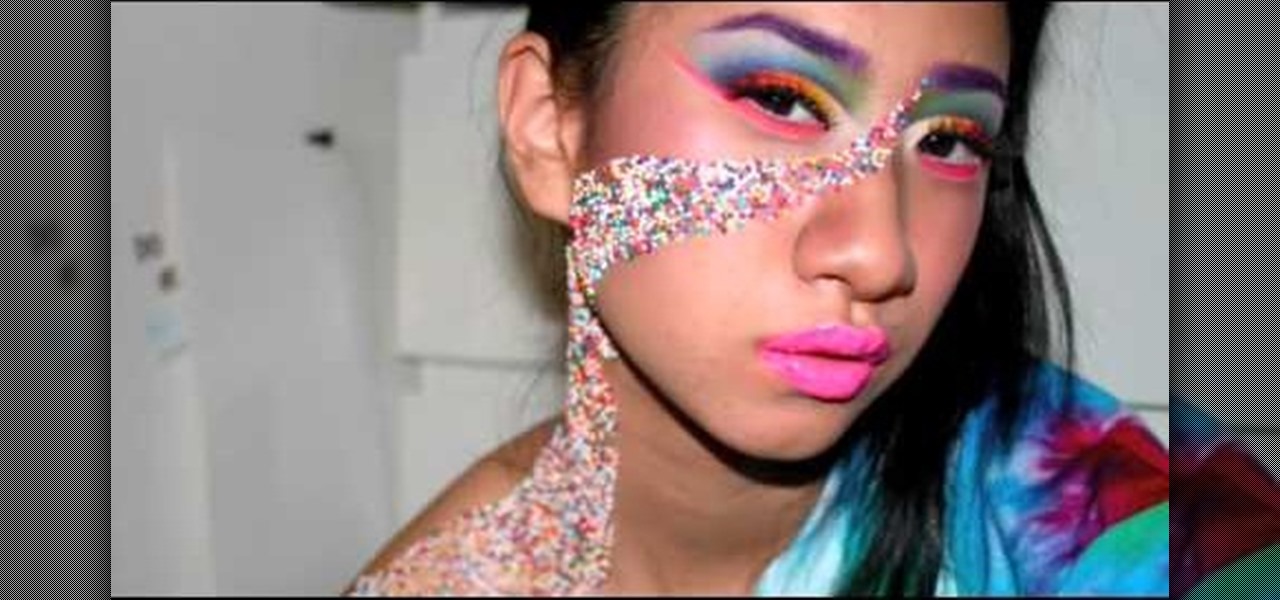
Aspiring makeup artist demonstrates how to apply nonpareil sprinkles to achieve a candy-inspired look Purchase rainbow-colored nonpareils (tiny round sprinkles). These can be found in the baking aisle at your local grocery store. Apply sprinkles using a clear sticky lip-gloss. Create unique patterns, such as this swirl from the corner of the eye to the collar bone. Pair with candy-inspired jewelry and a chunky bun positioned high on the head to finish the look. Follow these suggestions to tur...
In this tutorial, we learn how to pierce your lip and hide it. First, you will need to get a safety pin and clean it off with alcohol or antiseptic. From here, you will then mark the spot on your lip that you want to pierce. Once you have this lined up, you will need to numb the area with some ice so you don't feel the piercing as much. After this, pierce the pin through and then place the jewelry inside. Clean this off when finished with some Listerine. Stick a new stud in your mouth backwar...
In this tutorial, we learn how to pierce your own lip like an emo kid. First, grab a safety pin and put heat with a lighter to it. Let this cool off, then put gloves on your hands. Mark where you want the piercing to be on your lip and look in the mirror to make sure it's in the right spot. Once you have this spot picked out, then you will poke the safety pin through the spot until you poke through the other side. Use tissues to clean up any blood that comes out. Next, you will slip the jewel...
In this video, we learn how to pierce your own lip and avoid infection. First, mark the spot on your lip where you want to pierce it and then check it in the mirror. After this, grab your needle and clean it off with antiseptic or mouth wash that has alcohol in it. Push the needle all the way through the spot on your lip and then place the jewelry into your lip. Once finished, you will need to rinse your mouth out with mouth wash that has alcohol in it. Make sure to clean this regularly so yo...
In this video, we learn how to start stretching your ears. To do this, you will need a tapper that is small and pointed at one end and large and thick at the other. You will also need cleaning supplies to sterilize and clean out your ears. You can also use pinchers, because they will distribute out weight evenly around your ears. When you first place these in your ear, it may pinch a little bit. Leave the pinchers or taper in your ears and then keep them locked down with new jewelry. After th...
The bohemian look has really been in recently. After all, with famous starlets like Nicole Richie and Jessica Szhor working long, messy waves, beaded headbands, and flowy floral maxi dresses, the trend looks good and we don't mind following along.
In this tutorial, we learn how to pierce your cartilage. To do this, you will need: gold/silver earring, alcohol, and paper towels. To start, you want to mark the spot that you want to pierce, then clean your needle and the area with rubbing alcohol. Now, pierce the needle through the area you want it to be. Keep pushing the needle through until you get to the other side, then replace the area with the jewelry as you go. You will pass several different layers of skin and cartilage, so be prep...
In this Outdoor Recreation video tutorial you will learn how to abseil (decend) in rock climbing. You will need some friction device for this purpose. Earlier people used to wrap the rope around their body and used the body as the friction device. That is a painful process. In the modern method, a figure 8 friction plate is used. There should be no jewelry or other hanging material around the body that can get entangled with the figure 8 plate. Also check the harness is OK. Then carefully go ...
This video explains how to make a polymer clay "rainbow cane," which, amongst other things, can be used to make jewelry or pendants. First, you must run a conditioned piece of each color of clay through a pasta machine. Then, cut each color into a square, and from there cut each square diagonally, creating triangles. Arrange the triangles side by side and attach them together, so that you create a large rectangle of the colors. Run this rectangle through the pasta machine several times, until...
She teaches us how to make a beautiful jewelry pendant for a necklace out of polymer clay. She starts with kneading a black base. She then sends it through a pasta machine. After she has a black flat sheet she rolls it into a ball again. Then, she takes the other five colors and starts rolling tiny little ball. She attaches them to the base black ball. Next, she creates a snake with the colors swirling around. She sends it back through the pasta machine to create a perfectly flat surface. To ...
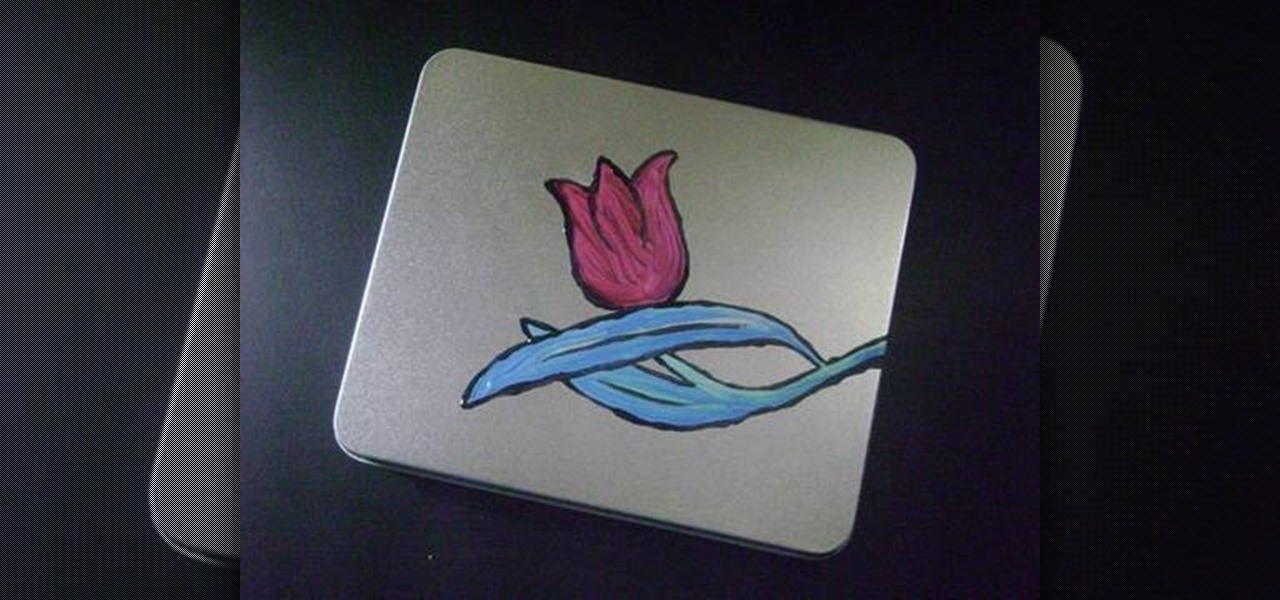
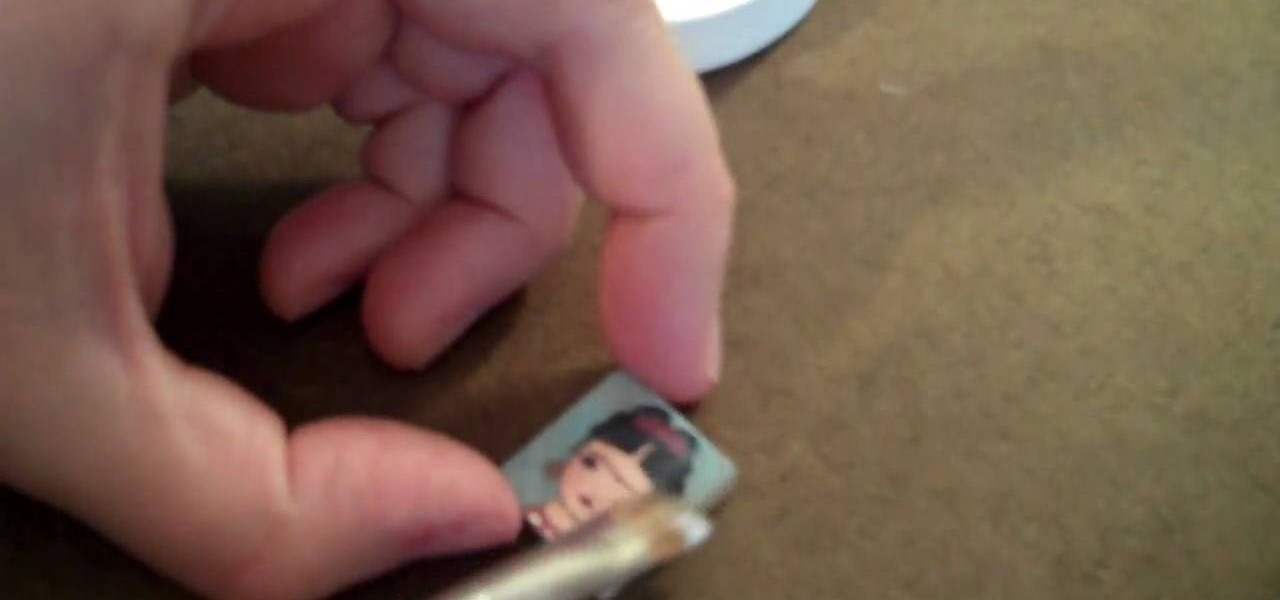
Simple Kids Crafts demonstrates how to make a decorative painted tin case for a mom's jewelry. To make the decorative case, you will need one recycled tin case with a lid, paint, and thick and thin paintbrushes. First, use the thin paintbrush to paint green stems of grass on the tin. Then, use the blue paint and a thick brush to paint grass blades on the tin. Use the red paint to paint a large red flower on the tin case. Let the paint dry. Use a thin paintbrush to accent and outline your flow...
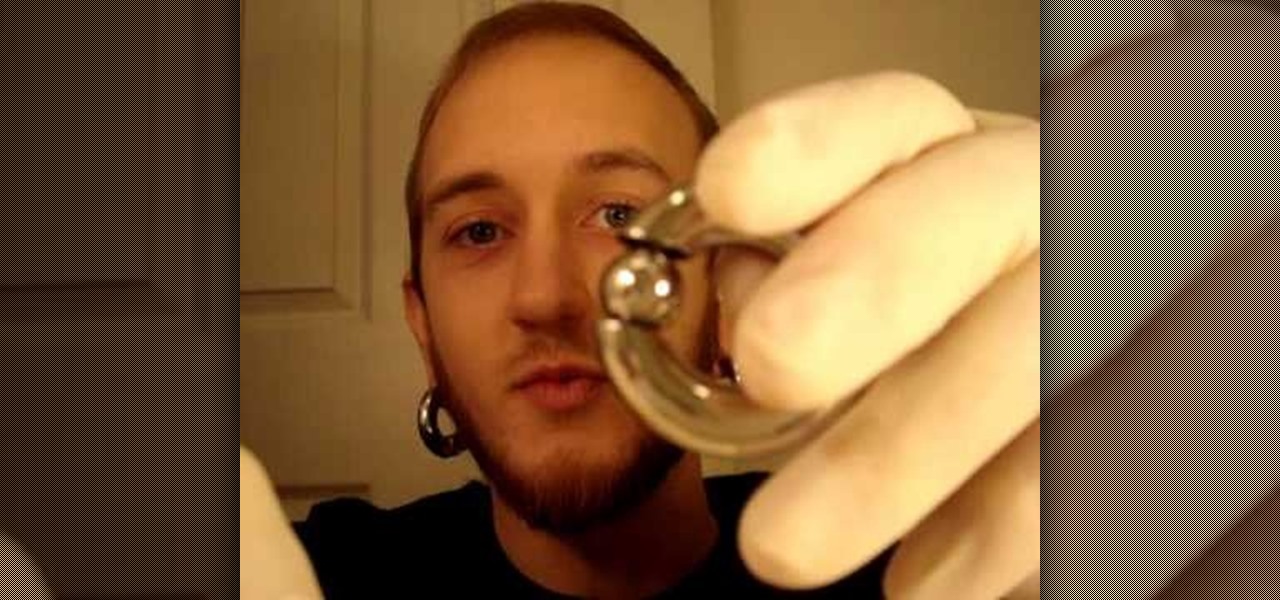
You've graduated to a bigger gauge. Unfortunately this means you can't put it in the same way. Get some tools!
So you want to get a piercing but you don't want to get impaled and infected. This video walks you through the do's and don'ts when looking for a great piercer.
Preproduction work when making glass beads will ensure your tools are working correctly, and your glass is ready to melt. Learn about preproduction for glass working with this free jewelry making video series.
If your idea of jewelry making is simply strining on glass beads and vintage knick knacks onto a string and then adding a clasp, then you have some serious learning to do. While in the end creativity trumps all, it's important for many intricate projects that you calculate exactly how much of one particular stone or filigree stamp you need. And in order to do that, you must measure them.
Scrabble charms and pendants are gaining popularity in the world of crafts, because they're easy to make and fun to wear. They make great gifts, can be fully personalized and turn Scrabble into more than just a board game!
Scrabble isn't just for playing Scrabble anymore— there's a whole world of uses for the game and its pieces. One particular use is in jewelry— those Scrabble letter tiles are the perfect size for creating DIY pendants!
This video shows how to make a cute vintage looking jewelery box. A cardboard cheese box forms the body of the jewelery box. Other items you will need include mod podge, white glue gesso, masking tape, ribbons, a mirror from a compact, some fabric, and some faux pearls and flowers. Begin my removing the labels from the box. Paint the inside and outside of the walls of the box and the lid. Paint the areas of the box that you just primed with gold metalic paint. Now use the box to trace three c...
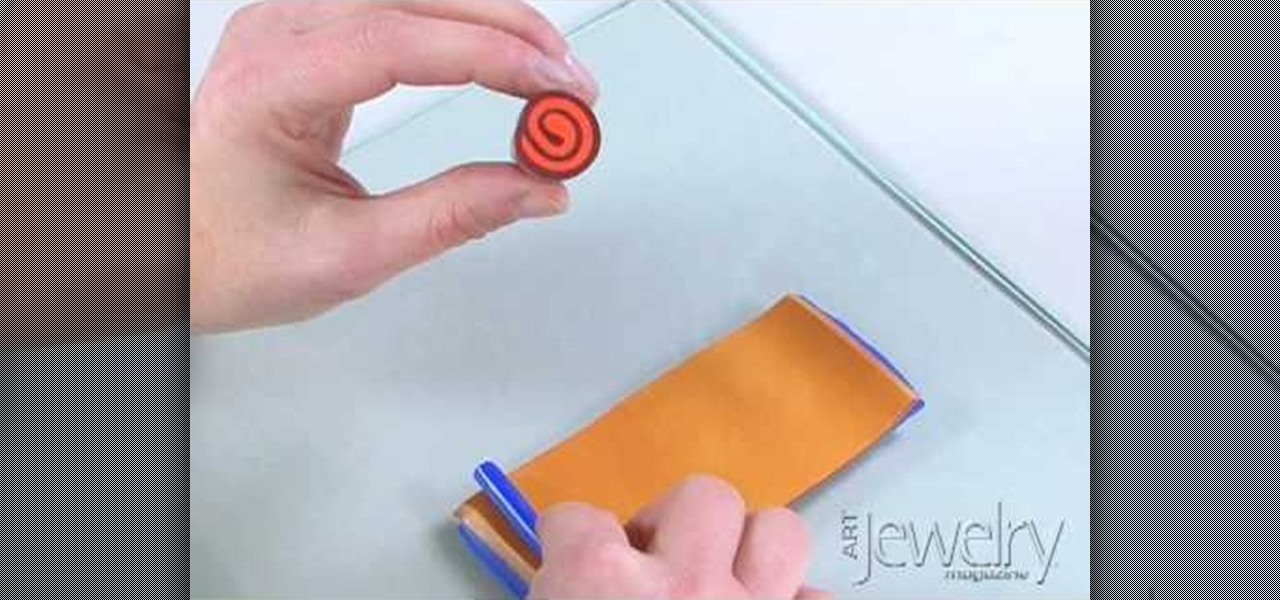
Jill Erickson from Art Jewelry Magazine demonstrates how to make a Jellyroll cane with polymer clay. Condition two different colors of clay by running them through a pasta machine set on medium. Then, trim off any rough edges. Stack the clay on top of each other and place a little bit of pressure on it to confirm the two layers. Using a blade slightly bevel the edges. Slide the blade underneath the two layers of clay for easier handling. Place a think snake of clay in the contrasting color on...
Wrapping leather is the least of your worries when it comes to the meticulous and dexterous art of making jewelry. IIf you have the basic jewelry making skills down, doing this wire-wrap on leather should be a cinch.. This demonstration video will help walk you through the process of wire-wrapping leather.
This lobster claw isn't the same one you'd be cracking during dinner. This lobster claw is a clasp for jewelry making. Great for necklaces or bracelets. If you've perfected the meticulous and dexterous art of jewelry making, than this should be simple. This demonstration video will help walk you through the process of attaching a lobster claw clasp to your work of art.
If you can do a crimp, you can easily do this bead tip attachment. Though meticulous and dexterous, jewelry making isn't as hard as it seems, especially when attaching beads. This demonstration video will help walk you through the process of attaching a round leather bead tip to your jewelry masterpiece.
One of the hardest parts about jewelry making is the knot-tying. It's an intricate process, much like jewelry making in general, which is meticulous and dexterous. Working with leather is also more difficult because of it's thickness and un-malleable contour. This demonstration video will help walk you through the process of tying a knot end with leather.
The clam shell is a clasp for homemade jewelry. Putting a clam shell on can be difficult, because jewelry making is meticulous and dexterous, but with a crimper, it should be easy. But a crimper isn't all, a pair of pliers is also needed. This demonstration video will help walk you through the process of this clam shell attachment.
Throughout the meticulous and dexterous process of jewelry making, when you get to the end of your bracelet or necklace, there's a feeling of accomplishment and satisfaction. But to seal the deal, you need to crimp. Crimping is a necessary process for the ends of your homemade jewelry. This demonstration video will help walk you through the process of this crimping end beads on soft flex.
Make your own lovely earrings out of Swarovski crystals! This jewelry tutoral shows you how to make a pair of eye-catching and elegant diy earrings using the crystals and an earring base, then attach them together to make your own earrings.
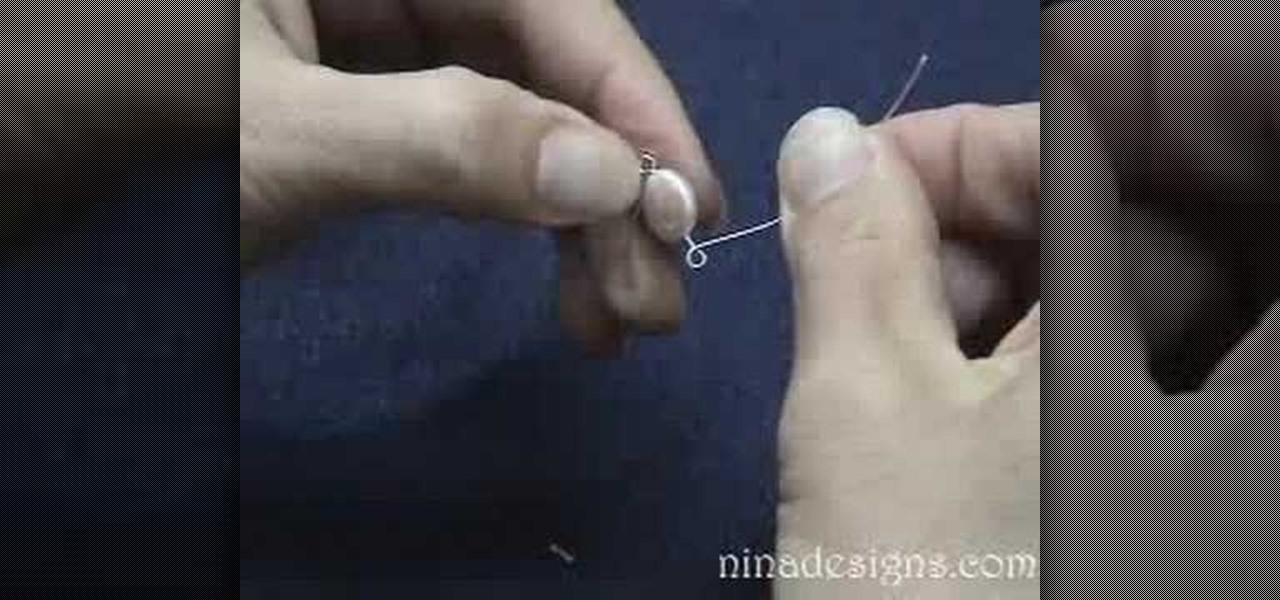
First of all you need to have a piece of silver wire which is about three inches long and twenty-two to twenty-four gauge. Now take pliers and bend the wire into a right angle. Now take round nose pliers and wrap the wire around the tip. At the half way reposition the wire and then complete the loop. Now look at the loop which should be nicely stemmed in the middle. No insert the bead into the wire and grab the bead with thin nose pliers. Bend the wire at the right angle. Now take round nose ...