This video takes us through the procedure of creating a transform effect in Illustrator. First, choose a rectangular box and fill color in it. Input some text inside the box. The font and the color of the text can also be changed. Then position the text properly. Make a group of the shape and text. Now go to effect and choose transform. Transform is a very powerful effect which lets us create duplicates. Now select the number of copies, for example, one copy. Select preview. Now set the point...

1. This video describes how to use the application Infinidock for the iPhone and iPod Touch. This is used to set how many icons to be placed per page, this Infinidock Cracked is doing full document customization like scrolling, adjustable icon amounts and can add as many icons as you want. We can download and install in the phone 2.For using Infinidock first click the "Settings" and select the Infinidock into that you can see the "icons per page" options now you can add the number of icons yo...

This video tutorial from TutVid shows how to create a simple movie poster text effect in Adobe Photoshop CS4.

Pixel Perfect is the "perfect" show to help you with your Photoshop skills. Be amazed and learn as master digital artist Bert Monroy takes a stylus and a digital pad and treats it as Monet and Picasso do with oil and canvas. Learn the tips and tricks you need to whip those digital pictures into shape with Adobe Photoshop and Illustrator. In this episode, Ben shows you how to use color correction in Photoshop.
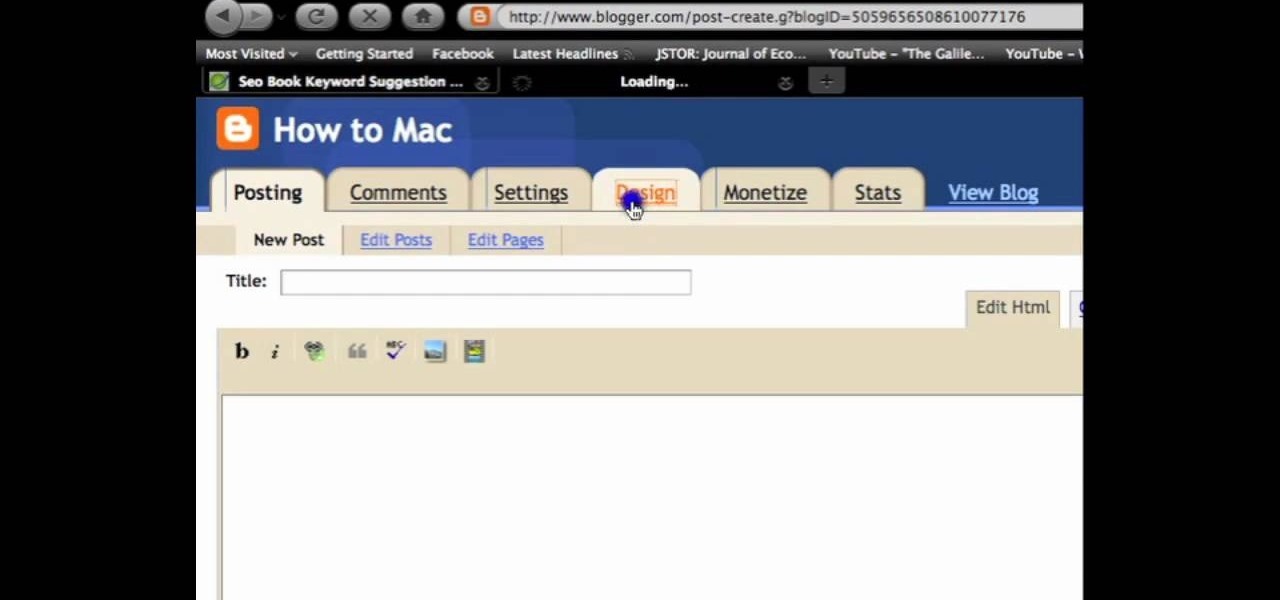
Sometimes when making a blog post you'll want to post it without any date whatsoever. To do this is easy, and this short how-to from How to Mac, makes it easy as pie. This is a tutorial on how to turn off dates on your blogger blog posts. If you want to change the blog post dating system click on the formatting tab and change the first setting. To completely turn the dates off make sure you de select both the first and third option in the edit blog post window.

In this video, we learn how to properly balance chemical equations. You will see what substances are in each side of the equation. You will then need to count the atoms that are on each side of the chemical equation. Once you write down the number of atoms on each side, you will need to even them out. To do this, you need to change the coefficients within the equation. These change the total number of atoms inside of a chemical. Once you do this, you will add more to each atom present and the...

In this video we learn how to make a hip hop beat in FL Studio. First, load up your drum sounds from the browser to the interface. After this, change the hits on the drums to make the beat sound different. Edit how high the volume is on the snare drum and then change the ghost kick so it's not too loud either. Once you have this figured out, add in the high hat and the shaker patterns. Once you have these added in and you like the volumes that they are at, you will have your very own hip hop ...
In this tutorial, we learn how to change a string on an acoustic guitar. First, you will put the string in the bridge pin. Make sure the ball from the string is against the bridge plate. If the ball is underneath the bridge pin it will make the string come out easily. After you have the string locked in, pull the string out tightly until it reaches the bottom of the guitar. Pull it to the tuner you want to wind it to, then pull it out a couple of more inches to know how much slack to give it....
In this video, we learn how to use the Ribbon and Backstage view in MS OneNote 2010. First, open up MS OneNote 2010 on your desktop. You will now see a new user interface where the ribbon appears underneath the tabs. Click the home tab to see the ribbon and then you will see the options to change font, colors, headings, and more. These help you find the features you want to change much faster and is completely customizable. The options can be located on the backstage view, which is underneath...
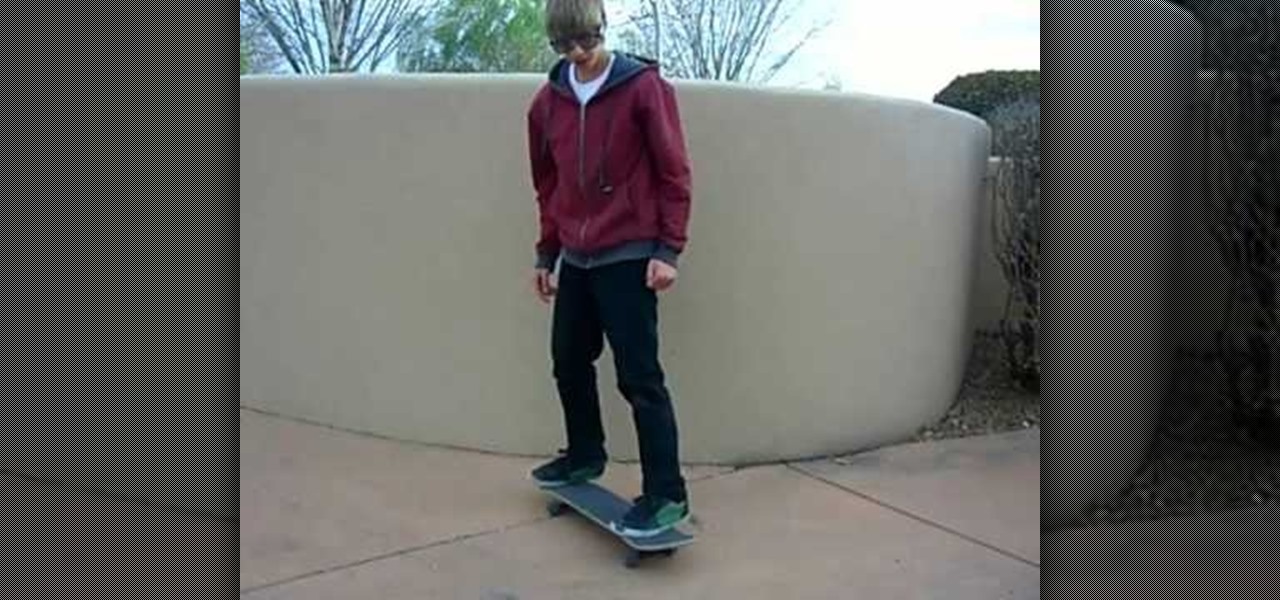
A video that teaches you the basic tricks involved in skateboarding. The demonstrator Melvin and his brother have inserted quite a few puns to make this video humorous.
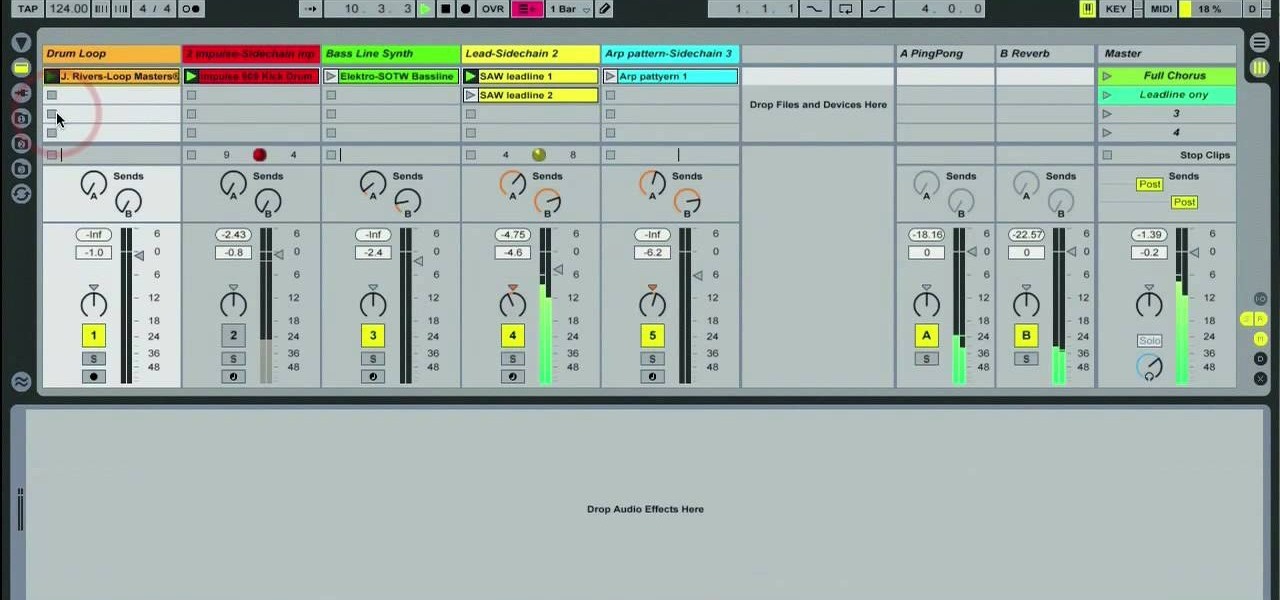
In this video, we learn how to use sidechain compression in Ableton Live 8. First, set up your tracks on the software. Open up the compressor and select the sidechain so you can decide how the impulse will sound on the different tracks. From here, change the filter type and anything else you need to change. After this, go and mute your kick drum from the track so you can better hear with the sidechain that you have activated. Continue to play your tracks and play around with how they sound, t...
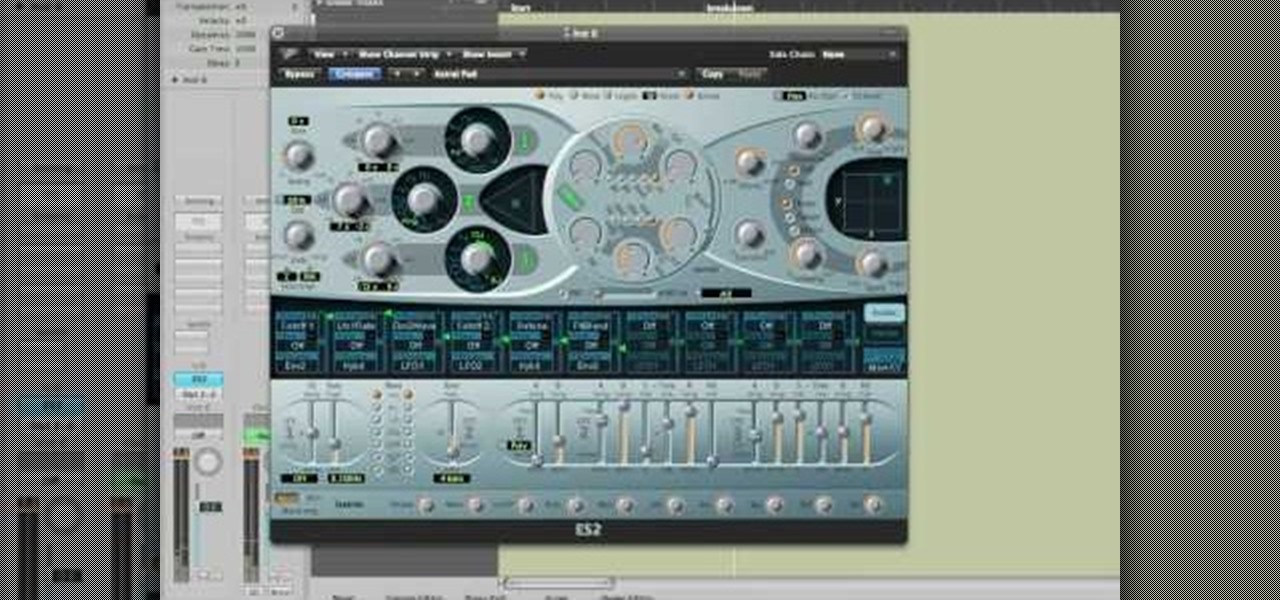
In this video, we learn how to use Logic Pro: Changing presets in Logic instruments. First, insert the ES2 and add in a preset that you like. You can also use key strokes to step through presets instead of using the mouse to click through all of them. By doing this, you will save time while you are going through presets to audition a bunch of presets to find the one you want. Use the drop down menu within the instrument to find the different presets and then choose one you would like to inser...
In this video, we learn how to use "It's + adjective + infinitive" in English. To form these sentences, you will use the pattern that is stated above. This is very common in the English language, and you can put whatever you want into the sentence as the infinitive. You can change this from "it's hard to do" to It's not hard to do" to "it's easy to do". You can also make something negative, by giving it the prefix "im", which would change "possible" to "impossible". You can also ad in "un" to...
In this video, we learn how to use the verb "be" in different tenses. This verb changes depending on the verb tense and subject in which it's used. In the present tense, "I am", "we are", "you are", etc can be used. In the past tense "I was", "you were", "he was", "we were", etc can be used. For future tense "I will be", "you will be", "he will be", "she will be", etc can be used. Depending on the tense you have, the verb "be" will change in all the sentences. Make sure to go over these and l...
In this video, we learn how to use compound tenses with "haber" and "estar" in Spanish. "I am speaking" would translate into "You estoy hablando". If you are talking about a girl eating, you would say "Ella esta comiendo". To say "they were writing letters", you would say "Ellos estaban escribiendo cartas". You will see the form of the verb changing in each of the sentences. You will also see the gender of the verb changing in each of the sentences, depending on who is being talked about. The...
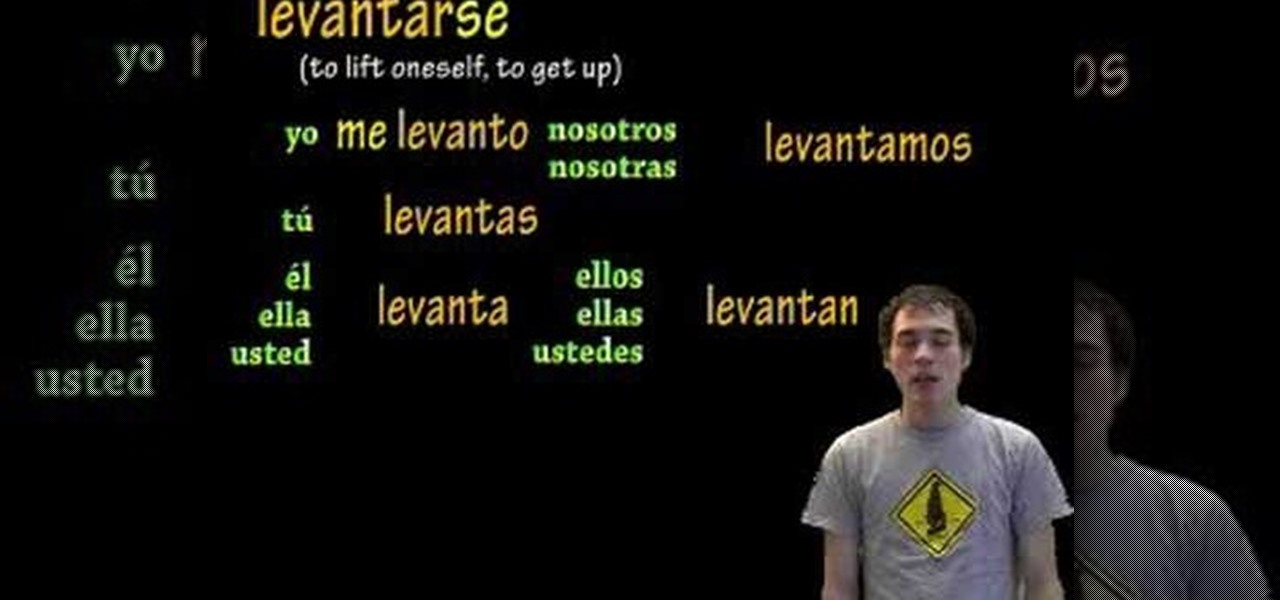
In this video, we learn how to use reflexive verbs in Spanish. All of the reflexive verbs are related. Once you have your verb changed, you will have to change how you are saying the different words in the sentence. If you are talking about yourself, you will have to make sure you take out "es", so you aren't saying the sentence incorrectly. If you are calling yourself something, you are reflecting the verb back to yourself. I you want to say "I talk", you will say "yo habo", because you are ...
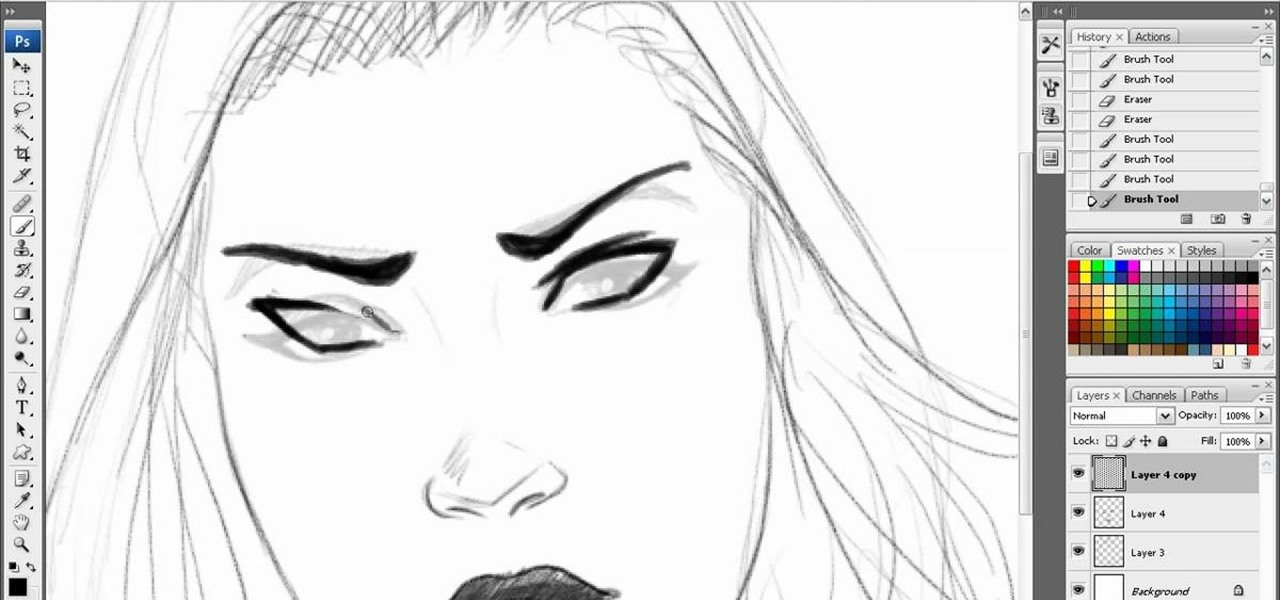
When drawing any sort of art, conveying emotion is key to creating a great and significant scene. The twist of an eyebrow, the way the eyes stare at you, it all conveys a different emotion, and with a very small change to one of many different features of the face, you can completely change the idea and emotion conveyed by the picture. In this amazing video series, you will learn all the various positions and looks of the face that'll convey all the emotions that you want to bring out in your...
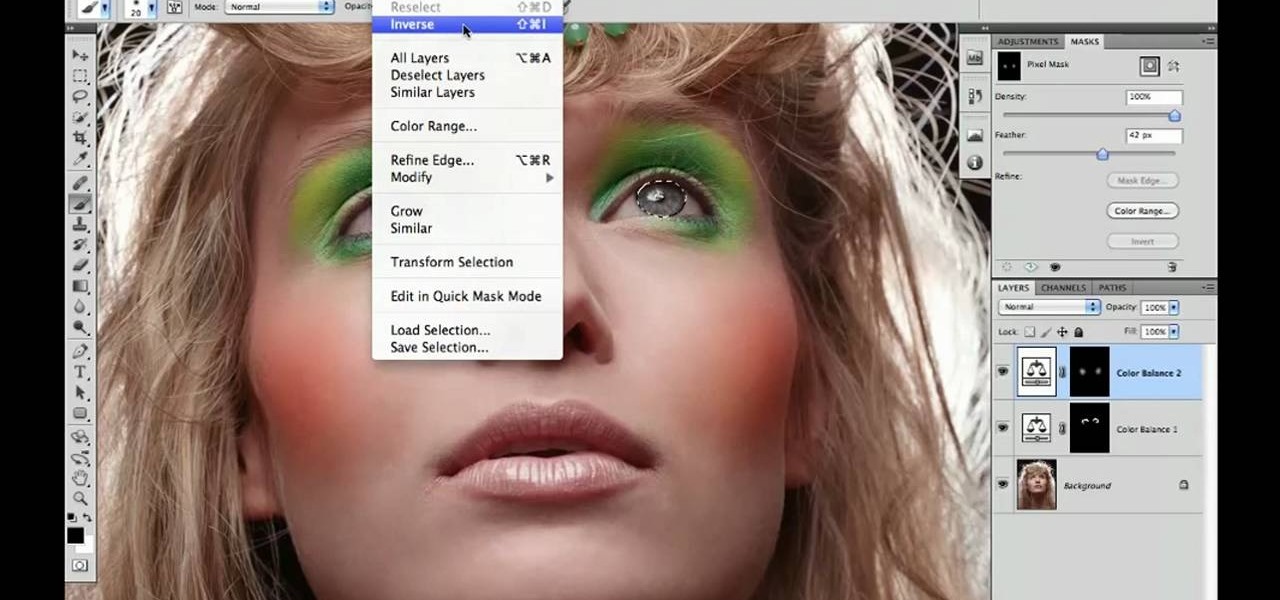
Want to know how to change someone's eye color in Adobe Photoshop CS4 or CS5? This clip will teach you what you need to know. Whether you're new to Adobe's popular raster graphics editing software or a seasoned professional just looking to better acquaint yourself with the program and its various features and filters, you're sure to be well served by this video tutorial. For more information, including detailed, step-by-step instructions, watch this free video guide.
In this tutorial, we learn how to draw a smiling graffiti style face. First, start off by drawing the nose, eyes, and eyebrows. Then, draw the large open mouth and hair at the top of the head. Make sure to add in ears and large teeth when you draw the character. Then, shade around the individual teeth so it looks like gums. Then, fill in the eyebrows and hair individually. After this, make two lines underneath the nose so it looks more realistic, then sign your name next to your graffiti face...
In this tutorial, we learn how to upgrade a 32-bit Windows to 64-bit. Chances are, it should be able to run as a 64-bit, depending on the processor. If you change the settings in BIOS, you can change it up so you can upgrade the computer. If your computer is still not working, use the backup CD to reinstall the previous software back onto the computer. If you do not have a backup CD, you can try to download the original CD back onto the computer. You will lose all your personal information th...
Interested in changing your eye color in Adobe Photoshop CS5? It's easy! And this guide will teach you everything you'll need to know. Whether you're new to Adobe's popular raster graphics editing software or a seasoned professional just looking to better acquaint yourself with the program and its various features and filters, you're sure to be well served by this video tutorial. For more information, including detailed, step-by-step instructions, watch this free video guide.
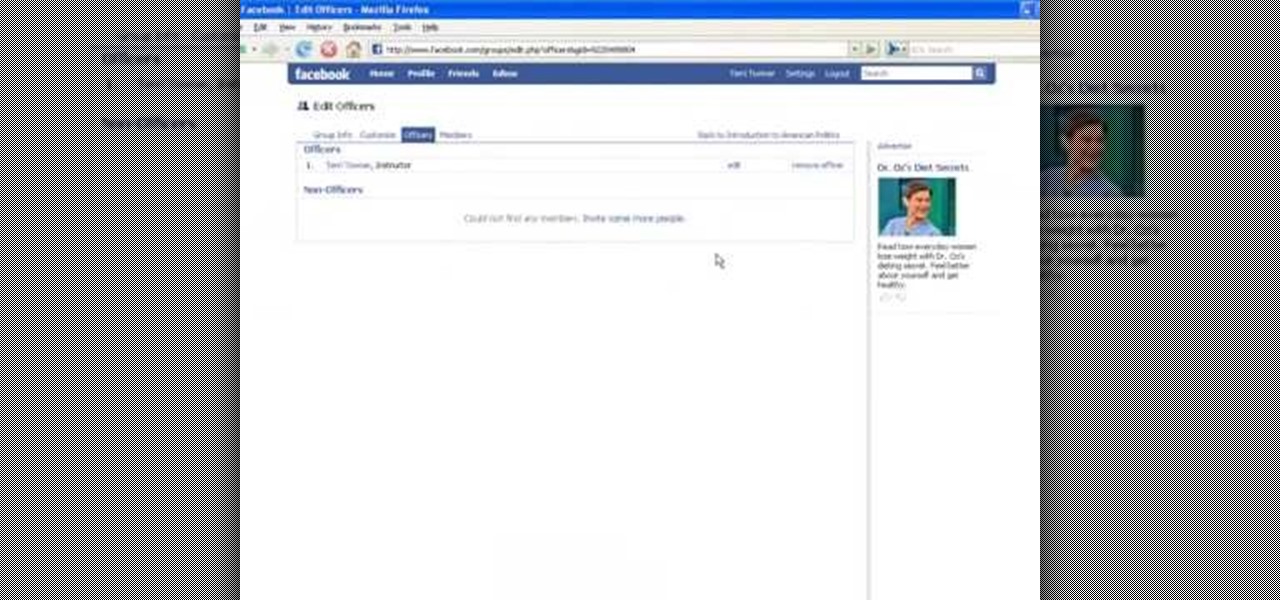
In this tutorial, we learn how to set up a group on Facebook. First, log into your Facebook, then click on "groups", then click "create a new group". Now, give your group a name, description, news, email address, and contact information. When finished, click on "create group". Now you will be able to customized your group by adding images. Once you do this, you can add a website and change your different options. Allow only instructors to upload photos, because students may decide to upload i...
In order to prevent accidental CAP LOCKS, you can use a number of new, innovative and free software solutions. With your Windows 7, there are functions available to assist you.
Do you find the black and white icons in 3D Studio Max 10 boring and bland? Do you need some color to brighten up the hours and hours you spend modeling in front of the computer? This video will show you how to change the color of the icons and text in the dark UI of 3D Studio Max. It may not make you 3D model look any sharper, but it should help you keep your sanity while you work on it.
Before you can work in Word 2010, you'll need to learn how to work with it. See how to adjust line spacing parameters within Microsoft Word 2010 with this free video software tutorial. Whether you're new to Microsoft's popular word processor or just wish to get to know Word 2010 a little better, you're sure to find much of value in this video lesson. For more and better information, and to get started changing line spacing settings in the Word 2010 UI yourself, take a look.
Have you tired of the stock camo setting that you can clothe your character with in Call of Duty 4: Modern Warfare? This video has the solution for you, at least if you play the game on the Playstation 3. It explains how to use the Sony Vegas Pro video editing software to change the colors of your in-game camo, allowing you to dress your character in a much wide variety of colors. Stand out from all the other kids at the frag party with this helpful technique!
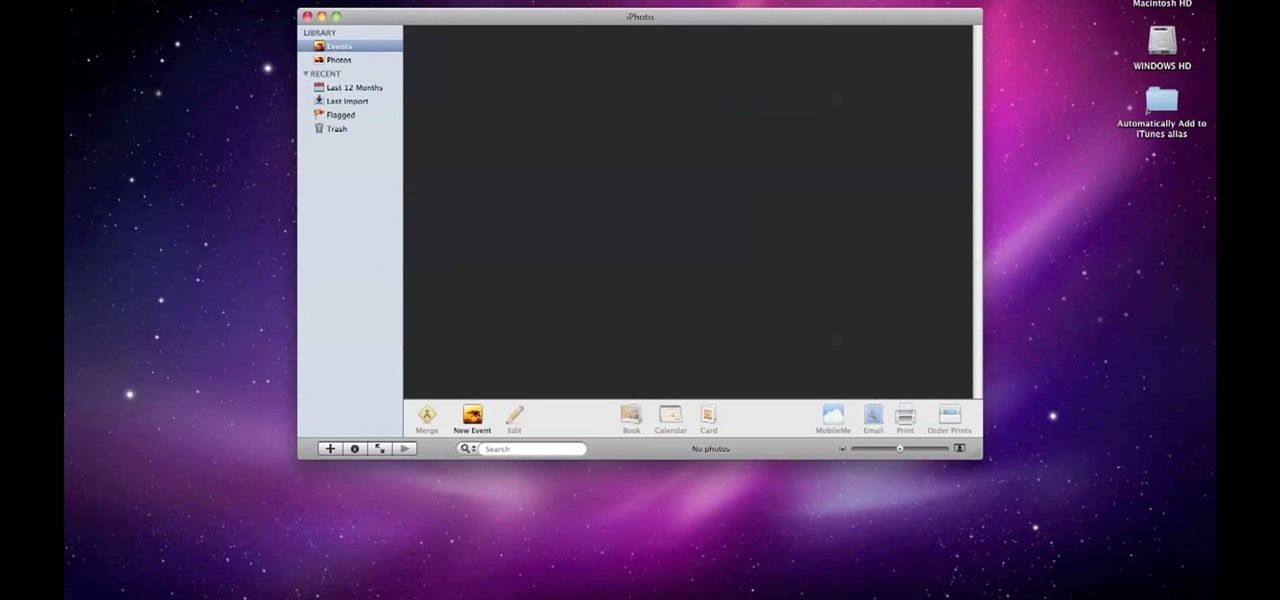
By default, iPhoto will open as soon as your Mac detects a digital camera or iPhone. In this tutorial, learn how to change your iPhoto settings so that it does not automatically open. The auto open is a good feature, but can be annoying, especially if you are just using your computer to charge your device and do not need to import any files. iPhoto's auto-open can disrupt other activities you may be involved in on your computer. In this video, Luke will take you step by step through the proce...
A new introduction into the iPhone community is WordPress which easily allows you to easily control things like your WordPress blog on the move. Start off by tapping in your blog details, start writing a new post with a single tap, setting your tabs or publishing data right from the main editor through this. This also allows you to add photos directly taken from your iPhone's camera, you can change your publish date and set a password on your posts to decide who has access to them. Finally yo...
In this video tutorial, viewers learn how to do the "my favorite ace" trick. The trick begins with all 4 aces. Then the magician flips them over and goes through them. As he goes through them, each ace changes the color of the back. All the aces change to a red back except for the ace of spades. Users will need 3 aces with the red back, the ace of spades with a blue back and a double back card. This video will benefit those viewers who enjoy magic tricks and would like to learn how to perform...
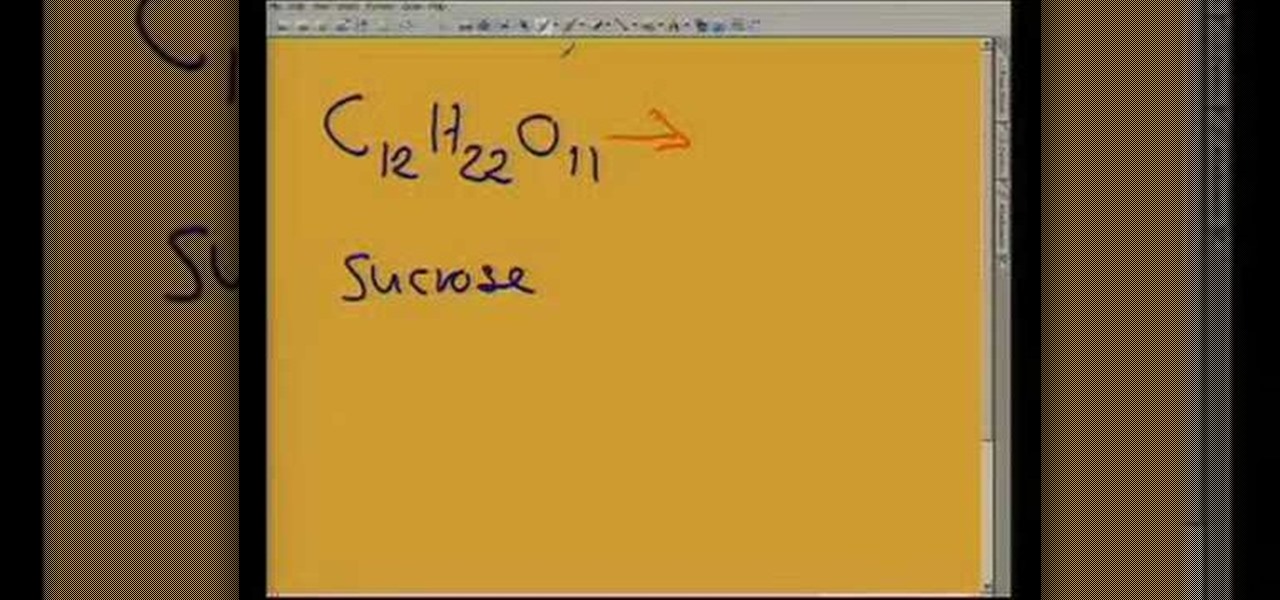
This video helps us understand the organic molecules and elimination reaction. Take some sugar in a beaker. Sugar has 12 carbon atoms, 22 hydrogen atoms and 11 atoms of oxygen. The sulphuric acid is poured into the sugar and the color change is observed. The color of the sugar gradually changes into black. The sulphuric acid causes an exothermic reaction which releases a large amount of sulphur dioxide gas. All the water (containing hydrogen and oxygen atoms) is eliminated out of the sugar du...
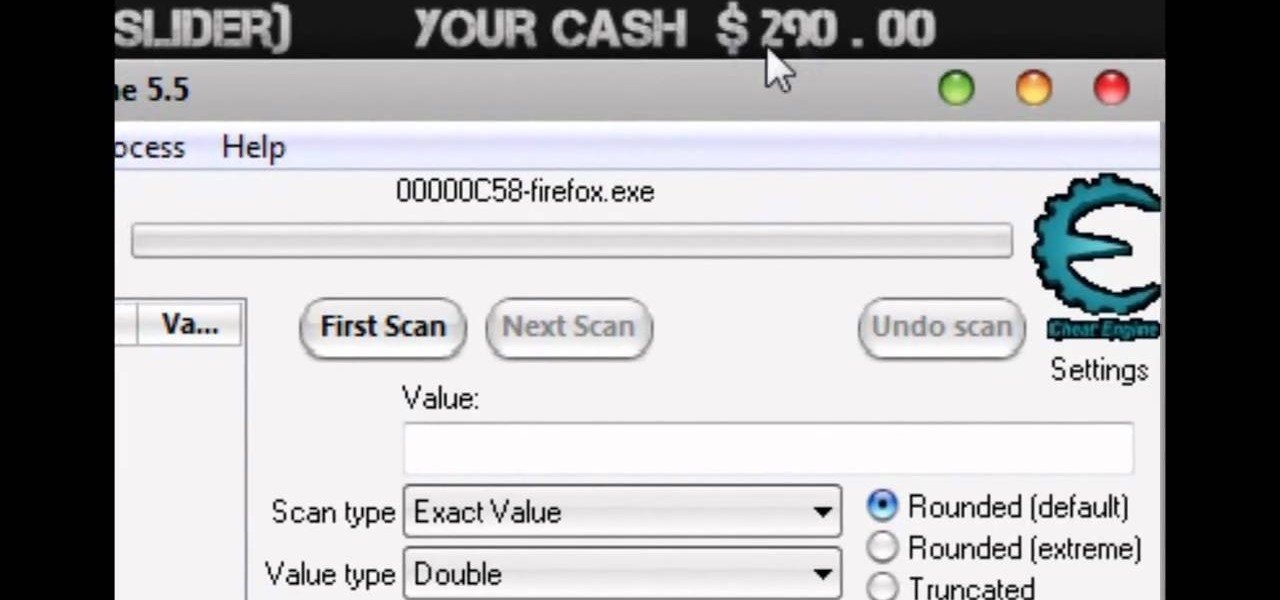
In this video tutorial, viewers learn how to hack the flash game, Palisade Guardian 2: Modern Combat with Cheat Engine. Begin the game by entering your name and play the first level. After that, open up Cheat Engine and select your internet in the process list. Change the Value Type to Double and Truncated to Rounded (default). Enter in the value of your cash and press First Scan. Then buy something to lower your cash and enter in your new value. There should be only 1 address. Check the froz...
Learn how to simulate snow in your photograph in this video tutorial by photoshopuniverse. For this you'll need a photo depicting winter scenery. Add a new layer, fill it in with black, go to filer noise and add noise as shown using the given amounts. Go to filter effects and add blur to the layer. Go to images and adjust the levels to reduce the snow-flakes as shown. And add some motion blur to it. Change the blend mode to screen, duplicate the layer, rotate the new layer, apply the filter c...
Don't know how to add some line frames in Photoshop? Well, this video teaches the viewers how to exactly add line frames, or borders for their images using Photoshop. First of all, change the background layer into a normal layer. Next, go to image size and add in some more pixels in order to allow room for the border. Next, add another layer and set it to transparent. Now select where you want your border to be, then go to strokes, and select a color. At this point, the viewer should have a b...
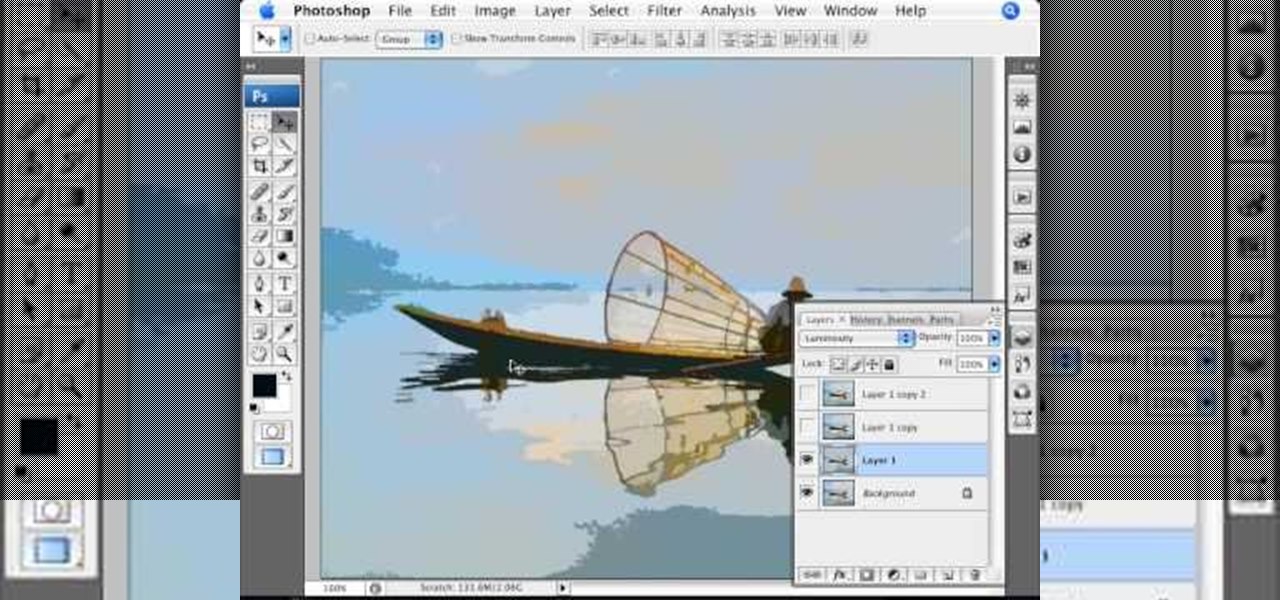
Photoshopuniverse shows you how to simulate a watercolor painting on Photoshop. With this you can take any photo and make it look like it was a water color painting. Take any photo and then duplicate the layer 3 times including original. Focus on the first layer go to cut out. You want a high edge fidelity, and add the number of levels no more than 5. Add some simplicity and the change mode too luminosity. Go to the second copy layer do a dry brush increase size to maximum. add just a little ...
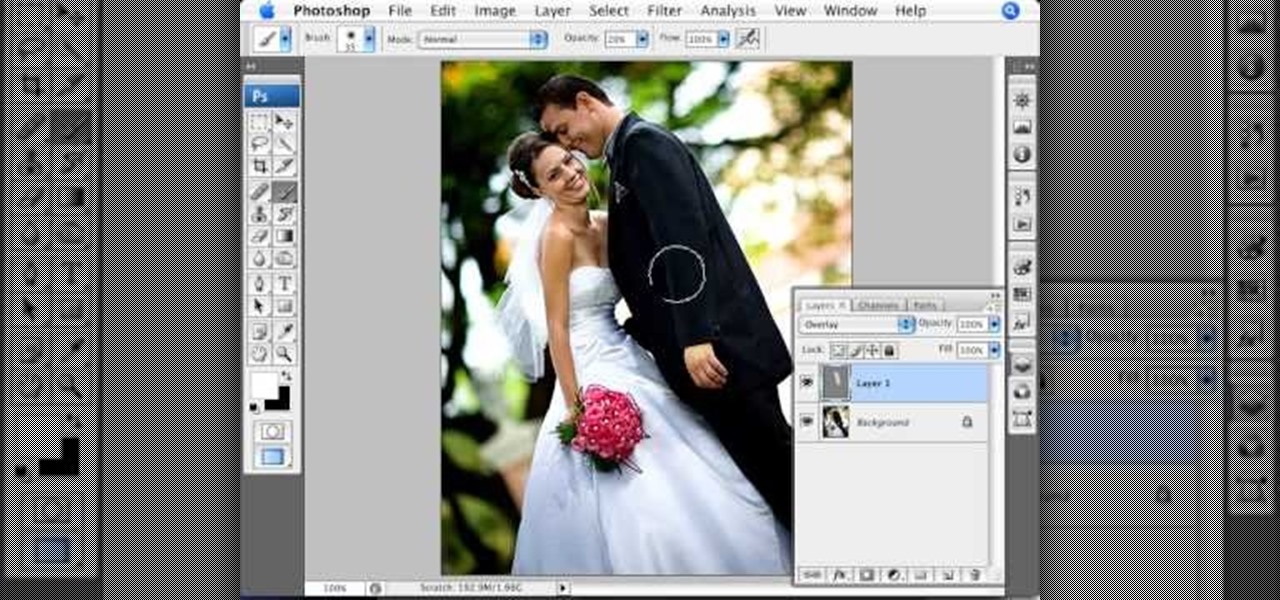
Photoshopuniverse teaches you how to use the Dodge and Burn tools in a non destructive manner, in Adobe Photoshop. Dodge makes things lighter. Burn does the opposite. The problem is that this is destructive operation. Use the Brush tool at 20% opacity. Create a new layer with 50% grey. Change the layer's mode to Overlay. With the black color you will make things darker and with the white lighter. To view the changes, review the overlay layer. To correct a mistake on this layer, use a brush wi...
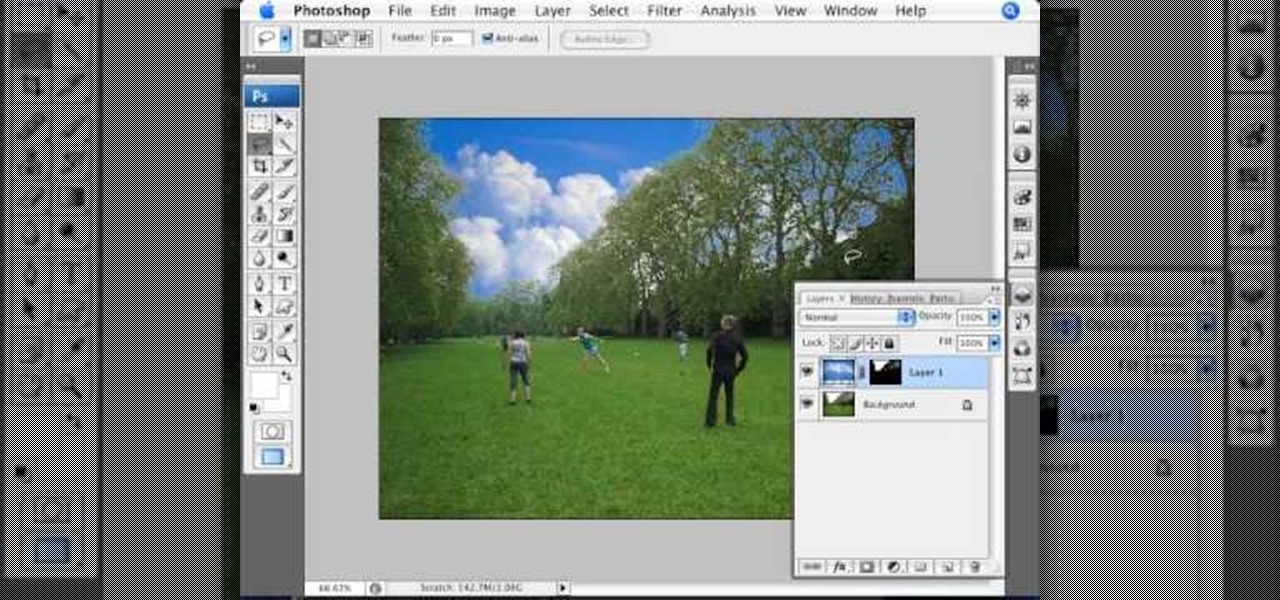
In this Photoshop tutorial the instructor teaches you to replace the sky in a photograph. If you have a photograph which has a very dull and blown out sky you can change it to make it look better as shown in this video tutorial. Some times when the sky is cloudy or due to improper white balance you end up with photos having a over bright or dull sky. Now you can find another image where the sky looks bright and attractive and replace the sky in this image with that one. Open the photo that yo...
This video shows you how to enhance the sky in pictures using a program called Adobe Photoshop. With this program you can use a gradient tool to layer different areas and change the color to enhance the picture of the sky. You can also invert colors and do a lot of different things using this tool. It is a very helpful tool to have because it drastically changes how bold the sky looks and could help a photographer out a lot to learn this skill.
Even girls can repair their bikes! This video, by Girl Meets Bike, demonstates exactly how to change worn out pedals on your bicycle, using a pedal wrench. If your pedals are worn out or rusty, or you just want to upgrade to a different pedal style, check out this tutorial. You will learn step by step how to remove and install new ones. Soon, you will be on your way to a smooth ride. Happy biking!
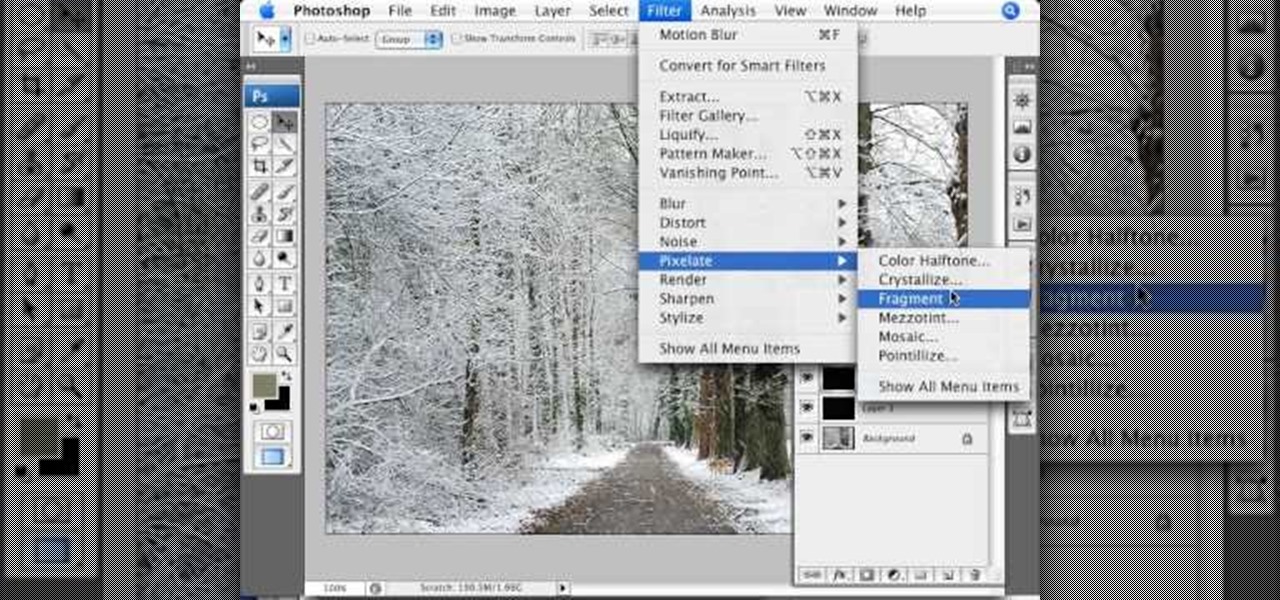
This video teaches about adding any of your photos to a billboard. Now copy into the computer memory back into the original billboard image to create another layer this is the layer place in our image. We can do this correctly, respective into this filter which is called vanishing point. Clicking at the four edges make this little bit bigger in image area. Now we can paste in that image control and change the promotional image. It fits sign of the billboard area and resize after the slight li...
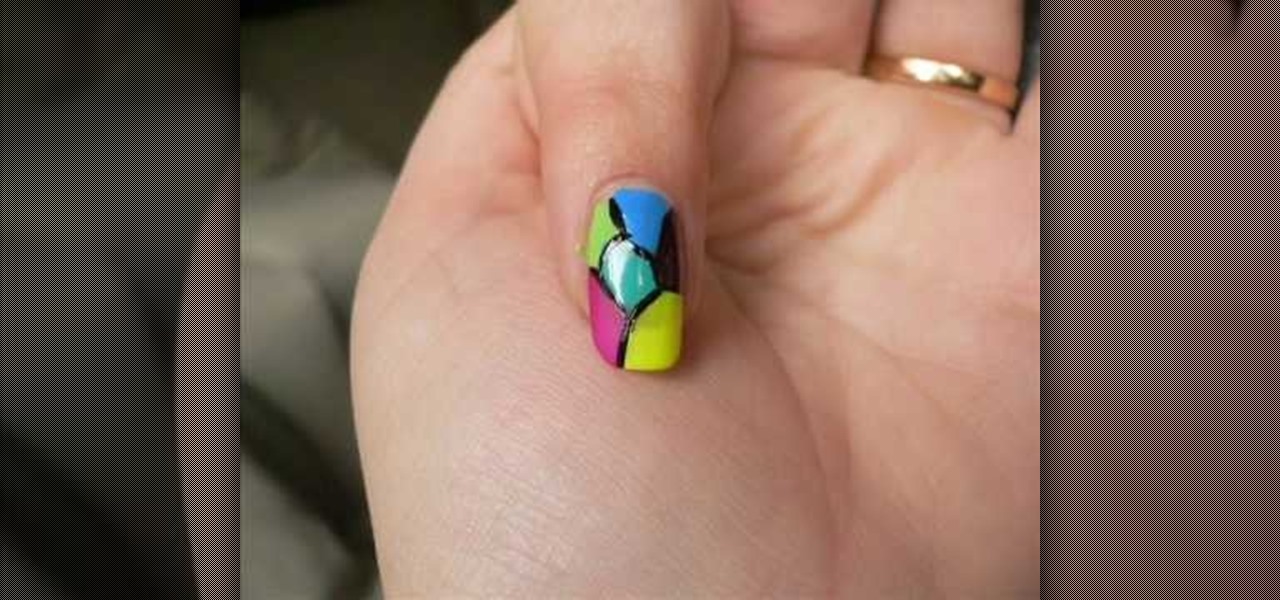
This video relates to Neon Mosaic Nail Tutorial. This video teaches how to make the nails good looking and also pleasing. In this video she teaches how to select the colors of nail polish and also she teaches the steps to be followed regarding which color nail polish to be applied first and also to create a mosaic by using multiple colors. She also add some border line to create and pleasing look. She also narrates to change the colors in applying to each nail. She also teaches how to create ...