Crostini is the Italian word for toast and is basically a fantastic canvases to put almost anything on top of to make easy and tasty hors d’oeuvres. This video will show you some crositini using Italian ingredients or other flavorful combinations. Watch this video to learn how to make a simple crostini. Great for picnics and parties! 12 slices firm white bread 5 tbsp. (75 ml) butter 2 tbsp. (30 lL) all-purpose flour 1/2 c. (125 ml) milk 3 oz. fresh mushrooms (about 9 med.), finely chopped 6 t...
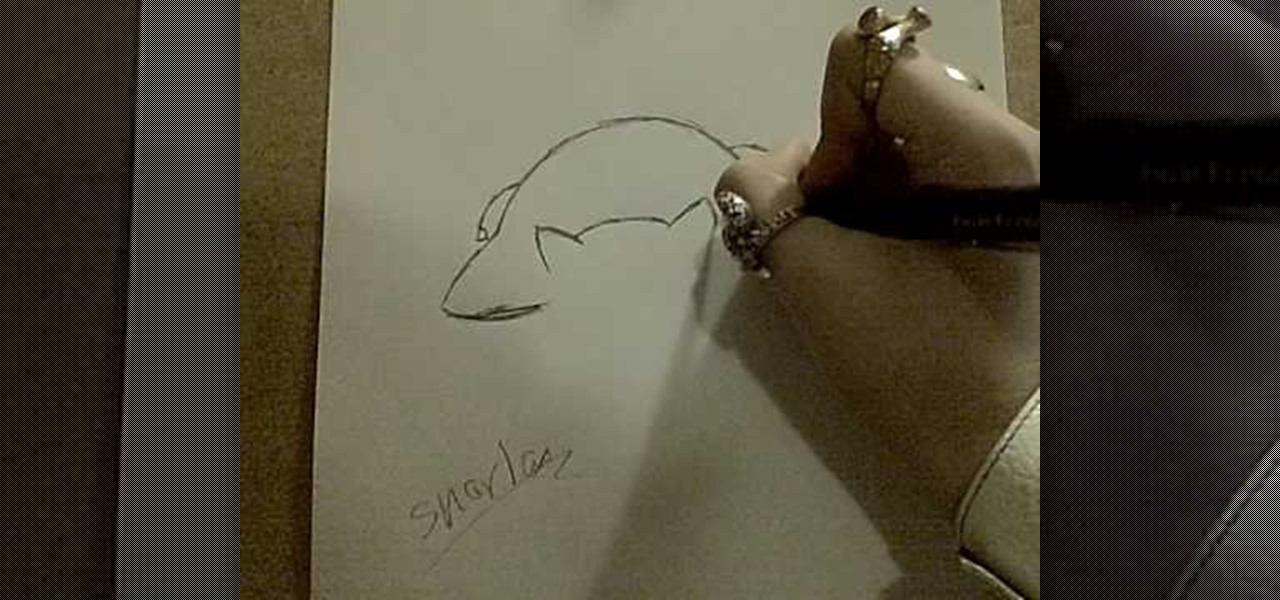
MAZE2510 teaches us how to draw the perfect Snorlax. Draw out an oval for its head, a large body and two small circles at the bottom on each end for its feet. Begin to work on the head. Add in the ears and the curve at the top of the head. Then add in two rounded cylinder-like shapes for its arms and finally add two smaller circles inside the feet circles that were already there. Add in the detail on the face and then the half circles on its body. Add in the fingers on both hands. Each little...
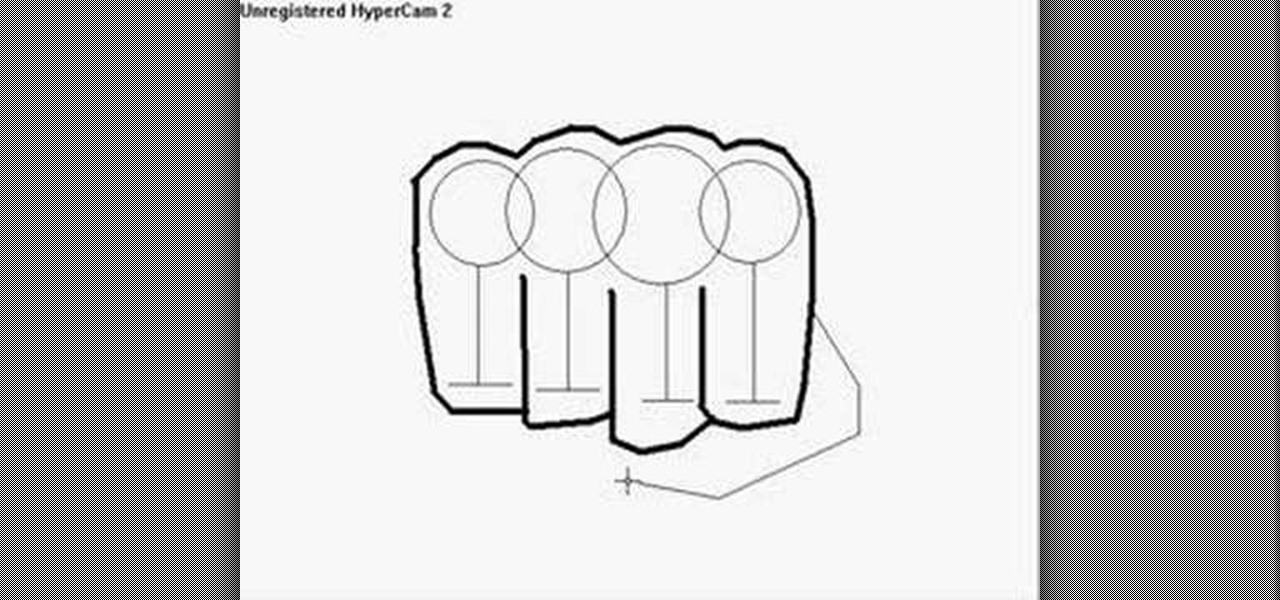
In this tutorial, we learn how to draw a fist. Start off by drawing for circles linked to each other, then draw lines coming down from the middle of each circle. Then, draw a line across the bottom of each vertical line, going horizontally. After this, use a dark line to outline around the circles and the bottom of the lines. Make sure to draw a line in between each of the individual lines. Next, add a couple of curved lines to make a thumb appear on the side. To finish, erase the original ci...

First of all cut of the top and the bottom of the cylinder to get two circles. Now take a scissors and cut of the cylinder into two halves from the top to the bottom as shown. Now you get a rectangle shape. You can easily measure the length of the cylinder but to measure the base is a problem. So mark a point on the table with tape and also make a mark on the can or the object you want to measure. Now place the two points over each other. Now use a ruler as a guide and move the can so that th...
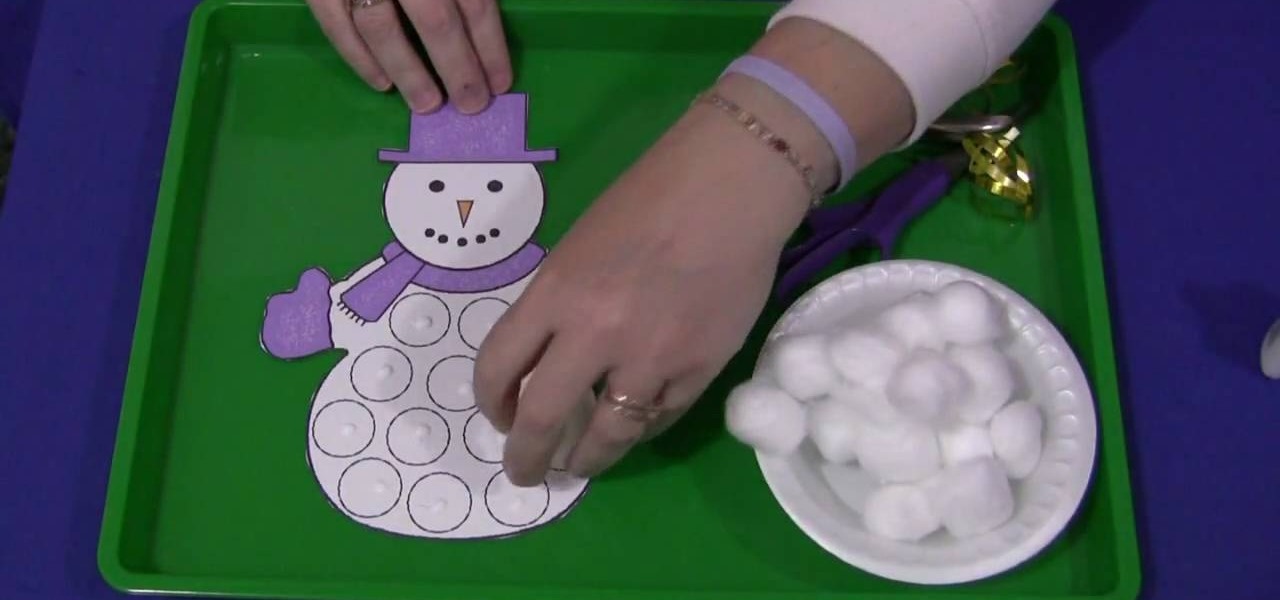
Shelley Lovett from ChildCare shows us how to make a cotton ball snowman. This is a great activity for developing fine motor skills. The snowman comes in a several variations, there is a snowman that has circles on its tummy so that children would have to try and place the cotton balls inside the circles. There is a snowman that comes in black and white so that the children could decorate the snowman's scarf, mittens and hat. Now on the plain tummy snowman, you'd just apply glue all over the ...

This video shows you how to easily draw a Pokémon step by step. The first thing you have to do is draw 3 circles for the head, tail and body. You can always start off the ears with little circles, and then add the little pattern on the face, which consists in two circles, one near the other. Then, make the ears (please note that the ears are very sharpen). Then the face legs and belly. The front legs are kind of pointed, while the back legs are roundish. Draw the tail, which looks like an axe...

To create Converse shoes nail design, you will first apply a base coat in the color you want the shoe to be. Tape off to create a shoe top and paint white. Pull off the tape, but not too soon or line will be uneven. Take a darker color of base coat make a curve on both sides leaving the middle so it's shaded. Repeat on the other side. Using black outline the white nail tip. Using silver make circles, while the polish is tacky make holes in the circles. Using white make little lines for stitch...
In this video lesson of LEARN TO DRAW with Tom Gammill, where the creator of The Doozies discusses cartooning and the spirit of Christmas. Learn how to draw a cartoon santa claus using mostly circles and half circles. Towards the end of the video Tom teaches you how to make a holiday yule log too. Follow along and learn how to draw an easy cartoon Santa Claus.
In this tutorial, we learn how to make a Tractor using Stampin' Up punches. First, you will need to punch out a black scallop circle, another black circle, two yellow circles, a yellow square, and four green square shapes. After you have these cut out, you will glue the black scallop circle to the yellow circle so it's underneath. Then, take the green piece and glue it with the other yellows to create the shape of the tractor. Glue the circles at the bottom to make the wheels, then save this ...
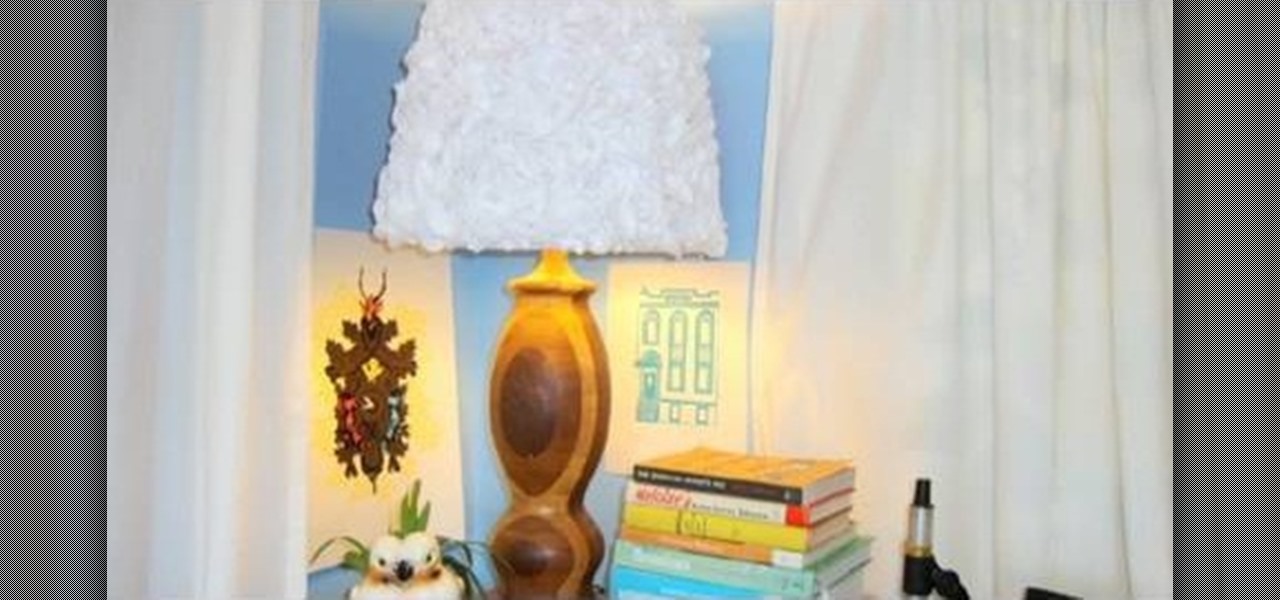
In this video tutorial, viewers learn how to upgrade an old lamp shade into a blossom lamp. The materials required are: 1 1/2 yard of felt, old lamp shade, bias tape, glue gun and scissors. Begin by folding the bias tape in half and iron it down. Then glue the bias tape from the half fold on the top and bottom of the lamp shade. Cut the felt into 3x3" square pieces and then cut them into circles. Fold the felt circle in half and glue it onto the lamp shade. Continue doing this for the rest of...
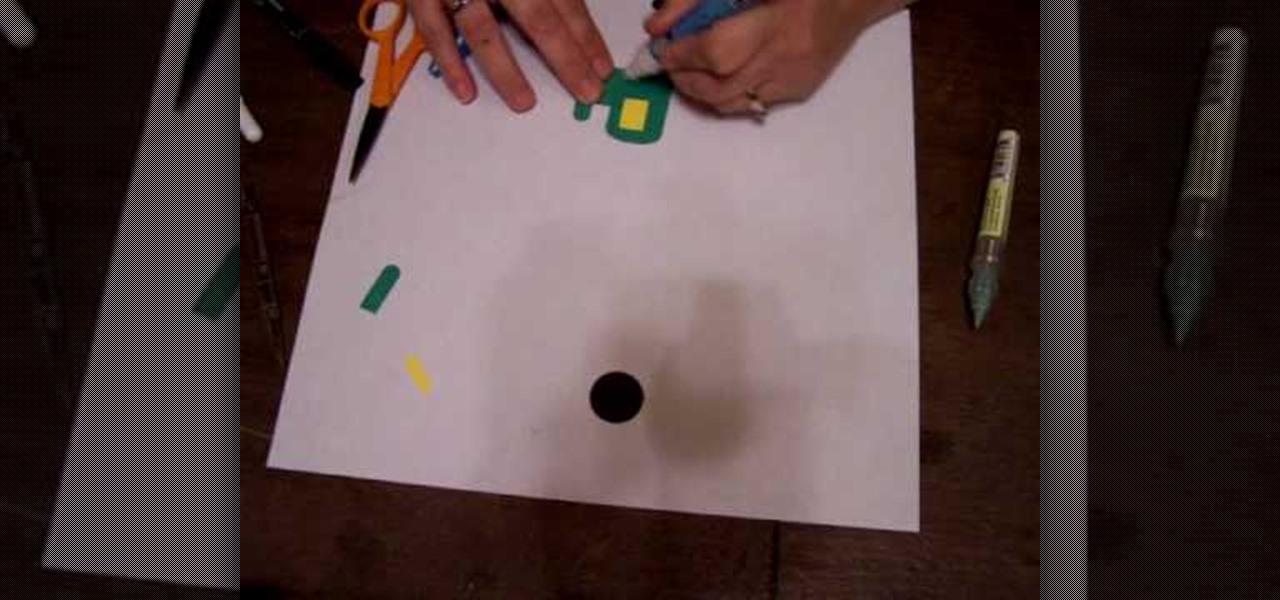
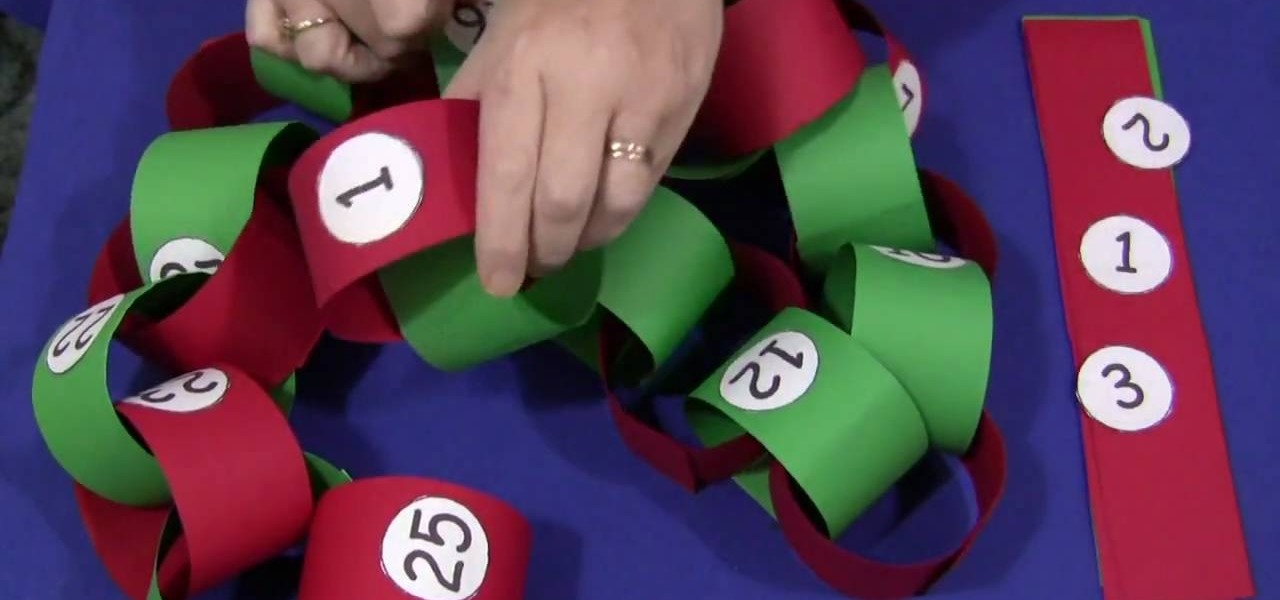
In this video tutorial, viewers learn how to make a Christmas countdown chain. The materials required for this craft are: construction paper, paper cut into small circles, glue and marker (optional). Begin by cutting the green and red construction paper into even strips. Users may choose to write out the numbers or print them out onto paper. Then cut out the numbers into small circles and glue them in the middle of the strips. Alternate the color of the strips each day. Then put the edges of ...
Once you get started with the concept of "stair step" cards - it is hard to stop! It would be fun to try a double set of stairs, add another row for five letter words and cut letters into the bridging circles. Cut the extra panels for the front and emboss them with the Divine Swirls 'Cuttlebug' folder. Then use the Stardust 'Stickles' on the swirls to really make them pop! The extra letters from the name cutout were perfect for the envelope. Emboss the envelope with the Birthday Candle 'Cuttl...
In this video, Andrea Nguyen of CHOW goes to Shanghai Dumpling king to see the perfect soup dumpling which is called xiao long bao. Here the chef, Lu Kuang, takes the dough and rolls it into a long snake likes thing and then breaks nuggets out of it. Then he uses the rolling pin to make small circles out of those nuggets. He then fills the circles with pork filling which has a little sweet flavor too. Then he closes the circle and gives it a nice typical shape. These dumplings are then steame...
You’ve cooked on your own now try cooking with a dog companion. This video will show you how to make these popular Japanese snack. They consist of pancakes sandwiched around a whipped cream and sweat red bean paste.
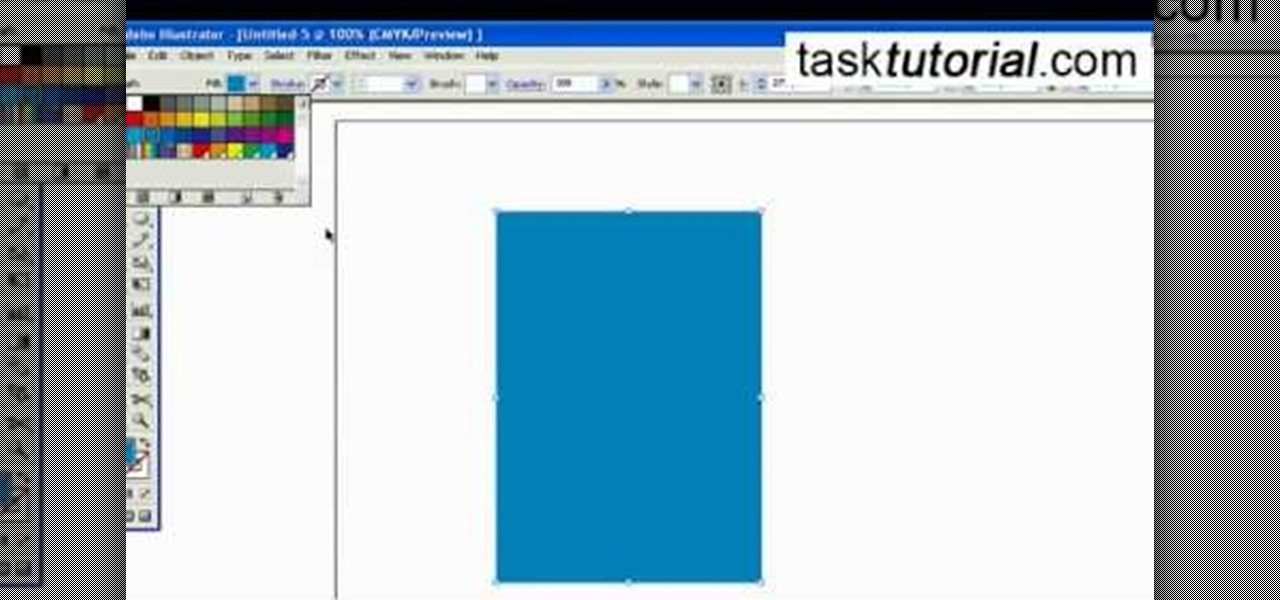
This video demonstrates how to create a 3D Lego brick using the Illustrator. In this, first a circle is made and then, by using the "transform‚" mode, another circle is made. Then by the 3D command it is converted into a 3D image. Further you can copy these circles and make them 3D just like there are in Lego bricks. You can also use the 3D mode to do the same thing to the rectangle frame on which the circles were made. So this is how a 3 D Lego brick is made. This video is useful to people w...
Are you feeling like you've got the hang of Google+? Or do you, as I do sometimes, feel like there are just a few too many quirks to keep track of? Here, I've given you 15 quick tips you should know about Google+ so you can maximize the way you want to use it.
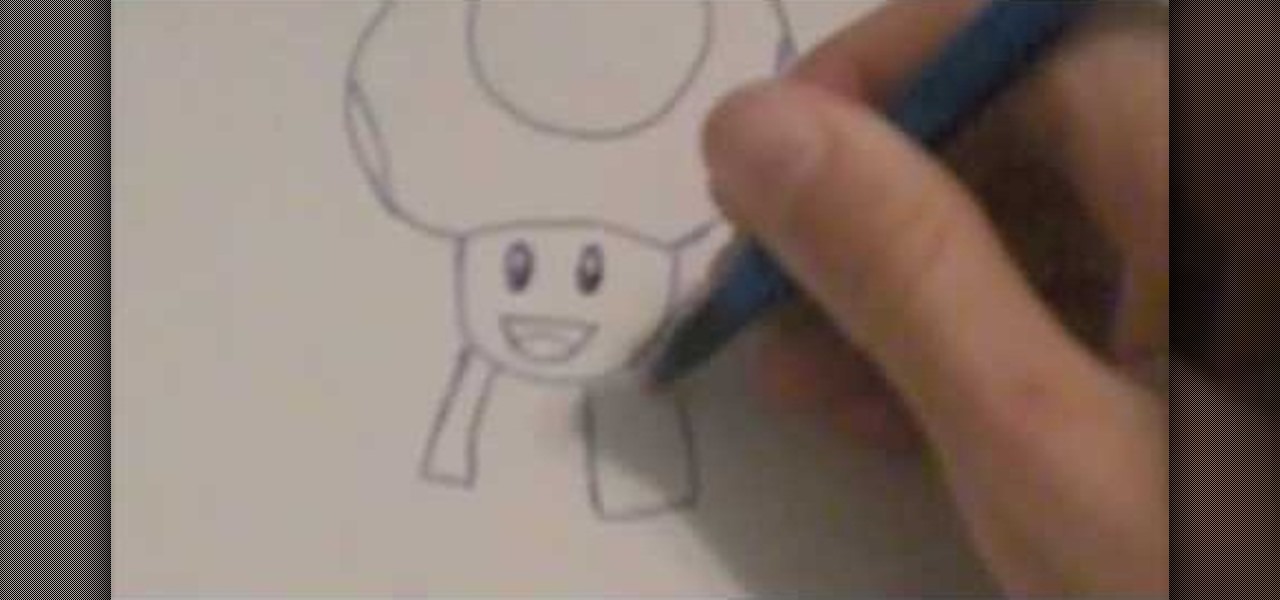
Learn an easy way to draw a ‘Toad’ by watching this art tutorial from Super Mario. The artist begins by drawing a mushroom first. A 3/4th circle is drawn and closed at the bottom with a slight curve. A full circle is drawn inside the mushroom, near the top. Slight curves are outlined on either sides of the mushroom, to reveal part circles. The face of the toad is drawn next by outlining a semi oval at the bottom of the mushroom. Two ovals are drawn for the eyes, with the pupils facing down. T...
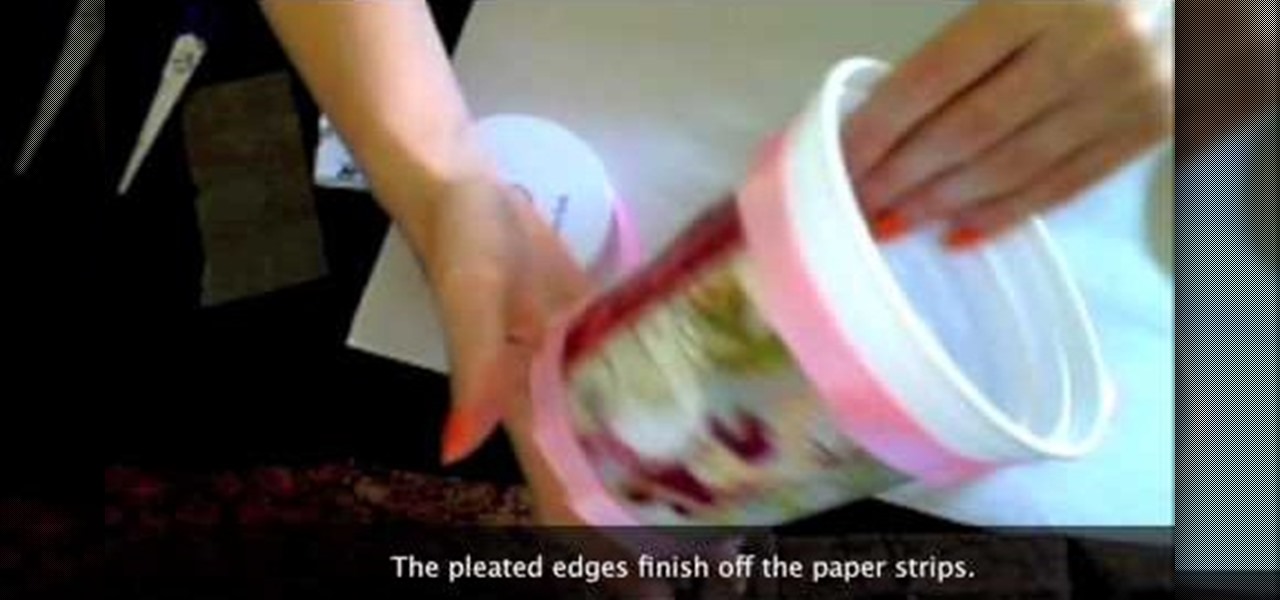
Creativity Prompt demonstrates how to turn a yogurt container into a mini-album. First, measure the lid's diameter. Then, cut a corresponding circle from your patterned paper. Use Mod Podge to adhere the paper circle to the lid and seal it with another layer of adhesive. Next, cut a bunch of different 4 x 1 inch strips of patterned paper. Adhere the paper strips to the yogurt container with Mod Podge. Seal it with another layer of adhesive and set it aside to dry. Measure the bottom of the co...
First of all use a grey color shade to draw the outline sketch of the figure. First draw the trapezium in the front. Now draw a rectangle at the side of the trapezium. Make a flat top to the figure. From the middle of the trapezium draw a string protruding downwards. Now divide the figure into three equal sections. Now you have to darken sections on the rectangular side. Draw the vertical lines of the rectangular side curved outwards at the far end. At the front end of the rectangular side ma...
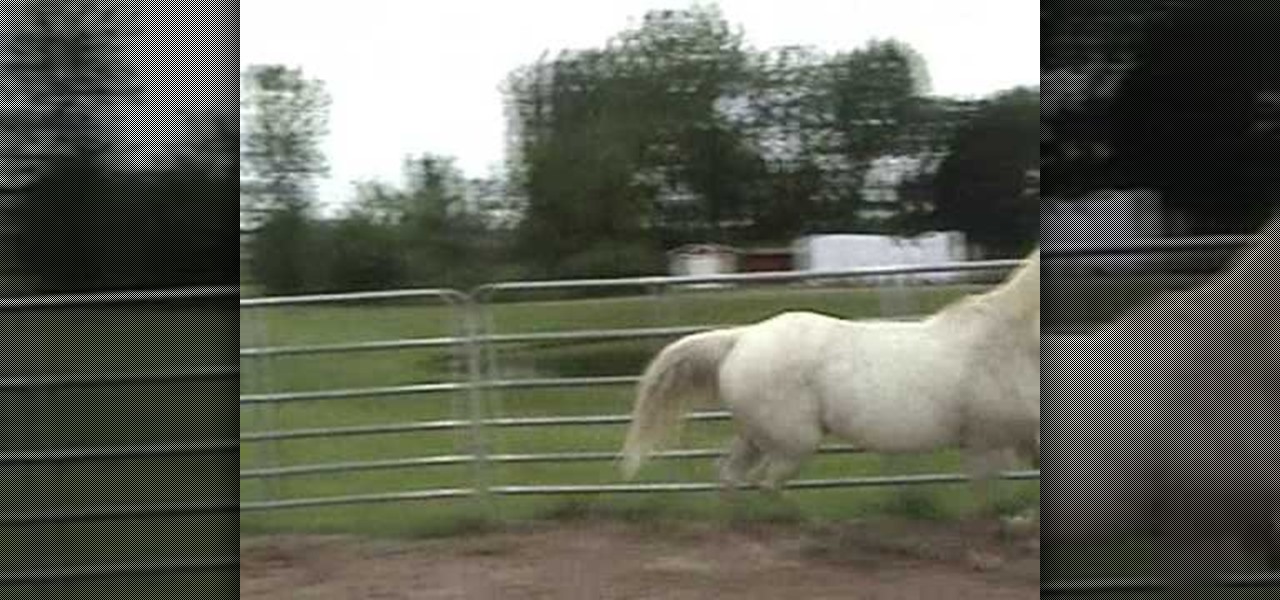
Horseriderchamp productions presents this video on how to do join-up with a horse. Here, in this video, the lady demonstrates this with her one year old horse 'majestic. She says that join-up is basically creating bond or relationship with your horse and there are three signals to join-up. The first signal she says is to have horse's one ear locked on you when they start to look on you and start to make small circles, and she says that once you get the signals, when you turn to speak to them ...
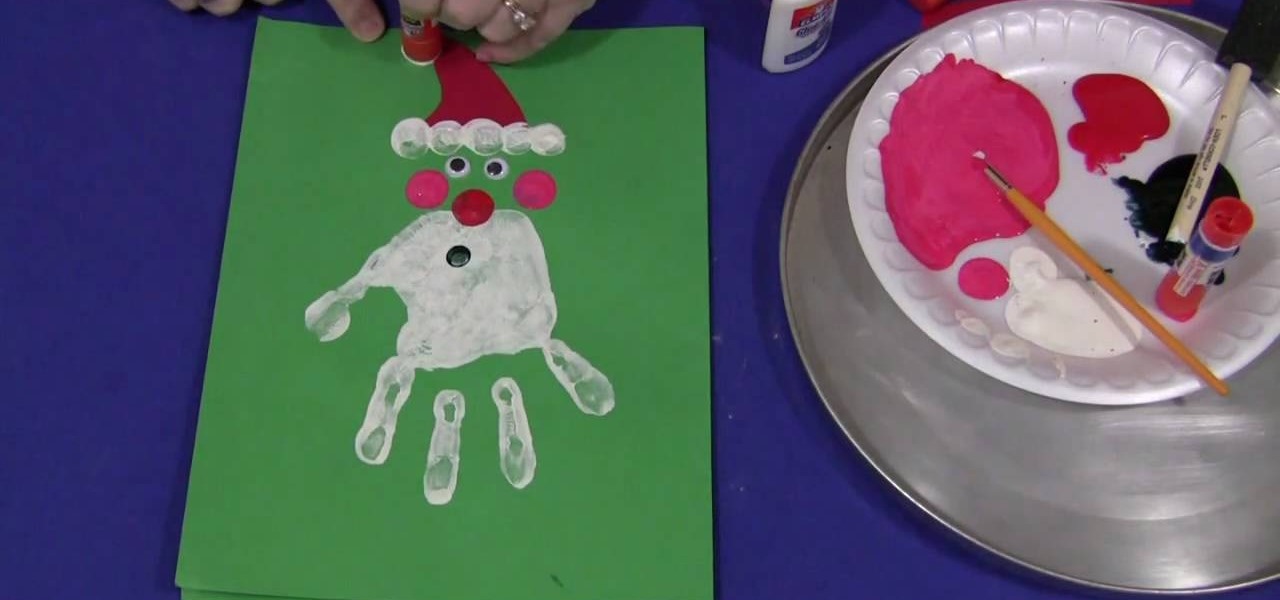
In this Family video tutorial you will learn how to do a handprint Christmas project with your kids. Paint your kid’s hand with a thick layer of white paint, place it over green construction paper, press it and gently lift it. If the child doesn’t like painting of the hand, you can cut out the outline on white construction paper and paste it on green paper. After the paint is dry, dip a finger of the child in black paint and put an impression on the hand print for Santa’s mouth. Then dip the ...
Make sure your hand is warmed up and you have lotion in your hands, start by stroking from the ankle toward the toes, fold the whole foot while your hand is gliding over the surfaces of the foot towards the toes.
Add a party favor to your next hosted New Year's Eve bash. Ring in the New Year wearing personalized party glasses! It's a fun project for kids and adults.
Callowlily is an urban artist who creates drawings of women who are society types with a dark edge. So you'll typically see her depict beauty queens with vampire fangs and blood splattered all over her dress. While these girls are more messed up than straightlaced beautiful, they do make great artistic inspirations.
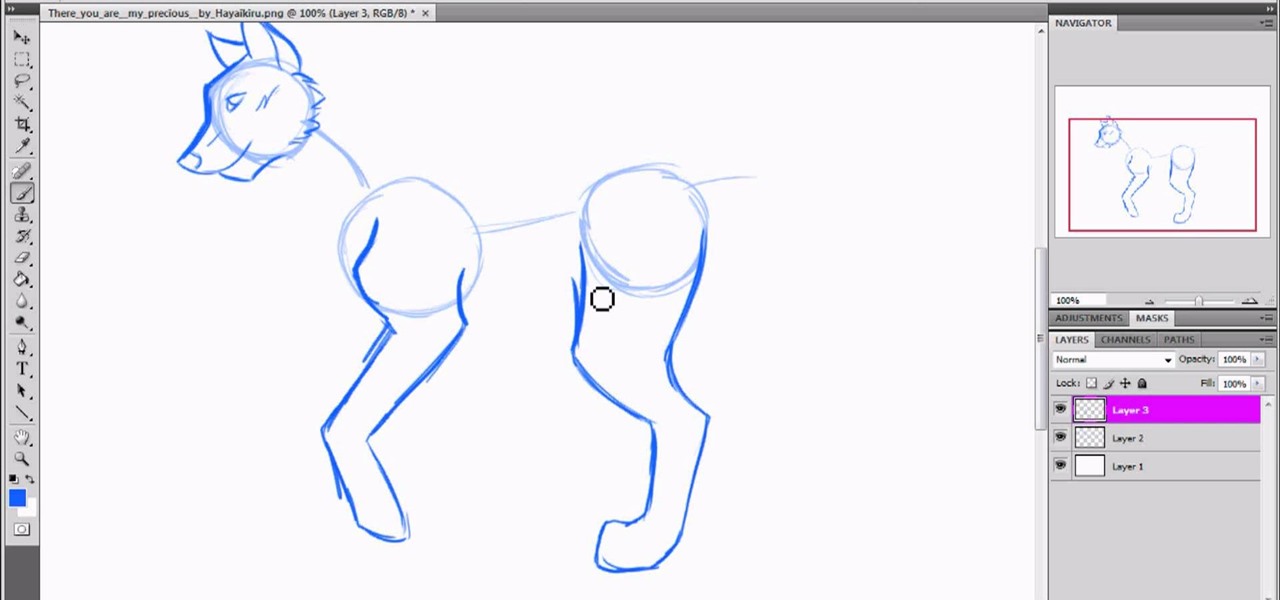
In this tutorial, we learn how to draw a wolf with basic guidelines. First, draw in circles from where the main sections of the wolf is. Now, draw a line connecting all of these and draw in the details of the face. Now, draw the back legs starting with the front leg and then the back leg. After this, draw in the stomach and the main part of the body. Erase the circles and background lines, then draw in the hair of the wolf and the stomach. Create a tail on the back, then add in the ears and t...
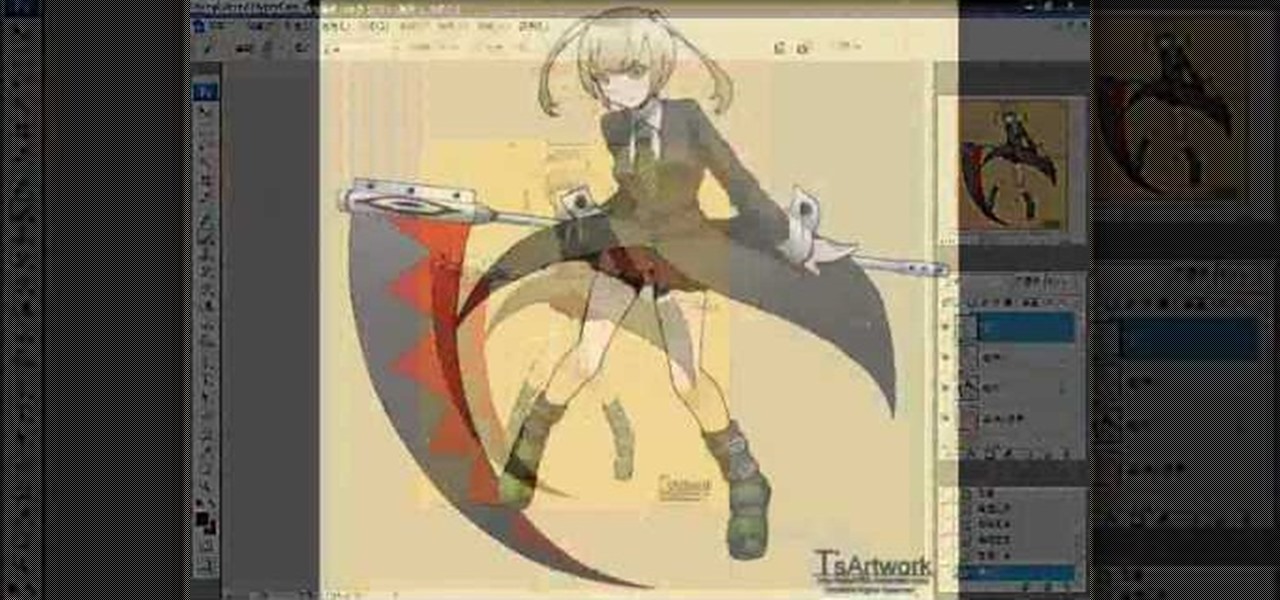
In this tutorial, we learn how to draw manga bodies. Start out by drawing circles for the body. These circles will start at the head, then go to the shoulders, arms, stomach, hips, knees, and ankles. After you do this, draw lines to connect them all together and make out the basic shape of the body. Now star to use a bolder line to create the realistic outline of the body. When you're finished with this, you will be able to do the fun part. You can fill in these spaces with color and lines to...
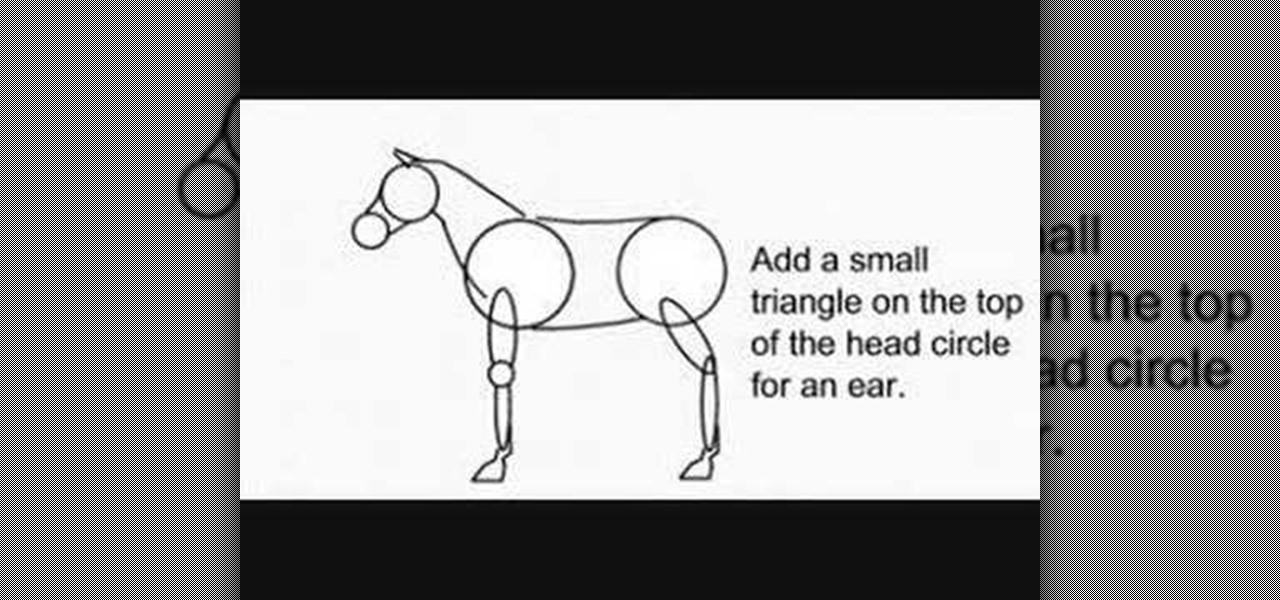
In this video, we learn how to draw a decent horse. First, start with two circles connected by two curved lines. Next, add a sausage for the top of each leg and add a small circle for the front of the knee. Then, add another for the lower part, and add two hoof outlines at the base of each leg. Then, add the back of the hooves. Next, draw two more lines that are far apart at the bottom and narrow at the top for the neck. Then, draw two circles for the top of the head and the muzzle. Join the ...
In this tutorial, we learn how to make a cat punch using Stampin' Up! products. First, you will need to use the: circle scalp punch, circle punch, oval punch (black and white), and five petal punch (black and white). You will also need two small circles each of black and pink for the eye and cheek area. Once you have all of these punched out, you will be able to assemble the head. Use the circle as the head and apply the white and black circles in the middle for the eyes. Use the flower punch...
In this video, we learn how to draw foreshortened figures. First draw a circle and then continue drawing other circles to connect them together and make an out line. After you have drawn these, you will start to outline the circles so you see a body detail coming out of the drawing. Draw in the legs and the arms as well as the head. Don't worry about adding details to this, it's all about drawing just the figure. Shade on the different areas and add in lines to make the figure look more reali...
In this tutorial, we learn how to make a Victorian hat from a lampshade with Gwen. You will need: a lampshade, scissors, acrylic paint, paint brushes, glue, a compass, and cardboard. First, take the compass and make the circle as wide as you want your hat to be, then trace your lampshade on the cardboard. Now place the small end of the lampshade around the large circle that you drew. Next, cut these circles out of the cardboard. Leave extra room, don't cut it out exactly on the line. When fin...
First, outline the upper portion and lower portion of the right eye. Make the upper line darker than the lower one. Copy and paste this to create the left eye of your anime artwork. Create the eyeball using the Circle tool. Create two more circles inside the eyeball - one bigger and the other smaller. Make eyelashes by using a set of curved lines. Create at least three thick strands of these eyelashes. Create another circle inside the eyeball that intersects the two smaller circles created ea...
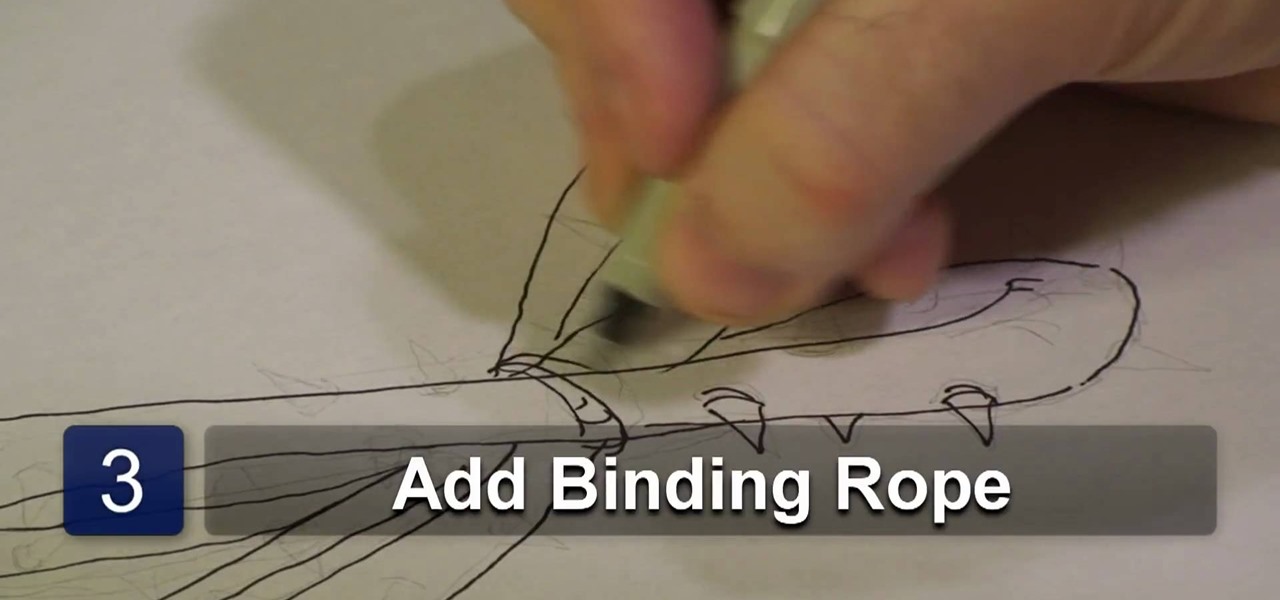
In this video tutorial, viewers learn how to draw a crown of thorns. Users will need a sheet of paper and a drawing utensil. Begin by drawing 4 semi circles. Then link the 4 circles together to form 2 vein-like thorn weeds. Now add detail by adding a rope to bind the thorns together. Then add barbs along the thorns and some more detail to give it realistic look. This video will benefit those viewers who enjoy drawing and art, and would like to learn how to draw a corn of thorns to utilize in ...
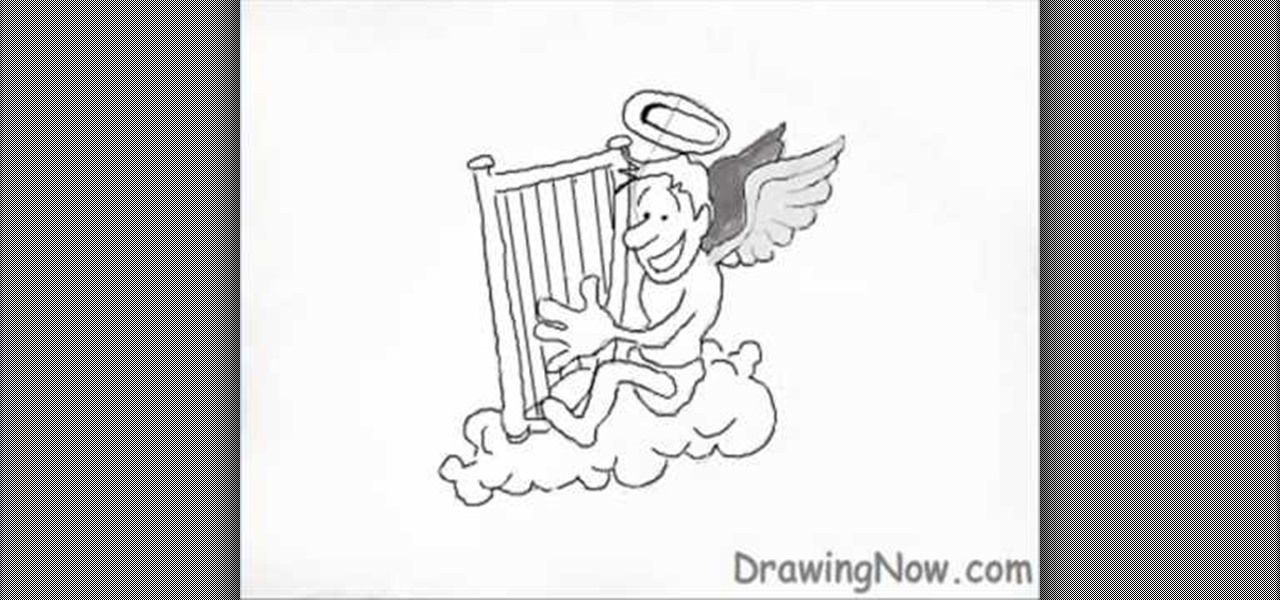
Three circles are drawn ontop of each other and a foot and a hand is added to the left side of the bottom and middle circles respectively; with the foot in a running motion. A rectangular shape is added in a way that the hand grasps it. A cloud is added below the forming person, so that he sits on it. Wings, a crown, a nose, an ear, hair, eyebrows, eye and a mouth with a smile are created in and above the first circle. The middle circle is traced onwards to the hand, to create the back,chest ...
To make a butterfly Valentine card, you need scissors, coloured pencils or candy stick and pipe cleaners. The first task to do, is go to Family Fun and print the butterfly template, which you can find on the site. Print your template into coloured cardstock. You can find cardstocks in the scrab-booking section of your craftstore. Cut out your butterfly from the template. Cut along the dotted line to create a slot for your pen or candy stick. Next we rap the pipe cleaner on the top of the cand...
This video illustrate us how to draw professor E. Gadd in Mario paint. Here are the following steps:Step 1: Draw a circle and within the circle draw another circle at the center.Step 2: Now from the periphery draw another circle so that half of the circle is in the circle and the other half on the outer part of the circle .Step 3: Now draw another circle another circle in similar manner on the opposite side.Step 4: Now draw three circles within the two circles drawn so that they form a hazel,...
This video both shows the viewer how to calculate the volume and surface area of a cylinder. It also explains what these different numbers mean. The volume is the amount of ‘matter’ that the cylinder can hold. The surface area is literally the area of the cylinders curved face and the two end circles.
This instructional video shows us how to make a Japanese flag fan. The materials required are: Foamy (Red and white), four popsicle sticks, glue and scissors. First cut two circular shapes (with one straight edge) from the white foamy, then glue on the popsicle sticks to the straight edge of one of the circles to make the handle. After this, glue down the other white circular piece of foamy to cover the tops of the popsicle sticks. Then cut out two smaller circles from the red foamy and glue ...
Learn how to draw a flower in MS Paint in this video tutorial from Shannon. In the first step, you will need to draw a circle with the shape tool. To create the petals, you will need to draw additional circles surrounding the first circle. Use the paint brush tool in green to create the stem and leaves, which you will draw free-hand. Using the bucket tool, fill in the leaves and the petals of the flower. Shannon also shows in this video how to draw a bird next to the flower with the paint bru...
DrawingNowVideos teaches you how to draw SpongeBob Squarepants. You start off with a squiggly line and you want to create a rectangle and then create a 3D box out of that. That will be the head. Add circles and ovals on the side to make it look more like a sponge. Add eyes, eyelashes, nose, cheek with freckles and an open mouth with two teeth up front and the tongue. Then draw the body and add details such as pants and a tie. Complete the face by adding a few circles around. Also don't forget...
To make the Crust, mix the flour, sugar, baking powder and salt in a bowl. Cut in the butter and shortening with a knife or pastry blender until mixture resembles coarse breadcrumbs. Stir in the iced water, a little at a time while gathering the mixture to form a soft dough.