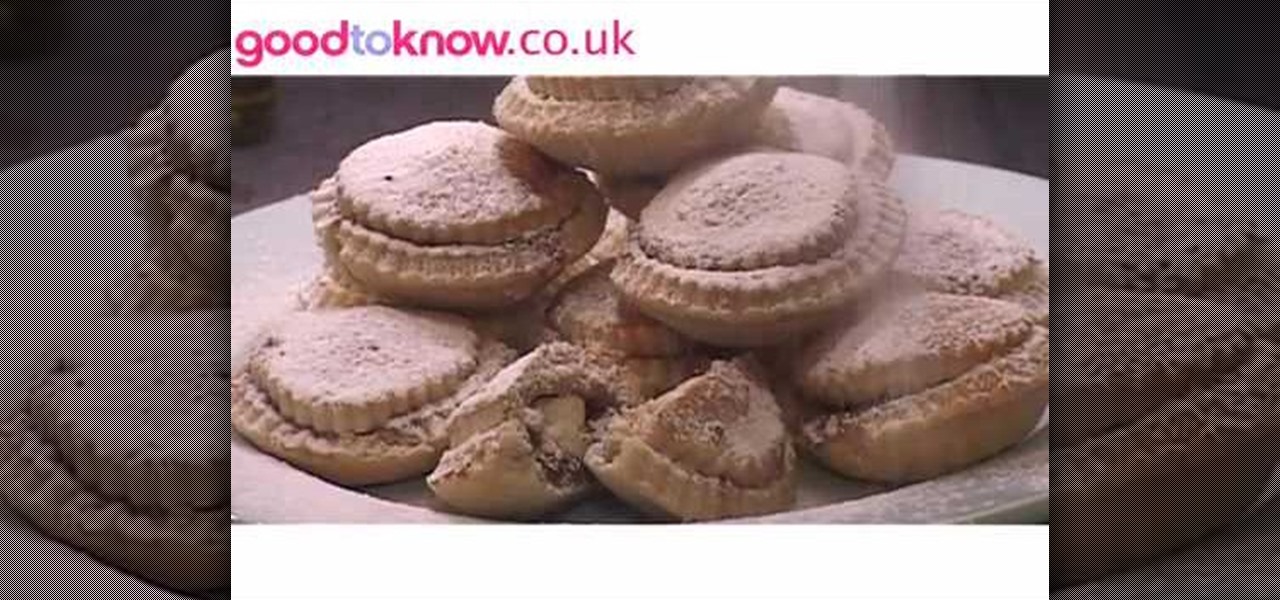
In this video, we learn how to make mince pies. Start out by sprinkling flour onto your counter and then rolling out your dough for the pies. Roll this out until it's thin, then cut out circles with a cookie cutter and place into a muffin pan. After this, fill with the mince filling and then a spoonful of cream cheese on top of that. After this, place the topping on these and secure with melted butter. Place these in the oven and bake them until they are golden brown. Let cool, then sprinkle ...
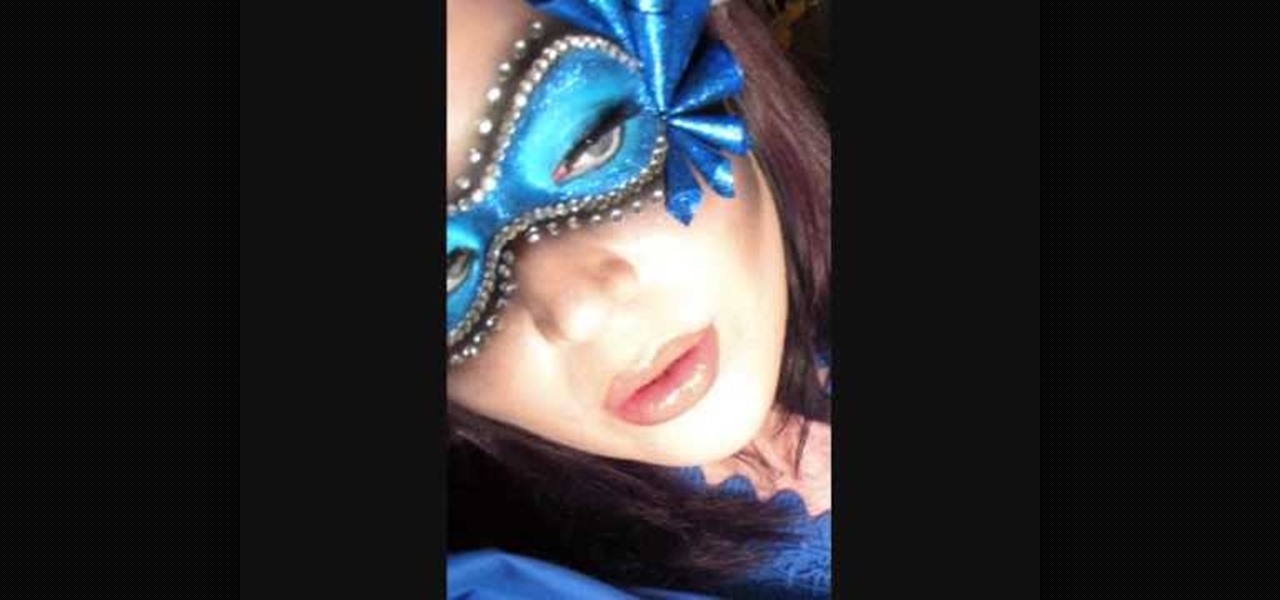
In this tutorial, we learn how to create a masquerade ball mask with makeup. First, draw the outline of the mask around your eyes. After you do this, paint on light blue eyeshadow in circles around your eyes. Then, take a dark blue color and apply it on the outer edge of the light blue and inside the outline that you created. Apply glitter to the dark blue portion of the eyes, then draw on black around the outline of the mask, smudging it onto the outer edges of the face. After this, apply ey...
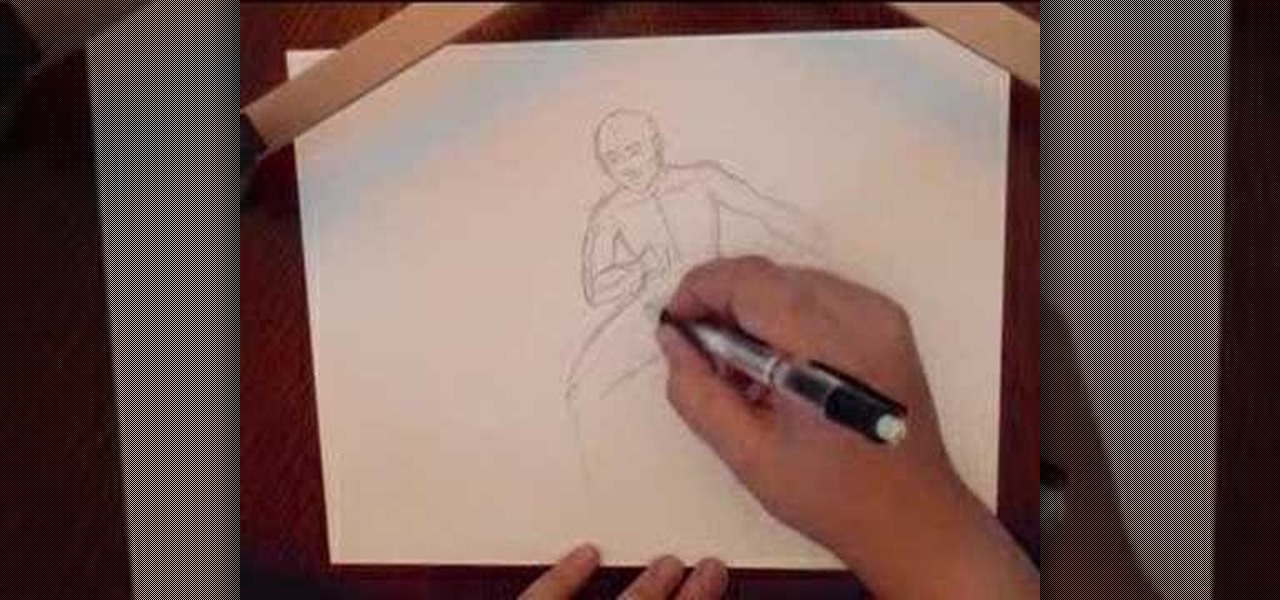
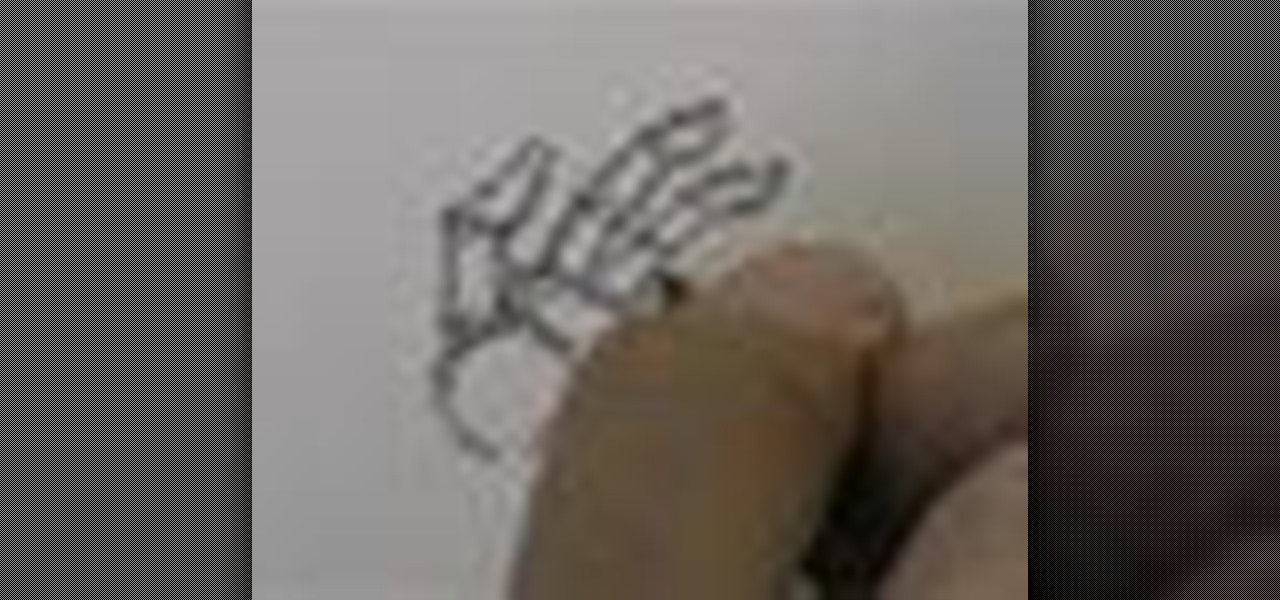
In this video, we learn how to draw a basic human figure. Start with a circle first as the head, then draw cross hairs over the circle to indicate the tilt and direction the head is facing. Then, add in the chin, shoulders, then circles where the joints are. Draw in the rib cage and spine, then the hip bones. After this, draw the legs and continue down until you reach the feet. When you finished with this outline, use a darker line to draw more details and shading in on the face and body. Whe...

This video tutorial is in the Arts & Crafts category which will show you how to make crumpled flowers for scrapbooking. Cut out three circles of 2", 1 1/2" and 1" diameter out of a sheet of paper. Then wet the pieces of paper lightly with water or colored ink and crumple them one by one as shown in the video. Then place the three pieces together and pin them up with a split pin. Now crumple the edges of the paper further to give them the look of a flower. Allow it to dry and your flower is re...

In this tutorial, we learn how to make a pig out of punches. First, you will need to have white paper, pink paper, and black paper. You will also need punches that are in star shapes, different circle sizes, oblong shapes, and a flower shape. TO put this together, first glue a small heart shape to the bottom of the oblong shape and set to dry. Next, take a large pink circle and place two white dots and black dots on top to make the face. Next, draw two black circles onto a smaller pink circle...
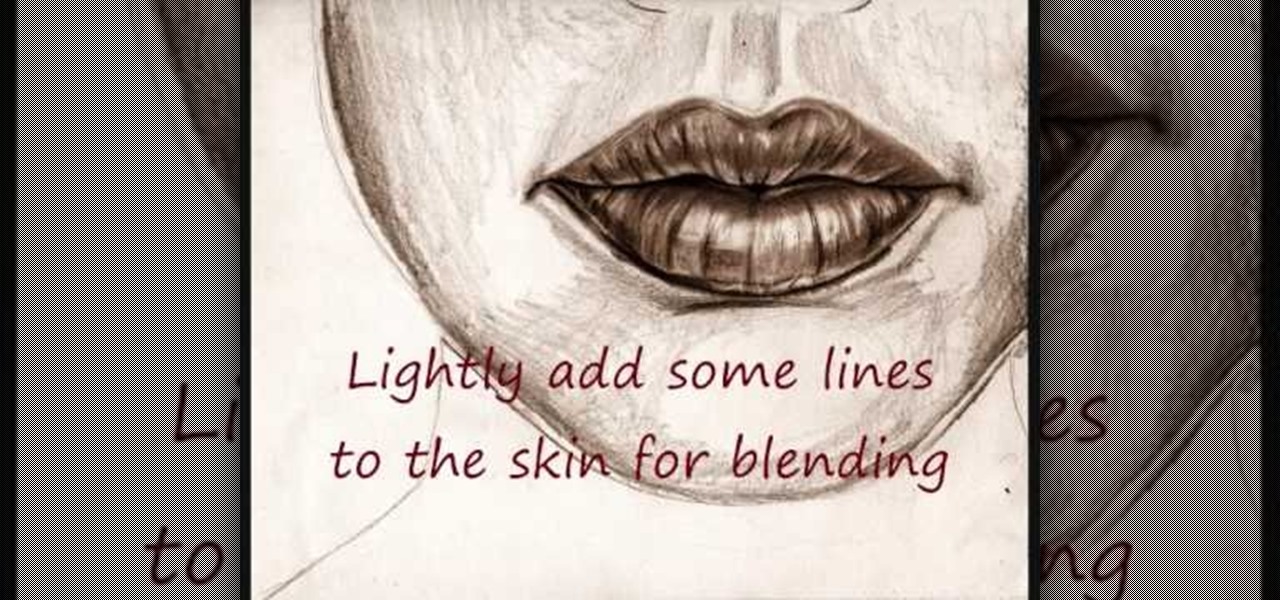
In this video tutorial, viewers learn how to draw lips. Begin by drawing a horizontal line for the mouth and draw a Mickey Mouse shape in between the line. Then sketch the upper lip with the 2 smaller circles on top and draw the lower lip with the large circle as guidelines. Now users may draw the rest of the face. Then darken and define the upper and lower lips. Now lightly sketch some lines on the lips to show depth. Then darken and shade the lips. This video will benefit those viewers who ...

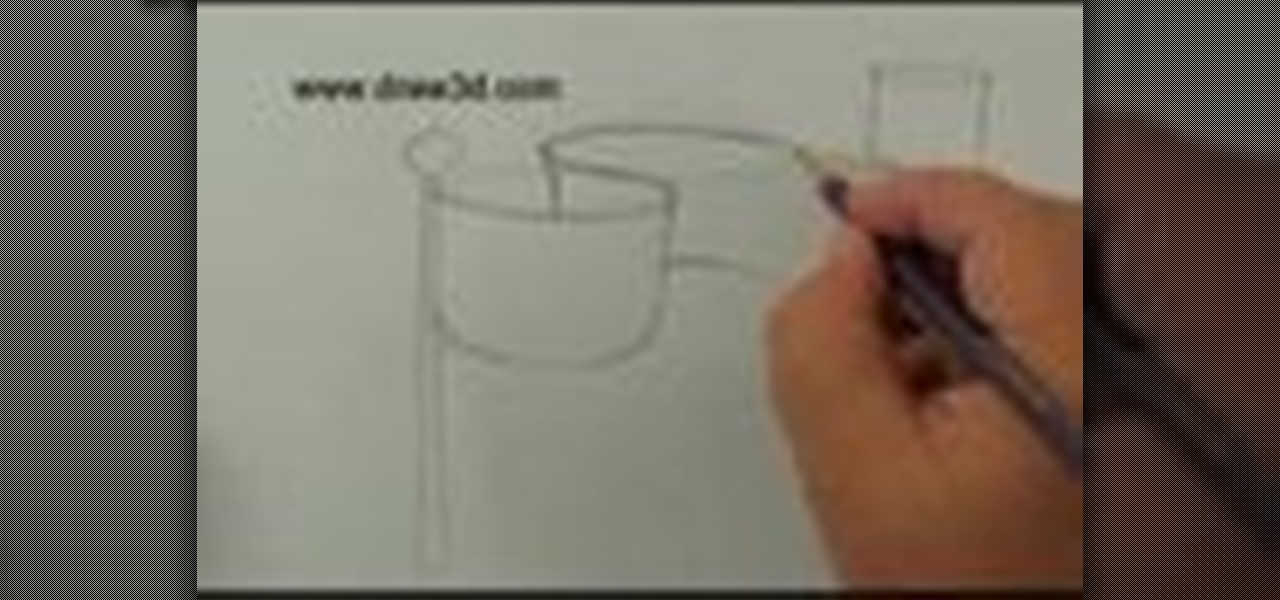
In this Fine Art video tutorial you will learn how to draw with basic shapes and apply them. The four basic shapes are spheres, cubes, cylinders and cones. A sphere is a three dimensional circle. On paper it will look flat without shading. Make sure you practice all kinds of circles. A cube is a three dimensional square. You can make a basic cube by drawing two squares and then join the corners. Cylinders are tubes or pipes. Draw two ellipses and join them by lines. If you are just starting o...
Dragons are one of the most fun, traditional, and challenging things an artist can draw. Fortunately, Drawing Now is here to help you get started with this tutorial on how to draw a cute, simple, Western-style dragon. Here are their step-by step instructions:
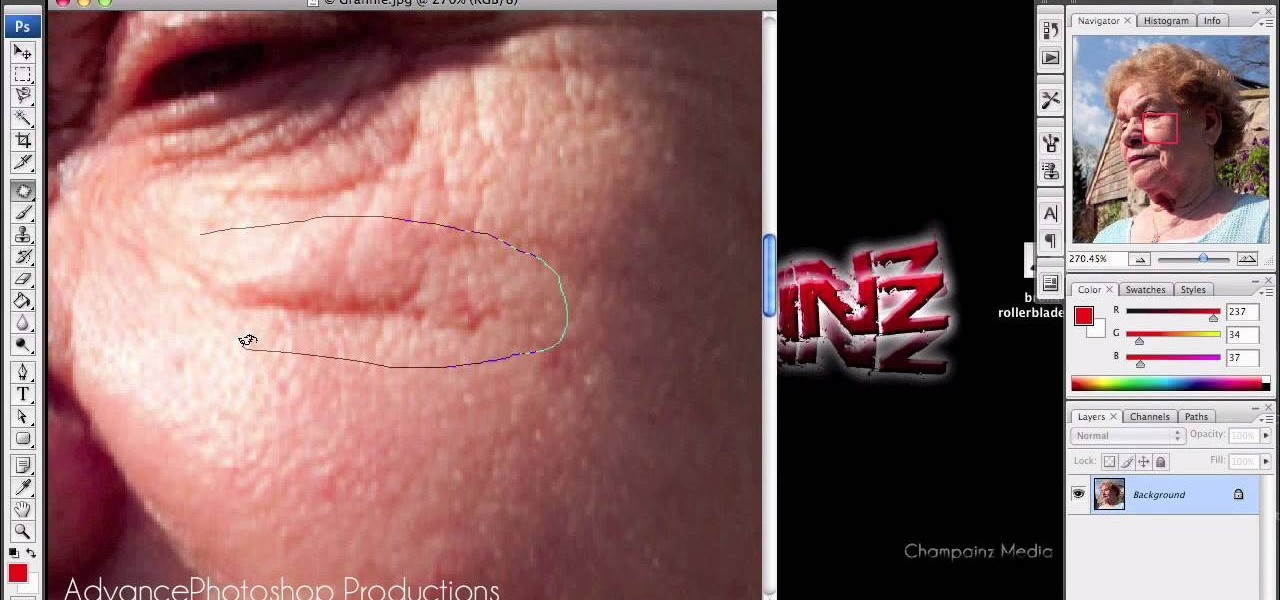
In this video, we are given ways to clean up an image, or remove unwanted objects in an image using Adobe Photoshop. The first tool that we are shown is the clone stamp tool. It allows you to clone a certain sample of an image, for you to use to paint over the object in the image you don't want anymore. In the video, the narrator shows us how to seamlessly take a man out of an outdoor setting. The next tool that we are shown is called the patch tool. In the video, the narrator uses the patch ...
Want to draw a male chibi? This video will show you how. First, draw a circle. Second, draw a tiny triangle underneath the circle. This will be the body of the chibi. Then, draw two little circles for eyes in the center of your face. Next, draw four little ovular rectangles for the limbs of the creature. Now you must give definition to your chibi's eyes by emphasizing them with dark shading. Lastly, add the rest of the clothes on depending upon your preference. The author takes the opportunit...
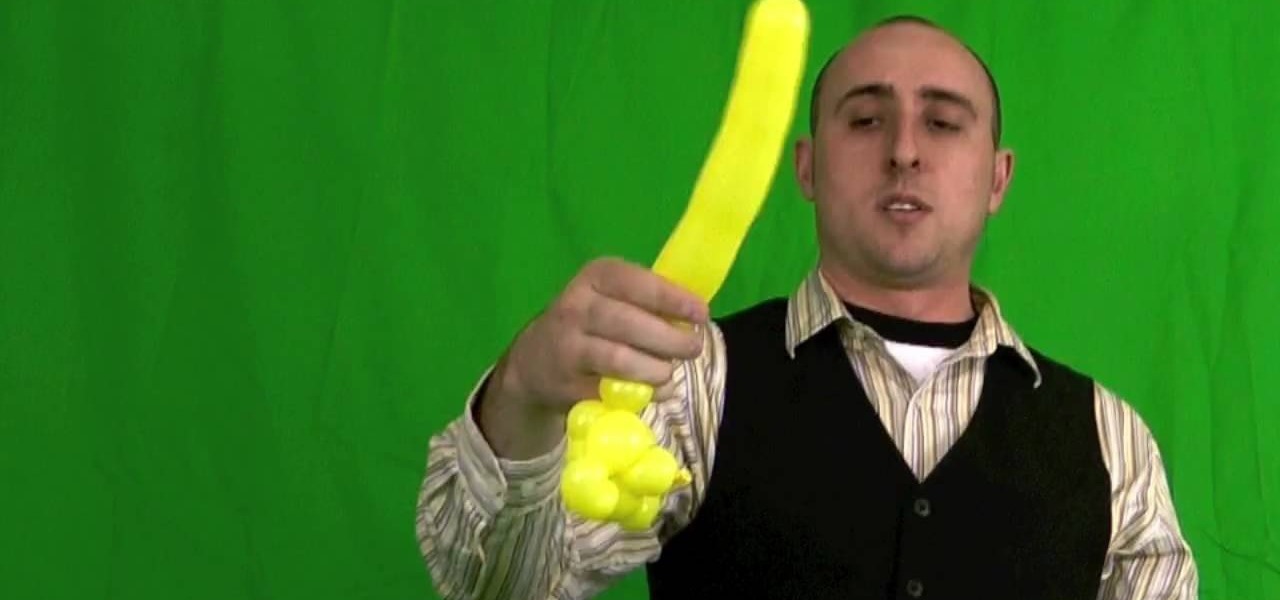
Learn how to make a balloon teddy bear using only one hand by following the steps outlined here in this tutorial. You will need one balloon already filled with air. At the end, create a nose. Then, add two bubbles for the back of the head. Twist the five bubbles that will comprise the head of the bear. Once the head has been formed, you will stick the nose in through your ring for the head to create the overall head and face. Pinch twist to create the ears at the top of the head. The body is ...
Learn the right way to draw a wolf with its full body, by watching this video. The artist begins by drawing three circles faintly and connecting them with a line, representing the head and body of the wolf. Next, the skeletal structures of the legs are outlined. The tail and ears are faintly outlined next. The artist then begins outlining the face in detail, adding the eyes, nose, mouth, ears etc to the wolf’s head. The body is now outlined adding rough edges to indicate fur. The legs of the ...
Learn how to draw Gastly, the Pokemon. 1. Start by drawing a circle. 2. Add a smiling mouth. 3. Draw half circles for the eyes with little lines for the pupils. 4. Add two little "V"s for teeth/fangs. 5. Add a flame behind him. 6. Add shading.
In this video, we learn how to make a mouse hat with construction paper. You will need: 2 small pompoms, 1 large pompom, poster board in blue, black, white, and yellow, lace, scissors, and glue to make this. First, cut the blue piece of construction paper on once side, then twist into a cone shape and tape it together. After this, take the rest of the blue paper and cut it into half circle shapes for the ears. Now, take the yellow paper and cut it into a smaller half circle and place inside t...
This video is about how to make flowers from recycled dryer sheets. Since the dryer sheets have already passed through the dryer it will be wrinkled but it does not matter. Cut the dryer sheets into strips 1 inch wide approximately and need not be uniform. Take a button and place the edges of the3 strips in such a way that it takes the shape of the flower and the other edge collects at the button holes. You may color the dryer sheets with dye like Ranger perfect pal mixed with water and spray...
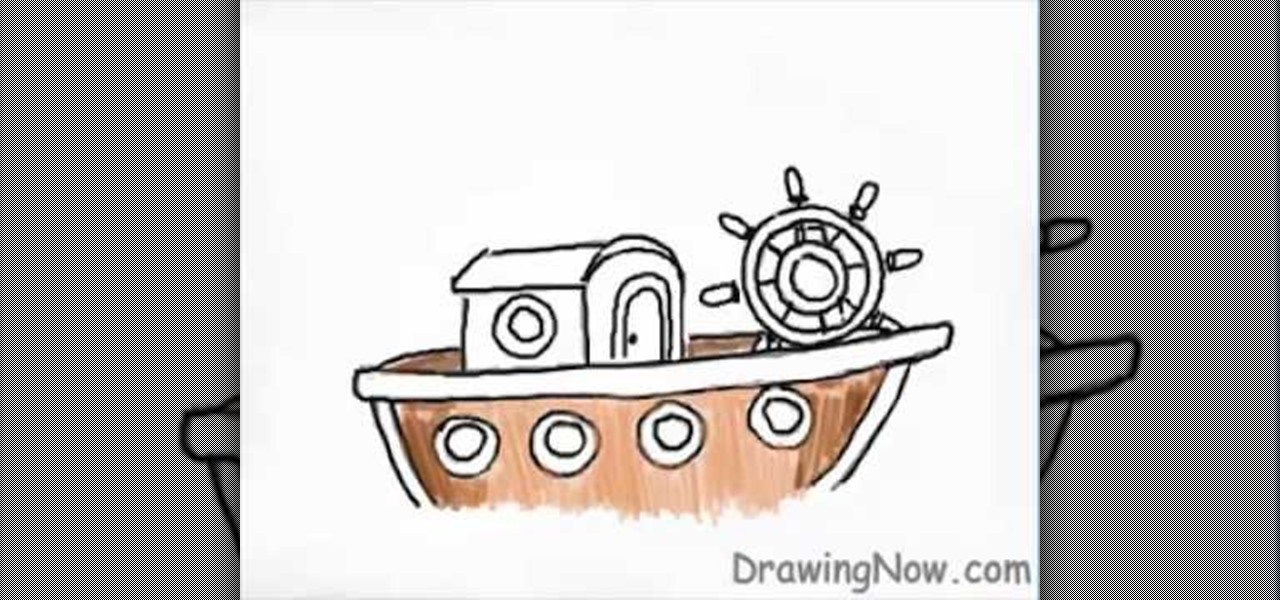
This video helps you to draw a boat. First draw the base with double lines. Then draw a cabin and a wheel. Next draw small circles on the base. Now paint the entire lines with black. Next draw spokes on the wheel. Shade the base of the boat with a lighter brown color and over-coat it with a dark brown. Paint the cabin with orange and brown color as shown in the video. Give a dark brown to the outer area of the circles in the base and fill the inner areas with black color. Give a white line to...
To begin you need to have a metal hollow tube made up of a strip which is around one inch wide and about two inch in length and has been bended round. Now take some clay and put it inside this hollow tube on a table. Press it with your finger. Take a glass tube with lid and use it to press the clay down to form a pot with this clay. Now remove the both the glass tube and the metal tube. Put the clay pot again back over the lid of the glass tube and press with your fingers. You have to press s...
This video shows a demonstration of how to make crepe paper rosettes. The materials used are four strips of paper, two small paper circles, and double sided tape. First put double sided tape on one of the circles and trim the edges. Put a corner of one strip of paper onto the sticky edge of the circle. Fold and crease the paper as you go around paper circle, forming fan-like folds in the crepe paper. Put a tiny piece of double sided tape to hold the end. Trim the edges with scissor to make a ...
Have a bunch of old magazines sitting around the house you'd like to recycle? Use old magazines to make a cool basket that suits your more eco-friendly side. Learn how to make a coiled basket out of magazines with help from this how-to video.
exist†trace is a popular Japanese all-female metal band, and their singer Miko is something of a heavy metal beauty queen for modern times. This video will teach you how to replicate her makeup look from the band's video for "Vanguard".
What to put a cake on can be a dilemma. You can decorate a cake board or purchase a cake turntable. This video will show you how to cover a cake board.
In this tutorial, we learn how to draw a beautiful unicorn. Start by outlining the unicorn, using circles to show where the head and joints are. Draw long lines for the legs and the tail. Then, draw on the point for the head and start to add in the details of the body. As you continue, add the hair on the back of the unicorn and then shade all around the body. Add colors to the unicorn and then start to make the background. Show it in front of a purple and blue background with a large moon, g...
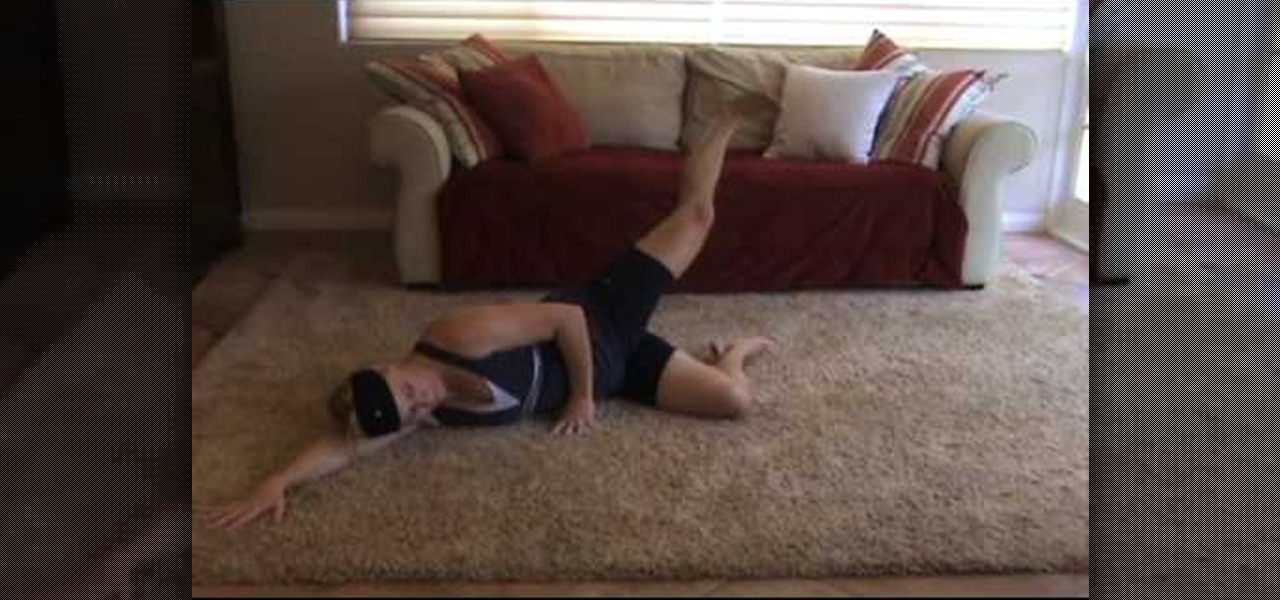
In order to do the increase your strength, through the Pedestal Pose Routine, you should begin in a modified pushup position. Resting on your elbows and looking down at the ground/floor, while you rest on pointed toes. Hold each pose for 20 seconds. Next, rotate over to one side. Remain resting on one elbow. Next, roll over onto your back, resting on both elbows. Next, roll over onto your other elbow. Make sure that you keep your spine aligned in all poses.
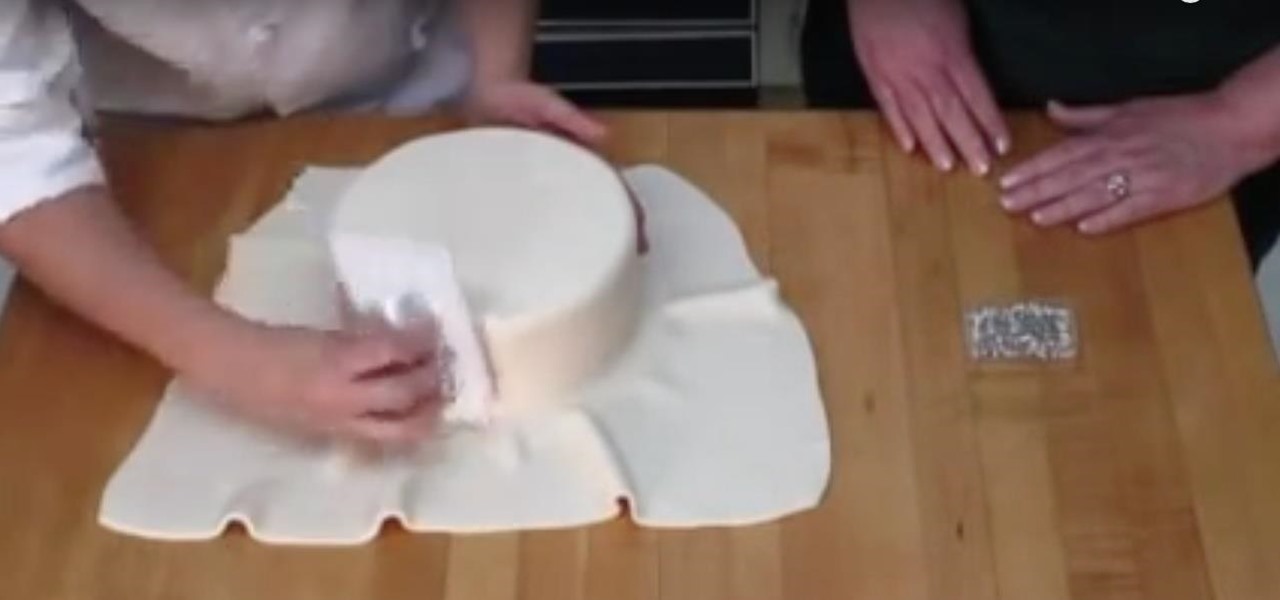
This is a demonstration of covering and decorating a cake with fondant. The cake is chilled and kept aside for covering. Fondant is bought from a cake decorating shop in bulk of about one pound as less is hardly available. The fondant is kneeded like a bread dough and made smooth and soft. The dough is rolled by a rolling pin after spraying a little corn starch on both sides so that it does not stick to the table or the rolling pin. It is rolled upto a thickness of 1/4" to 1/8" thick if the c...
In order to make a gum paste anemone you first should roll out the gum paste onto a flat surface and cut out about 13 circles of this with a cookie cutter. Use thin foam and ruffle 12 of the petals leaving the last flat. Place your ruffled petal on thick foam and drag a ball tool over the bottom half of the petal. This will give it an oval shape. Now, put these into a flower former. Now let the 13th petal that is flat down to dry. Let these dry for about 2-6 hours but not until they are rock ...
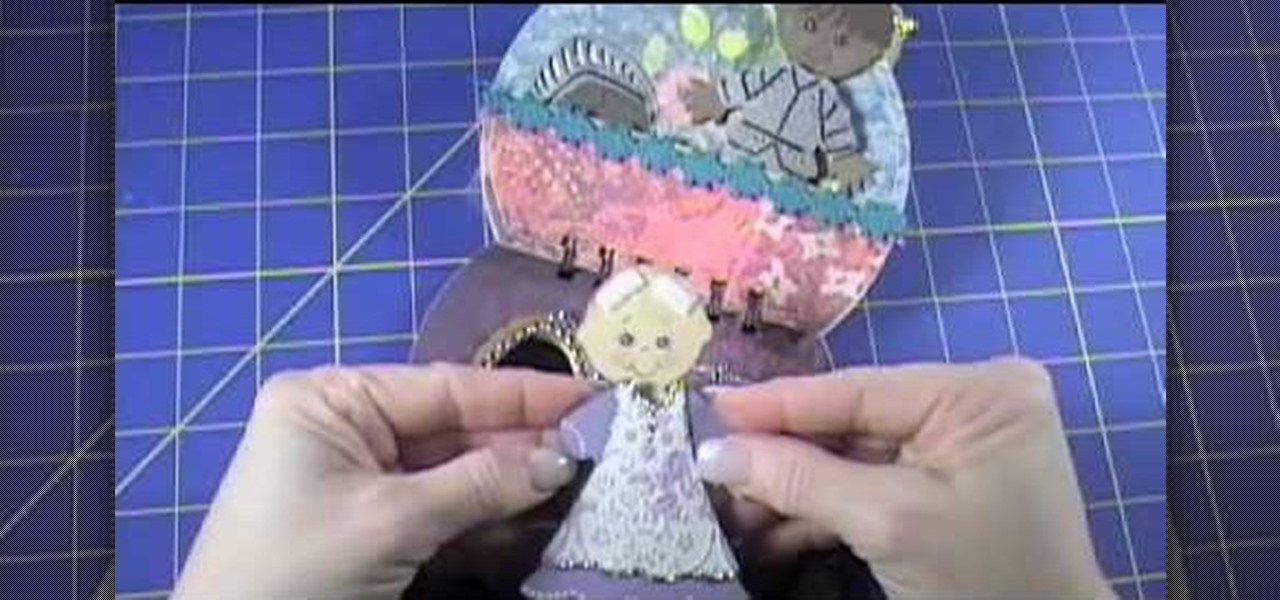
The video describes the making of Paper doll dress up and a Tin Purse to put the dolls inside. You can use the cartridge paper but regular paper should do. She was sticking to the princess themes in this tutorial. The tin comes from provocraft but creative imaginations also offers one. Instead of purchasing a tin you can find a old tin purse maybe once for a over sized set of playing cards. There is a tab feature you can use on the dolls but which children the might come off. She suggests usi...
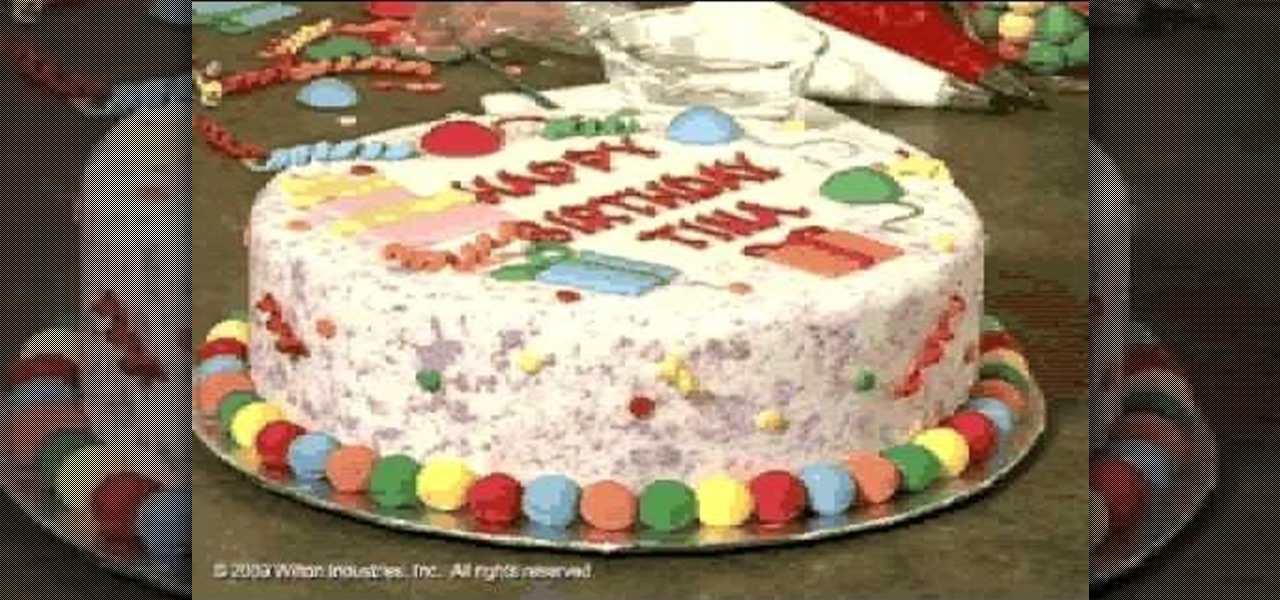
This video is a demonstration on how to make a festive and colorful birthday cake. The frosting on the cake is made of rolled fondant, which comes in bright colors already made. Roll the fondant about 1/8" thick. The cake should have a thin layer of buttercream frosting on it. Lay the fondant over the cake and mold the fondant over it with your hands, trimming the extra off the bottom. Fondant can also be used for decorations on the cake. They cut out squares of fondant to make birthday prese...
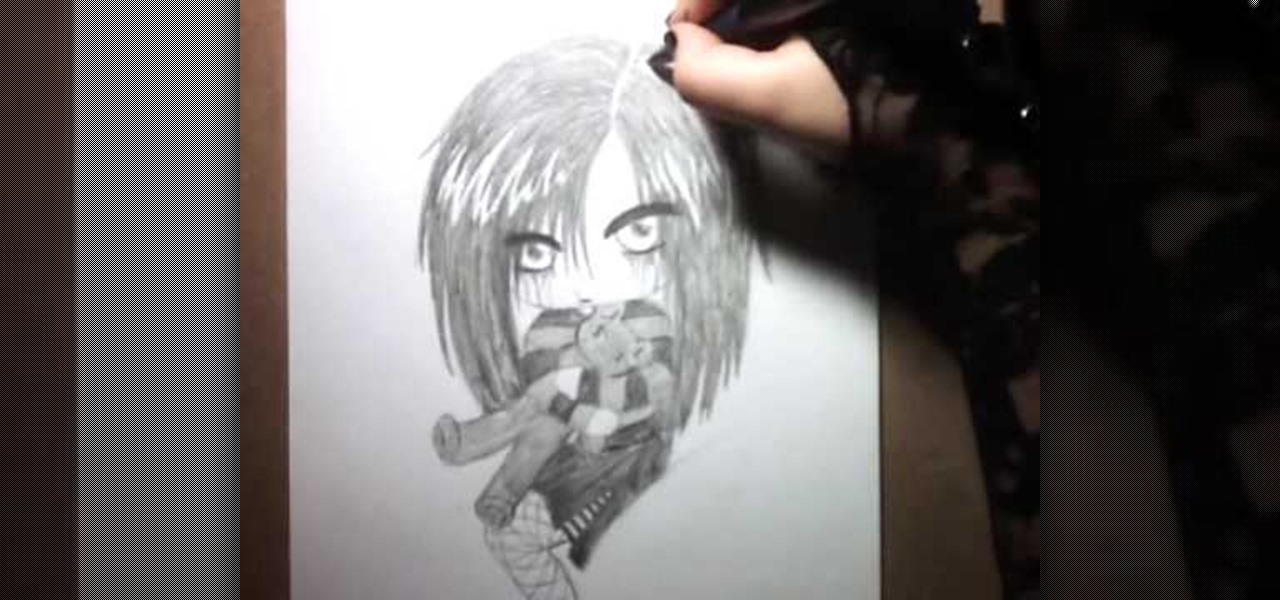
This video describes how to draw an emo-angel chibi. First draw eyebrows, make sure they are dark and thick, then draw half circles going down from them- these are the eyes. Then draw in the eyeballs centered in the middle of the eye. Next draw dark around the bottom of the eyes. Draw lines drooping coming from the darkness around the bottom of the eye, on both eyes. Next draw other dark lines coming down the forhead. Next draw a line coming down from both eyes, and curve them to make small c...
Anne Knowler Fitness demonstrates how to banish belly fat with a triceps pushup home workout. First, position yourself in a pushup position with your elbows in tight to your ribs. Then, lower yourself down, letting your chest and nose reach the ground. Keep the shoulders out in front of the hands. In this workout, the triceps are doing all of the work. Keep a perfect plank when doing the pushup. Return to the pushup position to do the obliques by raising your hands to the ceiling in a windmil...
Mark demonstrates how to draw flapping flags or scrolls. He starts with a paper in a binder but any paper will work. In this demonstration he uses a pencil to create his drawing but any pen or pencil will do. He draws the flagpole first starting on the left side of the page. He draws multiple circles creating cylinders that you may have learned how to draw in a previous lesion by Mark Kistler. He uses shading to create the effect of a curve and depth of the flag. He shows how to create the ef...
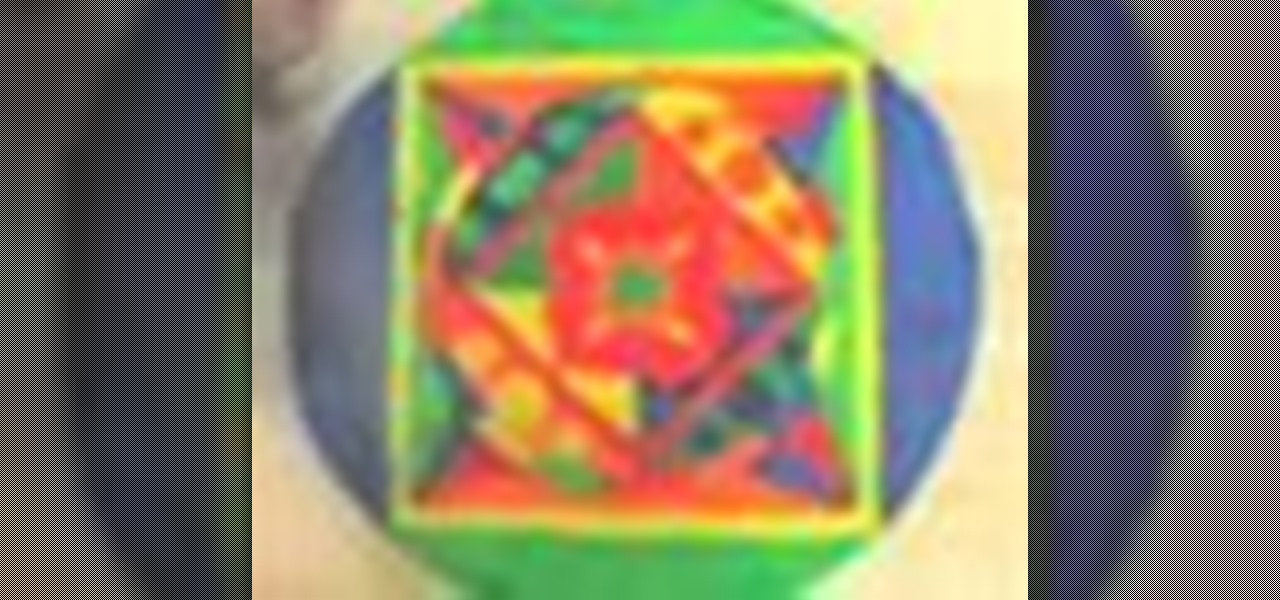
A Mandala is a sacred part of meditation. Instead of searching everywhere to purchase one, this tutorial will show you how to make your own, and feel spiritually closer to your creation.
Learn to draw Pokémon Oddish with these simple and quick steps. Start your drawing project by placing the Pokémon Oddish name somewhere on the page. Oddish is a round or onion shaped object. Place this basic shape in the center of your space. Add the feet which are shaped like little shovels at the bottom of the Oddish body. Go to the lower central area of the body and add a triangular shaped tongue. For the eyes, use little circles placed proportionately in the upper central area. Place seve...
This video describes how to draw an anime face viewed from the front. Anime faces are enjoyed by everyone because they depict unique personalities. Anyone can draw an anime face using their imagination. These steps make it simple:
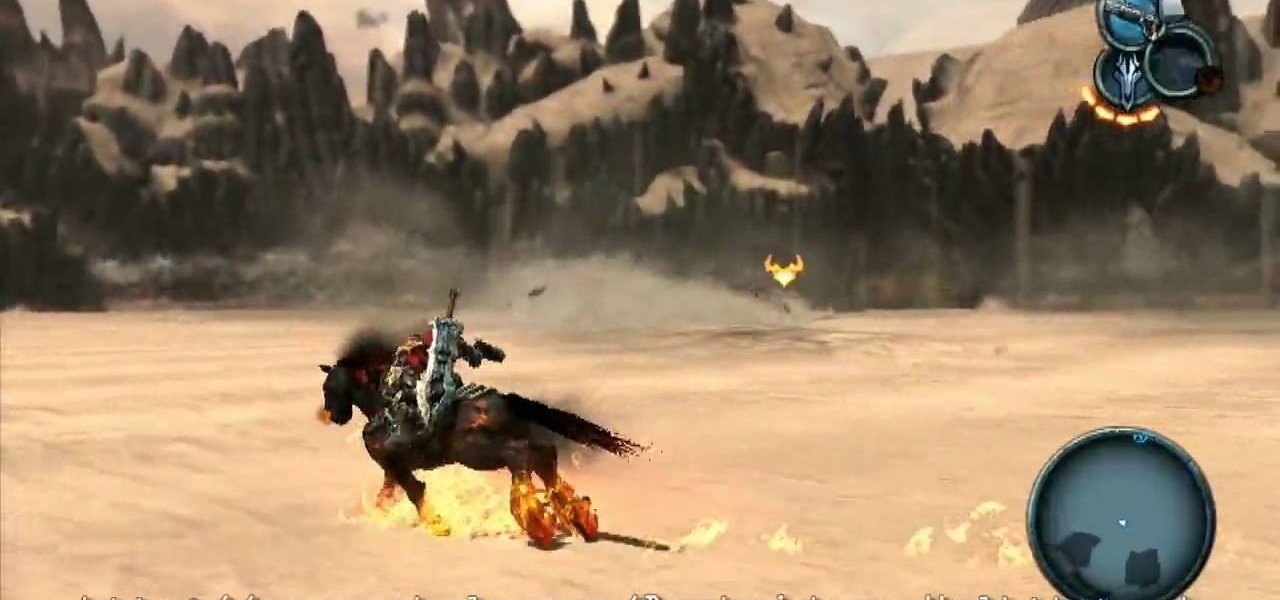
The hardest part in the Ashland level of Darksiders on the Xbox 360 is probably the boss fight between you and Stygian. At the start of this battle, Stygian will be wearing a metal cage around its mouth. This prevents you from doing any damage to the beast so you'll have to remove it if you wish to kill the creature. As Stygian does circles around the field, ride Ruin along side its head so that you can swing your Chaoseater at the cage. Use Ruin's turbo to keep up with Stygian. Smash the loc...
Curious about Google's new social network, Google+? Get the rundown by watching this video and learn the ins and outs of Google plus, including the circles feature, the chat feature, photos and more. This is your video guide to Google+.
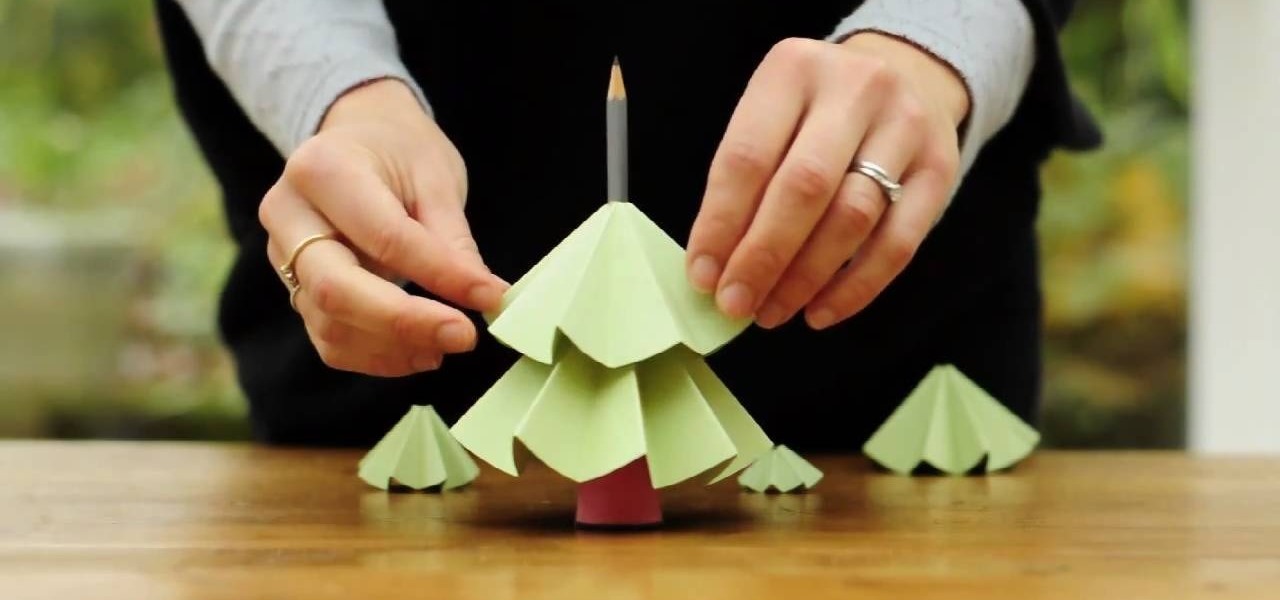
This tutorial shows you how to take several circles of recycled paper (from sixteen centimeters to four centimeters in diameter) into a lovely Christmas tree decoration. Fold each of them in half several times, cut a hole in the tip, then just stack and decorate!
You can make a lovely napkin shaped like a Christmas tree using just two fabric circles and a sewing serger. With a little folding, you can even make these napkins reversible! Great for a beginner to intermediate seamstress or sewer.
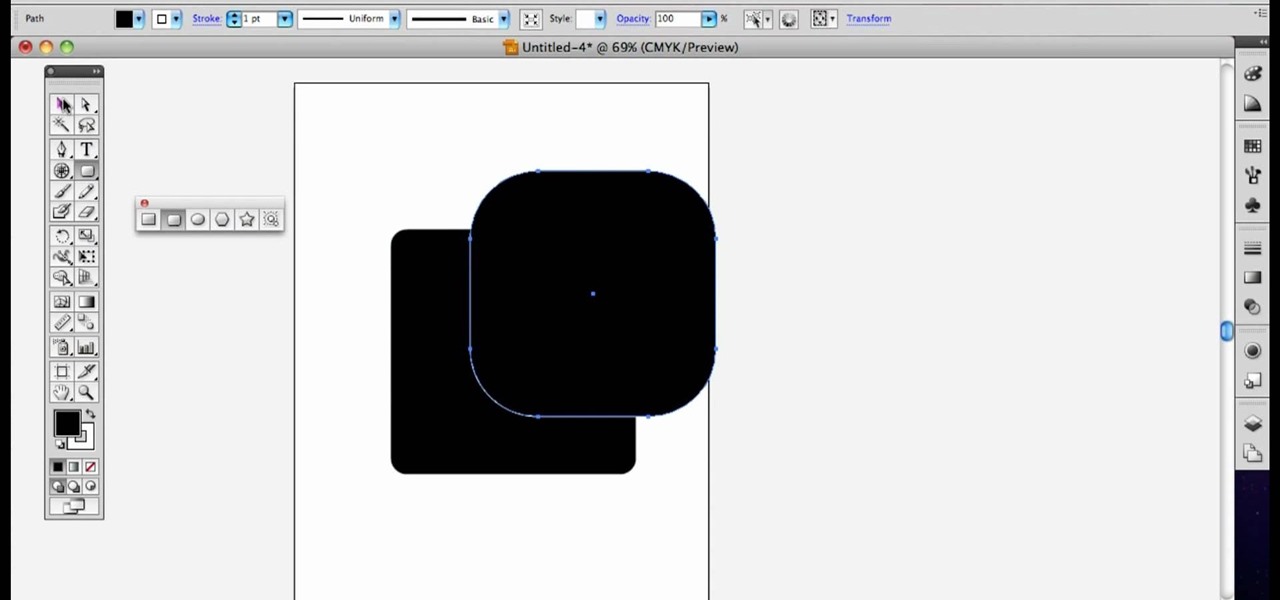
In this clip, you'll learn how to use the Shapes tools to create perfectly geometrical shapes like squares and circles. Whether you're new to Adobe's popular vector graphics editing software or a seasoned professional just looking to better acquaint yourself with the program and its various features and filters, you're sure to be well served by this video tutorial. For more information, including detailed, step-by-step instructions, watch this free video guide.
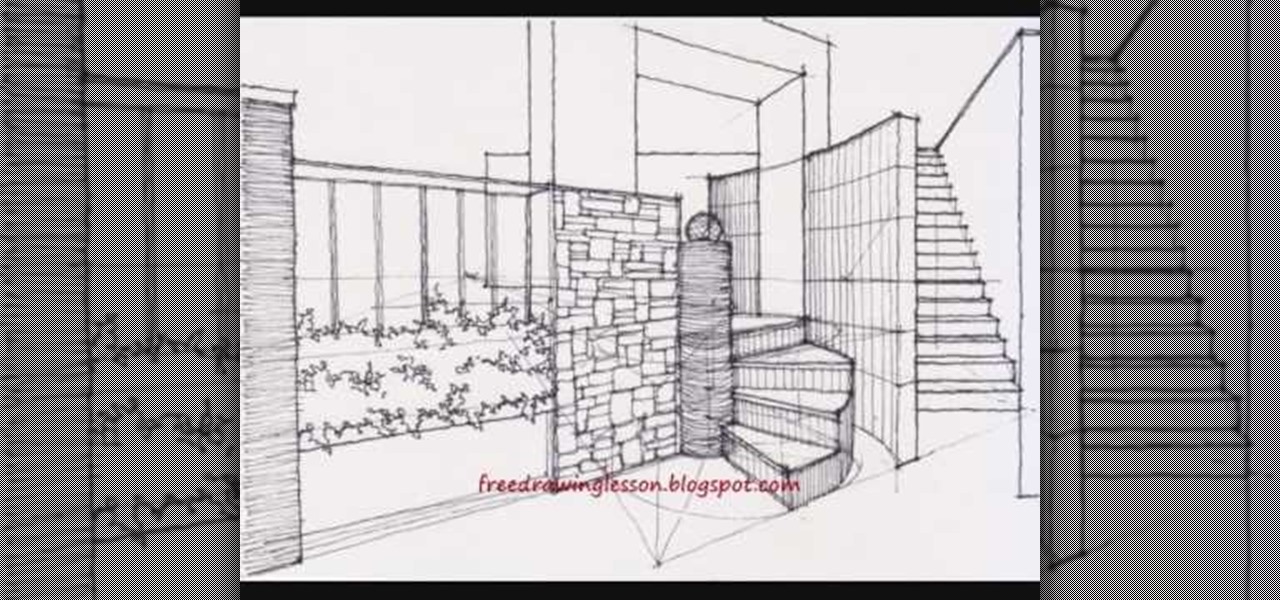
Are you a fantastically talented artist who's tired of scribbling the same circles and squares over and over again? Sprinkle some hot sauce into your drawing affairs by combining the two. Watch this tutorial to learn how to draw spiral staircases, which are much harder than normal linear staircases to complete but also much more fascinating aesthetically.
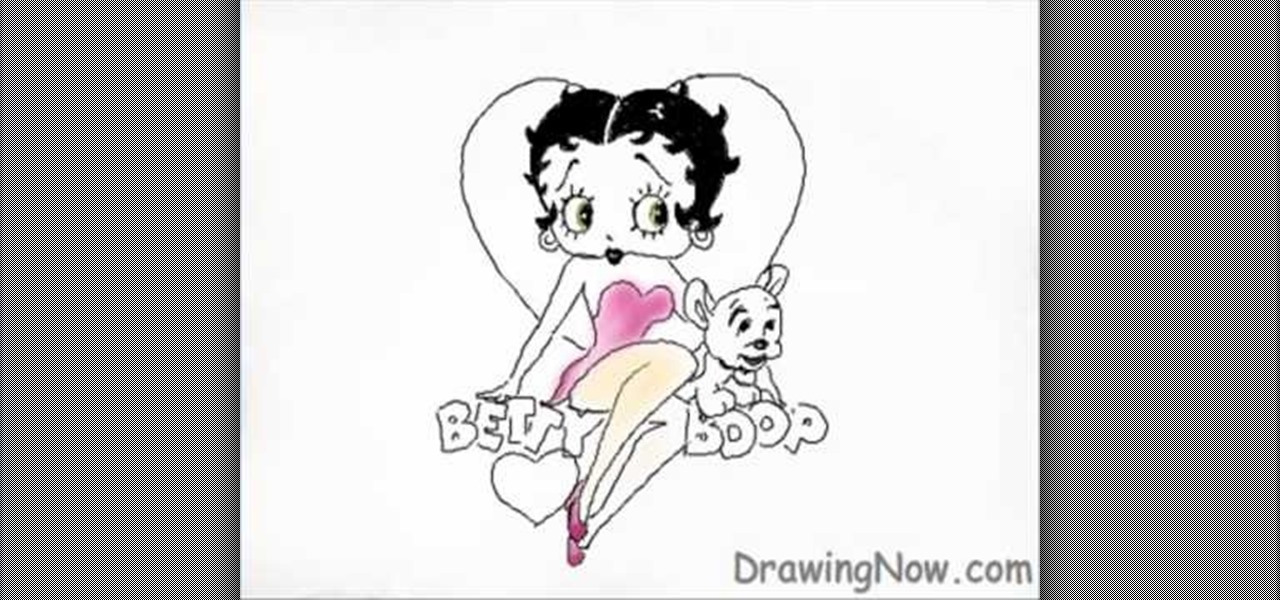
Drawing Now presents this simple video tutorial on how to draw Betty Boop. Begin by drawing an apple shape for her head. In the center of her head draw her part and extend the curved line down to her cheek finishing off with an upturned curl. Next draw the other half of her part and the front curved line of her hair. Then add two circles for her eyes. Inside these circles, shade in small half circle areas so it appears she is looking to the side. On the opposite side of the eye, add an accent...