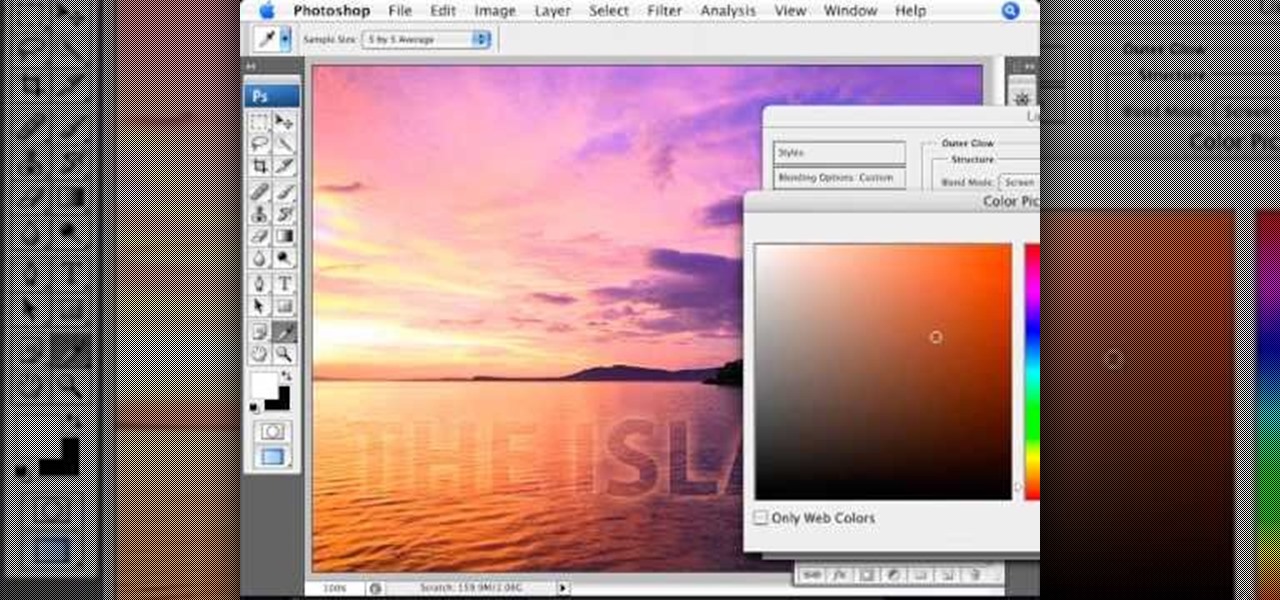
Learn how to create glowing text in Photoshop with this awesome video! 1. Write any text using text button T on the selected image as a background. Write a suitable text and place it somewhere. 2.Select the text and make it Bold. 3. right click and set Opacity and Fill options. Opacity changes the color of the text as well as its effect. Whereas Fill changes the color only . If you have set it to 0% then you can't see the text if its exist also. Set Opacity to 100%. 4. For glowing text select...
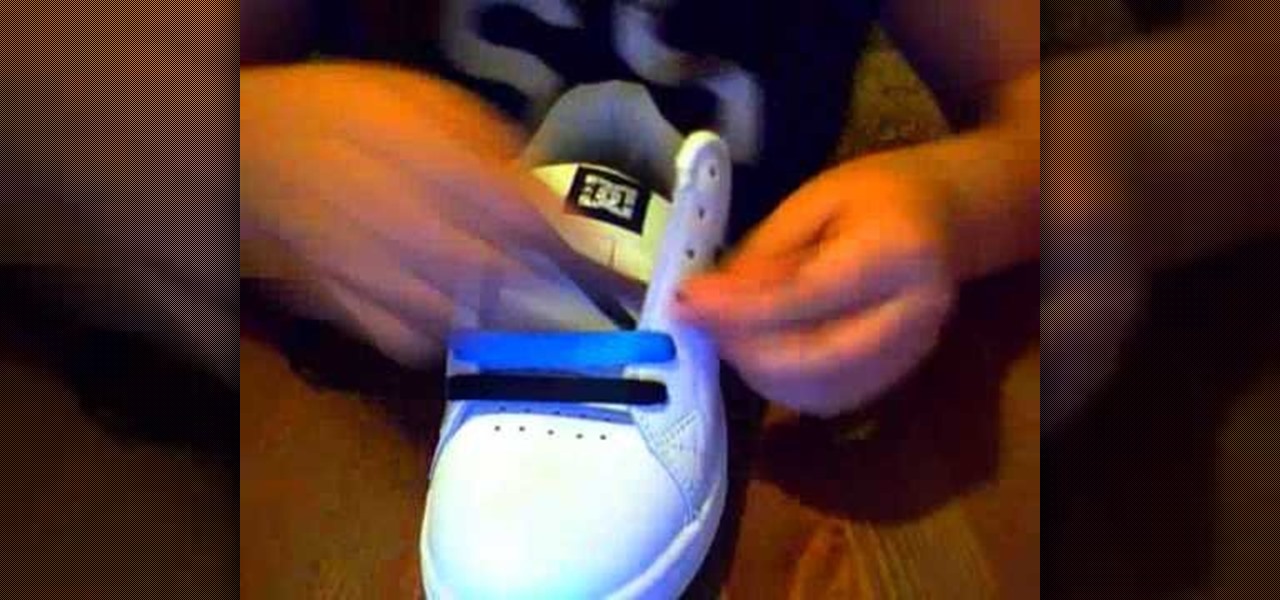
Wanting to try something new with your shoe laces? Have some fun by tying your shoes with two different colored laces, bar style. This look is funky and fresh, perfect for school or an afternoon out with friends.
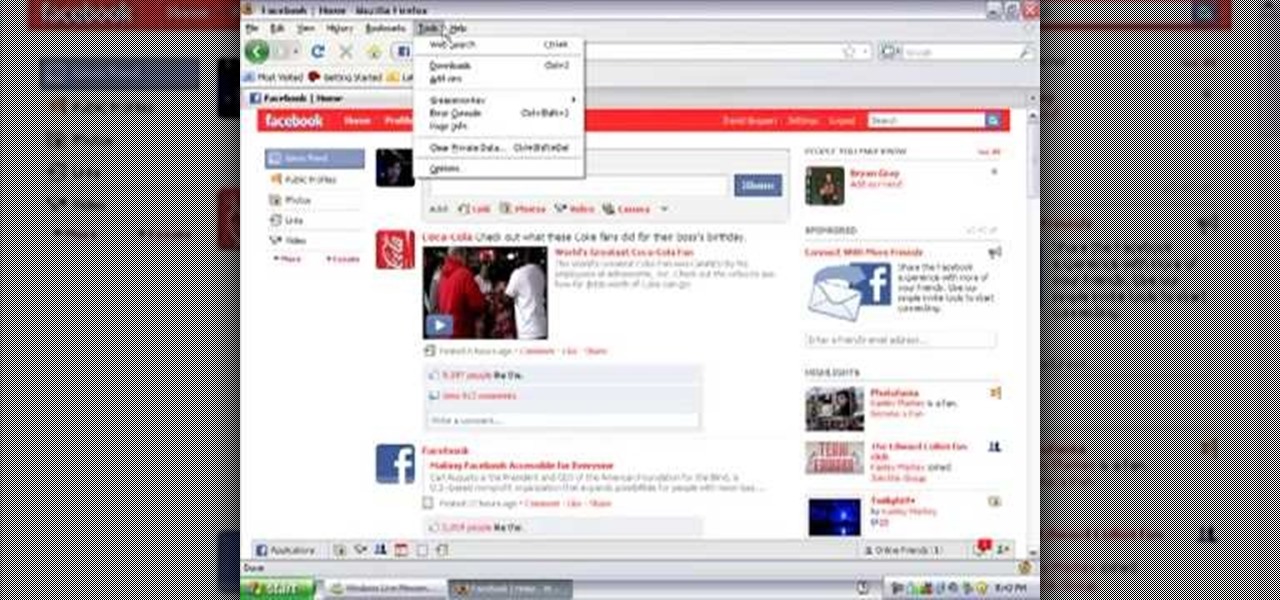
In this video, learn how to change your Facebook color scheme from boring blue to something new! In order to complete this, one must be using the Firefox browser. If you do not have Firefox, you can download it here. In addition, you will need to download Greasemonkey and a Facebook script, both available at the links below. Good luck!
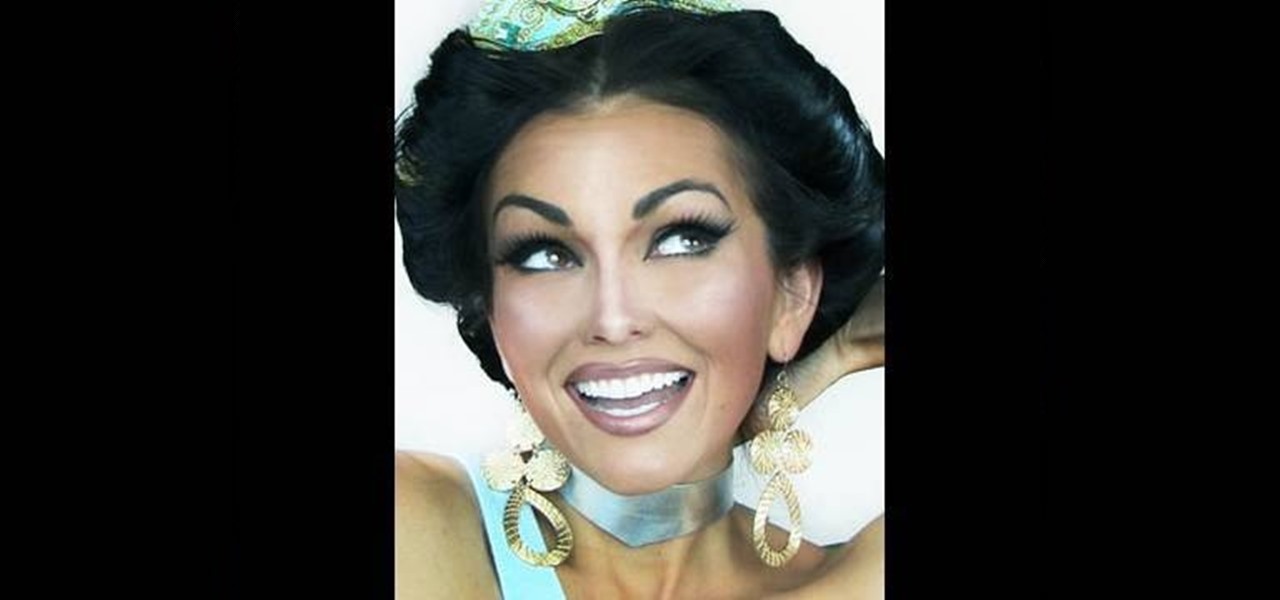
In this tutorial, amazing make-up artist, Kandee Johnson shows how to get Walt Disney's beautiful Princess Jasmine look from Alladin! Watch as Kandee transforms herself into a whole new her! (Get it? A Whole New World? A Whole New Her?)
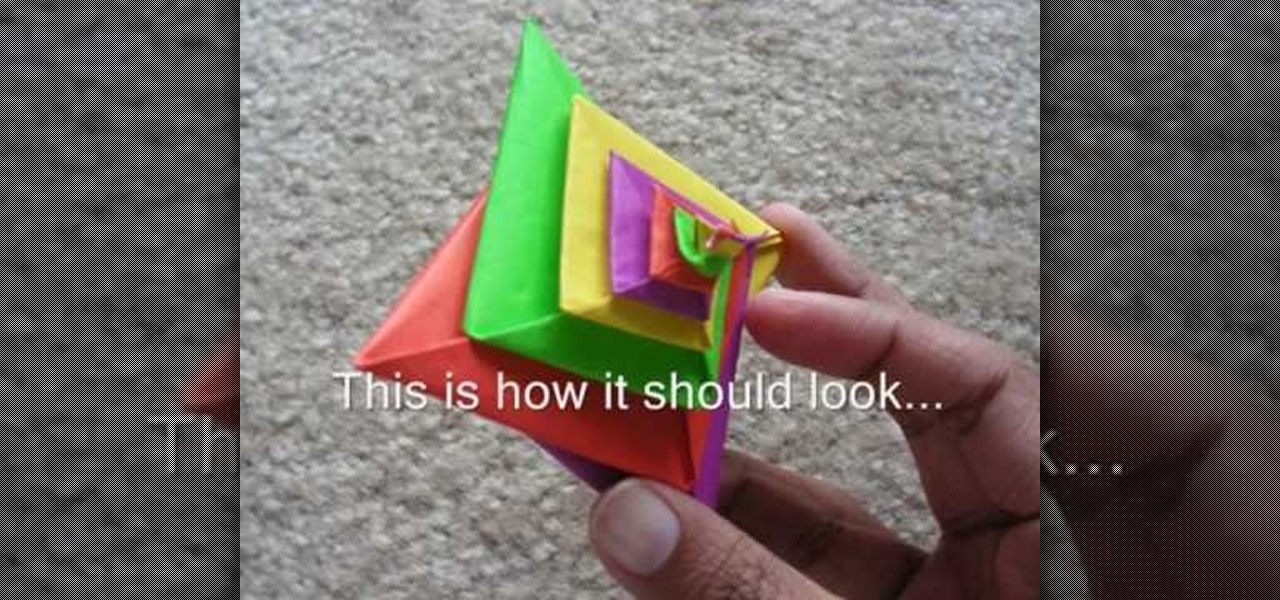
This video explains how to fold the Spiral by Tomoko Fuse. You need 4 sheets of paper of different colors of any combination of your choice. 2 sheets of 2 colors each would give you a dual colored spiral.

To draw snowy pines in colored pencil, depict the tree with snow weighing down the branches and with snow dunes in the background. Learn to depict snow on trees with tips from a professional illustrator in this free instructional video on drawing. All you need are a few tips and tricks to master the art of drawing snowy pines.

This software tutorial shows you how to use the plug-in Colorista to color correct in Final Cut Pro. This is an introductory tutorial which will cover the basics for new Colorista users within the Final Cut Pro software. An easy-to-use color correction plug-in that delivers great results quickly from within Final Cut, After Effects, Motion, Premiere Pro, or Avid systems.
Using Aperture, you can easily convert images to black and white and add color tints to enhance your photos.
Watch this video to learn how to traditionally hand-color silver gelatin black and white photographs.
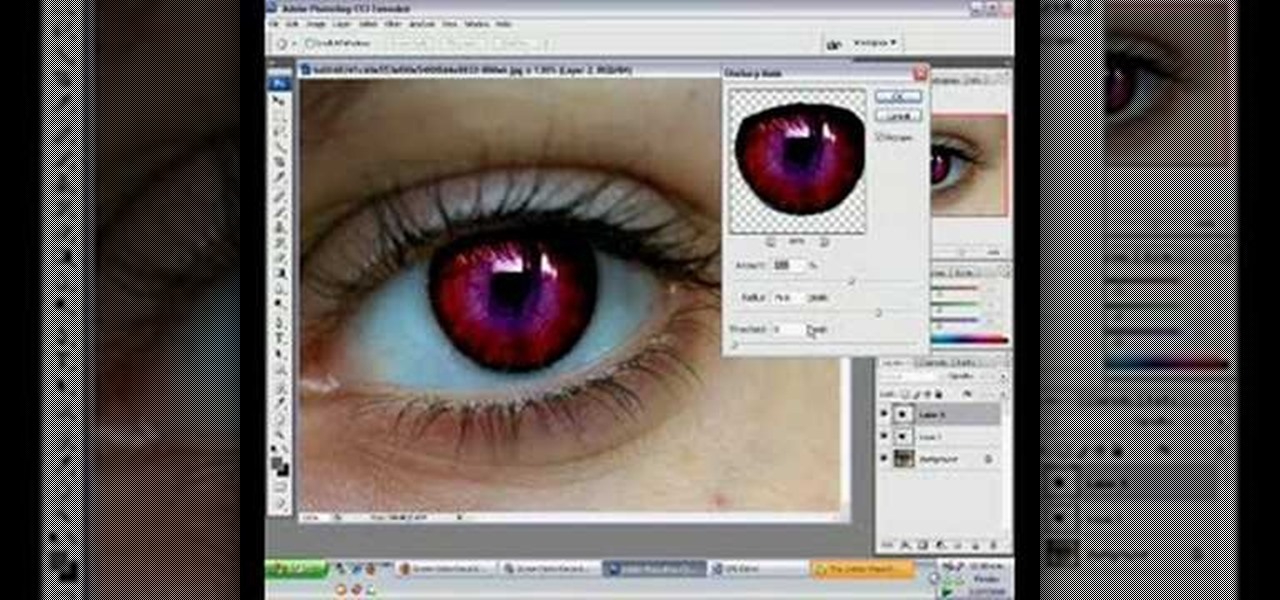
This quick tutorial explains how to change the color of the eyes in a photograph using Photoshop.
You've seen them at Disneyland's Fantasia. And in big budget movies like "Waterworld" and "Lord of the Rings." Spectacular, glowing fire effects that seem to ripple with the wind are a staple of action movies, and though it may seem like you need a super good video editing team to create such light shows, all you really need is some household chemicals.
In this tutorial, we learn how to cook your green beans so they keep their color. The secret ingredient you can add to your boiling water while cooking your green beans is ice! This will help the green and yellow colors from appearing in your green beans! It will keep the color a beautiful green and not mix in any other colors. To start, put enough water to cover the green beans in a saute pan and then heat it up, put in the green beans and as you cook them add in ice cubes. When finished, ad...
In this tutorial, we learn how to use color, texture, and style in your home. When choosing a paint color for your walls, first make sure the color is something you don't mind seeing everyday. After this, choose furniture that has different textures on it. Use a combination of different flooring materials to create contrast in each of the rooms. Use plants and paintings for decoration, but have them in popping colors to make the room come together. Use area rugs on floors, this can bring the ...
In this tutorial, we learn how to draw Optimus Prime of Transformers. Start off by drawing the outline of the entire body of the character. Make sure to add in the large arms and feet as well. Next, draw over this to make a more elaborate outline including the details for Optimus Prime. Once you have all the details draw, erase the background lines. Ten, color in the character and add in lines and shading to make it look more realistic. Once you have done this, then you will finish off with a...
In this tutorial, we learn how to make rainbow cupcakes. First, you will need to make the batter and pour it into six different bowls evenly. After this, drop different colors of food coloring into each of the bowls to make them all different colors. Once these are mixed together, you will have all the colors of the rainbow! Drop a small amount of each of the colors into the muffin liners in a baking dish. When they are full, bake these in the oven until they are golden brown at the top and y...
In this tutorial, we learn how to draw portraits. First, you will use a light touch of the pencil to draw the outline of the face and hair. Make sure to include the jaw bone and create a line for the chin. Next, use the side of the pencil to draw on the shading underneath the features of the face, which you will gently outline with the pencil as well. As you add more detail, you will increase the color with the pencil to create a bolder image. After this you will draw in the ears and the hair...
We always knew that Taylor Swift was a bombshell, but it wasn't until her 2010 VMAs performance that we saw just what a retro doll she could be. While Swift usually favors light and bright makeup colors that emphasize, rather than overwhelm, her natural beauty, she went all out for the awards show.
In this tutorial, we learn how to get Leona Lewis' Avatar themed "I See You" makeup look. First, you will need to apply black eyeshadow to your entire lid up until you reach the crease. After this, use a brush to blend the color out and create a winged effect on the outside corner of the eye. Next, apply this color on the bottom lash line, making a slightly smudged effect with your finger. From here, you will apply a teal colored shadow all over the eye and on the outside flare as well. Then,...
In this video, we learn how to create a brochure with Microsoft Publisher 2007. A brochure says a lot about your business, and you can make them yourself easily! Find the brochure templates first in the program. Choose a design and a color scheme along with the page size, font, and information you want to include. Once you do this, add in pictures and images to your template after clicking "create". Then, you can create a range of publications that adapt to different form functions. Click the...
In this tutorial, we learn how to draw Ino Yamanaka. Start off by drawing the head, drawing lines in the center to use as reference points. After this, draw the rest of the body, including the hands, torso, and neck. Now start to draw in all of the details. Draw the eyes evenly apart, then add in frown lines, a mouth, eyebrows, and any other details of the face to make it complete. Next, start to erase the reference lines and draw in the hair of the character. Draw around your basic outline t...
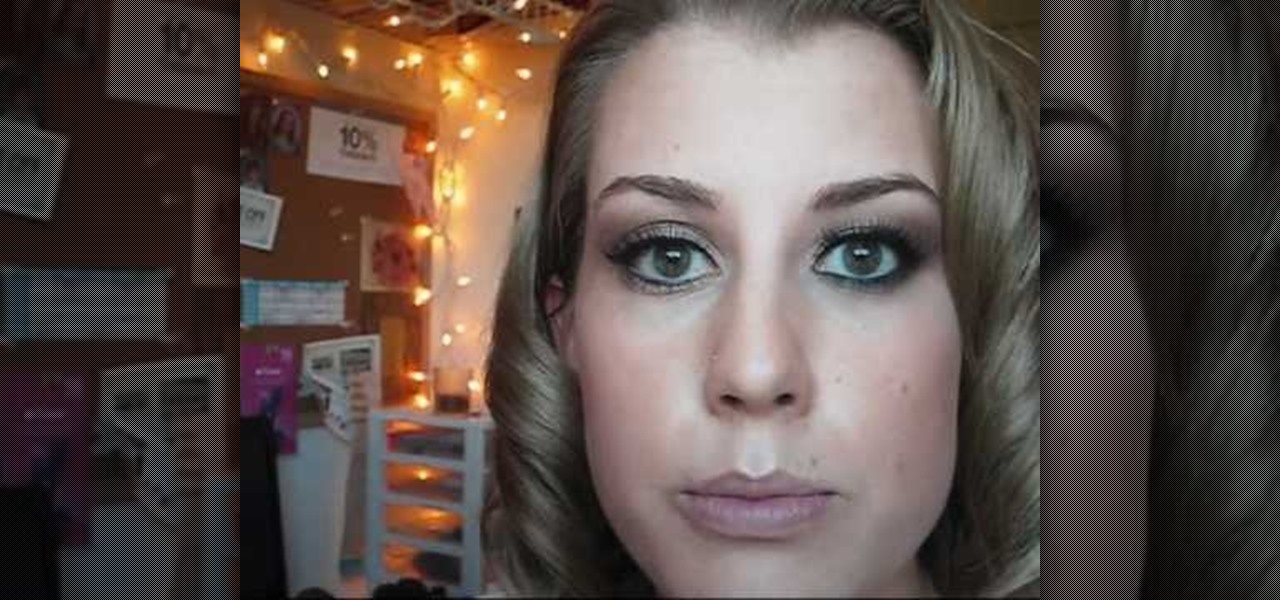
In this tutorial, we learn how to create a toned-down, everyday makeup look. Start out by priming the eyes, then brushing on a light nude color to the entire eyelid. After this, brush a darker color onto the crease of the eye and blend the two in together. Next, take a light nude shimmer color and brush over the eyelid on top of the other colors. Next, take this color and brush it up to the brow bone to create a highlight. Add in a dark brown color in the crease of the eyes, then blend in to ...
In this tutorial, we learn how to draw Axel. Start out by drawing the head, then add in the facial features including the eyes, nose, ears, and mouth. After this, draw in the spiky hair that goes around Axel's head. Next, draw the neck and shoulders. Continue to draw down the body until you reach the feet. Add in the details of what the character is wearing, using lines on the clothing to make it look more realistic. After this, you will need to draw in shadowing on the drawing to make it loo...
In this video, we learn how to draw a Pikachu PokŽmon. First, you should have a picture of the character in front of you so you can better draw it. Start out by drawing the eyes and filling them in with marker. Next, draw in the rest of the face, including the nose and the mouth. After this, draw the ears at the top of the head, then connect in the middle to create the head shape. Draw the sides and bottom of the head, then draw the body. Add in circles for the cheeks, then continue to draw u...
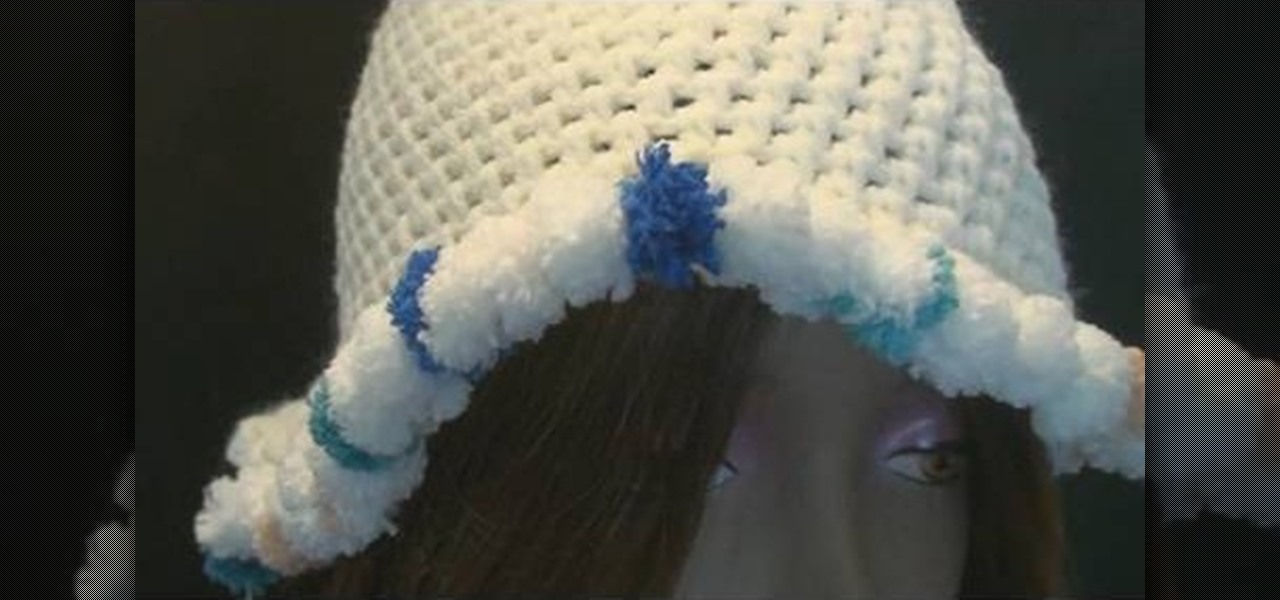
Despite what you may believe, making a crochet cap doesn't end at the last knitting row. In fact, crochet caps can be embellished in a number of different ways, including this Pomp-A-Doodle trim.
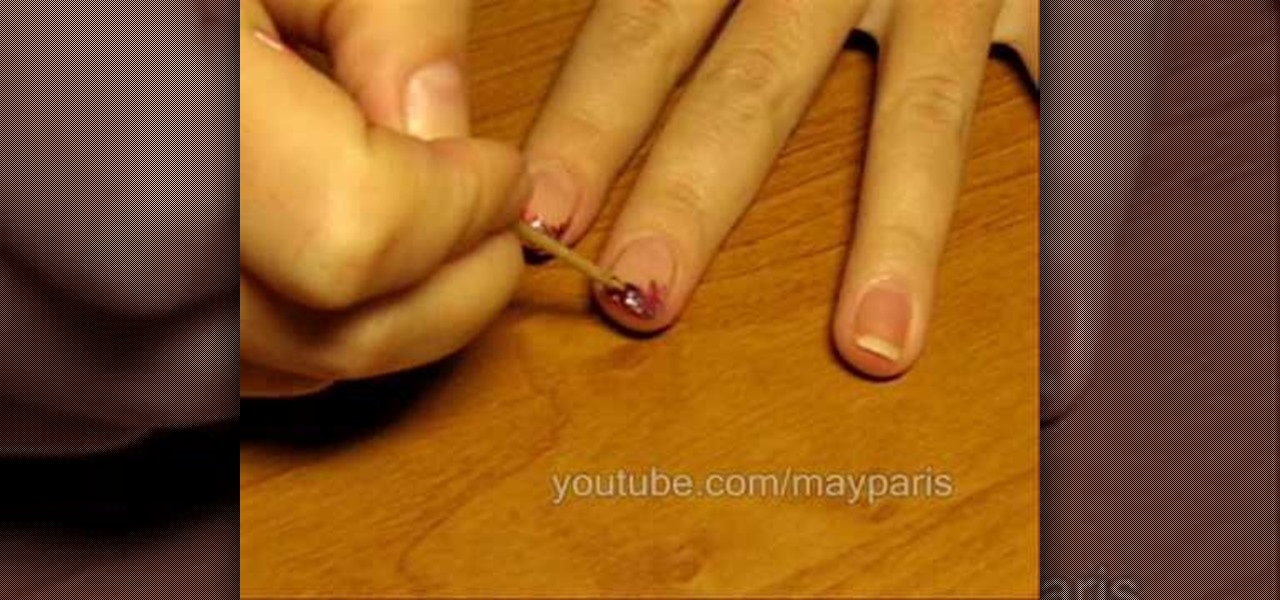
In order to create/paint a vintage French manicure, you will need several different nail polishes and a toothpick. You can use any combination of color that you want: e.g. neutral and purple and golden rose 10 and golden rose 31.
In this tutorial, we learn how to draw Neopet cartoon cats. First, use a small brush to create the outline of each of the cats. Use light strokes to make the outline, then start to add in the details onto the cat with a darker colored brush. Add in the details of the face, including the whiskers, mouth, and eyes. Don't forget to add on the ears as well. Erase and lines that are on the back of the drawing, so all you see is the darker and more exact lines. Continue on drawing the body, making ...
In this tutorial, we learn how to draw and color a room with art markers. Start off by drawing a basic room, using a vertical vortex as your map of where everything goes. Draw in the stairs as you see them, then draw the hallways, windows, picture frames, and more. Draw in the carpet that is on the floor, then add in any other details you may have in the home. After this, start to add color to your picture as you prefer. Color the walls and the floors in different colors that blend together a...
In this tutorial, we learn how to draw azure kite. Start off by drawing the face, then draw on the hat and the upper body. Next, you will want to outline the rough draft that you first made and start to add in details. Color in the hair and the hat, as well as the skin and the outfit. Add in wrinkles and buttons on the clothing as well. Add in the eyes to the face and include the nose, mouth and ears. Place the tattoo on the side of the face, then add in shading on the entire body. When done,...
Need some help figuring out just how long to let your hair process when dying it at home? It's easy! And this clip will show you how it's done. So easy, in fact, that this home beauty video tutorial can presenta complete and thorough overview of the process in about a minute's time. For more information, including detailed, step-by-step instructions, watch this handy hairstyling how-to.
In this video, we learn how to draw Charmander. Start off by drawing the large eyes with lines inside of them. After that, you will connect the head around it, followed by the nose. Next, you will draw in the rest of the body including the feet. Draw in the tail with flames coming out the end of it. Add in lines around the body to make the figure look more realistic, then draw in pupils for the eyes. When you are finished, you can color the character or just leave it how it is and shade in on...
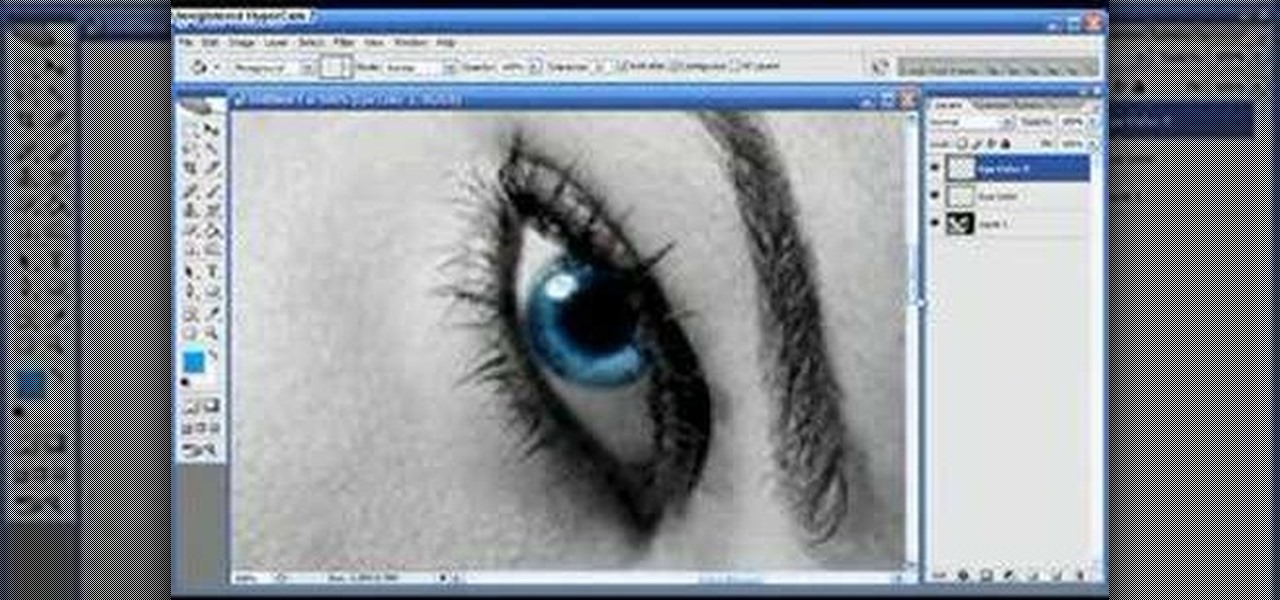
In this tutorial, we learn how to use Photoshop CS3 to change the color of someone's eye. First, open up your picture in Photoshop and zoom in on the eye. After this, use the lasso tool to surround the entire eye and then press All+J to start a new layer. Next, move the colors on the eye to change what color you see. Next, you will be able to change the hue and brightness of the picture until it is the exact color that you want. When you are finished with both of the eyes, make sure to save i...
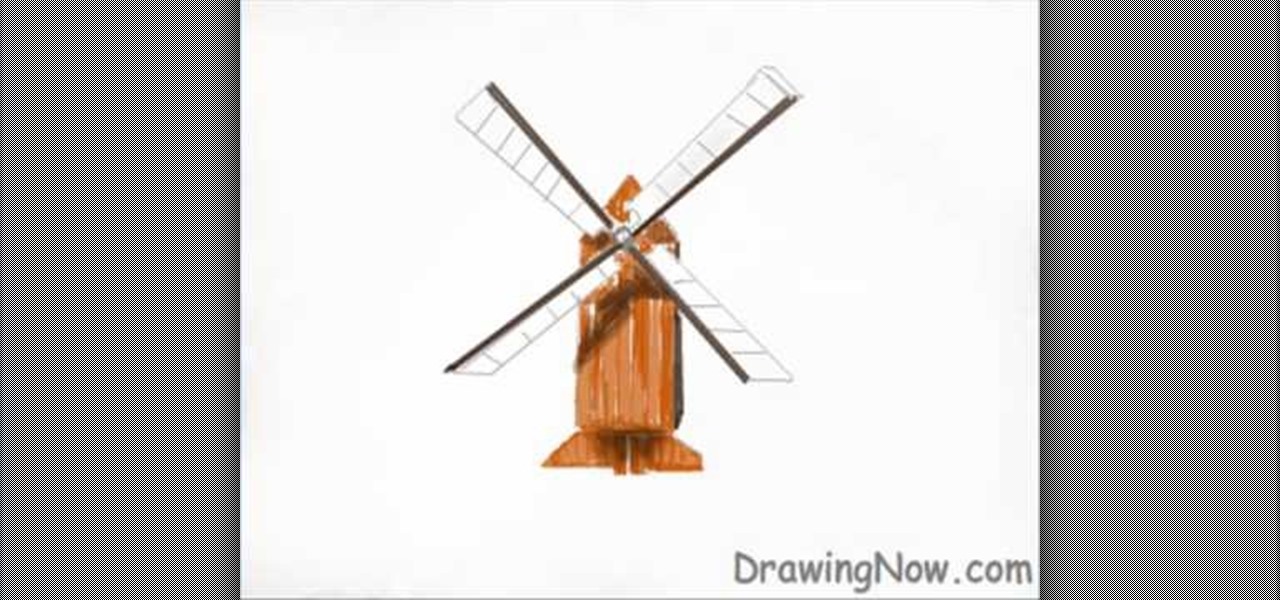
In this how-to video, you will learn how to easily draw a wind mill from scratch. First, start off with the building of the mill. Next, draw the arms of the wind mill. Include the flaps on the arms. Next, fill in the smaller details such as the center of the rotation. Next, you can fill in the color of the building. In this case, brown was used. Next, fill in the arms of the wind mill. Add appropriate shading on top of the building. You can also add shading to the arms. Next, fill in the back...
First of all you have to draw the rough sketch using light color lines. You have to draw blocks to the size of helmet, chest, two arms, legs and boots. Now start from the helmet and draw the outline. Draw the glass for viewing. Draw the lines as shown on the helmet. Also darken the spots as shown. Now draw the chest guard. Draw the lines to make all the different straps and marks over the armor. You also have to draw a tank at behind. Make the arm and the gloves. Now draw the outline of a gun...
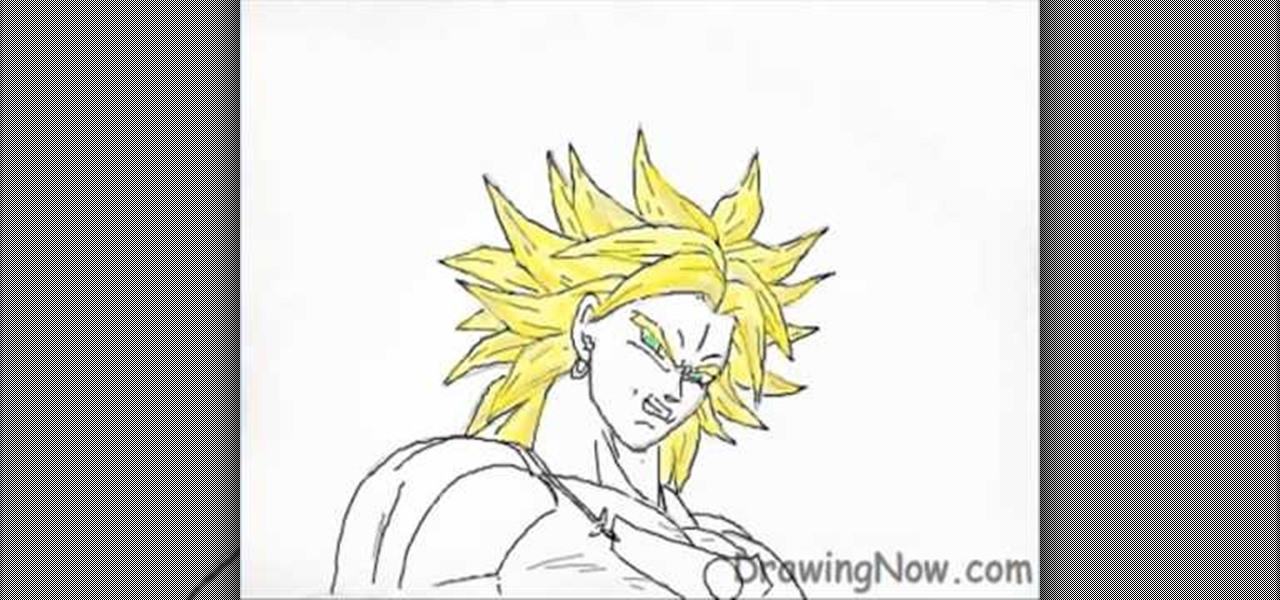
In this how to video, you will learn how to draw Broly. First, start out with an oval shape for the face. Next, add another for the ear. From here, you can add the neck, shoulders, and chest. Next, draw numerous spikes for the hair. The basic outline is complete. Go into the drawing with more detail by adding lines inside the spikes to simulate hair strands. Add the eyebrows, eyes, nose, and mouth. Next, draw in the muscles of the shoulders and chest. Add the outline of the necklace. Now you ...
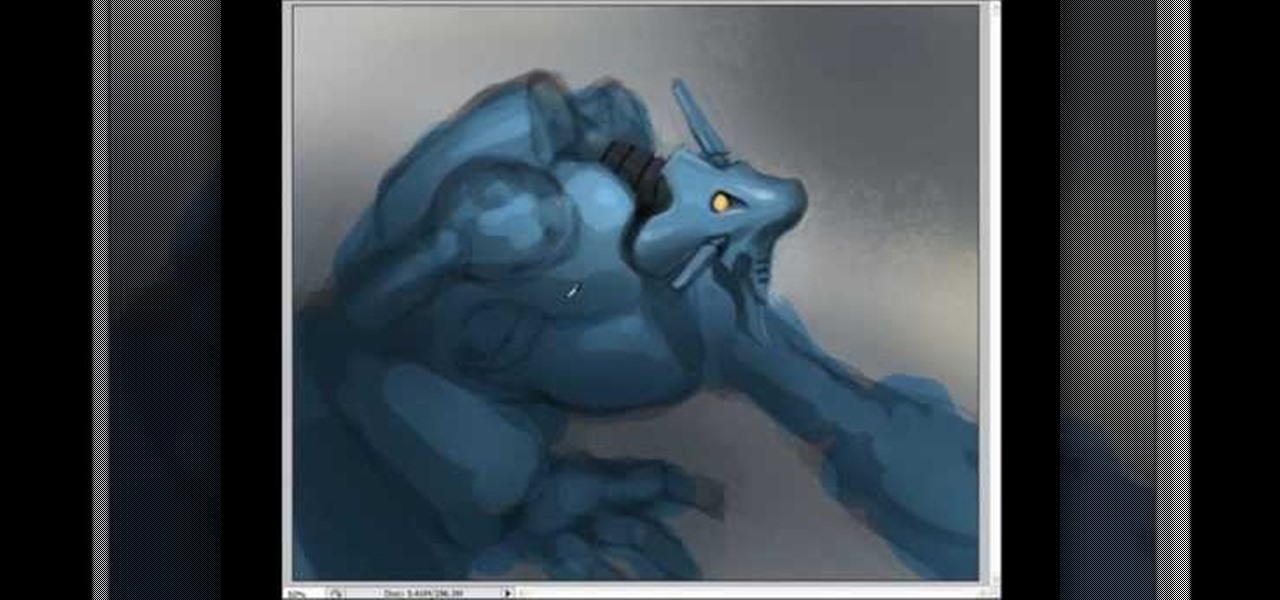
If you want to draw and paint a robot Mecha style you should first make a square and color this in a dark gray. Draw a silhouette in a darker gray color. You should draw basic body parts such as the head, arms and limbs and shoulder. You should draw this with simple dark layers. In the face, you can draw a different or cool complex design. You can also make the background darker and make shadows. To distinguish the figure from the background color the figure a dark dull blue. Now you need to ...
In this how to video, you will learn how to draw a guitar. First draw the body of the guitar. This should have an hour glass shape with a rounded top and bottom. Next, draw the neck of the guitar from the top of the body. Next, add in the details of the body such as the sound hole in the center and the bridge near the bottom. Next, draw the headstock at the end of the neck. Draw six tuning pegs, with three on each side of the headstock. Now you can shade in the guitar body with a light brown ...
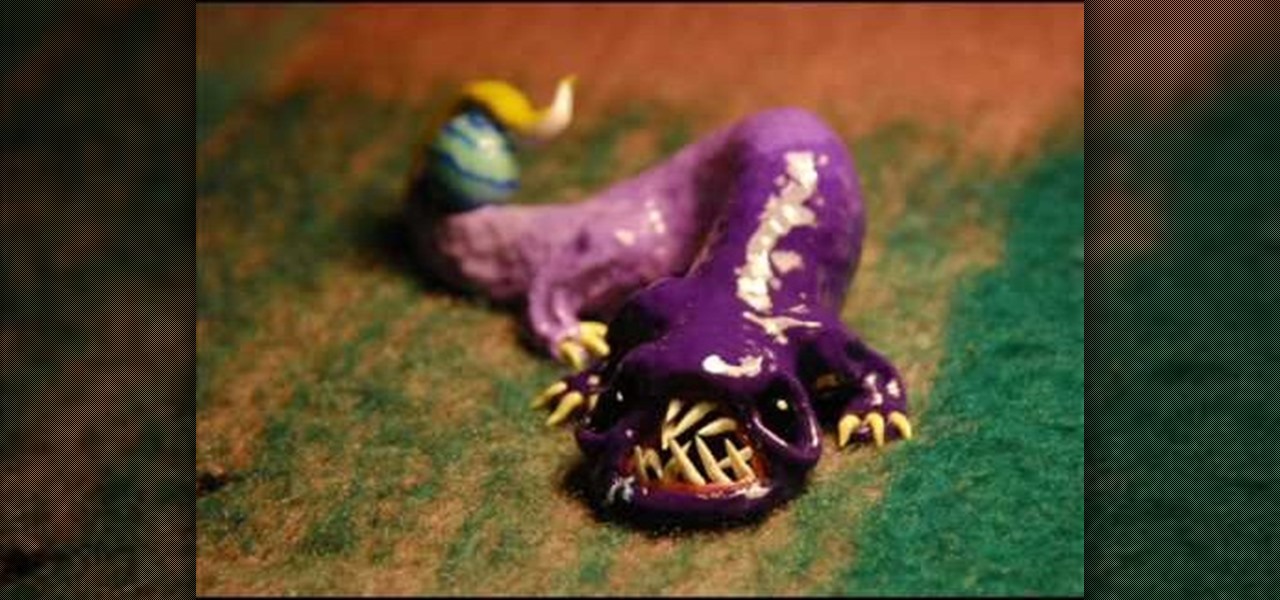
First of all take the clay and make a roll. Now keep rolling to form a roll that has one end large and the other end smaller at the tip. Now bend the roll upwards from the middle. Now take a match stick. Now use this to make a hole to make the mouth. Use to fingers to make the corners of the mouth round in shape. Make the mouth wide and open. Now make the eyes by using a matchstick to pierce the sockets. Now take a little clay and then make a roll of it. Now make a leg out of it by making the...
Gordon Bruce shows an easy and speedy way to draw and paint a superman. First draw the head portion with a oval face and add eyes, nose etc,. Now come to the body portion which have big muscled arms and a thin body, having the triangle with S symbol at the center. Now draw the leg portion. Draw belt and other attractive features. Now give the outline with acrylic black color. Now add red color to the gown part and blue color to the body. Give yellow shade to belt and triangle and red to the S...
First of all take two pieces of FIMO- one white and the other red color. Now roll them flat on the table into rectangles. Now cut triangles out of them and then join together to form a rectangle which has more white than blue color. Now use a rolling pin to flatten their surfaces. Use a ruler to lift them off the table top. Now fold it in half and roll it again in the same direction. Don’t roll it too hard. Now keep rolling and folding in the same way. Now when you go thinner while rolling it...
In this how-to video, you will learn how to quickly set up the background image on your Apple Macbook Pro. First, right click the desktop and select Change Desktop Background. A new window will pop up where you can change it. Also, you can go to system preferences and selecting desktop and screen saver. To change the image, select any of the options available. This includes solid colors to large images. You can also go to your iPhoto albums and choose any picture in there. You can also go onl...