First select the pencil tool then click on pencil mode which is located at the bottom of the toolbar, select straighten and draw a line as in the video. Now you can see that the line is automatically adjusted, it will make the round and straight shape in the line depending on how you drew it. Now delete your shapes and select the smooth in pencil mode and draw a line as in the video. Now you can see that the line is automatically smoothed. And finally select the ink in pencil mode and draw a ...

First double click on the image in layer window then name it and click on OK. Now if you use magic tool on the image and delete the background, it will also delete some of the image part. So to fix it you need to find that kind of places of the image and use brush tool to fill up that space. Now you can delete the background by selecting it with magic tool.
You can resize keyframes in Adobe Flash and you can do this for anything like images, animation etc. So to do this first click on your first keyframe and hold down the shift key and then click on the last keyframe. Now select the free transform tool and resize that as showing in the video but it only resize the keyframe on which the header currently is. So now this time right click on the keyframes and choose copy frames. Now make a new layer and hide your old one. Now select the pencil tool ...
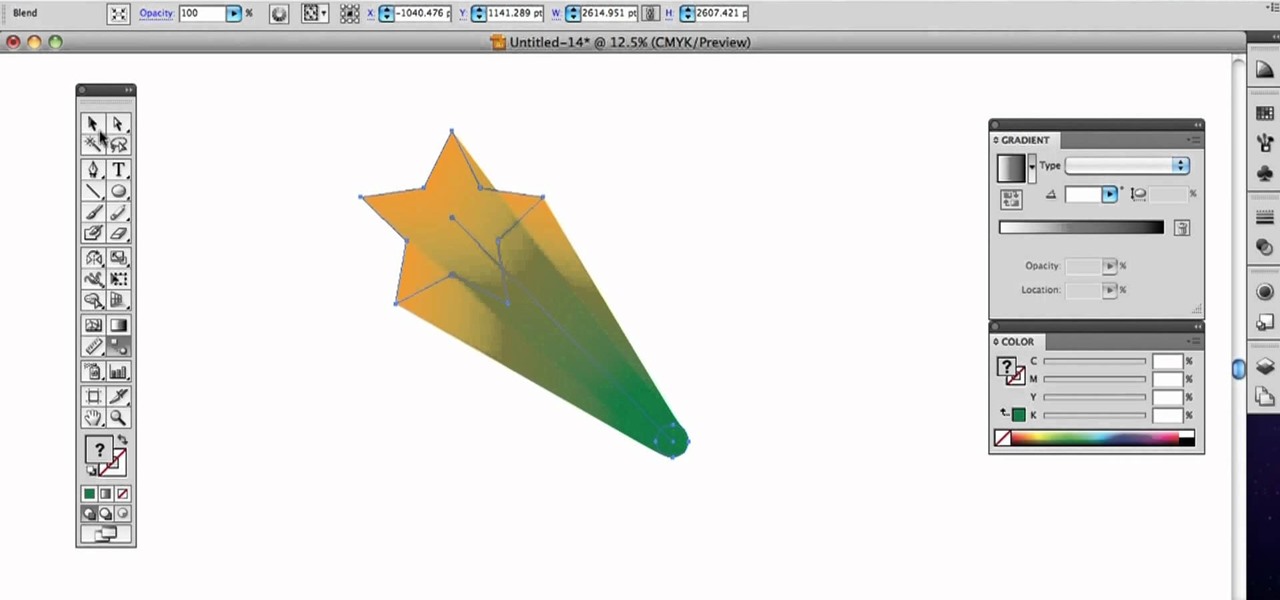
Need a quick primer on how to use the Blend tool within Adobe Illustrator CS4 or CS5? This clip will teach you everything you'll need to know. Whether you're new to Adobe's popular vector graphics editing software or a seasoned professional just looking to better acquaint yourself with the program and its various features and filters, you're sure to be well served by this video tutorial. For more information, including detailed, step-by-step instructions, watch this free video guide.

Looking for a quick guide on how to use the Artboard tool within Adobe Illustrator CS4 or CS5? This clip will teach you everything you'll need to know. Whether you're new to Adobe's popular vector graphics editing software or a seasoned professional just looking to better acquaint yourself with the program and its various features and filters, you're sure to be well served by this video tutorial. For more information, including detailed, step-by-step instructions, watch this free video guide.

In this video tutorial, viewers learn how to use the noise removal tool in Camtasia Studio. Begin by uploading the audio track into the time line. Then select and highlight the region that contains the noise. Now click on Edit and select Audio Enhancements. Under Background noise removal, users are able to select to automatically or manually remove the noise. Once selected, simply click on the Remove Noise button. Users also have the option to adjust the sensitivity. This video will benefit t...

In this video, we learn how to clear browsing history and cache in Firefox and Internet Explorer. First, while in Firefox, go to the tools menu, then click on clear private data. In the new window, click on the items that you want to have cleared, then click "clear private data now". After this, the computer will clear out all the internet files. Next, while you're in Internet Explorer, go to the tools menu, then click on "internet options". Once in here, click the appropriate sections to cle...
Looking for a quick guide on how to utilize the Live Trace tool to turn a digital photograph into a cartoon illustration? This clip will teach you what you need to know. Whether you're new to Adobe's popular vector graphics editing software or a seasoned professional just looking to better acquaint yourself with the program and its various features and filters, you're sure to be well served by this video tutorial. For more information, including detailed, step-by-step instructions, watch this...
Looking for a quick guide on how to use the Auto Trace tool when working in Adobe Illustrator CS4 or CS5? This clip will teach you what you need to know. Whether you're new to Adobe's popular vector graphics editing software or a seasoned professional just looking to better acquaint yourself with the program and its various features and filters, you're sure to be well served by this video tutorial. For more information, including detailed, step-by-step instructions, watch this free video guide.
In order to format graphs and charts using Microsoft Word 2007, click on Chart Tools. The tabs at the top of the screen provides you with your options. You can change the type of chart or graph by clicking on Change Chart Type. If there is a particular type of chart that you would like to use again and again, then you can save it as a template via the Save As a Template icon. You can edit the data in your chart of graph by clicking on Edit Data. You can modify the chart layout by clicking on ...
In this tutorial, we learn how to take apart an iPod Nano 3rd generation for repair. First remove the back casing using a guitar pick. Next, use a flat tool to lift up the battery carefully and remove it from the casing. You will see three wires that lead to the launch board, which are soldered into place. Now, use the flat tool to remove the back of the battery casing from the device. Now, remove the logic board by removing the 6 small screws inside of it. Next you will remove the LCD by lif...
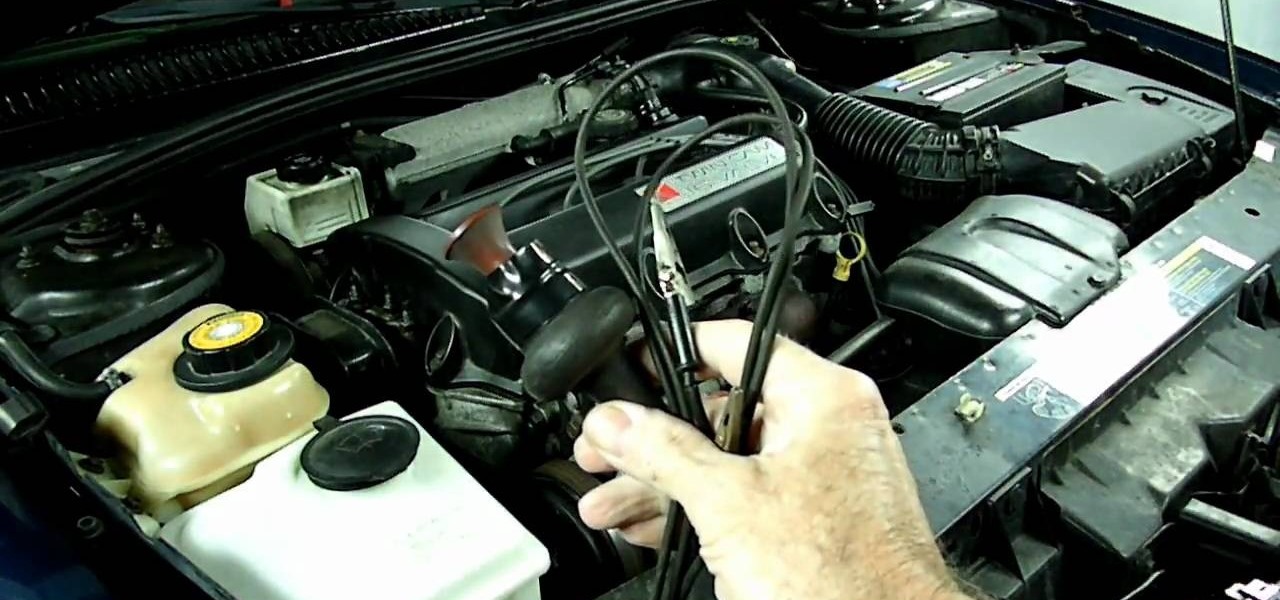
When working on a car, there are so many different tools out on the market designed to help make fixing a car easy. One of those tools is a remote starter. This comes in handy when you might want to perform a compression test on the car.
If you've ever worn gloves, you know that doing certain tasks with them on can be quite a hassle. Not only are you not able to grip things properly, but sometimes it makes it difficult to press buttons or text message on a phone. So in this next tutorial, you'll find out how to make fingerless mittens.
Get your sewing tools ready, because it's time for another great tutorial. In this video you'll learn how to make two cool objects easily. One being a stitch marker that helps mark a certain place in a row when knitting. The other object is a coffee cup sleeve that is perfect for making sure you hands don't get burned. A big improvements over the ones that you can throw away and never use again.
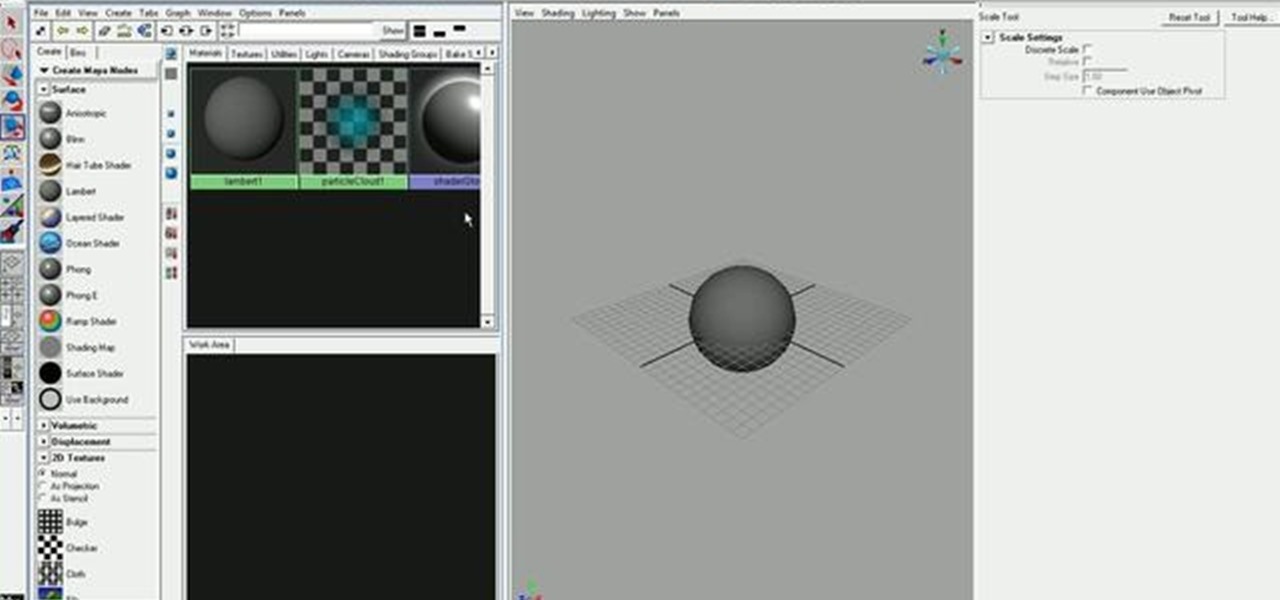
Want to learn how to quickly and easily paint directly on 3D objects? With Maya's 3D paint tool, it's a cinch. And this guide will show you how. Whether you're new to Autodesk's popular modeling software or a seasoned 3D artist just looking to better acquaint yourself with application and its workflow, you're sure to be well served by this video tutorial. For more information, including detailed instructions, watch this free video guide.
Learn to Use the Lathe Editor for lathe-machined objects in Swift 3D v6. A lathe machine operates by spinning an object really fast while it is held tightly at both ends. The lathe operator uses cutting tools and coolants on the side to shape the object. Whether you're new to Electric Rain's popular Flash-oriented 3D modeler or just looking to better acquaint yourself with the program, you're sure to find much of value from this free video software tutorial. For more information, including a ...
Want to restore an old photograph? With Adobe Photoshop, the process is easy. Maximize dynamic range with Photoshop's levels and curves tool. Whether you're new to Adobe's popular image editing software or simply looking to pick up a few new tips and tricks, you're sure to benefit from this free video tutorial from the folks at Britec Computer Systems. This video offers a step-by-step guide on how to repair damaged photos using Photoshop's clone and band-aid tools.
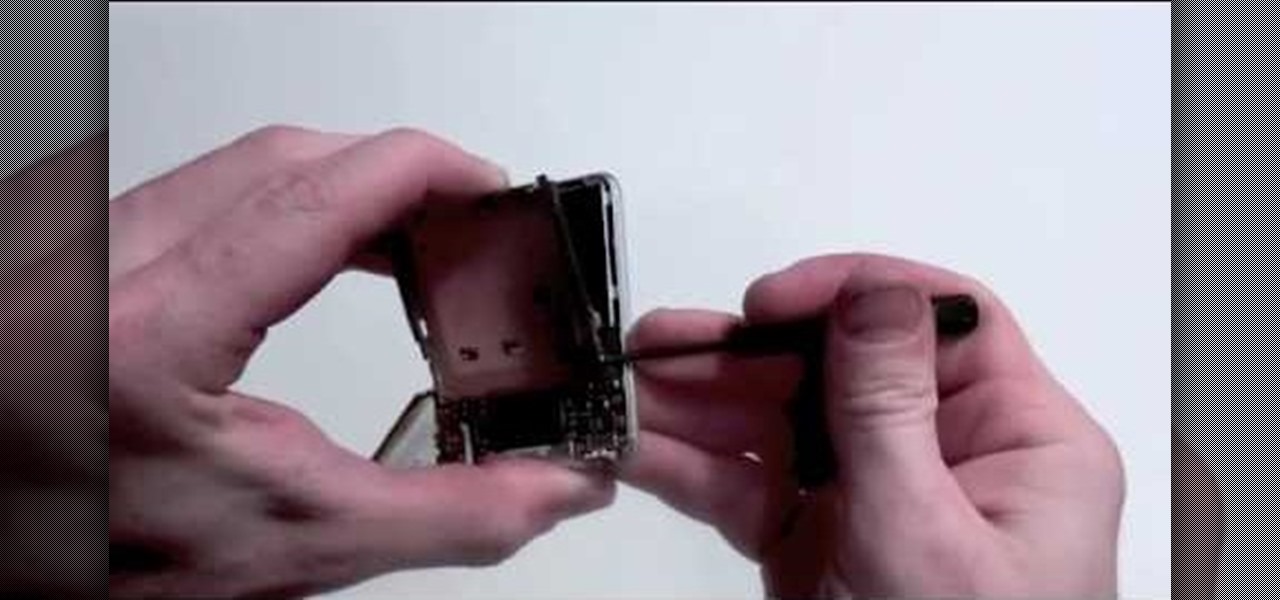
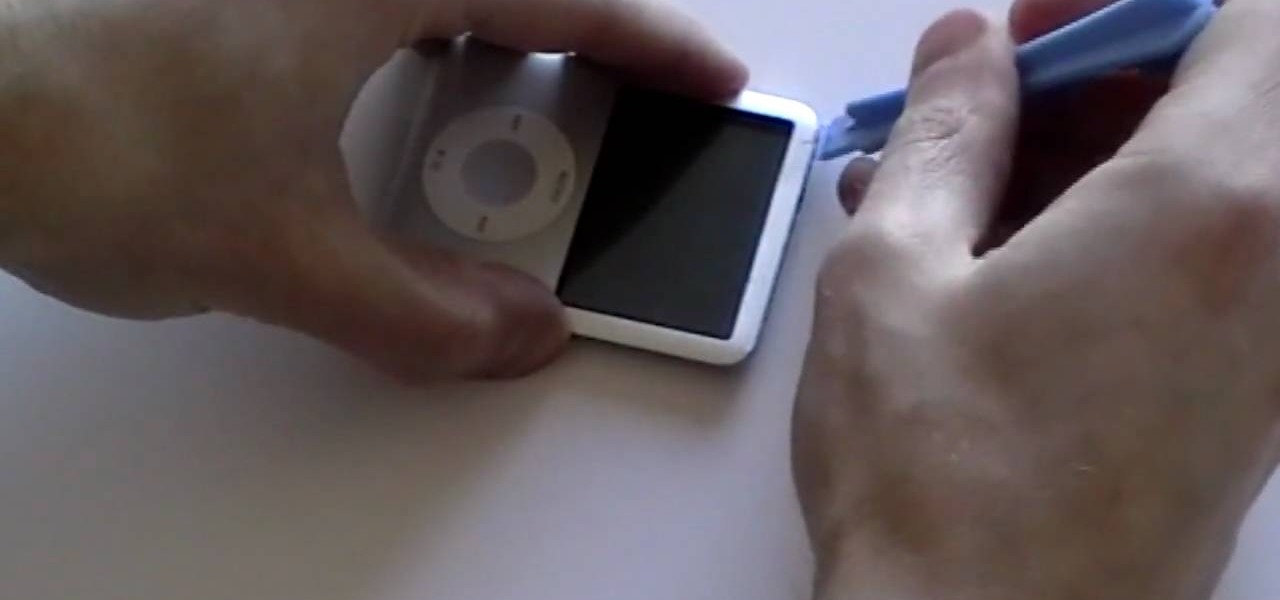
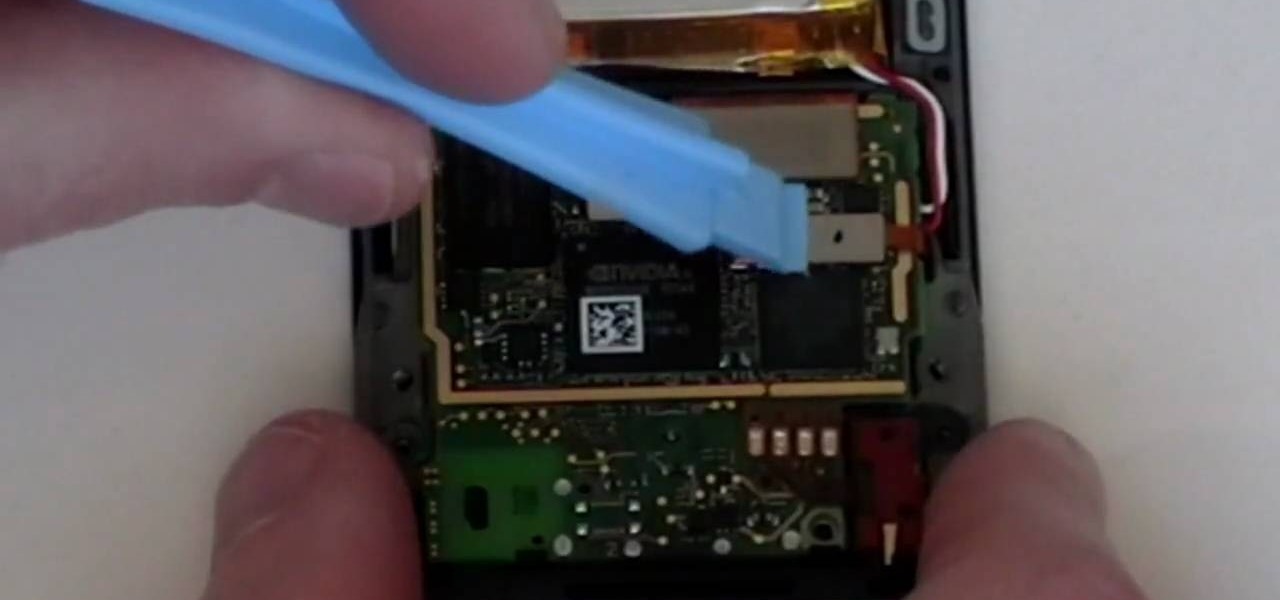
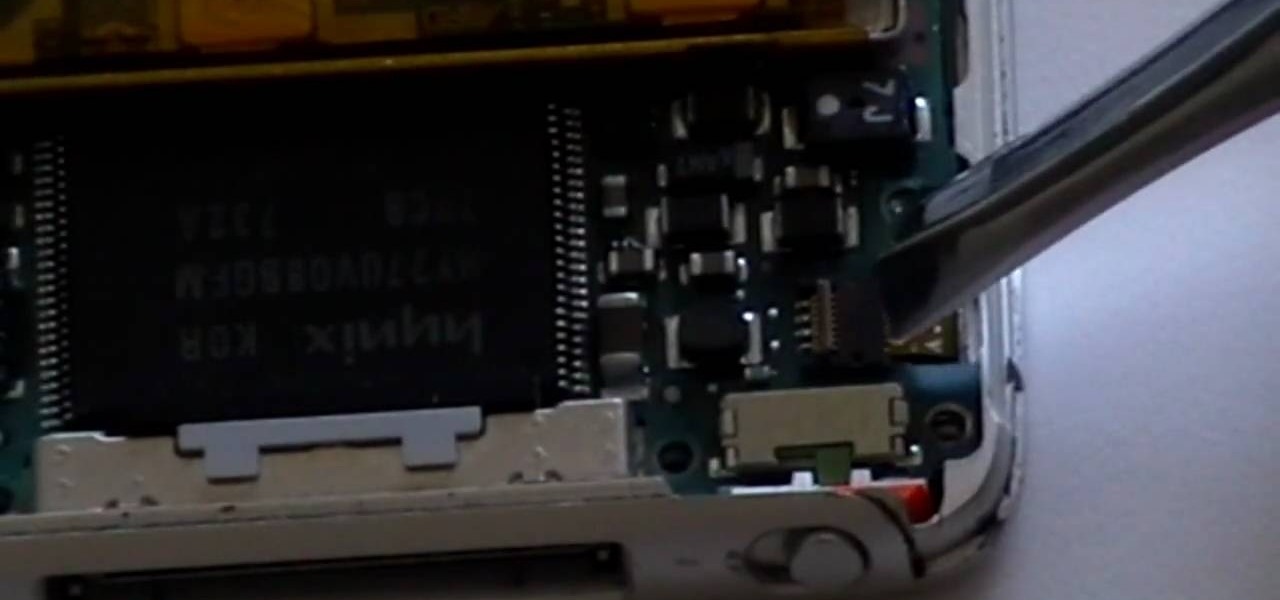
In this how-to video, you will learn now to dismantle an iPod Nano 3rd Generation. First, run a plastic tool on both sides of the device. Once this is done, remove the back cover with your fingers. Next, unscrew the six screws on the circuit board. Store them in a place where they will not be lost. Next, remove the click wheel ribbon cable from the jaw connector. Lift the jaw connector with the tool and use a pair of tweezers to gently remove the cable from the jaw. Next, remove the small met...
In this video tutorial, viewers learn how to use the Slow Keys access tool in a Mac OS X computer. The Slow Keys feature is located under the Keyboard tab in the Universal Access window. Once Slow Keys is turned on, users also have the option of using key click sounds as additional feedback when a key is pressed . Users are able to set the Acceptance Delay to determine how this feature behaves. The delay of the sound can be set from long to short. This video will benefit those viewers who use...
Repairs Universe demonstrates how to replace the battery on a Microsoft Zune HD. First, use a tri-ring screwdriver to remove the four screws on the back of the Zune. Then, remove the back cover. Next, remove the bottom cover by using your fingers to gently push it off. Then, use a T-5 screwdriver to remove the four screws on the back of the Zune. Release three ribbon cables from their pop connections with a safe pry tool. Use the pry tool to also release the battery from the Zune. Lift the mo...
In this how-to video, you will learn how to make a rainbow in an image. First, open the program. Make a new layer and go to the gradient tool. Change the style to the one that looks like a rainbow. From here, change the sliders that you have the colors of the rainbow selected. Once this is done, slide the rest of the sliders near the last color, which should be red. Save the gradient and click okay. Now, go to the bottom left hand corner until a plus sign shows. Click and drag until you get t...
This video shows you how to replace the LCD screen on a third generation iPod nano. Using a plastic safe pry tool, run it along the edges of the iPod, releasing the clips. Once the clips have been released, you should be able to remove the back cover. There are six exposed screws on the bottom of the inside back cover, remove all of them. Next remove the click wheel ribbon cable from the jaw connector. To do this, use the pry tool to lift the connector. Use a pair of tweezers to gently remove...
This is a video tutorial that is showing its audience how to replace the digitizer screen on a 2nd generation Ipod Touch. The first step is to remove the screen from the Ipod touch. Secondly use a safe pry tool and run it between the backing of the screen and the glass, this will release the necessary clips that are holding your screen in place. Next take the screen off. Next separate the digitizer from the mid section with the safe open pry tool again. Pry apart the digitizer and the mid sec...
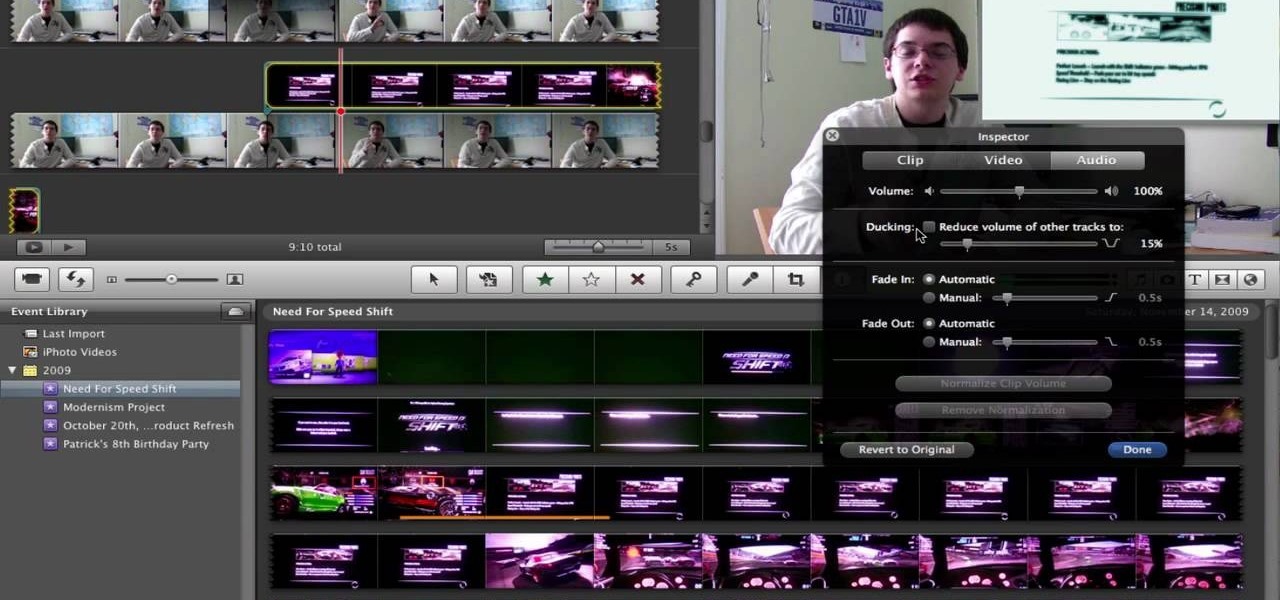
This video will show you how to take advantage of one of Apple's iMovie advanced editing feature, picture-in-picture effect. This feature allows you to embed either another video, or images into a base video. To enable this valuable tool in iMovie, go into the iMovie preferences by clicking on "iMovie" in the top left hand corner of your screen. Under the General tab make sure "Show advanced tools" is selected. Import a video from your event library by dragging it into iMovie and selecting pi...
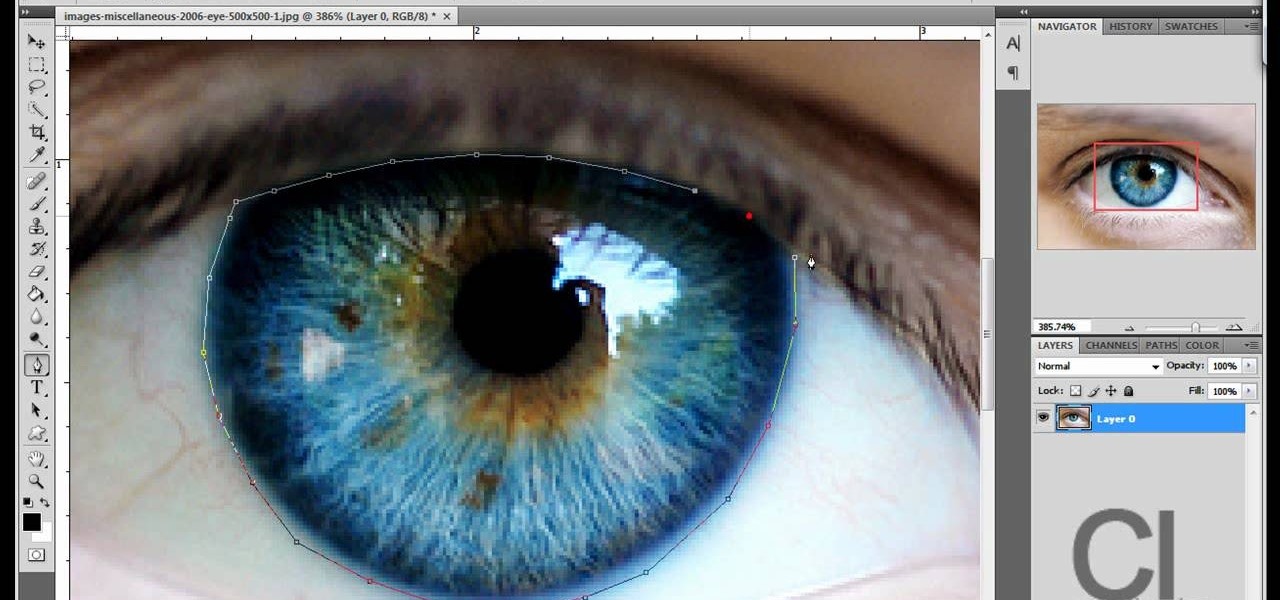
Changing the color of your eyes is very quick using Photoshop and this handy video. After using the selection tool of your choice to outline the eye (this video uses the pen tool) with a little bit of feathering, just change the hue of the eye. The video shows how to do this by pressing control + h, however it can also be selected by choosing the image menu, then adjustments, then hue/saturation. This great effect can be used as shown on close up eyes or on smaller eyes further away. Both way...
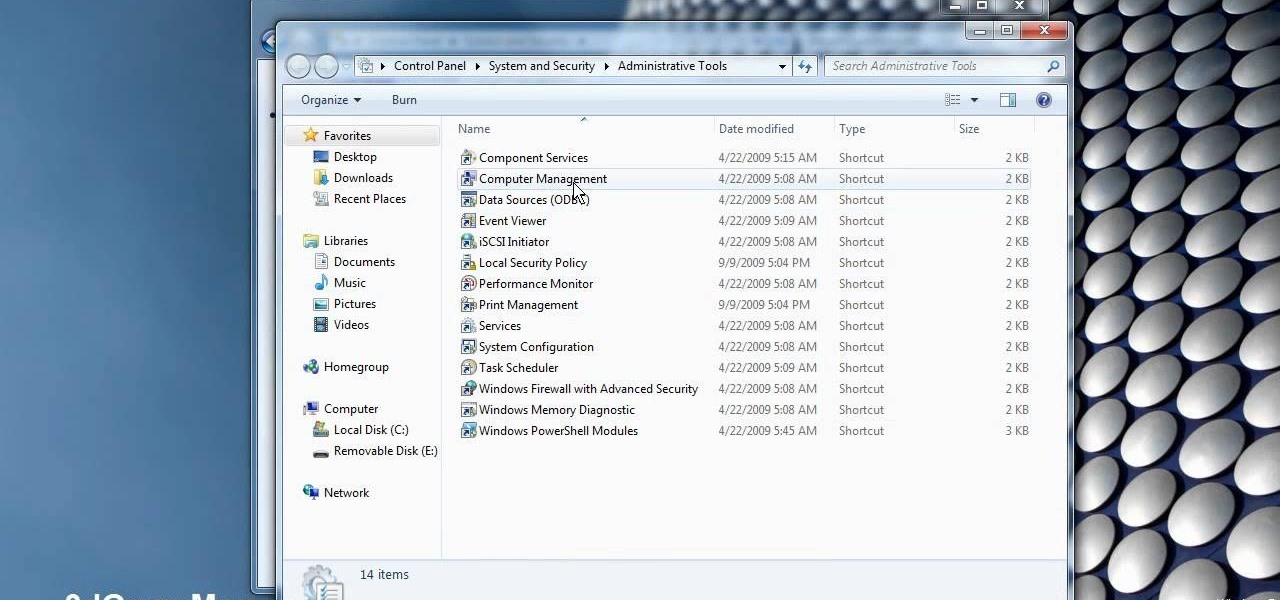
This video demonstrates how to change a drive letter to a certain drive in your Windows 7 computer. On you Windows 7 computer, go to Start > Control Panel. In the Control Panel, select System and Security then open the Administrative Tools. Look for and open the Computer Management tool. On the left side pane of the Computer Management window, select Disk Management. Look for and right click on the drive you want the drive letter changed. Select 'Drive Letter and Paths...'. Click change and s...
This video shows you how to excavate a pond using hand tools and a jackhammer.First of all, you must organize your digging in shelves. A pond should have some parts deeper than others. You start by leveling the pond at the part where it will be more shallow (thus creating the first shelf). Then go to a deeper part and level that out. In this way you create shelves with different elevations.Your tools for excavating are the spade, the flat shovel, the pick, the wheelbarrow and the jackhammer. ...
This is a video tutorial describing how to use a microdermabrasion tool to induce flawless skin. The first step is to wash your face and pat it dry. Next you should use a facial rejuvenation formula lotion and place it on the parts of your face that you think need the most work. You can even put some of the lotion on the microdermabrasion brush. Then you should set the timer on the brush to two minutes and begin to brush it across your face. You should only use the brush two to three times a ...
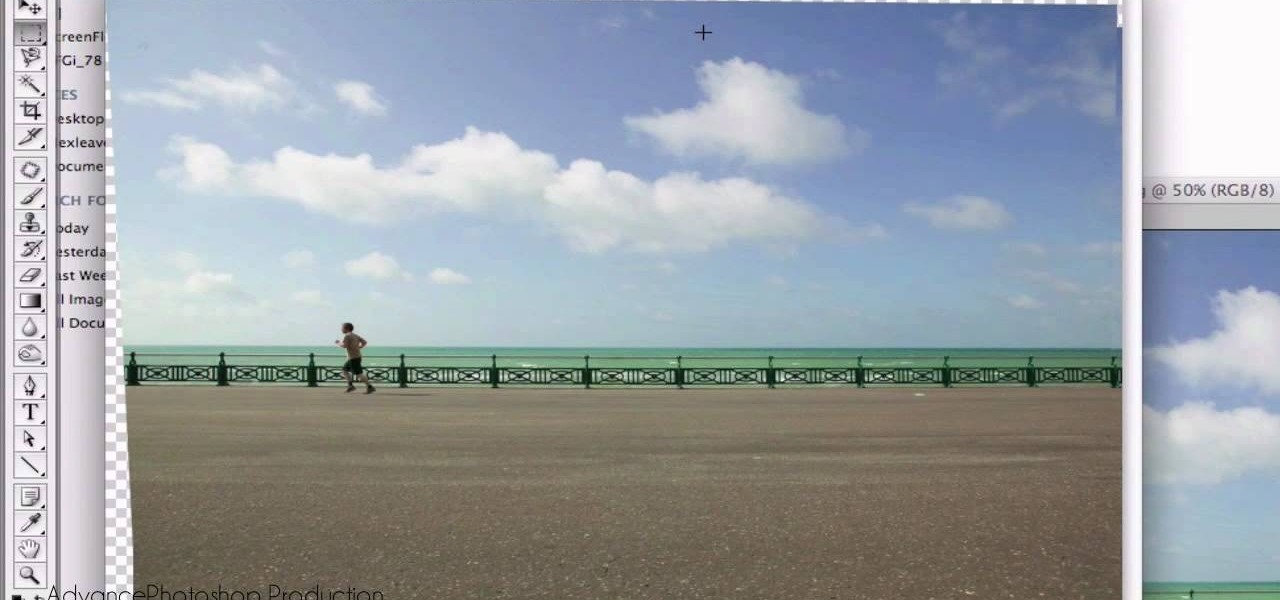
Open your first image and go to the rectangular marquee tool and select all of the image. Next click command or control C to copy image. Then go to your second image and click command or control V to paste the image. Select both the layers (hold down shift when clicking the layer), then go to edit, auto align layers and choose the top option then click ok. Last add a mask to your top layer, this is done by selecting the gradient tool (make sure its set black to white, the mode is normal and o...
Advance Photoshop shows viewers how to make the Photoshop CS3 icon in Photoshop. First in Photoshop go to File and then click New. Make a new blank at 500 x 500 pixels. Go to your layer button and create a new layer. Next, go to your rectangular marquee tool, hold down shift, and make the rectangle slightly smaller than the canvas itself. Set it from foreground to background and change the background color to a dark blue, enter 15396F for the color. Click on foreground color and enter 3070CA ...
This is another HelpVids.com technology video. This video will teach us how to sort table contents in Microsoft Word 2007. The video starts out with a Word 2007 document with a sample table. When you click on the table, you will see the Table Tools tab appear above the ribbon. Click the Table Tools button, then click Layout and finally the Sort Button. The sort dialog box allows you to choose which column to sort by, which direction you would like to sort, and any secondary sorting you would ...
In this video the instructor shows how to format tables in Microsoft Word 2007. To know how to format tables in Word, you will first have to know how to create them. This video assumes that you already know how to create tables. When you click inside a table in Word, a new tab label, Table Tools, appears above the Design tab in the tool bar. In the Design tab there are a lot of options available that can change the look of your table with just a click. To the extreme left there are three chec...
This video is from HelpVids and describes how to change the axis titles on charts in Microsoft Word 2007. To access the chart tools, select the chart and the tools will appear above the ribbon. There are many different design options that you can preview on the screen to make your final selection. To change the chart title, click on the Chart Title button which is located on the Layout ribbon. You can then select where you would like the title to appear. Once you select the location you can t...
This video outlines the process used to turn a chunk of wood, specifically sweet gum, otherwise known as Liquidambar styraciflua, American sweetgum, redgum, liquidambar, or simply liquid amber.
This video teaches the secrets of opening an XBox 360 without a case tool in simple steps. First remove the hard drive and then remove the face plate from the bottom. Now insert the pin through the holes on the sides and push it out where the side pieces are locked in. Now remove the four clips present on the face and open it as shown in the video. Remove the back holding it from the side, use a flat head screw driver and push it in as shown. With a T 12 driver remove the screws on the corner...
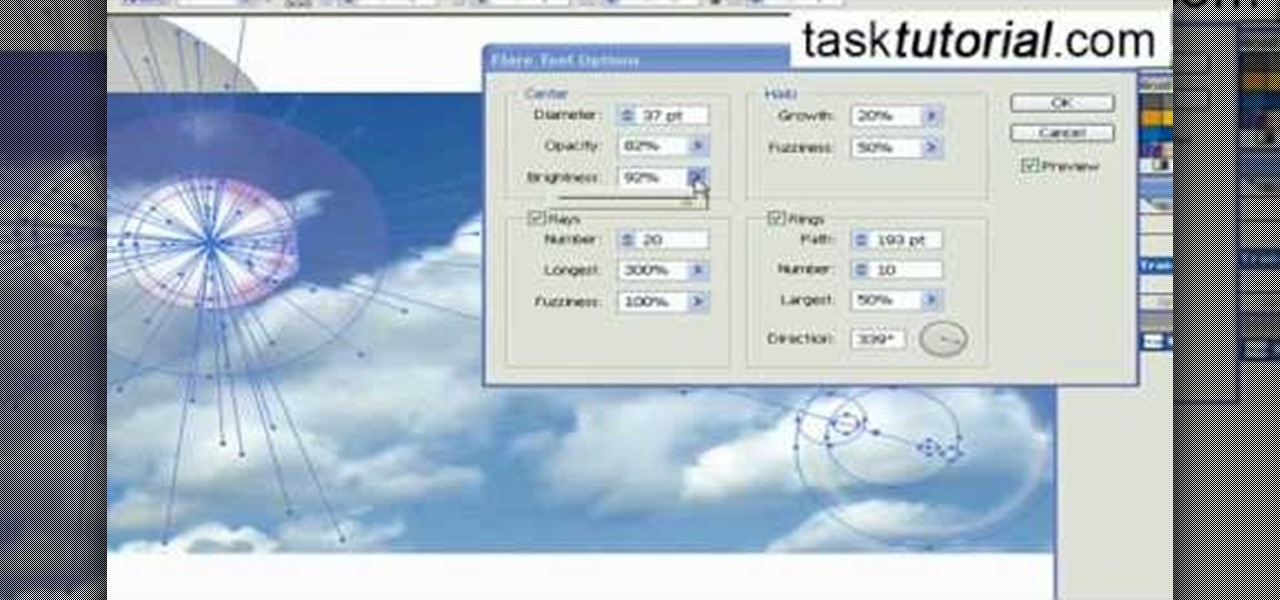
Ever wondered about the flare hitting your eyes from reflective surfaces (vehicle mirrors)? Let's create one. Open Adobe Illustrator with an image and embed it. Take the flare tool from tool palette. Draw the first shape and then second shape. To change settings, go to flare options. You can change the brightness, opacity and diameter of the flare which will add life to the image(open sky). This will help bring out some cool effects as well as realism to the image.
In this video tutorial by Task Tutorial we learn how to create a YouTube subscribe button using Adobe Illustrator. The first step to creating a button is to select the rectangle tool and draw a bar and then select a gradient fill. Next create the first color in the gradient and then the second color in the gradient. After that you'll want to change the gradient angle and also change the stroke width. Then you'll want to edit the stroke color to 9.6%. Then select the text tool and create your ...
In this video tutorial the author shows how to stretch objects and text in flash. To do this open the flash tool and select the radial gradient. Pressing shift key draws a shape. Go to frame 30 and create a key frame by pressing F6. Now similarly do it at frame 15. Now at frame 15 select the free transform tool and stretch the image. Now create the shape twins in the locations shown in the video. Repeat the same process for a text starting with adding some text to the scene. Finally convert i...
Tasktutorial will teach you how to create a nice vector cartoon flower using Adobe Illustrator. Start by selecting Rounded Rectangle Tool, and draw a black rectangle. Then select multiple points and move it according to the video, using arrow keys. Then draw an ellipse with the Ellipse Tool, using the Shift key. Watch the video to see the remaining easy steps in creating a vector flower using Adobe Illustrator and also get some cool tips and recommendations for best results.
Do you want to add some 3D effects in your 2D designs? Open illustrator and draw an oval tool holding shift key. Then draw an ellipse with a different color and place it on the oval. Take blend tool,then click on ellipse shape and then oval one for a gradient effect. Draw another oval with a gradient and give it screen. Your glossy sphere is ready. Adding gloss, specular highlights as well as shadows adds some realism to one's art work.