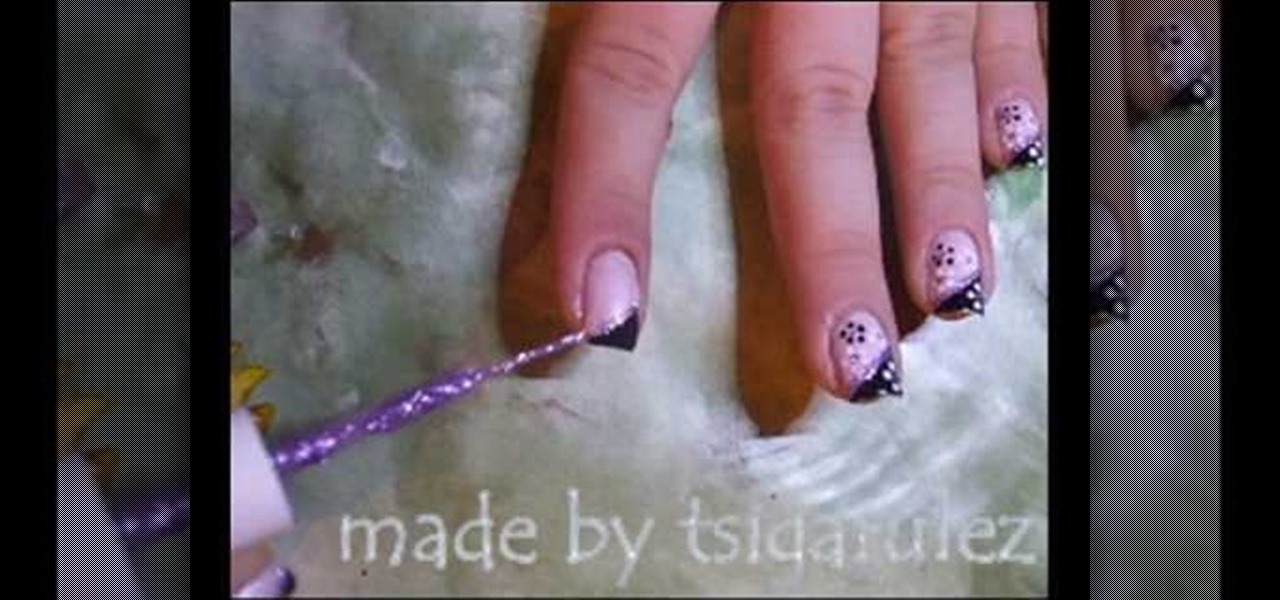
In this tutorial, we learn how to paint a black & pink French manicure with flowers. Start by painting the nails with a light pink nail polish, adding a couple layers so the color shows on top of the nail. Wait for this to dry, then paint black nail polish in a diagonal line across the top corner of the nail. Now, allow this to dry and take a sparkly purple nail polish and paint it in a line directly underneath the black polish. Next, use a toothpick or dotting tool to dot white nail polish i...
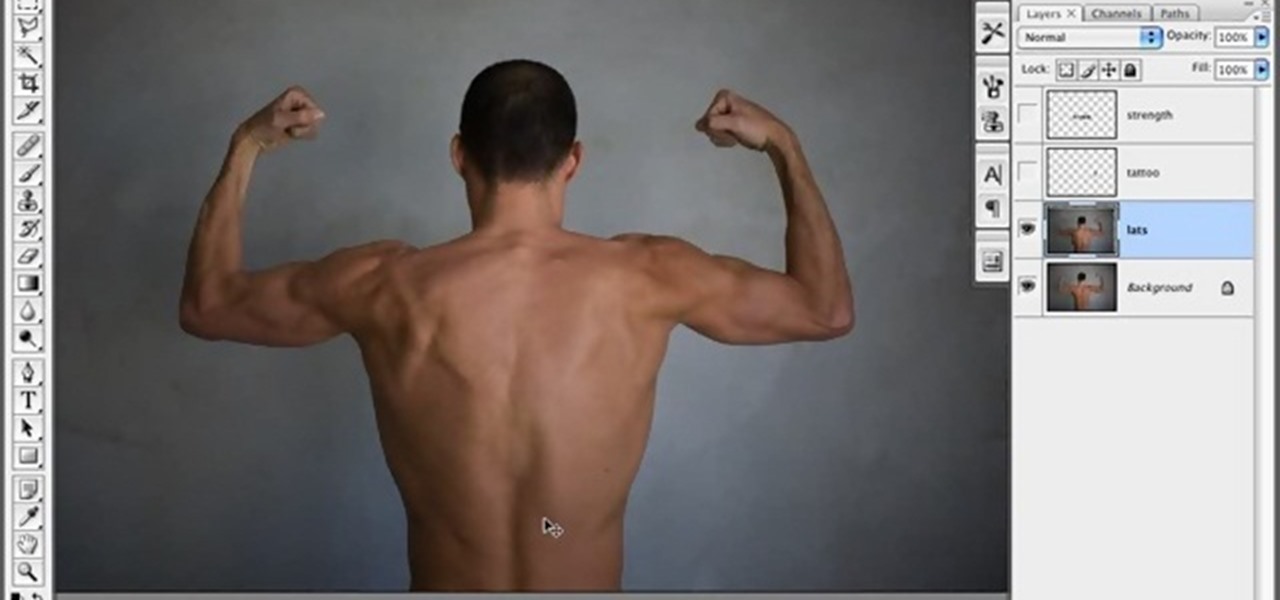
In this tutorial, we learn how to create a muscle man in Photoshop. Start off by opening up a picture with a man who has his back to the camera and is flexing his muscles. Now, use your tool to make his back look more broad and add more skin to the body. Copy the muscles that are on his back and reapply them to the sides. Use the blending tool to make this all look like the same body part. Add more definition to the abs, then apply more muscle to the upper arms as well. When you are done, the...
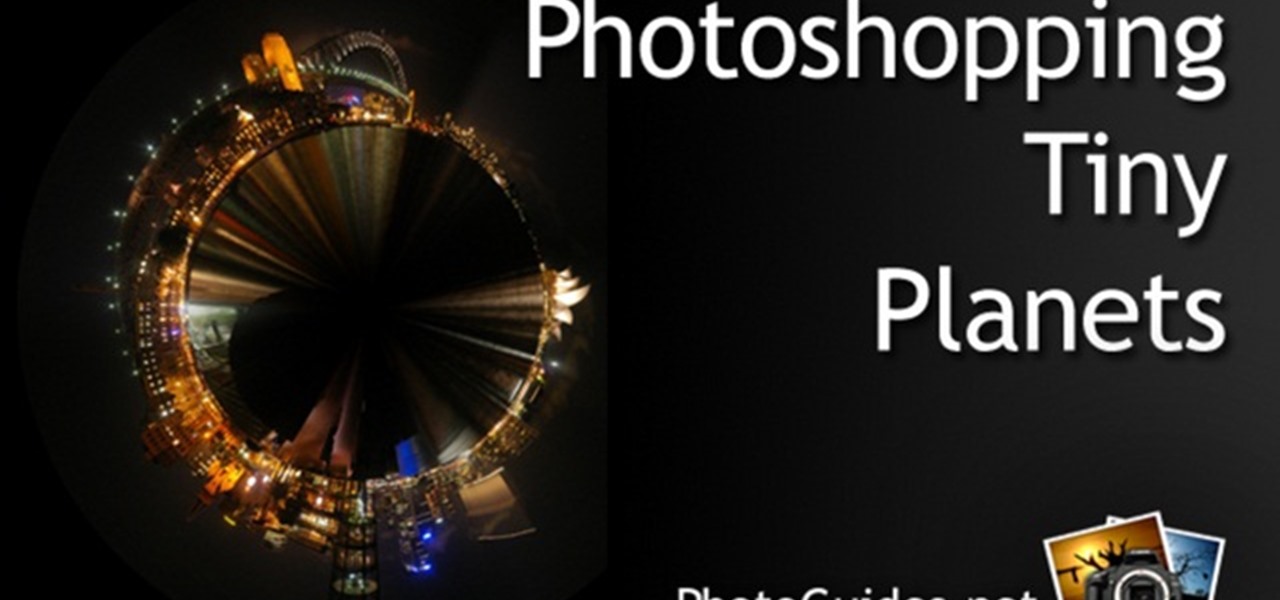
In this video, we learn how to create tiny planets in Photoshop. First, unlock your background layer and create a line in the middle of the image. Now, select the bottom that is underneath the line and drag it down to the bottom of the canvas. After this, make your image into a square by resizing the image with your tools. After this, you will need to rotate the image 180 degrees, then select "polar coordinates" in the distort tools. After this, you can rotate your canvas back around 180 degr...

In this tutorial, we learn how to make a cool neon text effect using Photoshop. First, type your text using a big and simple font. After this, right click on the text layer and click on "rasterize type". Now, press the control button while you click the thumbnail of the text layer. After this, grab the lasso tool and click "select inverse". Then, set it on 12 pixels in the toolbar. Now, use the magic wand too and select each of the letters by holding shift. Next, create a new layer and click ...

In this video, we learn how to use the web application, Sumo Paint. First, go to the website Sumo Paint and the website will start to load in a new window a Flash application. Once it's fully loaded, you will be able to add an image and then start to edit it. There are several different tools available on the side, whether you need to resize, crop, erase, or anything else to your picture! This is a great website for editing and makes everything simple. There is also a toolbar on the top where...
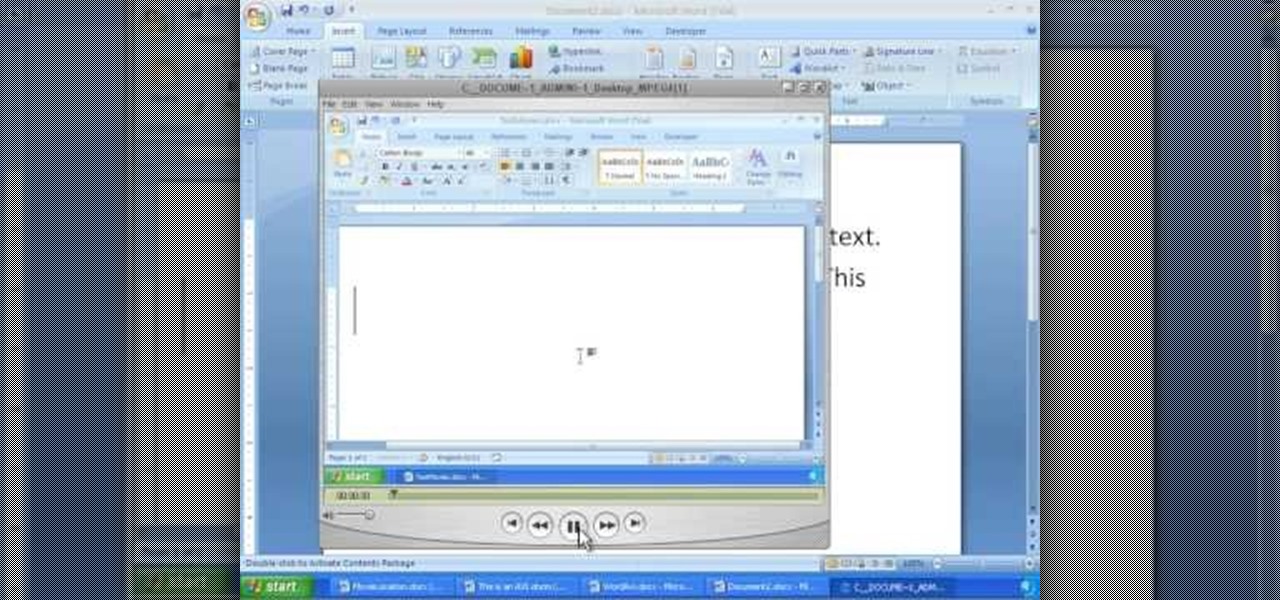
In order to insert movies into Microsoft Word 2007, Click on Insert. For AVI, go to Object, Create From File, and select the location of the file. Then, click on Insert. It will now appear on your document. The video should play. The video can be repositioned or adjusted. It can be saved with your document, although this is not true for other movie formats.

In this tutorial, we learn how to enhance the color of your lips and eyes with GIMP. To change the eyes, use the ellipse tool to highlight each individual eye, then change the contrast of the eye as well as the color and highlights. Do this for both eyes, then save. To change the lips, use the lasso tool to highlight the outside and inside of the lips, then go to "select", "from path", and then change the color balance as you did on the eyes. Change it until it's the desired color you want, t...
In order to do a nail art design with purple, glitter, white stars, and dots, you will need the following: 2 tones of purple nail polish, white polish, nail dotting tool, rhinestones, nail art polish, clear nail polish, and glitter nail polish.
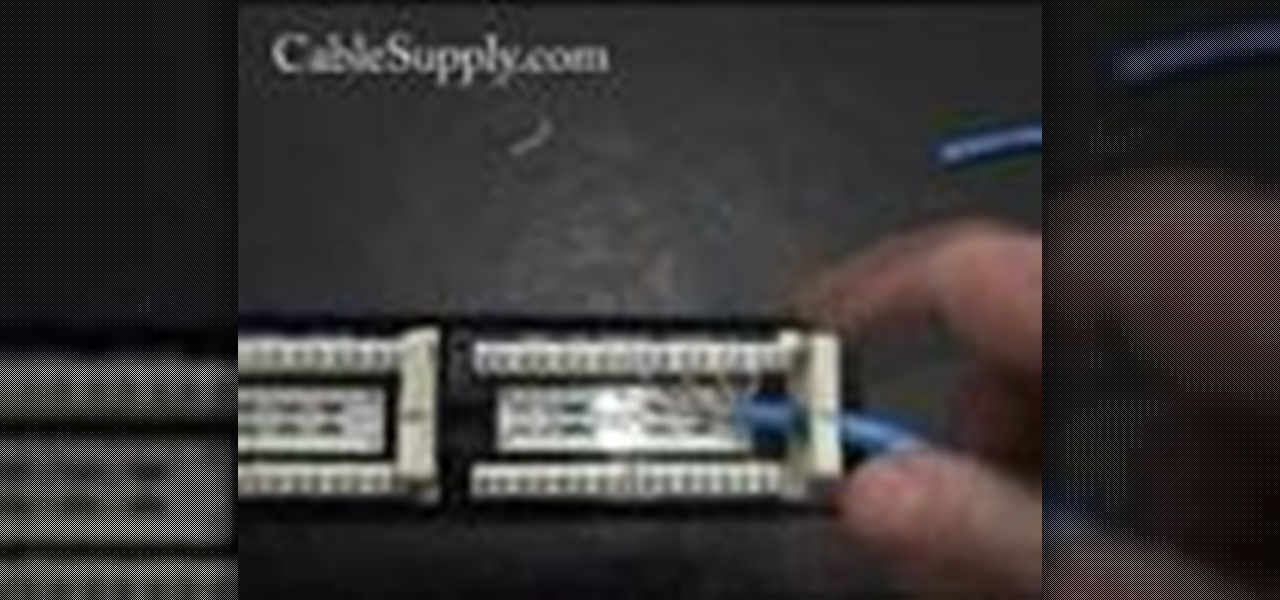
In this video, we learn how to punch down a 12 port patch panel. Start off by grabbing your cable and using scissors to cut off the outer covering of the cable. Next, use the wire scissors to cut off the end of the wires (about 1-2 inches). After this, place the stripped down wires into the appropriate spots that correspond to the colors that are on the 12 port patch panel. After you finished this, you will need to grab your punch down tool. Use this tool to push down on the wires, then it wi...
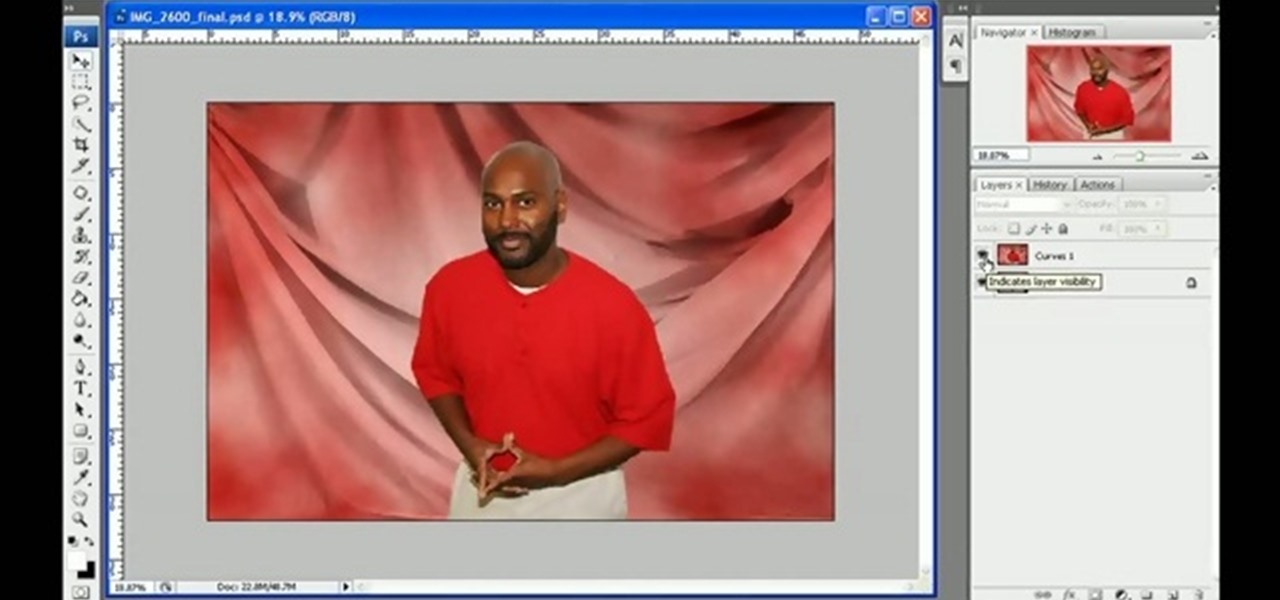
In this tutorial, we learn how to get a digital portrait backdrop in Photoshop. First, start by using the erase tool to remove the background from around the object completely. After this, fill in the background with the desired backdrop. Next, use the blending tool to blend the object's sides in with the backdrop, for a seamless look. Continue to do this for the entire object, cleaning up any blurry spots that you see as well. When you are finished, your object will have a new background and...
Jim teaches us how to punch down a 24 port patch panel in this tutorial. You will need: cable scissors, a punch down tool, and 24 port patch panel. Now, strip the cable by cutting it and stripping down the wires. Now, attach the wires to the port punch panel by following the pattern of where the different colors are at. When you have these connected, use the punching tool to punch the wires down, then it will cut off the excess wire from the panel. When this is all done, you will want to tie ...
In this tutorial, we learn how to make a single speed bike crank. You will need: chain ring bolt tool, large screwdriver, Allen wrench, file, hacksaw, vise, and crank set with 2 ring. First, grab your chain ring bolts and cut about 3mm off of the end. If the nut moves while you are cutting it, adjust it. After this, put your chain ring on the inside of the crank arm to align the chain. When you are finished, you will have a single speed bike crank! This tool shouldn't take too long to create,...
In this video tutorial, viewers learn how to clear cache and cookies in Mozilla Firefox. This task is very simple, easy and fast to do. Begin by opening the Mozilla Firefox web browser. Then click on Tools menu on the top of the window and select Options. Now click on the Advanced tab. Under the Network tab in Cache, click on Clear Now. To clear cookies, click on Tools and select Options. Then click on the Privacy tab and click on Clear Now under the Private Data heading. This video will bene...
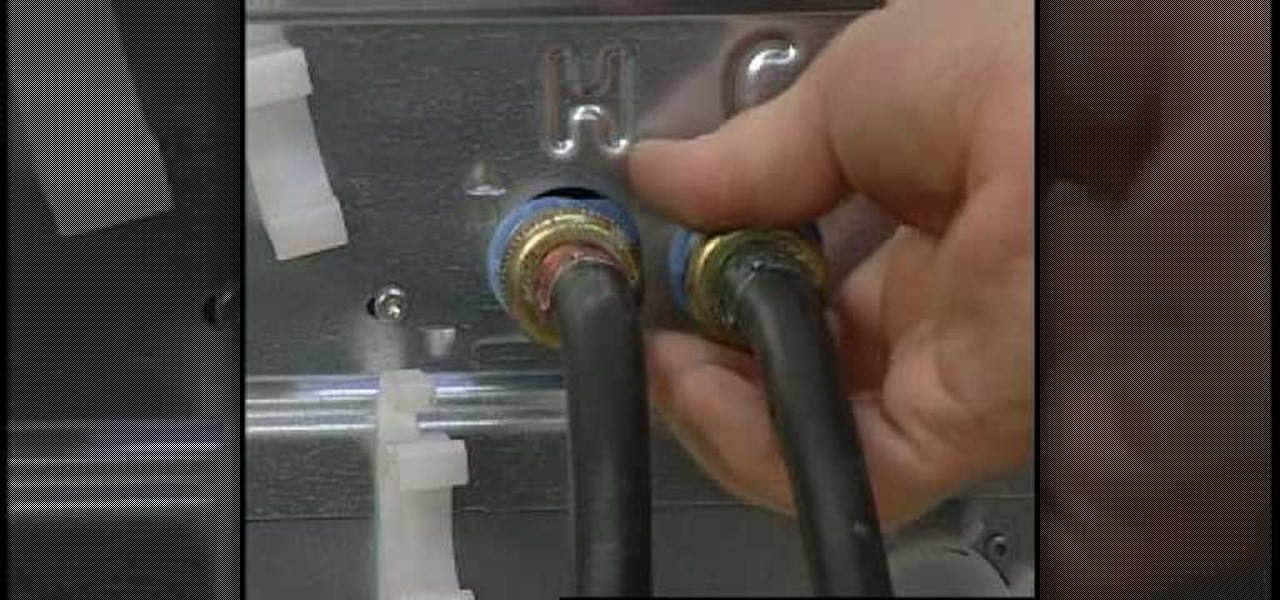
If you are standing in front of your new front load washer and need help with installing it, this video is just what you need.
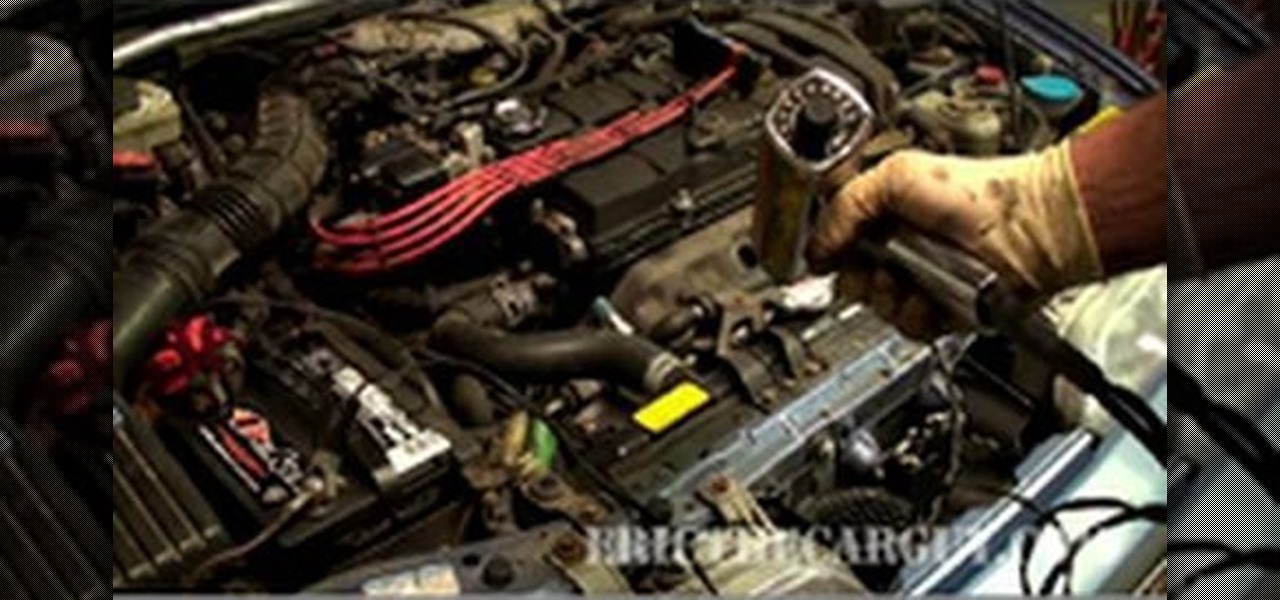
If you recently have replaced the distributor in your car or plan on doing so, prepare to set the ignition timing in your car. This is a process that can take some time and requires the right tools for the job. Trying to start and use your car before you set the ignition timing can be a bad idea since it can mess up your car in the long haul. This tutorial will tell you what tools you'll need and how to find the area in which to test.
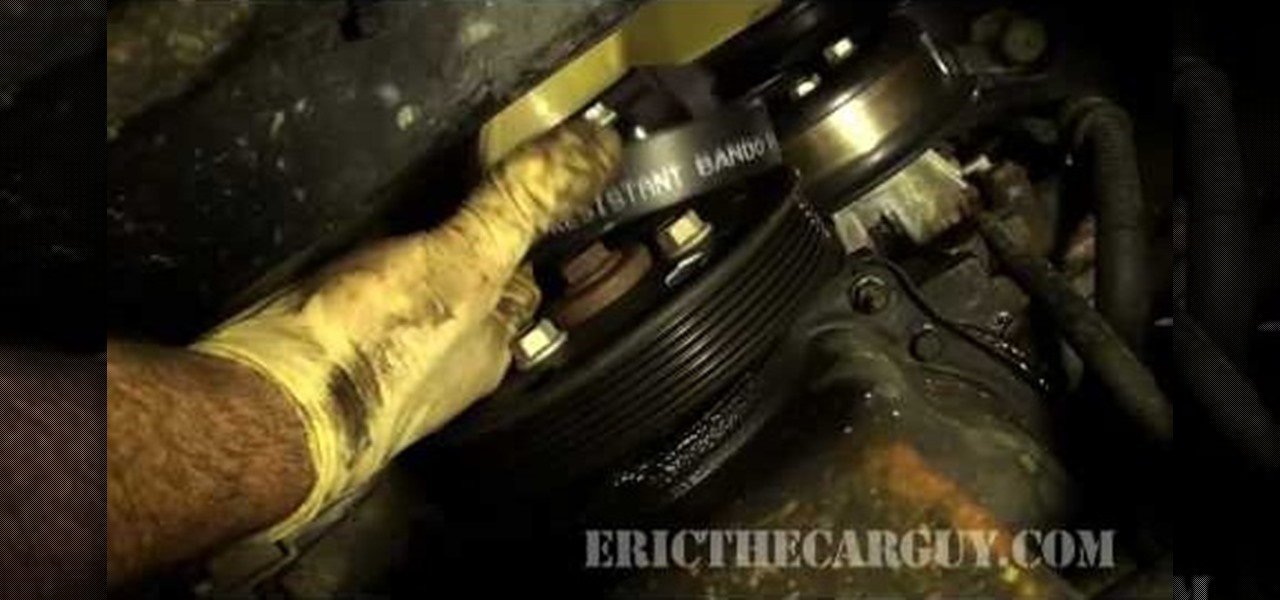
Like a timing belt, a serpentine belt is an important tool that helps make sure that various tools are working. A/C, alternator, and power steering pump are just a small set of examples. Finding the right one for your car is easy, but adding it to your car can be a very difficult task, even for experienced mechanics. So check out the tutorial and see if you have everything you need to replace your serpentine belt. Good luck and enjoy!
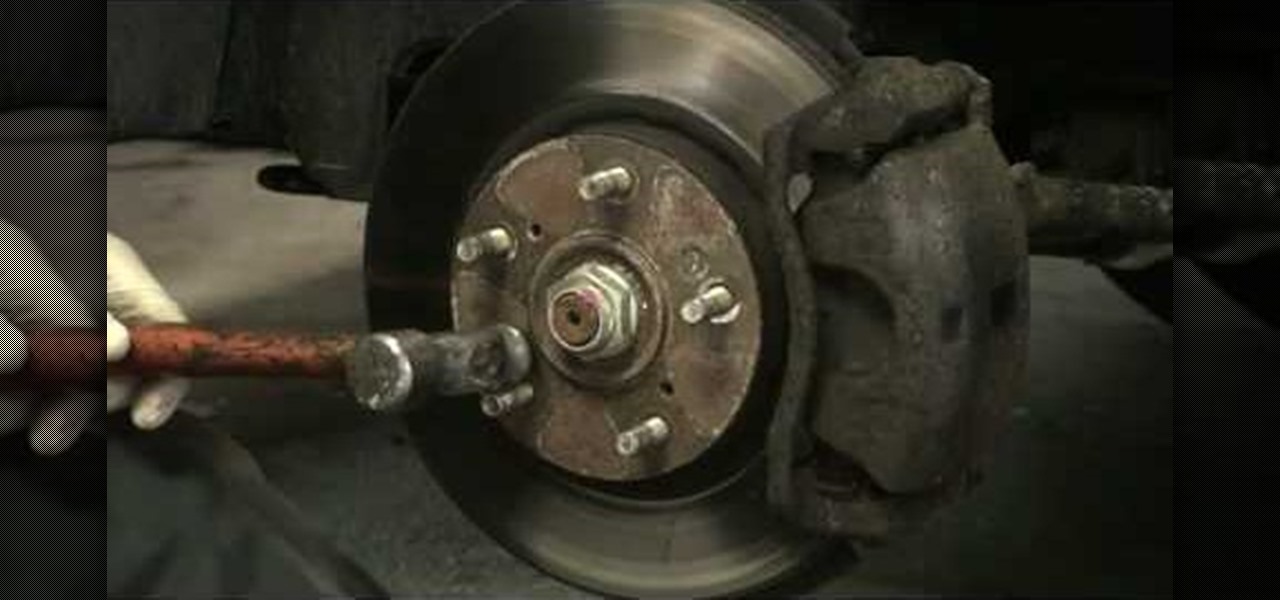
If you own a Honda, then this may be a problem that you are fully aware of. If you don't, if you need to remove anything near your brake wheels, it's important to know how to remove the rotor screws. This can be quite difficult to take out and so a special tool is needed in order to do so. In this tutorial, you'll find out how to remove any screws that may be stuck with a special tool. So good luck and enjoy!
If you want to take a boring photo and pump it full of life, Photoshop CS5's two methods for making a High Dynamic Range image will do just that. The first is a streamlined and improved merging tool, and the second is a new HDR tool that turns a single image into a trendy HDR masterpiece. Whether you're new to Adobe's popular image editing software or a seasoned graphic design professional just looking to better acquaint yourself with the unique features of Photoshop CS5, you're sure to find ...
This two-part video demonstrates the ancient Chinese book binding technique called stab binding. If you do a lot of calligraphy, you can use this technique to put all of your sheets together into a really attractive and traditional book. Make sure you line the pages up correctly!
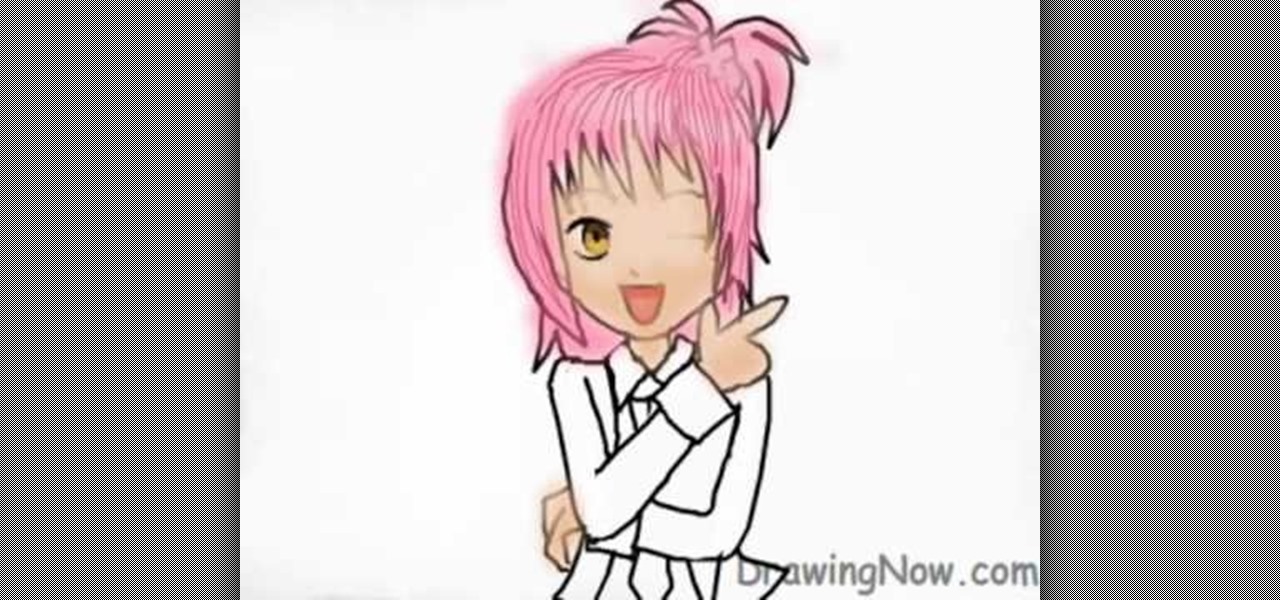
If you love the prolific schoolgirl manga series Shugo Chara, you have probably wanted to draw a replica of the iconic title character for yourself. This video tutorial will teach you how to draw her on the computer quickly and with great detail and color.
Do you enjoy taking pictures of bodies of water such as lakes, rivers, adn even oceans? Do you find imperfection in these photos such as bubbles, dust, and other thigs? Do you wish that there was something out there where you could get rid of it all? Well there is! Photoshop is a piece of software that enables you to edit photos at your pleasure. You can take things out or add them to it, whatever you like. So in this tutorial you'll find out just what it takes to clean up murky water using t...
Being able to know all the tips and tricks to Photoshop, people can produce some amazing pieces of art. But for the people who don't know their entire way around the most used and known piece of software, there's tutorials out there calling their name. In this video you'll find out how to use the magnetic lasso tool in Photoshop. it creates a well defined outline of the picture in the image and is fairly easy to use. So sit back and enjoy!
The strength of your torso is helpful in many exercises. If you plan on body sculpting or weight lifting, you will need to have a stong enough upper body to support it. In this tutorial, learn how to use a tornado ball to increase your strength.
If the subject of your photo doesn't look as fresh as you'd like, check out this tutorial and learn how to soften skin with the surface blur tool in Photoshop. This tool is quite easy to do and in less than five minutes you could make a dramatic difference to your photos.
The narrator introduces Patrick Quirk as the horticultural expert to whom is going to demonstrate how to safety transplant a cactus. Patrick highlights the ease of doing this if we use the right tools. Patrick recommends using an old garden hose and 2 types of tongs as part of his tools. Safety is paramount to us and to the plant. Cactus need to have is roots loosen and dried, which it different to other plants. It is important to keep the same soil level as you previously had. Patrick finish...
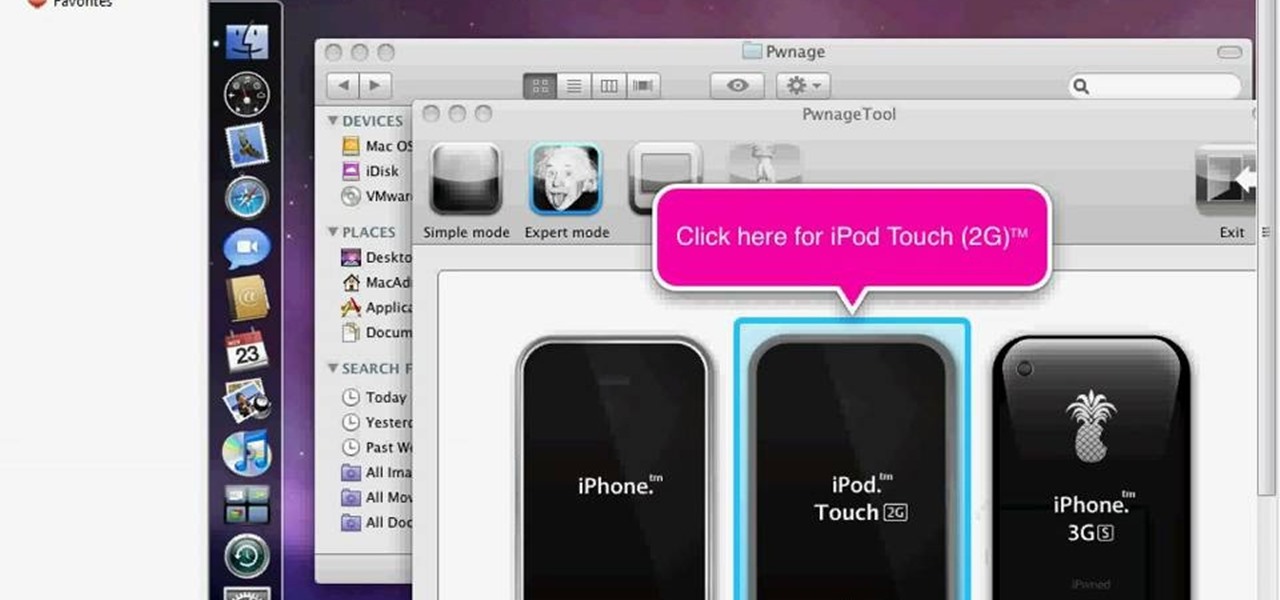
Learn how to run the PWNAGE tool on your Windows PC by following the steps outlined in this video tutorial. To begin, you will need to download utorrent at utorrent.com. You will also need to download three other files, the links of which are listed in this video's description. Once you are done downloading those files, you will need to download and install the VMware Workstation. Once the installation is complete, shut down your computer to make sure the installation is complete. Next, unzip...
In this video, we learn how to get white teeth using PhotoShop. Before you begin, open up PhotoShop and open the picture you want to change. Make sure you zoom in on the teeth so you have a good view and it's easier to paint. First, select the dodge tool, the choose midtones. Now, select the brush that is "round-soft" and brush the brush over the teeth that you want whitened. If you make any mistakes, you can use the eraser tool to clean up what you changed. Once you are done, save your photo...
This video shows you how to remove a tattoo from a photograph using Photoshop. First, select the tattoo using the pen tool, to get a very accurate line around the tattoo. Make sure the "Paths" button is punched in. Drag the mouse and click several times to make a path around the tattoo. Right click on the path and choose "make selection". Feather the selection with a feather radius of about 8 pixels. Use the clone stamp tool and a large size brush. Hover outside the selection and click to sam...
In this video tutorial, viewers learn how to add a watermark to an image using Adobe Photoshop. Begin by importing the image into the program. Select the Horizontal Type Mask Tool under the Text tool. Then select the font color, type and size. Now type in the text and click out of it when finished. Then press the Control and J key to open the text into a layer. Click on the layer and select the style. Now finish by editing and customizing the text. This video will benefit those viewers who ha...
In this how to video, you will learn how make car rims bigger using Photoshop. First, open the image in the program. Choose the elliptical marquee tool and select the rim. Next, right click the selection and click layer via copy. Now you should have the cut out rim in a new layer. Drag layer 1 bigger by holding shift. Replace it and then click on the accept button. Erase the part of the rim that is on the body of the car with the eraser tool. Have layer 1 selected and merge it down. Do the sa...
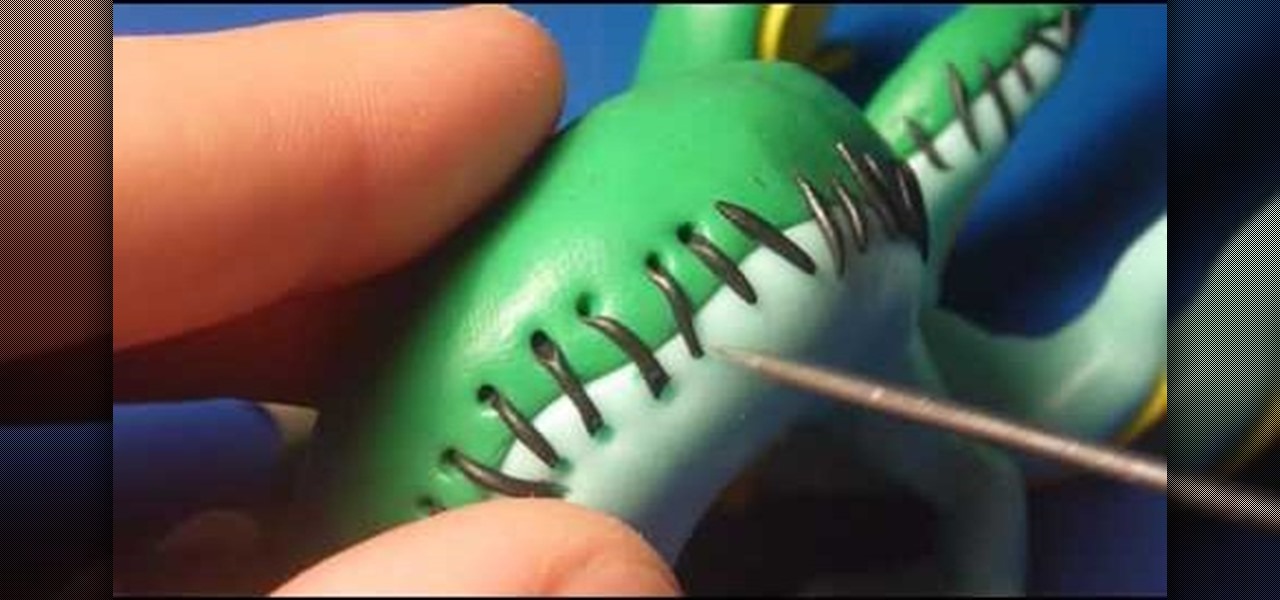
If you would like to create the look of stitches or sutures on your clay sculptures, you will need the following: clay, a toothpick or sharp implement, and a cutting tool.
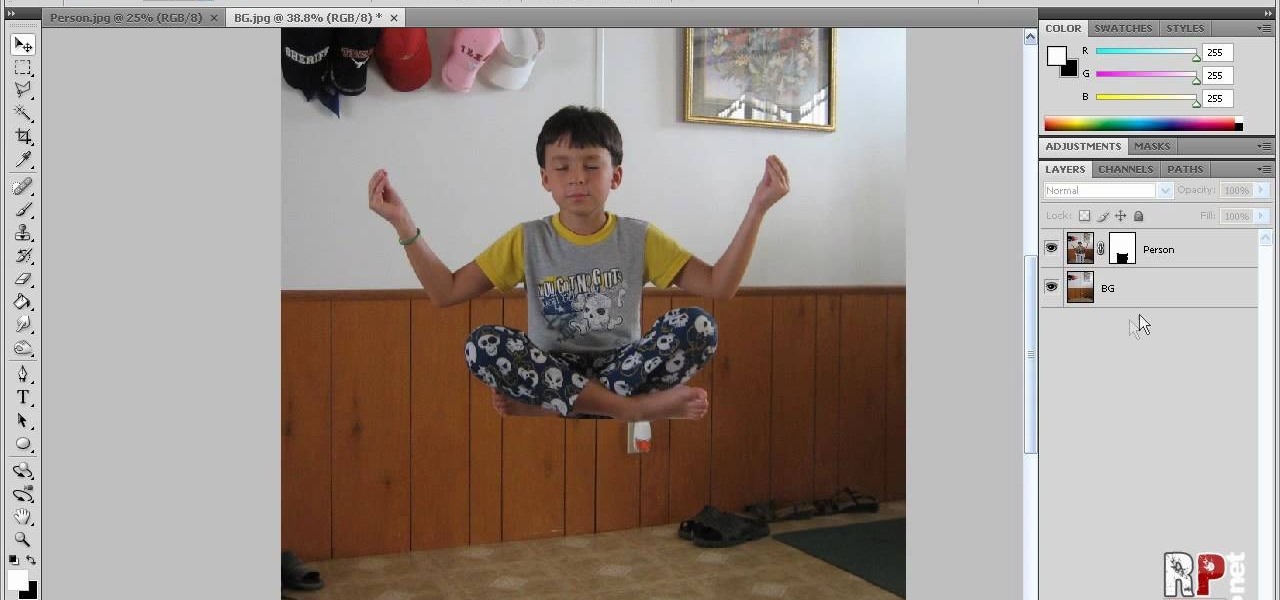
This video tells us the method to perform a simple levitation trick using Photoshop. Take the photo of the background and the person sitting on some object posing as if he or she is levitating. Select the 'Move Tool' and hold the 'Shift' key down. Drag the picture on to the background and release the shift key. Select the layer containing the person and go to the mask tool. Select the foreground color to black. Go to brush tool and set the 'Master Diameter' to 70 pixels and the 'Hardness' to ...
This how to video will show you how to remove blemishes and do other touch ups in Photoshop. First, open the image you want to touch up in the program. Now, choose the polygon tool and select the background of the image. Now, go to adjustments and change the brightness and contrast. You can also add a blur in the filters. Use the smudge tool to touch up any errors from using the blur filter. To fix blemishes, use the patch tool. Select the area you want to fix and drag it to an area of simila...
This is a video tutorial that is showing its audience how to make a glossy Vista wallpaper in the program Photoshop. The first step is to open Photoshop. Photoshop is a very large program so it might take a few minutes to open fully. The second step is to go to file open and open up your wallpaper folder that is on your computer. Choose one of the images and click okay. Then you should select different parts of the wallpaper that you chose and use the elliptical tool and the paint brush tool ...
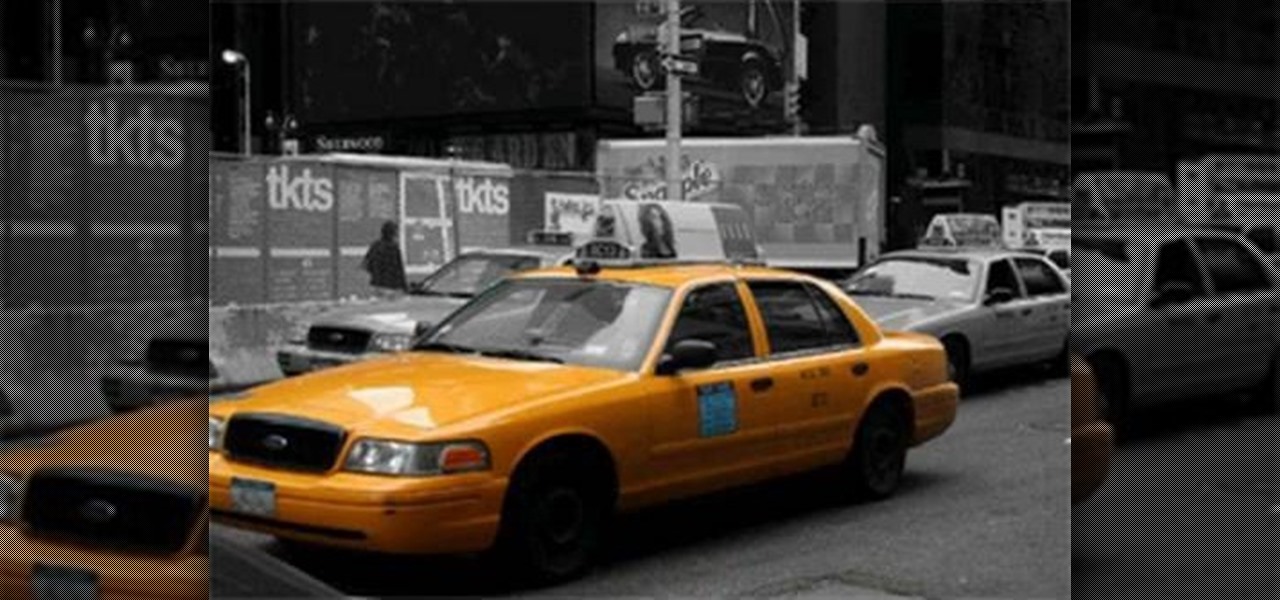
This video shows us how to turn parts of a color photo into black and white and keep the colors for the parts we choose. Start by choosing the polygonal asso tool in the tool box. Now create borders for the parts of the image that you want to keep the colors. Hold the ALT key while clicking to draw borders around a second or third object. Once all the borders are created, right click on your selection and click "select inverse". Now go to "image menu, highlight "adjustment", and then click "b...
This video shows the method to turn off pop-up blocker in Internet Explorer and Firefox. Firstly, open Internet Explorer and go to 'Tools' option. Go to 'Internet Options' and click on the 'Privacy' tab. You will see an option of 'Block pop-ups' at the bottom of the window. You must uncheck it and hit 'Apply' to turn it off. For Firefox, go to 'Tools' and 'Options'. You will see 'Block pop-up windows' as the first option. Uncheck it and the pop-ups will not be blocked. You can also set except...
This shows how to use live trace on Adobe Illustrator to make a vector image. First, you need to open up Adobe Illustrator. Then go to file and select New and adjust your size to letter. For orientation you can choose to have it landscape if you want. Once you have your blank work space you will want to get a saved image. Go to File and click on Place and locate your image. Adjust the size of the image if you need to. Click on the image and then go up to the tool bar to click on the live trac...
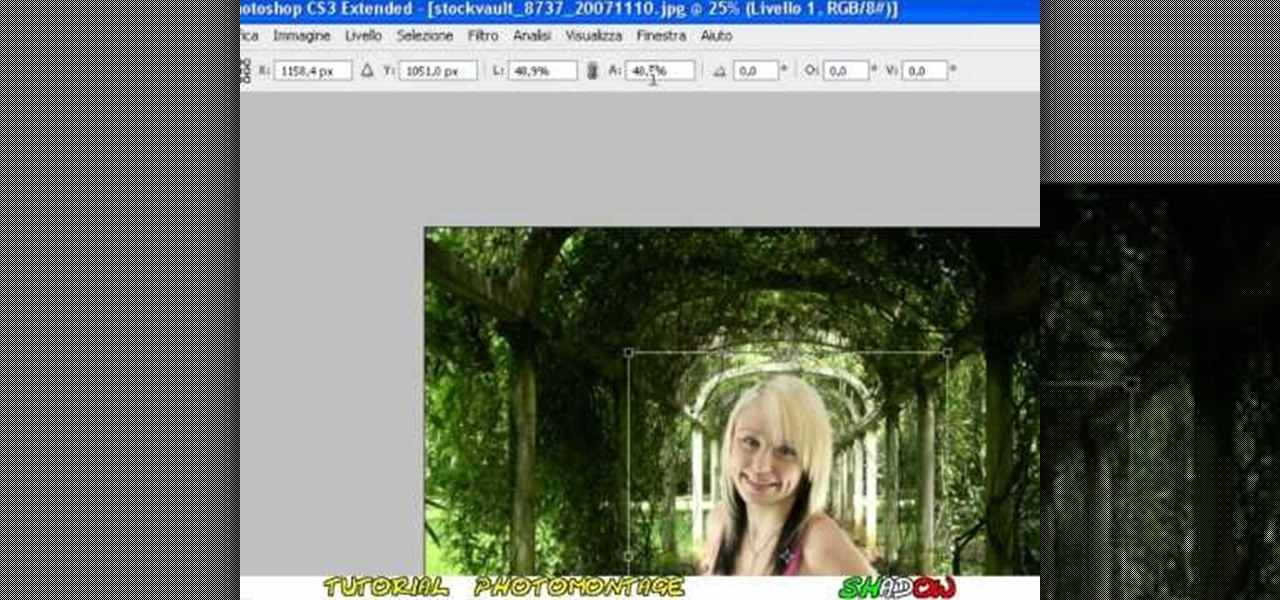
In this video tutorial, viewers learn how to create a photo-montage using Adobe Photoshop. Begin by inserting the images into the program. Then double-click on the montage image to unlock it and select the eraser tool to remove the background. Once the background is removed, select the move tool and move the montage image to the background. To modify the dimensions, go to Edit and select Free Transformation. Hold the Shift key to maintain the proportions. This video will benefit those viewers...
Ali440134 demonstrates how to make a bootable ISO image or a CD / DVD disk. Making a bootable ISO disk is easy and requires just a few simple steps to complete. First, use the Magic ISO program to make the disk. Open Magic ISO and click your desired file. Then, click the open button. Your Magic ISO panel should then say Bootable which means that you can make a bootable disk. Next click tools and under the tools drop down menu click the burn CD / DVD with ISO option. Then, select your file and...
This video demonstrates how to change the color of hair, dress, car or any thing of your choice using photoshop. This is really simple. Select the photo in which you need to change the color. Create a new transparent layer. Click on the brush tool and select a brush type with the right size required. For hair, you could use a brush with a fuzzy edge while sharp edges for clothes and car. Select the white color in the task bar. Click and drag carefully along the edges and fill in the area wher...