In this tutorial, we learn how to make a paper mache Helm's Deep. You can make a pretty good one just using paper mache if you don't have the professional materials. Build it on a cardboard surface and then use cut outs from cereal boxes to make the structures and building features. The paper mache will go over the buildings, so you can make different types of structures. You can also use crumpled up news paper to make the terrain so it will maintain its shape. After you put the mache on, it ...

In this tutorial, we learn how to draw curvy steps using pencil. To start, you will draw a thin horizontal line with a small point on it. After this, you will draw lines out from this, using a ruler to keep them straight. From here, draw your steps on the bottom of the page using the lines to keep them proportioned and in place. Draw them in a triangle wedge shape and then color them in. Shade the bottom and the sides to give them depth and dimension. After this, draw in the area around the s...
With this video, we learn how to recycle milk bottles to make decorative flowers. First, mark eight coupled marks on four sides of the bottom of the bottom. Then, poke holes into them and cut into them with sharp scissors. From here, you will continue to do this all the way around the bottom of the bottle until you have created petals. Then, cut above these to make long oval types of shapes and then spread the petals out on the bottom and on the top. Pull the longer petals into the open areas...

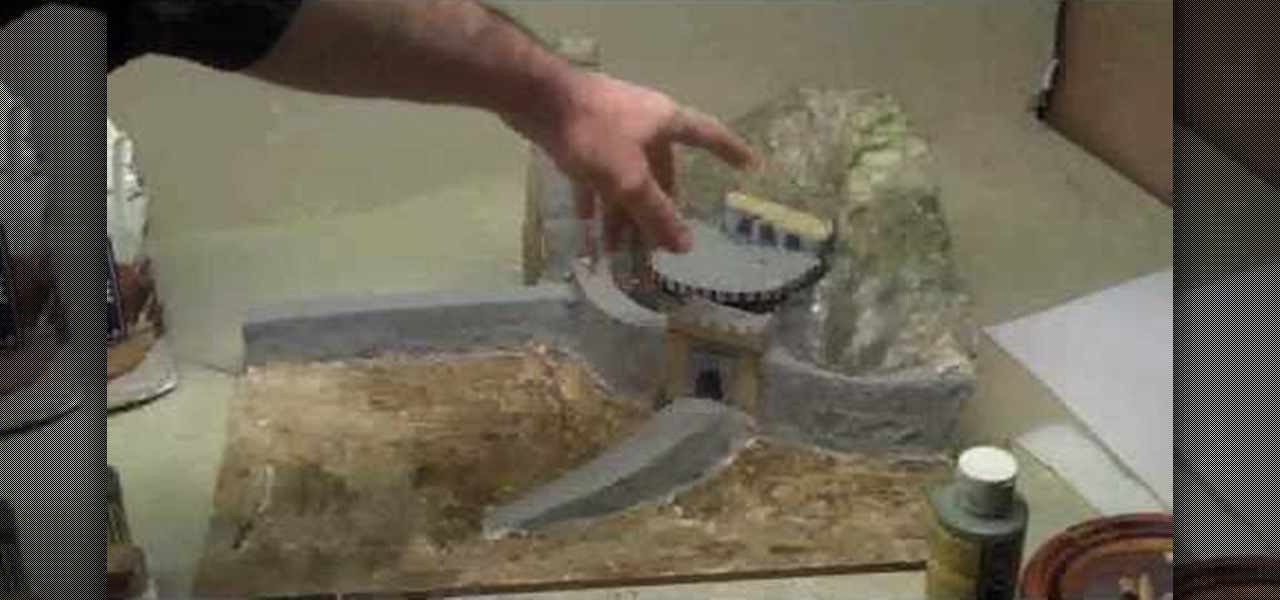
In this tutorial, we learn how to use foam to make diorama terrain. Foam will make a realistic diorama because it comes in so many different shapes and sizes. You can buy this from hobby shops and even online. To put these together, you will simply use some wood glue. You can easily cut this with a sharp knife, scissors, and anything else that is sharp! You can use a hot wire cutting tool to mold and sculpt the foam as well. You can also use a hot glue gun to connect the pieces of foam togeth...

In this video, we learn how to make a paper flower with a simple piece of paper. First, fold the paper in a triangle shape from each side. Then, fold the paper in the middle and then fold it into a square on all the sides. Next, you will fold the outer tabs into the square to make a triangle. After this, you will flip it over and to the same thing on the outside. This will complete your flower and make it look fantastic! Have fun making this and if you do mess it up just try again with anothe...
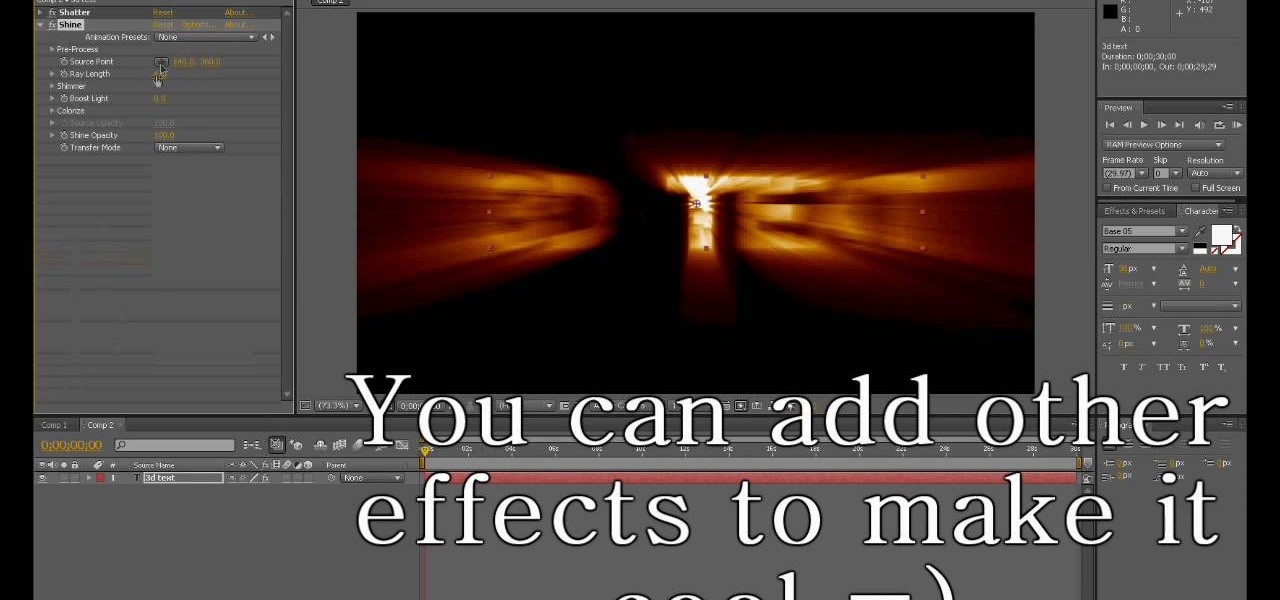
In this tutorial, we learn how to create basic 3D text in After Effects. First, make a new composition and then create a text layer. After this, write in your text that you want in 3D. Then, add shatter to the drawing and select rendered. From here, change the pattern to custom and shape to text 1. Then, put all the strength and gravity to 0. Then, frame the text into the position that you want it to be in by rotating it around. Change the color if you would like to, then when you are done sa...

In this video, we learn how to make a great 3D paper snowflake. First, fold a square blue piece of paper into a triangle. Then, draw lines from the middle to the top going in the triangle shape. Cut these lines on both sides, avoiding the middle and the very top. Make sure you don't cut in the middle either. After this, open up the folder and take the inside. Roll it up and then tape it together so there's a ring on the inside. Flip it over, then make another ring on the top side and tape it....
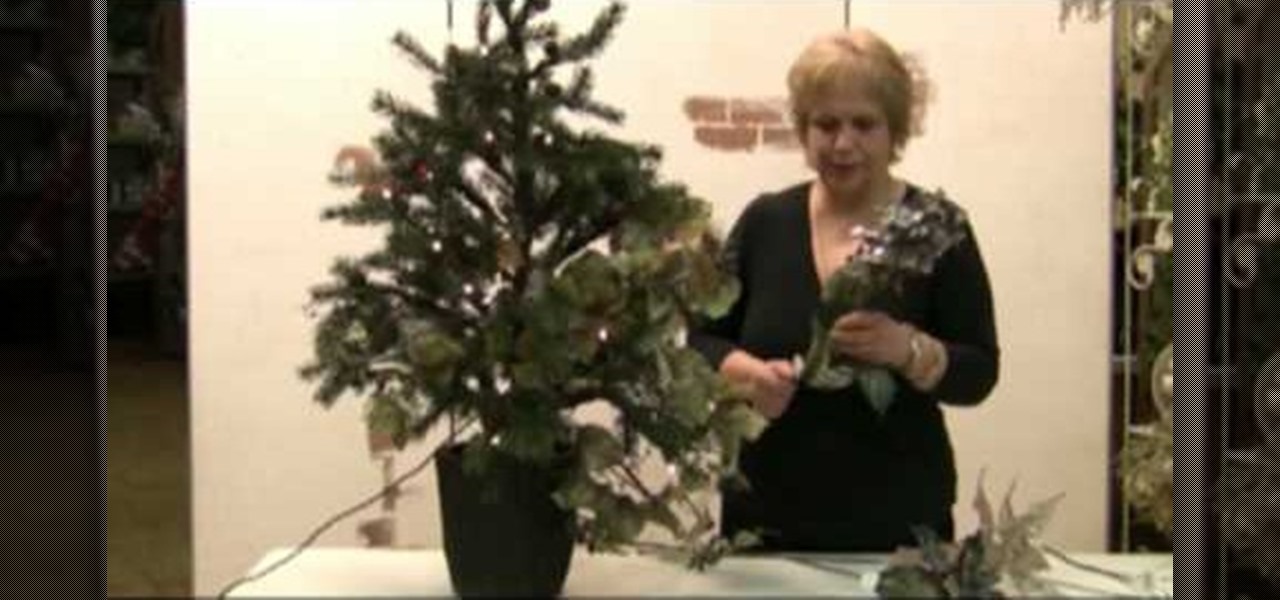
In this tutorial, we learn how to decorate your Christmas tree like a pro. Before you do anything else, put something together that is going to look good that you can place in your tree. Put in different types of flowers, bushes, and garland to make a pretty piece to place inside of your tree. Once you do this, you can shape the branches in the tree around this, then continue to place the elements from the main piece all around the rest of the tree. Add in a long string of matching ornaments,...
In this video we learn how to make biscuits. First, pour 2 c self-rising flour in a large bowl. After this, add in 1/2 tsp salt and then add in 4 tbsp shortening then mix up with your hands. From here, add in 3/4 c milk and then mix everything together until well combined. After these are combined, spread these out and cut them out into biscuit shapes. Bake these in the oven until they are golden brown and cooked all the way through. Then, serve these with some fresh butter and your favorite ...
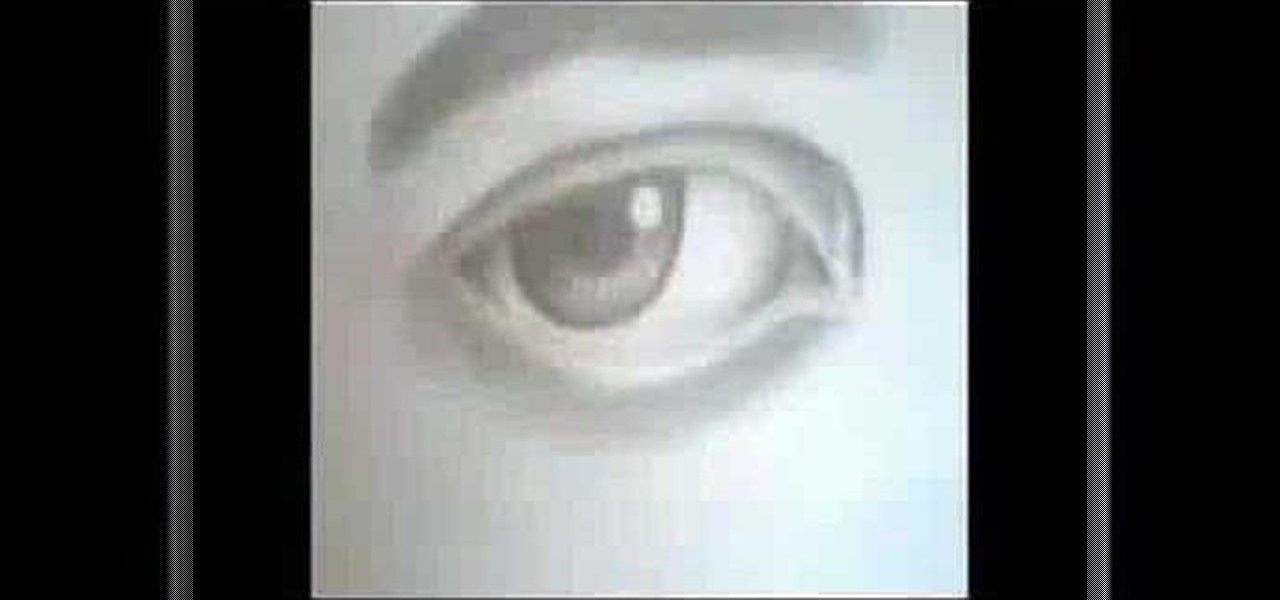
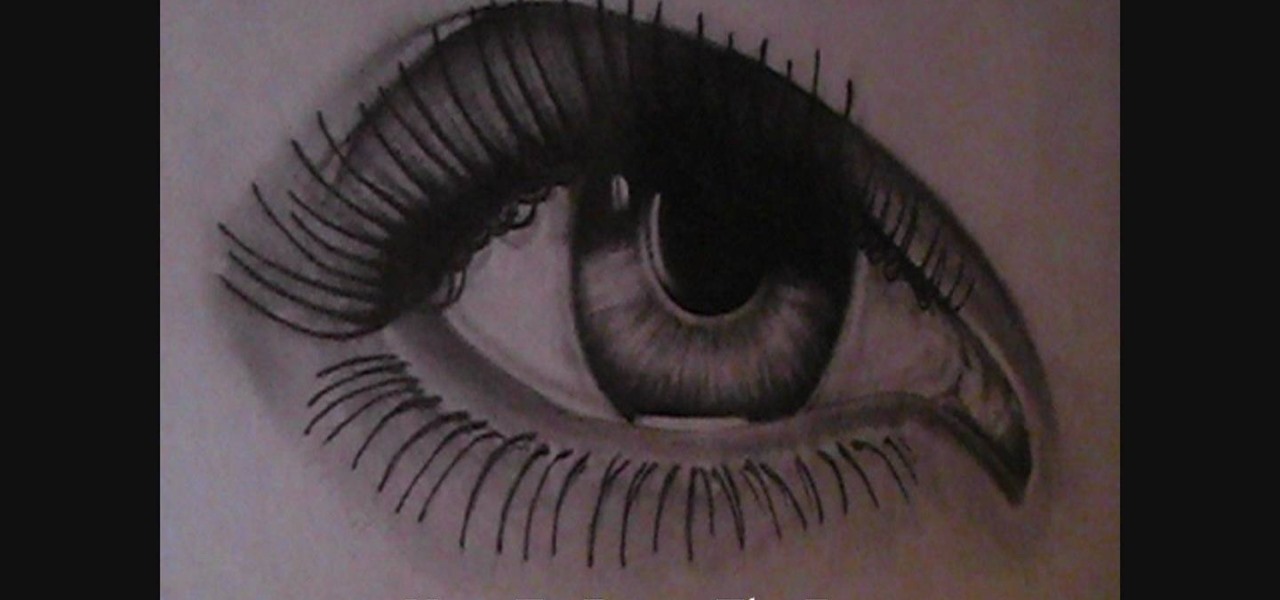
In this video, we learn how to draw a perfect eye. Start out by drawing the outline of the eye, the create the basic shape. After this, draw the crease above the eye and then the inside details of the eye. Darken the pupil, then add in lines around the pupil to show detail. Create a circle eraser mark near the pupil to show the eye having a glare, making it look more glossy. After this, shade in the sides of the eye and underneath where the bottom lash line is. From here, create the eyebrow a...
In this video we learn how to make a paper rose from newspaper. First, fold a red piece of paper into a small triangle. After this, fold it into quarters on both the right and left side. After this, you will have a slight flower shape. Take a pair of scissors and cut diagonally across from this, then open it up. Then, wrap the flower around a pen to create realistic petals. When finished, make more of these to create a bouquet of flowers. Use different colors and different types of papers to ...
In this video we learn how to make Christmas bows. First, take the ribbon and then tie it into two separate one sided bows. Connect these together at the bottom and then continue to make these shapes and connecting them to the same brad. Once you are finished, put double sided tape on the bottom of it and then you will be finished with the bow! You can do this several times to make a whole bunch of bows or you can make it larger to create a huge bow. Have fun making these and use your own sty...
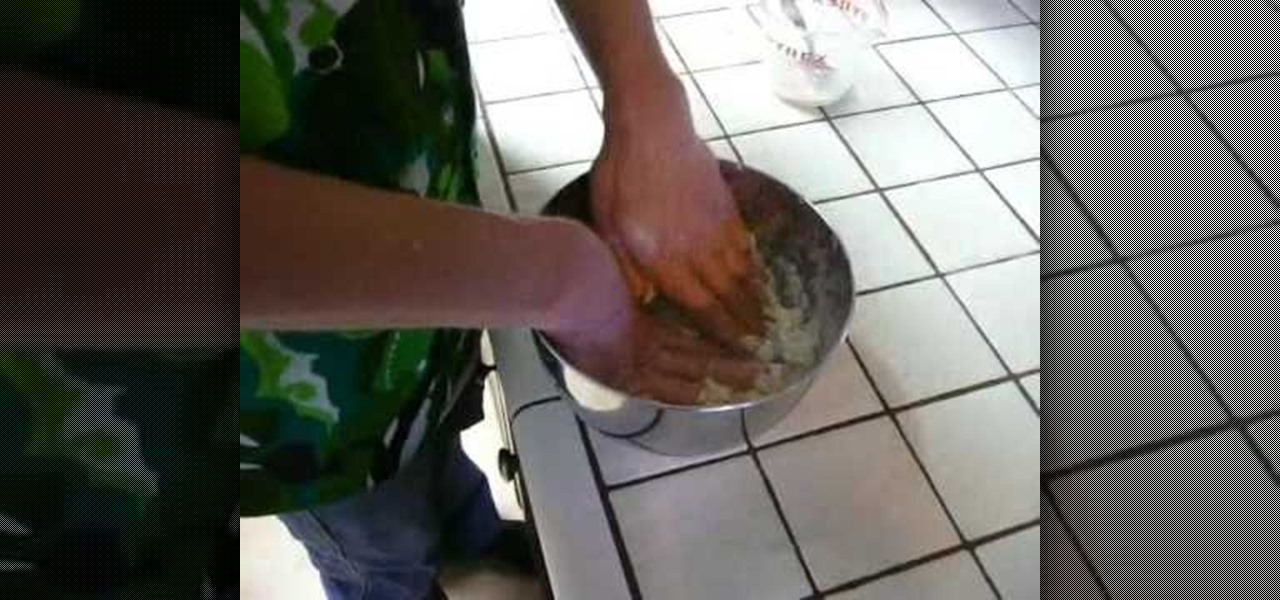
This video tutorial is in the Food category which will show you how to make a no-bake oatmeal raisin cookie. Put dry oat powder into a mixing bowl, then add 1/2 cup of dates, 1/2 cup of raisins and a pinch of cinnamon. Now mix well with your hands to make the cookie dough. Normally the moisture in the dates should help in binding the dough. If that doesn't happen, you can add a little bit of water. The awesome thing about this cookie is that you don't have to bake it. After the dough is ready...
In this tutorial, we learn how to make 3D nails. You will need: nail glue, nails, glitter, nail polish, tools, and anything else to decorate. To start, paint the nail and then apply small ribbons to them at the top. You can also add in glitter if you would like. Glue the ribbons by using nail glue or super glue. For the rest of the nails, repeat the same process, making all of them look different by adding small pearls, different shapes, and glitter. Let these dry, then you can place them ont...
In this tutorial, we learn how to draw an eye. Start out by drawing the outline of the eye, which should be in a football shape. Then, draw the inside of the eye and the outside of it as well. Then, you will start to add in additional details around the eye and the eyelashes. After this, add in the crosshatch inside the eyes and shade in the pupils. Shade around the outside of the eye, then add darker lines for the eyelashes on both the top and the bottom. Add a crease in the eye to make it l...
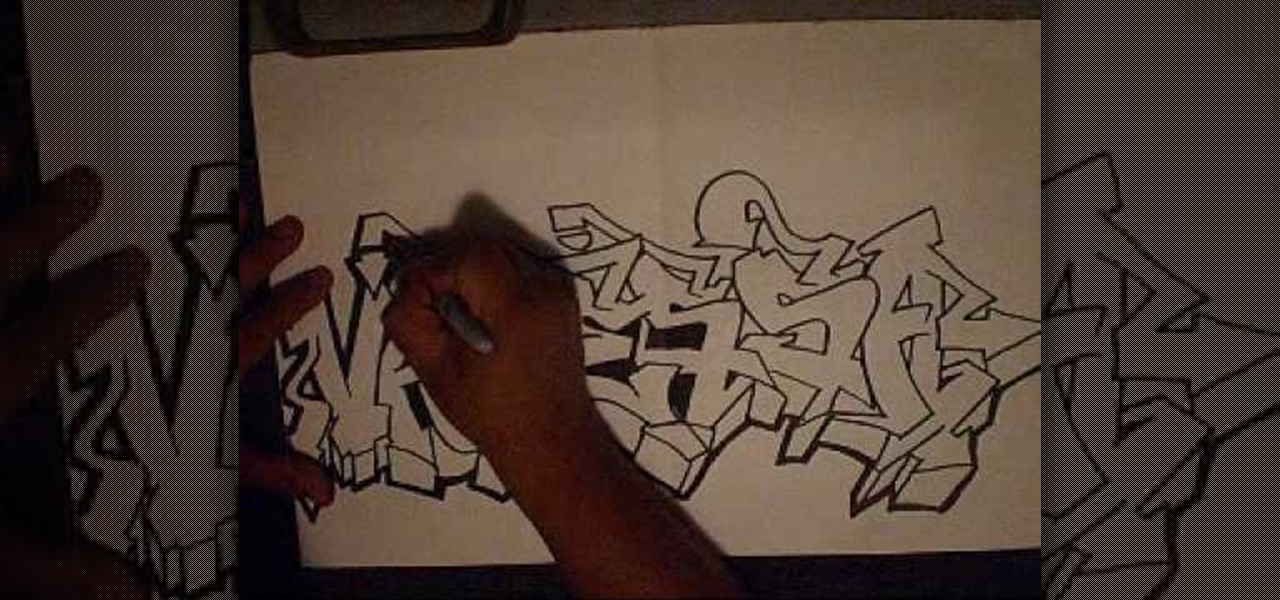
In this video, we learn how to write a name in graffiti letters. Start off by outlining the letters, make sure to draw them thick so they look 3D. Add in different shapes edges to the letters to make them look more like graffiti. Make sure they are all touching and overlapping as well. Then, use the pencil to draw in the areas in between the letters and in the middle of them. Once you do this, you will be able to add in additional lines and shading to each of the individual letters. You can a...
In this video, we learn how to draw a graffiti spray can. Start out by drawing the top of the can with the nozzle on the very top. Use a half circle with a thick line under it to make the top. Next, draw the rest of the can creating a face on the side of the can with a mouth, nose, ears, and eyes. Then, draw in the bottom of the can using a circle shape and filling it on black so it looks sealed. Add in some lines to show the can spraying, then write in graffiti letters underneath to finish!
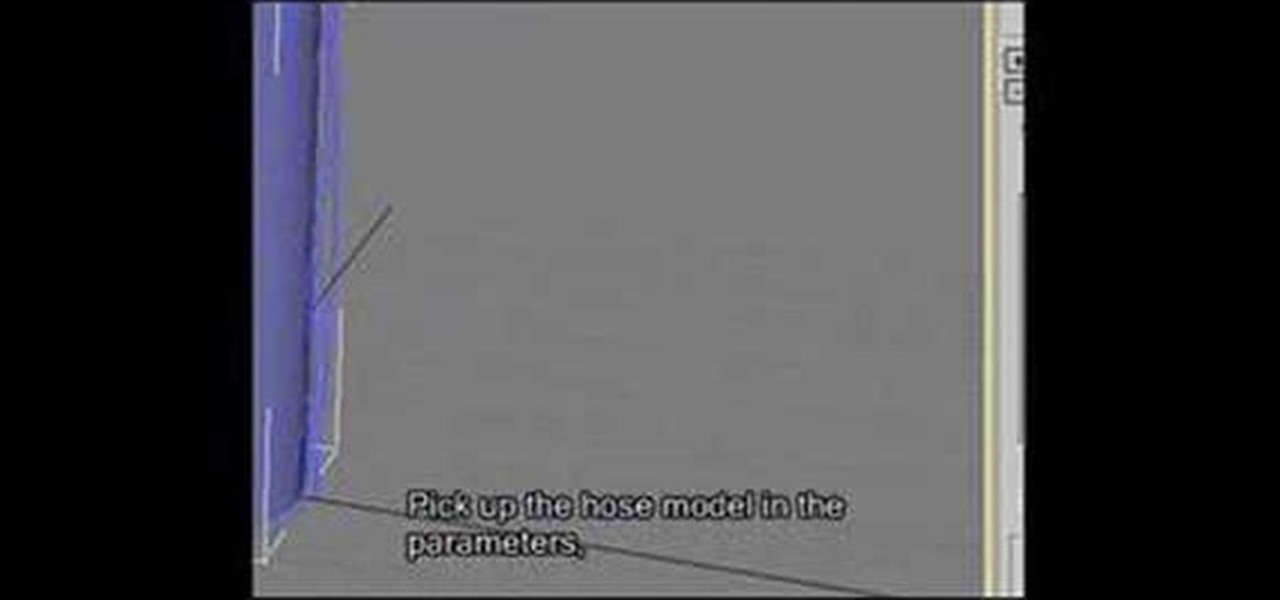
In this video, we learn how to apply normal maps in 3D Studio Max. First, go to the cylinder button and name it. Then, change the radius and height how you would like them. After this, select "extended primitives" from the drop down menu on the top. From here, enter in the diameter and sides for the round hose and then select the diameter of the cylinder. This will create a cylinder but with the look of a hose instead. Use the bottom toolbar to edit the sizes of the map and then save this whe...
In this tutorial, we learn how to make Styrofoam and fabric Christmas ornaments. First, shape the Styrofoam into a ball and then grab the fabric you want to place around it. Place the ball into the fabric, then tie it at the top with a ribbon and some string. After this, you will be able to decorate the fabric with bows and glitter, whatever you want to use. You can attach a hook to the string in the middle if you would like to hang this on a string. Be as creative as you would like, just mak...
In this tutorial, we learn how to draw eyes with a pencil. First, draw the outline of the eye, giving it an almond type of shape. From here, you will add in the lines to the eyes and shade it in to make it look more realistic. Add in the crease above and below the eye, then draw another line on the bottom for the lash line. Then, darken in the areas around the eyes, then add in the lashes to the top and the bottom of the eyes. Shade in the pupil, then use lines to create a more realistic insi...
In this video we learn how to create advanced shadows in GIMP. First, create a new image that's 500x400. After this, create different layers on the page and use the shadow and gradient to create different colors. As you do this, you can you can add in a layer mask to create a deeper shadow inside the image. Use a larger brush to make the shadowing fuzzy and then use the shape tool to drag it out and make it larger. Practice playing with the different brushes and gradients and have fun creatin...
In this tutorial, we learn how to draw a fairly realistic eye. Start with a pen and draw a wispy line for the eye, like a football shape. Then, you will draw the pupil inside the eyes and the ring around it. Draw in lines around the pupil and the eye to show where the colors and shades of the eye come into play. Then, shade in the entire eye lightly. From here, darken up the upper lash and create a create on the eye. Then, make the eyelid crease on the bottom of the eye and add in the inner c...
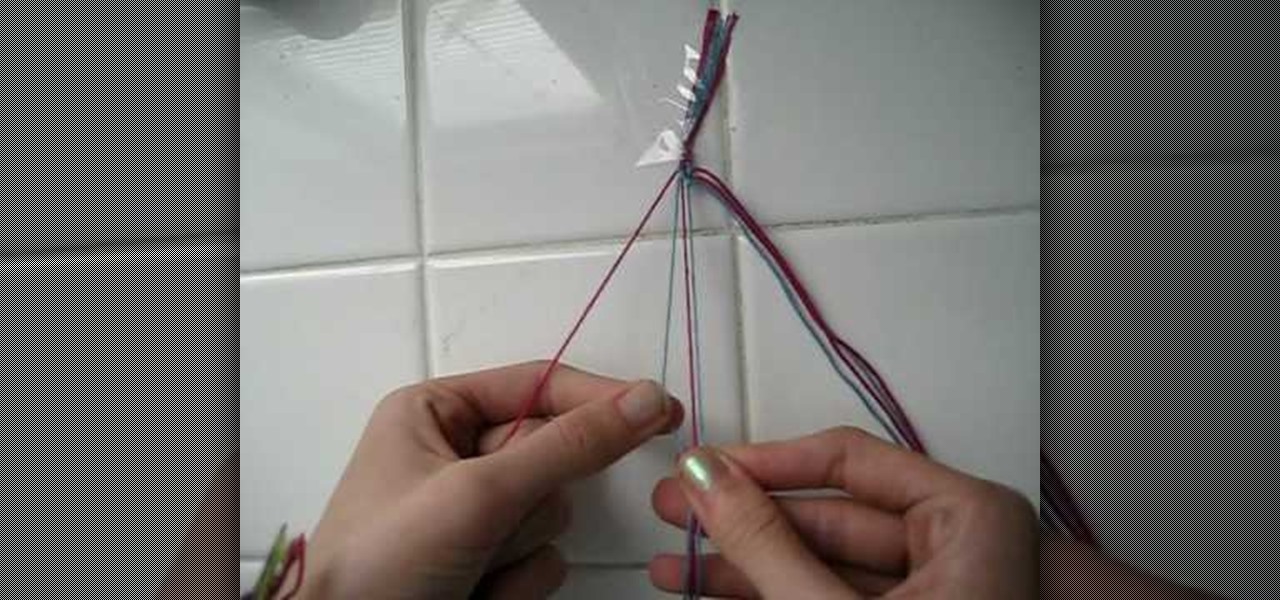
In this video we learn how to make a friendship bracelet with vertical hearts. First, tape your strings to a wall, they should be two colors with four of each. Arrange them so they are alternating colors until you reach the other side. After this, grab the first string and set it aside. Then, take the next two and tie them in a knot at the top. Tie the third string with the fourth at the top as well. Continue to do this until you reach the seventh string. Continue to tie the strings until you...
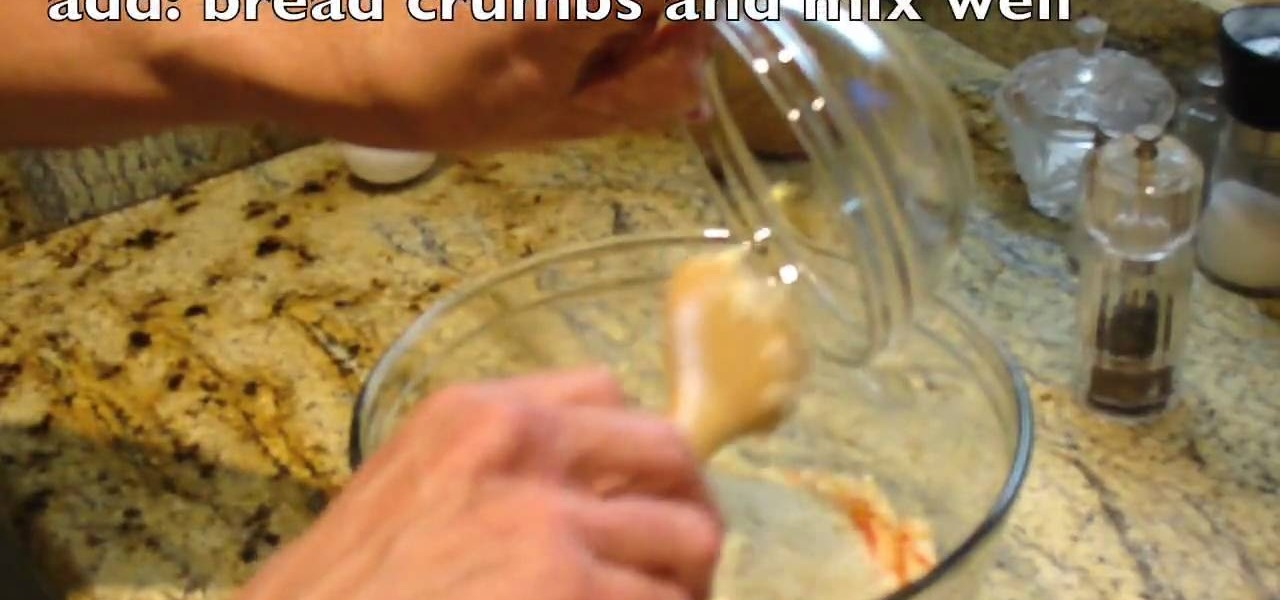
In this tutorial, we learn how to make Alaskan king crab legs. You will need: 1 lb crab meat, 1 dice medium onion, 5 minced garlic cloves, 1/4 c dry white wine, 1 lightly beaten egg, 2 tbsp mayo, 2 c panko bread crumbs, salt, pepper, and olive oil. First, heat up the olive oil in a skillet, then add onions and saute. After this, add in the garlic, then add in the dry white wine. Bring to a simmer, then turn off and set aside to cool. Then pour in bowl with crab meat and add in egg, mayo, salt...
In this tutorial, we learn how to make a Domo plushie. First, cut out the shape of Domo on a piece of brown fabric. Cut this out twice to make the front and the back. After this, sew both of the sides together with a sewing machine. Make sure to place pins in it to keep the fabric in while you are sewing. When finished, turn the plushie over and stick some stuffing inside of it. Now, sew the section where you placed the stuffing in. Then, you can sew on the face of the character and you will ...
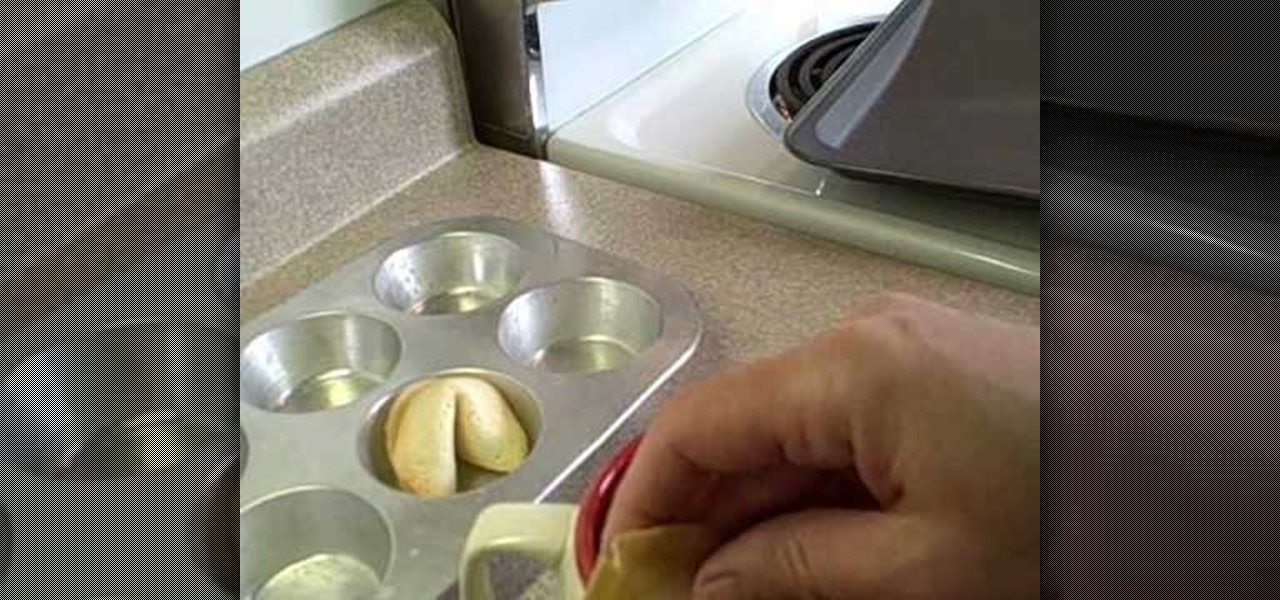
In this tutorial, we learn how to make fortune cookies from scratch. You will need: 2 large egg whites, 1/2 tsp vanilla extract, 1/2 tsp pure almond extract, 3 tbsp vegetable oil, 8 tbsp flour, 1.5 tsp corn starch, 1/4 tsp salt, 8 tbsp sugar, and 3 tsp water. First, write out your fortunes on small pieces of paper. After this, heat the oven to 300 degrees and grease two baking sheets. From here, combine all of your dry and wet ingredients, then combine them both together. Spoon the batter ont...
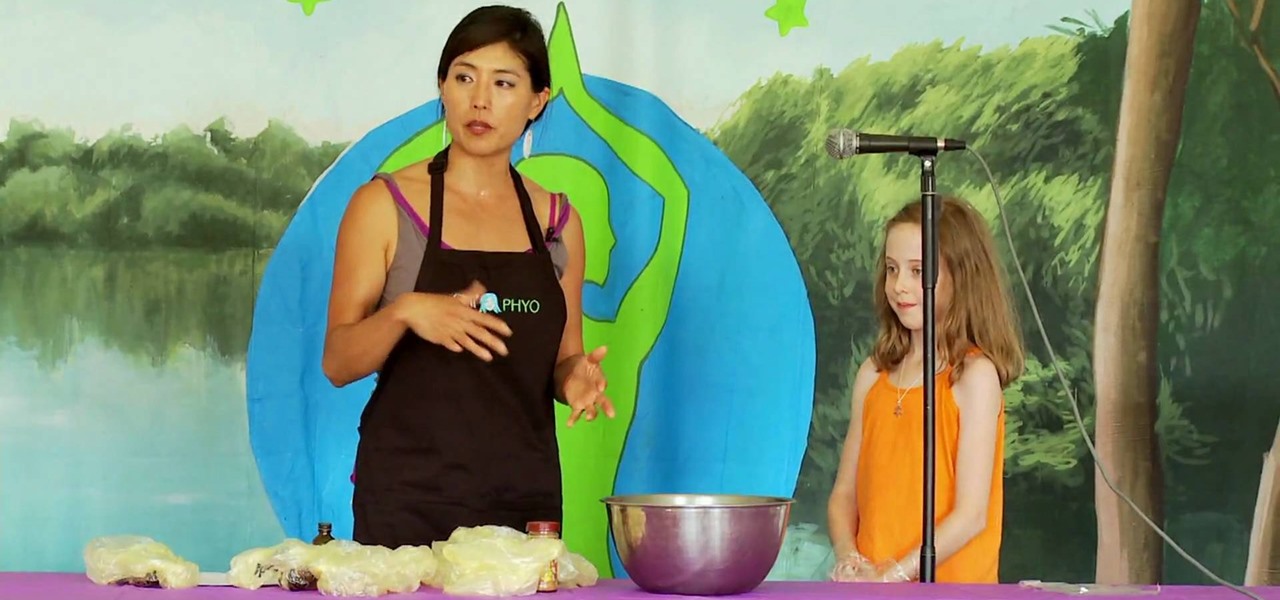
Have your favorite flowers and eat them too with this recipe and how-to video for how to put together sugarpaste flowers in the shape of delicate daisies. These daisies are so incredibly lifelike that your friends may just mistake them for real the next time you toss them on your baked creations!
In this tutorial, we learn how to make a bow. First, take some fabric, it should be double the size that you want the bow. Now, fold this up in half horizontally, then fold it in half vertically. After this, sew the ends together on the bottom of the fabric. Turn this inside out, then bring it to the middle and turn around. Bend this in the middle, then bring the sides up. Shape this until you see the bow form, then sew along the middle to hold it down. When finished, you can use this however...
In this tutorial, we learn how to draw manga bodies. Start out by drawing circles for the body. These circles will start at the head, then go to the shoulders, arms, stomach, hips, knees, and ankles. After you do this, draw lines to connect them all together and make out the basic shape of the body. Now star to use a bolder line to create the realistic outline of the body. When you're finished with this, you will be able to do the fun part. You can fill in these spaces with color and lines to...
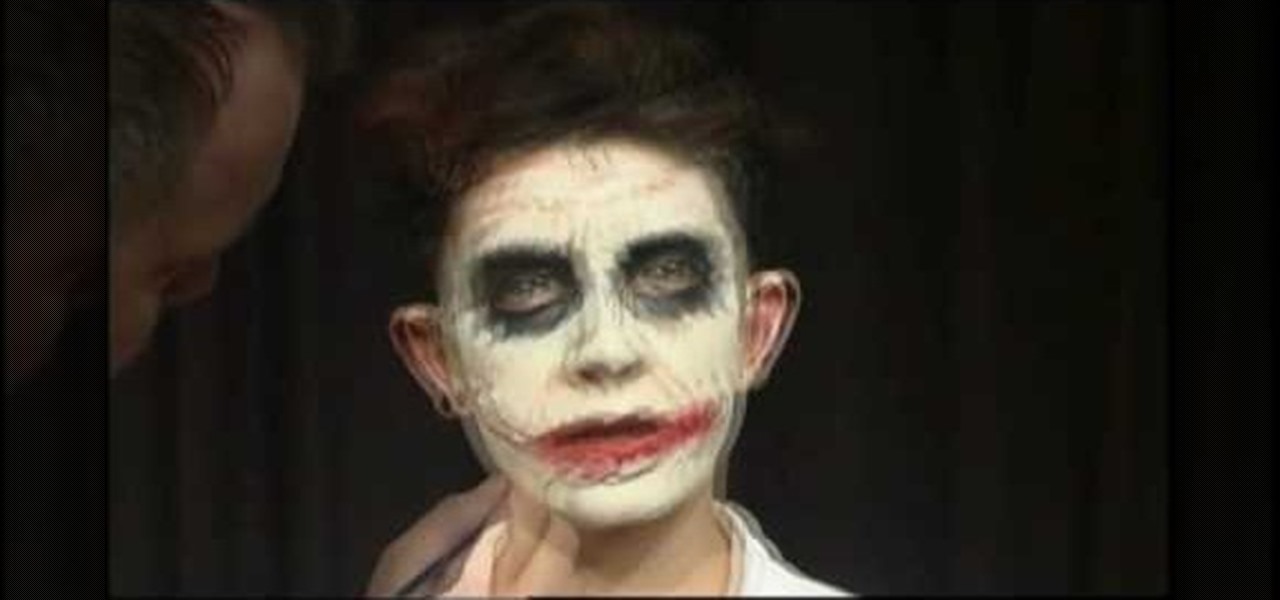
In this video, we learn how to make a prosthetic Glasgow smile like the joker. First, smooth the material onto the face and around the lips. Follow the shape of the lips for the sides of the mouth to make it look larger. Use a Q-tip to push on the prosthetic onto the face. Once this is attached, you can add in the color to the lips to make it look more realistic. Makeup will need to be added to the entire face. White should be on the face, black should be around the eyes. Go for a cracked and...
In this video, we learn how to make the best paper snowflakes. First, take a dark blue and white piece of paper and fold it up into a square, then fold into a triangle. Next, grab a pair of scissors and start to cut along all of the sides of the paper. You may have to do this a couple of times to get the shape right, it will be helpful to use a diagram to show you where to place the scissors. When you are finished, open up the piece of paper to see your snowflake! String this with other snowf...
In this tutorial, we learn how to make a paper snowflake from scratch. First, take a CD and trace around it on a piece of paper so you have a perfect circle shape. After this, take your scissors and cut out the circle. Next, take the circle and fold it in half, then fold it from the right to the left in half again. Then, take it and flip it so the "v" is pointing towards you, then take it from the right to the left and fold it again. After this, face the point away from you, then use your pen...
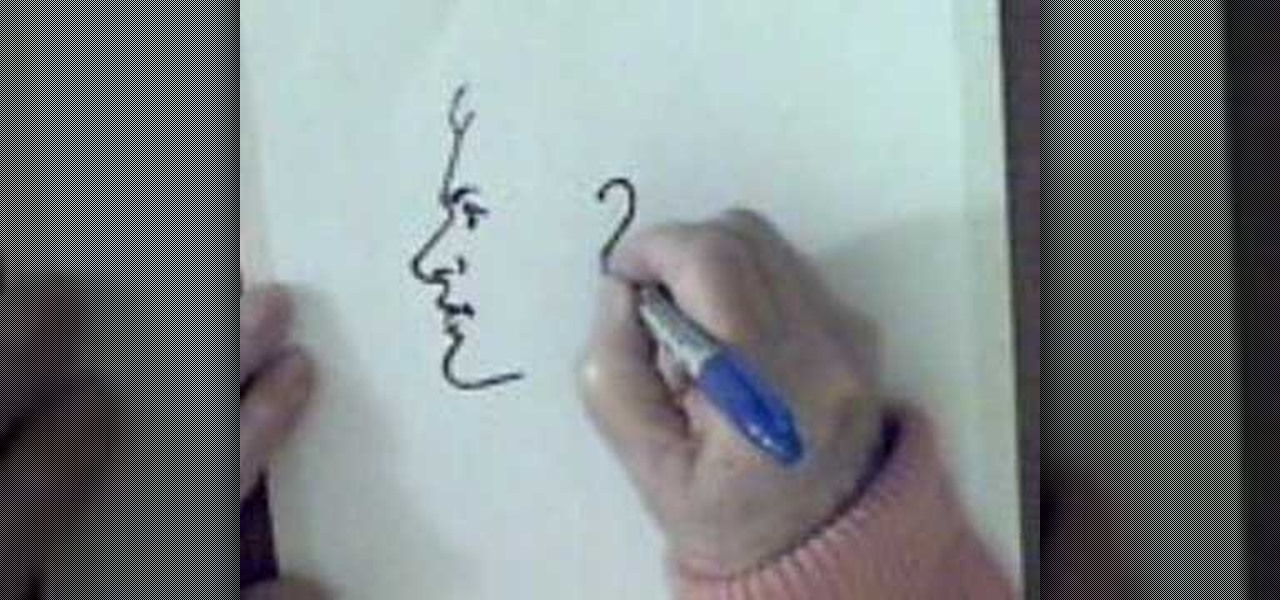
In this video, we learn how to draw a man's face in profile. With a Sharpie marker, first draw the bump to show the forehead of the face, then the bump for the nose. After this, draw the upper lip, then the bottom lip. Draw in a crease around the mouth the make the shape of the lips. After this, draw in the chin to the specifications you would like. After this, draw in the detail of the eye and the eyebrow around the area of the forehead. Next, draw in the nostril of the nose and then a creas...
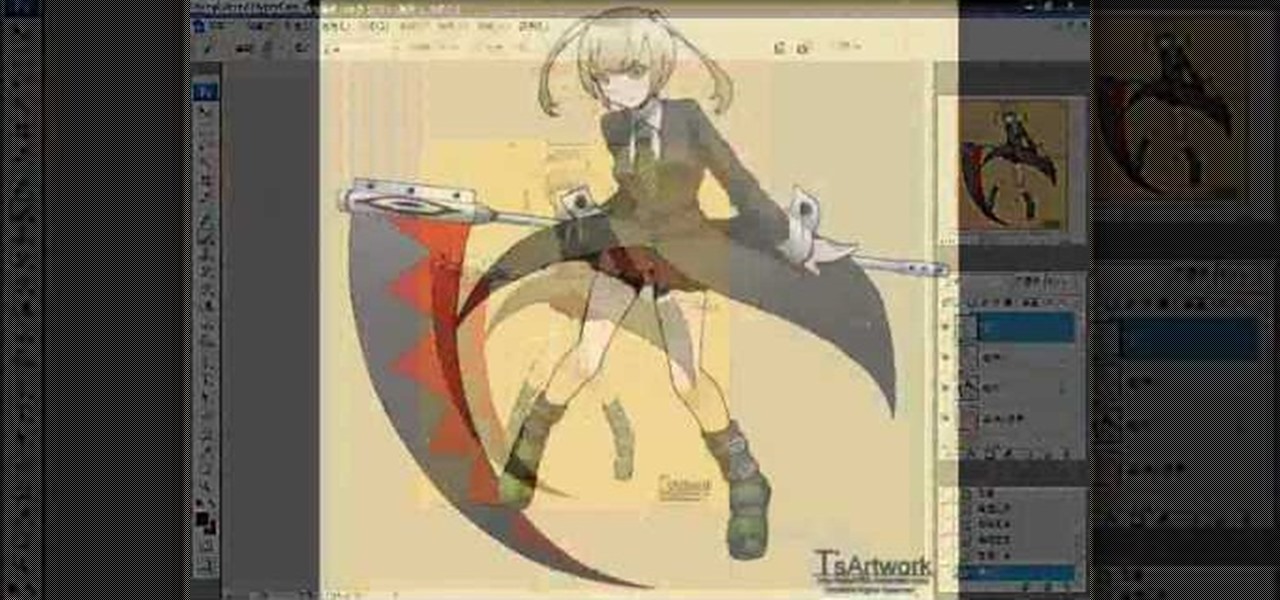
In this video, we learn how to draw Rukia. Start out by drawing a circle with a triangle shape at the bottom. Then, draw reference lines in the face to measure where the features of the face are going to be. After this, start to draw in the details of the face. Draw the eyes, mouth, nose, eyebrows, and any other details you need. Make sure the eyes match the original character and leave white for the pupils to show. Draw in the hair to finish up the drawing, making sure to draw the eyebrows a...
In this video, we learn how to make someone burst into flames with After Effects. You will first need Fire Assets from Action Essentials 2 or from somewhere online. Know which you are going to use before you shoot so you can get the right angle. Then, bring your shots into your software and position the fire above your character. Change the size and shape the match your actor. Then, track your footage by clicking on track motion and continuing forward. To make this look more realistic, change...
In this tutorial, we learn how to draw a female vector cartoon character in CorelDraw X4. Start out by drawing the head of the character with lines that are curved. Then, add in the pupil and color of the eye. Don't forget to add in the lines underneath and on top of the eye, as well as the creases above them. Copy and paste this to create the other eye, then add in eyelashes and eyebrows. Then, draw in a nose and shape the face. add in additional details to the face, then add in the colors t...
In this tutorial, we learn how to draw Johnny. Start off by drawing Johnny's head, then draw a stick for his body, arms, and legs. Once finished, draw an outline over this body to create the shape. Next, draw in the hair for him and then draw his eyes in. Next, draw in the hands and arms, then a knife in his hand as well. Erase any background lines that you have drawn, then shadow and add more lines to the entire drawing. Once you have done this, add in his eyebrows and any other details to f...
In this tutorial, we learn how to draw Rock Lee. First draw a circle for the head, making a chin underneath and using lines to reference where the facial features will go. After this, draw eyes that are slightly aligned to the left hand side of the face. The right eye should be larger than the left, both off center. Then, draw two dots for the nose and a "u" shape for the mouth. After this, draw a larger circle around the head and then draw in angry eyebrows above the eyes. Start to erase the...
In this tutorial, we learn how to pick a padlock with a single paperclip. First, check your lock to make sure it isn't broken, busted, or damaged. After this, take your paperclip and bend it out. Next, use pliers to bend the paper clip into a loop shape. Once you've done this, stick the loop into the lock in the middle and twist it. Play around with the lock for a few seconds and continue to twist until the lock comes unlocked. If it's not working, create a bigger or smaller loop in the paper...
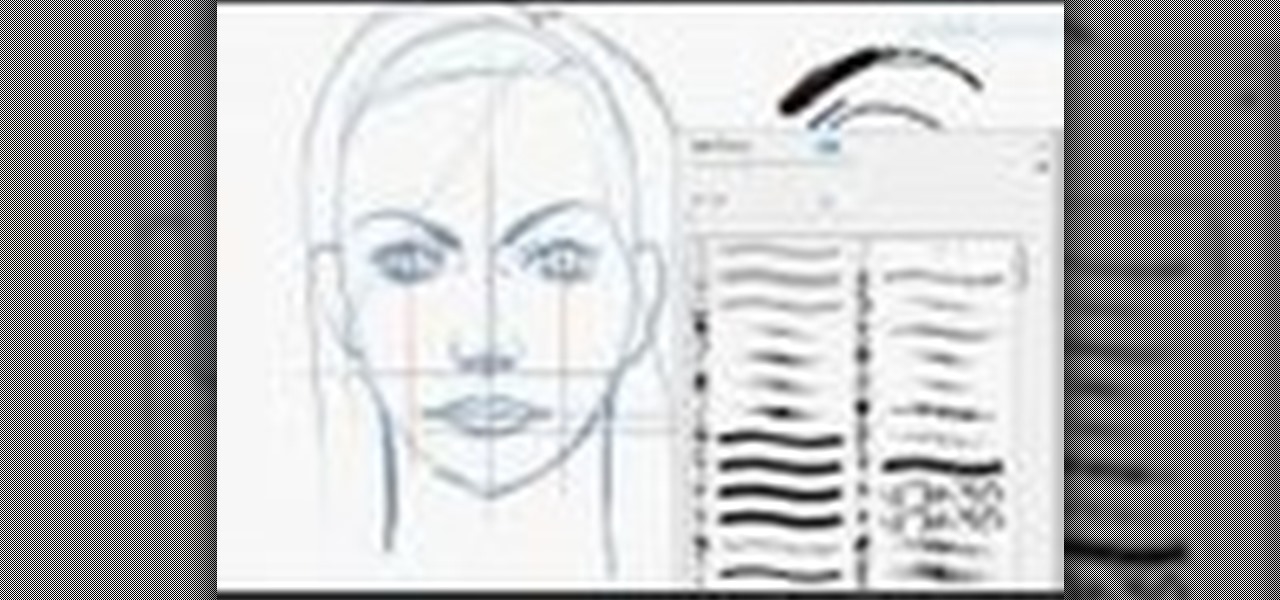
In this tutorial, we learn how to sketch a female face. Start with an upside down egg shape for the face, then draw in the contours of the chin. Use reference lines on the face to help you place where the eyes, nose, and mouth are going to go. After this, start to draw in the additional features, using a lot of lines to contour the face and make it look as realistic as possible. It's very important to use the lines in the background of the face so everything is even and lined up. After this, ...