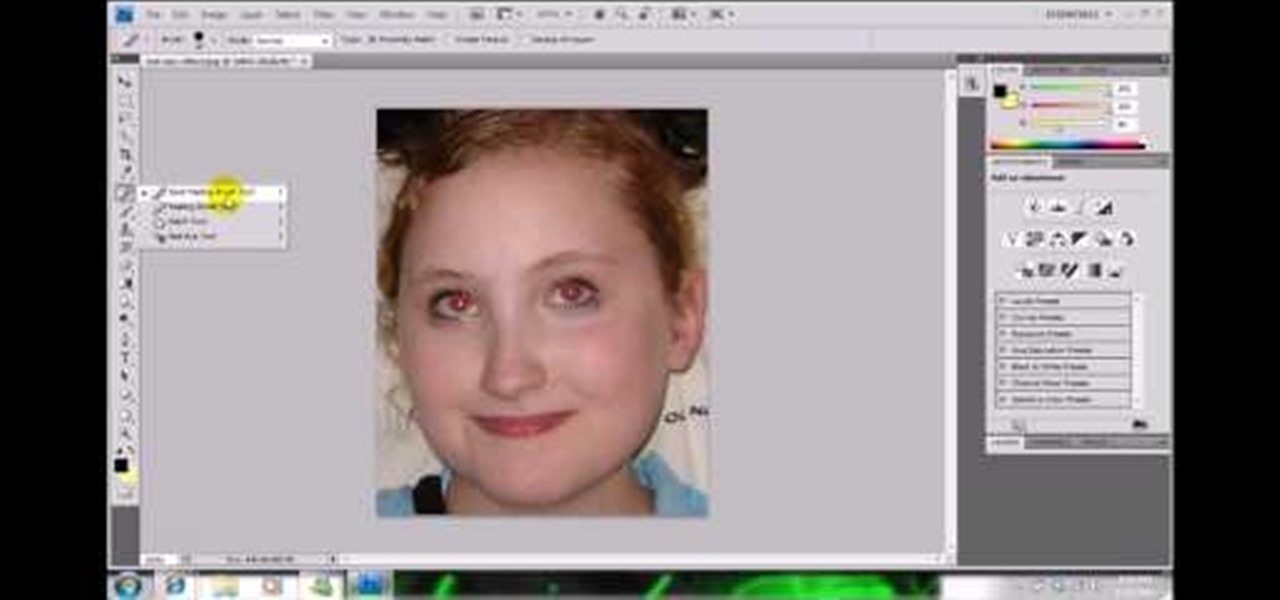
In this video, we learn how to get rid of red eyes while using Photoshop. Make sure you have Photoshop open with your picture up and you're ready to go. First, on the left hand side you will find a "healing brush" tool (which is 7 tools down from the top), click on that and then click "red eye tool". Next, you will click on each of the red eyes in your photo. After this, it will change the color of your red eye to the normal color. If the photo needs changed, you can also change the contrast ...
This video describes the procedure of making "sloppy joes." It is recommended to use ground turkey because of the texture and even the health factor of the meat. He uses pork and beef and adds a little bit of oil to a pan and browns the meat. He uses both of those meats for the texture of the fat and flavor. He lets the meat get brown and then adds the vegetables. He says to save the fat from the meat to cook the vegetables in. He adds red onion and green peppers so the colors are bright and ...
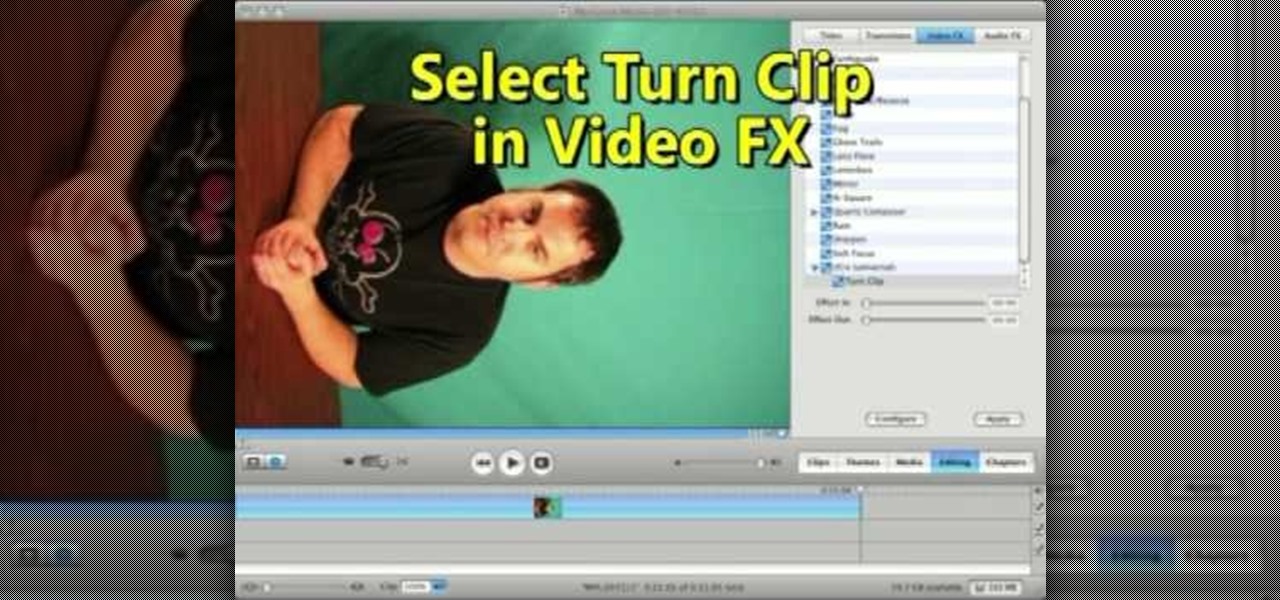
This video shows us the method to rotate a video clip using iMovie HD. Go to iMoviePlugins and download Turn Clip from it. Also make sure you have iMovie HD installed. Now add the video clip to the timeline. Go to the editing tab and choose Video FX and CFX enhancements. Choose Turn Clip from the resulting window. Now set the rotation angle. This can be configured to 90 degrees or 180 degrees. Click on 'Apply' and the software will render the rotation on the timeline. When everything is done,...
This step-by-step instructional video shows how Photoshop can be used to purposely over-process a photo and give it a more gritty effect. First, a High Pass filter is applied to give the photo a gray buzz. Next, hard light blend layers are applied to give the photo more contrast. A few approaches for applying noise filters are described next. Finally, de-saturation is applied to produce an amazing finished product. A must-see video for anybody looking to add a fantastic grunge effect to a photo!
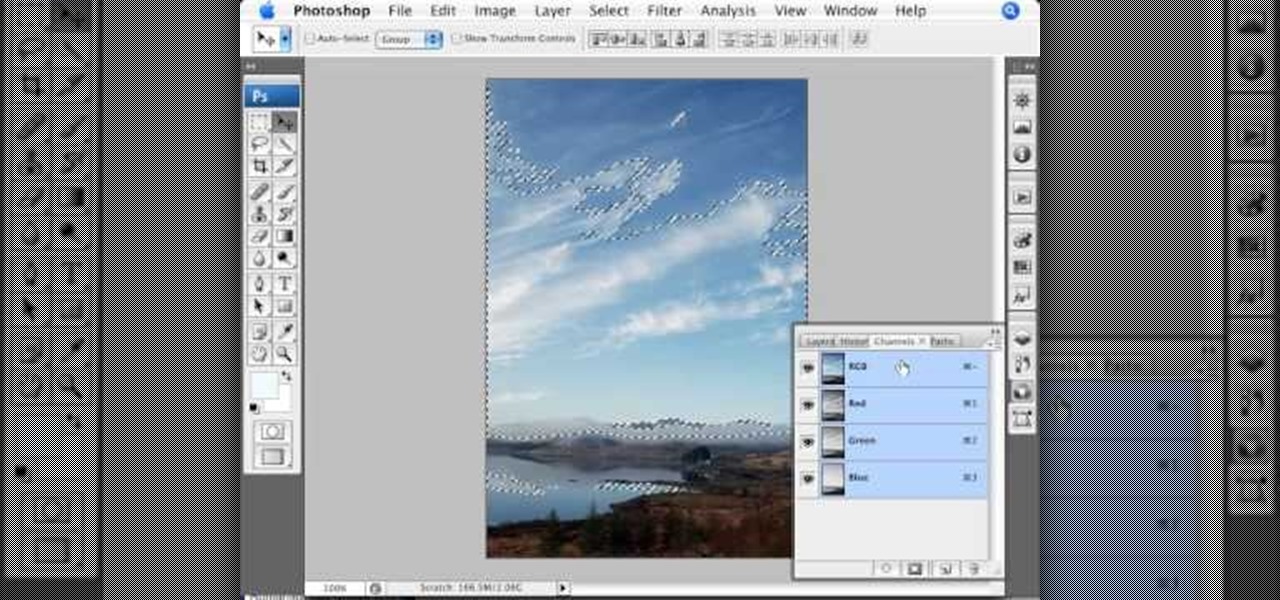
This video is about using a luminosity mask in Photoshop. The luminosity mask is used to enhance the color and contrast in photos that lack each of these. The color is enhanced or punched up. Choose the manipulation tool: channel and RGB. To choose RGB, touch control and then select RGB. Select the 100 % white or light parts of the photo, it will not select the darker or black images. Copy the light parts of the image by using control J. Choose to copy the lightest parts by selecting overlay ...
Writing a song? Want your chorus to have a strong impact? Jimmy Kachulis of Berkleemusic gives songwriting tips on how to make the chorus stand out from the verses even when you use the same chord progressions.

In 2019, Sony is mixing up its design, attempting to stand out among the sea of familiarity. Instead of emulating Samsung with punch hole cameras, they decided to target a rare section of the market, content consumers. There's the Xperia 1 for those who want the best, and the Xperia 10 and 10 Plus for the budget crowd.
There are a lot of cool things in iOS 7, but there are also a lot of annoying things about it. One of the biggest issues I have is Apple's stock wallpaper options. I was really hyped about the new dynamic wallpapers, but they turned out to be a real disappointment because of the new interface.
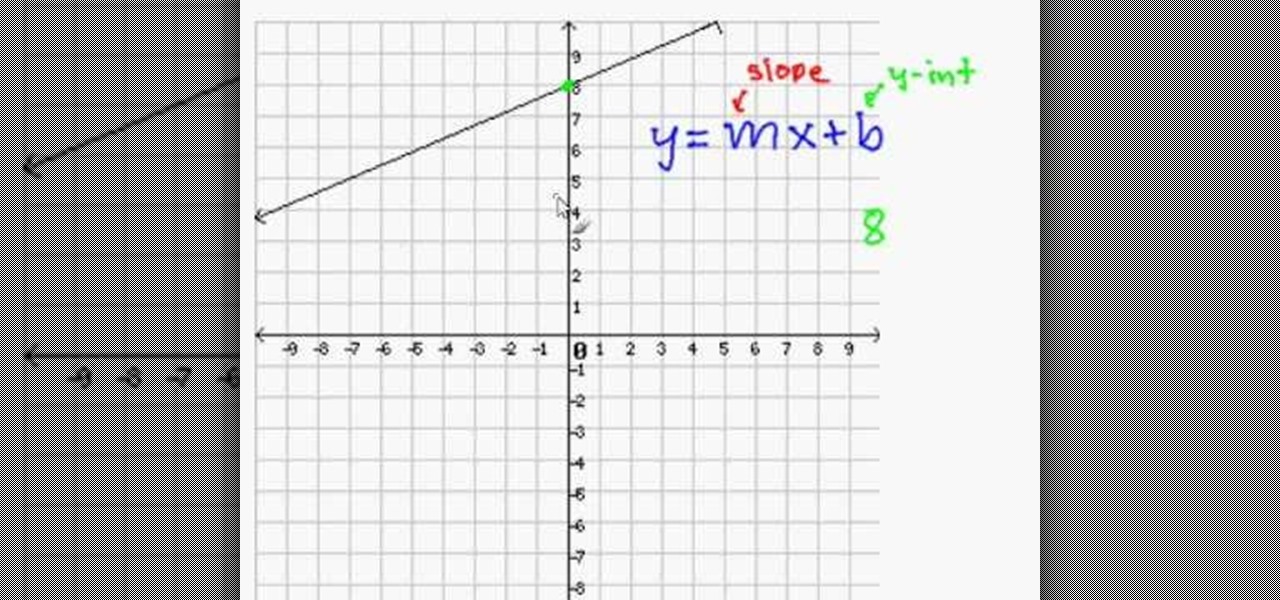
A topic which is taught during school days: The slope - intercept equation of a line in a 2 dimensional space.
First you need to do is to open up the HD video file of Canon HV20 and then you can set the project properties. So go to file, import, media and open up the video file. Now drag it to the timeline and go to file, properties, click on the file folder called "match media settings" and open the same video file which you just opened. Now click on apply and then ok. But now video proportion is not fine. To fix it go to option, preferences, click on video tab and check the box which says "simulate ...
In this tutorial, we learn how to crochet a left handed streamer hat. For the first round, you will chain four, then double crochet through the loop. After this, repeat nine times from the beginning then slip stitch to join the beginning chain 3. For round 2, attach contrasting color of yarn, then chain 2. Single crochet in the previous chain 1 then go over the double crochet. Work 2 single crochets in the next crochet 1 then work a single crochet in each space. Slip stitch to join with the b...
Teen pop star Miley Cyrus is not one to shy away from taking chances - in life and in fashion/makeup endeavors. Cyrus enjoys flaunting her bright eyes with shimmery shadows of gold, silver, and bronze, which contrast with her eye color in the most flattering way.
Part of the beauty of summer is the stark contrast between day (hot, sunny, bright) and night (chilly, starry). While loads of makeup tutorials can be found that will teach you how to get the "summer glow" and infuse your face with more bronzer than Mr. Armani has ever encountered in his lifetime, gorgeous summer nights are often neglected as a beauty inspiration.
Oh, Adriana Lima. Men want to be with her and women want to be her. At almost six feet with neverending legs, a perfect olive complexion, buxom lips, and contrasting hazel eyes, Lima is one of the most gorgeous women in the world. Which, of course, is why Victoria's Secret recruited her to be one of their famous Angels.
In this video, we learn how to make a floral arrangement. Start off with the biggest flower you are going to use, and build around that. If you have a white flower, pick a bright colored one to go next to it. Remember to use different flowers and colors to mix and match and make beautiful bouquets. You will also want to remove the bottoms of the stems and tuck smaller flowers in between the bigger ones. Creating color contrasts can help make an eye-popping floral arrangement. You can start bu...
The way to wear hijab shown in this demonstration with a simple wrap around the head, securing the hijab with bobby pins at the back of the neck. The ends of the hijab are pulled forward to the chest. Then a thin scarf in a contrasting color can be wrapped around and tied at the nape of the neck as well. A portion of the hijab is pulled forward over it and pinned over the ear. Then one of the ends is pulled under the chin to the opposite ear and pinned to the head. The other end is wrapped ar...
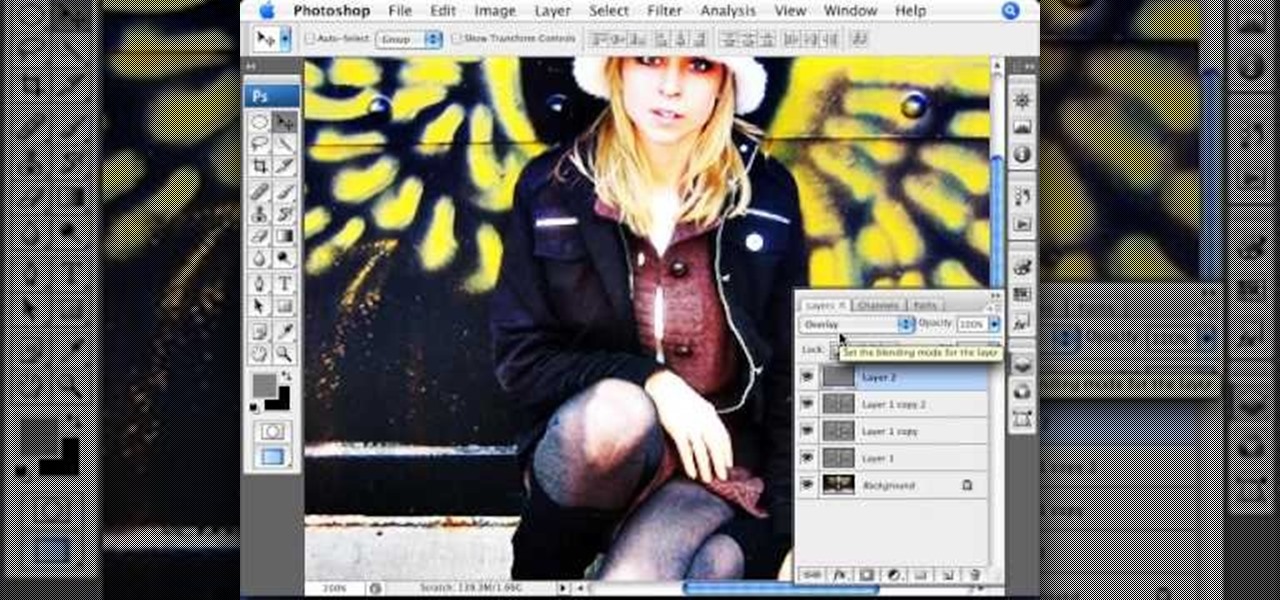
In order to add a nice contrast punch to an image using Photoshop, go to your adjustment layer and click on the black and white adjustment layer. Then go to your "blend modes" and change it to "overlay". If you find that the effect is too harsh you can adjust your opacity settings or you can switch your blend mode to "soft lights". In "overlay" using the black and white adjustment panel you can change your settings to meet your preference. If you are using a previous version of Photoshop that...
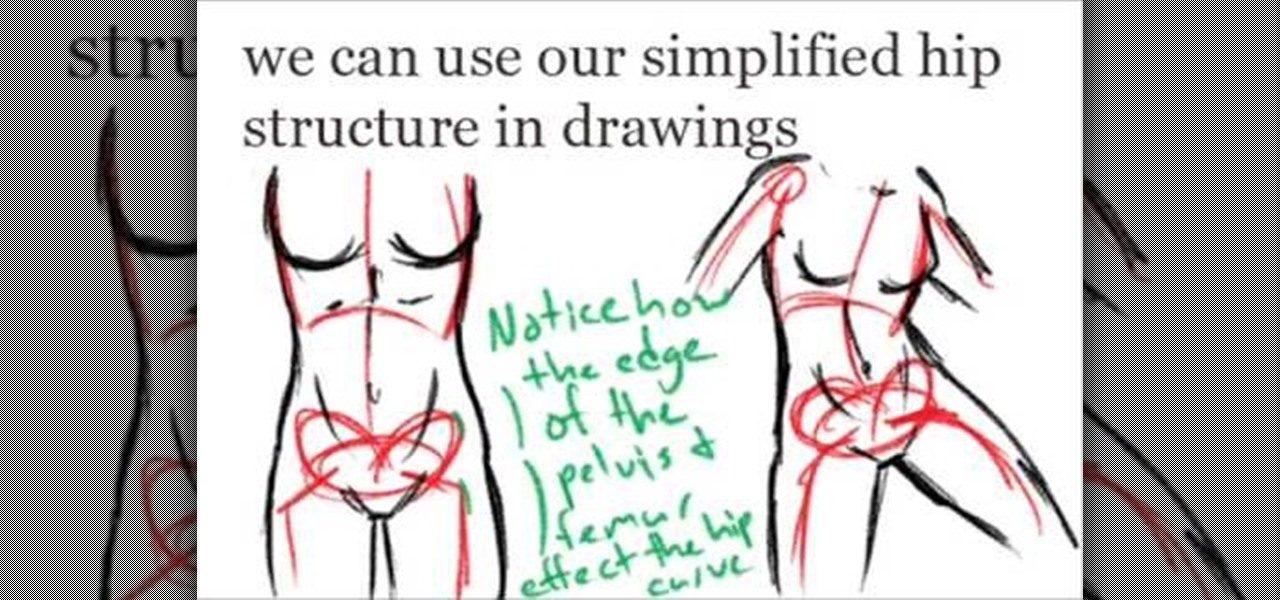
This video, which gives tips on drawing realistic hips, is helpful to people learning to draw the human form. The video starts by showing examples of bad drawings of hips and explains that these are how you should not be drawing them. It then shows a realistic black line picture of the pelvis bone on which the presenter has drawn a simplified version of it in a contrasting red color. He gives a simple description of his drawing, saying it is like an oval with butterfly wings coming from it. H...
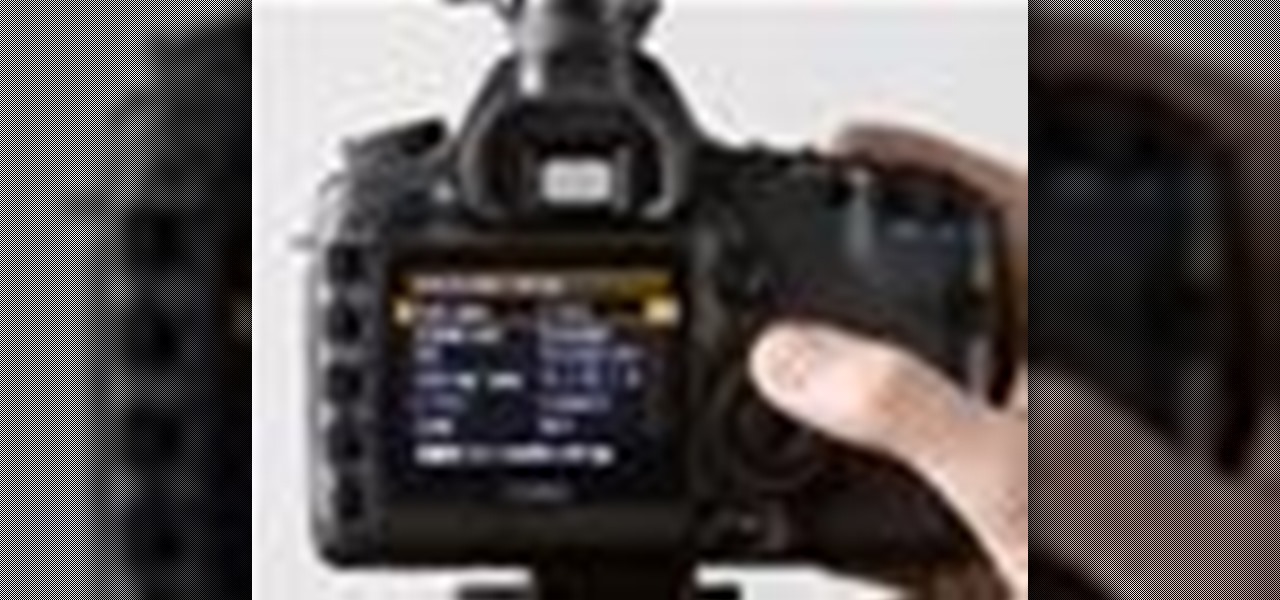
Bruce Dorn from Canon breaks down the exposure and Speedlite controls on the Canon 5D Mark II. His explanations are especially helpful as he gives certain shooting scenarios in which tweaking these settings will improve your overall image quality.
This Adobe Photoshop CS3 tutorial teaches you how perform slight photo retouching to supersaturate a photo without the distortion and bleeding. This adds a slight but noticeable saturated look of a photo which enhances the color quality. First the graphic artist adjusts the saturation. Then he creates a version copy using the lab mode versus the RGB mode. He then adjusts the contrast of the Lab mode image. Once you return the photo back to the RGB mode, you can continue altering the photo.
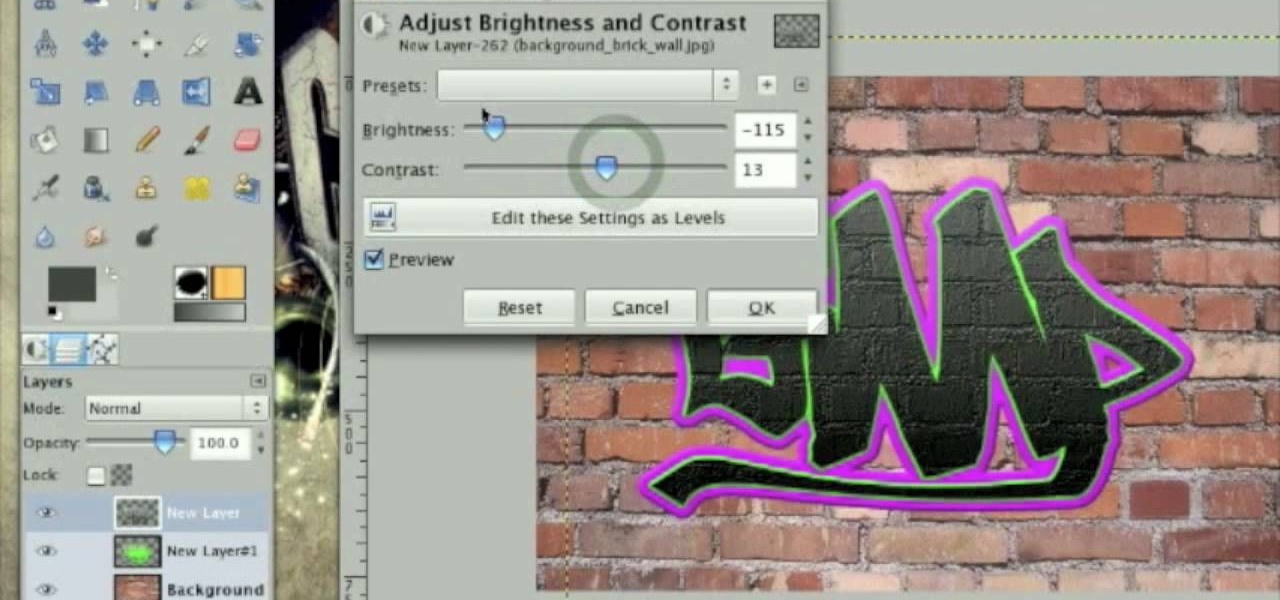
This tutorial describes how to create a realistic graffiti effect in a program called GIMP. You must first make sure that you have the font "writers original" installed on your computer. If not, you must download it to create this graffiti effect. Simply open a brick background on GIMP and put whatever text you want to have. Enhance the text by creating multiple layers and create a multi-dimensional image by creating contrast among those layers. Lowering brightness opposite layers and changin...
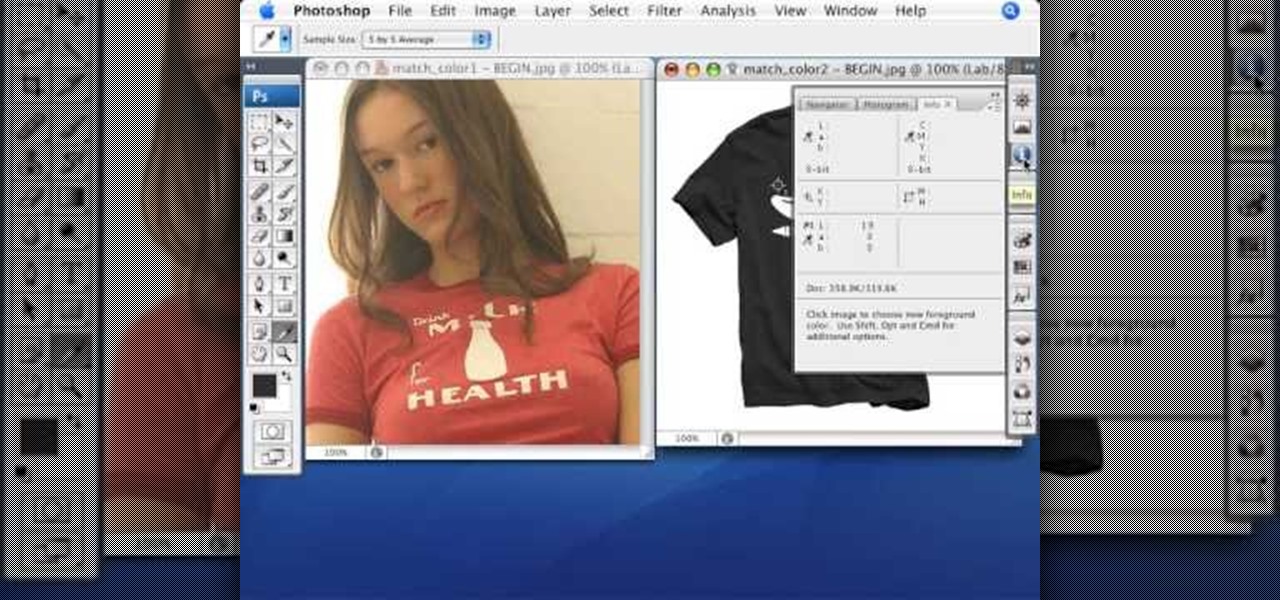
Match the color of objects on Photoshop. Take a picture of your self of one shirt that the shirt is on different color mean while choose the black tea shirt because it the traditionally one of the harder colors, change the image mode to the lab color for both images then use eyedropper tool and expose the info pallet select the neutral part of the image i.e. red. Hold down shift then we can see the icon changes then add contrast to it by hue saturation present in the layer pallet.
For all you women out there who do not fall into the normal categories, Anna Saccone offers some styling tips for both tall and petite women. For petite women, Anna suggests that you should wear just one color in order to elongate your body and fool people into thinking that you are taller. If it is not possible to wear simply one color, it is suggested that you have a 2 to 1 ratio of color in your outfit and that the colors do not clash too much, as this will seem to cut your body in half, e...
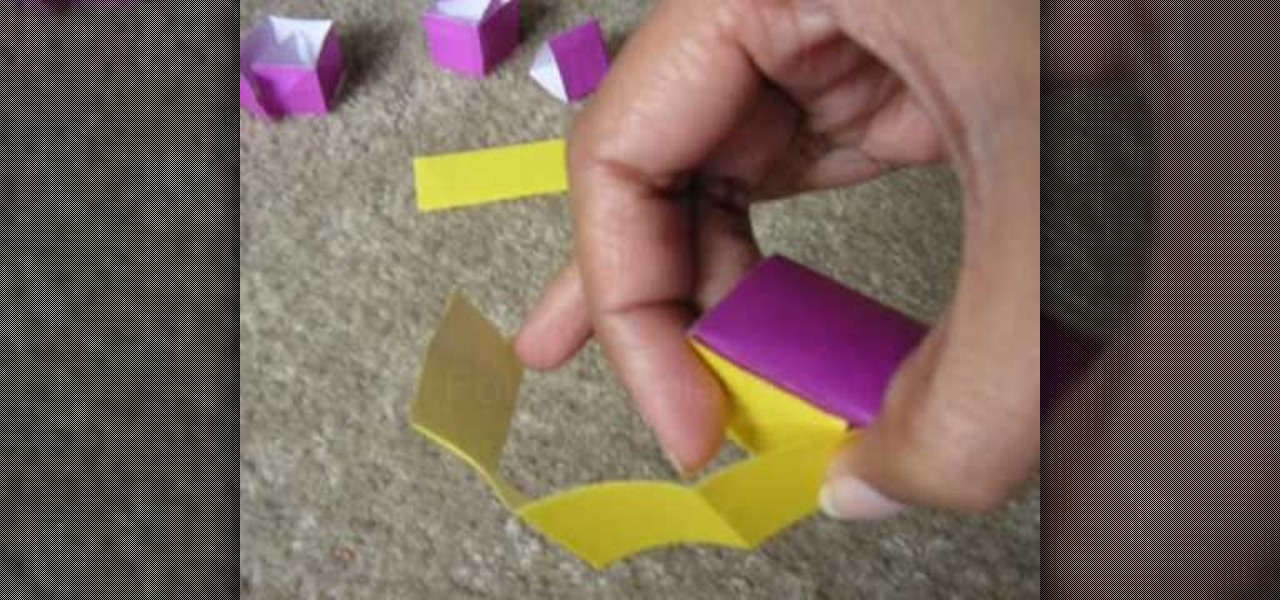
This video explains how to make an Origami Icosahedron (designed by Heinz Strobl) using 50 strips of paper. You need 20 strips of a single color for the triangles and 30 of a contrasting color to connect the triangles.
If you're not much of a drawer, you can still get the look of a detailed drawing simply by taking a picture and using Photoshop's tools and filters to transform it into something that looks drawn by hand.
As the premiere app for chatting and video calls, it only makes sense for Skype to provide a dark theme to help prevent eye strain and minimize battery drain. Not only that, it has to also keep pace with popular messaging apps like Facebook Messenger that also have the feature built-in.
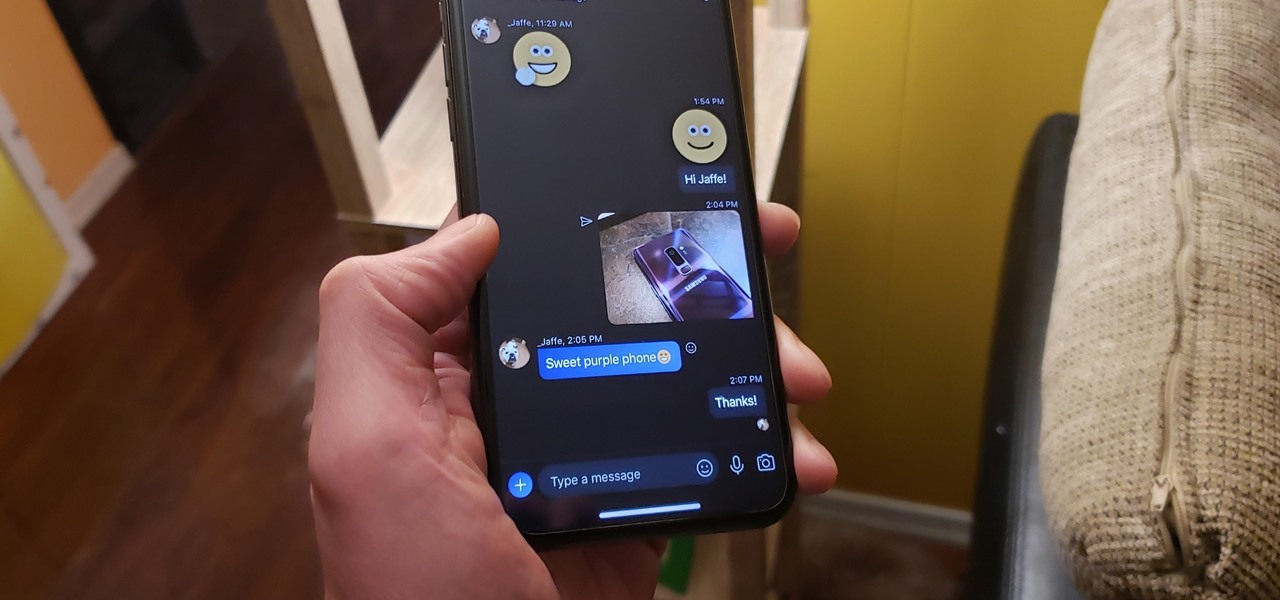
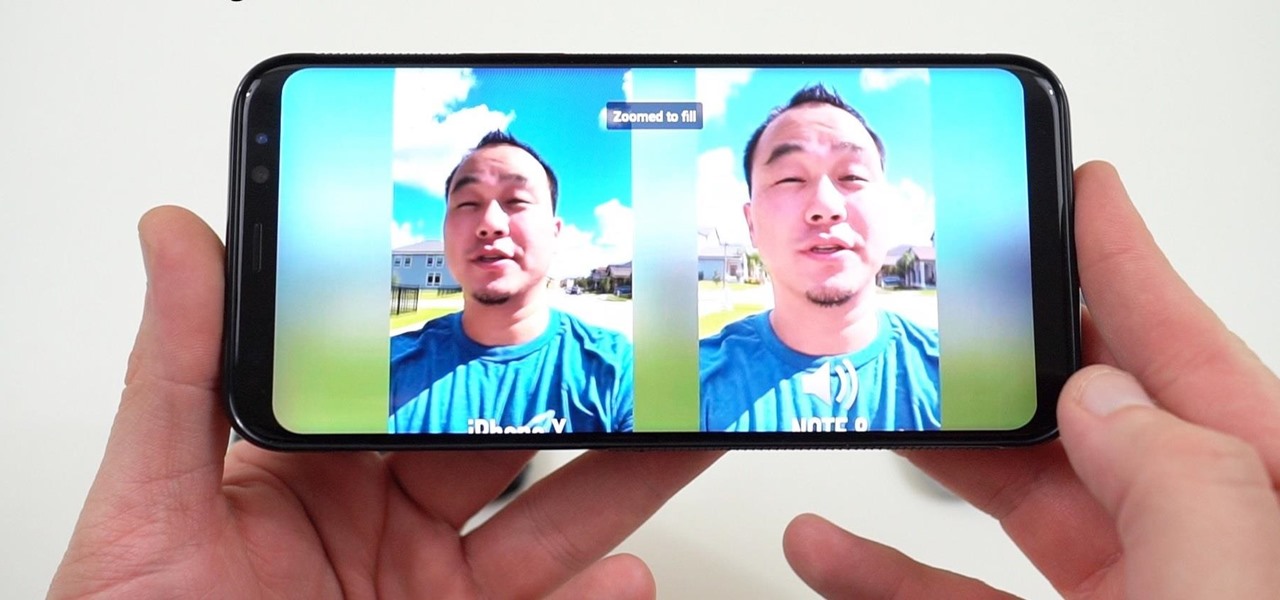
Google launched the Pixel 2 XL with a unique pinch-to-zoom feature in the YouTube app. The feature is pretty basic, allowing users to expand the video to full-screen on devices with 18:9 aspect ratios with a simple pinch gesture. Considering its simplicity, it was strange that the feature was limited to the Pixel 2 XL. Today that exclusivity has ended as the feature is rolling out to the Galaxy S8, Galaxy S8+, Note 8, LG V30, and LG G6.
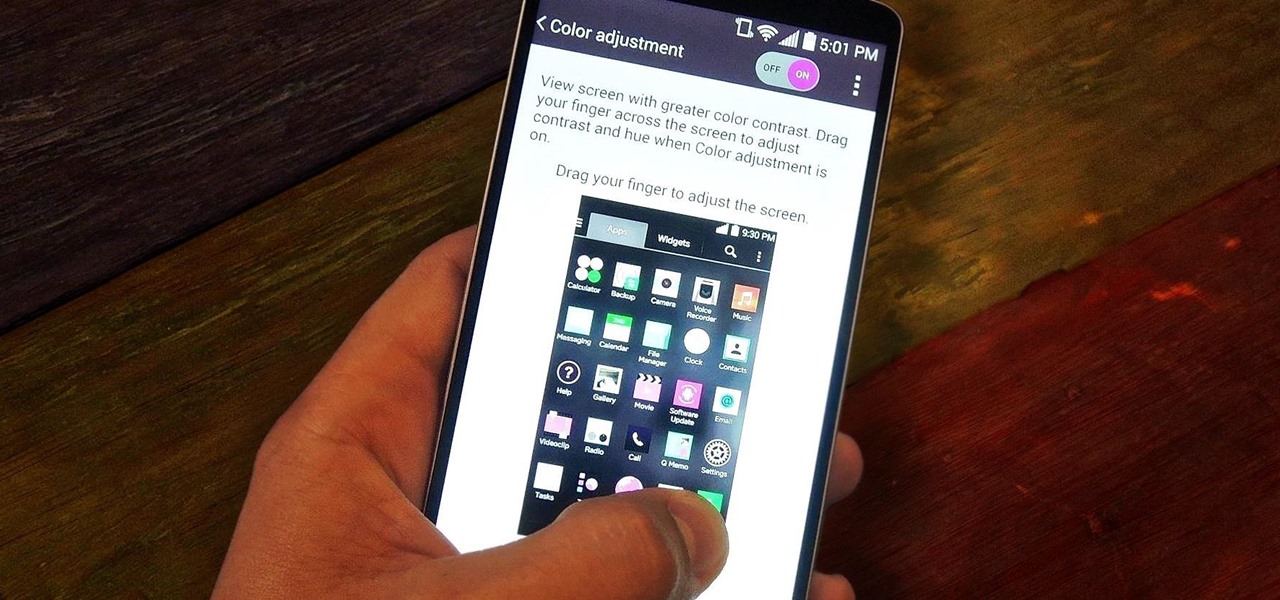
The first thing you probably noticed after turning on your LG G3 for the first time was its gorgeous Quad HD display. The G3 is the first device to offer the soon-to-be standard QHD screen, and it's a beauty. That being said, the colors can look flat and dull, especially when compared to my previous device, the Galaxy S4.
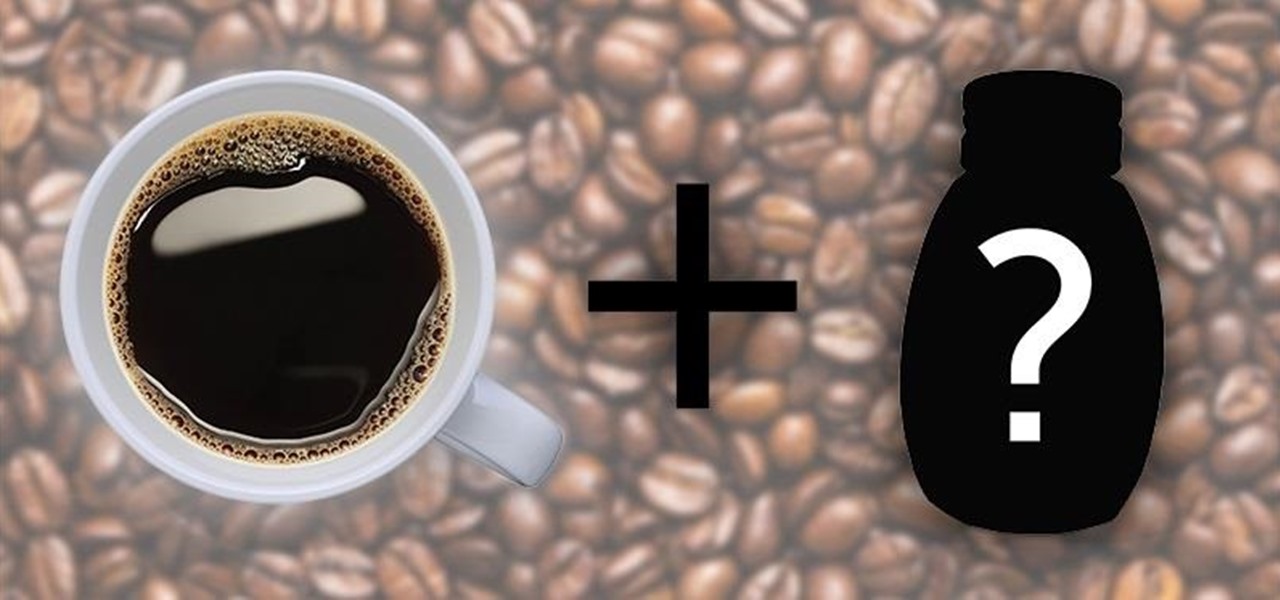
Finding the formula to the perfect cup of coffee for your taste can take a while. I finally got around to buying a French press a few weeks ago and I'm still tweaking the right ratio and brewing time to get it just right (though I am drinking it at the right times each day).
Tired of the Instagram wave? If you're sick of having to view the world through low-contrast and sepia-toned filters, there's a way to get them back to how they're supposed to look, and it's called Normalize, which undoes the magic filtering that Instagram and similar photo filter apps provide. The process of un-Instagramming your (or anyone else's) photos with Normalize is perhaps easier than Instagramming them in the first place. All you need to do is copy and paste them into the app and wa...
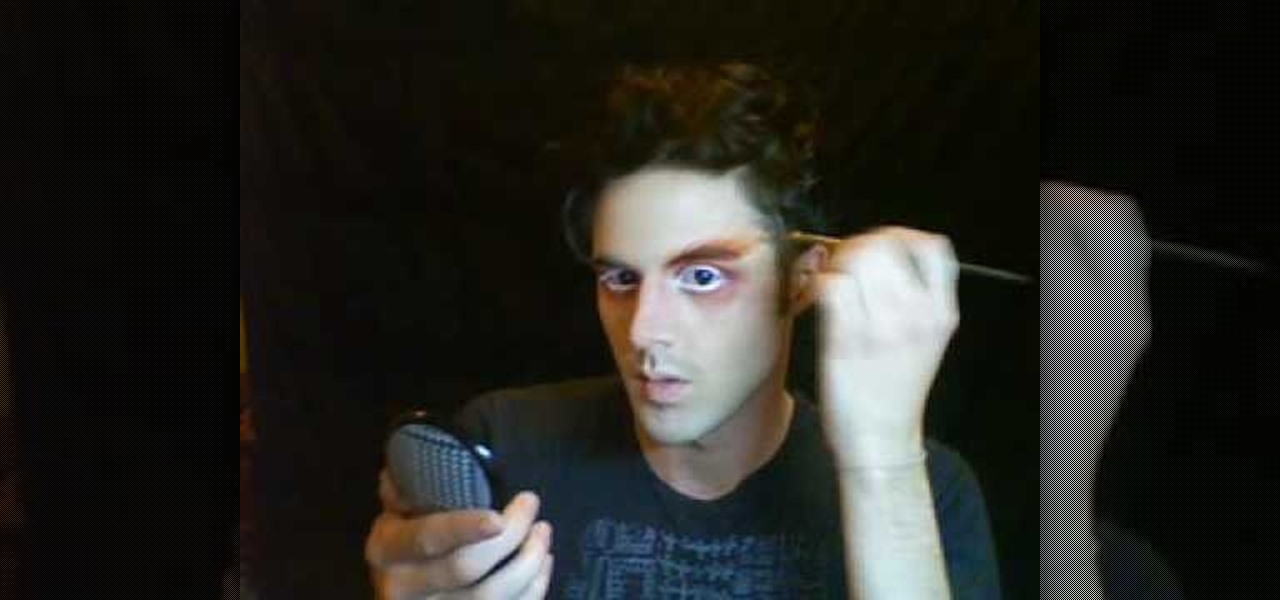
In this video, Logan Salter teaches us how to apply Mad Hatter makeup for Halloween. Start out by applying white eyeliner to the tops and bottoms of the eye, then apply it to your eyelashes until they are white. From here, apply orange eyeshadow underneath your eyes and to the tops of the lids. Blend this outward from your face and then add in a darker orange to create a contrast. Next, apply a pink shadow into the crease and under the eyes. Apply the orange shadow to the brows, then brush it...
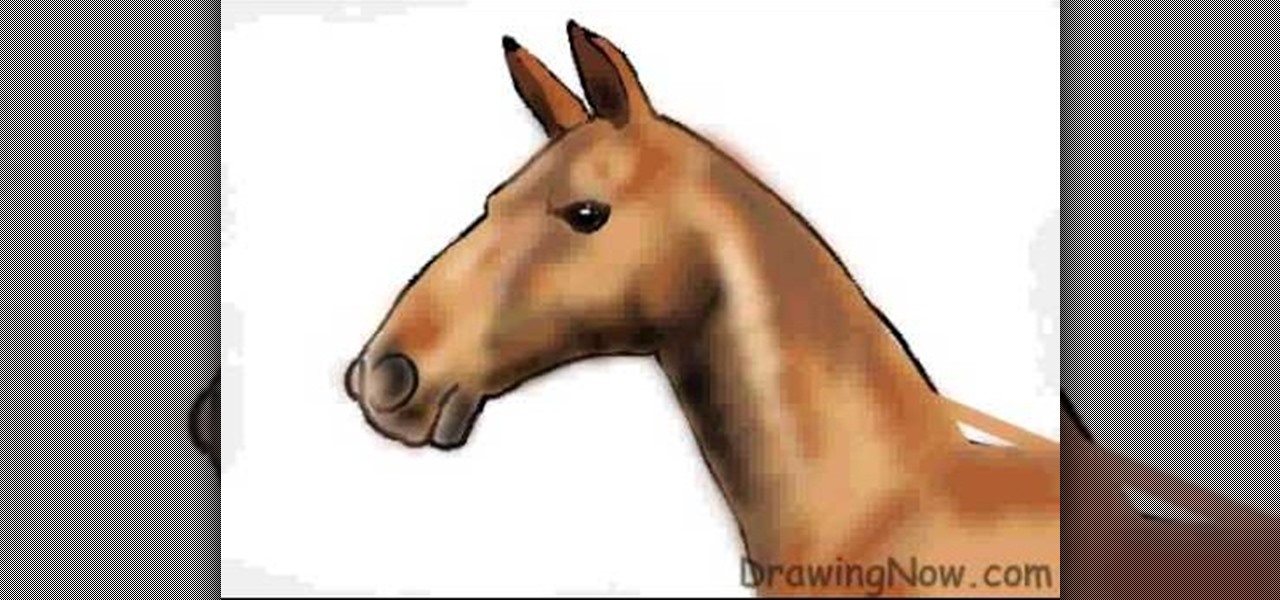
In this tutorial, we learn how to draw the head of a horse. Start out by drawing the outline of the horse's head and the neck. Then, draw in the ears and the details for the nose and the face. Next, color in the horse and then add shading along the sides of the horse and fill in the features with black. Use different colors of brown to show a contrast between the colors on the horse. After this, you will use small lines to create hair on the horse, then add in additional features. Clean up an...
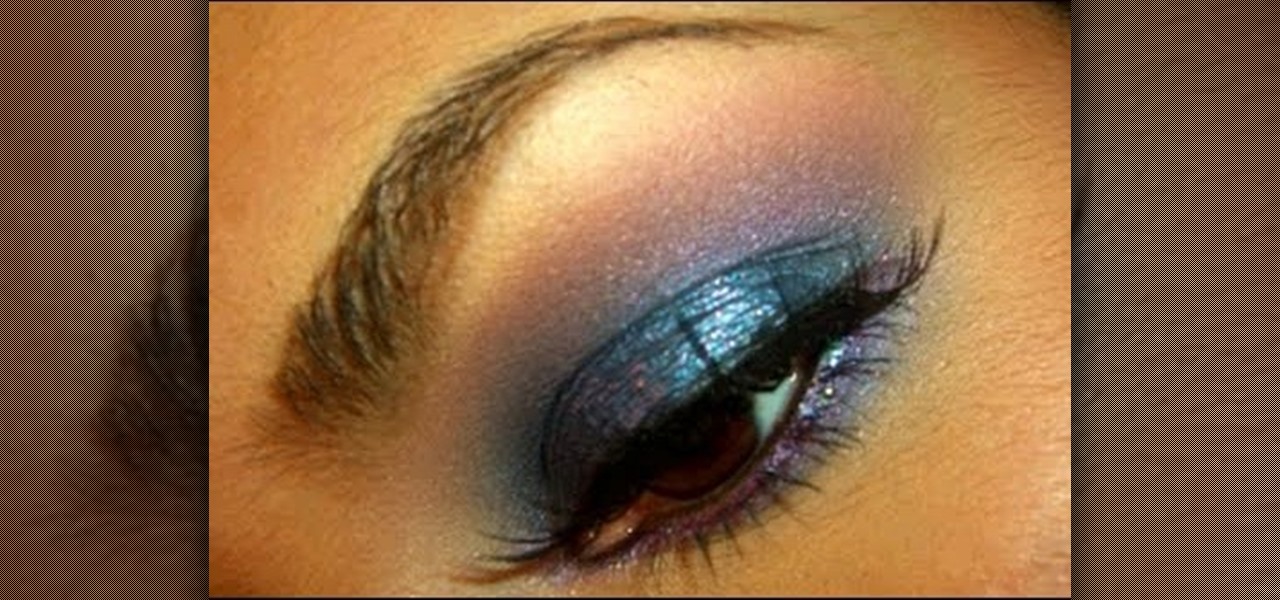
Though it may not seem like it, blue eye makeup is one of the most universally flattering shades out there. We're not talking robin's egg blue or any of the lighter shades of blue; rather, we're thinking a deep, dark navy or an electric, sparkly teal.
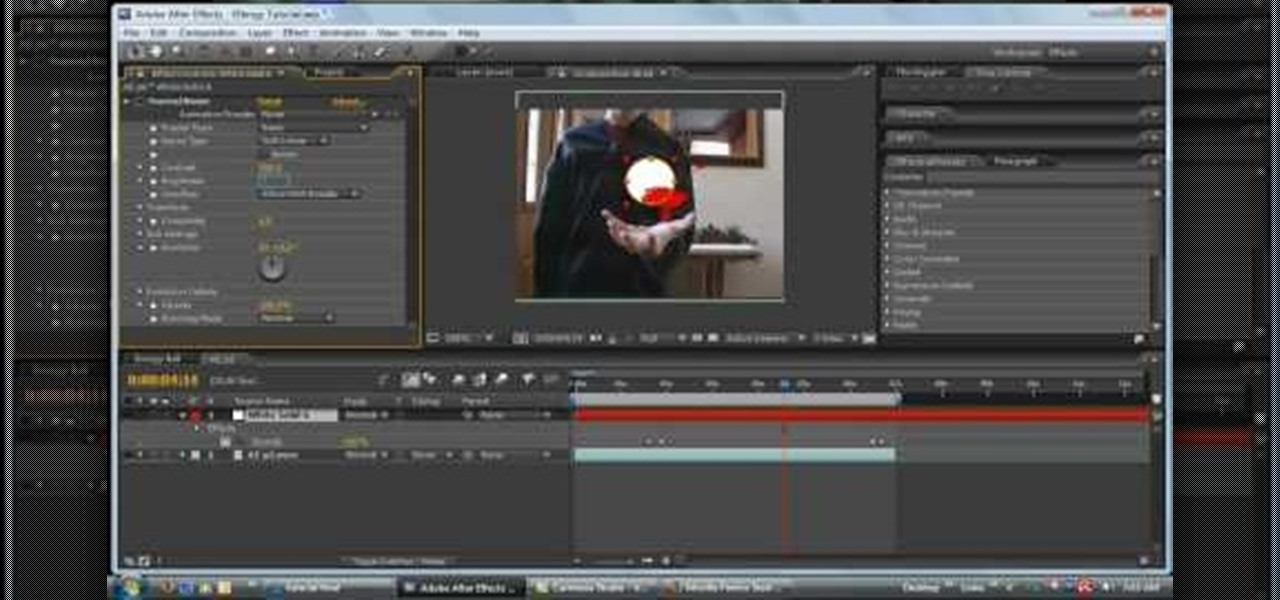
In this tutorial, we learn how to make an energy ball in Adobe After Effects. First, load a movie of someone pretending to hold an energy ball in their hands. After you do this, you will select a new setting and change the color. From here, you will select a round circle tool and add it where the hand looks like it's holding it. Then, change the effect to make the ball move around with the hand. After this, add the tracker to the hand and position it with the hand. After this, change the cont...
In this tutorial, we learn how to create a Lomo effect in Photoshop. This is a contrast that gives the photo a "cool" vibe and change up the effect that you see. First, load up your picture into Photoshop and then go to adjustments, then curve. From here, add a slight s-curve and then add a green channel with the same s-curve that you just created. Go to the blue channel and create the opposite s-channel from the others, then click "ok". Now, go to layer, new adjustment layer, then gradient m...
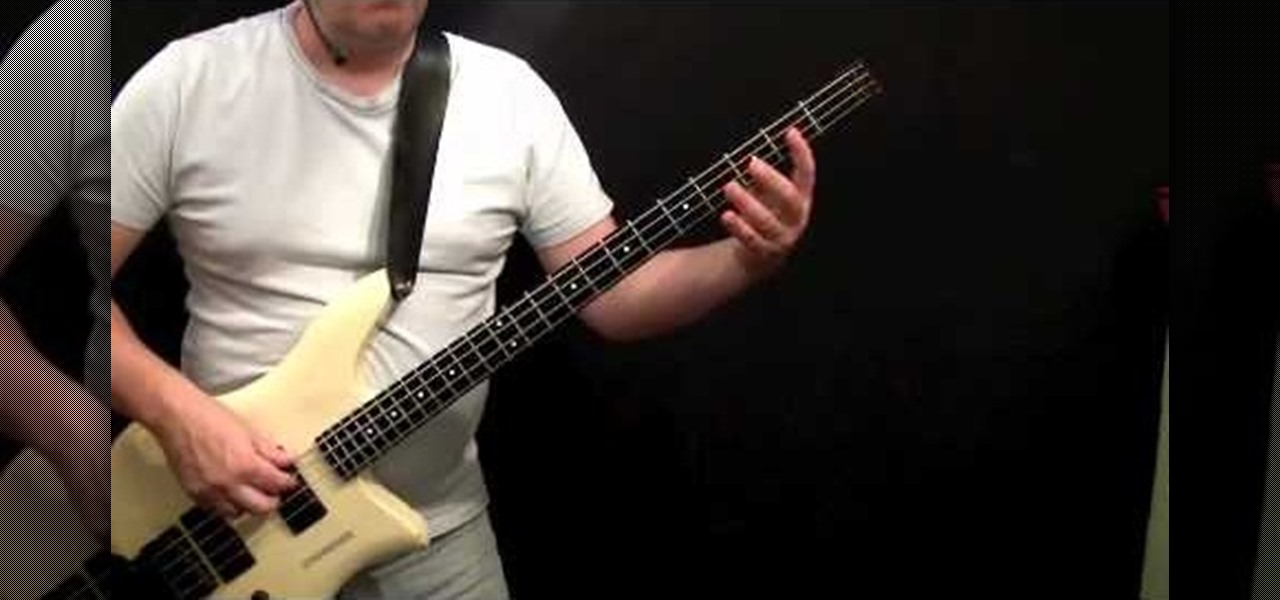
Bass players definitely don't get as much love as guitar players when it comes to glory and mainstream music popularity. After all, the base is the low-sounding, harmonizing complement to the lead guitar's riffs, offering a nice contrast but getting obscured in the process.
In this tutorial, we learn how to draw an eye in GIMP. First, open up the GIMP software and set up a circle, then color it dark blue. Next, add in light to the middle of the eye, so it looks like a light is shining onto it. After this, make a small circle in the middle of the eye, coloring it black. When done with this, create a new layer and then add brightness to the pupil of the eye. Continue to play around with the contrast and colors of the eye, so it looks more realistic and life like. ...
In this video tutorial, viewers learn how to find the length of a triangle using sine. This task is very easy, fast and simple to do. This formula can only be done on right triangles. Begin by finding the angle first and figure which trigonometric ratio to use. Then find which sides are given. For sine, users need to divide the opposite and hypotenuse of the triangle. Then cross multiply it with the sin degree to find the length of the triangle. This video will benefit those viewers who are s...
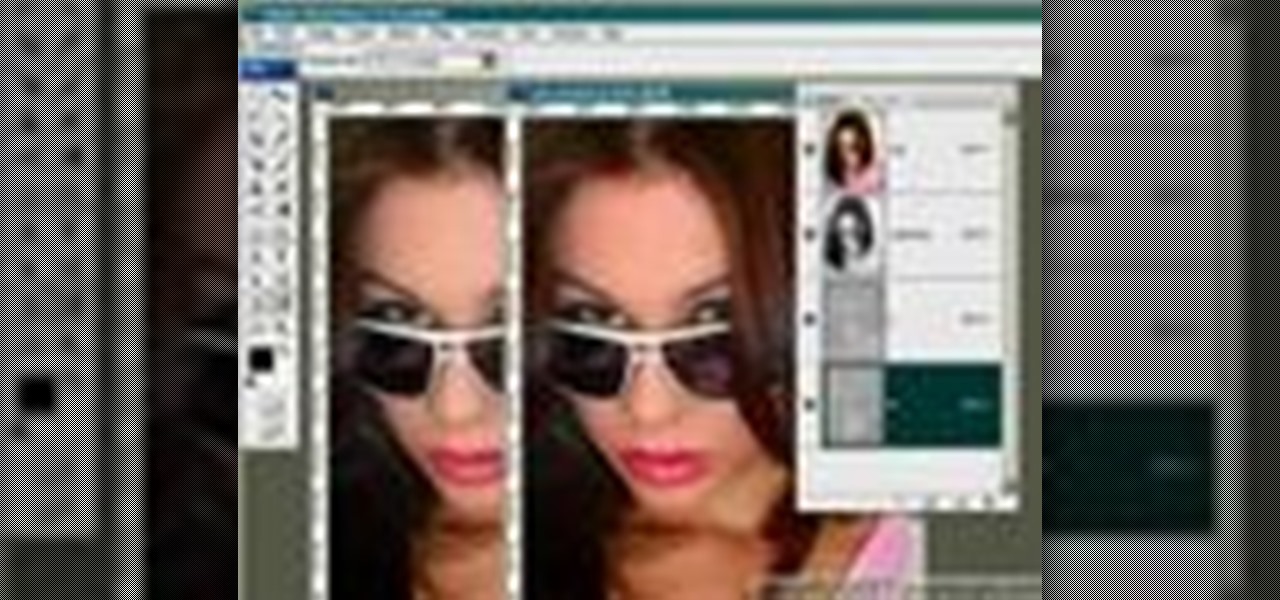
This video tutorial is in the Software category which will show you how to "Photoshop' someone into an image. It is like cutting and pasting one image over another. First open both the images. Ctrl and click the person's image that you want to move over. Drag the cut out image over the other picture where you want to superimpose it. Then click "edit', resize, rotate and position the image where you desire. Then go to "Image Adjustments' and adjust the brightness and contrast to match with the...
In this video, we learn how to change the color of clothing in Photoshop. First, click "enhance", then "adjust color", then "saturation". Now place a magnetic lasso around the shirt color you want to change. You can now use a slider to go through all the different colors, and pick that one that you want to use in the picture. Play around with the saturation, hue, and brightness to change what the color looks like in the picture. If you want to add more contrast, it will look more real like it...