With the introduction of programs like Photoshop and Illustrator, now more than ever, people have the ability to be as creative as they want when it comes to almost anything. From manipulating pictures to creating professional looking images from scratch, these programs can be used as powerful tools. In this tutorial, you'll see on of them in action when you find out how to create OSX icons using Adobe Illustrator. Enjoy!
There aren't any words in the silent instructional tutorial video, but if you watch carefully, you'll learn the exact steps necessary to create a phenomenal looking shooting star or comment with nice looking special effects that are achievable in Photoshop. First you'll select a circular region with the selection tool, then you fill it with white. Next you'll use brush settings to create a brush stroke that straight and fades over time to create the comet's tail. Then you'll use Photoshop's l...
This video tutorial tells you how to create a free VPN with the website itshidden.com. The first step in creating your VPN on itshidden.com is to make an account on itshidden.com. Register with your own username and password. Then when you've made an account log in to it so that you can use the rest of the website. Next you go to control panel, and then network setup. Then you will have to click through the instructions in order to create a new network. Next you will have to create a new conn...

In this video, we learn how to create a picture frame on a photo using PhotoShop. First, open up the program and open the picture that you want to change. Next, select the rectangular marquee tool from the toolbar on the side. Now, create a selection of what you want to frame. Then, click with the right key and select "inverse". Click again with the right key and choose "layer via copy". Now, click 2 times on the layer to open and the layer style menu will show up. Now put the contour to crea...
This video is a tutorial on creating an Icon Logo in Photoshop Cs4. Go to File and open a new document. In the Layer option, set up a new layer and give it a name. Using the pen tool, create a shape for your logo, it can be anything you like. When you have the shape you want, right click and select Make Selection. Now you can fill the shape with a color. Press ctrl+U for the Hue/Saturation option to get the exact color that you want.
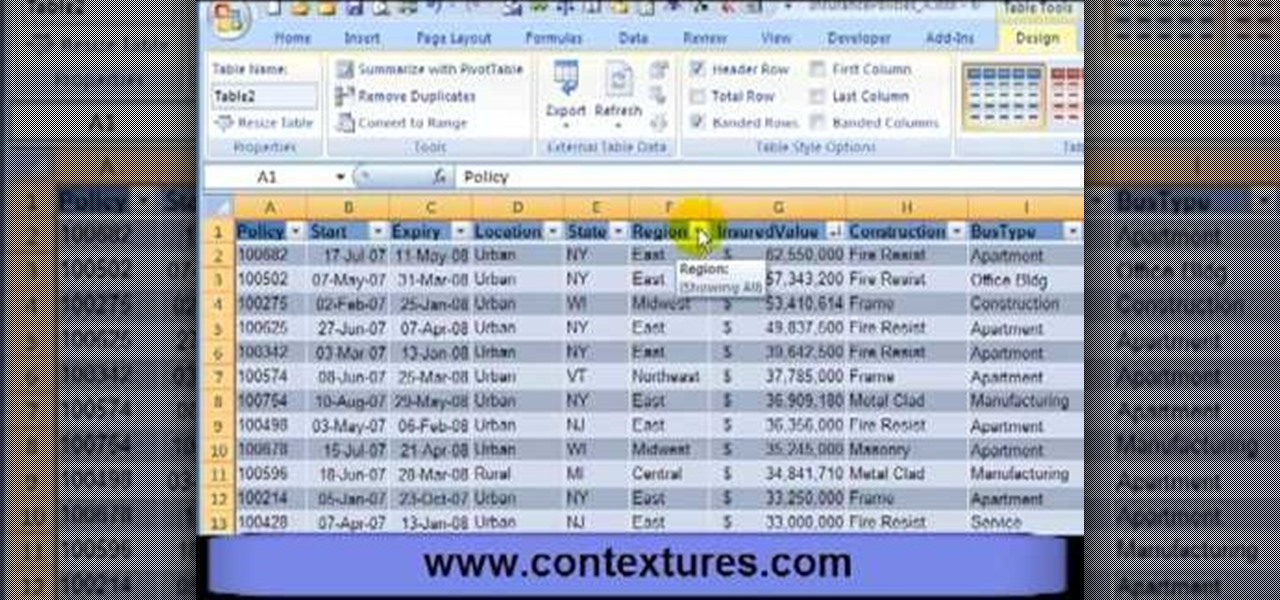
First, open the Excel worksheet you have previously created that you would like to create a table for. Click on any of the cell that contains data for your table. On the menu found on the upper portion of the application, go to the Insert Tab. Find and click Table. Your entire worksheet will now be selected. When a prompt window appears, click OK. Your table should now be created automatically.

In this video tutorial, viewers learn how to make a real flame text in Adobe Photoshop. Begin by opening a flame image in the program and select the text tool. Type in the text and position it over the flame. Now go to Select and click on Load Selection. Once the selection is created, delete the letter. Then select the marquee tool. Right-click above the selection and select Feather. Now create a new sheet and fill it in black. Using the move tool, drag the selection to the new sheet. Go to F...
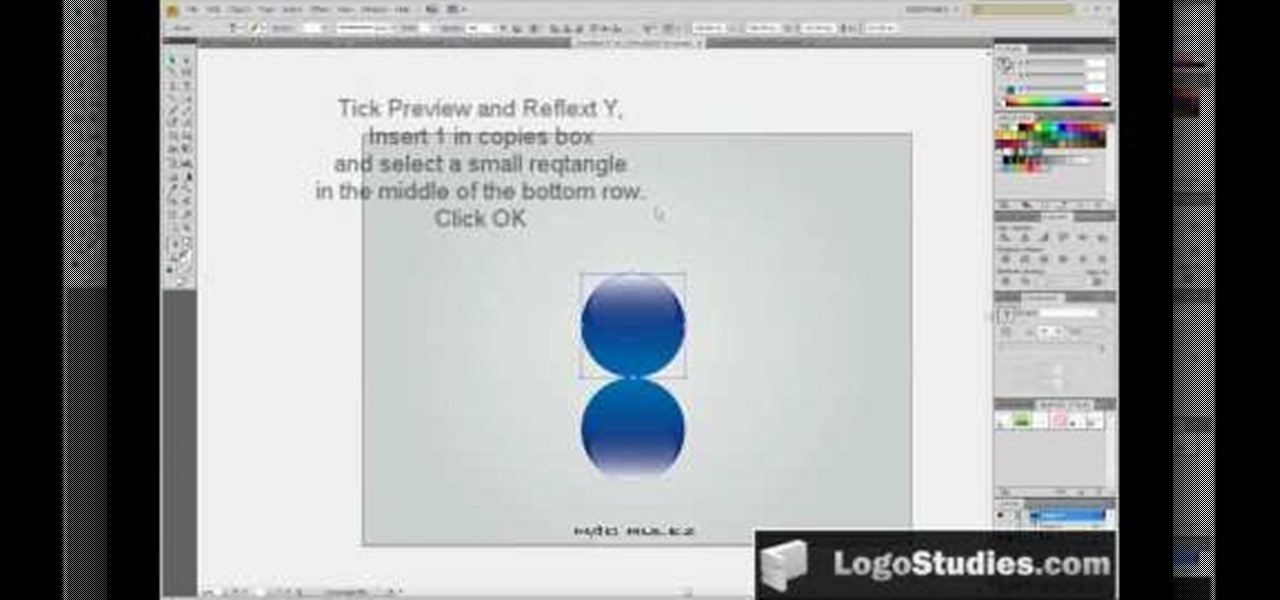
In this video tutorial, viewers learn how to create a 3D sphere and reflection in Adobe Illustrator. Begin by using the ellipse tool and create a circle. Select the black and white gradient, and drag the colors that you want into the gradient panel. Now hold the Alt key and draw a smaller circle inside. Fill it with white/transparent gradient. Select the sphere and go to Object/Group. Now go to Effect/Distort and Transform/Transform. Tick the Preview and Reflect Y, insert 1 copies box and sel...
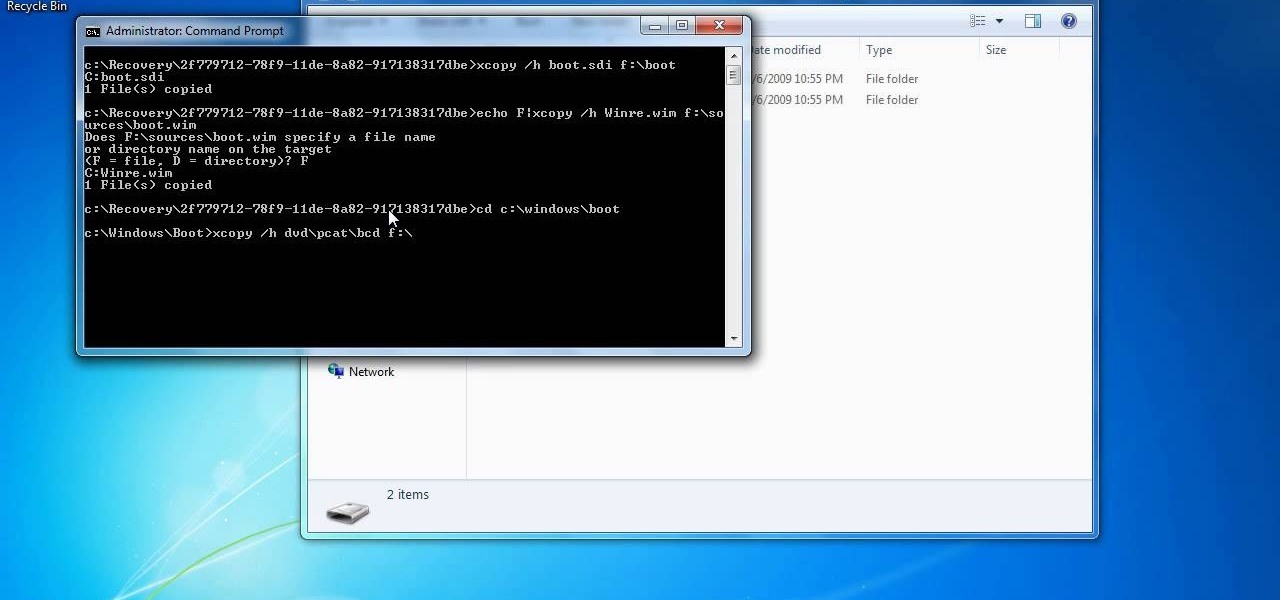
In this how to video, you will learn how to create a system repair disc on a bootable USB flash drive without having to burn a CD for your Windows 7 system. First, plug in your USB drive and create new folders in it. Name the first folder boot and the second sources. Next, open a command prompt and type in the cd c:\recovery, dir /a:sh, and so forth as shown. Once you have typed in the proper commands in the prompt, eject the flash drive. Restart the computer with the drive plugged in. Boot f...
New to Microsoft Excel? Looking for a tip? How about a tip so mind-blowingly useful as to qualify as a magic trick? You're in luck. In this MS Excel tutorial from ExcelIsFun, the 2nd installment in their series of digital spreadsheet magic tricks, you'll learn how to create charts via keyboard shortcut as well as how to create dynamic charts with cell references.
To create glossy or reflective vector image, you will need to know how to use the offset options in Adobe Illustrator and the basics for pathfinder. You will be creating a vector image that can be resized without hurting its quality. To start select you text style, which be glossy for this. You will have first a white layer, a shadow, a radiant layer, a white outline and a shadow going underneath. In this video the Oh Gizmo Logo! is being used as the template. Right click create outlines. You...
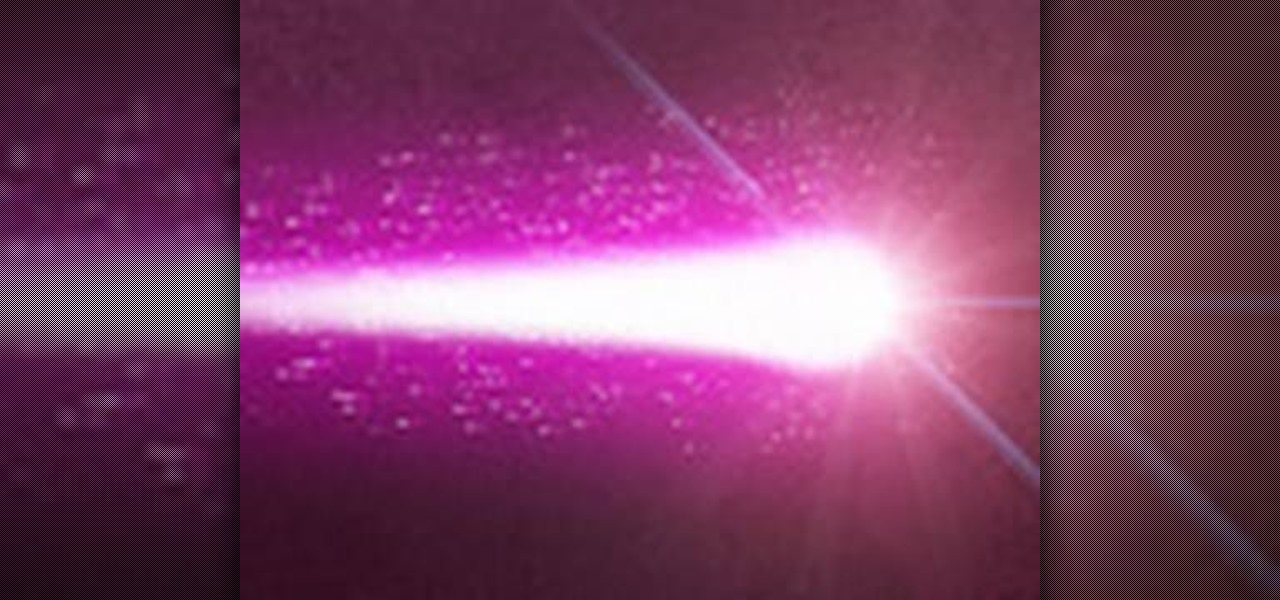
This how to video shows you how to create a nebula star scene in Photoshop. First, create a new image in Photoshop. Fill the background with black. Next, create a new layer and call it stars. Go to filter and select noise. Choose Gaussian and click monochromatic. Click okay to add the noise. Once that is done, go to adjustments and levels. Change the settings so that you have less clutter. Next, make a selection in the middle. Copy and paste it as a new layer. Go to edit and select free trans...
Creating customized brushes is really useful when using Photoshop and is not difficulat to do at all!
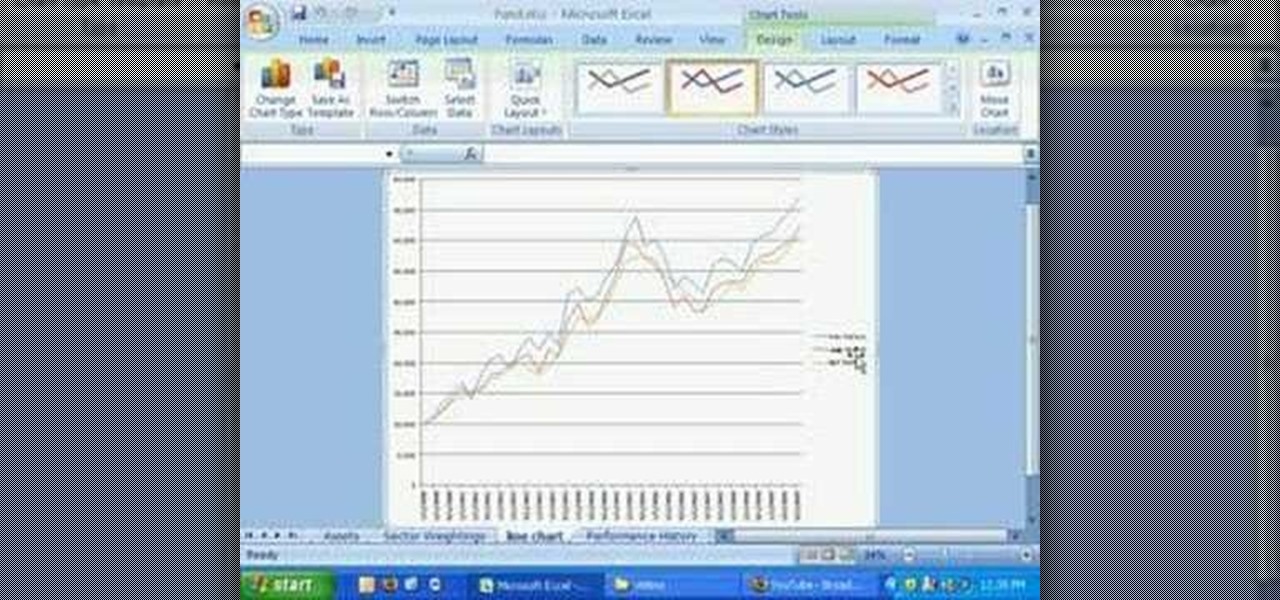
Namuoc demonstrates how to create a line chart in Excel. To create a simple line chart in Excel 2007, first highlight the cells in your worksheet that you would like to include in the chart. Then, select the insert tab on the top of the worksheet toolbar. Next, click on the line option. Select the two dimensional line graph option from the given choices. Move the chart to a new sheet. Label the new sheet in the appropriate field and click the OK button. Your line chart will now be created usi...
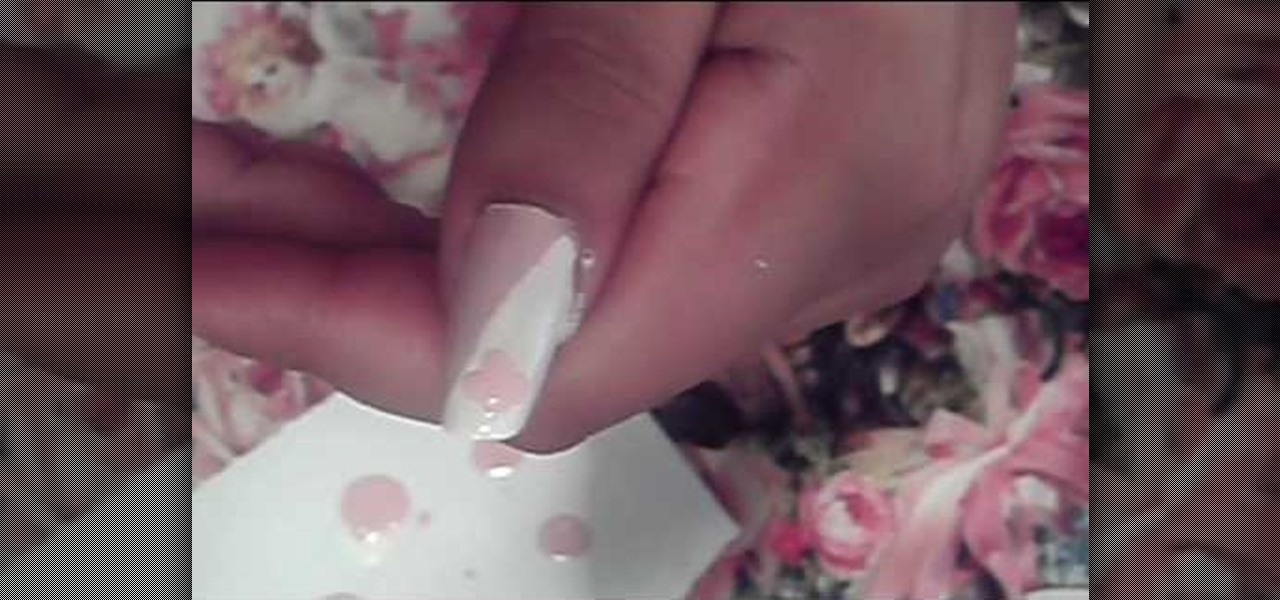
Love4Nails demonstrates how to paint nails with a pink and white sparkly design. First, apply a hydrating base coat. On top of the base coat, apply the color of your choice like a light pink color. Then, create the side swipe which is about half of the nail. Create a straight side swipe in a white color. You may need to do two coats. Then, create a flower with the background color on the white polish. Add a pink rhinestone to the flower. Repeat the technique making a white flower on the pink ...
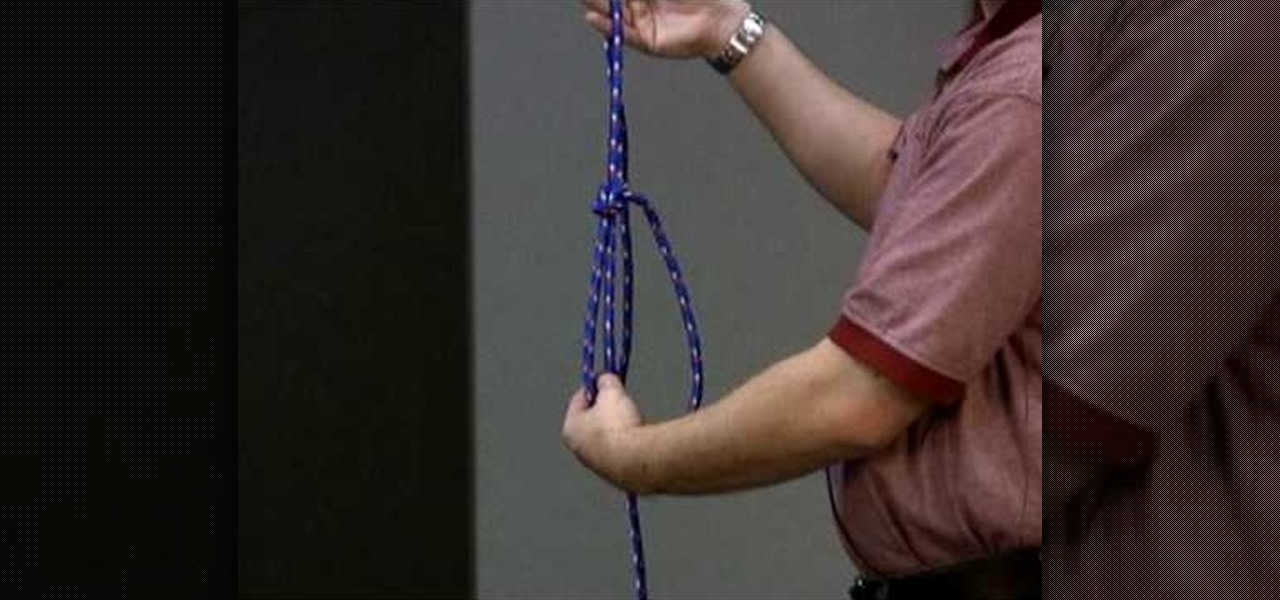
This video describes and shows you how to tie a loop in the end of a rope with a bowline knot. A bowline knot is used in rigging by the ground rigger to create a point for the up rigger to have a point to pull up. This is how you create a bowline knot. First you must create a loop in the middle of the knot. With the free end, come up through the loop, then you go around the standing end of the rope and then you move it back through the loop. You pull the knot tight. That is how you create a b...
IShowU and Shiny White Box demonstrate how to create still image effects in Final Cut Express. First, place your scroll bar in the front of the timeline and click on the clip so that it is selected. Then, click on the motion tab in the preview window. Hit the keyframe button in the scale option. Create a keyframe also where you'd like the effect to stop on the clip. Adjust the line. When you now play the clip, the image's size will be adjusted as you have designated. You can use the same tech...
In this video Jesse Liberty demonstrates how to create user controls dynamically (at run time) and how these user controls can raise events to interact with the page that creates them. This is a step by step, extensive tutorial on exactly what you'll need to know when using Microsoft's Silverlight. This is a detailed, easy to follow video, to help you use the program, and all it entails.
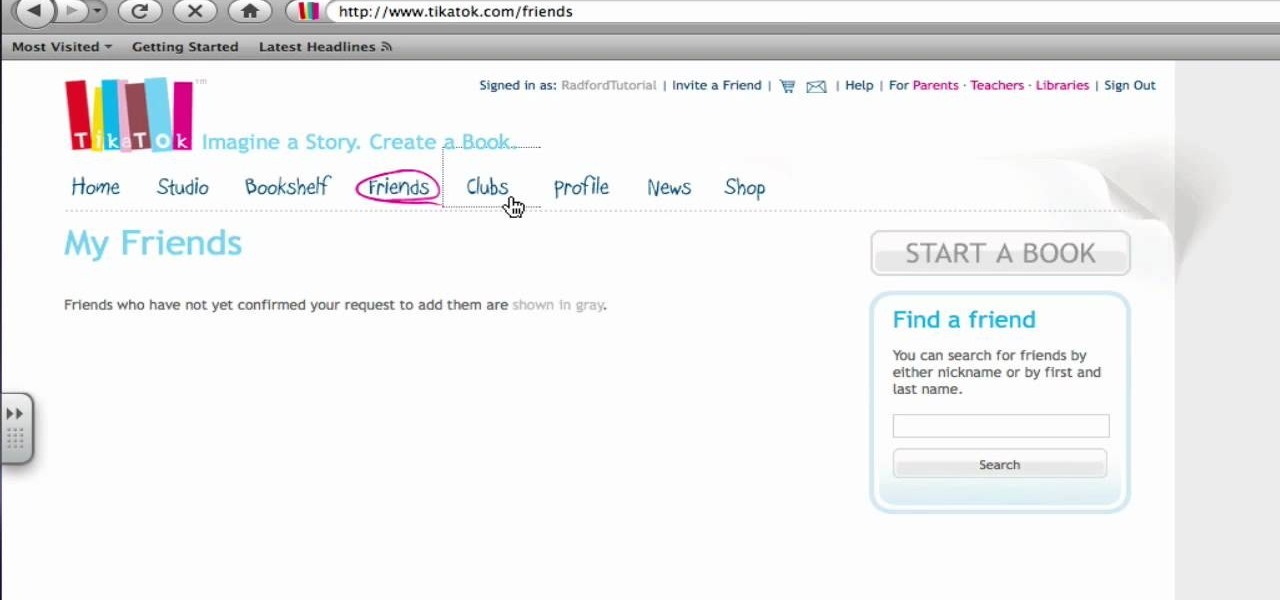
If interested in writing a story this two part tutorial will introduce you to Tikatok. You will learn the basic navigation and setup of the web site. Tikatok allows you to create and publish your own storybooks online. This program is ideal for allowing anyone to be creative and come up with their own ideas for stories.
StampinMama1 demonstrates how to add ink texture effects to your scrapbook projects. When creating backgrounds for your scrapbook pages, you can use ink to both create texture and create interesting effects on the layout. Press the ink on the paper to use a direct to paper ink application technique. You can create cool effects like waves using this technique. Don't swipe the pad around or smudge it onto the paper. Instead, drag the ink pad in a motion of waves across the page. Start at one ed...
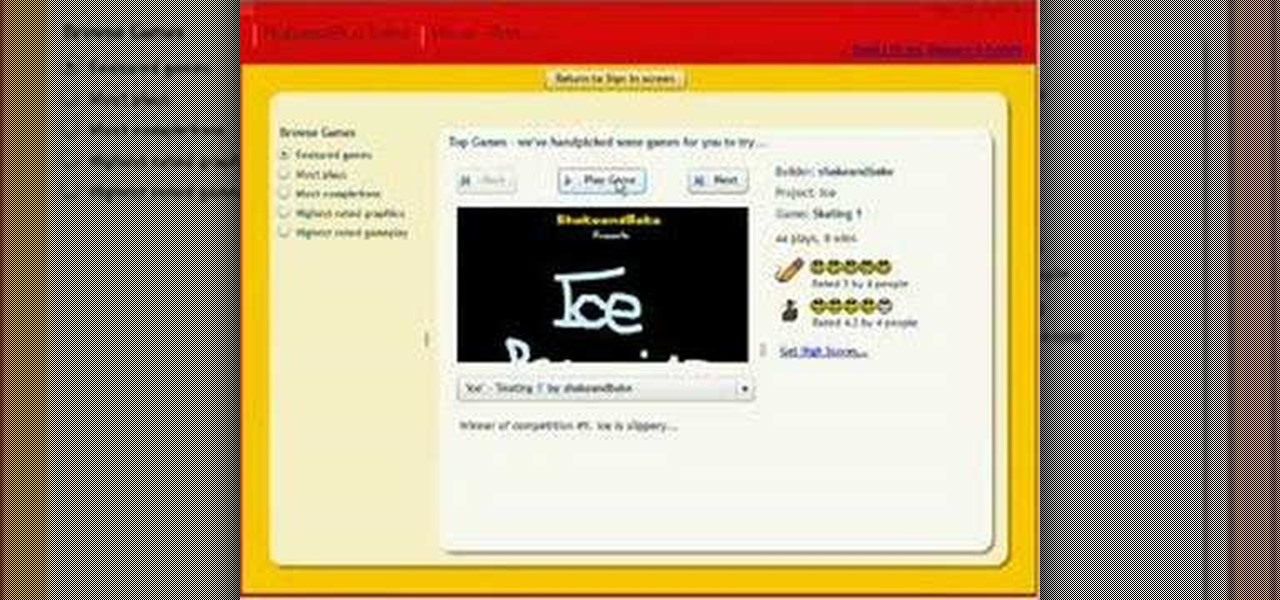
In this demonstration video, learn how to make flash games using My Game Builder. This program will allow you to create your own games for yourself and your friends. The program is free to use at My Game Builder. Once you launch this web page, you will be able to do three things: Play games, browse other users' games, or make games. Under Play Games, you will find different game types as well as featured games. Under the Browse feature, you can see how other people are creating games. Lastly,...
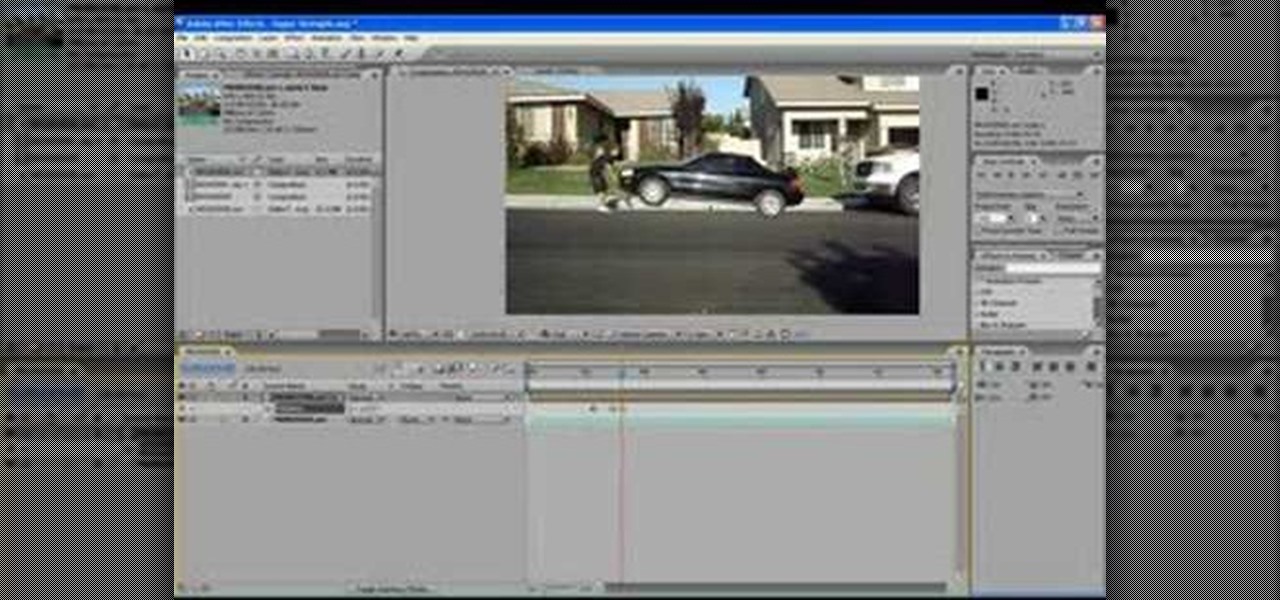
The end result of this tutorial is a video of a person lifting a parked car. The tutorial demonstrates how to create this super strength effect using Adobe After Effects. It is part of a series made by ajones8126 of super hero effects for Copilot.net. First, the narrator, AJ, creates a still from a clip of the parked car using time stretch. Then he trims a clip of himself "lifting" the absent car. He masks out the car, and pre-composes it into the other clip. The car is then carefully rotated...
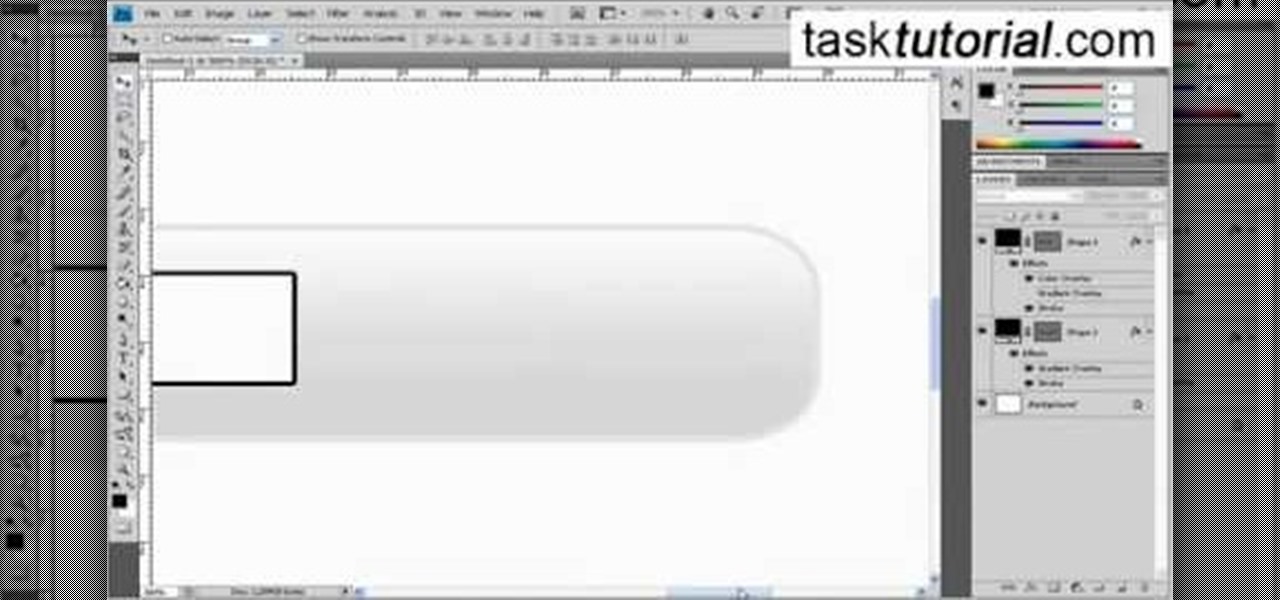
In this video you will learn how to design how to create a license plate in Adobe Photoshop. To do that that just follow these instructions: Create a new file with 1000x1000 px. Then create a new layer, pick a white color and make a rectangle with the rounded rectangle tool. Use the Rectangular Tool to create a new rectangle on a new layer like in the video. Now color the rectangle and merge the layers. Add the effects for the layers and make a new layer to create the stars for the license pl...
This video shows the viewers how to create a simple but well done Halloween text in GIMP. Starting from a simple white background you will end up creating a creepy text perfect to use every year on the 31st of October . The video is actually a easy to learn walk through , showing your each and every step you need to make . Advance users but also beginners can benefit from this short clip . At the end of the video you will surely create the type of text you usually see only in horror movies su...
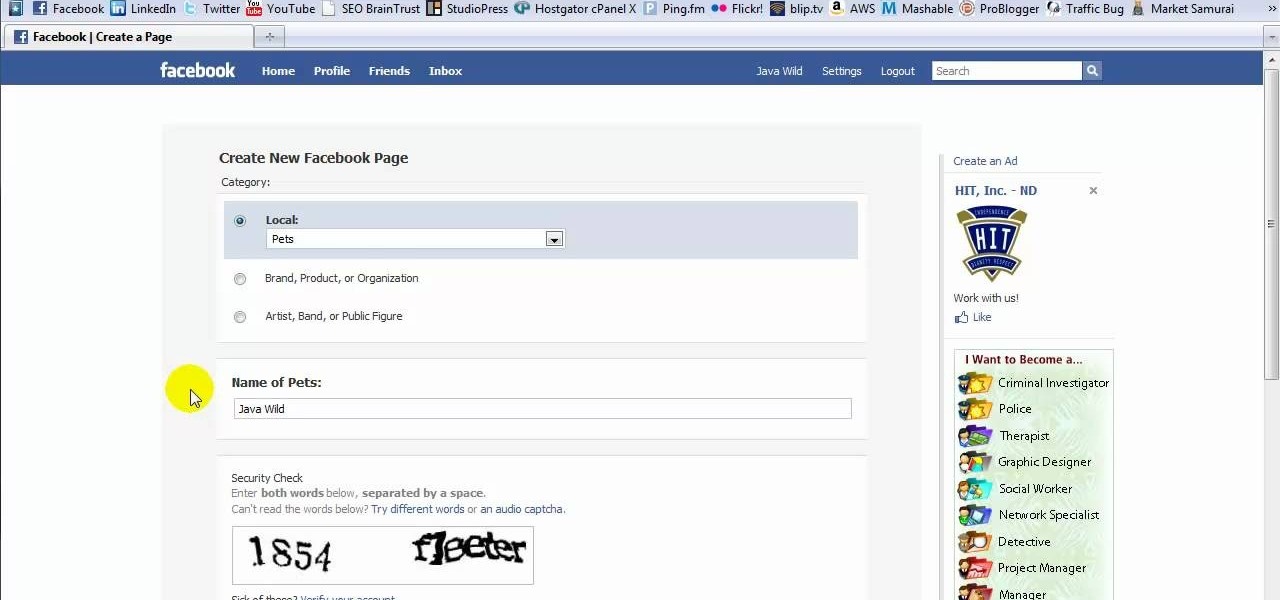
This tutorial is in response to mail to Facebook. Scott Wilde leads you through the process. You can start by creating a brand new profile page. In this case, Mr. Wilde created a profile page for his dog Java Wilde so he could have a fresh new page without having to alter his initial profile page. Fan pages are different than your base profile. Your base profile is not indexed, it is not public, it is private and limited to 5000 friends. A fan page is unlimited up to millions of fans and it c...
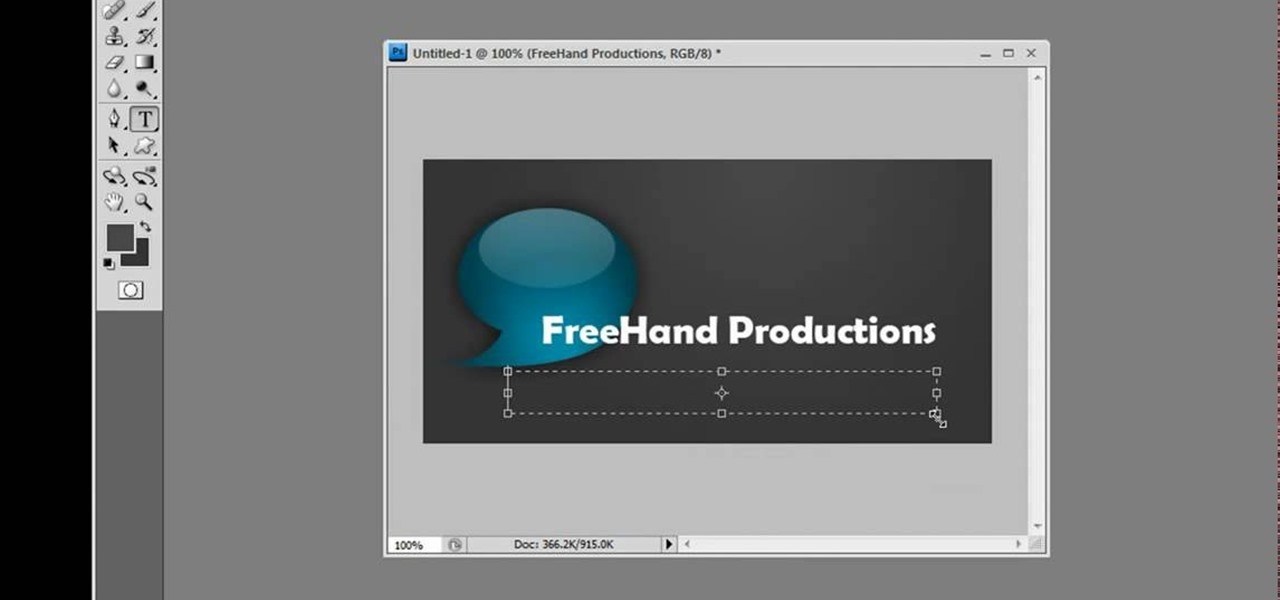
HelpTube1 teaches you how to create a watermark for your videos using Adobe Fireworks CS3. Create a new 100x100 pixels file, with a transparent canvas. Create the custom shape that you want. You can add borders and colors, but make sure you don't overcomplicate your design, as people seeing your video will not be able to decipher it. You can also add a short piece of text, preferably in the middle of your watermark. Go to file and save it as Fireworks png. You can then bring up this file in "...
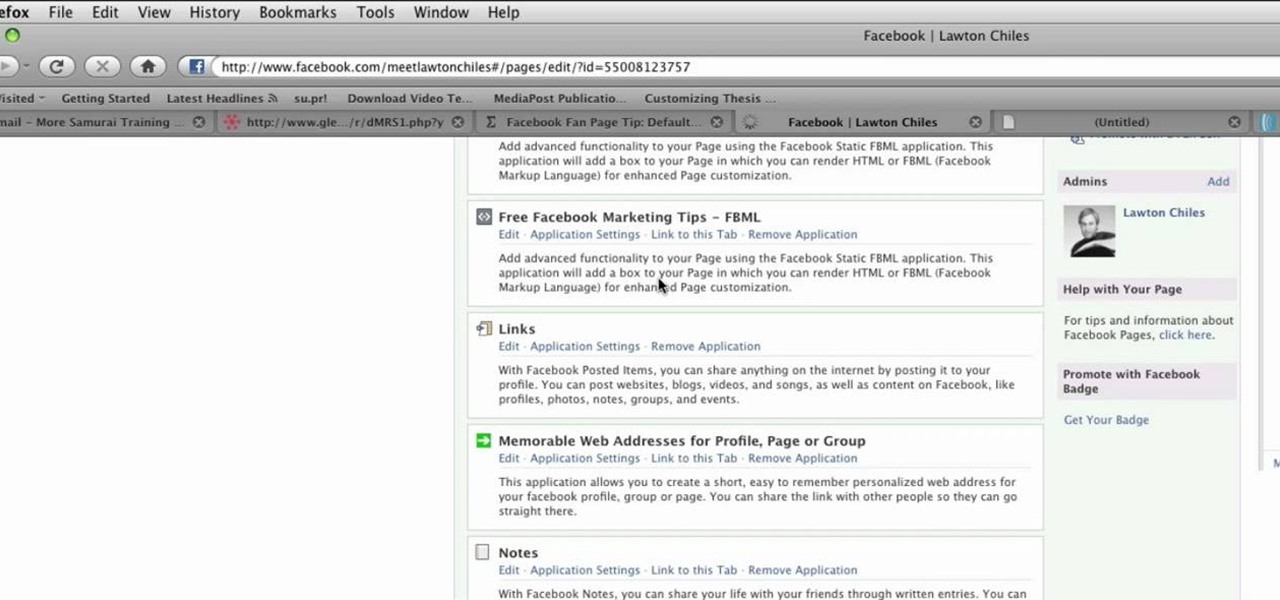
This video shows you how to make a custom Facebook Fan Page for your favorite Celebrity, Club, activity or anything you choose! First thing you must do is activate a Facebook account. Its really simple, just go to www.facebook.com and create a profile. After that type in FBML in your search bar and click on Static FBML. That application will enable you to create many different settings for your Fan page including ads and different looks and security measures for your profile. Now get to creat...
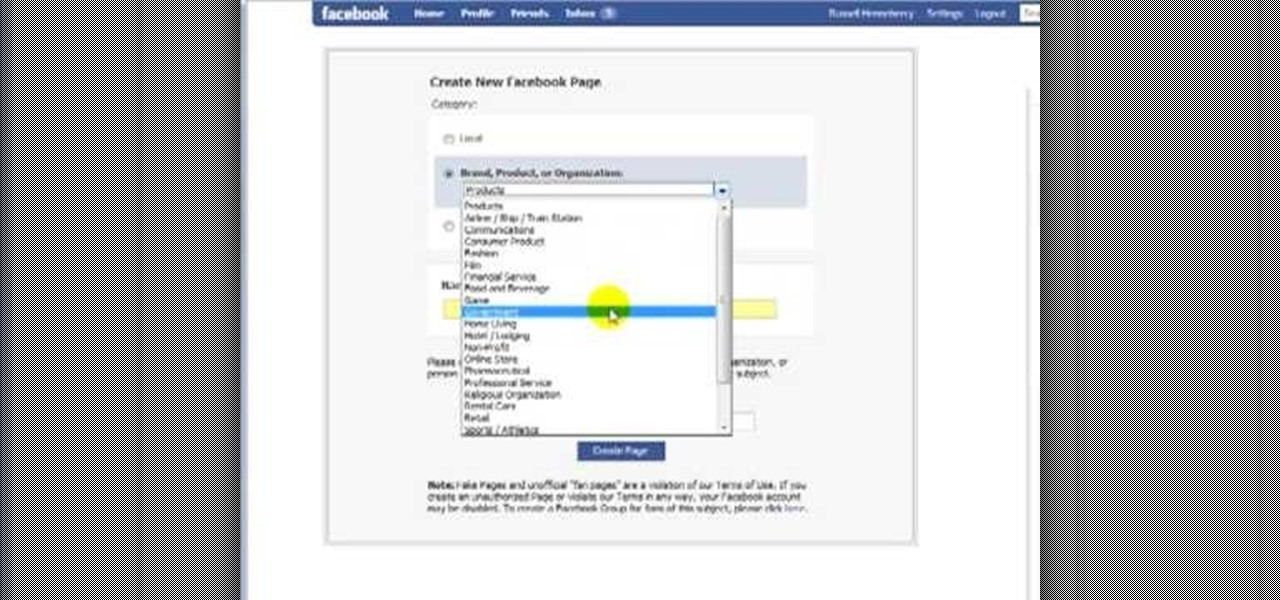
First, you must log on to your personal face book page or create one if you do not already have, but don't log in yet. Then at the bottom of the face book home page click the click here sign within the words to create a page for a celebrity, band, or business click here. Now that you are on this page log in. You will be able to select what you are. Enter name of your website, now select that you are authorize to create this page. You must then enter your electronic signature, which is the exa...
This video shows how to create a search bar in Photoshop. To begin creating a search bar you must select the template and start with a black page. The following step include choosing the color you wish to apply. The instructor explains that you must manually make your tool bar by hand and the pixels set to option five. The final step includes turning on grade in to show the program that what you are creating is an actual tool bar.
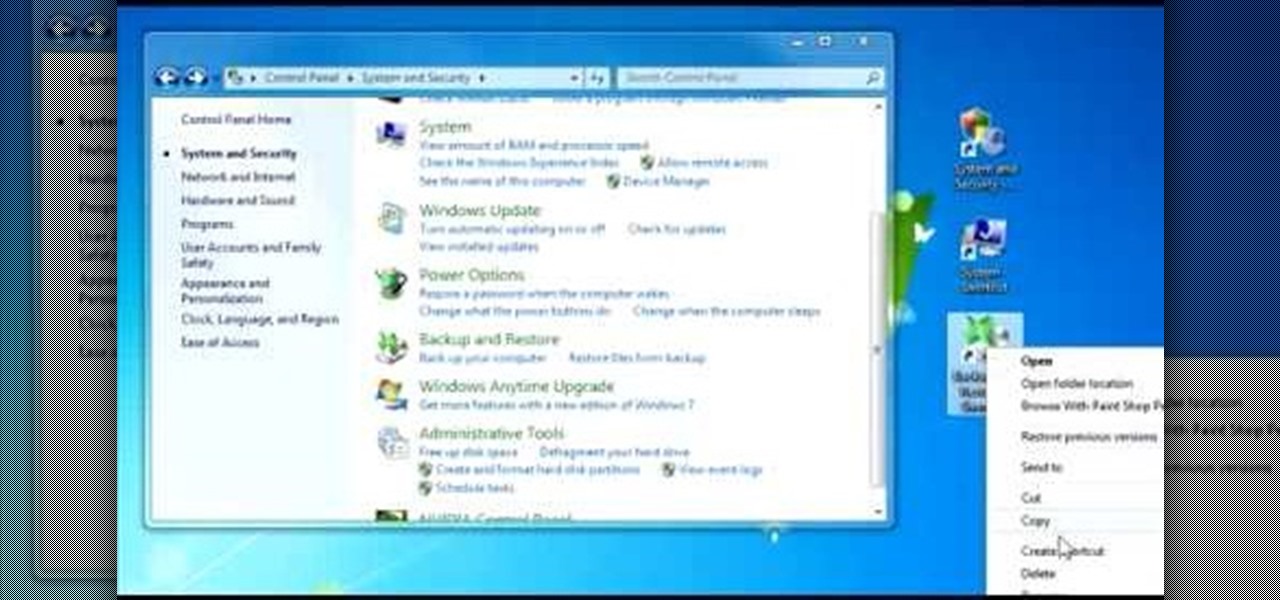
In this Windows 7 tutorial video, host Rich from PC Mech shows you how to create control panel shortcuts on your desktop in Windows 7. You will learn how to use the "drag and drop" method to quickly create shortcuts to various applications you may use quite often in "Control Panel", so that you may access them more quickly, without having to go into the Control Panel menu and drill down through menus and sub menus to find the applications you're looking for.
In this Tasktutorial video, learn how to create a button for a website using Illustrator software. To begin, create a rectangle with the rectangle tool and then make the outline gray with a stroke of 3 points. Fill this box with a gradient and change the angle to 90 degrees. A second box within this rectangle, will contain the actual text. Then follow the rest of the steps in the tutorial to show how to change the opacity and color so that the two boxes match in color. To actually animate thi...
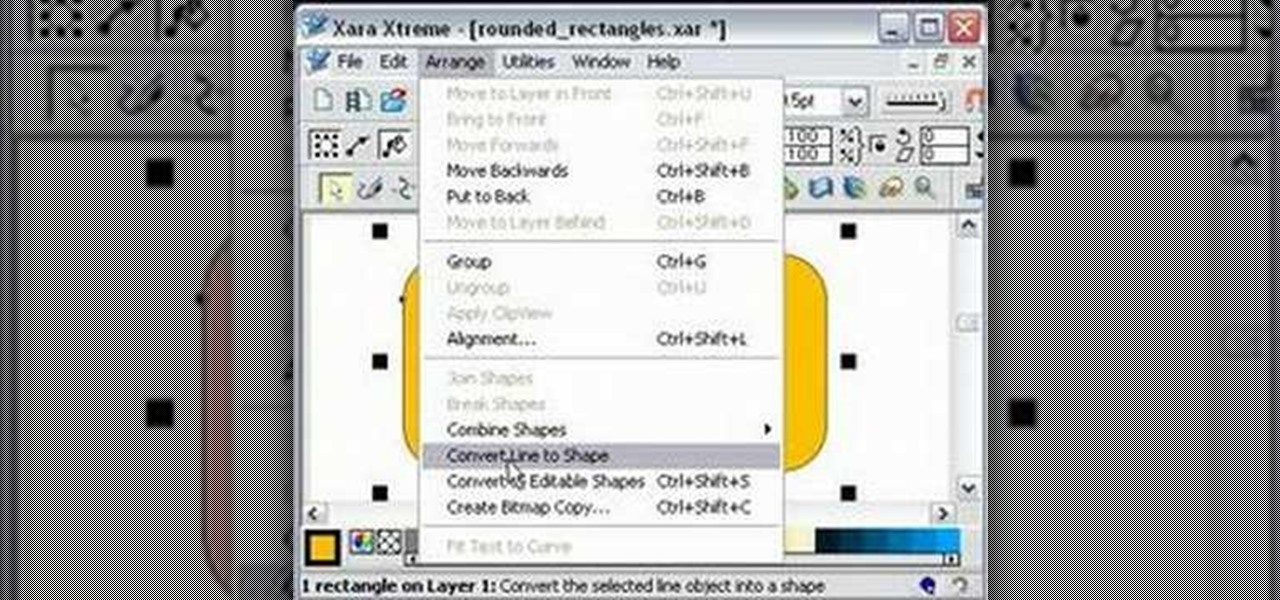
One must have often wondered how to create rectangles with smooth rounded corners. Open Xara Xtreme and create a rectangle on the stage. To change it to rounded corners, click on 'curved corners'. Then one can edit how much curve is required on the rectangle. If we scale the rectangle, then it will lose the curve path. So it should be converted to 'editable shapes'. This will maintain the curves, even if scaled from one angle. This will be helpful to create those party fliers.
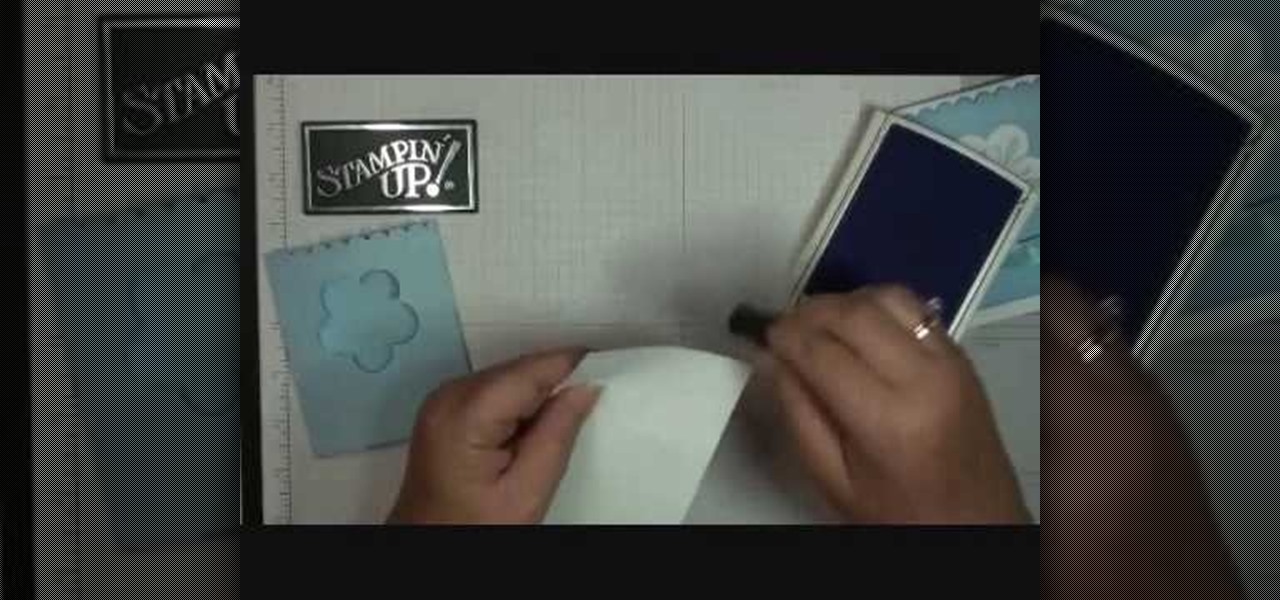
Stampin' Up Dawn shows how to use Stampin Up to create original gift card holders and sleeves in this craft tutorial. The tutorial shows how to create the Bashful Blue gift card holder. However, it should be noted that the Certainly Celery card does not utilize the scalloped edge design. The third style, Elegant Eggplant, uses ink #10510 and card stock #105126. You will need a strip of bashful blue card stock cut 4.5" by 7 3/4" scored at 3/4 and 4 1/4. Fold the score lines to create the sleev...
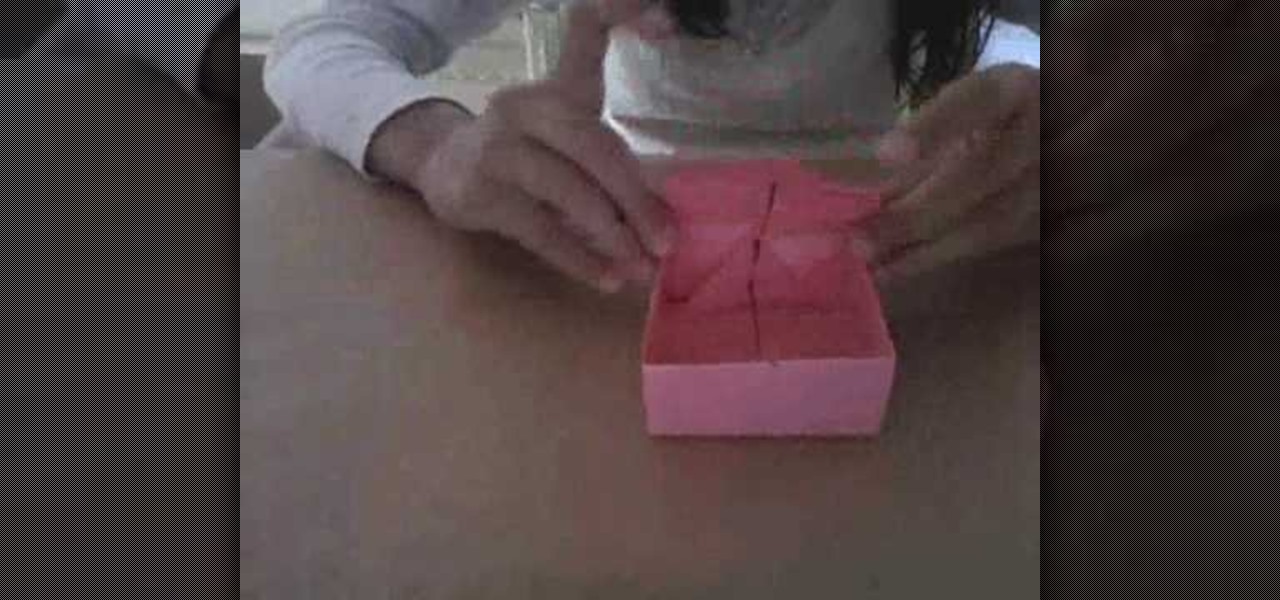
Learn how to make a paper gift box by following the steps in this video tutorial. The first series of steps shows you how to make the lid. Take an 11" by 8.5" piece of paper. You can use whatever color you want. Fold one corner toward the opposite end creating a triangular shape. Trim the remaining rectangular shape. Unfold the piece of paper and create another fold in the opposite direction. Take a marker to mark the center and bring all four corner to that dot. You will create an additional...
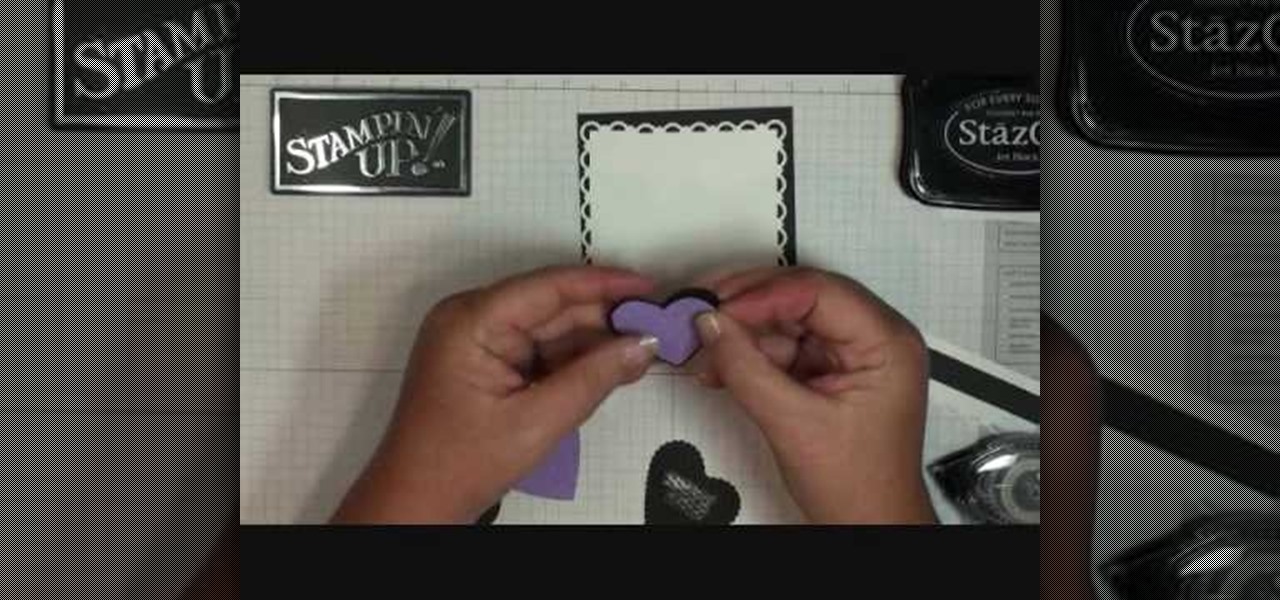
Using products from Stampin' Up you are able to create this great looking easel card. This quick and easy project uses card stock, stock lace created with a border punch, stock cutter, embossing plates, a few dimensionals, and a few other items that can be bought in the Stampin' Up kits. Each item adds it's own unique look to the creation of this easel card. The process to create these cards are sped and simplified with the kits and a variety of items can be created to add a personal touch to...
1) Create a rectangular sheet of paper by folding the left side in, like a book, about 1-inch and remove this excess paper. 2) Fold the rectangle in half, bottom to top like a newspaper, and then unfold and lay flat. Now take the bottom edge and fold it up (again like a newspaper) to meet the center crease that you made with your first fold. Unfold again. You will now have two creases in the bottom half of your paper. 3) Lift the bottom fold (bottom forth of the rectangle) up and line it up w...
Want to create the look of expensive Hollister designer jeans? Fancy department stores, specialty jean stores and boutiques sell them for outrageous prices. Now you can create them at home with simple supplies, a little practice, careful observation and some "elbow grease". The creator of this video uses common hardware store supplies to complete the task. With the help of the video's host, the right sandpaper and with the right moves, you can create all of the most common styles of Hollister...
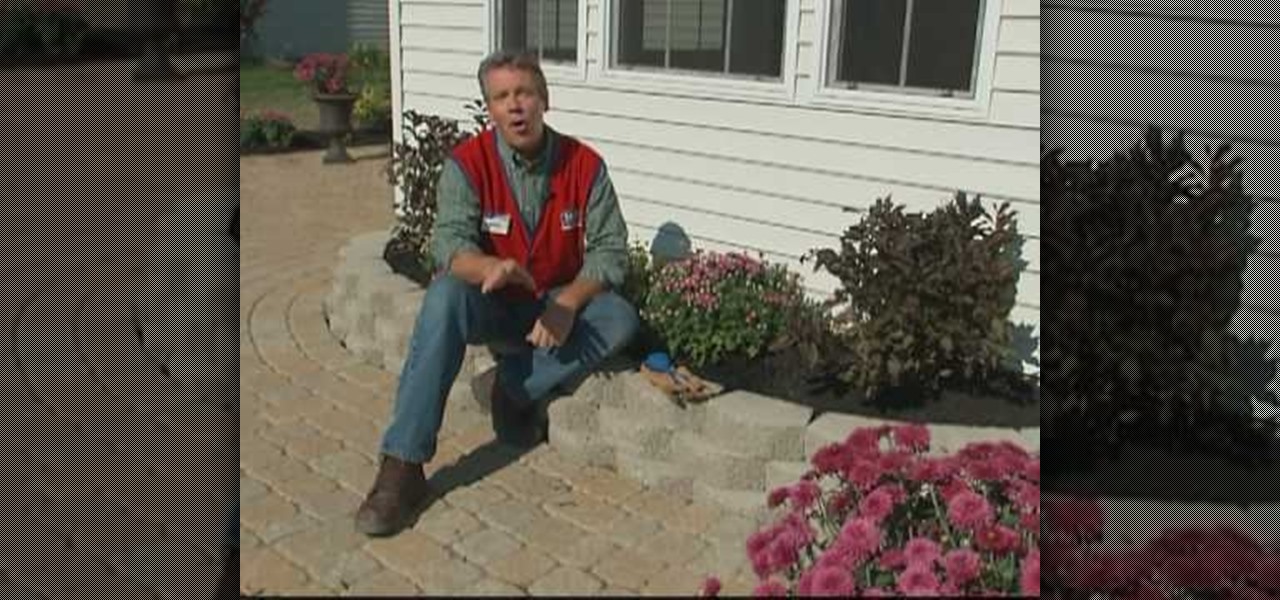
In this installment of home improvement do-it-yourself videos, brought to you by Lowe's, host Mike Kraft, one of Lowe's home improvement experts, demonstrates a landscaping technique that shows you how to create a retaining wall with interlocking wall blocks, that features a raised planter bed. Mike gives you a list of all the tools and materials you will need to create the retaining wall, and offers some tips on creating curved lines when laying out the wall.
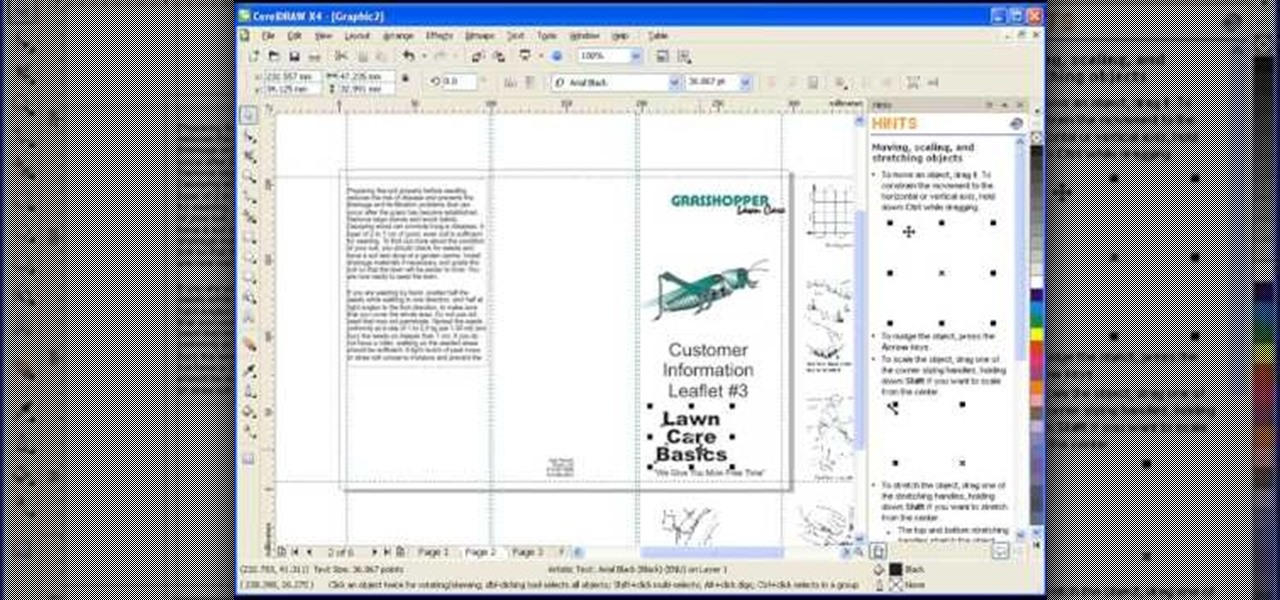
Roger Wam will show you how to creating a brochure in CorelDRAW graphics suite X4. Begin by changing your page to A4 and the view to landscape. Create a page frame and then divide it to thirds. Add a second page for a double sided print job. Remember to number pages. Cleaner brochures look better, don't change fonts all over page, and use color. Import your file to CorelDraw. After files are imported start laying them out on your brochure. Just by using a few simple tools you have created a b...
Do you want to learn how to create a comic book style cloud using Photoshop? Now you can with this video. First of all, create a blue colored layer. Next, create a few white shapes on this background. Now duplicated this layer. Go to the bottom layer and make it black. Go back to the top layer and move it a tiny bit so that the black shows. Combine the layers and now blur it. There you have it, a comic style cloud in under 3 minutes.