dewalttv teaches you how to cut nested crown molding with a DEWALT miter saw. The advantage of this position is that it doesn't require a bevel angle. The bottom of the molding should be placed against the fence. To cut the right piece, set the miter to 45 degrees to the left and make the cut. To cut the other piece, the left one, set the miter angle to 45 degrees to the right and cut. You are done. This technique is useful when you don't want to worry about setting up a level cut.

In this video you will learn how to build scrolling credits in Final Cut and Photoshop CS3. He begins by showing you how to do it on Photoshop CS3. He does this by having his own finished credits and the steps you need to take to set up your own. Then, he moves on to Final Cut and drags his Photoshop credits into Final Cut. He explains how it may be off a little in size, but you can readjust everything for accuracy. This is all done through his computer and with vocals.
Once you get started with the concept of "stair step" cards - it is hard to stop! It would be fun to try a double set of stairs, add another row for five letter words and cut letters into the bridging circles. Cut the extra panels for the front and emboss them with the Divine Swirls 'Cuttlebug' folder. Then use the Stardust 'Stickles' on the swirls to really make them pop! The extra letters from the name cutout were perfect for the envelope. Emboss the envelope with the Birthday Candle 'Cuttl...
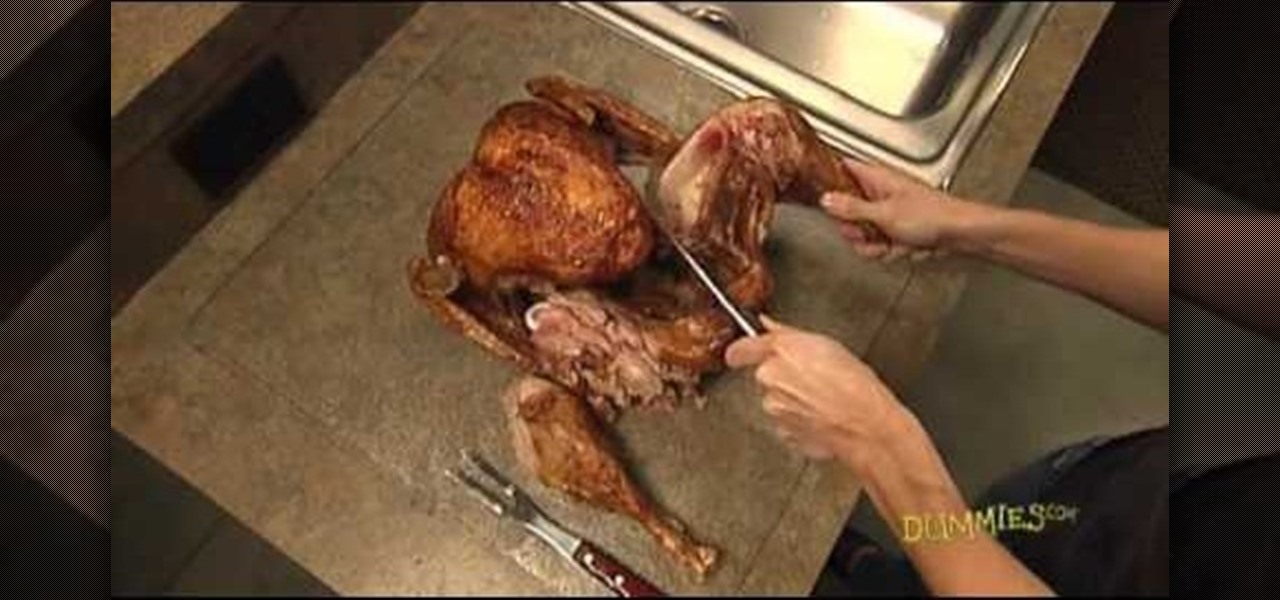
Learn how to carve a whole roasted turkey into serving sizes from this video in simple steps. Place the roasted turkey with its breast side up and the drumsticks facing you. Take the knife in your dominant hand and the fork in your other hand. Start on one side by cutting the leg from the joint where it meets the breast and repeat on the other side. Carve out the meat on the drumsticks on either side by holding it with the fork. Find the thigh bone using your knife and cut the meat off. Slice...

Chef Allen Susser first tells us about many different kinds of mangos and that he uses them often in his cooking. He then demonstrates how to select a mango, and then properly cuts it. Learn tips such as signs when a mango is ripe and how to choose the right one, as well as various methods of cutting and preparing mangos for cooking. You will learn how to slice or dice a mango in just seconds with a few excellent techniques. Cutting and preparing mangos for cooking is easy after watching this...

FoodWishes will show you how to make an apple swan with this short little video. This project is simple and quick.

Beef has many primal sections; the chuck, ribs, short loin, sirloin, round, flank, short plate, brisket, shank, and beef is rated by the USDA. Prime has the most marbling, followed by Choice, then Select, which has the least.
Learn how to keep from cutting yourself while shaving and how to avoid razor burn with expert shaving tips in this free men's grooming video series.
In this three part video series Bob Schmidt shows you how to cut drywall for easy installation. Part 1 of 3 - How to Cut and install drywall.
Knowing how to cut a straight line is essential for most projects. AsktheBuilder.com host Tim Carter demonstrates one technique for cutting a straight line. With his tips, you'll have no problem getting perfect cuts every time.
Discussing the technique of cutting a turkey quill pen, with reference to the bamboo pen. These quills can be used to write calligraphy. Part of the Tools and Techniques of Calligraphy series.
Our expert will explain many different types of hairstyles. You will learn about men’s hairstyles, short hairstyles, prom hairstyles, long hairstyles, and wedding hairstyles.
The intestinal parasite Cyclospora cayetanensis has a dramatically increased infection rate this summer, and the source is still unknown, the CDC advised today. 2017 is a good year for Cyclospora looking for homes to start their families and a bad year for those of us who don't like food-stealing tenants living in our bodies.
Viral infections have been the focus of attention in the development of autoimmune diseases—diseases where the body's immune system reacts to the body's own cells—because they trigger the immune system into action.
Chopping veggies is pretty straightforward: grab the right knife and start slicing. Nothing to it! However, the way you cut your food does affect the length of time it takes to cook, as well as how evenly it cooks. So the next time you need to get your vegetable from hard and crunchy to perfectly soft in mere minutes, give the oblique cut a try.
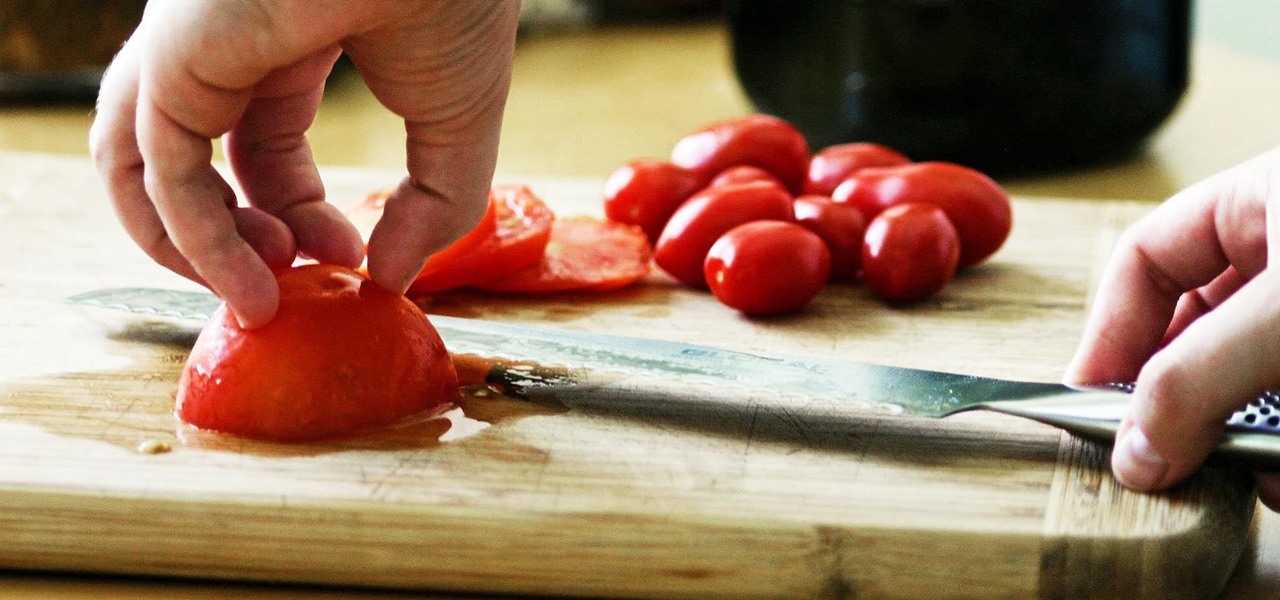
Tomatoes are the perfect barometer for kitchen knives and knife skills. If you've ever watched an infomercial for a set of knives, you've surely seen the enthusiastic host waxing about how well the knives cut tomatoes. And if you've ever had your knives sharpened, you've most likely tested them out on a tomato.
We will show you with easy step by step instruction how to create a beautiful edible apple swan. This swan is easy to create and can be done in under 5m. Makes for a great centre piece during a special dinner.
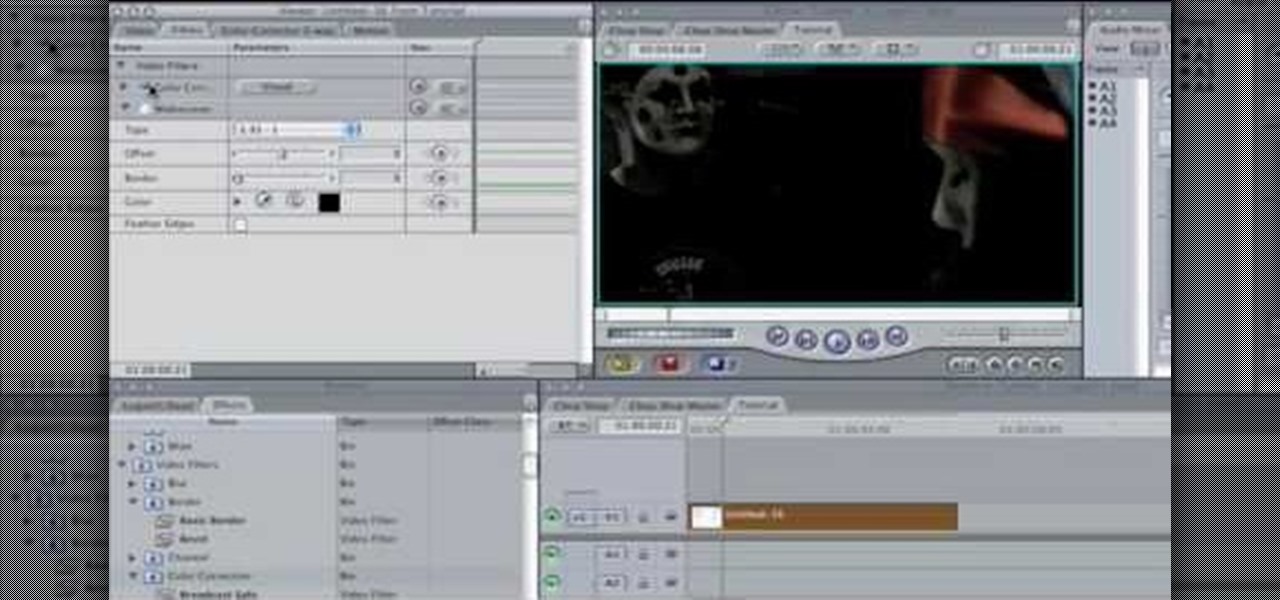
This video tutorial is in the Software category which will show you how to color balance in Final Cut Pro. Open a video clip in which you want to do color balance. Double click on it, click effects > video filters > color correction > color corrector 3-way. Click the "color corrector 3-way' tab and find something in the video that is supposed to be white. In the color tray you will see 'whites' written. Now click the eye dropper tool and just click the white object, and you have done the colo...
In this Software video tutorial you will learn how to use tool shortcuts in Final Cut Pro. To change opacity and the volume limit, click the little mountain button on the bottom and you will have two lines in the clip representing audio lines of two mono tracks. And you also have opacity located above the audio lines. With the help of the slide bar you can set the opacity. To get the pen tool press 'P'. To get out of any tool, press 'A'. To delete the entire audio track, select it, lock, dele...
In this how to video, you will learn how to create a film look to your videos in Final Cut Pro. This effect will create a light and warm tone to the clip. First, take the original clip and copy and paste it. Grab it and place it on top of the original clip. Next, make sure that the top clip is selected and click modify, composite mode, and add. This will bring up the highlights in the video. Go to effects, video filters, and Gaussian blur. Go to the settings increase the radius of the blur. Y...
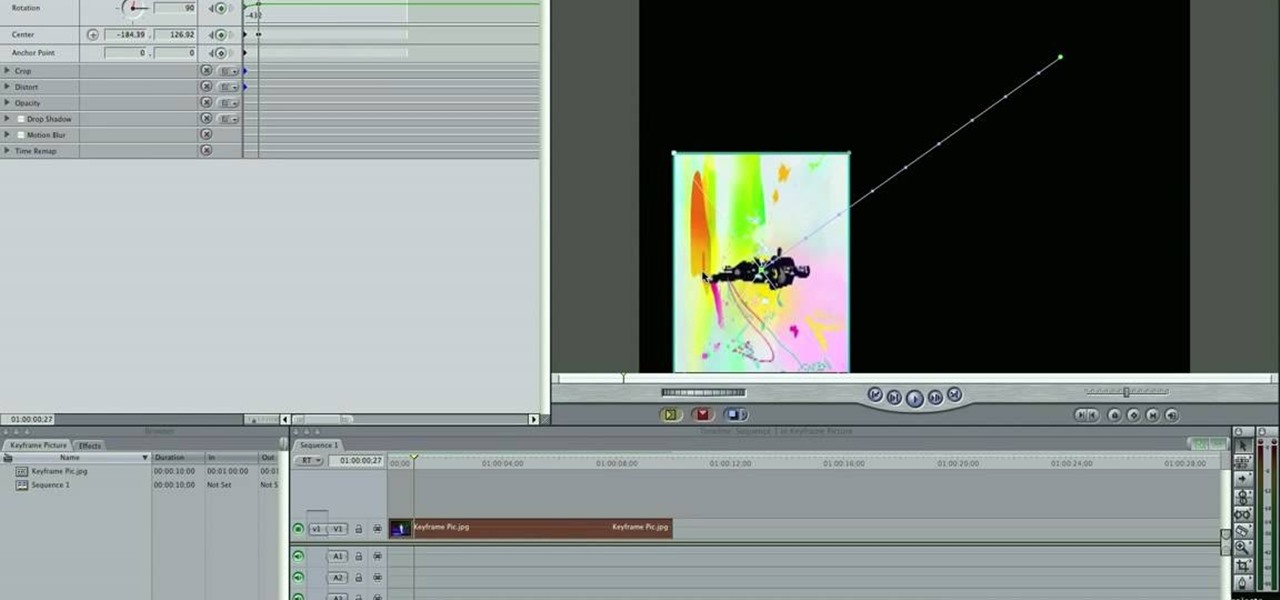
This video tutorial teaches you the basics of Keyframing using Final Cut Pro. A picture is used in this tutorial. You can also use video or picture for this example. The video shows the keyframe button and the different keyframing tools. The video then teaches a basic keyframing concept of how to add a motion to the clip using keyframing. You can also add rotation effect in the keyframe. When you add a keyframe and move the clip from one place to another, it adds a path along which the clip o...
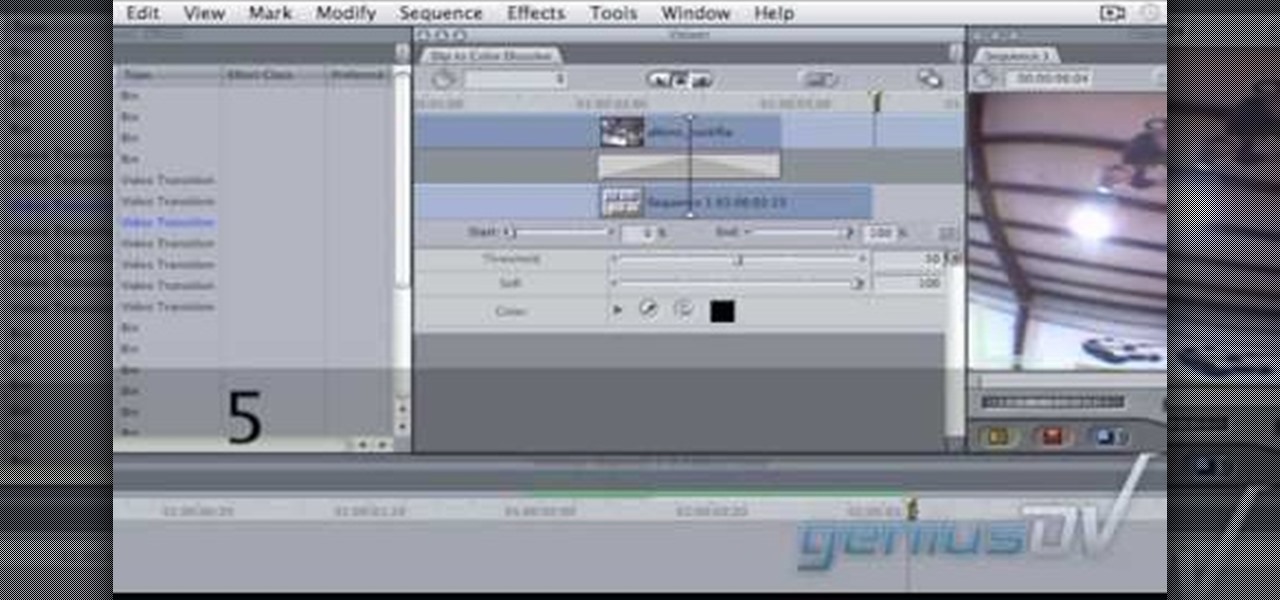
In this video tutorial, viewers learn how to create a freeze-frame effect in Adobe Final Cut Pro. Begin by placing the time line indicator to where you would like to place your freeze-frame. Press Shift and N to create the freeze-frame. The default user preference is 10 seconds. To change it, change the time and click on the insert button to splice the new freeze-frame time into the time line. Now click on the Effects tab and select the Dip to Color Dissolve under Video Transitions and Dissol...
In this Software video tutorial you will learn how to apply the Film Look effect in Final Cut Pro. This is an advanced technique. This essentially takes a video and makes it look like a film. Select the video clip that you want to work with. Then select the ‘color corrector 3 way’ filter. This is under the ‘Effects’ tab. The key to any color correction is to crush the blacks. So, decrease the blacks with the slider. Then increase the whites as films have higher white level. Depending on the s...
IShowU and Shiny White Box demonstrate how to create still image effects in Final Cut Express. First, place your scroll bar in the front of the timeline and click on the clip so that it is selected. Then, click on the motion tab in the preview window. Hit the keyframe button in the scale option. Create a keyframe also where you'd like the effect to stop on the clip. Adjust the line. When you now play the clip, the image's size will be adjusted as you have designated. You can use the same tech...
Learn how to create a green screen effect using Boris Continuum Complete's Chroma Key filter in Apple Final Cut Studio. BCC Chroma Key is used for compositing camera footage shot using a blue, green, or orange screen as a backdrop over a new background video or a still image from a separate file. BCC Chroma Key is also included as part of Boris FX 9.2 and Boris RED 4.3. If you have access to this powerful plug-in for Final Cut Pro, watch and learn how to use it for precise chroma keying.
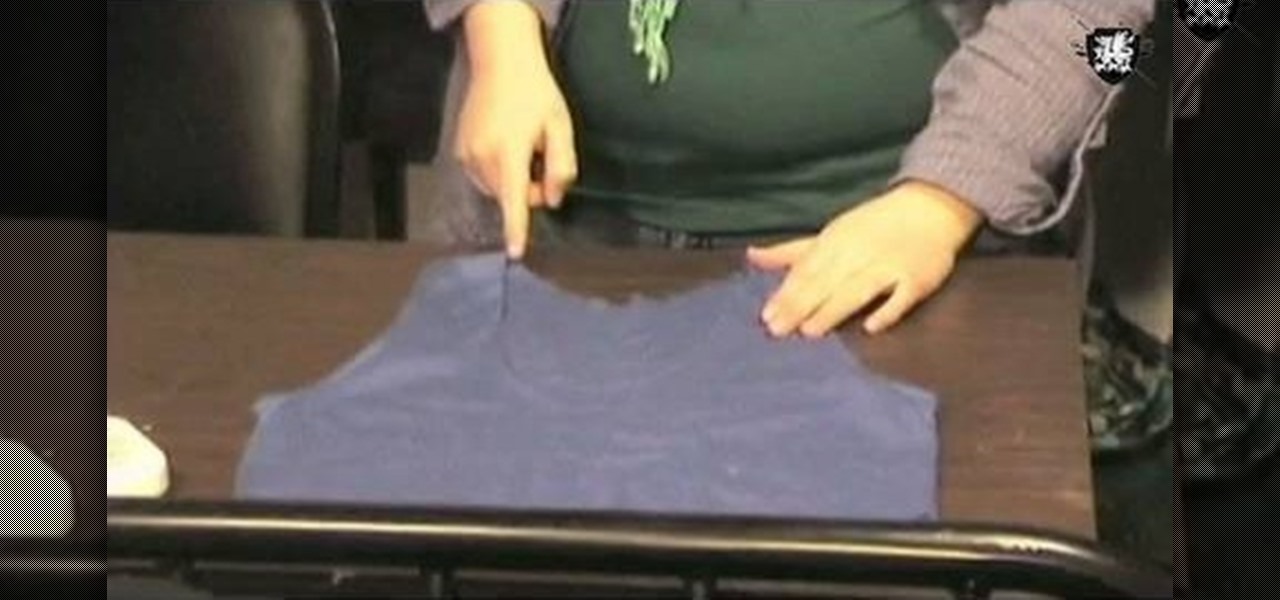
In this Beauty & Style video tutorial you will learn how to shred your t-shirt 70's style. For this you need a pair of fabric scissors and a t-shirt. Hold the t-shirt over your body, measure it up to the hip on the right side and make a snip with the scissors. The fabric will shrink, so, keep little extra margin. Now cut it diagonally from the snip down to the seam on the other side of the t-shirt. Cut off the seams from both the sleeves and cut up the sleeves from the end right up to the sea...
Poke, jab, and stab your opponent without taking out an eye. You Will Need
In this tutorial, we learn how to make a summer party dress with Threadbanger. First, take a tank top and mark right under your boobs with a pencil. Then, lay it down on the fabric you want to use and outline it, making sure there is extra seam allowance. Cut one that will be your back and the front. Next, cut off the bottom of the two pieces that you cut, making sure you leave extra allowance again. After it's cut out, sew them all together to make a cute dress for the summer! Adorn with any...
In this video, we learn how to make an Easter pop-up card. First, draw a duck with a little baby duck on a 4x6 piece of paper. From here, fold it in half so you can see the image on the outside. After this, use scissors to cut the middle, where the little baby chick is at. Cut the top and bottom around it, but avoid cutting the sides. From here, bend that piece left and right. Then, open up the card and bend it into the middle. From here, take a piece of paper with eggs cut out of it and bend...
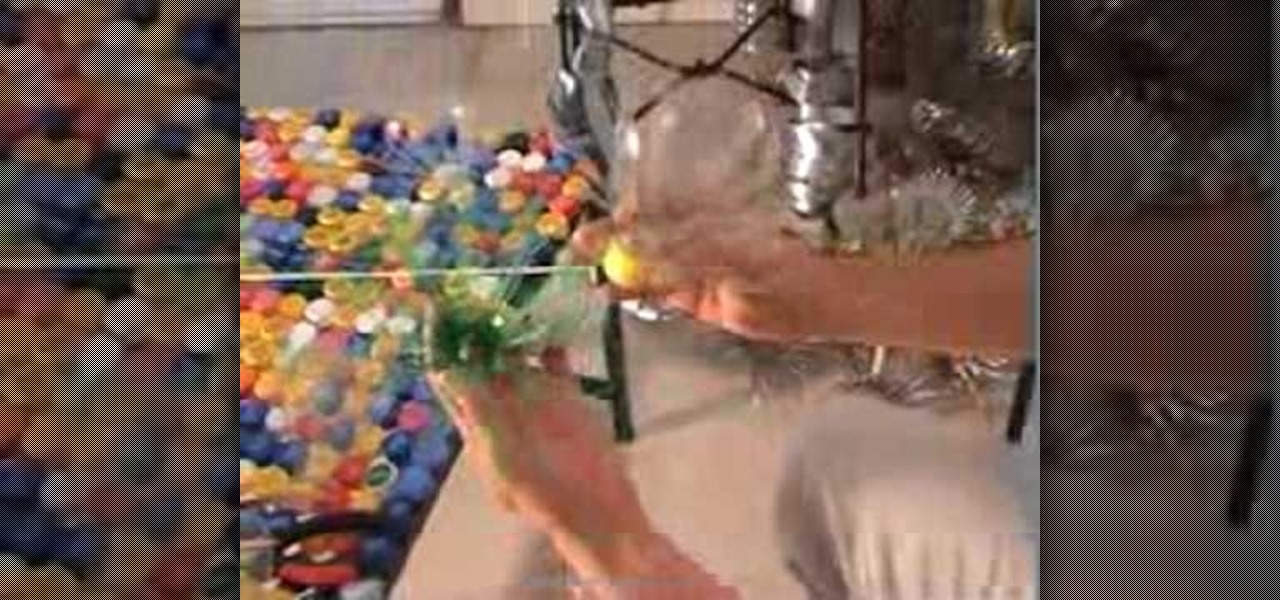
In this tutorial, we learn how to recycle plastic bottles and make decorative flower art. Start out by cutting around the cap of the bottle until the body is cut off. Then, cut small slits in the bottle until it's completely cut up. From here, you will spread these out so they are opened up like petals. Take different colored plastic bottles and repeat this process. When you're finished, you will then attach these together using heat and use them as decorative art for your wall! This is great...
In this tutorial, we learn how to make a Saw 2 death mask. Start off by grabbing an old helmet and covering it with plastic wrap. Then, make paper mache over it. From here, cut a piece of rubber into small strips. Then, draw and cut three stripes on a piece of cardboard. Then, use two strips for the shoulders and one for around your waist. Then, make the front chest piece with cardboard. From here, make a square with Styrofoam and cut out a piece of an egg carton. Now, draw the eyes and mouth...
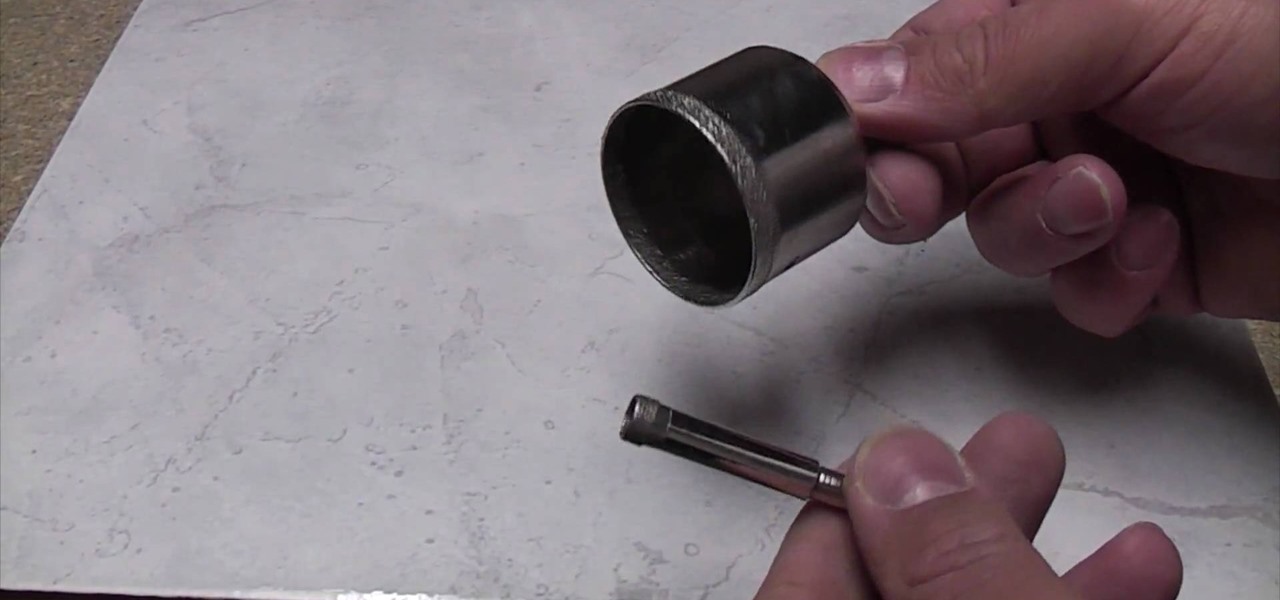
In this tutorial, we learn how to drill porcelain tile like a professional. You will first need to get a blade that is round and very sharp. Place this on the porcelain and then gently rock the blade back and forth until it cuts the tile all the way through. Make sure you place tap underneath this to catch any of the dust and debris that flies away from you while you're cutting. Remember not to use really strong force to the drill while you are using it, to prevent any wrong cuts on the porce...
In this video, we learn how to make a prop Michael Myers knife. You will need: six pins, a pen, a sharp knife, black paint, hot glue gun, cardboard, thin cardboard, and medium foil. First, print out a picture of the knife that's given in the video. After this, cut out the pieces and tape them together so it looks like a real knife. Then, cut off the points from the pins and draw the handle of the knife out on the regular cardboard, making two layers. Then, cut out the large part of the knife ...
In this tutorial, we learn how to skin a deer hide. First, cut into the joint on the back legs. Cut across this, then down through the back side of the leg. Open the leg up with the knife and continue to cut until you see the last joint. After this, you can snap the leg and then repeat this same process for all of the legs. Now, apply pressure to the neck where you want to cut and then skin the stomach area from the inside area. Keep the tip of the knife away from the hide so you don't poke a...
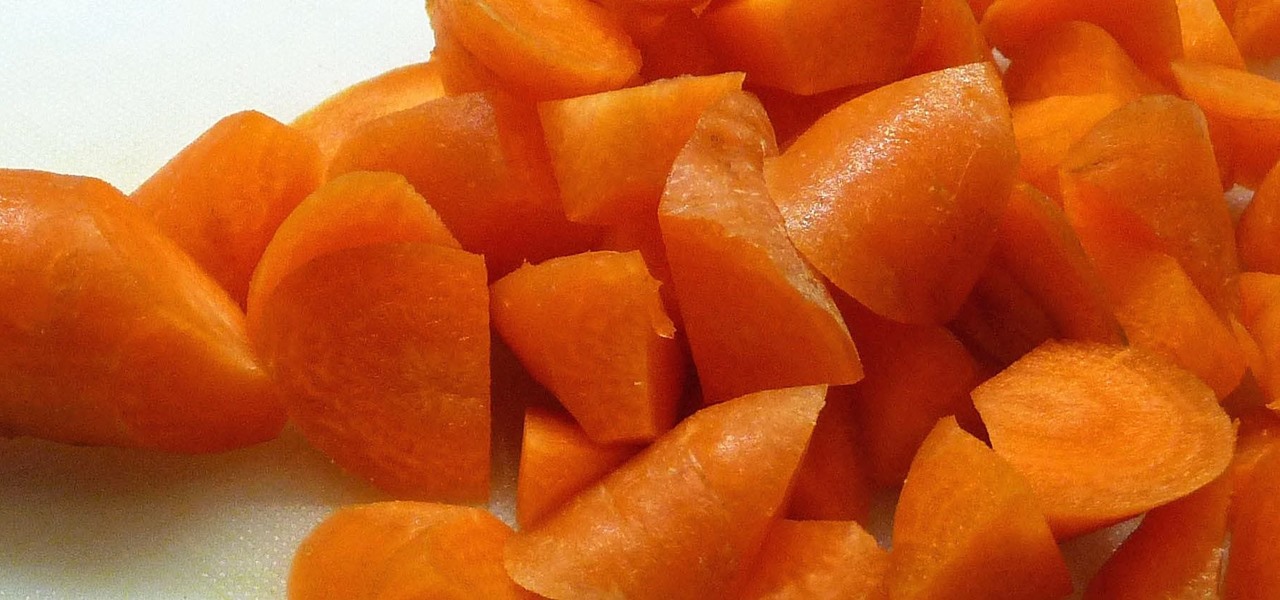
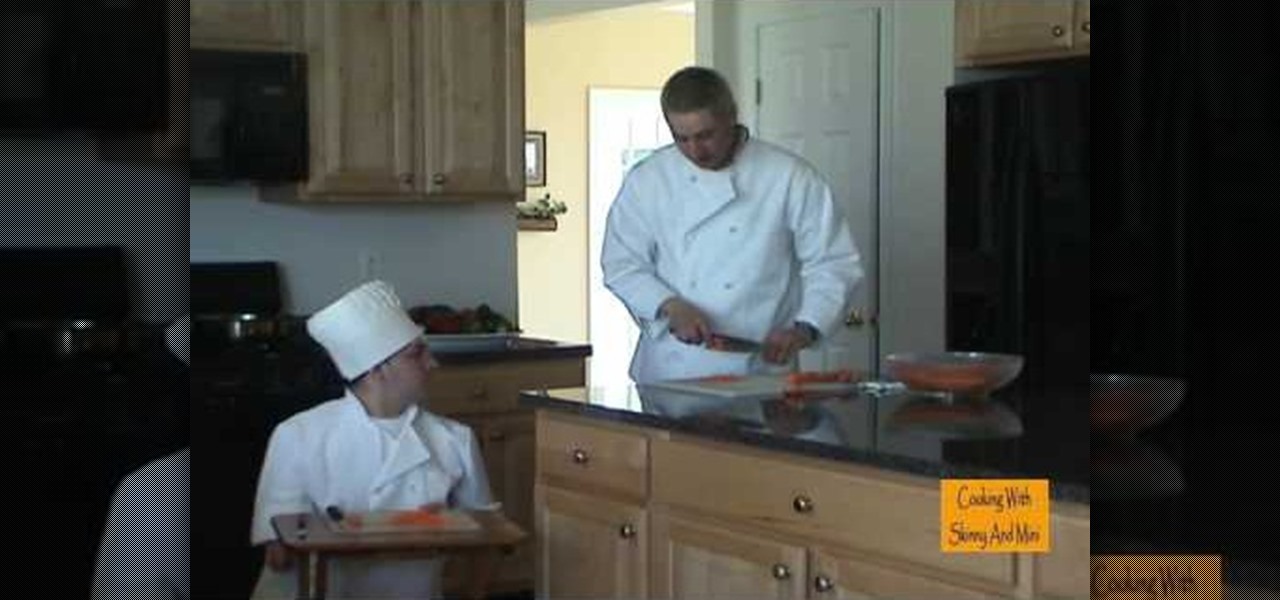
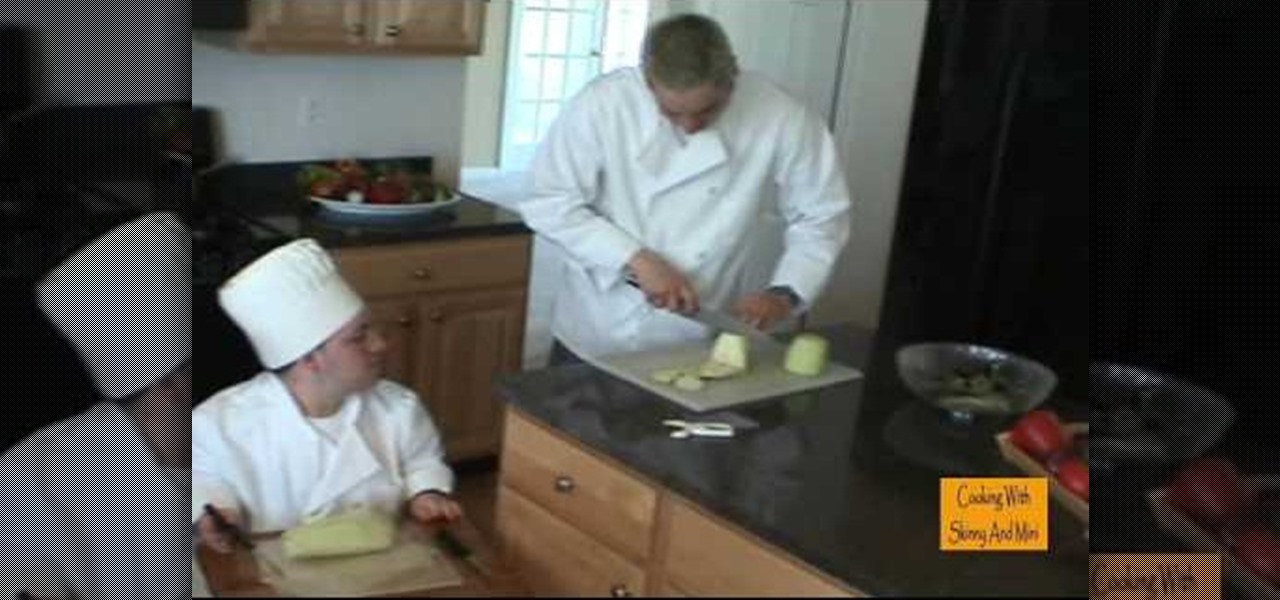
In this video Skinny and Mini teach us how to prepare carrots. First, take a peeler and peel the carrot from the top to the bottom all the way around the carrot. After this, you will cut the carrot. To julienne the carrot you will cut the carrot into small pieces. Do this by cutting the ends off and then cutting it in half. After this, hold the carrot from the top and slice down. After this, stack it and work all the way down. You can also slice the carrots into small slices or cube it if you...
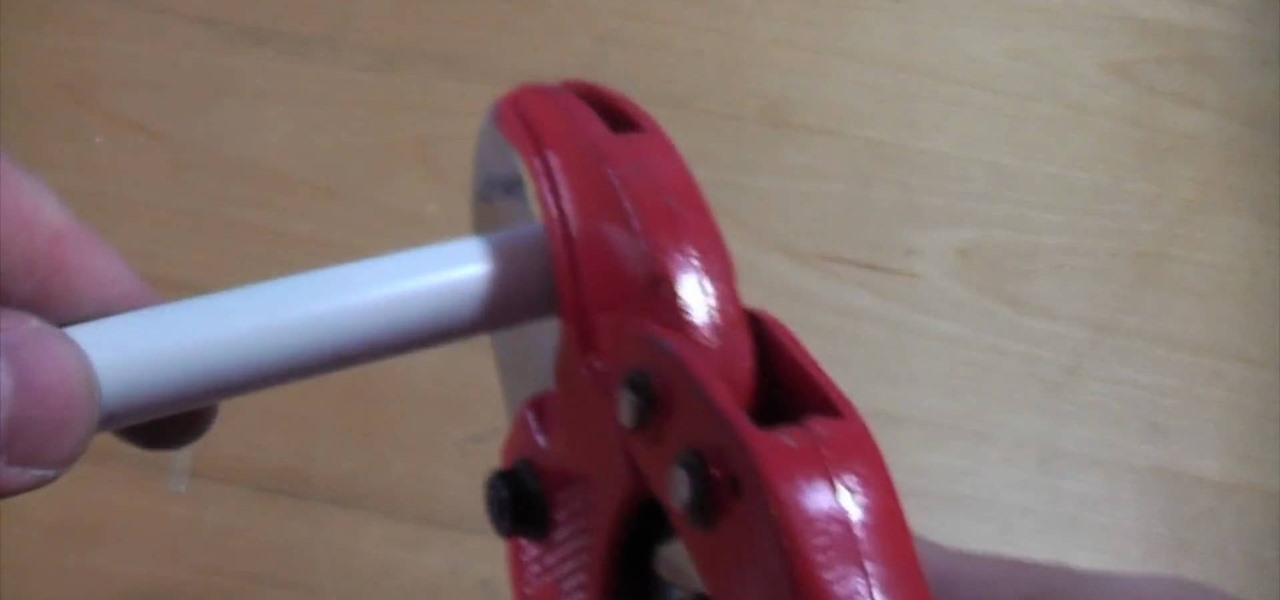
In this video, we learn how to cut plastic push-fit pipe. Make sure you never use a hack saw to cut the push-fit pipe because it can damage the O-ring in the connector. What you need is a pair of dedicated plastic pipe cutters. Once you have this, put your pipe in the middle of the cutters and then push down on the handles. After this, your will cut the pipe and it will com out nice and clean. From here you will be able to fit a connector into the pipe and continue to use it rather than ruini...
In this tutorial, we learn how to prepare eggplant. First, cut the top and the bottom off of your eggplant. After this, grab your eggplant and hold it so it's standing up. Then, grab a sharp knife and cut down from the top to the bottom so the skin comes off of the vegetable. Go all the way around until you remove all of the skin from the eggplant. You can also use a peeler to do this to speed up the process. When all the skin is off, use your knife to cut the eggplant into slices and then cu...
In this video, we learn how to cut side bangs. Fist, you will need to grab some shearing scissors, a comb, a trash can, and water. Now, get your bangs wet in the area that you want it, then part your hair where you usually part it. Once you do this, separate your bangs from the rest of your hair and clip the rest back. Next, use your scissors and cut at an uphill angle from the bottom of your bangs to the top. When finished, continue to cut until you have the desired length. Keep in mind your...
In this tutorial, we learn how to cut layers into hair: the basics. Start out with dry hair and brush it out thoroughly. After this, grab the back of the hair and use a small comb to comb out from the head. Hold the hair at an angle, then cut it diagonally. Continue to do this for the hair on the back of the head so you create a bunch of layers in the back. This is a short look, so you may have to cut a lot of hair off in the beginning to get to the top of the head. Create a bob on the front ...
This is a video tutorial in the Magic & Parlor Tricks category where you are going to learn how to do card trick: "Emerge Triumphant". Have the deck of cards completely in the standard form in which it comes. The sequence is spades, diamonds, clubs and hearts. The trick is keeping the deck in the order it comes, do straight cuts, swivel cuts, one handed cuts and false riffle shuffle. It shows riffling, shuffling and cutting the deck. But, when you expose the deck, it is still in the same orde...