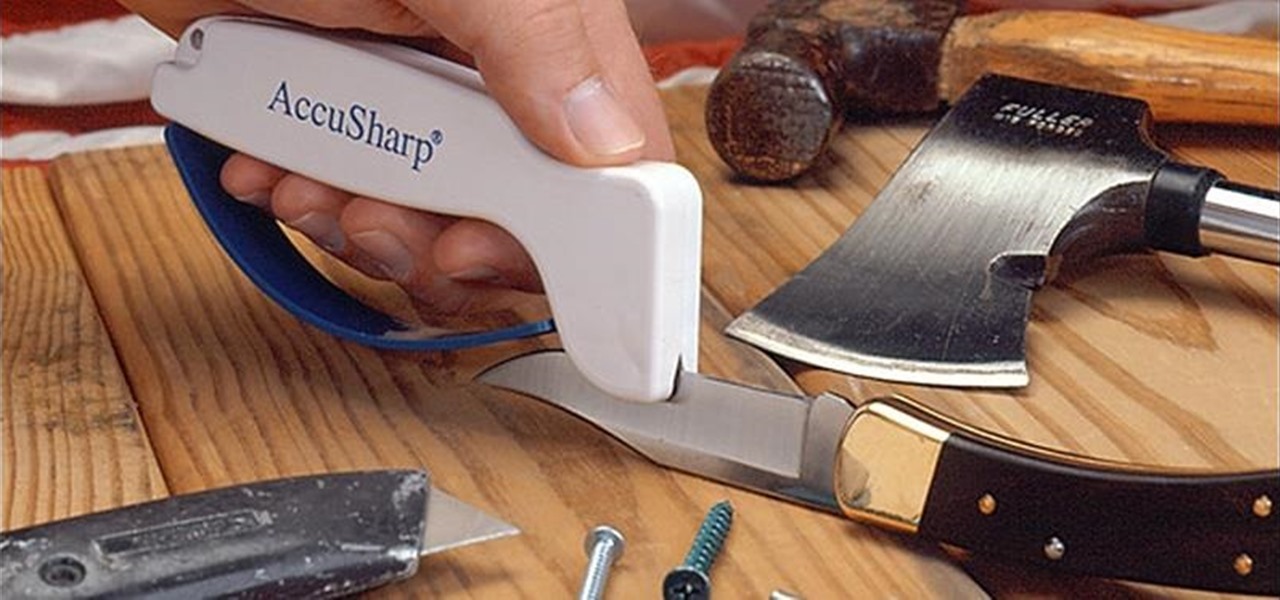
This video demonstrates the proper way to sharpen knives with a steel. First, the blade of the knife should be held at about at 22 degree angle to the steel, Second, the knife should be slid along the steel in a sharpening motion. The steel should run along the blade of the knife from one edge to the other. Both sides of the blade should be sharpened in this manner. The steel has a guard to prevent the knife from accidentally cutting your hand, but if you are afraid of being cut, the steel ca...
Making this DIY album is easy and fun! This video will show you how to make an 8x10 photo album enclosed in ribbon. After cutting two pieces of cardboard to size, you can take the material you've chosen for the cover and cut a 9x11 piece so that you can fold over the edges. After that, it's as simple as gluing the material to the backs of the cardboard and taking an extra piece of material for the inside cover. Good luck!

Need a way to keep the kids busy on a rainy day? Making a pop-up card is quick, easy, and will entertain them for hours! Watch this video to learn how to make a pop-up card.

This video tutorial shows how to make a cool beer glass out of a beer bottle. This is also a great trick for cutting the bottle; forget the glass cutter or tricks with string and acetone. Just pour oil up to the level where you want the bottle cut off and place a red-hot piece of metal into it. Because of the great heat conductivity of oil and at the poor heat conductivity of glass, it will expand at the edge of the oil surface, cracking in a nice even line. Watch this instructional video and...

Poke, jab, and stab your opponent without taking out an eye. You Will Need
Similar to the reverse fringe appliqué , Kirsten goes through each step of the tucked appliqué technique for smooth edges on your project. A key detail includes keeping a balance between cutting your edges for enough tucked material for your stitching and cutting enough material for a smooth finish. Apply the tucked reverse appliqué technique.

When I finally saved up some cash and got my first good chef's knife, I vowed to do everything by the book: clean it properly, hone it regularly, sharpen it faithfully, stand by it in sickness and in health, blah blah blabbity blah.
Making your own Mondrian-inspired cushion cover is demonstrated in this clear and concise crafting video. Materials required are a plain cushion cover( preferably in a tight weave such as canvas or cotton; water; medium size, firm, flat edge paint brushes; scissors; one inch wide masking tape; a sturdy piece of cardboard , saran wrap and 4 jars of textile paint - one color should be black or graphite. You may choose plain or glitter paints. Cut the cardboard about one inch smaller than the si...
The Art of Crochet by Teresa explains how to sew together crochet ribbing. Thread a tapestry needle and align the edges of the crocheting project. Sew the first stitch together and secure with a knot. Sewing through the top of the stitch on the edge will help prevent distortion and create a neater look for the ribbing. Pick up the back loop and align it with the stitch on the opposite side. Continue all the way across, sewing through the same stitch. It will push the top of the stitches up, c...
This video shows a demonstration of how to make crepe paper rosettes. The materials used are four strips of paper, two small paper circles, and double sided tape. First put double sided tape on one of the circles and trim the edges. Put a corner of one strip of paper onto the sticky edge of the circle. Fold and crease the paper as you go around paper circle, forming fan-like folds in the crepe paper. Put a tiny piece of double sided tape to hold the end. Trim the edges with scissor to make a ...
Nothing sets off your garden beds like a nice, crisp edge. Here are four common tools for edging a garden bed. This video gives you a few options on how to edge your garden.
In this Autos, Motorcycles & Planes video tutorial you will learn how to feather edge paint to prepare a damaged car for primer. Feather edging is the process of feathering or layering each layer of coating in order to prevent a rough edge. Use a 6 inch DA and 150 - 220 grit sandpaper to feather edge the paint edge. Apply the sandpaper all along the edge of the paint till the edges are smooth. Feel it with your hand to ensure that all the edges are smooth. Feather each layer of paint at least...
In this tutorial, we learn how to make a cute Thanksgiving card using stamps. First, cut an oval shape with an oval template. After this, you will stamp the image from the harvest home stamp set on watercolor paper. After this, outline the image with SU markers and color the image in with an aqua painter brush. From here, scallop the edges of the design to make it look more unique. Then, glue the stamp to the card stock and use it as the front of a card for the holidays! Experiment with diffe...
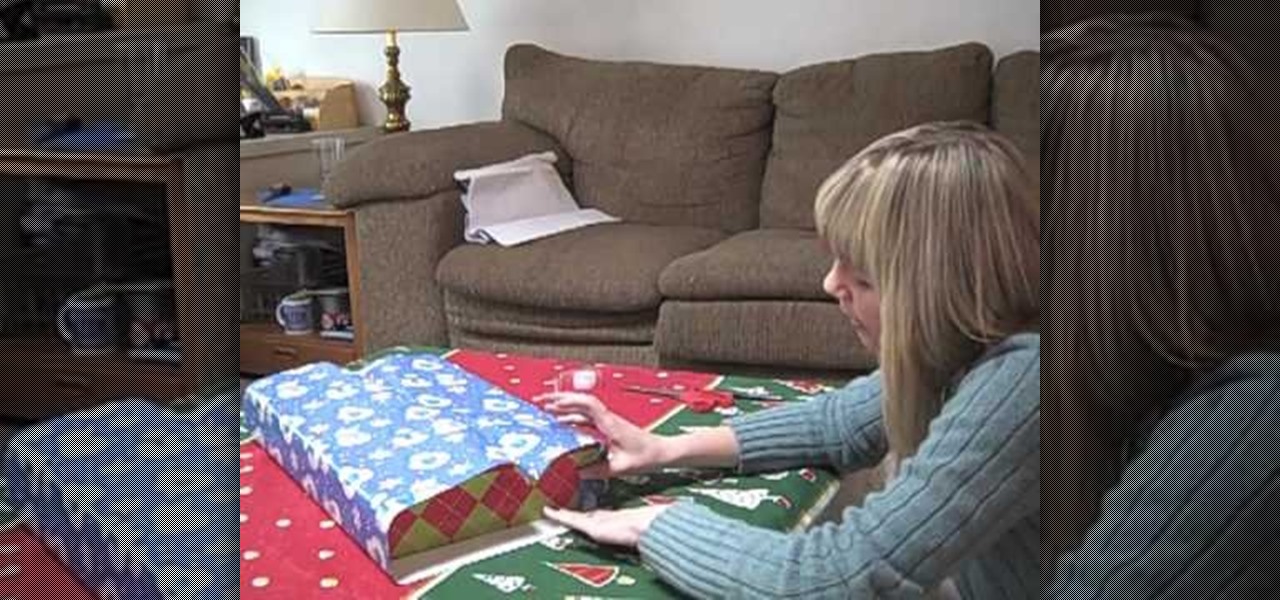
In this video, we learn how to wrap a gift so it comes out perfect every time. Start off by unrolling the wrapping paper out on a flat surface and cutting out a large square. After this, place the box upside down onto the wrapping paper. After this, meet the two ends to the middle of the gift and tape it down. Next, start to crease the edges of the sides down and flip the gift over. After this, push the top of the sides down, then tape it. Push the sides and bottom up and then tape it togethe...
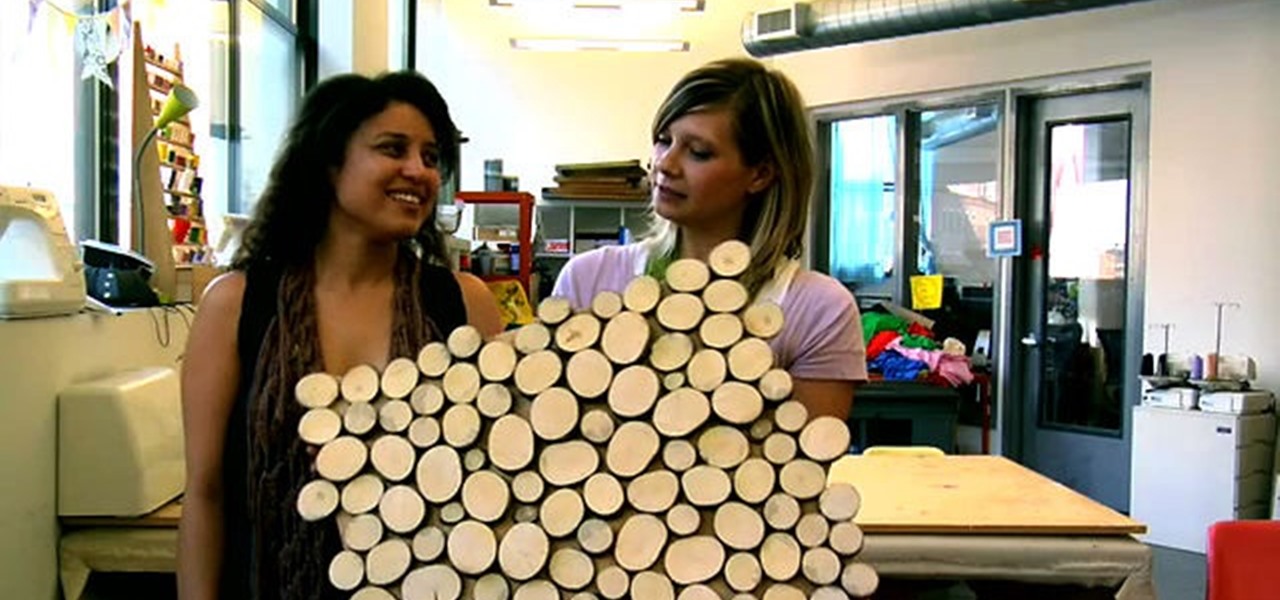
Remember summer camp? Remember the smell of the log cabins? The feel of the treated wood? Well, you can create something for your home that's perfect for a nostalgic summer camp aesthetic. Meg Allen Cole (recently of Threadbanger) was inspired to make this mid-century modern wall hanging piece made from a small wooden log (or branch) when she was at a relaxing, wooded vacation spot in Maine. And she shows you how to make one, too!
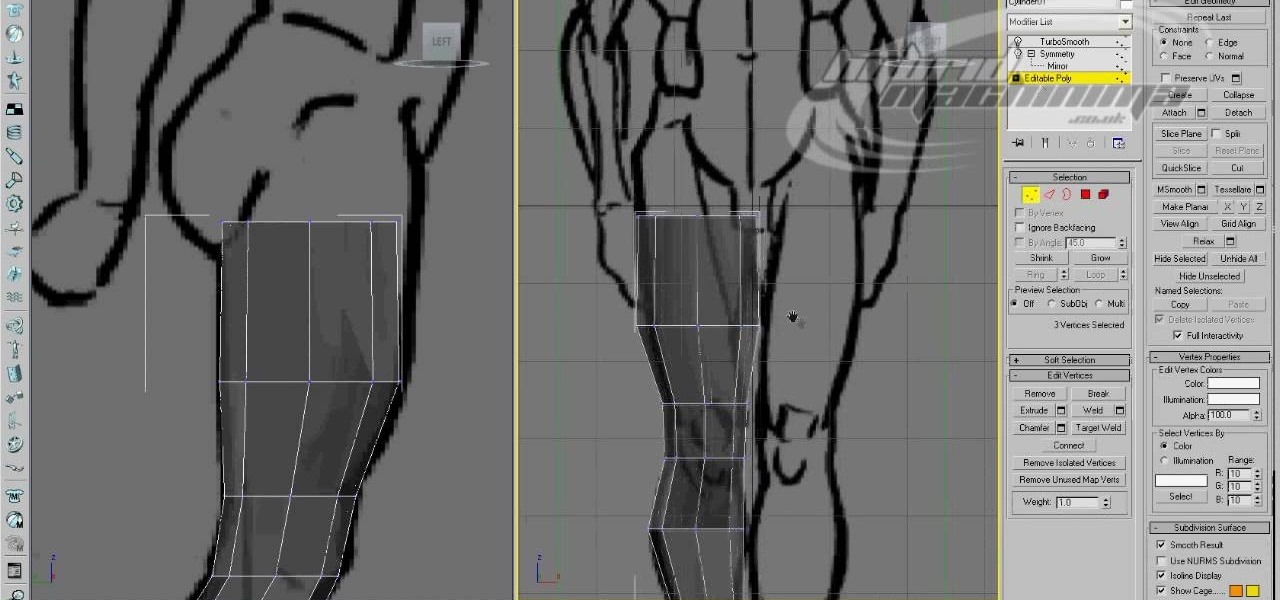
Edge loop character modeling in 3D Studio MAX allows you to create smooth, natural-looking characters. This video will introduce you to using edge loop modeling to model a character from a blueprint (get it here). This is one of the most fundamental techniques in 3D modeling, so get used to doing it!
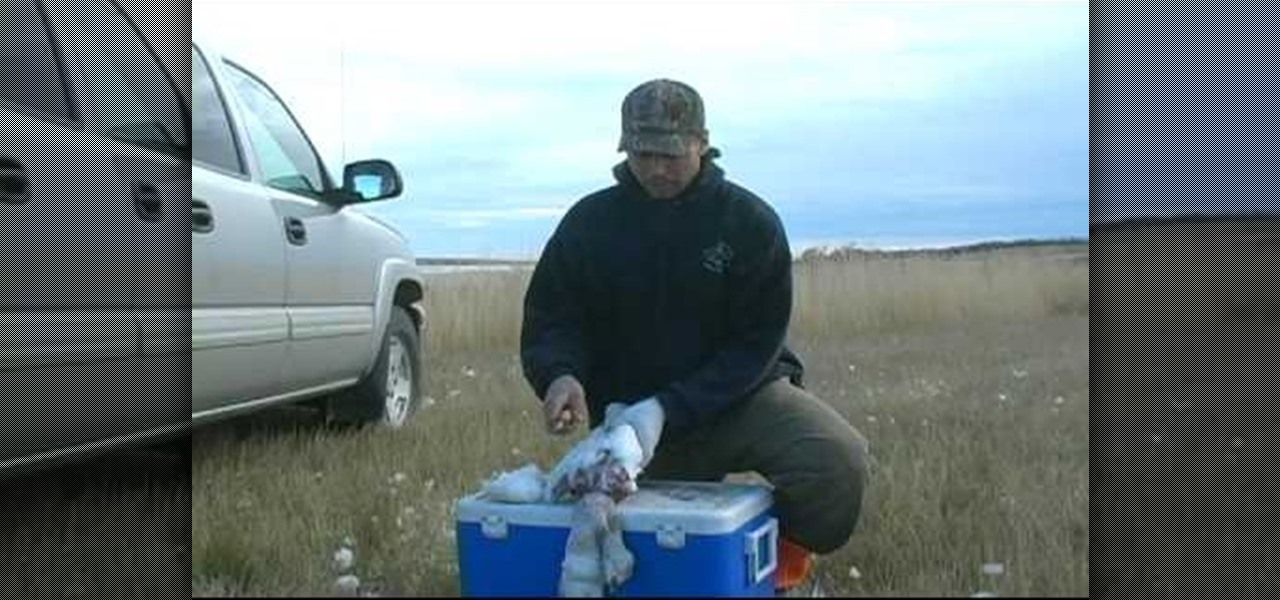
To clean fowl (ducks, geese, pheasant, etc) in the field, begin by turning it on its back. Lay it down on a flat surface. Grab a handful of flesh, underneath the head and neck and rip it away. Continue ripping the skin and feathers off around the torso. You will need to retain one wing for identification. Cut one wing off with clippers.
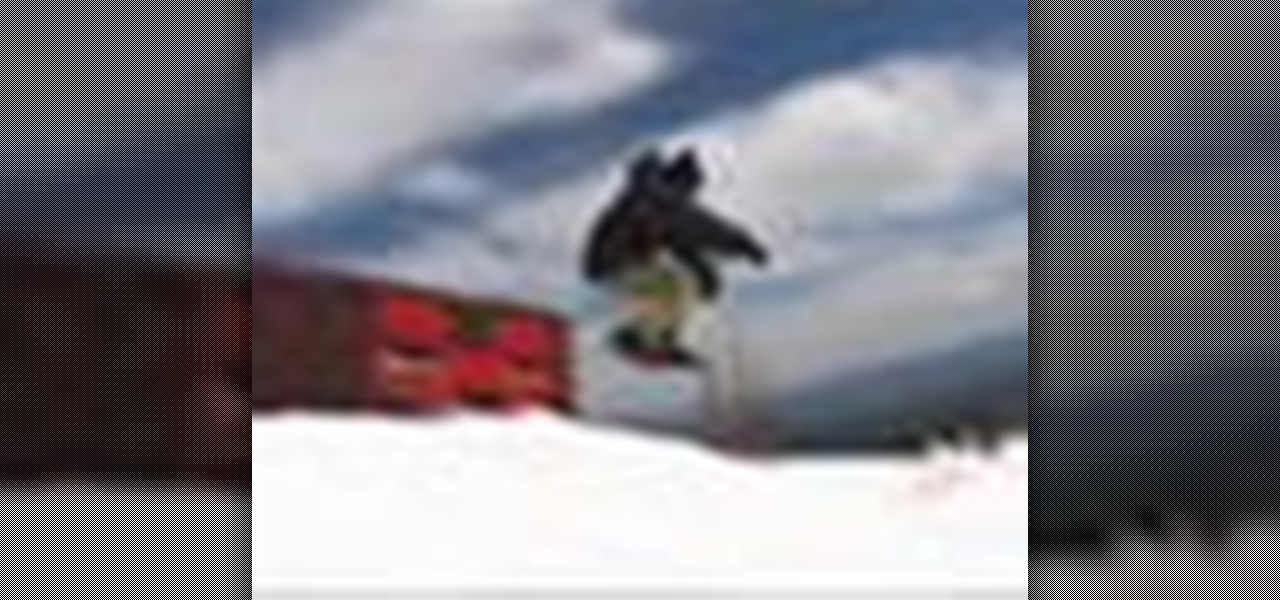
Snowboarding: Hit the Slopes With Style There was a time when simply riding a snowboard made you the extreme guy on the slopes. But now, with more people strapping on a board instead of skis, the stakes have been raised. Fortunately, we've lined up this video tutorial to keep you on the cutting edge. See how to tailslide a rail on a snowboard.
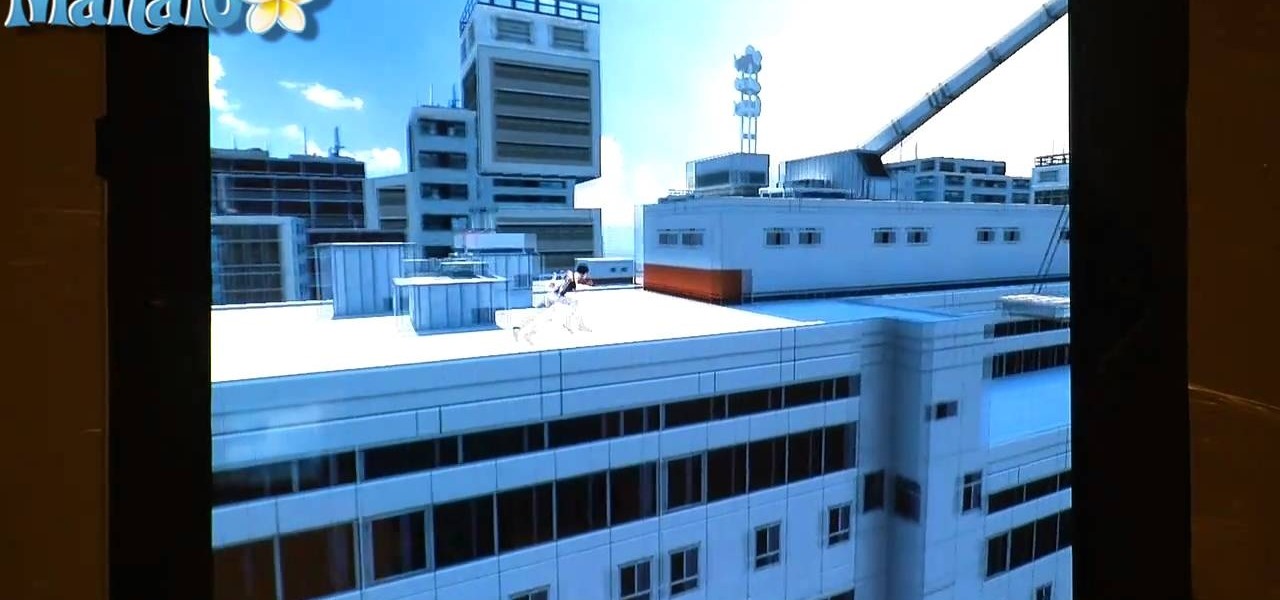
Check out this video guide for Mirror's Edge on the iPad! Mirror's Edge is a single-player, first-person, action-adventure video game available for the PlayStation 3 and Xbox 360, but there's also a side-scroller version for iOS (Apple's iPad and iPhone), and that's what you're going to see the gameplay for here. Watch the complete walkthrough of all the missions and see if you can get more "Bags" than Mahalo.
Tim Carter of Ask the Builder demonstrates the basics of a framing square. Tim shows how to make the marks for a simple roof rafter.
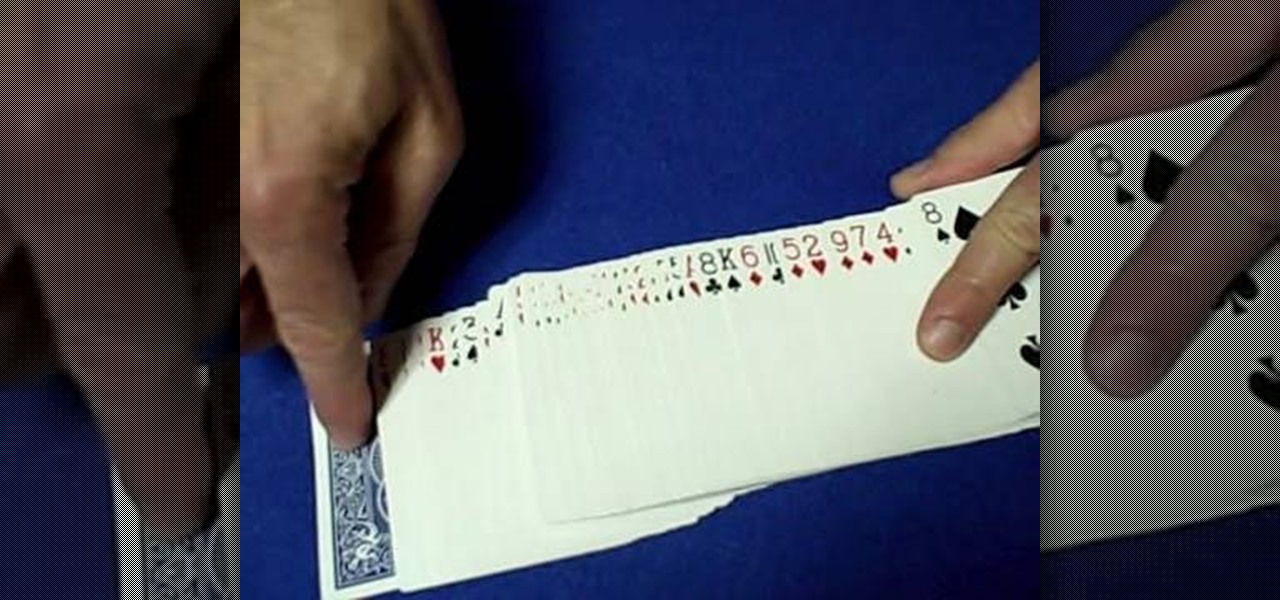
This is a really cool visual effect card trick that is performed on two spectators. Spectator number one is asked to choose a card. The card is then placed into the deck ( halves ) and the deck is combined into one. The trick is holding the cards apart with your pinky so the chosen cards position is still visible to you. You continue to hold the break by moving your thumb into the break, you cut the bottom half, in half and place that on top. Repeat the procedure with the break half, and plac...
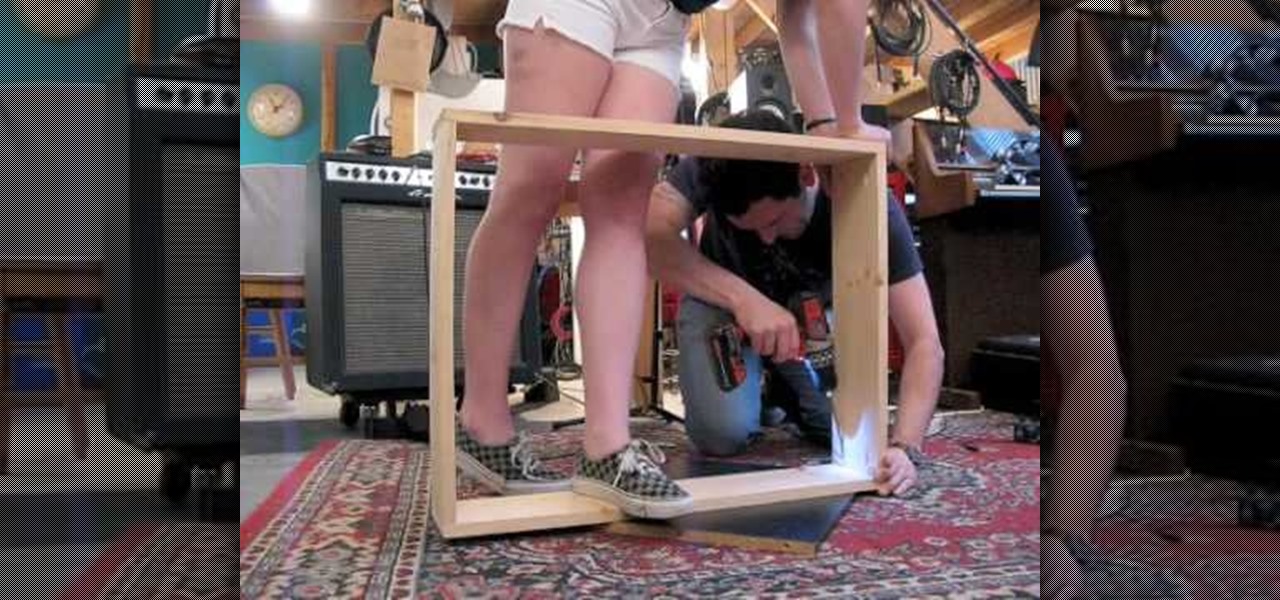
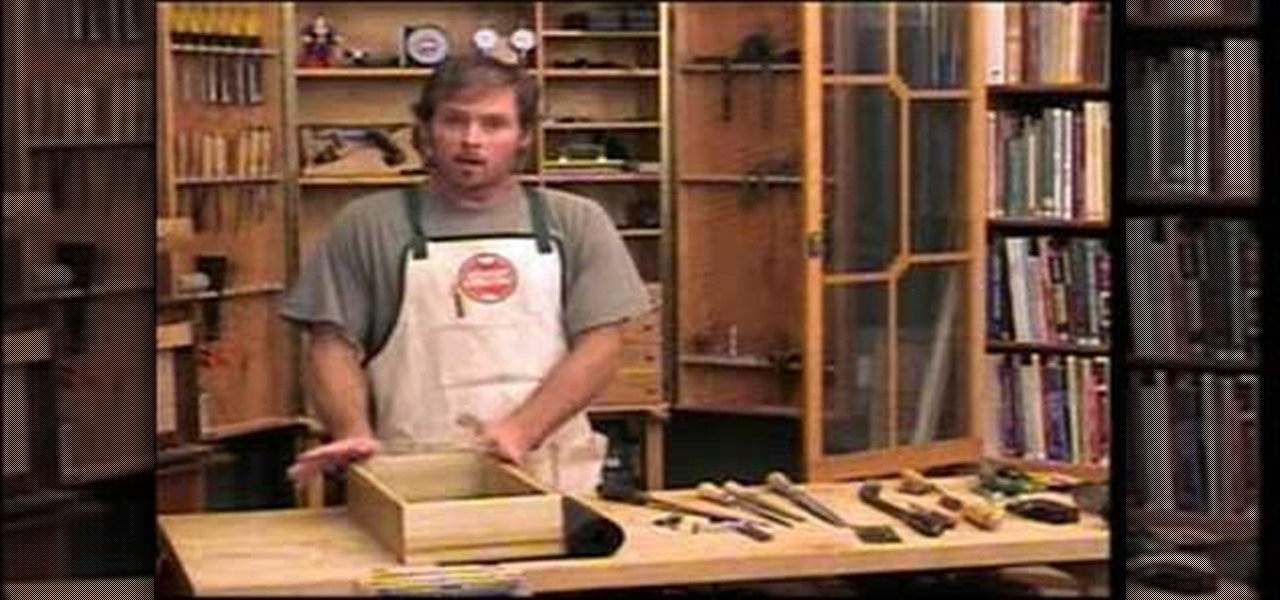
Josh Copp and Madeline Donahue show us how to build a light table from pine wood and plywood utilizing two fluorescent light fixtures as the light source inside the box. The frame of the box is fashioned out of two 1X8 planks cut into four pieces so that two sides are 30 inches and two sides are 22 3/8 inches. The base of the box is made of plywood or OSB and is 30X22 3/8. Once the pieces are cut and assembled using a pocket hole jig and wood screws, the inside of the box is painted with whit...
Those weird and creepy crown/mask things were one of the most memorable parts of Lady Gaga's "Bad Romance" video. But they're actually pretty simple, and you can make them yourself with stuff you probably already have at home. This video shows you how. (Of course, if you're planning to wear this to a party or something, bear in mind that you won't be able to see anything!)
This Thread Banger video demonstrates making a skirt from men’s button down shirt sleeves. Brooksie from Haute Sew presents the technique. Two men’s button down shirts are needed. Cut the sleeves off the shirt at the seams and then split them open at the shirt sleeve seams, leaving the buttons in the middle. Pin the sleeves together along the raw edge with wrong sides together and sew them. The panels can be made to alternate colors or in color blocks depending on the style of shirts used...
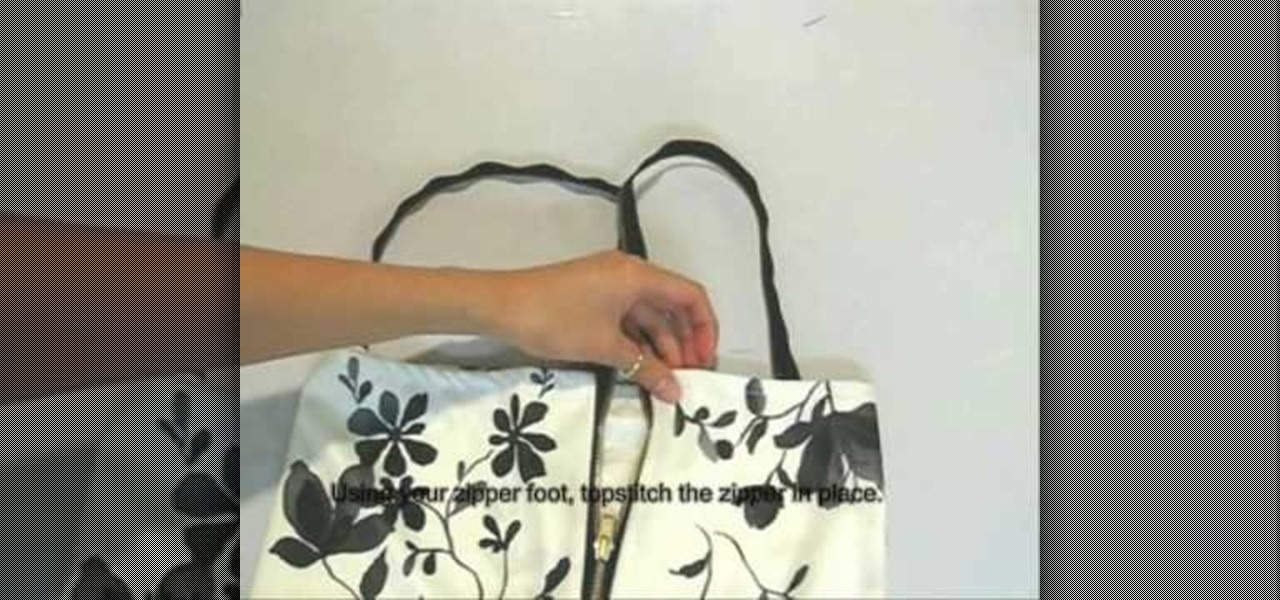
First of all you need some basic tools like sewing machine, scissors, pins, ruler, measuring tape and thread. You also need a printed knit of size 1.5 yard or 1.4 meters ad a separating zipper of size 18 inches or 46 cm. First you have to start by making the straps and bodice. Cut off two rectangles those measures from the top of your bust to the bottom of your bust. The length should be enough to go all the way around your upper half. Place these two rectangle pieces together. Now separate y...
How to sharpen a knife using a sharpening stoneIn this video we are about to see how to sharpen a knife using a sharpening stone. First of all we need to know the faults and the damages on the edges of the knife where it is to be repaired. Then get a sharpening stone to make a sharp knife. Now rub the knife at a 45 degree angle with a fair amount of pressure. Now repeat the process by changing the positions of the knife on either hand. This is done to get the knife cutting towards the stone t...
Making a tutu can be hard, but making a non-sew tutu is nothing but easy. Watch this video tutorial to learn the ins and outs of the non-sew tutu for young children. You can change it up all you want once you get the basics down, but for starting off, use the following supplies:
Storing tools properly will keep you working wood and not doing maintenance on them. Shopsmith Academy shows you an easy way to ensure your tools will be protected from nicks and dings. Watch this video for useful woodworking tips. Search Shopsmith Academy on WonderHowTo for more woodworking videos.
Doorknobs may not be on the cutting edge of decoration, but they certainly contribute to the look of your home. Update shabby doors and closets by replacing your old doorknobs.
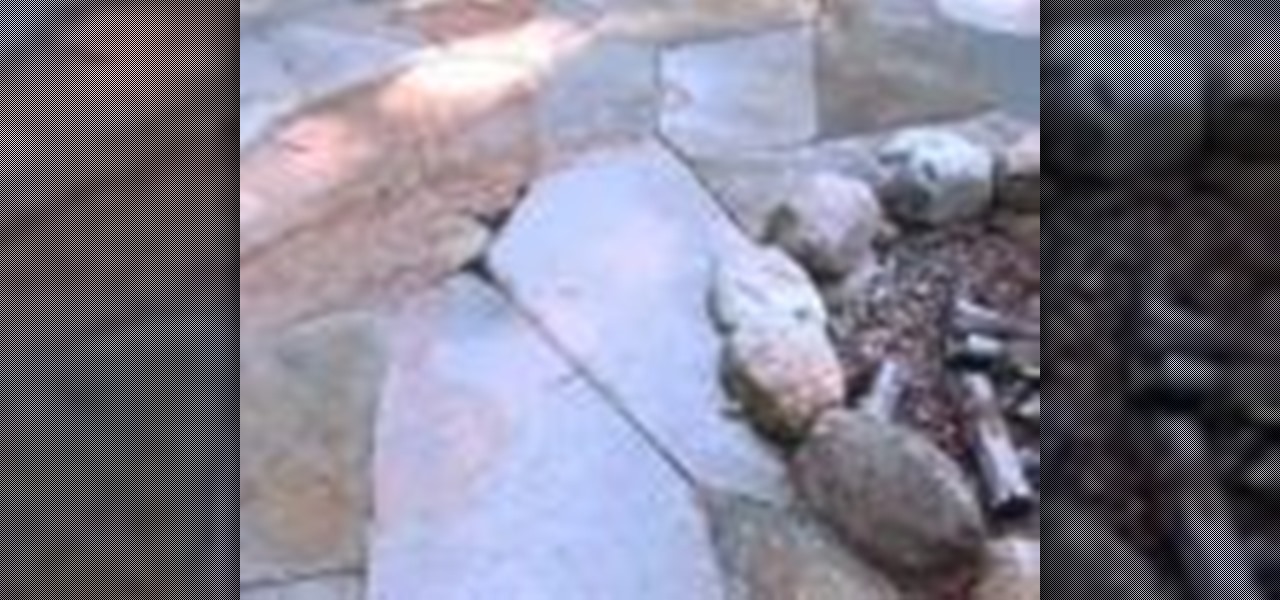
Learn how today's cutting edge landscape and garden designers are breathing life into patio spaces. Get some really great ideas on making your patio fun and functional and last a long time.
Watch this video from This Old how to learn how to install an interior door. Steps:
1: Place paper sideways. Place the paper on the flat surface with the long edges at the top and bottom. 2: Fold long edge to opposite edge and unfold. Fold one long edge to the opposite long edge, crease, then unfold. 3: Fold longs edge to center and unfold. Fold one long edge to meet the center crease you just made. Now do the same with the other long edge, so they both meet in the center. Unfold completely. 4: Fold short edge to opposite edge and unfold Rotate your paper and fold one short ...
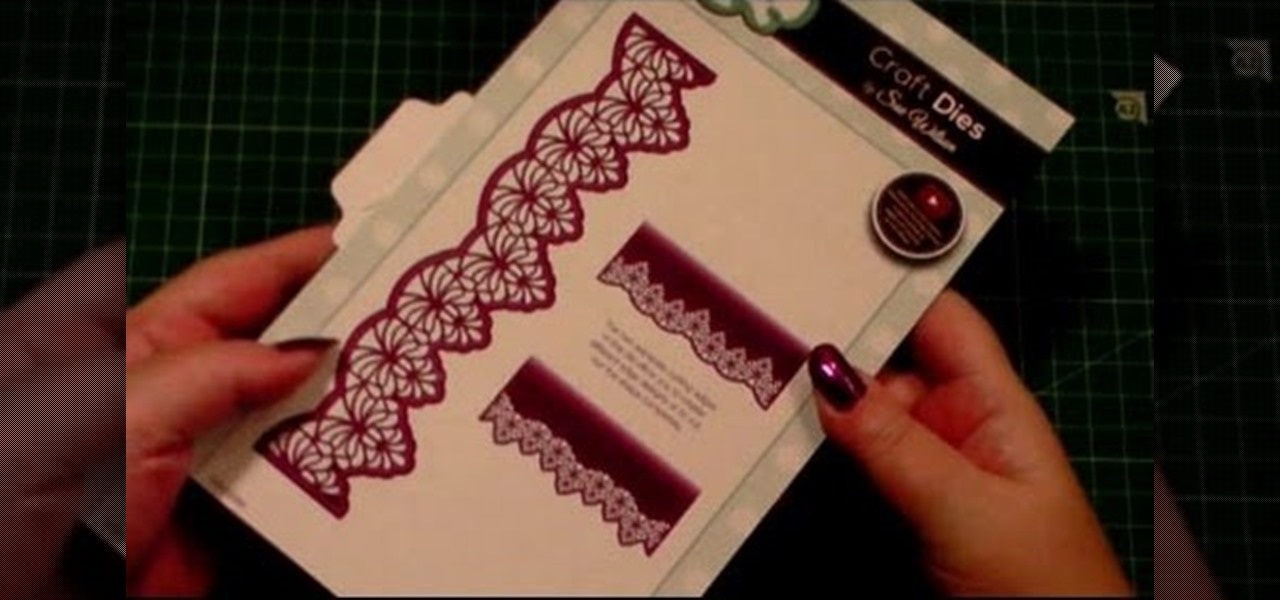
This card demonstrations shows how I have used the Creative Expressions Die from the Sue Wilson Gemini range, this one is called Corvus. This is Part2 of a mini series. .
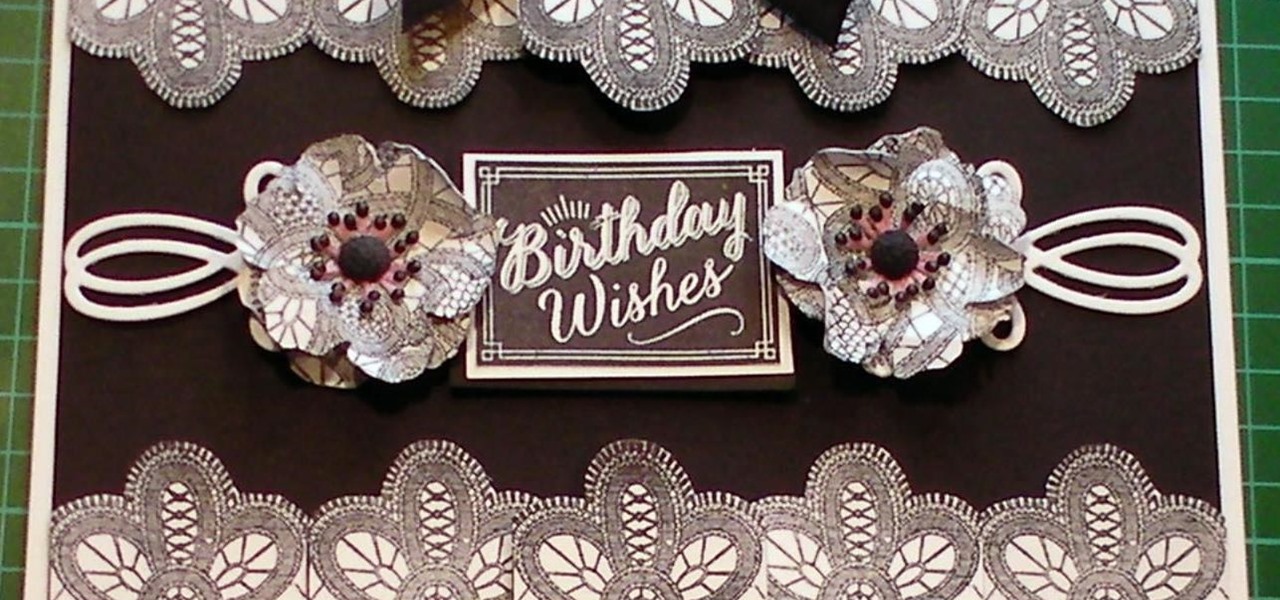
In this cardmaking tutorial I use a Anna Griffin rubber stamp to make a repeat pattern in a very easy way, so if you have trouble repeat pattern stamping this could be for you. I make a lace edged card with 2 pretty flowers and a stamped sentiment. Step 1: Items Used
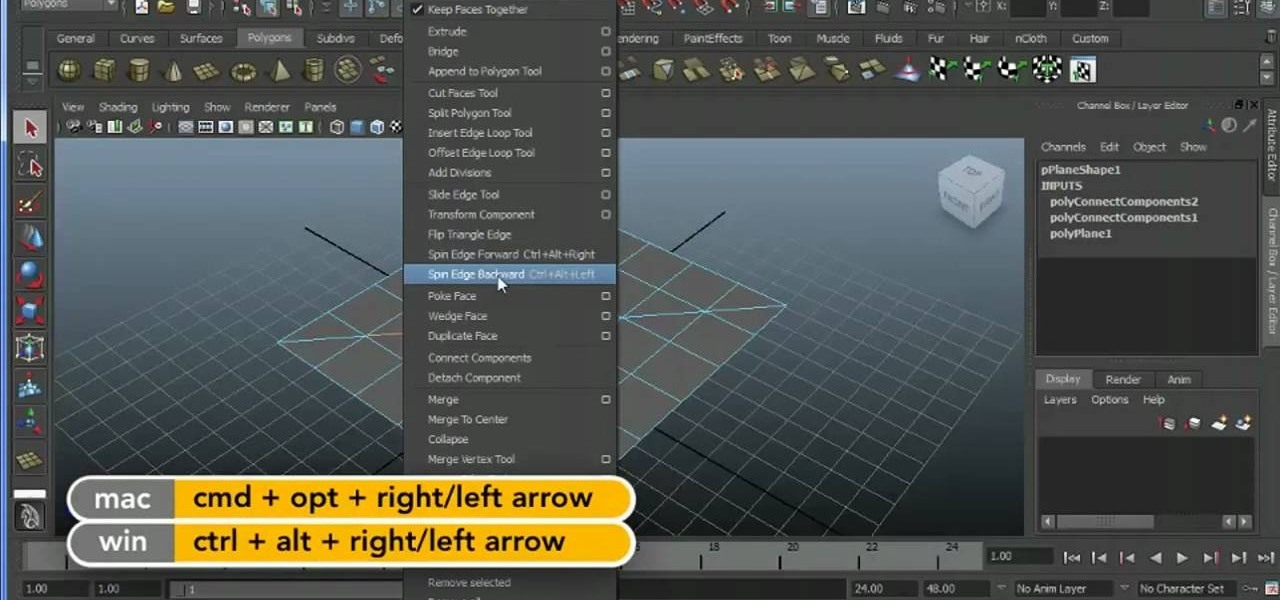
Learn how to take an edge and spin it around a model using Maya 2011's Spin Edge tool. Whether you're new to Autodesk's popular modeling software or a seasoned 3D artist just looking to better acquaint yourself with the Maya 2011 workflow, you're sure to be well served by this video tutorial. For more information, and to get started using the Spin Edge tool in your own Maya 2011 projects, watch this free video guide.
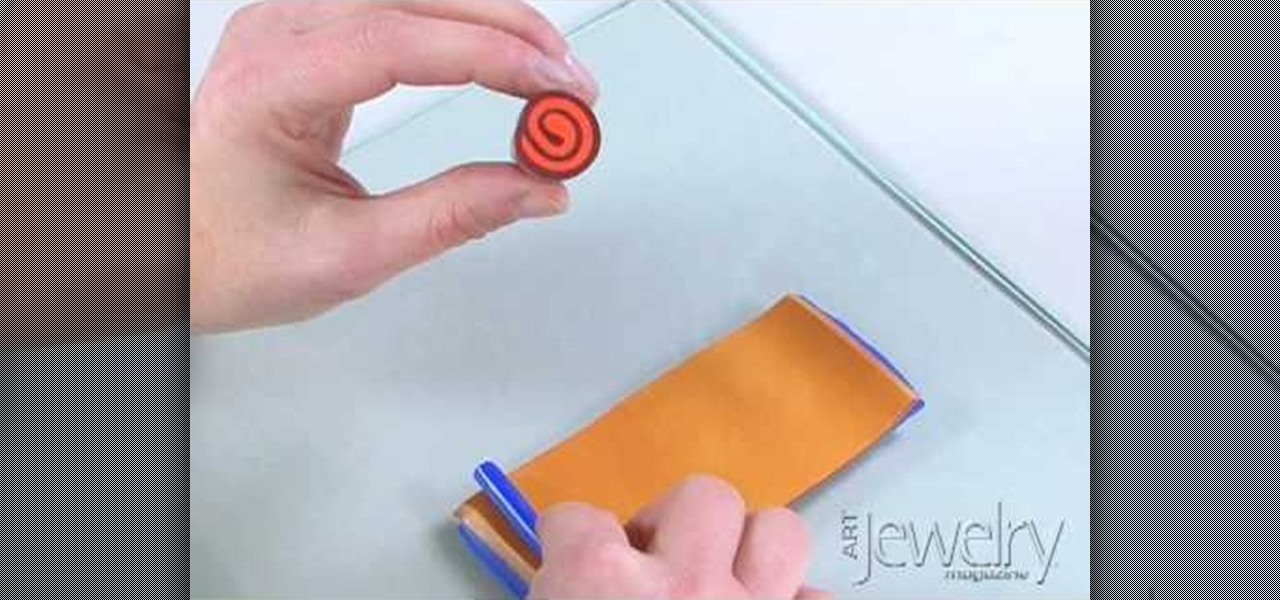
Jill Erickson from Art Jewelry Magazine demonstrates how to make a Jellyroll cane with polymer clay. Condition two different colors of clay by running them through a pasta machine set on medium. Then, trim off any rough edges. Stack the clay on top of each other and place a little bit of pressure on it to confirm the two layers. Using a blade slightly bevel the edges. Slide the blade underneath the two layers of clay for easier handling. Place a think snake of clay in the contrasting color on...
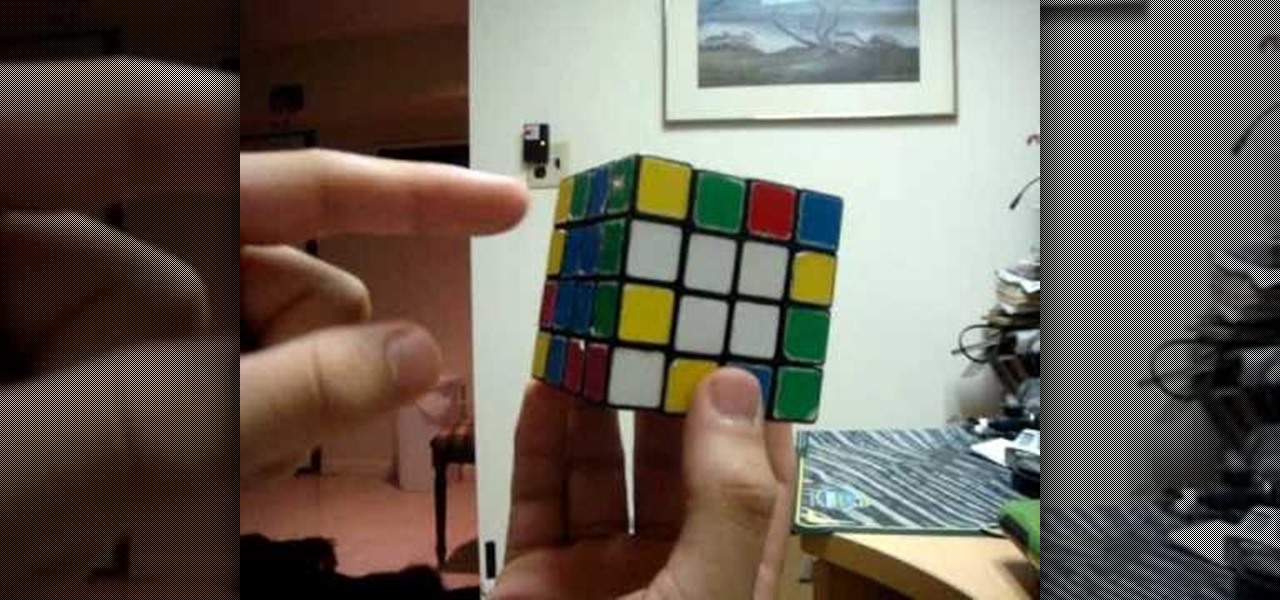
Check out this puzzle video tutorial on how to solve a 4x4 Rubik's Cube by advanced edge pairing. This video goes over how to match up multiple edges at a time, allowing you to eventually become faster with practice. This will also allow you to understand the technique necessary for multiple edge pairing in bigger cubes as well, where it really becomes necessary in solving quickly.
Watch this video from This Old House to learn how to install a door latch. Steps:
To start making your tea and toast, roll about a section of white fondant about four inches by six about 1/8th inch thick. Now take a one inch circle cutter and cut out one circle. Now taking a half inch circle cutter, make an impression in the center of the first circle being careful not to go all the way through. Now you have your saucer for your toast. Next, take a one inch square cutter and cut that out of the fondant as well. Cut it in half diagonally and poke tiny little holes with a to...
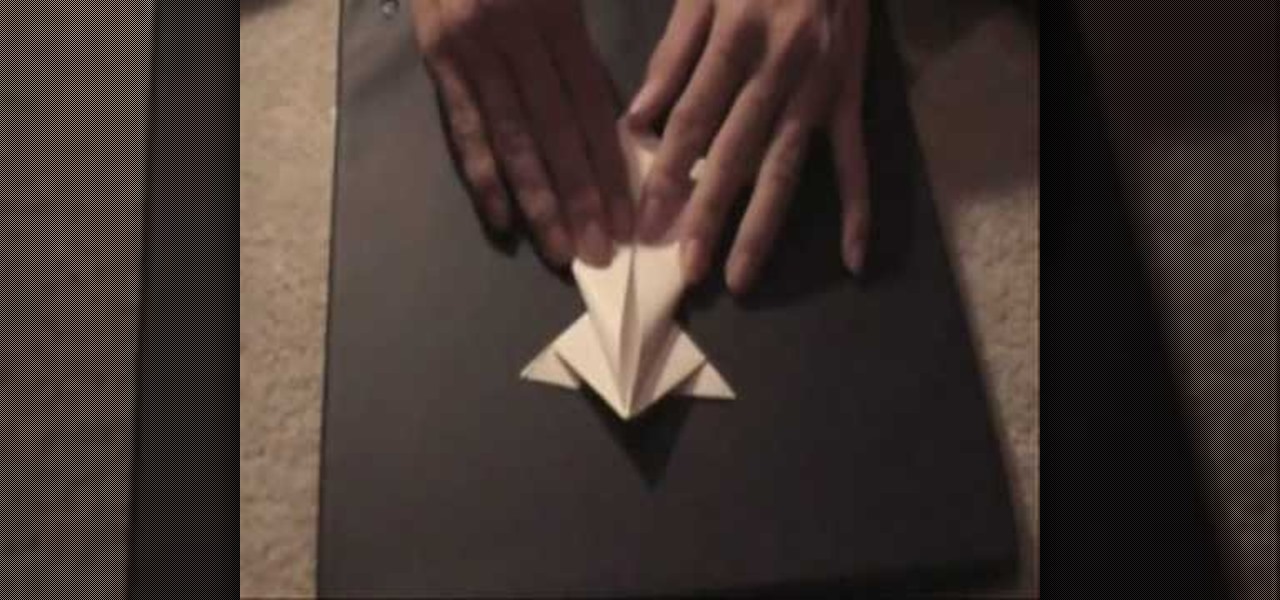
Kevin demonstrates how to make a paper frog. Take a regular sheet of construction paper. Fold the outer ends towards the center forming a triangle. Fold a crease at the base of the triangle and cut it out. Open the folds and you can observe two creases. Create two X-shaped creases by bending the opposite corners. Hold the triangles on the side of the X and squash it down such that the other two triangles meet. Repeat the process on the other side. This forms a square with a diagonal cut conta...