In this video tutorial, viewers learn how to change the color of lips in Adobe Photoshop. Begin by importing the image into the program. Select the quick mask tool and then select the brush tool. Now color the part that you want to retouch. This will allow the mask to create a selection. No click on the masking tool to create a selection. Then select the marquee tool. Right-click the selection and click on Select Inverse. Right-click the selection again and select Feather. Make it 1 pixel and...
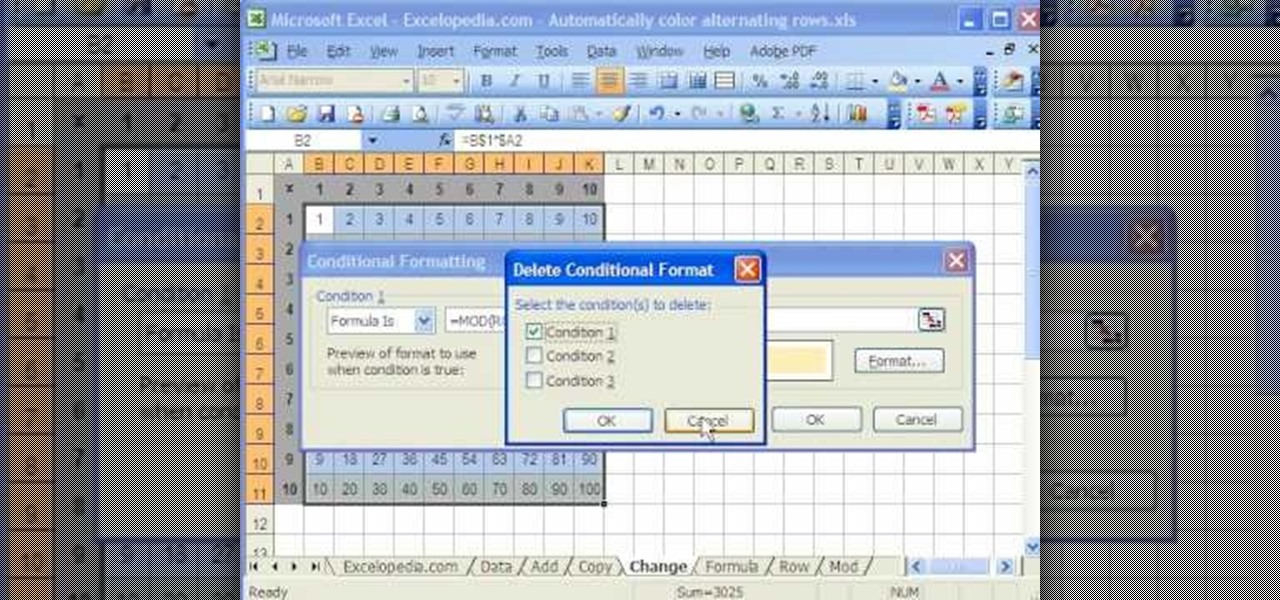
This video is a tutorial on using the Conditional Formatting function of Excel to automatically color alternating rows, which helps your eye to follow across the row. This can be done manually with the “Fill Color” button, but if you add or delete rows after applying the shading, the whole purpose is defeated.
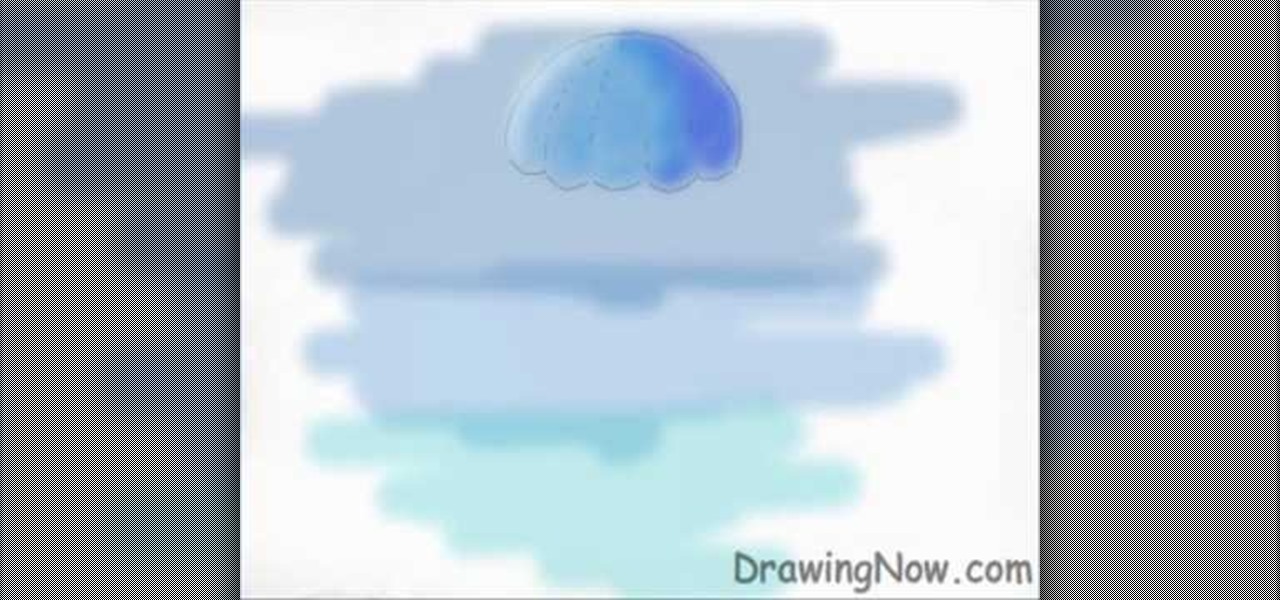
Drawingnow.com shows us how to draw and colour a jellyfish. First make an outline of the body of the jellyfish by drawing a dome with verticl sections like a parachute or an umbrella. Join the sections at the bottom of the dome like a skirt. Colour the background blue in three sections from top to bottom. Darker blue is used for the top-most section, a medium blue used for the middle section and a lighter blue for the lower section. Next colour the umbrella mass of the jellyfish in a blue ton...
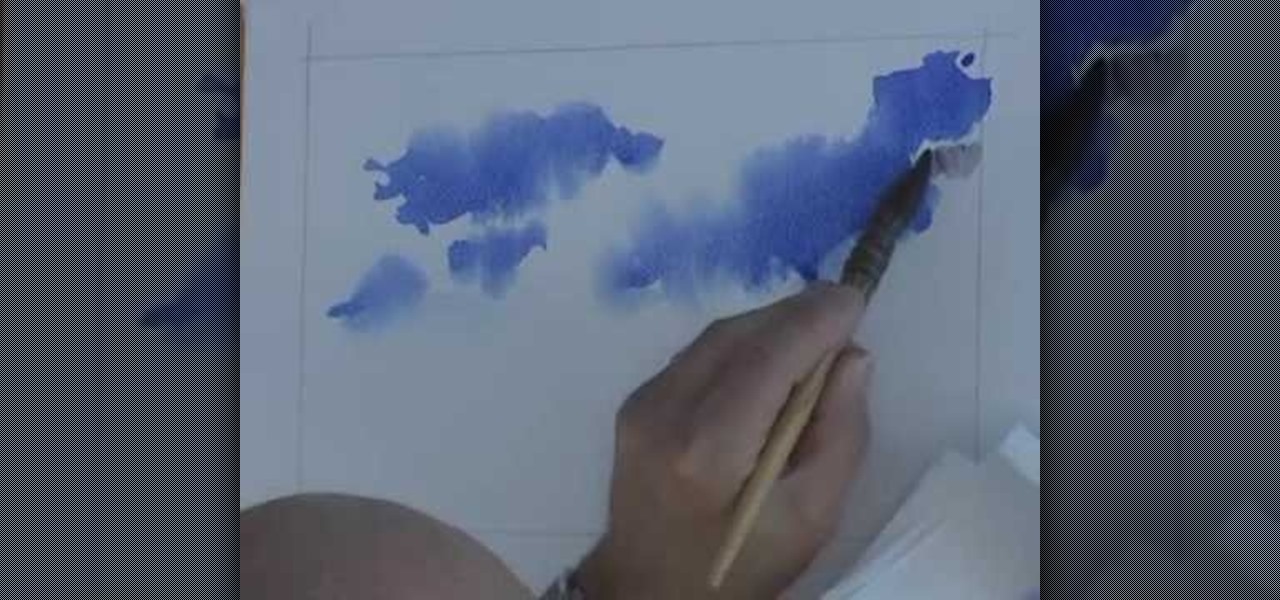
This video illustrate how to paint a breezy sky in watercolors.Here are the following steps: Step 1: First of all take sheet of paper,pencil and watercolors.
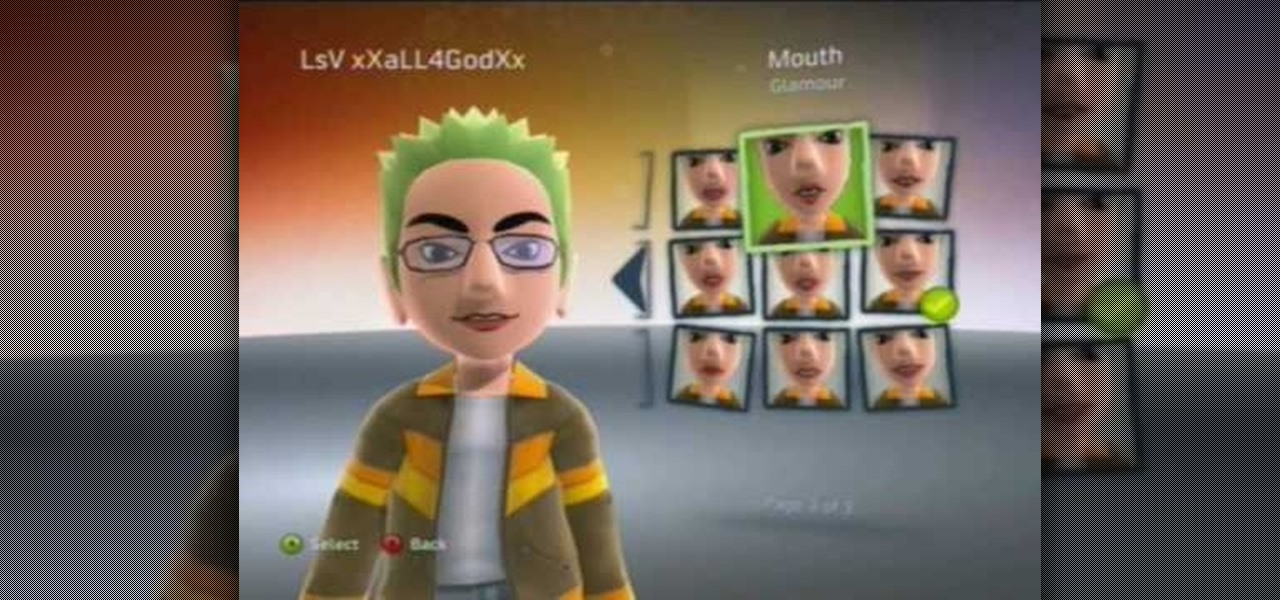
This how to video shows you how to make your avatar look like the Joker from Batman Arkham Asylum. First, go to the avatar edit menu. Hold the button down for 60 seconds until the box tilts. Now, search for spiky hair and choose a green color. Now, move on to the eyes. Choose evil eyes and select any eye color. For the eyebrows, choose a curved shape for an evil look and select a black color. For the ears, choose long ears. For the nose, select a wide or defined nose. For the mouth, select a ...
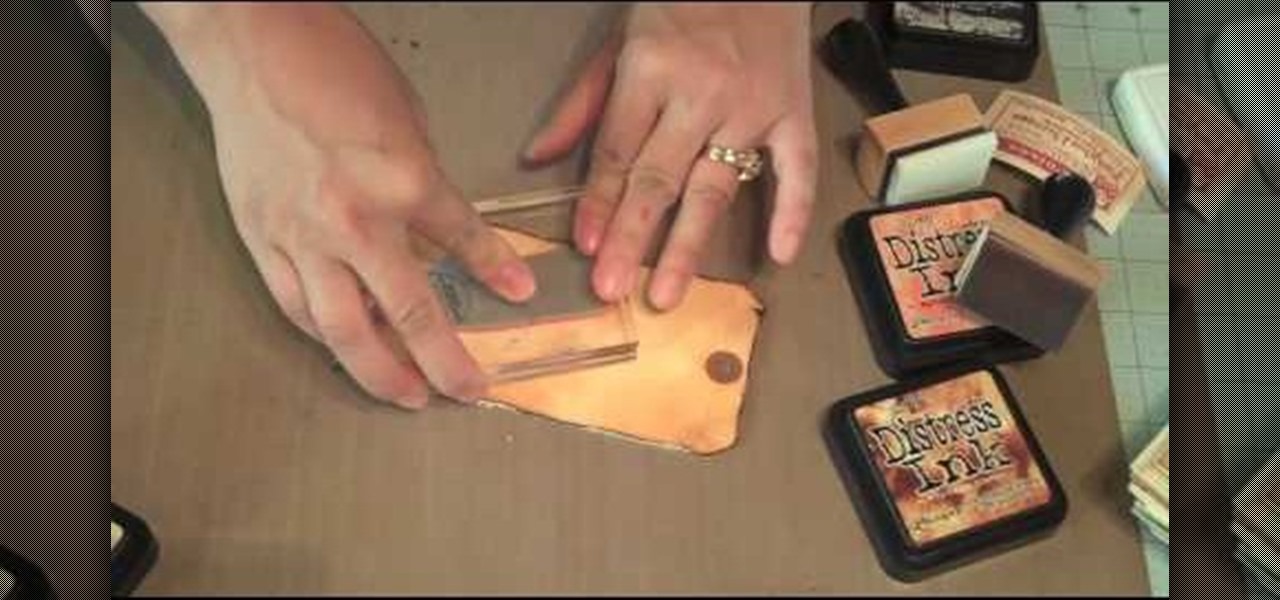
This video describes how to use distress ink. First we have to take a paper that we want to work on. Next take the distress ink colors. Spread the lighter colors first on the paper. Take the first color and spread it on throughout the paper. Next take the vintage photo and work on the edges with it. Next take the spiced marmalade ink and spread it on the edges again. Next take the paper and apply the paper edges directly to black soot ink pad. Next wait for sometime until it dry. Next take th...

JakeWright.net shows viewers how to make and avatar for the internet. In order to do this, you need to first go to Yahoo.com. Here at Yahoo you should go to Yahoo Avatars. Here you can customize everything about you. You can choose your hairstyle, color, eye color and your clothes color! You can also even change extra things such as accessories and the background of your avatar. You can also change the size of everything you pick! There are so many various options that you can choose from. On...
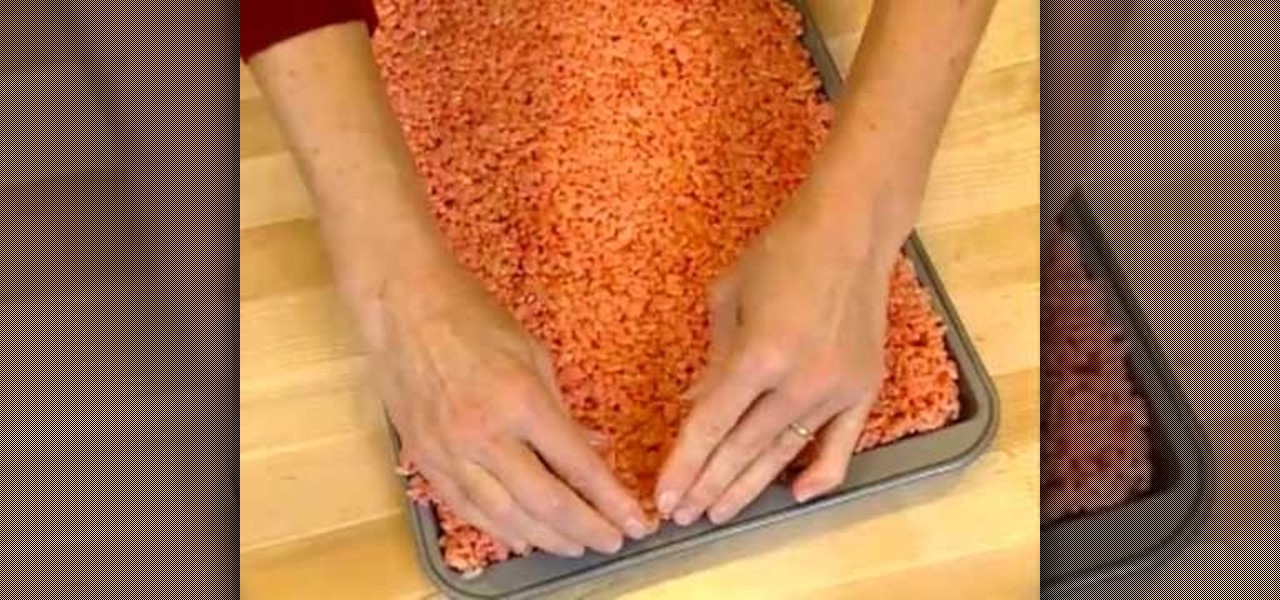
Make a fun marshmallow treat for Valentines Day! You will need:
In this tutorial, learn just how easy it is to enhance your subject by changing their backdrop. By changing the background of a photo you can place your subject in new and exciting places, and enhance the color of their skin and eyes with the right color pallette.
In this how to video, you will learn how to draw a violin. First, start off with the shape of the basic shape of the body. Next, draw the neck of the violin and the tuning pegs at the top. From here, you can draw the bridge, shoulder pad, and the F holes of the body. Next, fill in the outlines of the body. Color in the bridge and the neck with a black color. Now you can fill in the body with a brown color. Create highlights by selecting a lighter shade of brown and painting it at the right sp...
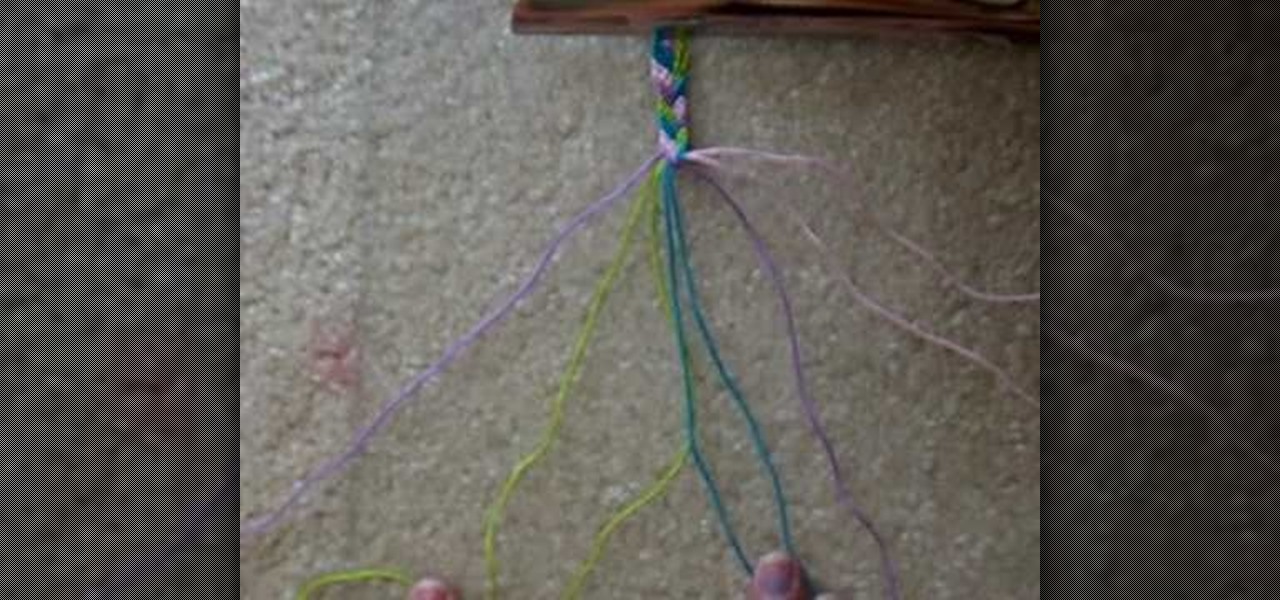
Brace yourself for (and with!) the colorful braided friendship bangle demonstrated in this crafty DIY how-to. Within this free video tutorial, you'll find detailed, step-by-step instructions for weaving your own four-color braided friendship bracelet.
This video will show you the process of how to draw a beautiful colored, and realistic looking bird. This is a crested bird resembling something like a robin. It Has earth toned coloring and a black mask facial feather pattern. This bird takes some hand drawn sketching and shading time starting from the head and working down the chest and filling in to the body and tail. You will need several different color pencils and with some practice and good quality pencils your will have a very subtle ...
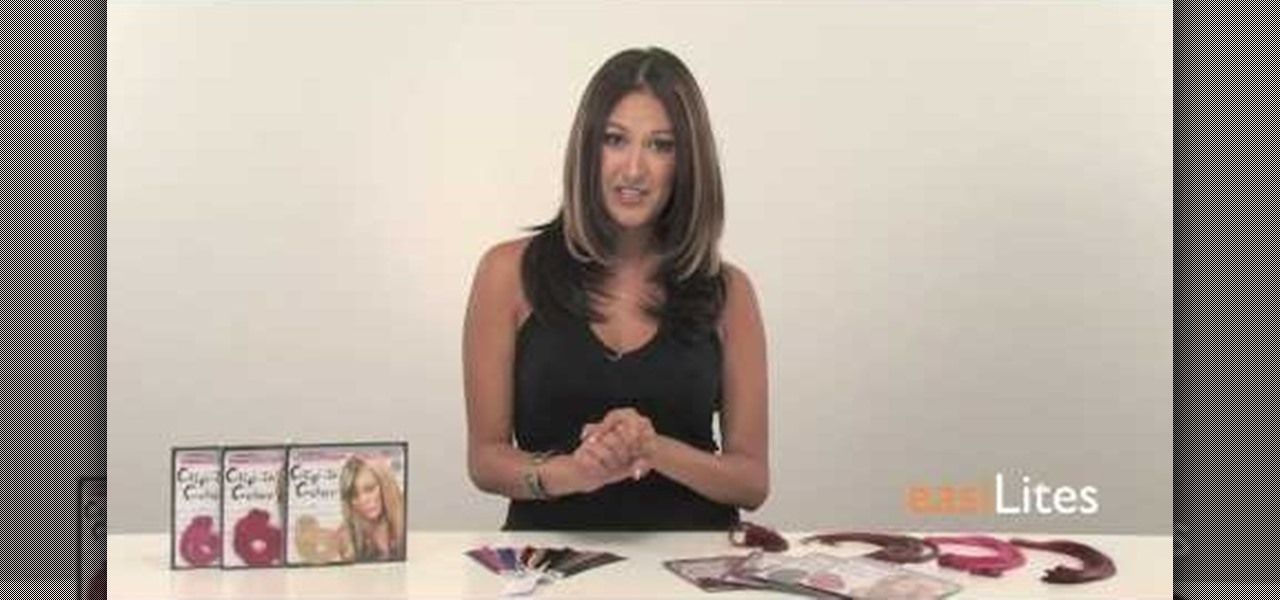
In this video, Jennifer Pompa teaches us how to use click in color extensions using Easilites clip-in color extensions. These extensions are about 1 inch wide and 16 inches long. They are also 100% human hair so you can use heat tools on them without damaging them. To use, grab a piece of your hair close to your hair line and pull it over to the other side of your head. Next, take the hair extension and slide it into the hair underneath. Make sure it is clipped in well and put your real hair ...
Love4Nails teaches viewers how to paint nails with a blue, white and gold nail art design! First, you need to apply your background color. This color will be a blue nail color. You should let this dry. Now, take a black nail art polish and do 3 stripes, that start at the bottom corner and go up slanted. You do not have to go all the way to the top. Next, get a white nail art polish and start the stripes at the opposite corner and paint two across - these two stripes will touch at the corner. ...
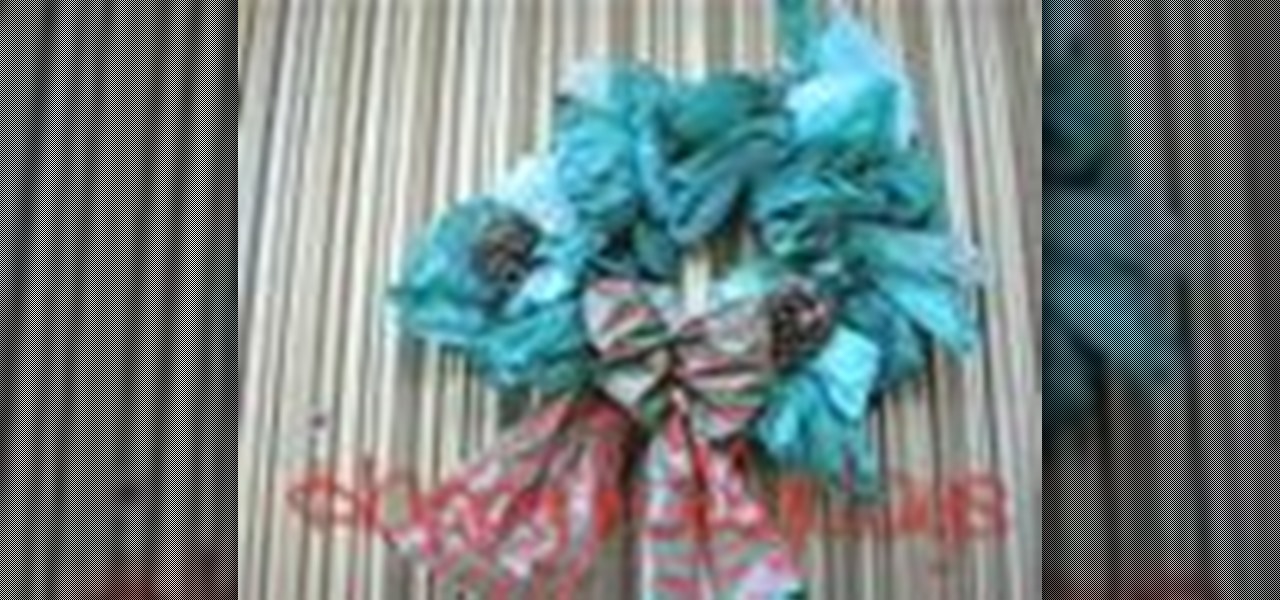
The old frame of the wreath of a previous year containing only two old ornaments is used. Placed on the frame are plastic bags from the grocery store . The bags were green in color however colored bags may be used for creativity . Fluff and fold the bags and wrap them around the frame. Nearly a dozen bags are used. A boy is made using two pieces of the same cloth of a complimenting color to that of the wreath, to form a bow. The bow is attached to wreath and placed on the outside part of a do...
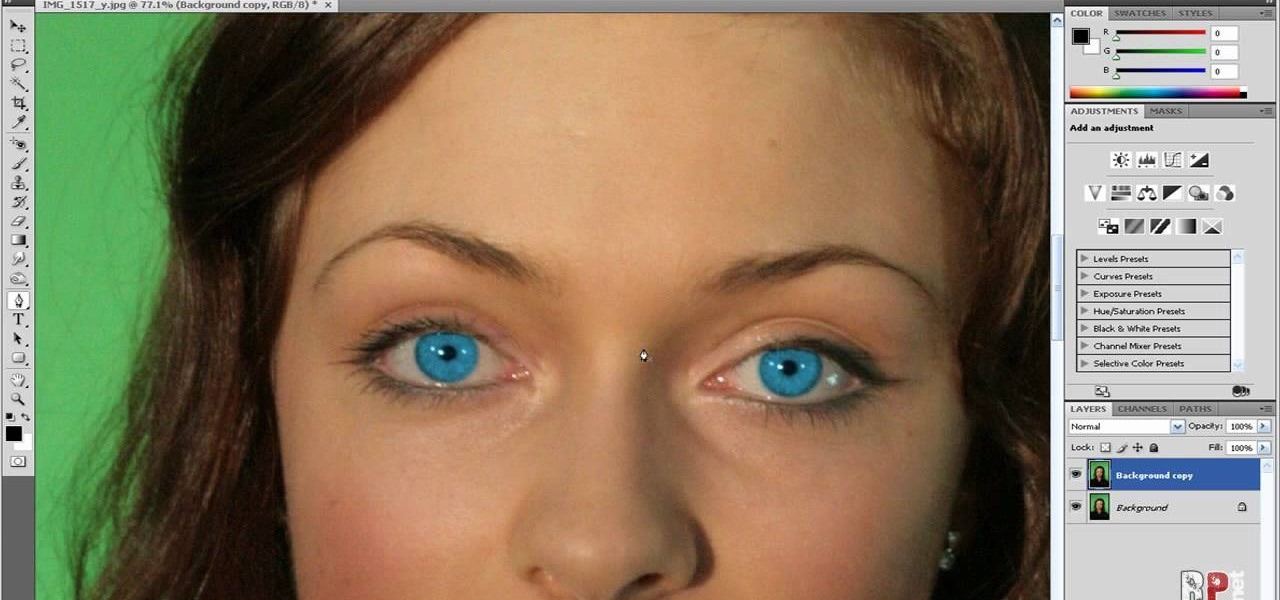
In this how-to video, you will learn how to change eye colors using Adobe Photoshop. First, open the image, Duplicate the background image. Zoom in to one of the eyes and select the pen tool. Set it to paths. Now, go around the iris of the eye. This does not have to be perfect. Click and drag to the other eye and select the other iris as well. Once these are both selected, right click into one of the selections and set the feather radius to about three pixels. Go to Image and Adjustments and ...
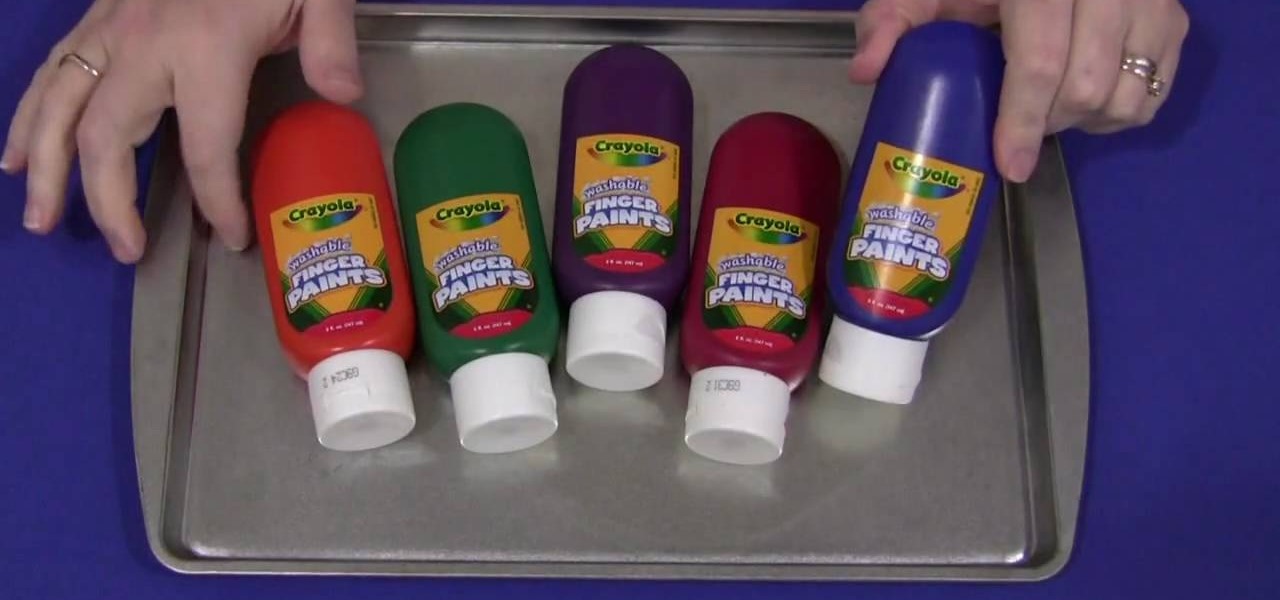
Shelley Lovett from childcareland demonstrates a fun activity involving finger paint that parents can do with their children. She uses finger paints and a pan to make a virtual canvas that is self contained and easy to clean up. She first recommends that only one color be used. She indicates that by using multiple colors, it may result in a brown ugly color and therefore should be avoided. She then spreads the paint onto a flat pan. After the paint is on the pan, parents and children are able...
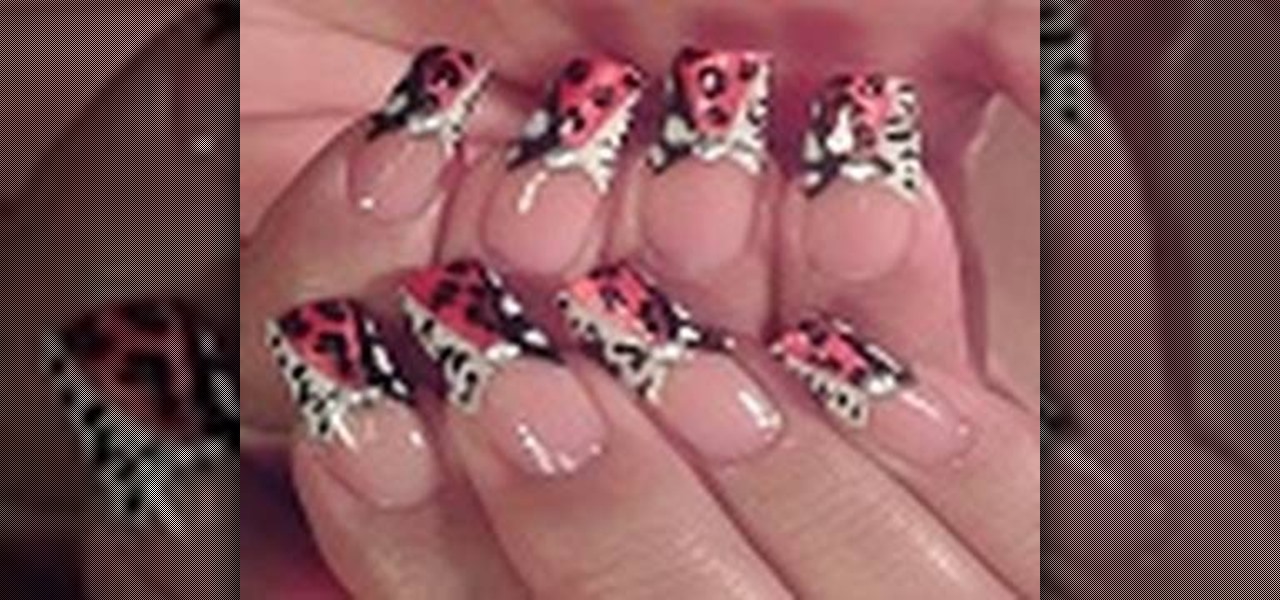
This video is a tutorial on how to paint your fingernails with a sassy animal print. The video begins with a an example of the finished nails being shown and the various alternatives used being explained. The first step completed is to dip the tip of the nail in a gray off white color and then use the color red to make small dots covering the entire surface of the nail. The red dots are then accentuated using the color black to give them a black shading. The final step taken by the nail artis...
In this tutorial the viewer is taught how to make a 3D letter "A". You will need a piece of paper and two different colors so the 3D letter is more dramatic. The directions from the video state to draw the letter "A" just as you would normally. Continue by coloring the "A" to make it a solid letter. Next you need to make lines from the "A" to make it appear as if its popping off the page. These lines should be parallel from the "A" this way it comes across as a 3D letter. As you connect the l...
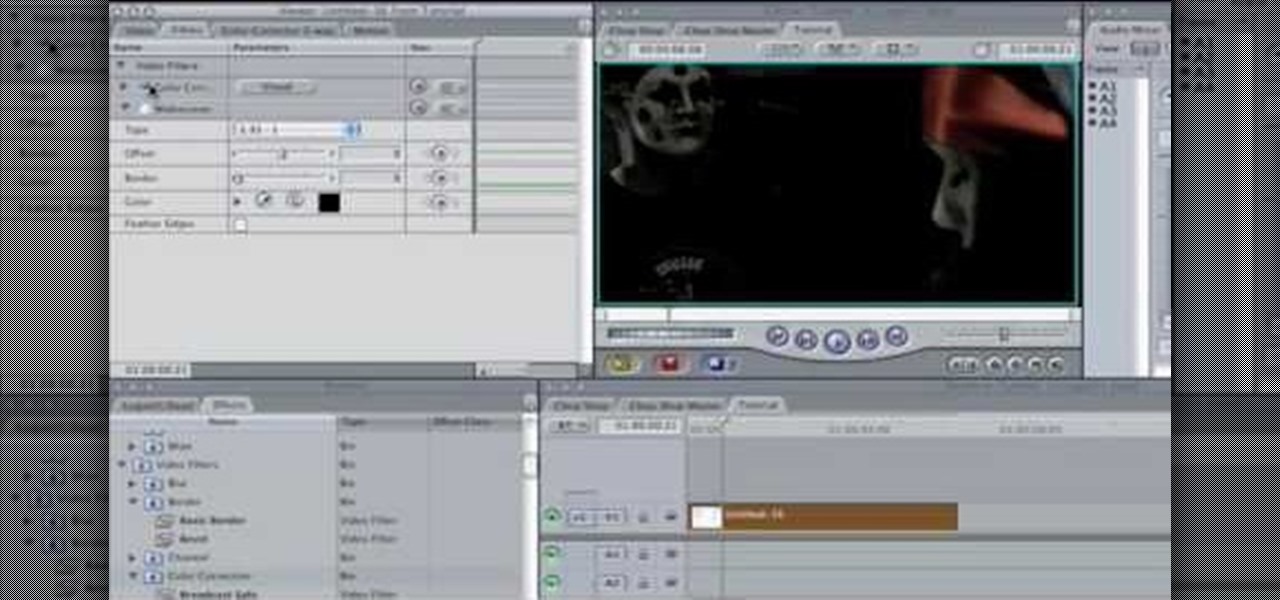
In this Software video tutorial you will learn how to apply the Film Look effect in Final Cut Pro. This is an advanced technique. This essentially takes a video and makes it look like a film. Select the video clip that you want to work with. Then select the ‘color corrector 3 way’ filter. This is under the ‘Effects’ tab. The key to any color correction is to crush the blacks. So, decrease the blacks with the slider. Then increase the whites as films have higher white level. Depending on the s...
Start with a faint outline of the leopards head which is an oval shape and is body which is connected to the head, then add the outlines of the legs ears and tail. In the oval draw the proper perspective lines for the face of the leopard. Now draw the outline of the tree or branch the leopard is laying on. Begin to darken the outlines, drawing with proper perspective, while adding the outlines for facial features. Add your shading depending on your light source then begin to erase the faint l...
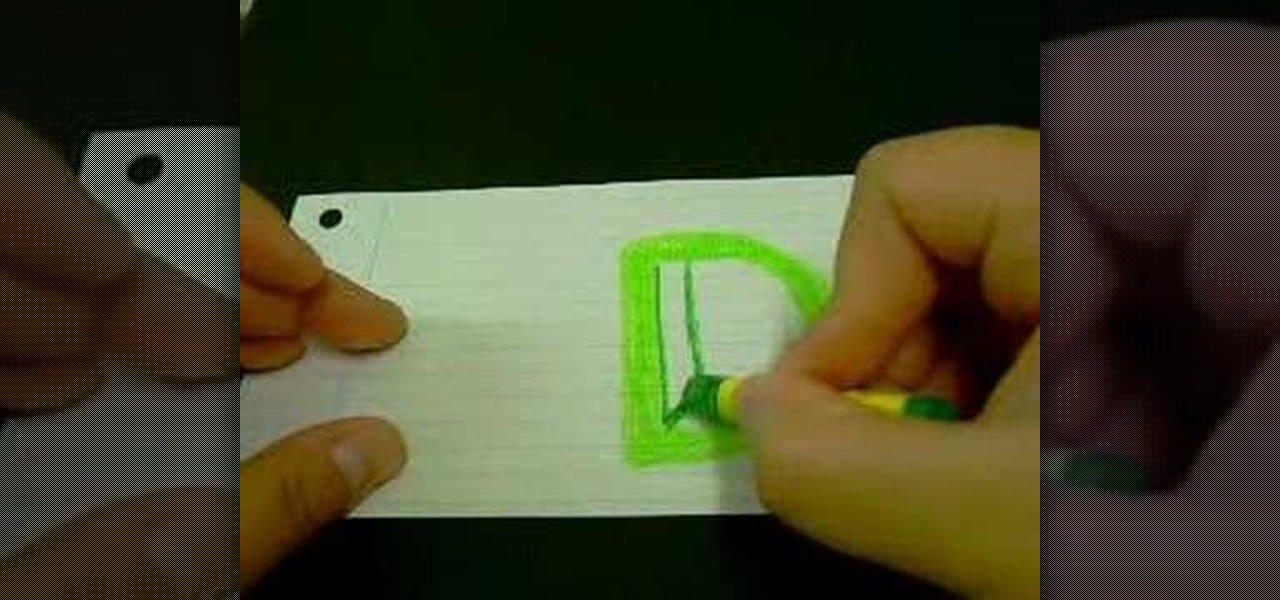
Drawing the letter D as a 3D block letter is easy and fun. To start simply draw the D like you normally would. Next, you need to draw another smaller D inside the first D. From there, draw another D on the outside of the first D. Color in the 3 stacked Ds with your first color. To continue, choose a darker version of your original color. In the bottom left hand internal corner of the D draw a short line that extends at about a 30 degree angle in reference to the bottom of the D. From the end ...
Fimo expert Corinne Bradd and Emma Ward with The Crafts Channel and magazine Craft Beautiful demonstrate how to create a striped cane in 5 minutes. To create the stripes, cut out rectangles of black and white clay and stack them in alternating colors. Then, roll out a cane in a nice, bright color so that it matches the length of the stacked clay rectangle. Then, cut the rectangle into slices. Then, press the rectangle stripes onto the bright cane so that it completely wraps the cane. Squeeze ...
This video describes how to create intricate nail painting designs. The first step is to choose a background color. You can either choose a lighter background color so the darker designs you paint over it will stand out, or a darker background color so the lighter-colored designs will stand out. For this specific design consisting of 3 flowers and a few dots, the former will be used. Next, take globbing paper and glob it with some white polish. Use a nail dotter to apply the polish from the p...
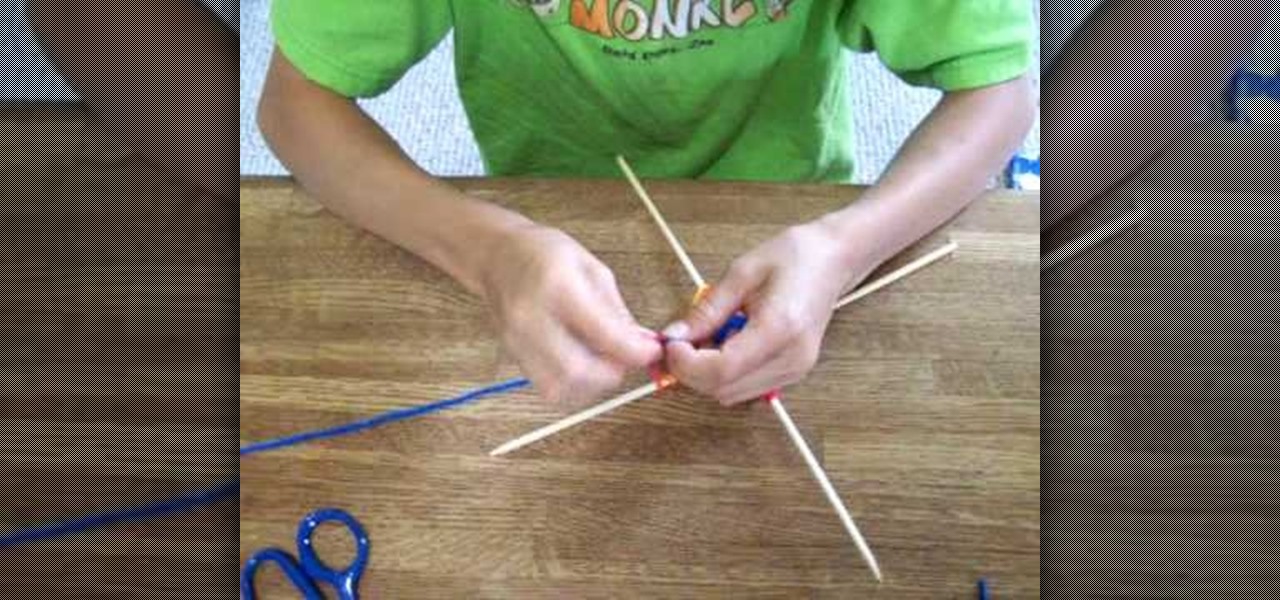
In this video and boy and a woman are showing you the steps to create a "God's Eye" or "Evil Eye". The materials that you will need are 2 sticks, yarn of your selected colors, and scissors. First, you take 2 sticks and use the yarn to knot around the middle wrapping diagonally to form a "t" shape. Then you take another piece of yarn, hold the end in the middle, and start wrapping around each stick going over one and under the next. Continue this pattern until you are done or unless you decide...
You will be using a picture of a Nintendo character and perler beads to make the necklace. Start by making an outline of the character using black perler beads. Then begin using colored beads to fill in the character. The color beads allow you to fill in the character and they also allow you to create all the detail on the character. You can shade and use multiple colors in making the characters. After you have put all the beads on the card put a sheet of waxy paper over the character and iro...
This Software video tutorial shows how to create a glass text effect in Photoshop CS3/CS4. Download a free trial version of Photoshop CS4 from Adobe. Open Photoshop, go to ‘file’ and click ‘open’. In the next box, give it a name, select width and height at 90 pixels, background contents to ‘transparent’ and click OK. Select the color palette and choose the background color and click OK. Now open ‘paint bucket tool’ and fill in the color. Then go to ‘text tool’, select the font, size and posit...
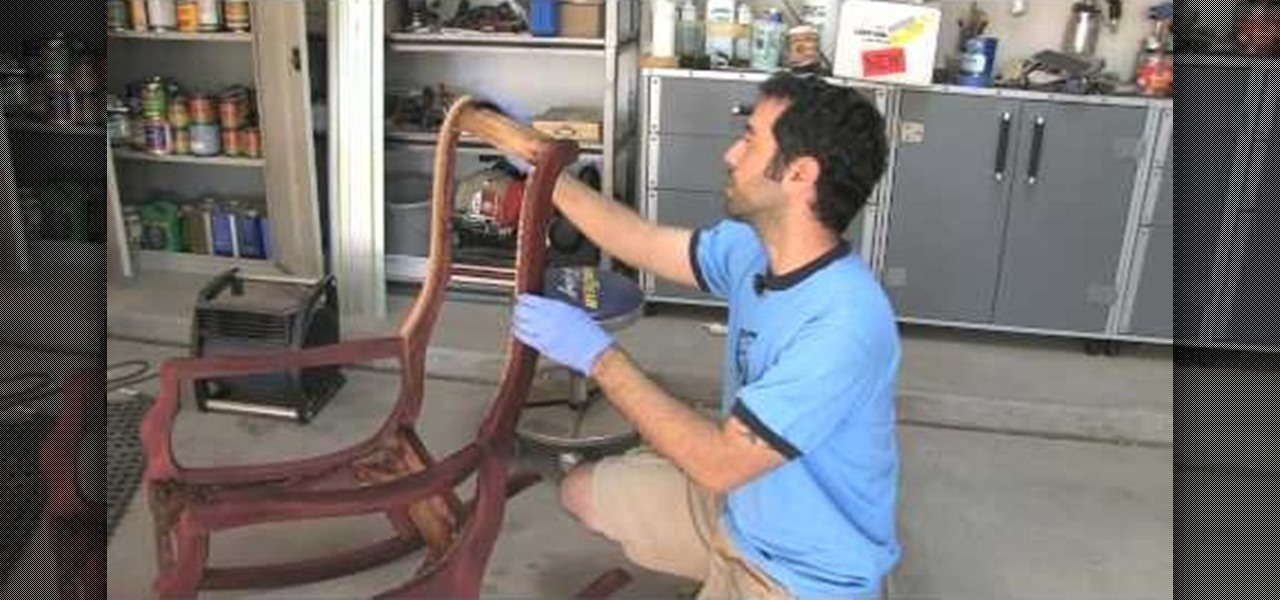
Add shimmer and color to your wood furniture with a Deep Red Mahogany Finish. Watch as The Wood Whisper's Marc Spagnuolo shows you how to apply this look to anything wood in your home. First Marc tells you about narrowing down whether or not you have to mask the wood or enhance the wood. After you figure that out you must choose how to color your wood. There are stains, oils, dyes and more! Marc chooses both a Merlot General Finishes Water Based Dye and Brown Mahogany General Finishes Gel Sta...
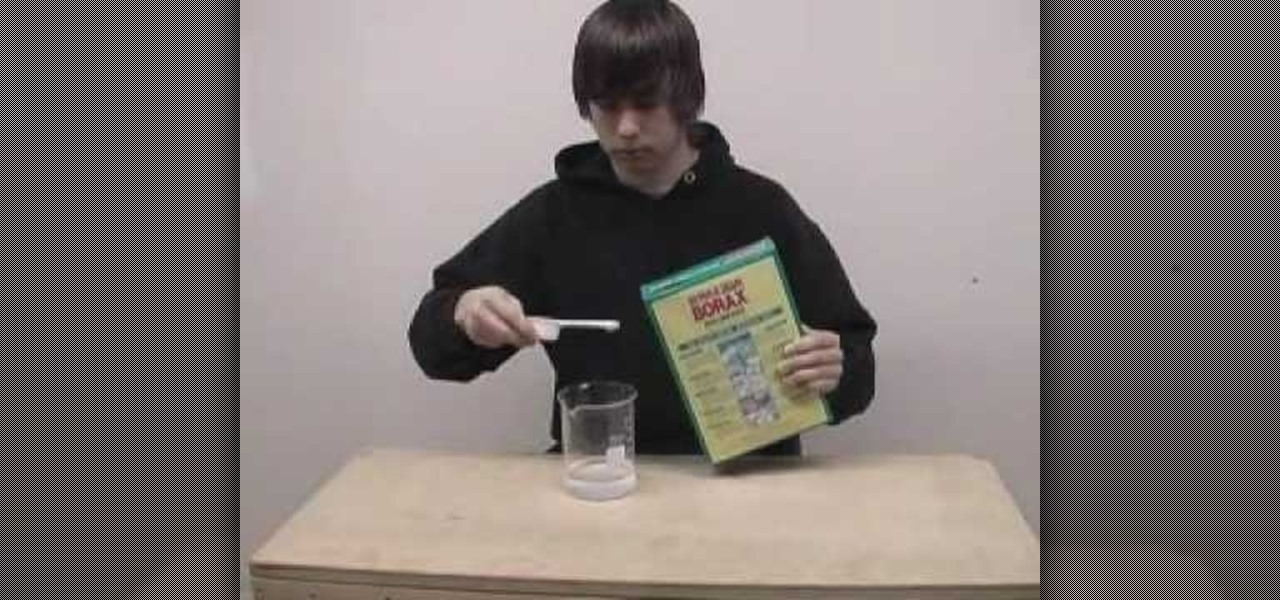
This is a hobbies and toys video tutorial where you will learn how to make flubber with household supplies. Put three fourths cup of warm water into one jar. Measure half a cup of glue. Take food coloring or any other color and pour it into the glue. Stir the glue so that the color mixes well. Now add the glue into the warm water and stir well. For the second mixture, take two teaspoons of borax and half a cup of warm water and stir. Now combine both the mixtures together in a jar. With both ...
This video teaches you how to make a steampunk bunny. You want to start off by making a blob with a fairly light color. Then you want to use a sharp stainless steel tool to create a round head. Make sure to make the head of the bunny is forwarded a little bit so that it looks like a bunny. Next, using your hands create a tail in the back of the bunny. Insert one of the bigger eyes using the little wire. Go ahead take your tool and carve out the nose, the cheeks and the mouth. Next you want to...
This video from fahimuk teaches you how to easily draw a very realistic looking Corvette. Fahimuk takes you through the drawing step by step and shows the drawing when it is sketched all of the way up to when the car is finally completed and in color. He goes very slow and is very explanative in his video. Even though the video is without sound it still adequately shows how to draw a very realistic looking car. The final product of the car is in full color and fahimuk even shows you how to co...
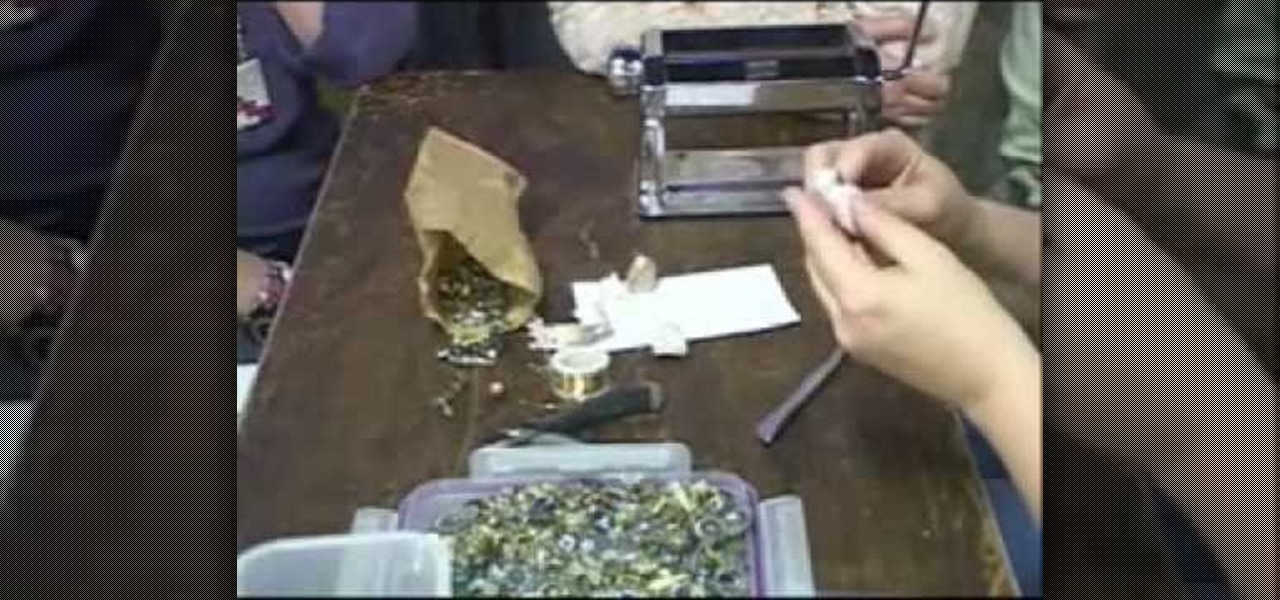
Follow the easy instructions of this video to create the perfect kitchen accessory for your dollhouse! The instructions for the mini polymer clay watermelon are quick and easy to follow. First you need red, black, green, and translucent clay. You want a very light green color for the watermelon. Use the pasta machine to mix the colors together. Slice the pieces of green clay and lay them on top of the light green clay. On the largest setting run them through together in the pasta machine. Rol...
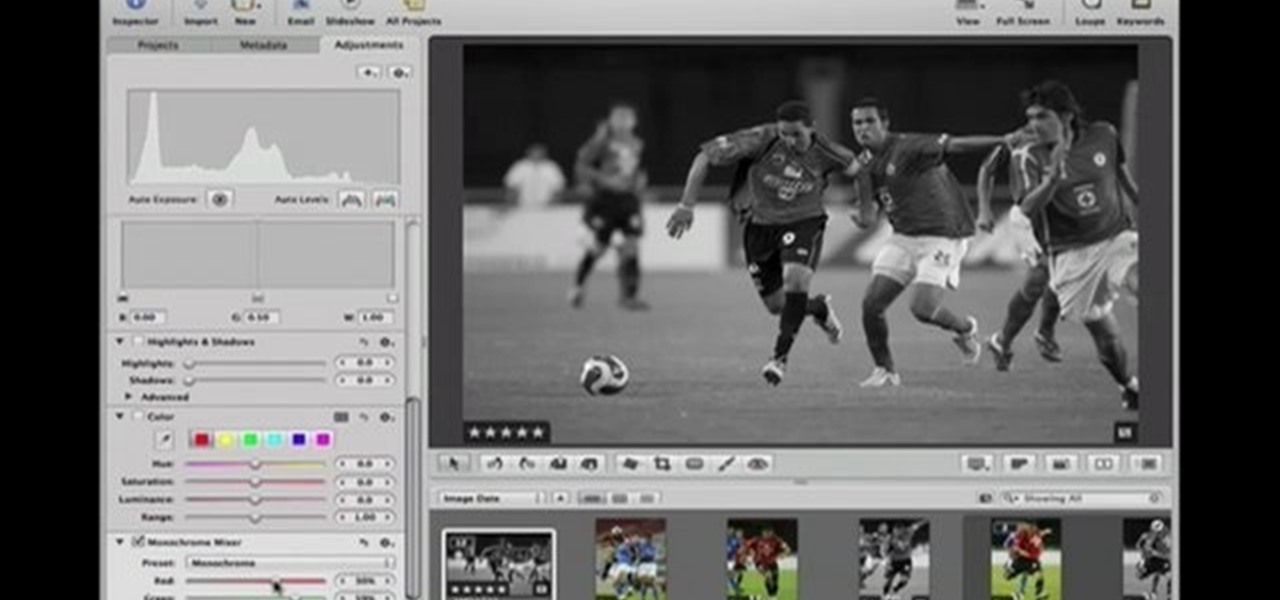
This Software video tutorial shows how to convert color images to black and white in Aperture. Scott Bourne presents this video. Open up ‘aperture’ program and select a color photo that you want to convert to black and white. Now move from the ‘projects’ page to the ‘adjustments’ page by clicking on it. Then click on the ‘+’ sign and select ‘Monochrome Mixer’. When you do this, the picture instantly turns to black and white. It’s as simple and easy as that. For editing the picture further, on...
In this video we learn to make a zigzag Chinese staircase friendship bracelet. You can go wild and make it all different colors or all one color. You start off with 5 strings about a yard long and fold then in half. Then you make a knot creating a loop for the end and to hold to a nail or clip while you make it. Take a strand and make 5 forward knots. With the same strand you then do 5 backward knots. Repeat this one time, so in all are 20 knots and then switch color, or to another strand. Do...
In this art tutorial, you will learn how to draw and then paint an orchid. You will need a Chinese paintbrush, a plate for the paint, water and paper. For paint colors, you should make sure you have red, yellow, black, green, blue and purple. First, dip your brush into the water and then mix yellow, red and black, dabbing some of each color onto the brush. When doing this, do not actually mix the colors on the brush. You want the red on one part of the brush, the yellow on another part, and t...
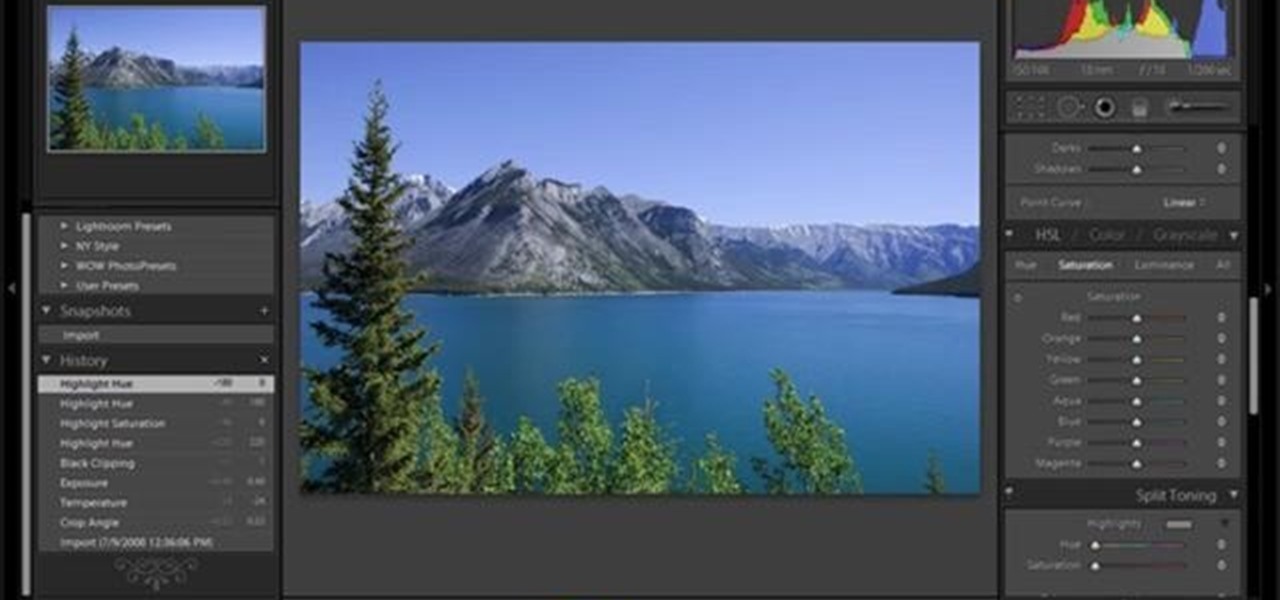
This video shows the method to split tone in Lightroom. Firstly, go to the 'Grayscale' button to change the photo into black & white. Go to the split toning section and change the tint into the color you want using the 'hue' option. You can also use the 'Highlights' option to select the color and see the preview. Bring the saturation down to get the right color. Repeat the same procedure with the shadows. Choose the right tint for shadows. Hold the 'Alt' key down to see the effect of change i...
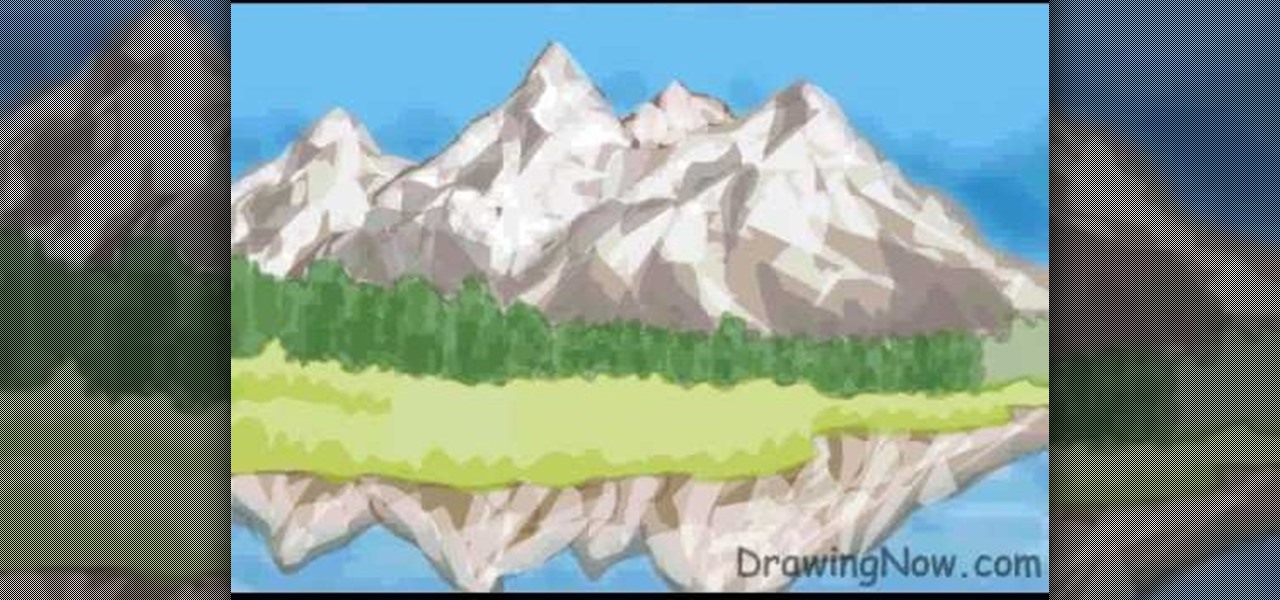
DrawingNow teaches you how to draw a mountain scene. You start with simple triangles on top of each other, which will serve as the sketch for the mountains. Use horizontal squiggly lines, which will act like a sketch for trees and water. You can color the sky blue to get that out of your way. Color each mountain a different shade of brown and make regions of white on the tops, to simulate snow. Then you have to color in the water and the mountains that are reflected in it. Next, draw grass ne...
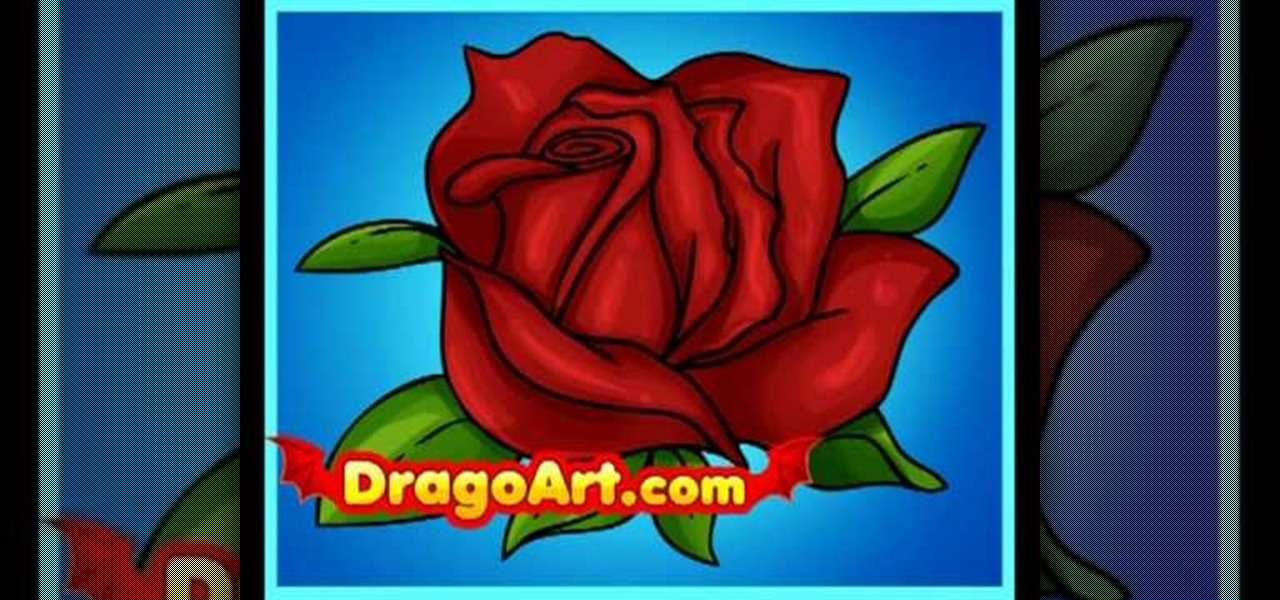
This video shows you how to draw a cartoon rose. Step by step, this silent clip shows the best way to draw this and then fill it in in color, including the leaves. First you draw a circle and a cross positioned above the centre point of the circle. Then you follow the drawing as it's shown, first outlining the bud and then expanding to the outer petals and finally on to the leaves. It's done in two colors on the video just so you can see the latest section of the outline. Then you color it in...
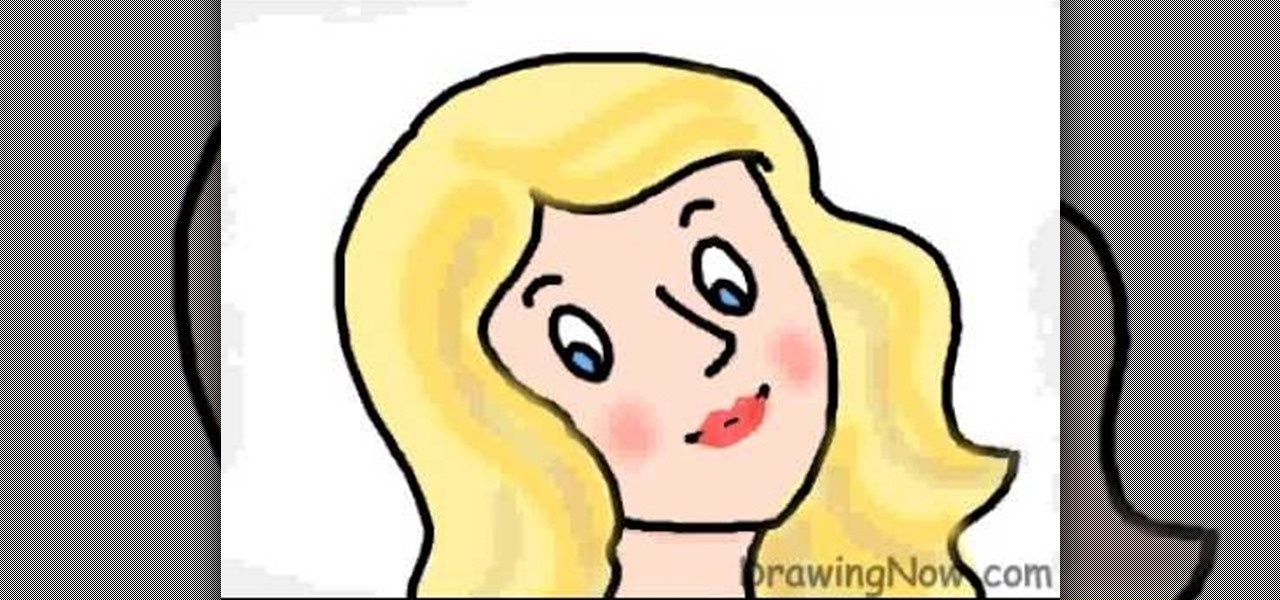
DrawingNow teaches you how to draw a cartoon mom on a computer in Microsoft Paint or any other drawing program. You start with a basic oval, but tilted to one side. Then, add the contour of the long hair. Next, you can start adding details to the face. Draw a nose and two equally spaced ovals with circles inside each one. These will be the eyes. Draw eyebrows and full lips. Now that you are done with the sketch, you need to color it in. Use yellow for the hair, blue for the eyes, a pink flesh...
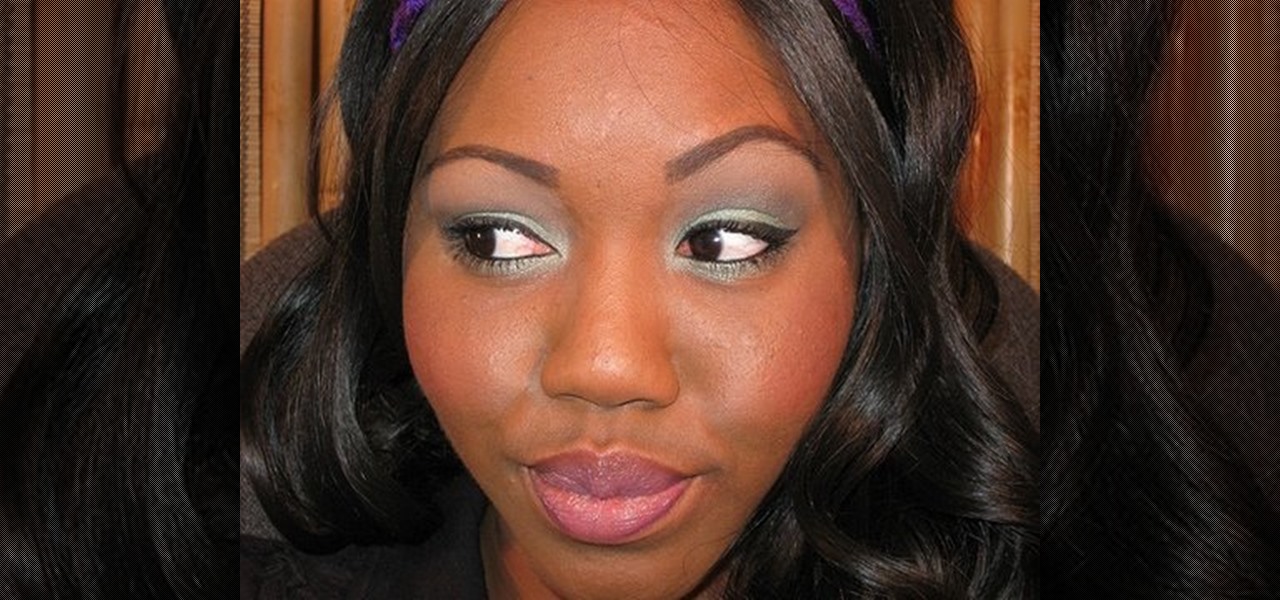
This simple video is a quick description of a woman applying makeup to her face in small, descriptive steps. She already appears wearing small amounts of makeup including large amounts of blue eyeshadow as well as lipstick. She then takes a brush and starts to apply tinting hues of color to her upper eyebrows-followed by that, she takes the same brush and applies tinting color to her lower eyelash line. Next, she goes over the pigment once again with her fingers to remove any excess pigment a...