The Canon EOS 7D can be fine-tuned to adjust its auto focus to suit nearly any subject. See how you can customize your AF functions to get the best focusing options needed for your desired result. This video breaks down everything.

You can gain even greater precision on the Canon EOS 7D digital SLR camera by using Spot AF or AF Point Expansion. When you manually choose one AF point, you also have the option of changing its size. You focus point will be exactly what you want. Very specific.

Dogs and pets make beautiful portrait subjects, but they can be difficult to photograph. In this video, learn exactly how to set up your surroundings, lighting and camera to take your best animal picture. This tutorial will teach you a photography technique that you can use to photograph your pet in studio or at home using an inexpensive lighting setup. You can apply the same technique to shoot a cat, bunny, pig, pony, tiger.. anything!
The egg drop has become a sort of rite of passage for gangly fourth graders as they embark on their first journey into physics and math before they approach these subjects again later on in middle school and high school.

In this how-to video, you will learn how to send an update to the fans on your Facebook fan page. First, go to your fan page. Go to the top and press edit page. Now, click send an update to fans. Now, click edit to change who will receive this update. This includes sending it according to gender or location. Enter the subject and message of the fan page. Click send to complete the process. This update will be shown in the sub category in the messages page called updates. Click it to read the ...
Vonage is a very cool and inexpensive way to have a home phone, but unfortunately it requires a little box to be near your phone at all times. In this two part tutorial, learn exactly how to hack your Vonage phone and route it to your central telephone box to distribute your VoIP line throughout the entire house. The days of being stuck near the phone box are behind you once you follow these steps to a simple hack.

Live View wit the EOS 7D camera from Canon, lets you compose and view your subjects with the LCD monitor as your viewfinder. This is great for a multiple of reasons. See how to use live view on this digital SLR camera.
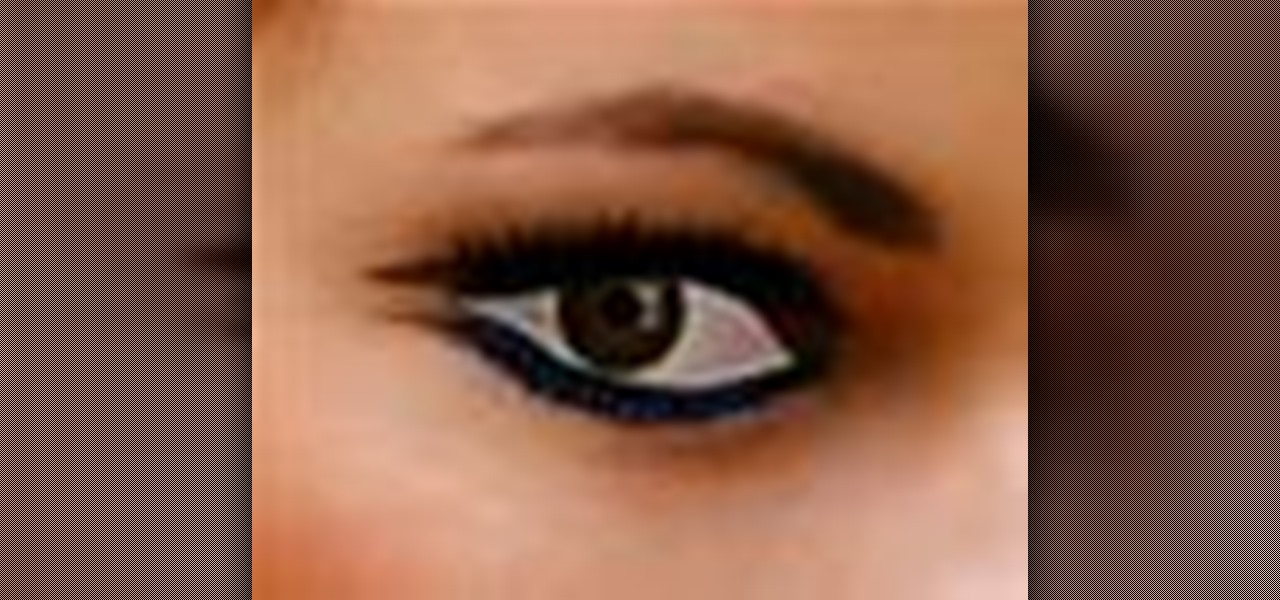
Increasing the contrast in Photoshop could help when performing this Illustrator technique. This subject: the eyeball. Watch this Illustrator video tutorial to learn how to vector an eyeball in CS3. Vector an aye of a model of your choice using simple techniques that will be useful, not only in vectoring eyes, but tracing techniques that are used for full face and body vectoring and vexeling.
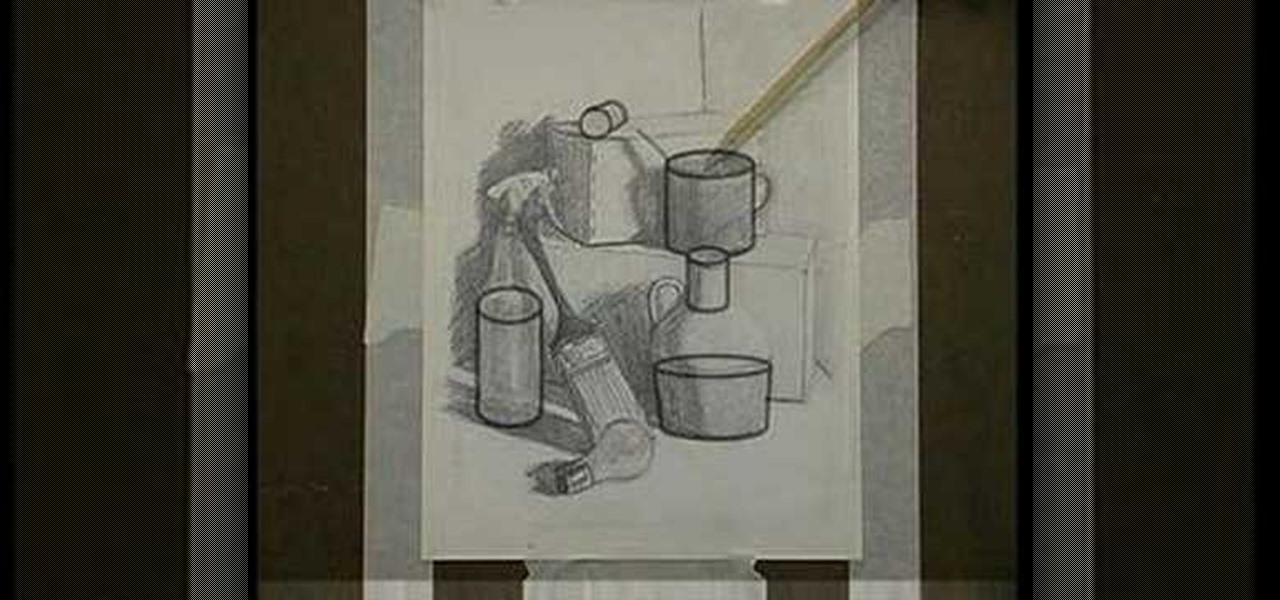
Jordon Schranz brings you this tutorial on drawing. Search WonderHowTo for Sessions Online School of Fine Arts for more drawing tutorials. Learn how to draw what you see. The technique & craft of drawing isn't necessarily about inherent talent, it is something that comes with lots of practice. It is all about being able to accurately record what you see. This drawing lesson focuses on learning to see the form of objects in the physical world. Rather than drawing every last detail in your subj...
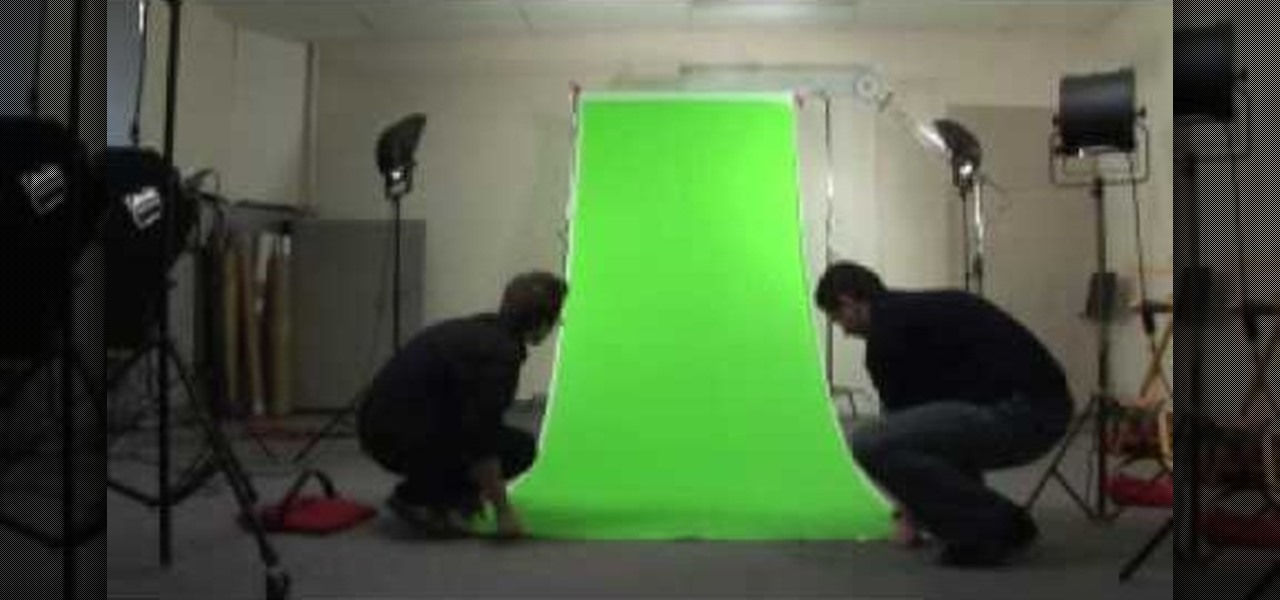
Tom of Videomaker teaches how to use the green screen to make a character appear in front of a set or to achieve the website spokesperson effect. Install a green screen in such a way that the fold at the corner of the wall and the ground is instead curved in order to create an even transition from the top to the bottom of the green screen. Build the base at the bottom part of the screen by weighing down the fabric at the corners and stretch it evenly. Light the green screen separately from th...
This how to video shows you how to setup a meeting using Microsoft Outlook. First, open the program. From here, click on calendar. Next, go to the upper left corner and select new. On the subject line, type in the subject of the meeting. In the body, type in what the meeting is about. Go to scheduling and go to the left and select invite attendees. From here, select the address book and search for people by their last names. Select who is optional and who is required. Click okay. You will see...
Setting up a chroma key backdrop contains various steps/ the support system and muslin consists of various parts like the support stands, shrink lamps and the muslin. Place the two stands 12 feet apart and attach 4 clamps to vertical section of each stand. Snap the crossbars together in a proper way and insert the muslin into the respective end of the crossbar and put the crossbar on the stands with the green end of the muslin facing out. The muslin should be attached using the clamp. And ens...
Dropping out of high school doesn’t have to mean the end of your educational career. You can earn a General Education Development diploma, also known as a GED. In this video, learn about the process needed, step-by-step, to get your GED.
Looking to get your family together somehow? Why not a family portrait? It's both a great keepsake and as an excuse to get everyone together. In this video, learn how to snap a great family portrait.
Don’t laugh—butter sculpture is a true art form that originated in Tibet in the 7th century. It is now one of the highlights of many American harvest fairs. Learn how to make your own butter sculpture.
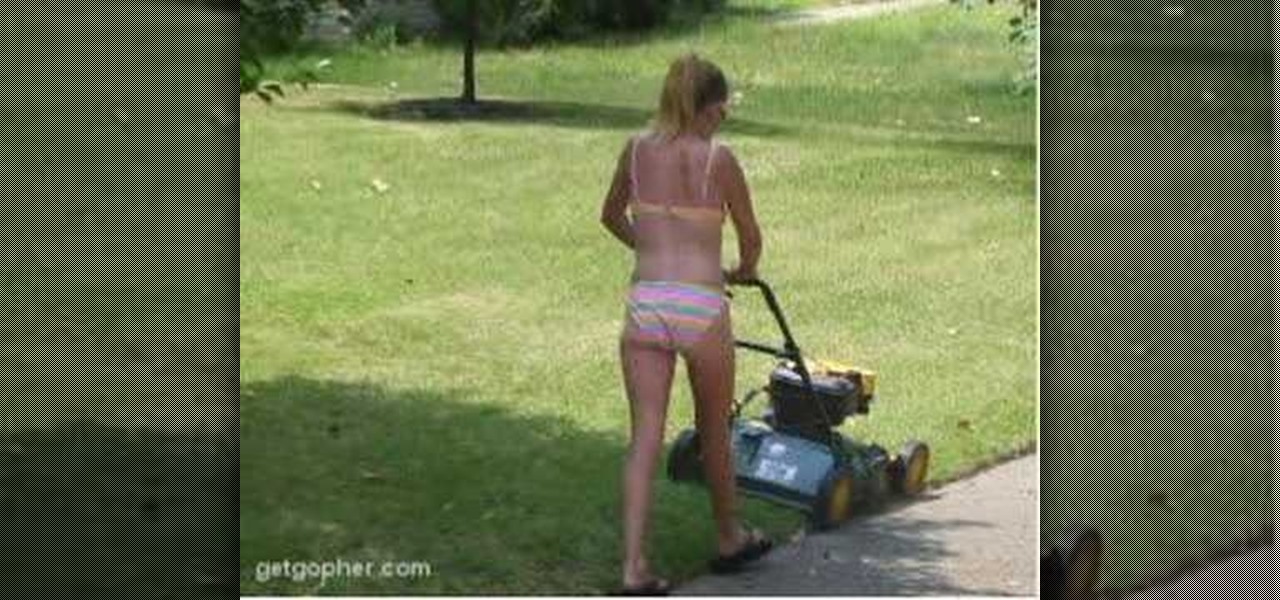
In this episode of Gopher Haul you'll learn how to get new customers for your lawn care business and new ways to distribute business flyers.
Facebook added a new feature that lets you post 3D versions of your portrait mode photos for all your family and friends to see on their smartphones, computers, and virtual reality goggles. These new 3D photos add a whole new dimension to your images with movement and more depth.
Hera, wife of Zeus, was the queen of the gods. As such, she sat on her throne on Mt. Olympus with great majesty and elegance. And as the goddess of marriage and women, she exhibited great poise and care for her subjects.
This hair and makeup tutorial helps you recreate the obvious style of Twiggy and her androgynous looks. The English model, actress and singer is known for her large eyes, long eyelashes and think build, but in this tutorial, you'll be focusing on her short stylish hairdo and a makeup look inspired by her. PrimpPowderPout's subject in this tutorial is Miss Lena Mae, burlesque performer extraordinaire!
There's a technique available for digital SLR cameras that most amateur photographers do not know about, or do not use correctly, and that's using a simple telephoto lens (long lens) to create blurry background, great portraits or awesome up-close macro shots. Without the telephoto lens, you lose a lot of the emphasis on your subject, because the background blends in, whereas telephoto lenses help create a degree of depth, blurring out the background, giving concentration on the foreground. I...
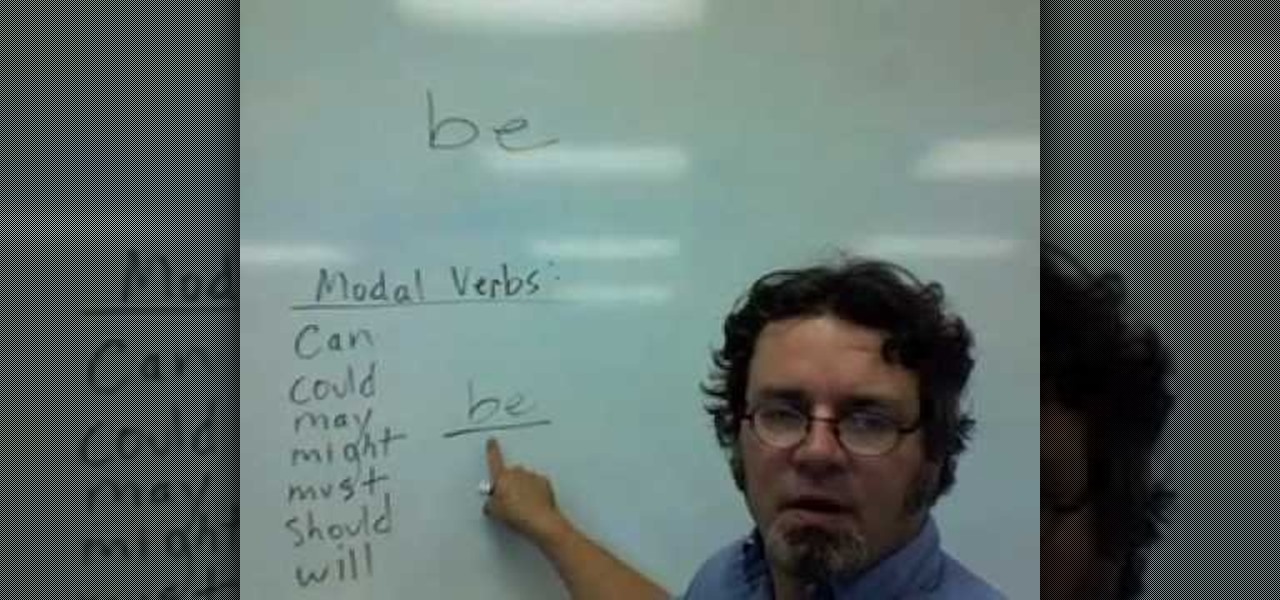
In this video, we learn how to use the verb "be" in different tenses. This verb changes depending on the verb tense and subject in which it's used. In the present tense, "I am", "we are", "you are", etc can be used. In the past tense "I was", "you were", "he was", "we were", etc can be used. For future tense "I will be", "you will be", "he will be", "she will be", etc can be used. Depending on the tense you have, the verb "be" will change in all the sentences. Make sure to go over these and l...
Fit bodies are made, gals, not born (unless your name happens to be Megan Fox). Most of us have some trouble getting the flab off our bellies because the fat there is the last to go when you're dieting and exercising to lose weight (sucks, we know). So how do you conquer the ab region without subjecting yourself to 3,000 crunches?
In this tutorial, we learn how to create summary tasks in MS Project 2007. First, put a task into your project and use the fill option to create more tasks. Fill in the duration and start time of your tasks as well. Now, write the subject at the top and then highlight the tasks that have to do with them, and click an arrow to indent all of these tasks. You can have up to nine levels of indenting and tasks, but this can make your project look far too complicated. When finished, save your proje...
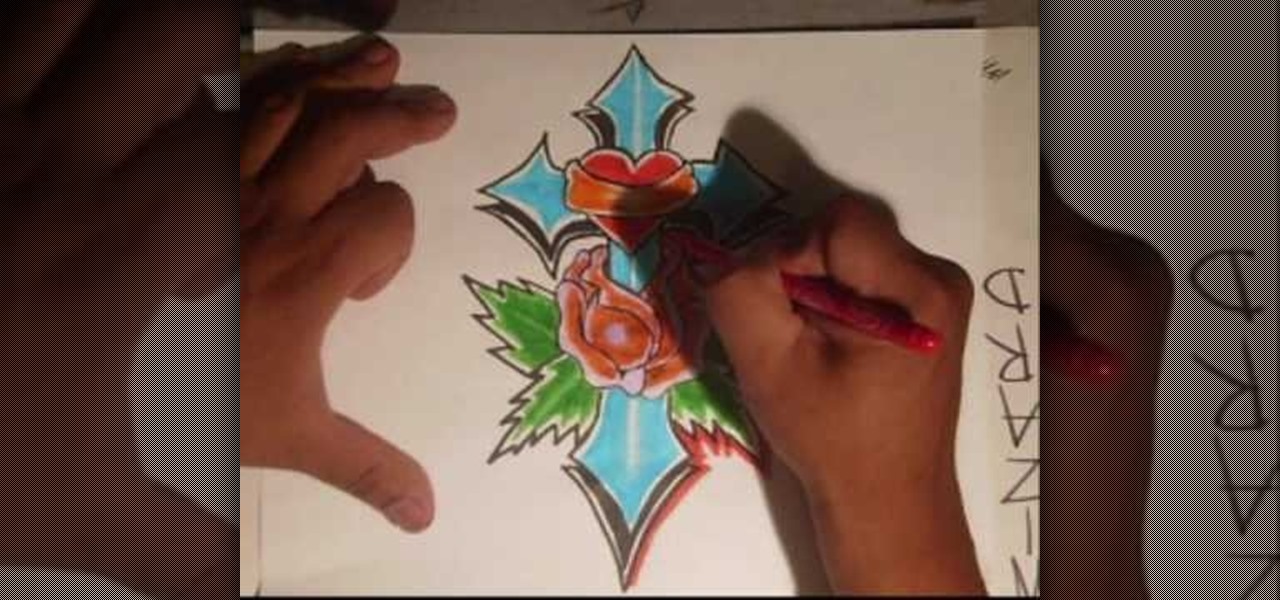
Contrary to popular belief, graffiti doesn't have to be all tough names, tough tags, and tough gansters. In fact, you can draw just about any subject you want using the graffiti style in order to make it look cooler and more street beautiful. But don't take our word for it.
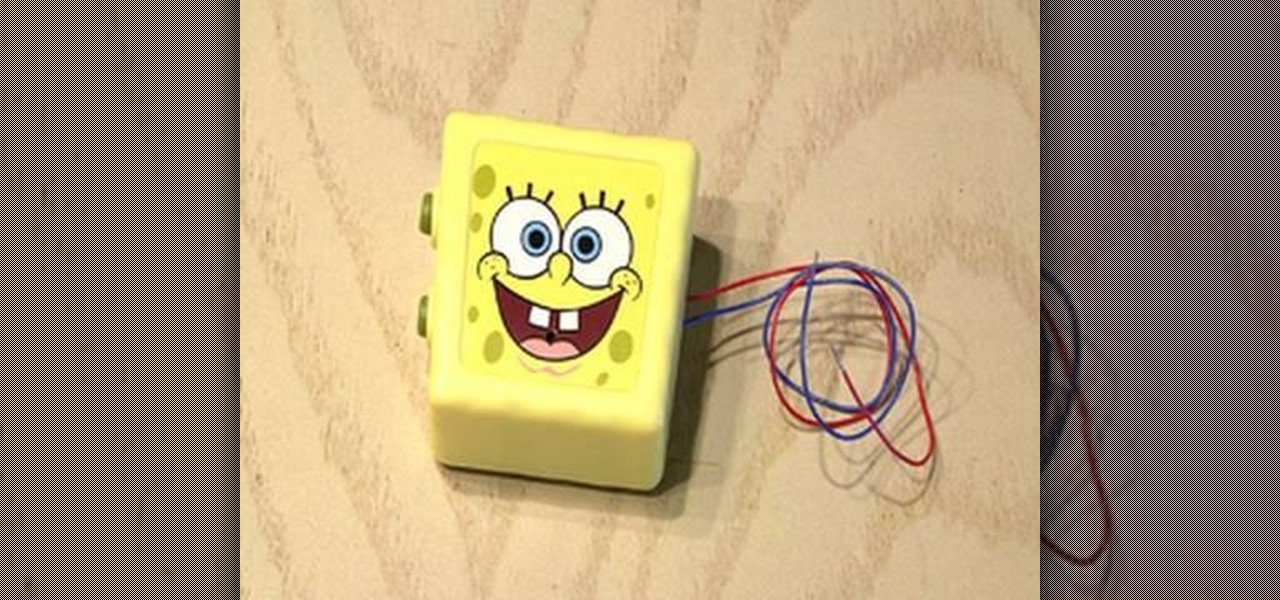
If you just happen to have one of those SpongeBob SquarePants chatterbox toys that were distributed at fast food restaurants a while back, then you just might be able to pull of this "Evil SpongeBob Toy Prank" from mastermind Kipkay.
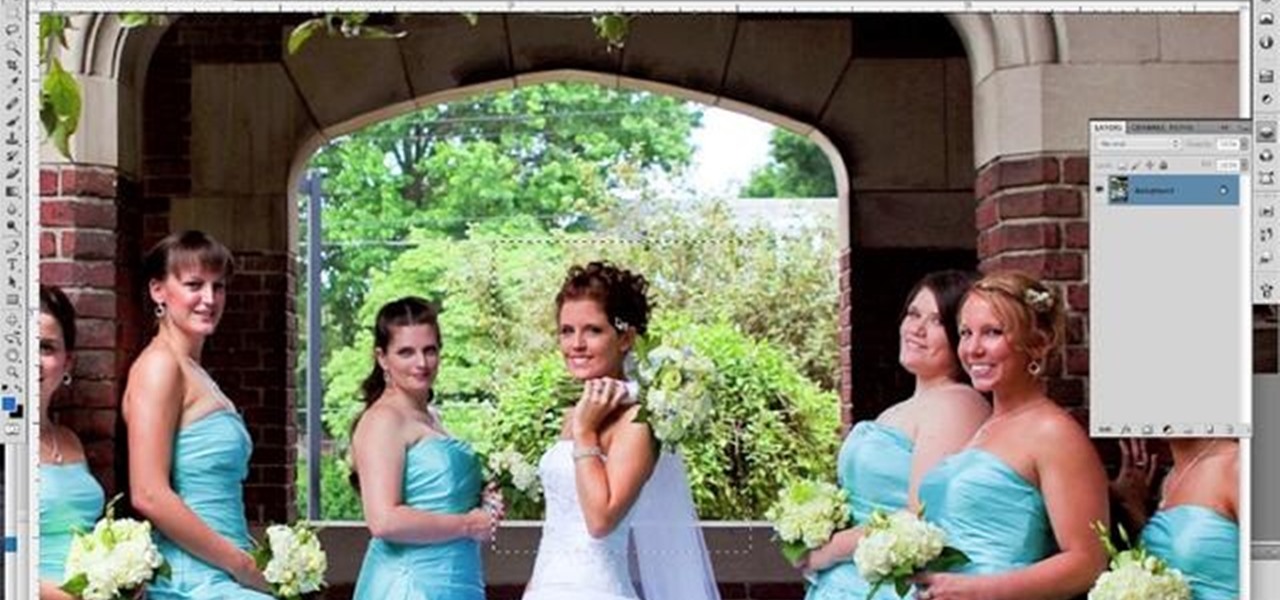
There's one in every group - the friend who closes her eyes as soon as the photo is snapped. If you're lucky, there is only one culprit in a group photo and through the magic of Photoshop, it is relatively easy to fix.
You can take high resolution photos with just about any digital SLR, but whether these high resolution photos turn out impressive depends on setting, lighting, and the compliance of your subjects to pose. While photographing your friends and family in everyday life has these aforementioned conditions already set for you, if you take photos in the studio many factors can be adjusted to your liking.
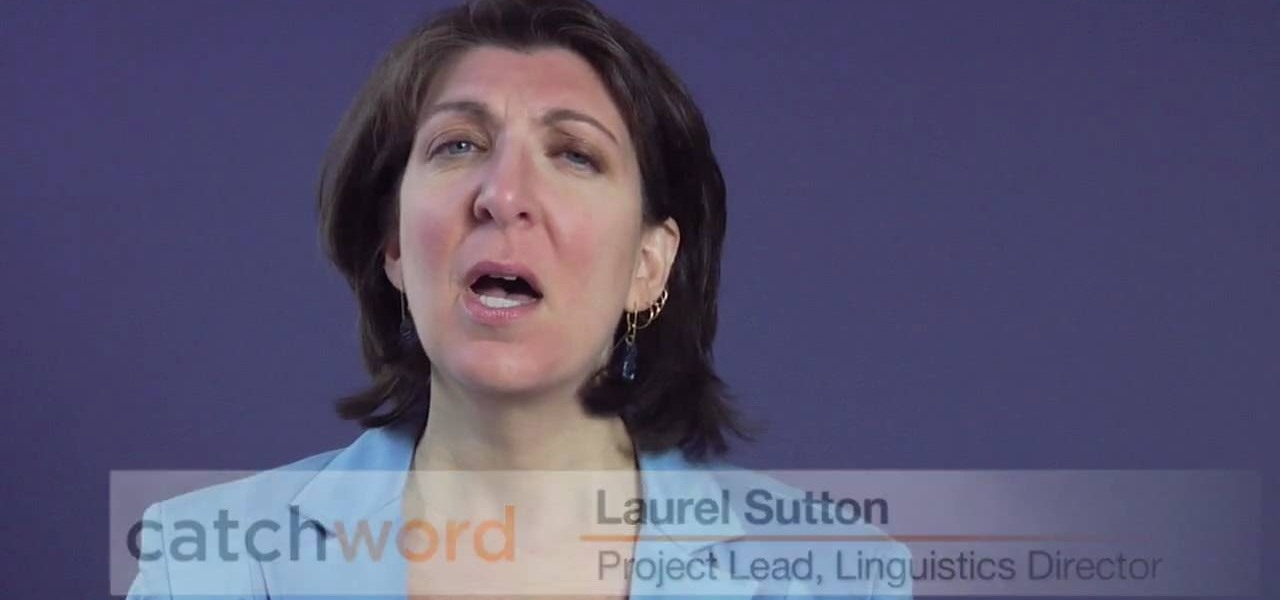
Focus groups strike fear into the hearts of even the most season marketer, and with good reason. In a world where everything is subject to change based on public opinion, from movie endings, to popcorn flavors, to logo colors, focus groups can make or break a new idea, but it doesn't have to be that way. A focus group is just a way to gather opinions in a vigorous way and can be very useful. Watch this video tutorial to use a focus group to develop and test a new brand name or corporate ident...
In this video tutorial, viewers learn how to fix hat hair for men with long hair. Begin by spraying some duo shot conditioner into your hair to make your hair more wet and easy to work with. Use a comb or your hands to push your hair back. Then evenly distribute some light wax by rubbing it into your hands and apply it into your hair. Run the wax through your hair and push it back. Then use a comb to part the side and top of the hair. Comb the hair to one side and spray some hairspray to help...
If there is anyone who can help you get closer to finding your true love it is Dr. Diana Kirschner. Dr. Kirschner is a love expert, media psychologist and bestselling author. She is the go to psychologist on most talk and reality TV shows and for newspapers and magazines in need of a relationship expert.
In this video tutorial, viewers learn how to wax a snowboard. The materials required for waxing are: wax (cold, warm, or all temp), an iron, scraper (plastic or metal) and a hard bristled brush (or rough side of a sponge). Begin by laying the board with the base facing up. Turn the iron on and melt the wax. Move the wax around to evenly distribute it on the base. Then use the iron to spread the wax in a thin layer. Allow the wax to cool for 30 minute and remove the layer with your scraper. Bu...
This video tutorial shows you how to use a long wrap product to dress yourself while creating a secure carrier for your baby. The long wrap is brought forward from back to front and round your belly button, criss-crossed over your back and brought forward and criss-crossed once more, then tied. The two criss-crosses (in the shape of an X) help hold the babies legs, as the pass through the criss-crosses and support the baby. You should then try to bring the fabric down as far as possible to su...
When you need to gather information without anyone knowing you will need to utilize covert audio surveillance. There are a variety of ways and technique to most effectively get the information you need.
This video by photoshopuniverse shows you how to make any photo seem as it was taken in a studio. Take the working photo and add a new layer over it and fill it in black as shown. Add a newer layer over that and add the filter> render> clouds effect. Increase the opacity of the cloud layer and merge it with the black layer as shown. Add the splatter effect and the sprayed stoke effect as shown onto the merged layer and add a hue and saturation adjustment layer and colorize it as desired. Go t...
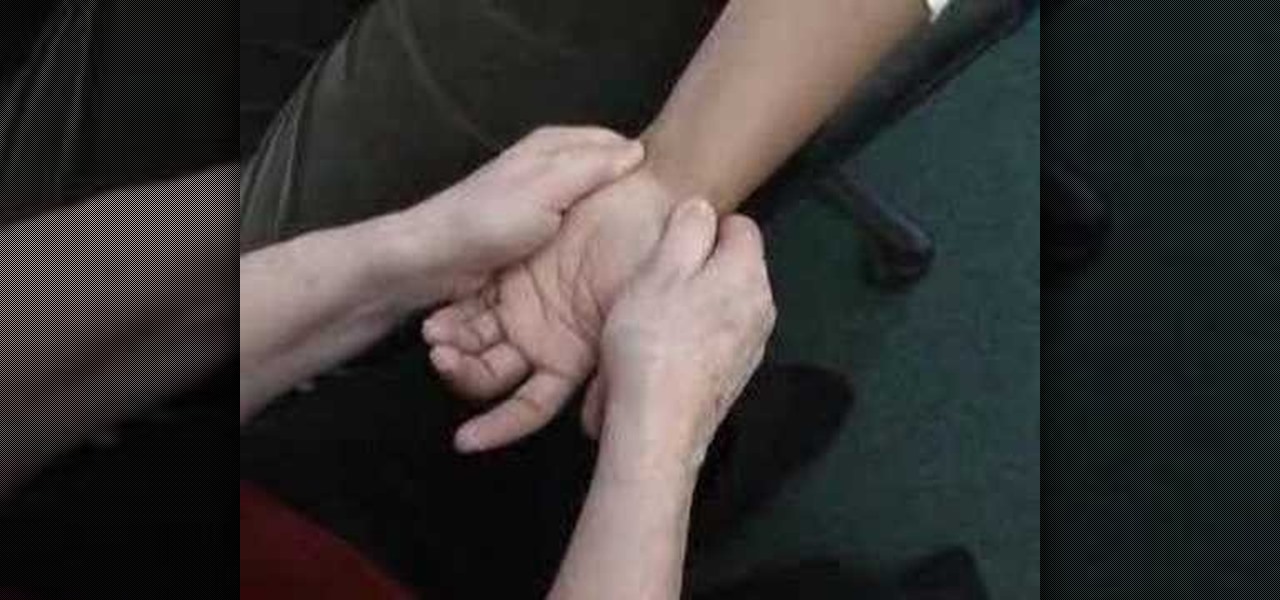
This three and a half minute video talks through the basics of hand massage. With close-ups of the action, the instructor talks through the basic technique and progression for hand massage, providing details and emphasis. All the various strokes are covered: stretching strokes, circular compression, squeezing and kneading. There's no lotion or special materials you need - just your hands, and the hands of a lucky subject. If you want to learn a new way to please your friends or partner, take ...
Paul, an English teacher, gives a lesson on the difference between the word "live" as a verb and as an adjective. To make to "v" sound when saying the word, the lower lip has to touch the teeth. "Live" as verb is an action, so you say "I live in Minneapolis". The singular form is "live," and the plural form is "lives". Live" as an adjective is a describing word, so you say "Live TV is fun". "Live"" as an adjective describes the subject of a sentence. "Live" as an adjective can mean something ...
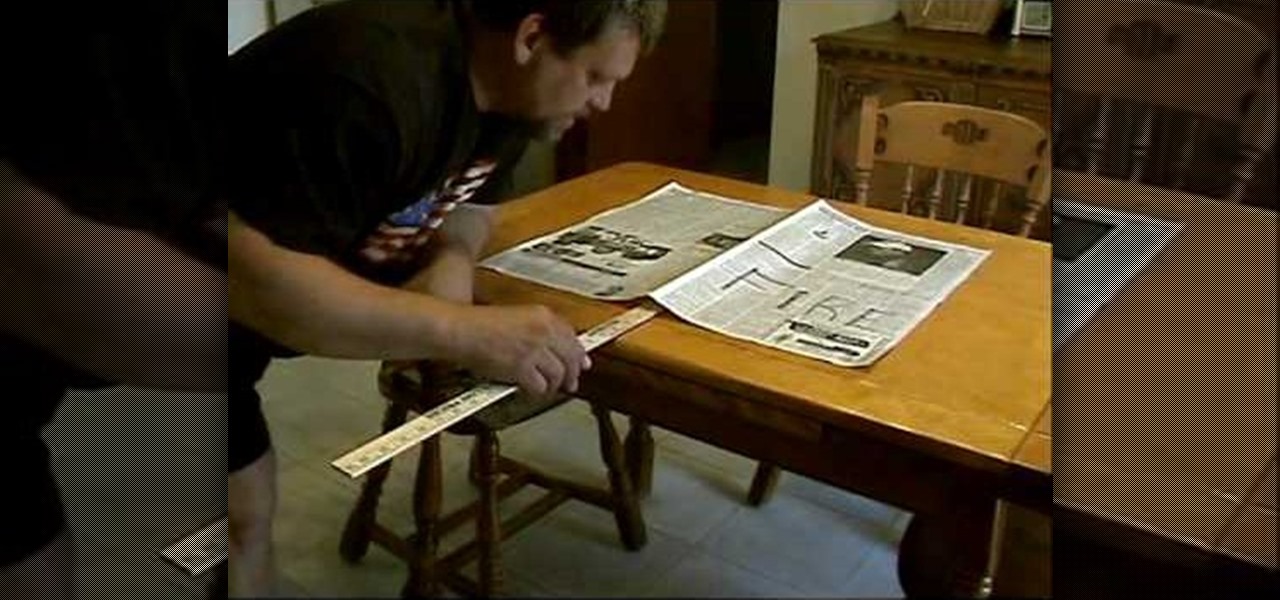
This video shows you how to break a yardstick with atmospheric pressure. The instructor first lays a ruler halfway on and off of a table. He then covers half the ruler with newspaper. The instructor states that you can chop the ruler in half with your hand because the air holding down the paper will keep the ruler in place. The experiment does work correctly and he did break it in half perfectly. This instructor seems to have many similar videos on the subject.
First, find yourself a very large pot with a thick base that will distribute the heat evenly, preferably a stock pot. If the bottom is thin, consider some sort of diffuser. If you don't have one, buy one. They are cheap and you'll be glad you did. They even have them in the grocery store sometimes, for less than $10. Pour in your milk and turn on the heat to medium/high. Bring the milk to a boil over high heat stirring constantly, controlling the foam against boiling over.
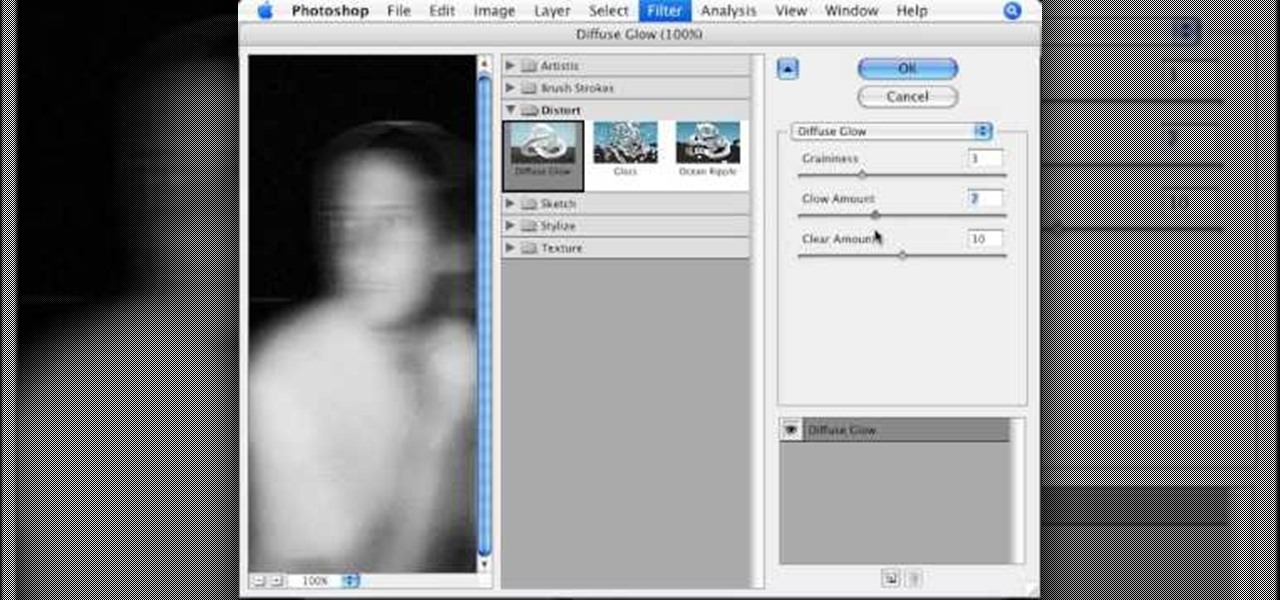
To manipulate photos and turn someone in a photo into a ghost, there are several filters that can be used in Photoshop. This video takes us through the steps of how to take an ordinary picture and turn the subject into a supernatural being using the motion blur technique and the diffuse glow filters among others to alter an image. The best types of pictures to use are ones where the background is relatively dark. By following these simple steps in Photoshop, you can turn anyone in an ordinary...
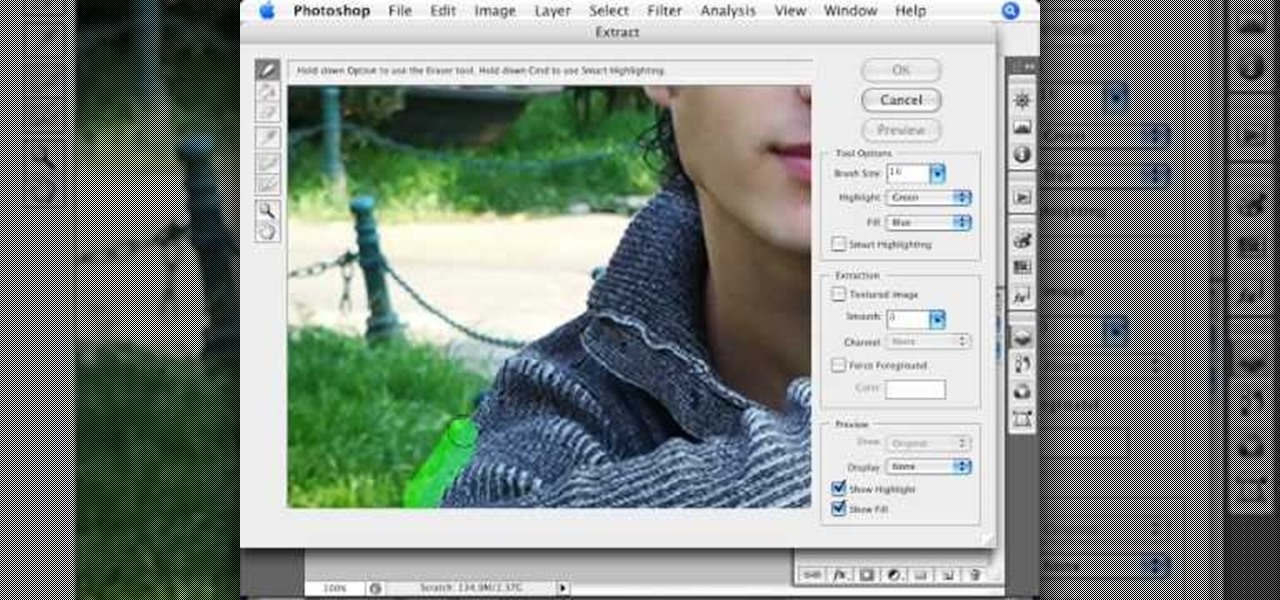
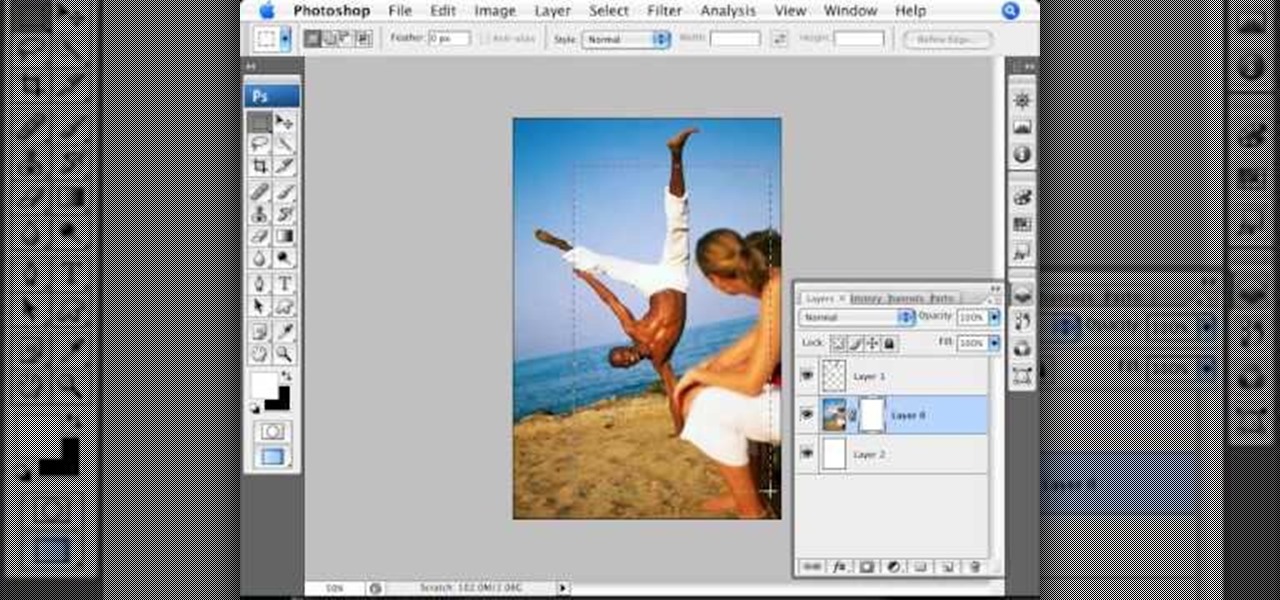
To add drama to a photo and create some additional pop, this video tutorial shows how to create a photo cutout using Photoshop software. What you need to do is determine what subject in a photo you would like to cut out. Using a cutout and multiple layers, the final impact is an effect that makes the cutout appear as though it is extending beyond the photo's boundaries and into white space. By following these steps, you can create additional interest or emphasize a certain part of a photo usi...