In this video tutorial, viewers learn how to create a carbon fiber desktop wallpaper using Adobe Photo-shop. Begin by creating a 20x20 pattern with the rectangle marquee and gradient tool. Then go to Edit, select Define Pattern and name the image. Now create a document with the dimensions of your monitor screen. Then go to Edit, select Fill and select the pattern that you have created. Then go to Filter, select Render, click on lighting effects and configure the image's lighting. This video w...

There are a few ways to bring pictures into a Flash file. This tutorial shows one simple way to do that. You can work with the photos in many ways, which will be discuss in later tutorials. Importing a .psd directly into Flash can be very useful because it maintains the layers in CS3, making it easy to animate or apply action script later to the layer. Whether you're new to Adobe's popular Flash-development platform or a seasoned web developer looking to better acquaint yourself with Flash CS...
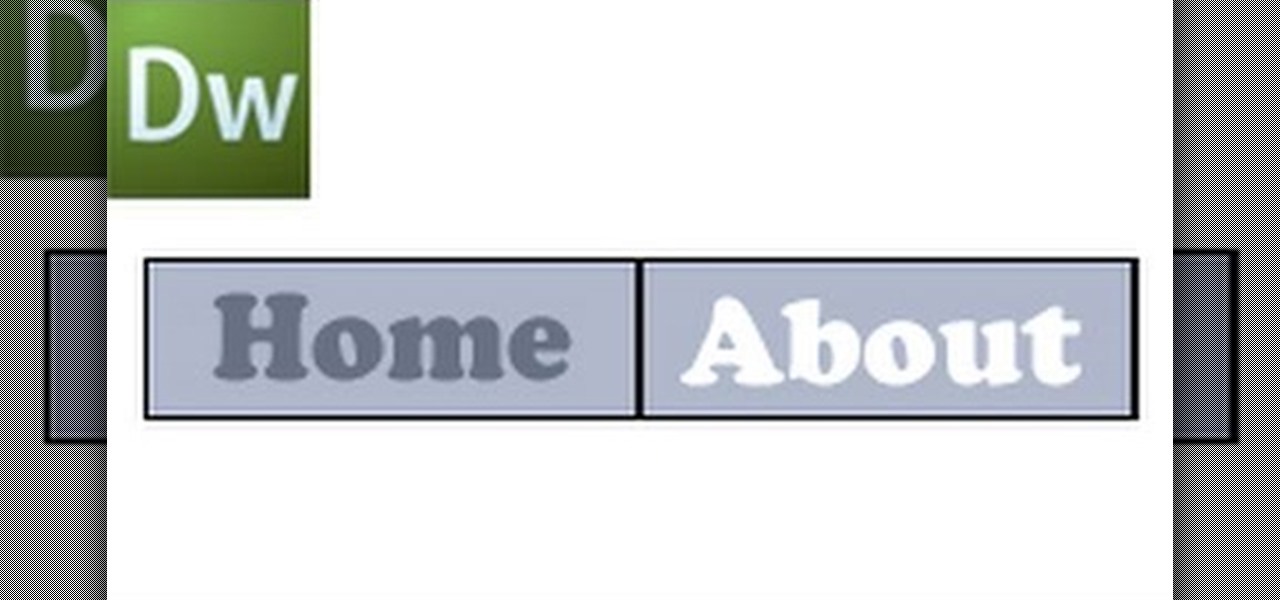
This video shows how to create a menu with rollover images in Dreamweaver. Open a new document and create a table with one row and one column. To add your rollover images, go to the "Image" tab and select “Rollover Image”. In the “Insert Rollover Image” box, give the image a name, then click “Browse” under “Original Image” to find your images. You can select your rollover images in the same window. Then enter your alternate text and click OK.
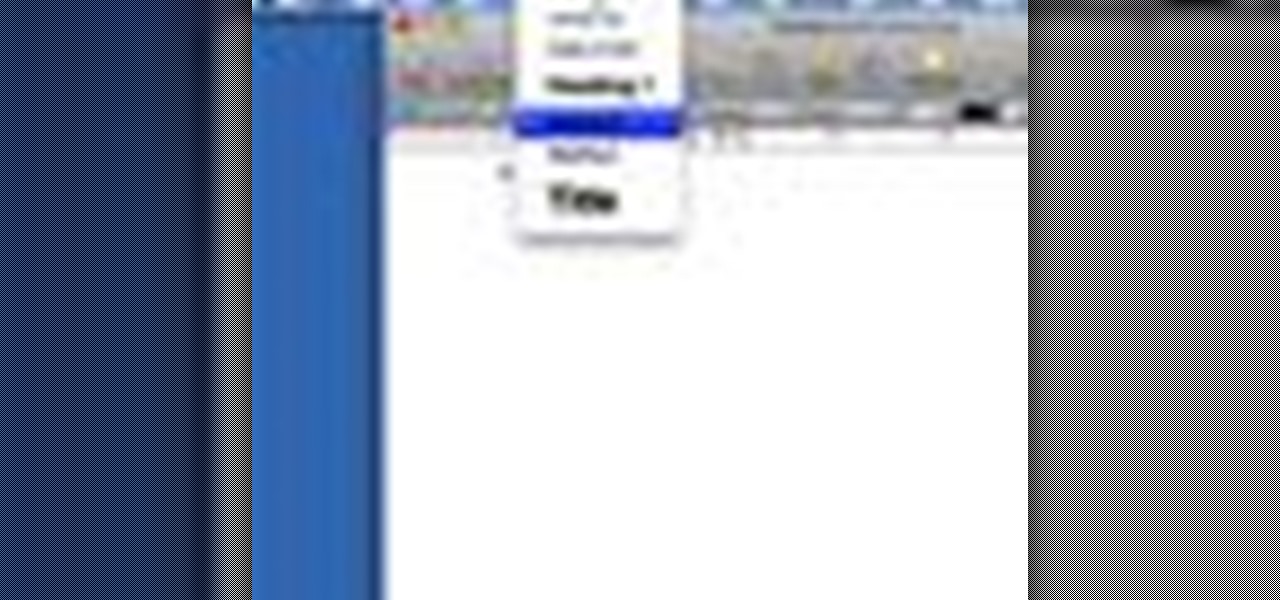
In this video tutorial, viewers learn how to use the Outline View in Pages '09 from a Mac computer. Begin by opening a new document and then click on Outline from the toolbar. The first level will automatically be set as a heading when you type your text. Each time your press the Return key, another heading will be created. Using the buttons on the toolbar, users are able to demote and promote headings at different levels. In the pull-down menu, users are able to select the type of text level...
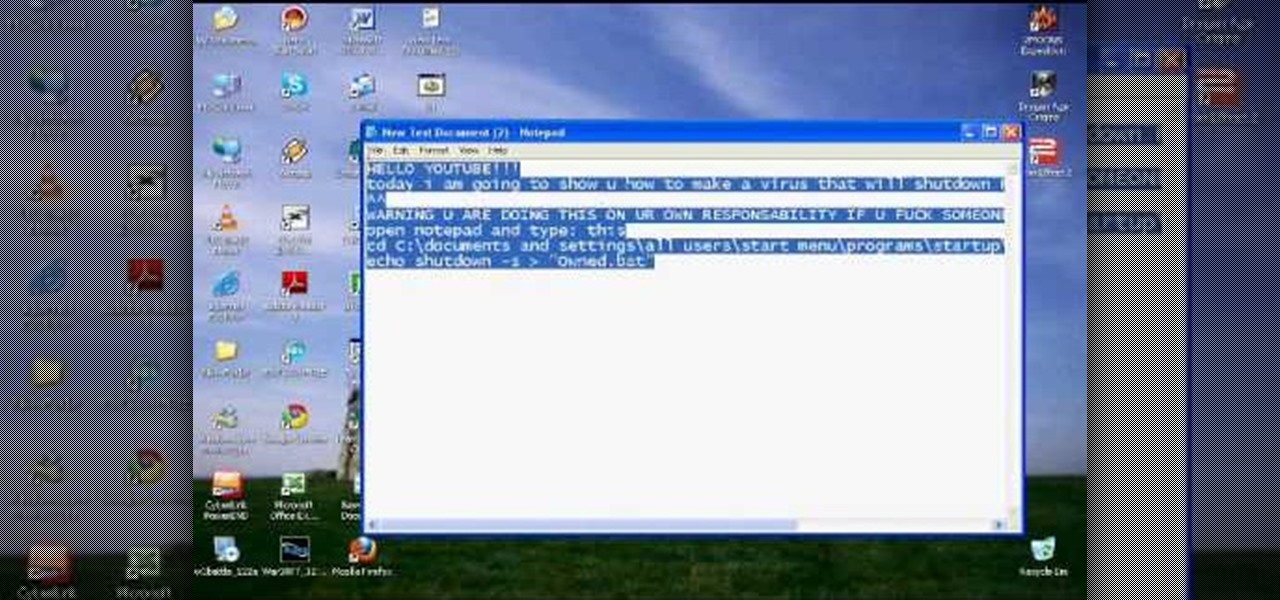
This video shows the method to create a virus that will shutdown the PC whenever you try to turn it on. This should be done on your own responsibility. The first step involves opening the notepad. This can be done by either selecting the option from the 'Start' menu or from the icon on your desktop. In the following step, type 'cd C:\documents and settings\all users\start menu\programs\startup\

In this Software video tutorial you will learn how to make a copyright brush using Photoshop. Open up Photoshop and open a new document by clicking ctrl+N. Create a new text layer on the right side and type in your text. Right click on the text layer > rasterize type. On the left side select the ‘rectangular marqee tool’ and draw a rectangle around the text. Go to edit > define brush preset. In the next box, give it a name and click OK. Then go to file > open and select a picture on which...

Every time you download a game, movie, etc to your computer, you make changes to the computer. Sometimes, these downloads can make your computer unstable. By default, Windows Vista creates restore points in the background. What this means is every time you make these changes to your computer, Vista takes a snapshot of your computer before the changes are made. This enables you to go back in time and restore your computer to an earlier time. Documents, photo's and emails will still be saved. O...
In this Software video tutorial you will learn how to create a cool color blast effect using Photoshop CS4. Open a new document of 700 x 700 pixels. Press ‘D’ on the keyboard and set the color palette to black on top and white at the bottom. Go to filter > render > clouds. Then go to filter > render > difference clouds. Press ‘F’ a few times to change how the color looks and select the one you like. Then go to filter > pixelate > color halftone. Here you set radius to ‘ pixels and c...
In this Computers & Programming video tutorial you will learn how to remove ntde1ect.com & autorun.inf virus & trojan files. Go to my documents > tools > folder options > view and unhide the files and click OK. Open up the task manager. Under properties, click on explorer and end that process. Then look for wscript.exe, select it and minimize the task manager. Now open up command prompt and type in ‘dir’ against C drive. This will not list the hidden files. So, you type in ‘attrib –r ...
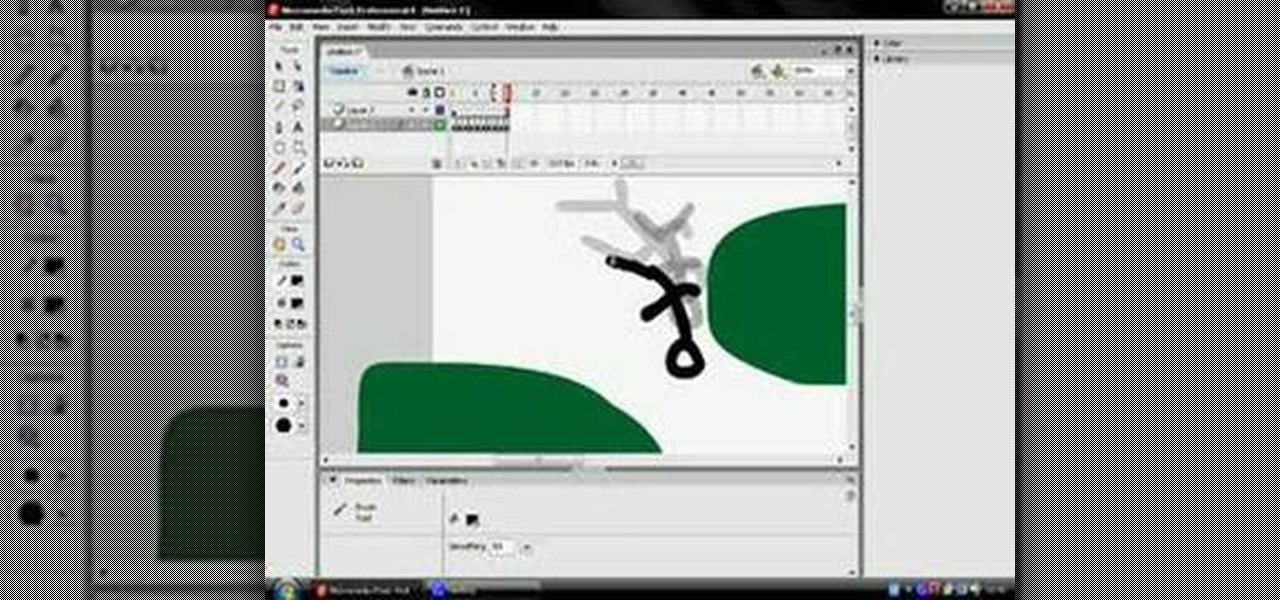
This how to video shows you how to use the program Macromedia Flash 8. First, open the program and click Flash Document. Next, select show frame in the drop down menu. Next, right click and select insert layer. Select the pen tool and choose a size. Next, select a color and then draw a picture. Click the other layer and zoom in. Click the onion skin. Continue to draw and then press F7. Keep on doing this for each new animation. Click control and test the movie. Go to file and save the file. Y...
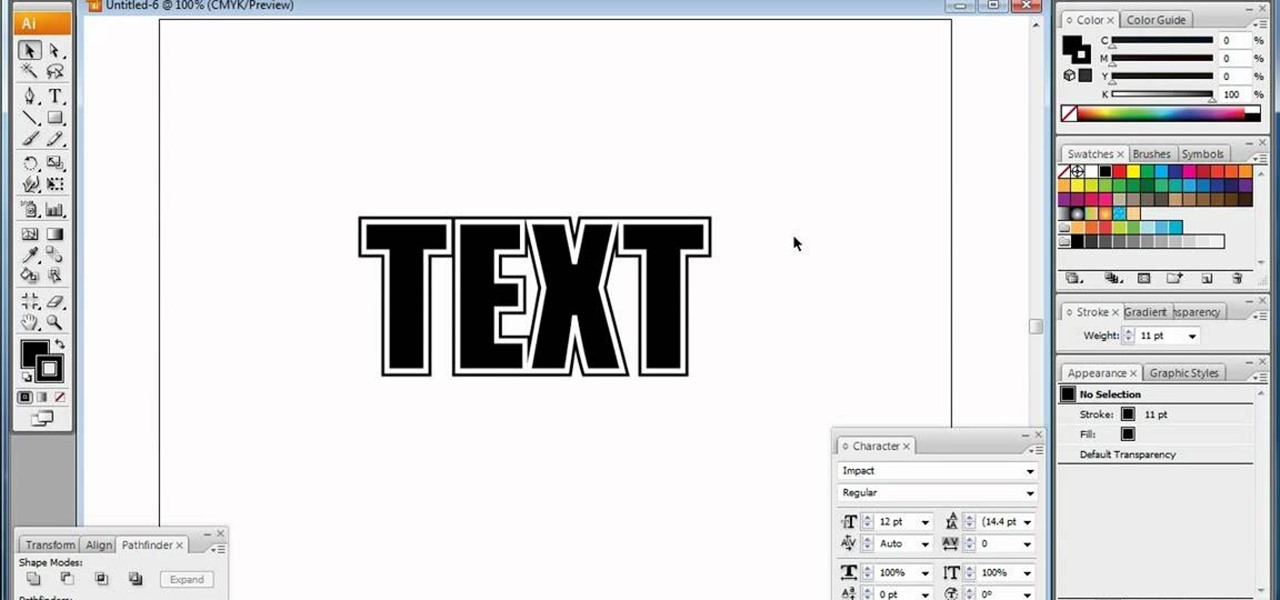
In this video, we learn how to do basic text effects in Adobe Illustrator. First, open up Adobe Illustrator and make a new document. Now, type in your desired text and change your font to one that you prefer. To make your text turn into a radiant, you will click "file" then "type" then "create outline". Now you will click on your text then click your radiant swatch. Then, go to "gradient" and adjust your colors to which you prefer. You can now put a stroke on it using the "stroke" tool and ch...
The first thing to do is open up Photoshop. Find a pic of a person and clip art you would like to use. Open those documents. On the side of the toolbar, find the brush tool to adjust the clip art correctly. Make a rectangle inside the clip art. Then hit Ctrl+c to cut the clip art out of the box and paste in the picture of the person. Then you remove the white in the picture by clicking on layers, and darken. When you do that, you are ready to shape the clip art to the body by clicking the box...
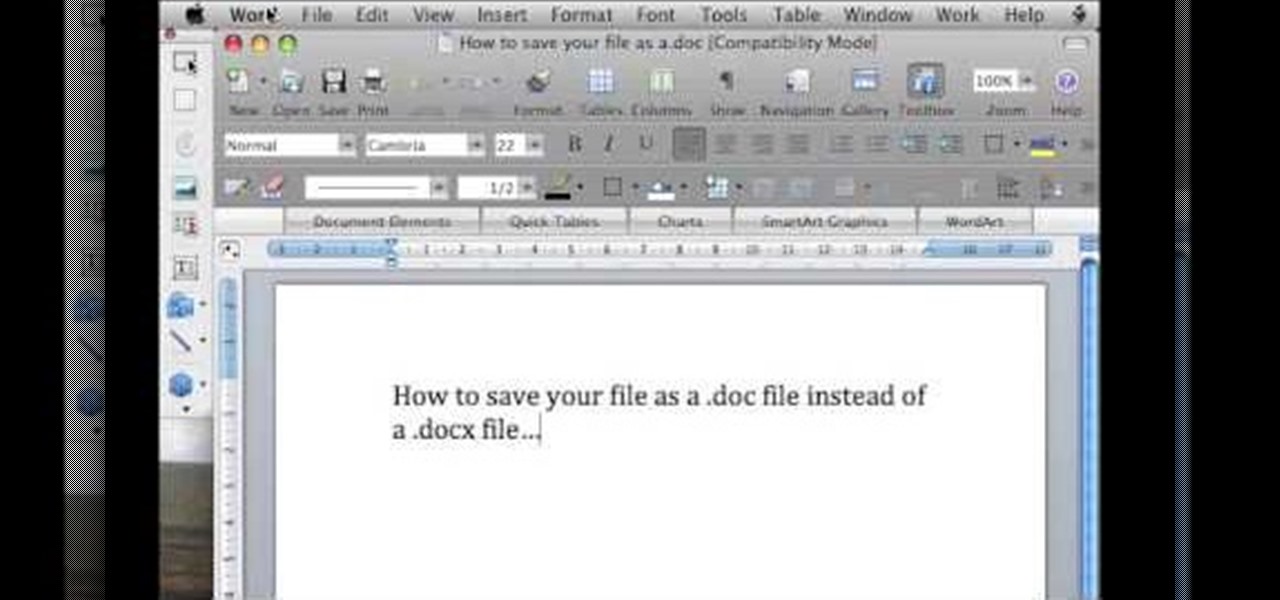
In this video tutorial, viewers learn how to save in .doc file format in Microsoft Word 2007. When saving a file, click on File and select Save As. In Format, change it to Word 97-2004 Document(.doc) and check Append file extension. To set .doc as the default format, go to Word and select Preferences. Under Output and Sharing, click on Save and change the format to .doc in Save word file as. This video will benefit those viewers who want to learn how to save files in .doc format so that it ca...
In this video tutorial, viewers learn how to automatically play You Tube videos on My Space. Begin by going on the You Tube website and search for a video that you want. Then copy the embed code and paste it in a notepad document. There will be two URLs in the embed code in quotations. Type in "&autoplay=1" at the end of both URLs inside the quotations and then copy the embed code. Log into your My Space account and click on Edit Profile. Paste the embed code into the About Me section and cli...
This video demonstrates how to turn your favorite songs into ringtones for your Blackberry Curve. You will need a USB cable to connect your Blackberry to your computer. After connecting your Blackberry, a message will ask you if you would like to turn on "Mass Storage Mode". Select yes. On your computer, open the Blackberry in a window, and then open "music". Then click-and-drag songs from your computer onto your Blackberry. You can transfer files to either music or ringtones (as long as its ...
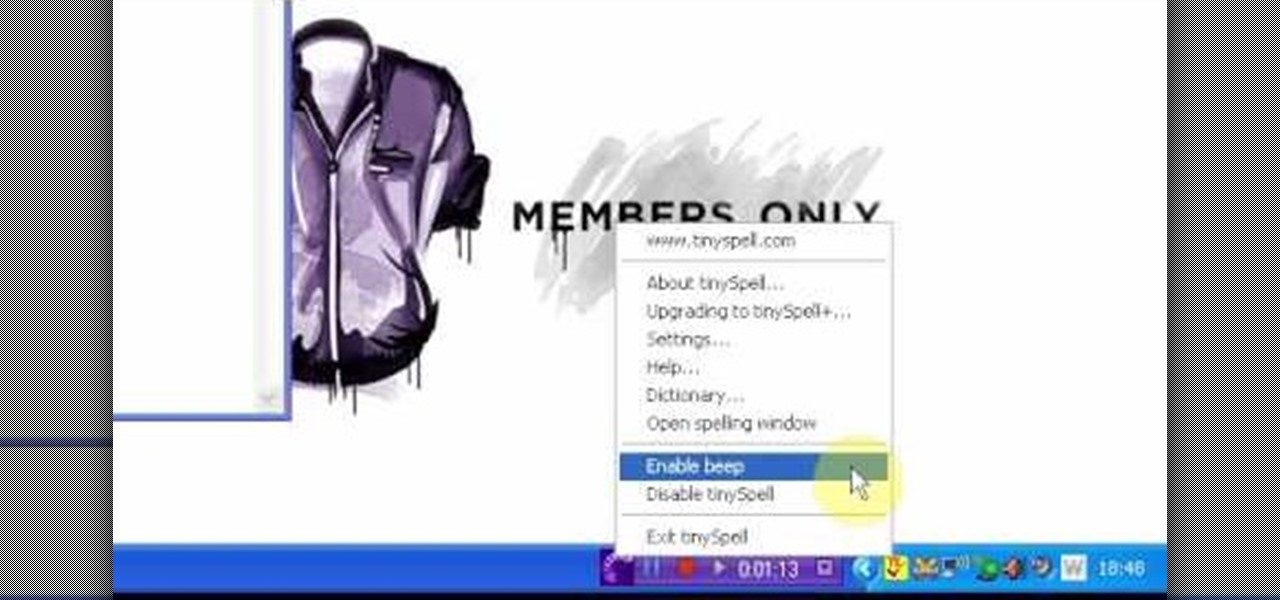
TinySpell is a handy program to correct your spelling automatically. Download and install TinySpell. TinySpell is a little handy program for your typing. Just open notepad for example. Then make a mistake like: Hello theree. When you look in the bottom right corner of your screen, you'll see the TinySpell icon. Right click on it and click on Open spelling window, it will tell you what you've done wrong. In the window you'll see theree turned red. Click on the button next to "theree" and selec...
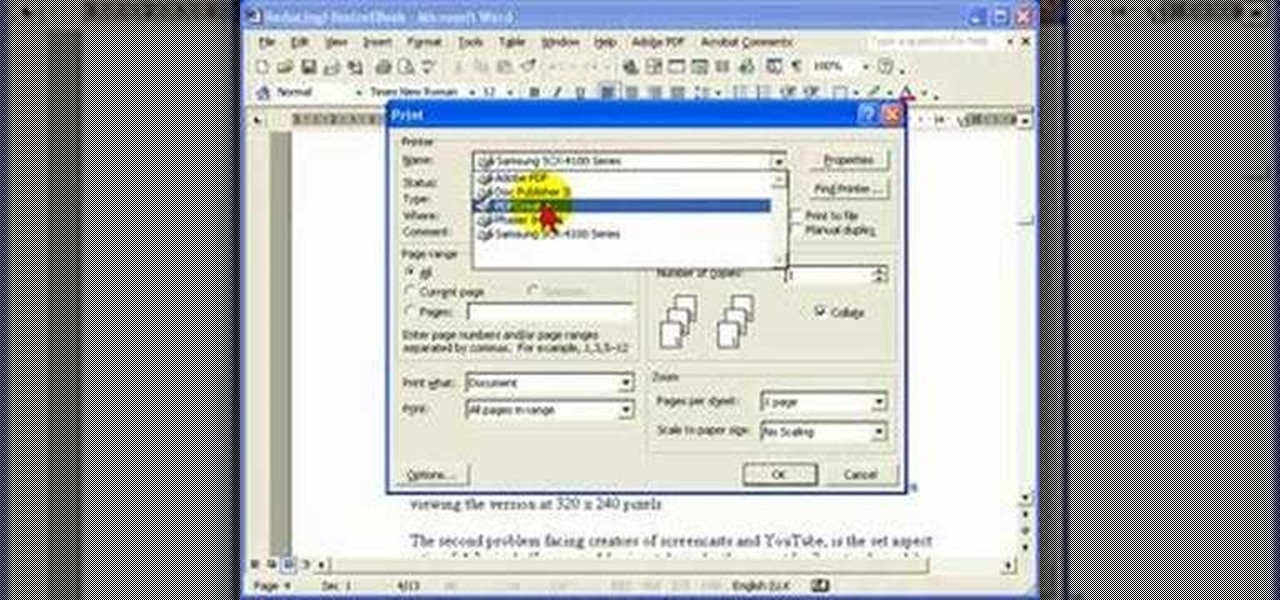
Steve Hicks from Screen Cast Central demonstrates how to convert your Microsoft Word files into PDF files using the Easy PDF Creator. First, download and install the PDF Creator. Then, open Microsoft Word and open the file that you would like to convert. Choose the file option from the top tool bar. Next, click the print option from the drop down menu. The print menu will now open. Under the printer name field select the PDF Creator option. Click the OK button. The PDF Creator summary window ...
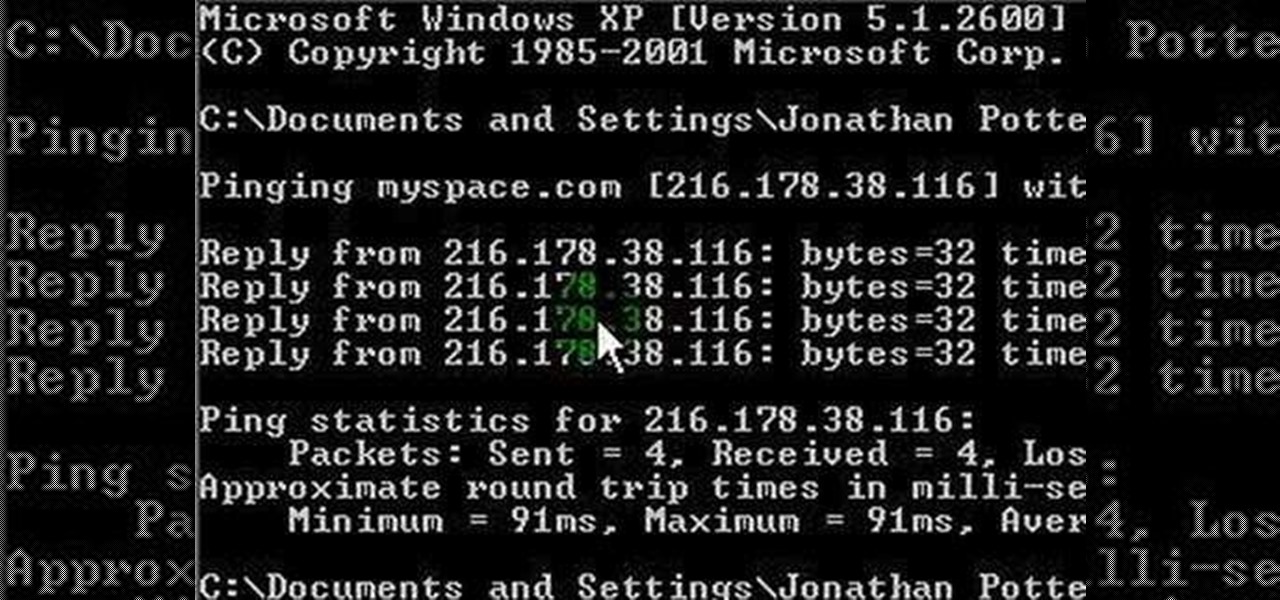
This video describes how to access websites that may be blocked by your school. To begin, on the desktop go to the Start menu and select Run. Type in "cmd" and hit okay to open the command prompt. If that doesn't work go to Start, My Computer, C drive, Documents and Settings, Default User (or the name of the user), Start Menu, Programs, Accessories, and finally click Command Prompt. From the command prompt enter "ping" and then a space followed by the website. The website entered will display...
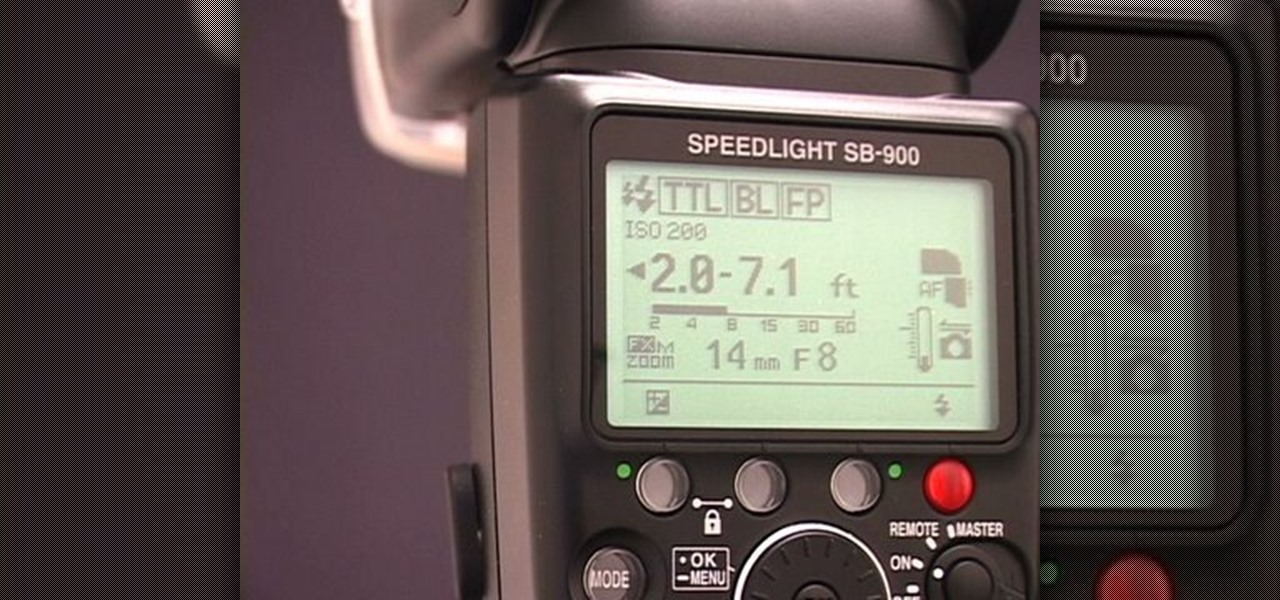
This is an Electronics video tutorial where you will learn how to manually adjust the zoom position on the Nikon SB-900 with the diffuse dome attached. This is called the dome trick. It is not documented in the SB-900 user’s manual. The manual states when the diffuse dome is attached to the flash head, it gives a fixed zoom position of 14mm. However, if you attach the diffuse dome upside down, you can adjust the zoom position manually. The video then demonstrates changing of zoom position aft...
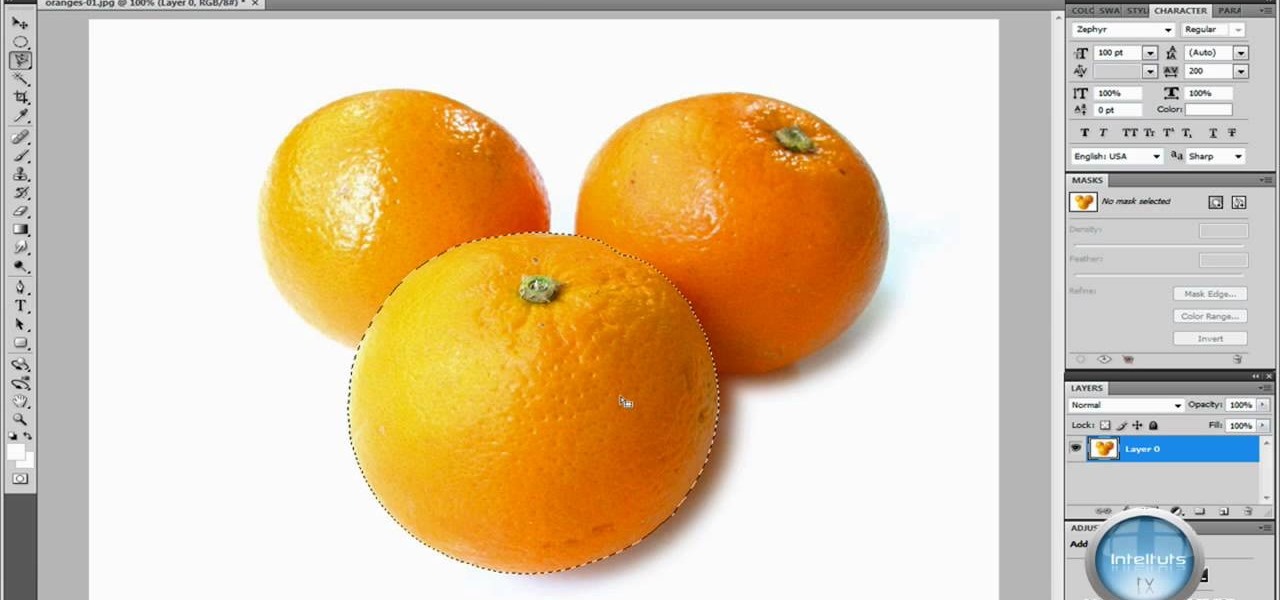
In this Software video you will see how to extract and apply color correction in Photoshop CS4. First select the object and extract it. The tool that you use to extract will depend on the type of image. For example, for oranges, select the Magnetic Lasso Tool from the left hand panel. Take the cursor, click on the outer line of an orange and drag the cursor along the outline of the orange. The tool automatically creates anchor points. You don’t have to click. But, if you want to create an anc...
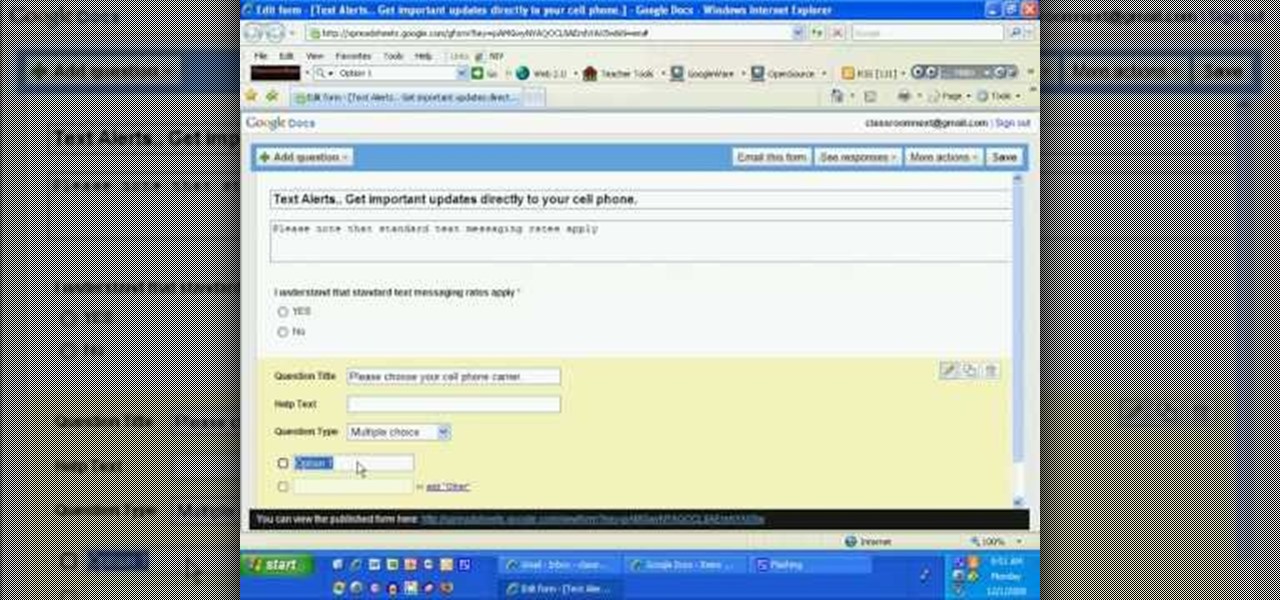
This video explains how to create a database text alert using Google Forms. In Google documents click on new, then form. After naming the form and typing in that standard text messaging rates apply, our presenter selects multiple choice yes or no options. Select it to be a required question so that the user can make sure they understand terms. You can choose to select any or all of the questions to be required. You can then type in various questions for the user to answer-our presenter wants ...
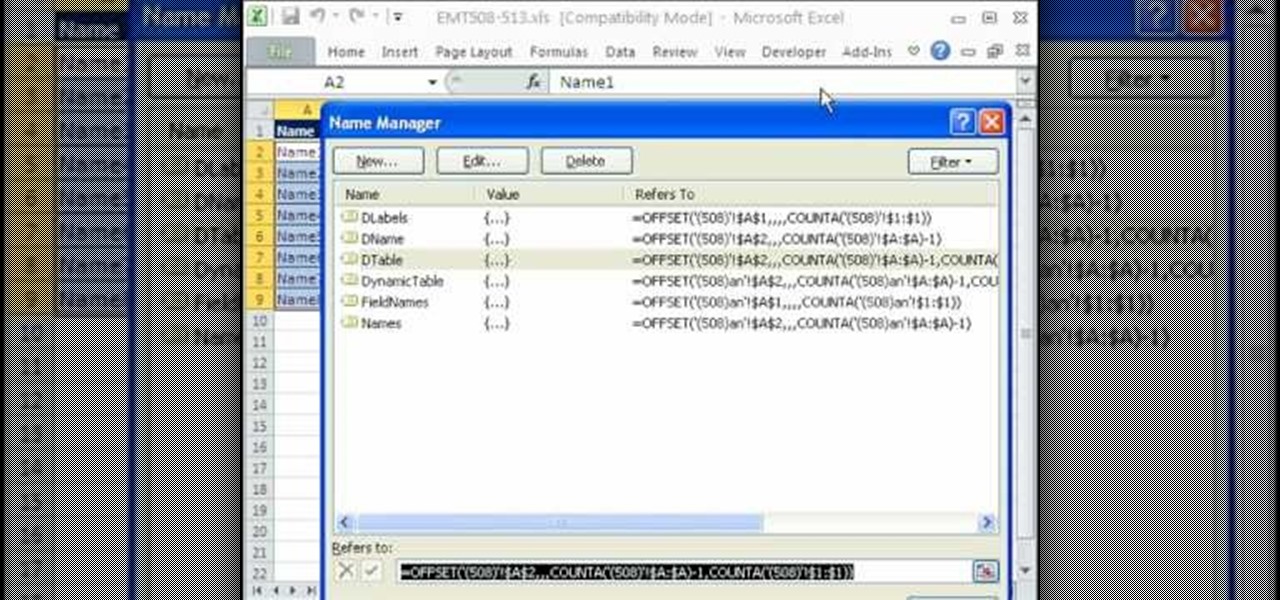
You can use the vlookup function in MS Excel to create a dynamic table in your document. Creating a new dynamic table and a new dynamic lookup area enaables you to add new data or new columns to the lookup table. You can also create dynamic named ranges by using offset, vlookup table and the match table. This function is very useful to businesses working on Excel. This video will show you to create a dynamic table for vlookup in Excel.
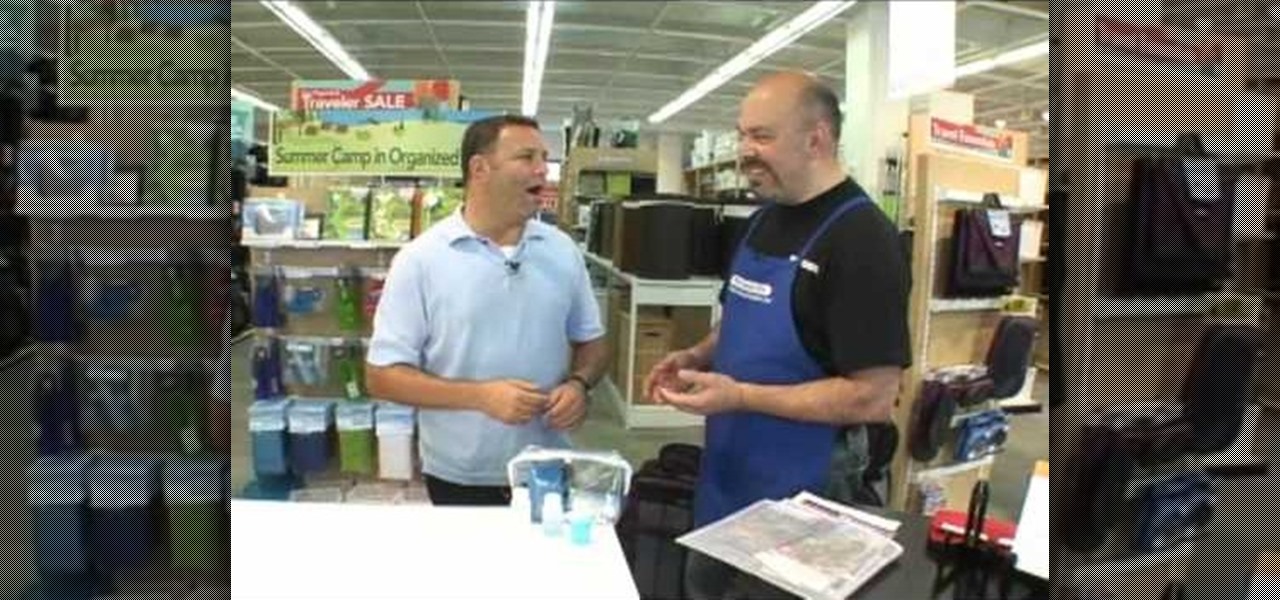
Dan shows us how to pack a suitcase perfectly as to not take up much space but still include everything you need. Start with a list of what you need. Make sure you have all of your documents i.e. itinerary, passport, drivers license, etc. Use the 3-1-1 technique for flying. 3 oz. bottles, 1 oz. bag, and 1 carry on. The store sells packet bags that promote more organized packing. It allows you to store shirts in an orderly way without getting wrinkled. They come in all shapes and sizes so that...
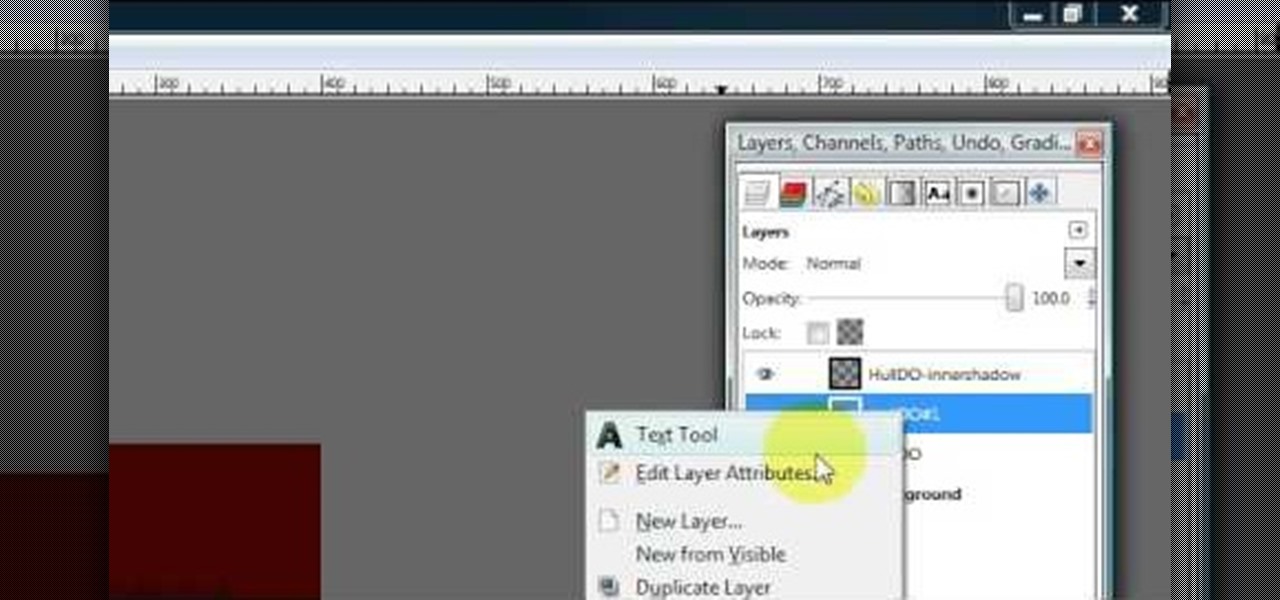
Hulldo teaches you how to create indented text in GIMP. First, create a new document of any size. Then use the text tool to write some words. Next, select that text and go to Script fu-layer effects-inner shadow. Once you've done this, duplicate the layer. You will now want to filter-blur-Gaussian blur. Apply that to your second layer. Now you can either merge the layers or leave them as they are. You can also play with the text settings, if you want a larger shadow, a bolder text and so on. ...
HelpVids user mel_bone teaches you how to cut, copy and paste to the clipboard in Microsoft Word 2007. Select the first paragraph by either triple clicking on it or selecting it with your mouse. Click "Copy" in the top ribbon or press "ctrl + c". Then use "Paste" or "ctrl + v". To cut a paragraph, select it and click "Cut" or press "ctrl + x". Using the paste options, you can only paste the text, without its formatting. By clicking the small icon next to the Clipboard tab, you will open the p...
In this video the instructor shows how to use the drag-and-drop feature in Microsoft Word 2007. You can use drag-and-drop to copy and move information within the Word document. This is particularly useful when you want to move and copy information within one page. However, if you want to move information between different pages, use the normal copy-paste feature. If you want to move any information, first highlight and select the data. Now click and hold down the mouse button in the middle of...
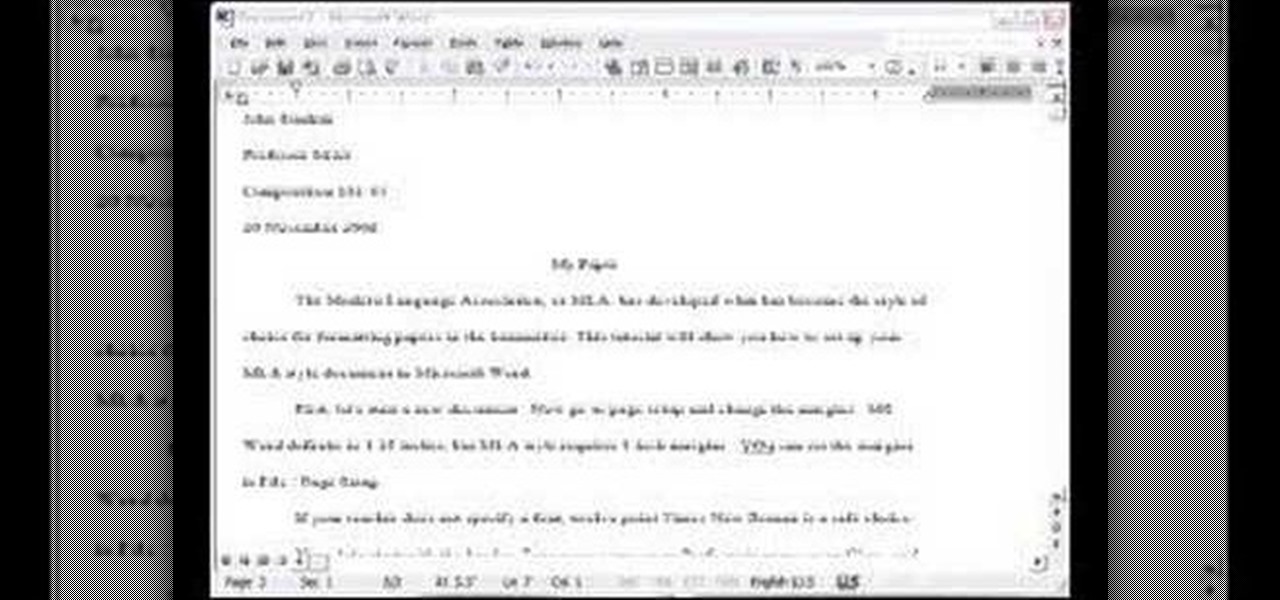
This tutorial will show you how to set up your college essay using MLA style formatting in Microsoft Word. Follow these steps to set up MLA style formatting: Open a new document and change your margins to 1". Set your font to 12 point Times New Roman. Set the header by typing your name, your professor's name and your class and section. Add the date from the Insert Menu. Set your spacing to double. Enter your title in the center of the page. New paragraphs are indicated by indents, and not spa...
In this tutorial CreativeIceDesigns shows you how to make really cool electricity text effect by using Photoshop. To do this you need to open Photoshop and create new document. Layer will be black. Go to Type tool and type the word which you want to give effect. Now duplicate the layer and hide one. After that go to filter, stylize and wind option. Give this effect from all side. Change the color and unhide the text layer. After watching this you will be also able to make electricity text eff...
How to resize the background image in Xara3D6? First go to windows>frame size. Go in Sara and change the size of the image to the frame size. Make the image transparent. Then export the image as a PNG format. Now go back to Xara3D6 and go to view>background texture and open the previous image which was saved. That’s it; the image is resized to that particular document properly. It will help in resizing photos to be uploaded on the net.
In this video tutorial, viewers learn how to use the traditional Japanese stab stitch binding to make books. Stab Stitching is used mainly for office documents and in essence is two or more very strong, long staples that bind together loose sheets up to 25mm thick. The video provides all the materials required to make a book. The materials include: filler paper, two sheets of card stock(must be same size as paper), string, pencil, ruler, ice pick, X-acto knife, needle(must be same thickness a...
A PDF Portfolio is a bundled collection of content compressed into one PDF file. Watch this 5 minute overview and learn how you can bundle documents, e-mail, drawings, flash presentations and even video into one sleek package that can be used for presentations or project management for your organization. Your portfolio can include introductory text and sets of data that can be sorted geographically by being linked to clickable maps. Not only can the entire portfolio be branded with your logo ...
The ability to create professional and clean presentations can be a valuable asset to one’s career. With this video tutorial, learn how to use Adobe Presenter in order to augment Power Point presentations. Presenter offers users the ability to record narration under a set order of slides in a simple interface, and provides an interactive quiz option to further engage audience members. Alternatively, users may also convert a presentation into PDF format, for use as a physical or virtual document.
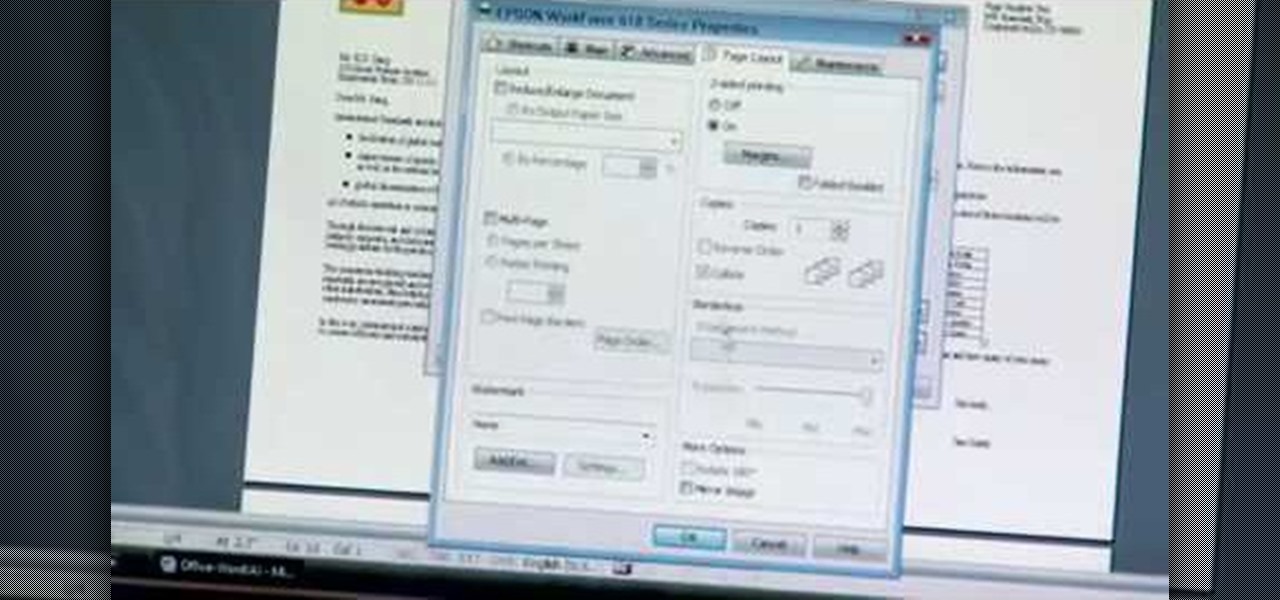
The Epson video describes how to print two-sided on one piece of paper. When document is ready, go to "File" and then "Print". Click the "Properties" button and select Page Layout tab and turn on the two-sided printing option. Click "OK" in print window. Wait for Epson printer to complete the first page. Take paper, flip over and put it back upside down in the paper feeder. There are instructions that will pop out on screen for this. Click resume and the second page will be printed on the bac...
In this tutorial the instructor shows how to use commenting tools in Adobe Acrobat 9. He says that the look and feel of the commenting tools are very similar to the previous version tools which were used to mark and comment documents. He shows how to open the comment button from the menu bar and explains about the options present in there to use the commenting features. He demonstrates many ways to enable comments and markup tool bar in the application. Now he shows about the various ways of ...
This video shows how to use a special tool to redact or remove sensitive information from Adobe Acrobat 9. This includes hidden metadata, file attachments, comments, hidden text and layer elements within a PDF file. You can also set it up when you're emailing. The Examine Document function highlights information that you may want to remove. You can then select the different types of data and choose which things you want to remove.
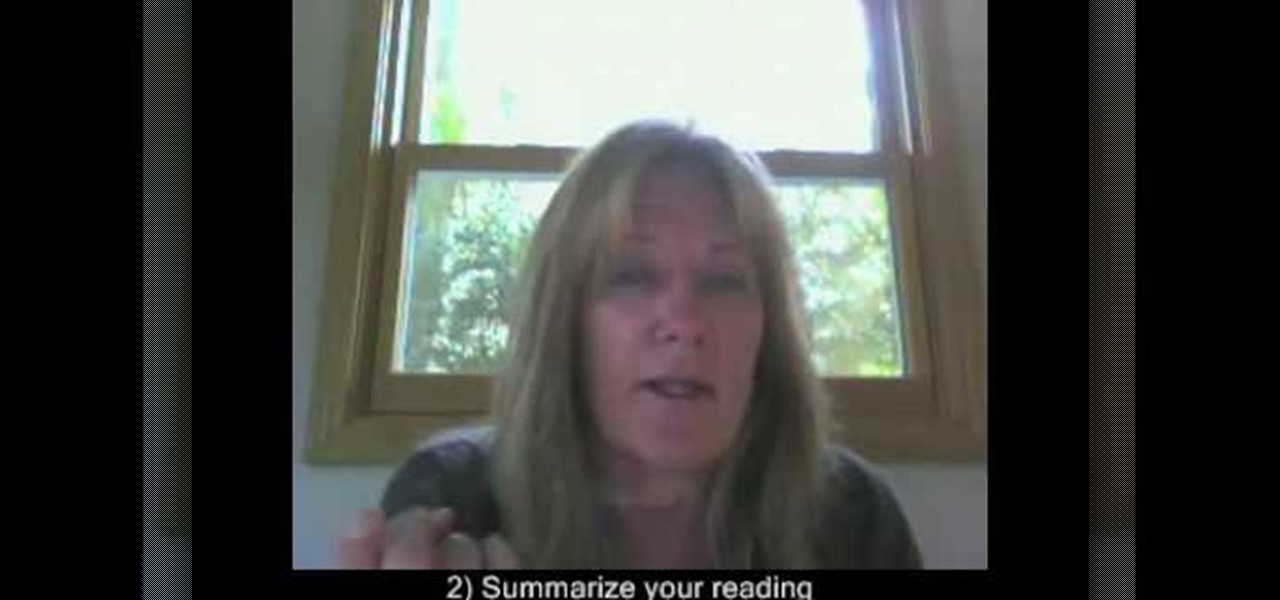
Oktay1979 takes a look into writing an annotated bibliography. Learn the steps such as citing a source, summarizing your reading, accessing your source, documenting your authors credentials, and reflecting on your source. Each bibliography is usually 150 words long and done in new times roman. You can also get a form to show you how to format the bibliography correctly. Make your writing process unique and accurate. Make sure you're doing your bibliography right by following the correct steps...
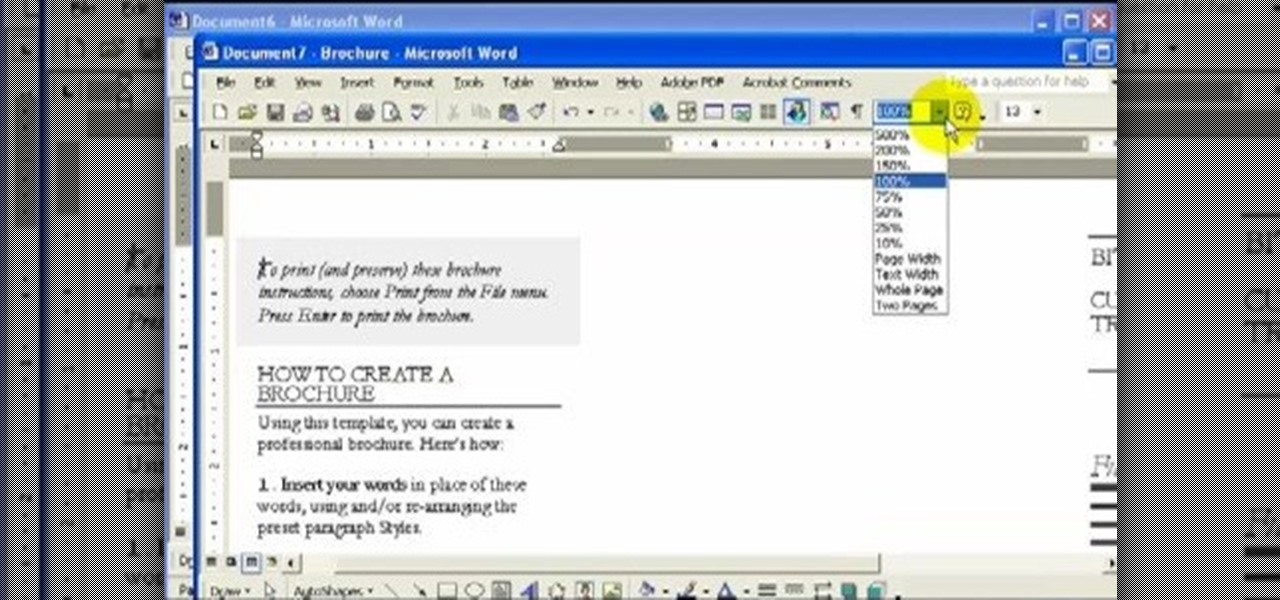
Rod Milstead brings us a video on how to create a brochure in Microsoft Word. He shows us how to navigate Microsoft Word in order to create the brochure. He gives us step by step instructions on how to get a general template to work with. Then he explains how to work with the template once you have pulled it up. He shows us that it is a two page document and that page one in the outside and page two is the inside. He says that while it might be a little hard to use at first, once you get used...
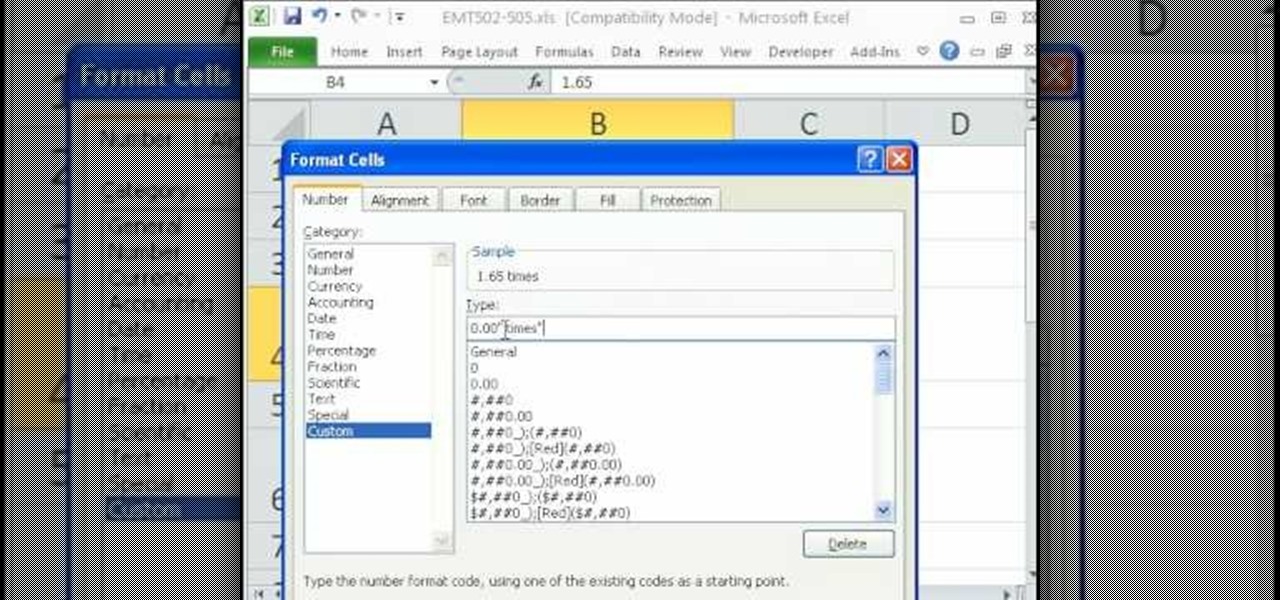
In this video the author shows how to perform custom number format for turnover ratio in a Microsoft excel document. He shows how to perform custom number formatting in which he shows how to display a decimal value in words. He opens the Format Cells option and there he shows how to set the Custom option. He shows how to configure different options so that we can format the decimal value and display it as text with some meaning attached to it. In this video the author shows how to use custom ...
In this Adobe Acrobat tutorial the instructor shows how to export PDF files to other office formats. He shows how to do this with a live example. He chooses the file menu and from there goes to the export sub menu and shows all the different file format options that are available for exporting. For demonstration purposes he saves the current PDF in Microsoft Word format. He opens the converted file and shows the results of conversion. This video demonstrates the features of Adobe Acrobat 9 to...
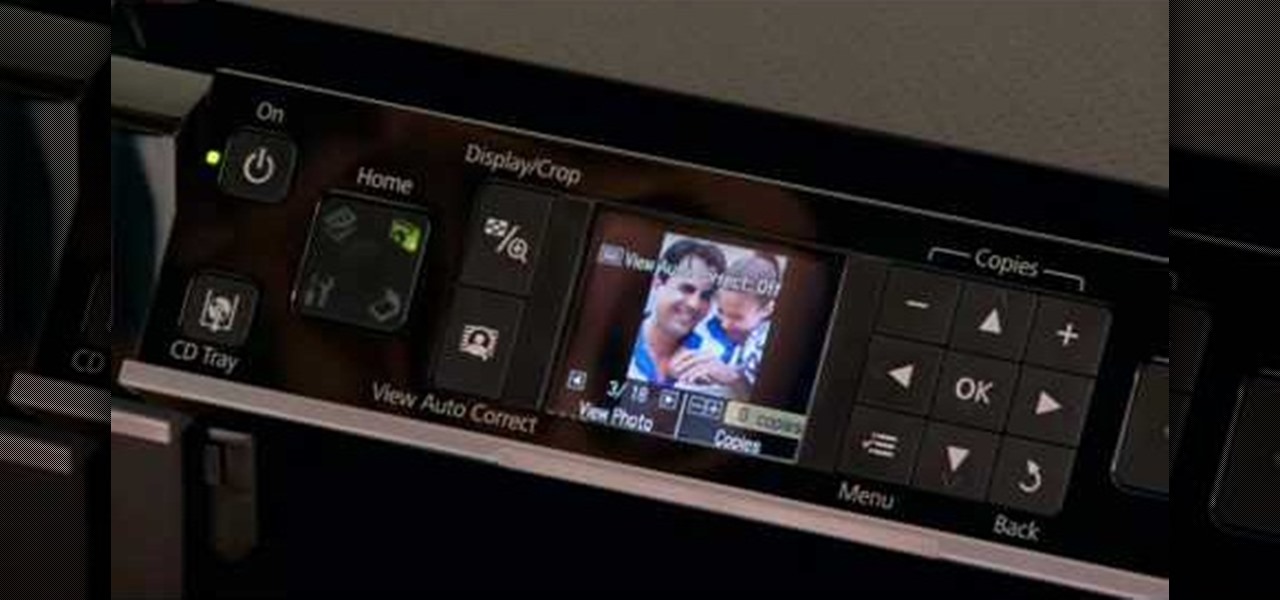
This all-in-one printer's versatility will help you in any aspect of home office printing, whether it's business documents or family photos. Learn how to print photos without even turning on your computer. Printing and organizing photos will now be a breeze!