The holiday season is in full swing - are you prepared to look your most dazzling, from the tip of your bun to your toes? While you probably know you have to fix your hair and put on some bright and cheery makeup, have you thought about how you'll do your nails?
Plain hoodies are among the most versatile pieces of clothing you can own. But while they're comfortable and chic, plain hoodies can also look a little dull, especially if all you're wearing is sweats or blue jeans with them.
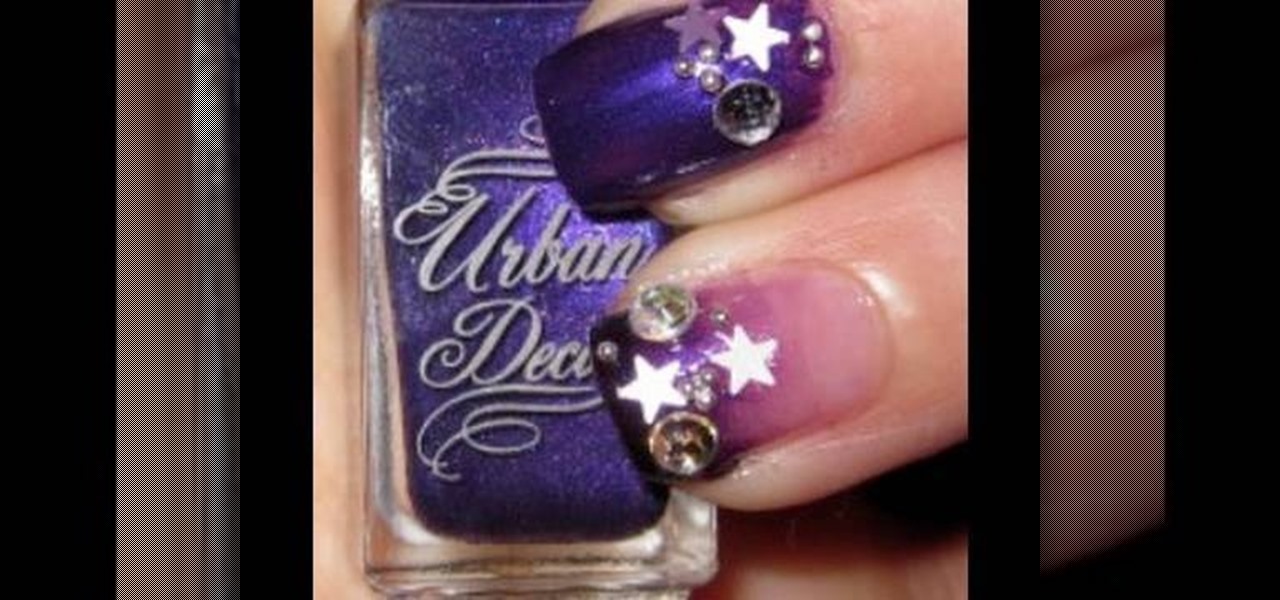
In this video, we learn how to create a 2010 New Year nail look. First, apply a dark purple nail color to the top half of the nails. Now use a clear nail polish to push the purple color down to the middle of the nail. Next, apply a black color to the very top of the nail and then use the clear polish to again push the color down and blend all of them together. Next, use a dotting tool and clear polish to pick up rhinestones or nail rocks and apply them to the tip of the nail where the color i...

In order to make a Cricut Sunflower card, you will need the following: card stock, Walk in My Garden Cartridge, ribbon, decorative paper, chalk, scissors, 2-sided tape, an ink stamp pad, adhesive, and pop dots.
Baby clothes and accessories are the cutest around: delicate polka dotted bibs, fuzzy knitted booties, and of course perfectly cozy knitted Afgans to cover them up as the get their first ZZZs.

In this video, we learn how to make baby rattle cupcakes for a baby shower. To decorate these, take some pre-made cupcakes and place a coat of icing on the top of it. Now, you can pipe some decoration onto the cupcake using a plastic bag or pastry bag. Making different lines and polka dots will make a great pattern for a baby shower. You can also make flowers with different colors. Add on different candies to make it more colorful and add different tastes. You can also write with your icing p...

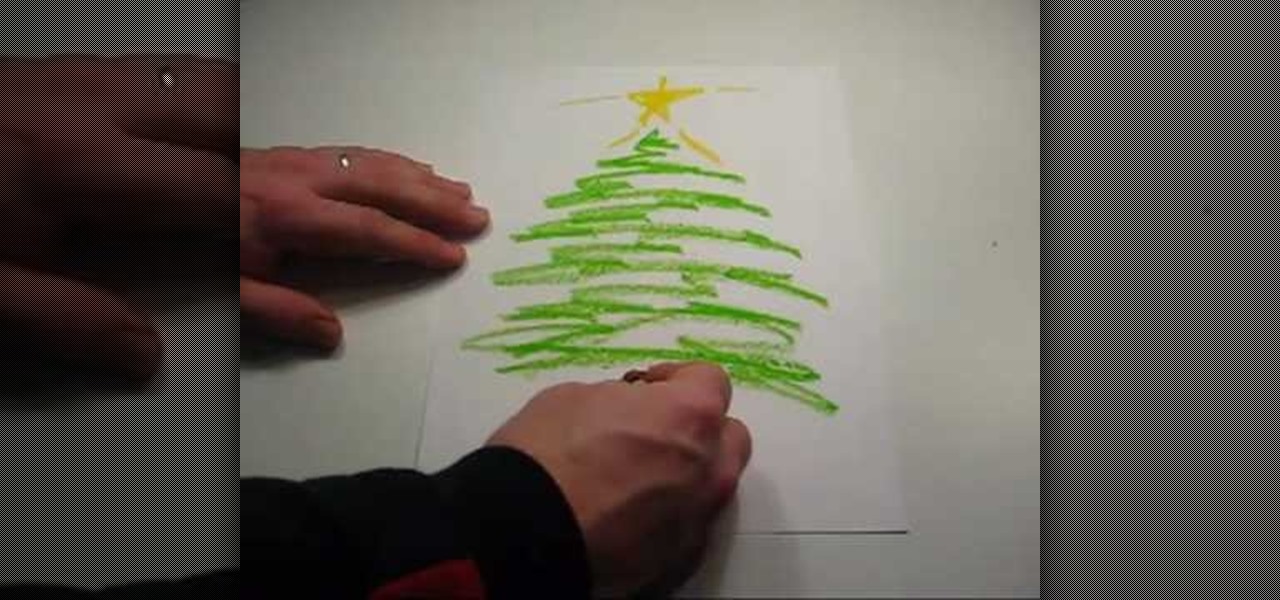
A video from http://www.donpower.me that shows how to draw a simple Christmas tree. This video is basically for kids. The presenter in this video, shows how using simple crayons a Christmas tree can be drawn in not time. The short duration of this video (0:59 seconds) is proof enough.
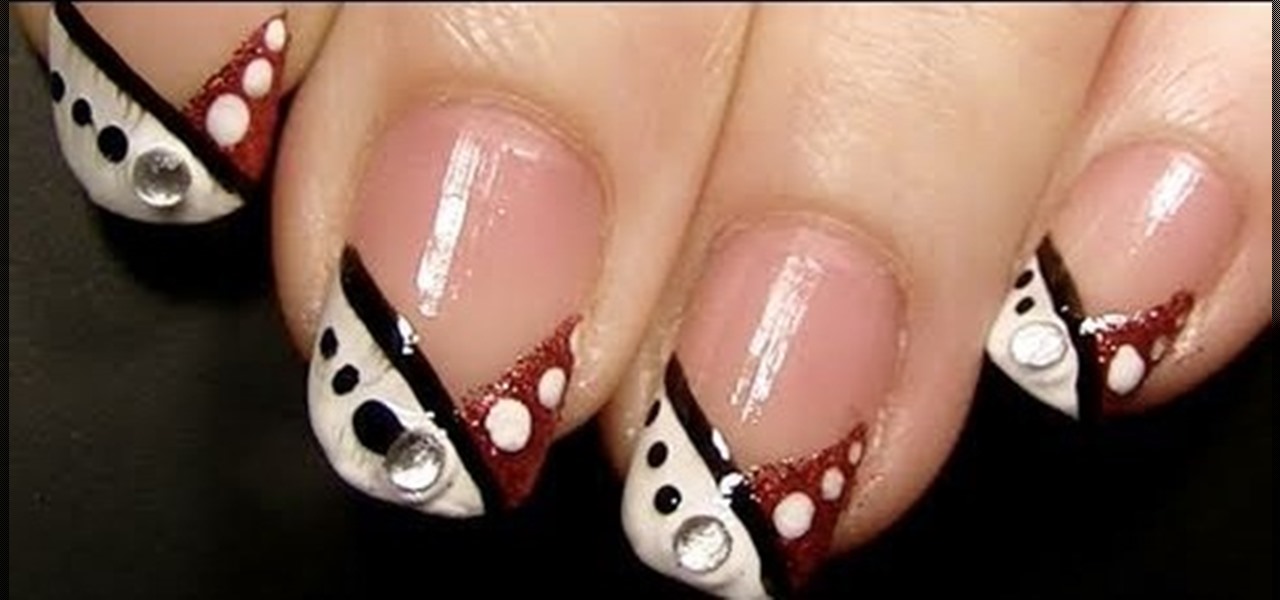
This tutorial teaches you how to do the same nail design as Ke$ha from her video "Tik Tok" had her nails done. First you apply a base polish to protect your nails. Apply a gold polish all over the nail, about three solid coats and then let them dry. Paint on a rich wine color to the corner of each nail end. Use a dotting tool and clean polish to pick up the rhinestones. Apply a little bit of nail glue on the seam of the two colors to help the Rhine stones stay put. Take a fine tip brush with ...
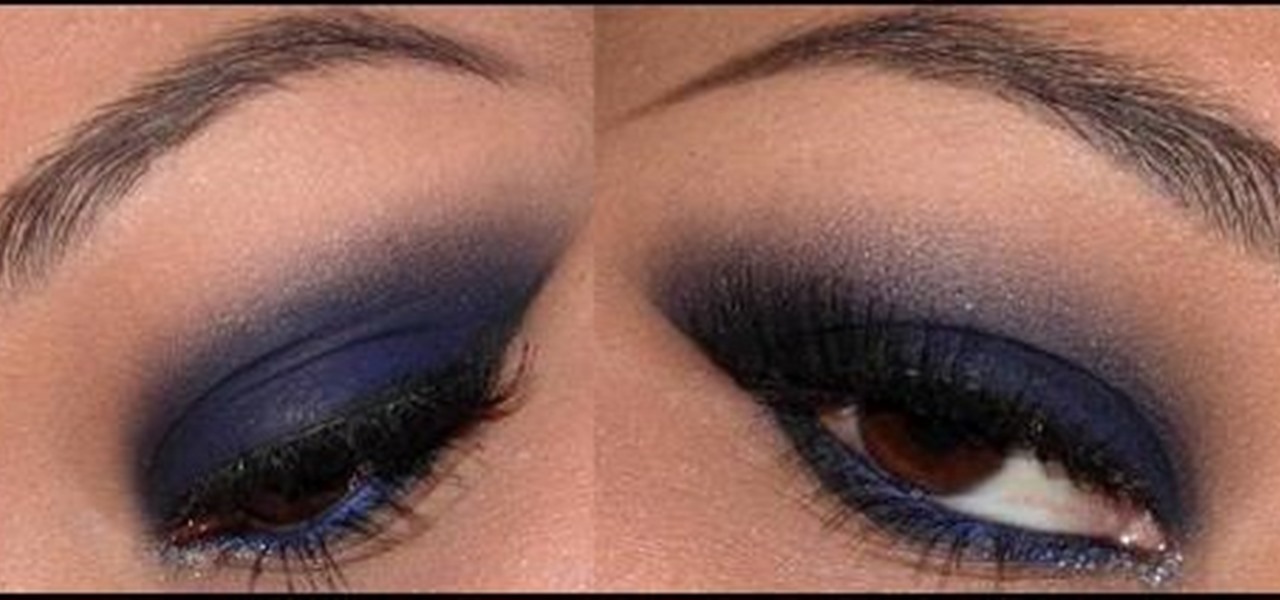
This video shows you how to get a New Year’s Eve look that is very fun, flirty, but simple using glitter. For a base use two face eye shadow insurance all over. Take a blue and put it onto the lid up and away. For the bottom use a dark blue and with a small brush smudge it across the bottom of the eye. Use Aqua Black and with an angle brush apply it as a liner. Use MAC glitter liner and put it on the inner corner of the eye. With a clean q-tip take a silver glitter and dotting it into the gli...
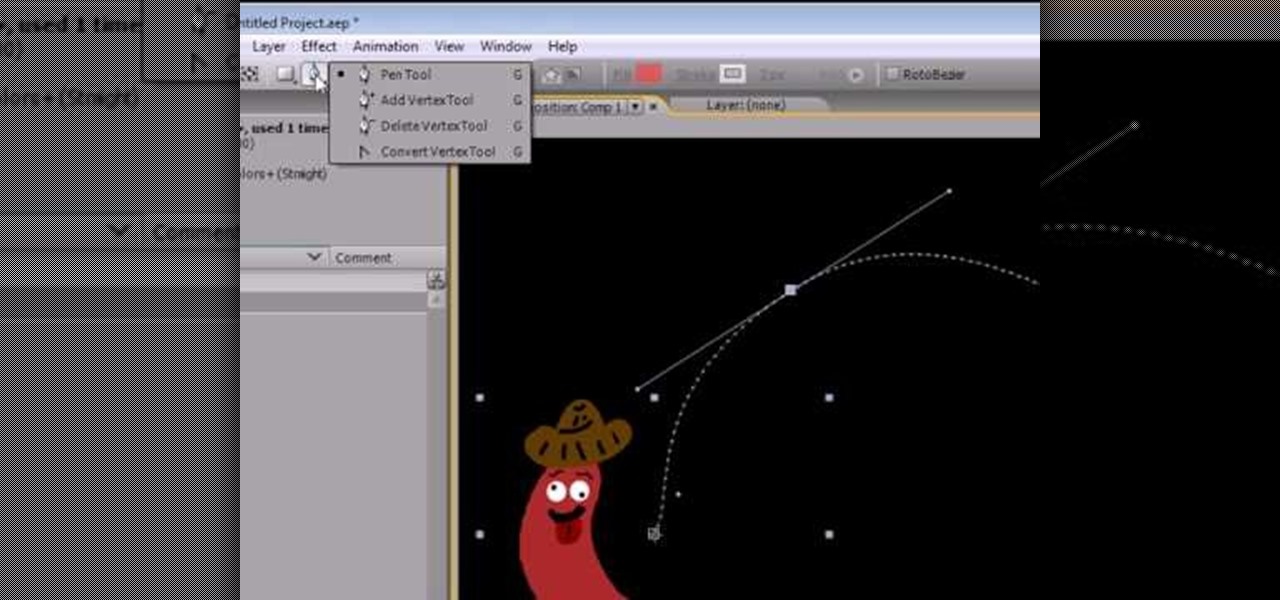
Get started using Adobe After Effects with the help of The New Boston! This beginner's tutorial is bound to answer the many questions you have about the popular digital motion graphics and compositing software. The main purpose of After Effects is for film and video post-production.
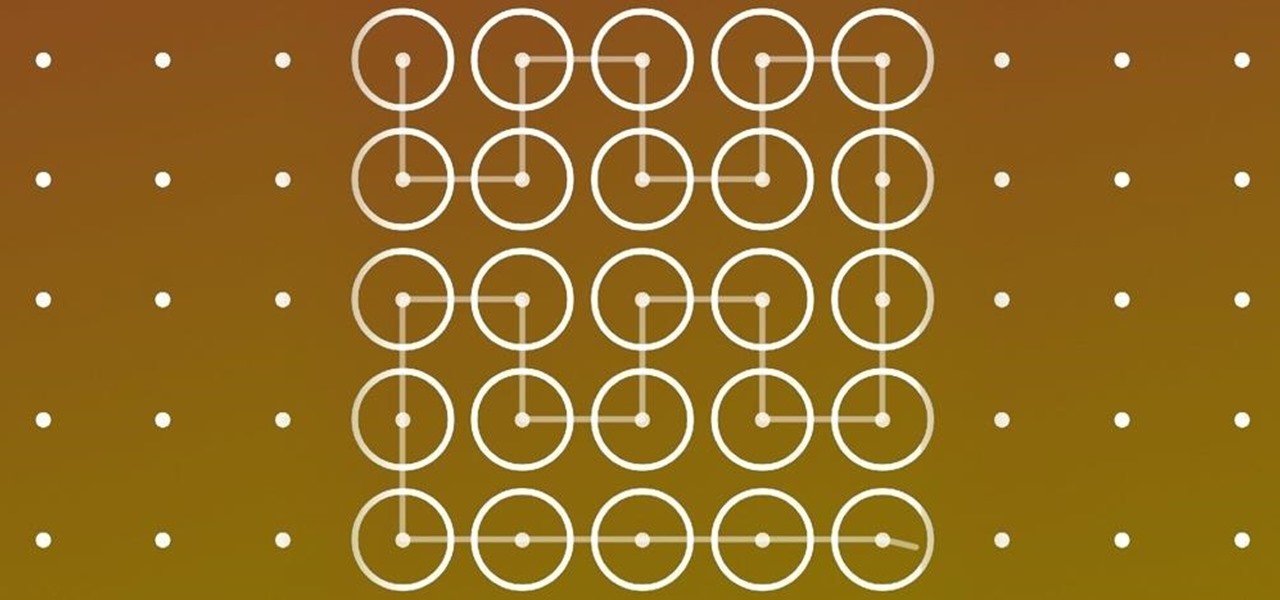
This video series shows you different patterns for solving the Rubik's Cube. The four patterns are a different colored dot on each side, a cross and an X, a pattern with an X on each side and the last pattern is 2 sides with solid colors and 2 with diagonals.
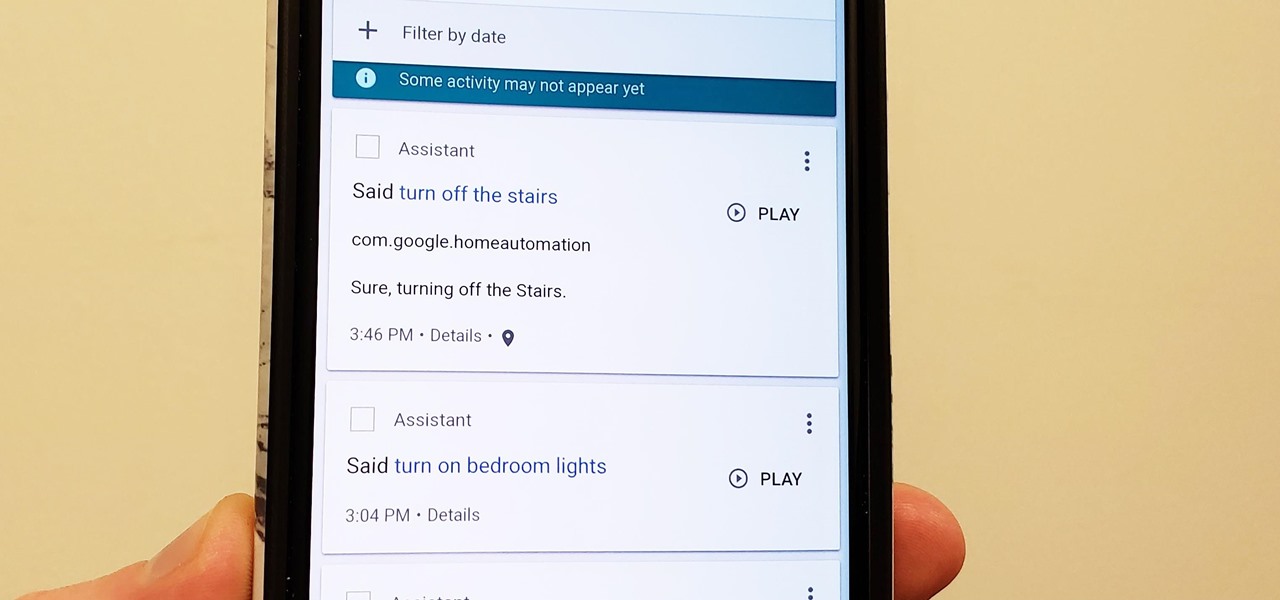
We all know Google keeps a history of everything we do on our phones unless we say otherwise. However, you might not realize just how detailed it is until you check it for yourself — even the actions you do in each app are tracked by default.
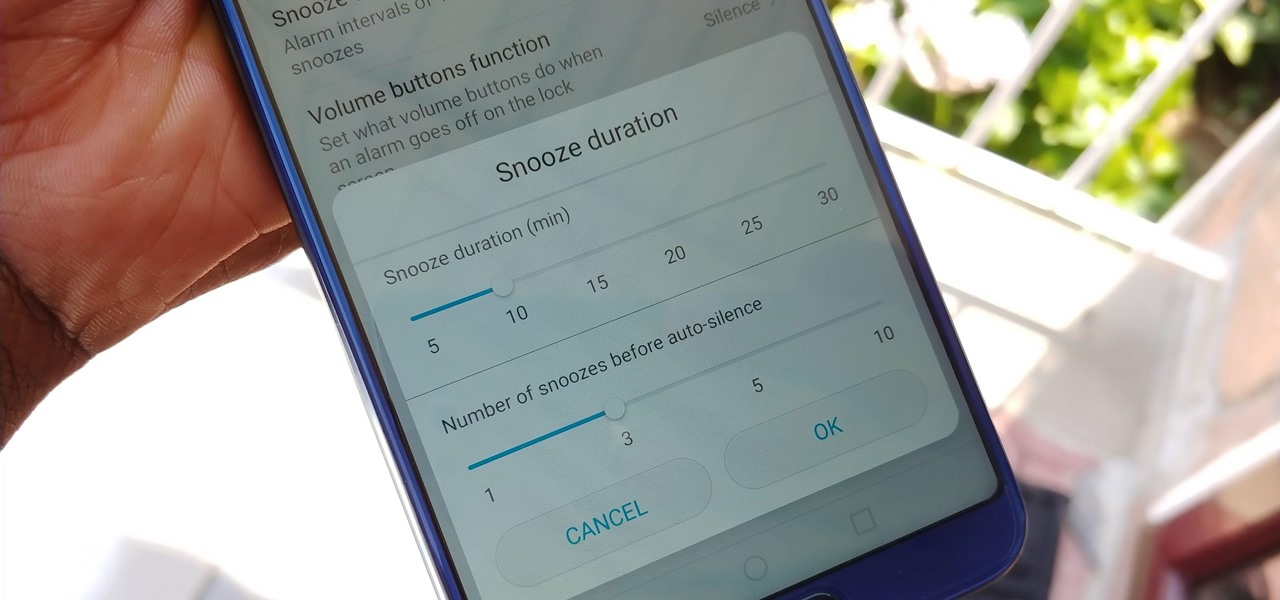
While we shouldn't rely on it, every so often we need to hit the snooze button to get a few additional minutes of precious sleep. Depending on which OEM skin is running on your device, this could be either five or ten extra minutes of dozing. However, some of us need a different length of time.
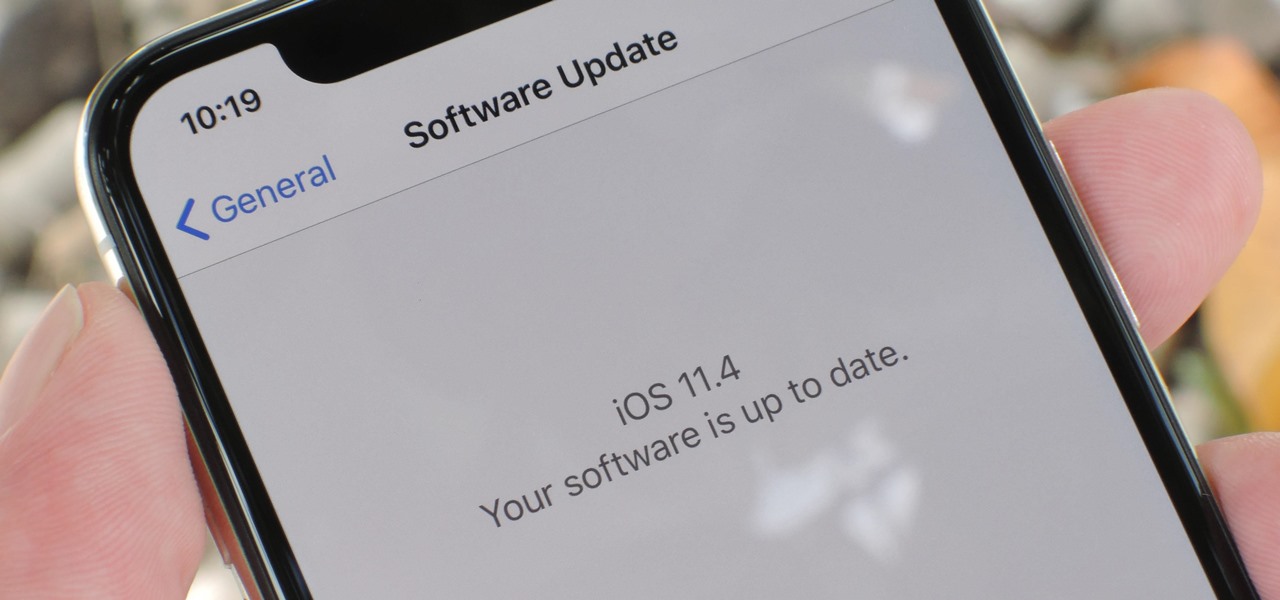
Talk about rapid-fire. Apple released the sixth beta for iOS 11.4 on Thursday, May 17. The update comes just three days after the release of iOS 11.4 beta 5, indicating that Apple is readily approaching the official release of the software. Apple has not issued an official iOS update since 11.3.1, which found its way to users over three weeks ago.
Privacy is a hot topic. In the wake of Facebook's data scandal, many want to safeguard their personal info. On the other hand, we all gain a certain amount of convenience by using services administered by huge companies like Google, Facebook, and Twitter. Google Assistant collects plenty of data, but you can easily check what is stored and delete items at will.
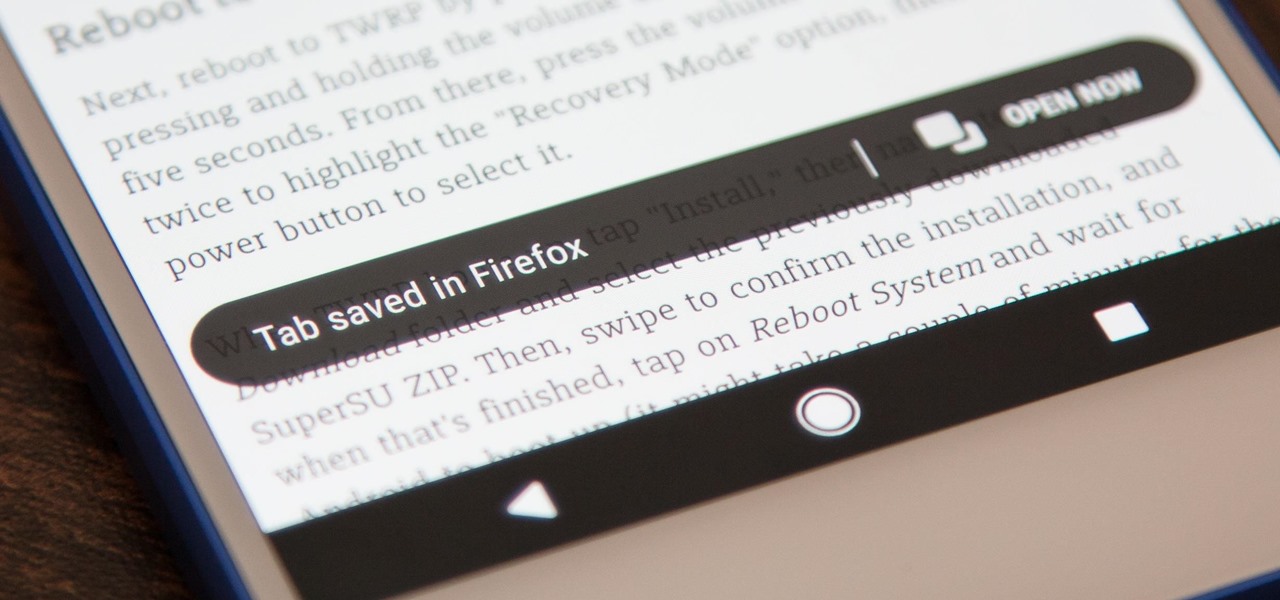
Mozilla baked an easily missed feature into their Firefox Browser for Android called the "tab queue," which you should definitely be using if you find yourself opening links a lot from emails, texts, and other link-heavy apps. With tab queuing enabled, you can save links as new tabs in Firefox without ever leaving the current app you're in.
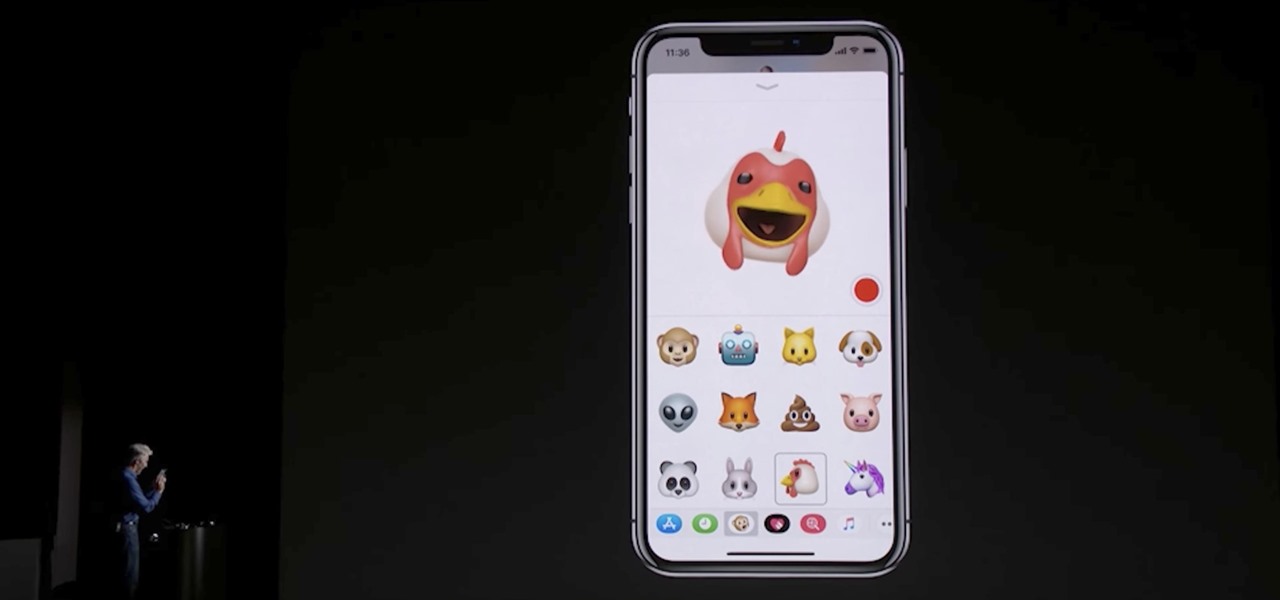
Animoji, short for animated emoji, was a focal point of the iPhone X presentation at the Sept. 12 Apple event. The reactions were split, to be sure, as some considered the attention to this feature on a $1,000+ smartphone to be a bit, well ... too much. As goofy as Animojis may seem at first, the tech behind them is undeniably impressive. In fact, it's possibly the most technically advanced feature of the iPhone X.
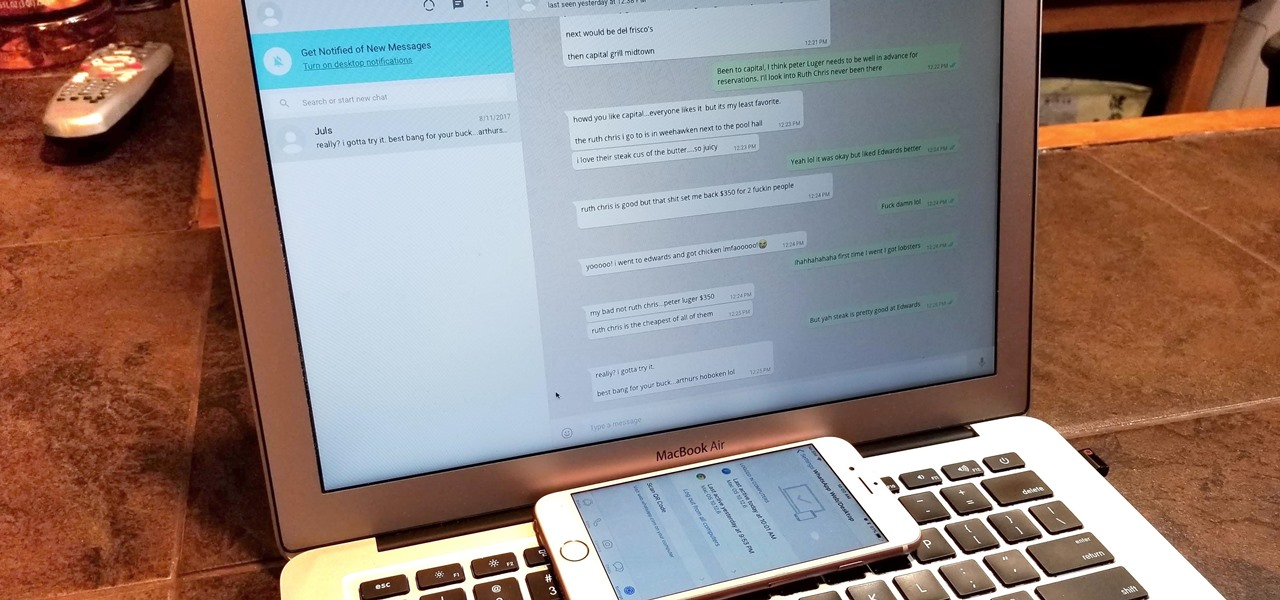
Typos are a constant annoyance that we all deal with thanks to the cramped touchscreen keyboards on smartphones. For many, nothing beats the feel of a good old physical keyboard when it comes to typing fast with minimal errors. Fortunately, WhatsApp has an awesome feature which lets you use their messaging service right on your computer.
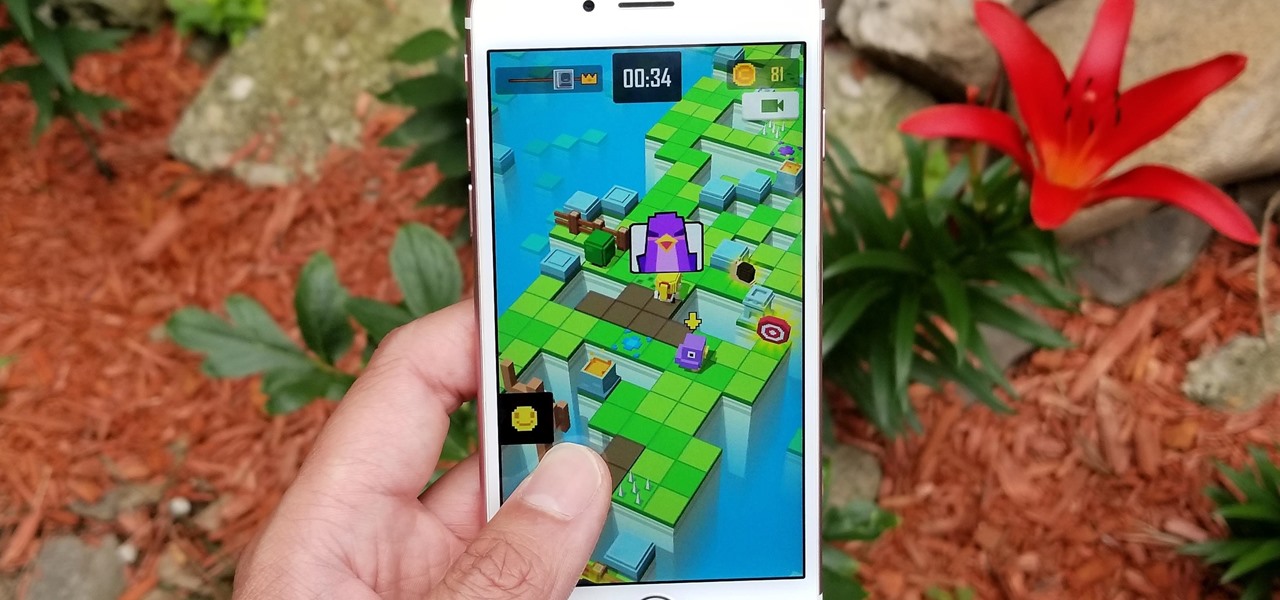
Puzzle games are a great way to kill time and exercise your brain in one fell swoop. They challenge you to think strategically and plan ahead, whether that's to create killer chain combinations for maximum points, or to plain old keep from getting killed.
YouTube is a giant platform — over 300 hours of video are uploaded every minute. It can be difficult to keep track of your favorite videos in such a chaotic sea of content. Difficult, but certainly not impossible.
The Google Pixel and Pixel XL have an exclusive set of navigation buttons that you can't get on any other device without some tinkering. But aside from just being solid, filled-in shapes, the real treat in the Pixel's nav bar is the Google Assistant animation that gets activated by long-pressing the home button. The four colored dots that animate outward give you some visual feedback for triggering the Assistant, but really, it's just a nice little touch.
Aside from media, there's not a whole lot you can do in 140 characters to make your tweets stand out. You can use emojis, but they aren't exactly ground-breaking. However, now you can use Bedazzle, a Chrome extension from Gordon Zheng that'll allow you to add "rich text" to your tweets.
Every smartphone manufacturer is susceptible to defects, but after dropping a good chunk of change on a shiny new device, we as consumers have little tolerance for such issues. We want our gadgets to be perfect in every regard, so even the tiniest flaw is irksome.
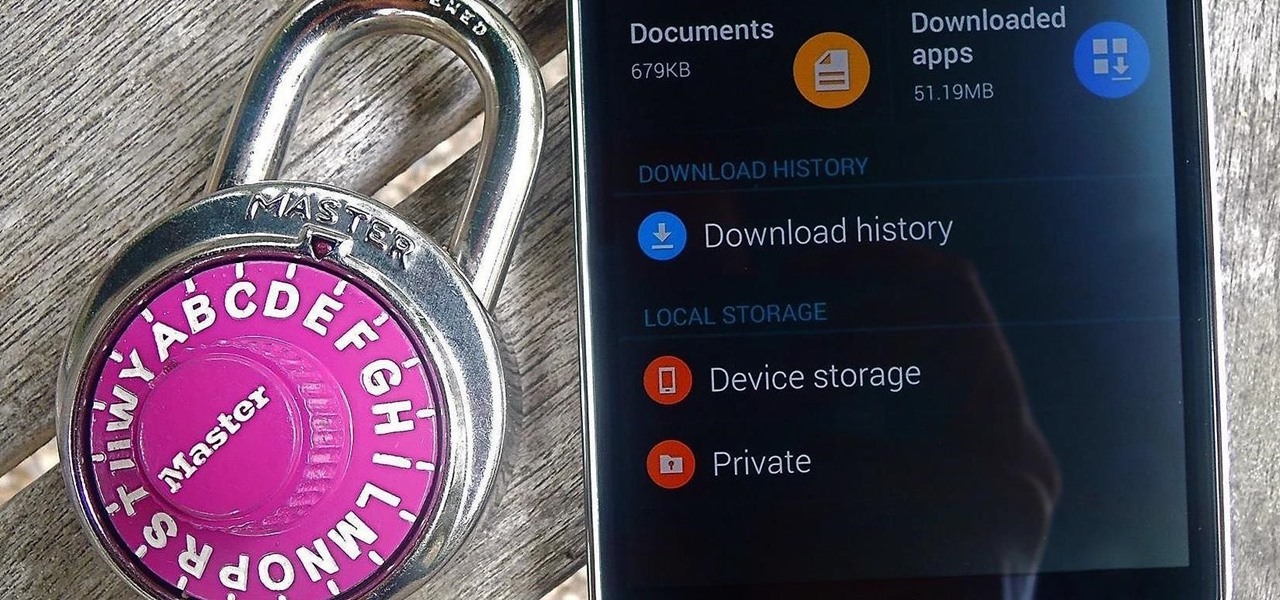
These days, our smartphones carry some very sensitive data. From banking app passwords to personal photos, there are many things on your Nexus 5 that you might not want other people to have access to.
3D has been all the rage for the past few years. It seems like every other film has a 3D aspect to it, our TVs have 3D capabilities, and we can even print functional objects using increasingly affordable 3D printers. And after some trial and error (ahem, Evo 3D), it's finally taking shape on mobiles.
Whether it's embarrassing pictures and videos on your smartphone, or files you just don't want anyone reading, there are plenty of ways to hide them. For most devices, that means installing third-party apps like Gallery Plus - Hide Pictures, Sectos - Photo & Video Vault, TimeLock, or Hi App Lock.
Despite having the UltraPixel branding, the M7's camera can leave you feeling a little let down. The picture quality is clear and the low-light shots are decent, but when looking at the same shots taken on a friend's iPhone, you may feel a little inadequate.
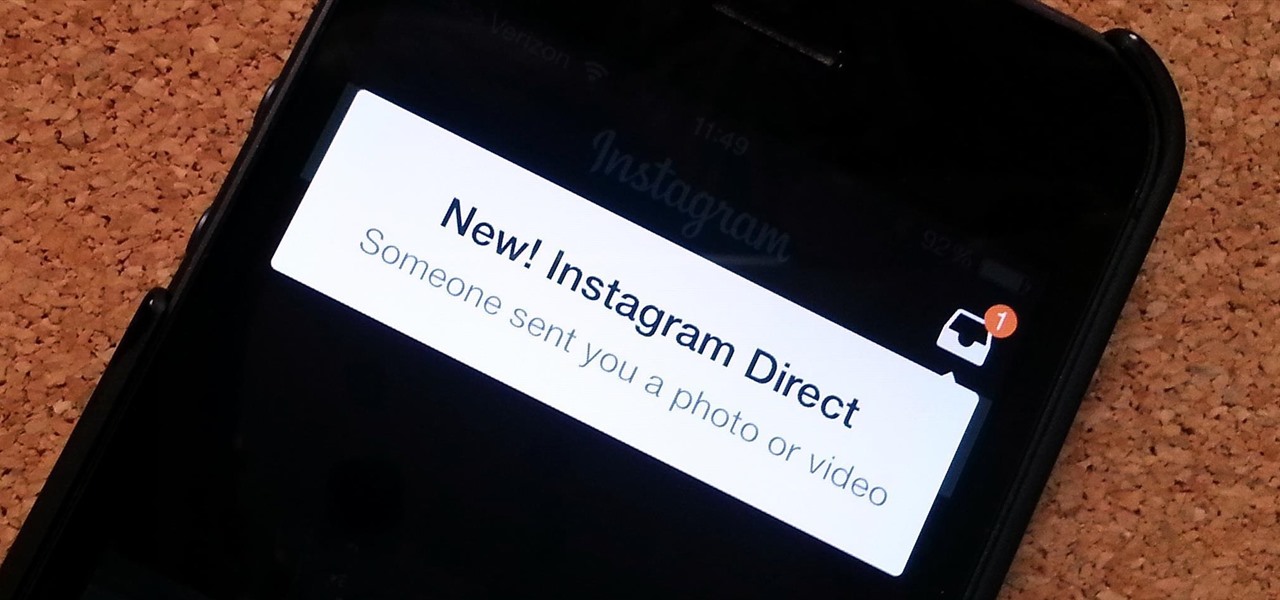
Instagram recently released their new Instagram Direct messaging feature in their Android and iOS apps, which lets users share private photos and videos directly with individuals or groups of up to 15 users. However, there are no restrictions on who you can send private photos or videos to.
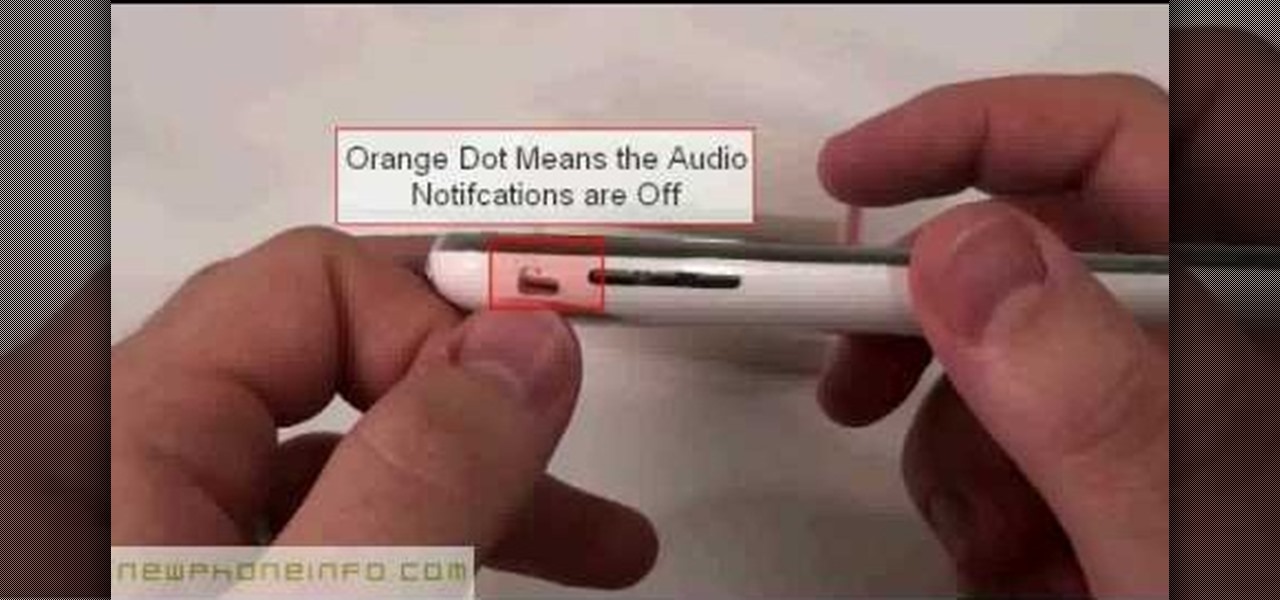
In this video, we learn how to use the ring/silent switch on your iPhone. First, you will find the switch which is on the side of the phone. This will allow you to turn your notifications on or off. Simply flick the switch until you see an orange dot, which means it's off. If you wish to receive vibration alerts, you can tap on settings, then sounds, then you can turn the vibrate section as either off or on. This is important, because if vibrate is off and the silent mode is on, you won't rec...
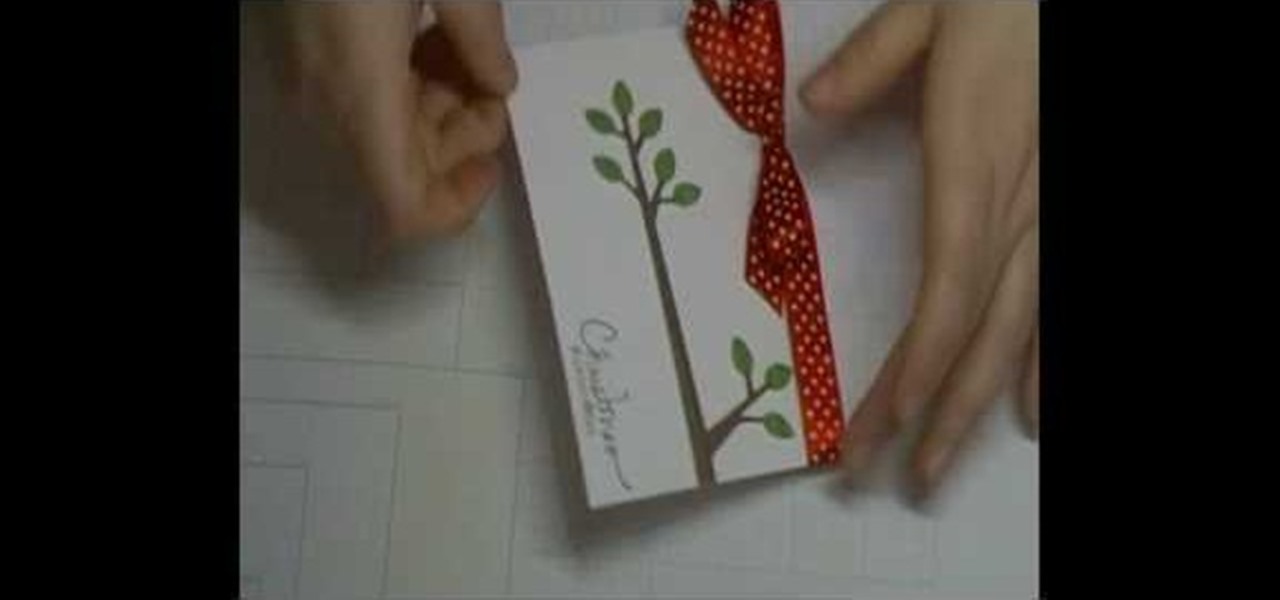
In this tutorial, we learn how to use Cricut Serenade & Joys for a simple Christmas card. First you will need to take a piece of white card stock and tie a red and white polka dot ribbon to the top. After this, you will need to take a tree branch stamp and stamp it on the side of the card like it's growing out of it. After this, make sure the color on the leaves is green and the branches are brown. Now, you will cut out another piece of card stock in a punch out to create the ornament that wi...
In this video, we learn how to make a double flap card with Stampin' Up!. First, cut out the card in green, then add a creamy caramel color to the top of a white piece of paper. Now, add a green piece of paper that is slightly smaller to the top of the caramel color paper. Add another piece of white on top of the green, then layer then together on the card. Add in a walrus and a little kid stamp to the cards and place them onto scalloped punches. On the bottom, apply striped paper, then apply...
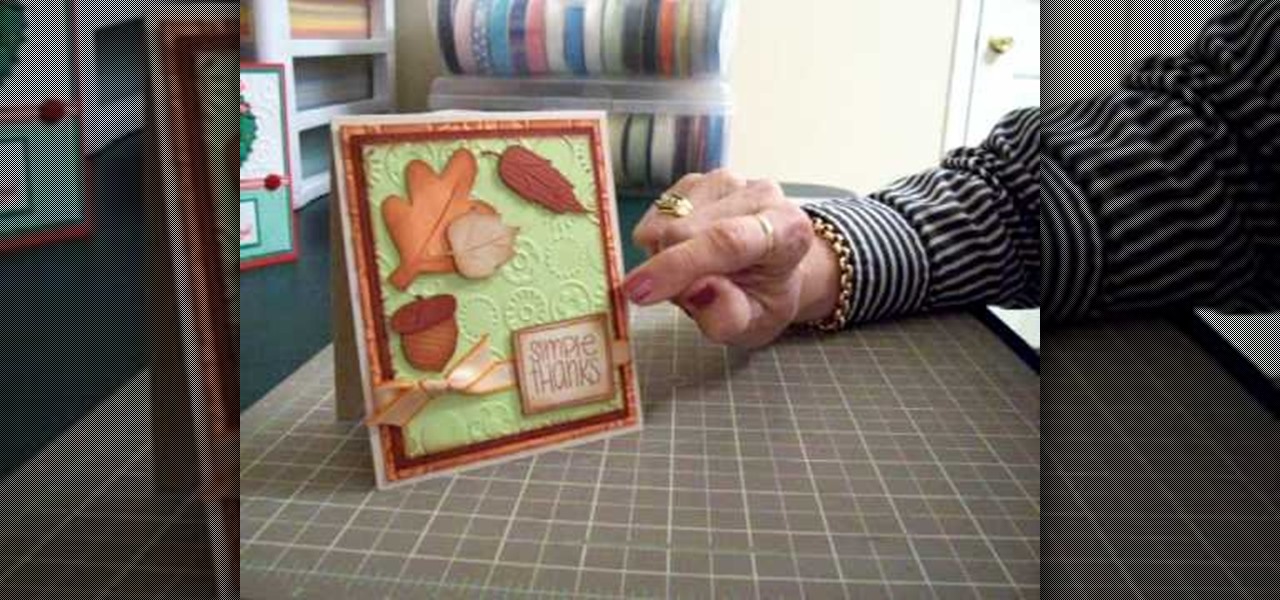
In this video, we learn how to make a thank you card using Cricut Doodle Charms and SYI. The card can be the size you choose. Layer orange, green, and brown mats, running the green and orange through the Cuttlebug using blue dots to give it texture. After this, ink around the edges with brown so the embossing shows up. Use the Cricut to cut the leaves and an acorn, using the Doodle Charms cartridge for one of the leaves cut at 2 1/4". You can also use the Stretch Your Imagination cartridge fo...
In this video, we learn how to write the letter J in calligraphy copperplate. For the uppercase letter, start by grabbing your calligraphy pen and drag it down so you have a thick black line with a thin line at the top. End the letter with a loop around it, then bring the top line to the left and loop it around, making a semi-thick line with it. To make the lower case letter, make a thin line going diagonally to the right, then dip the pen in ink and bring the pen down in a thick line down. C...
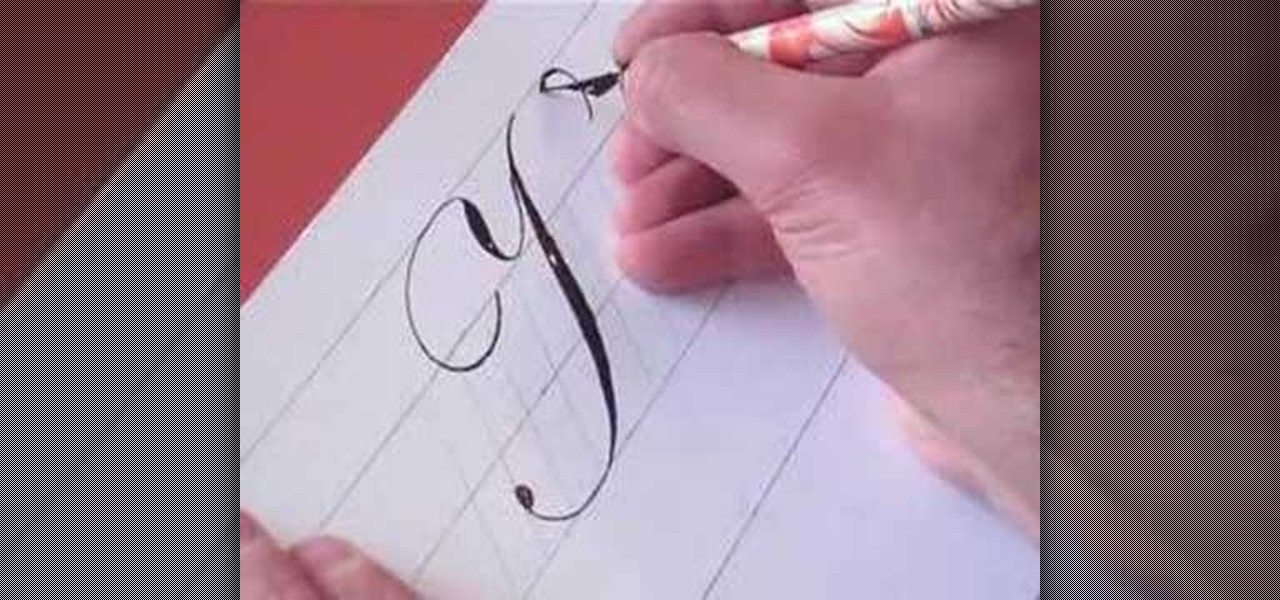
In this tutorial, we learn how to write the letter Y in calligraphy copperplate. First, make a thin line with the pen, going thicker as you go down, make a loop and then come back down. Make a "u" shape, then connect a curved line to the other side finished with a dot on the bottom to complete the letter. To make the lower case letter, make a small thin hump, then drag the pen down to a thicker line. Make a new line on the other side, making a thicker line and connect it with the other shape ...
In this video, we learn how to face paint a snake design. First, dip a paintbrush into dark green paint and place it on the forehead. Bring the brush down in a snake shape until you reach the cheek. Make a lump at the bottom of the snake followed by a small line for the tail. After this, dip a different brush into white and make a small dot on the face to make eyes, then make two teeth fangs. Also fill in the bottom to make the rattle on the bottom of the tail. Next, use red to make a snake t...
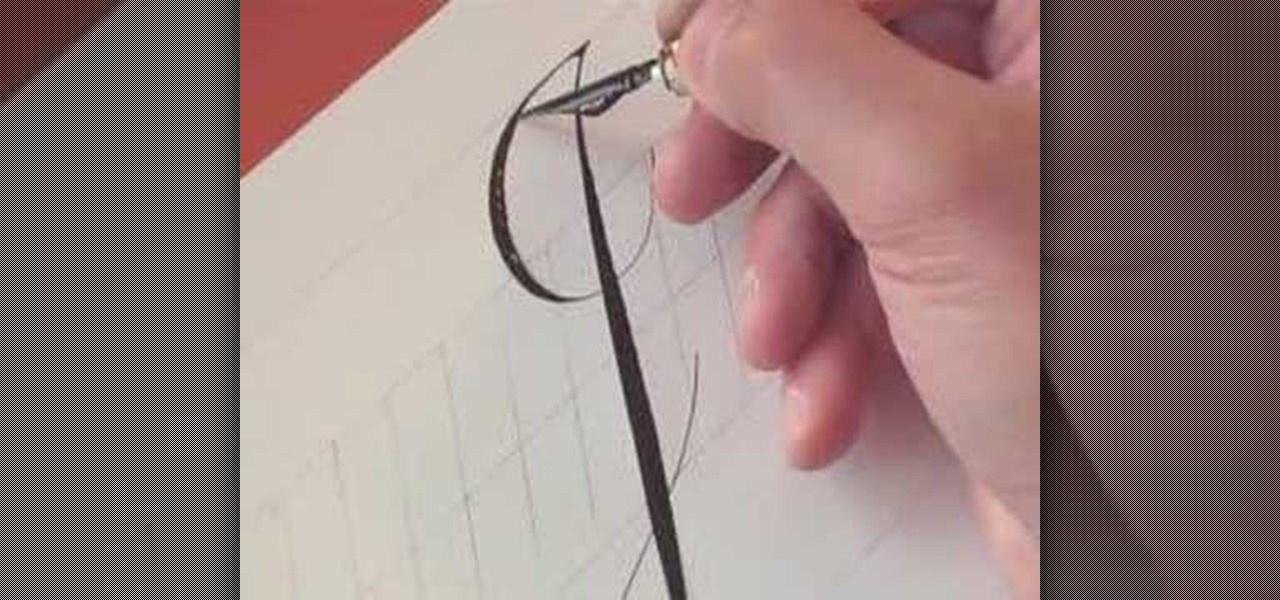
In this video, we learn how to write the letter K in calligraphy copperplate. Start by running your calligraphy pen on the paper going from a thin line to a thick, making a line curved to the left ending with a dot at the end of a small loop. Next, make a loop to drag out across the top on the right hand side and curve it down to make the K letter. Do the same to make the lower case letter, except making a loop for the top of the letter instead. When finished, let the ink dry and you've got y...
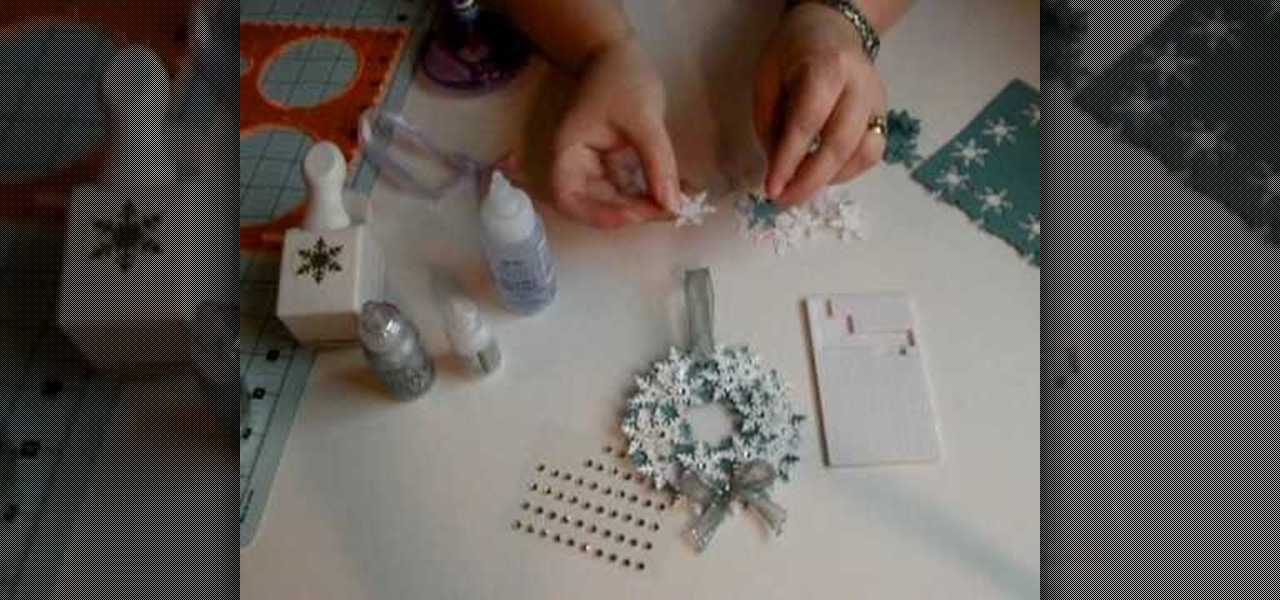
In order to make a snowflake wreath ornament, you will need the following: a snowflake punch, adhesive, foam, rhinestones, card stock, a hole punch, a circle cutter, scraps of paper, and ribbon.
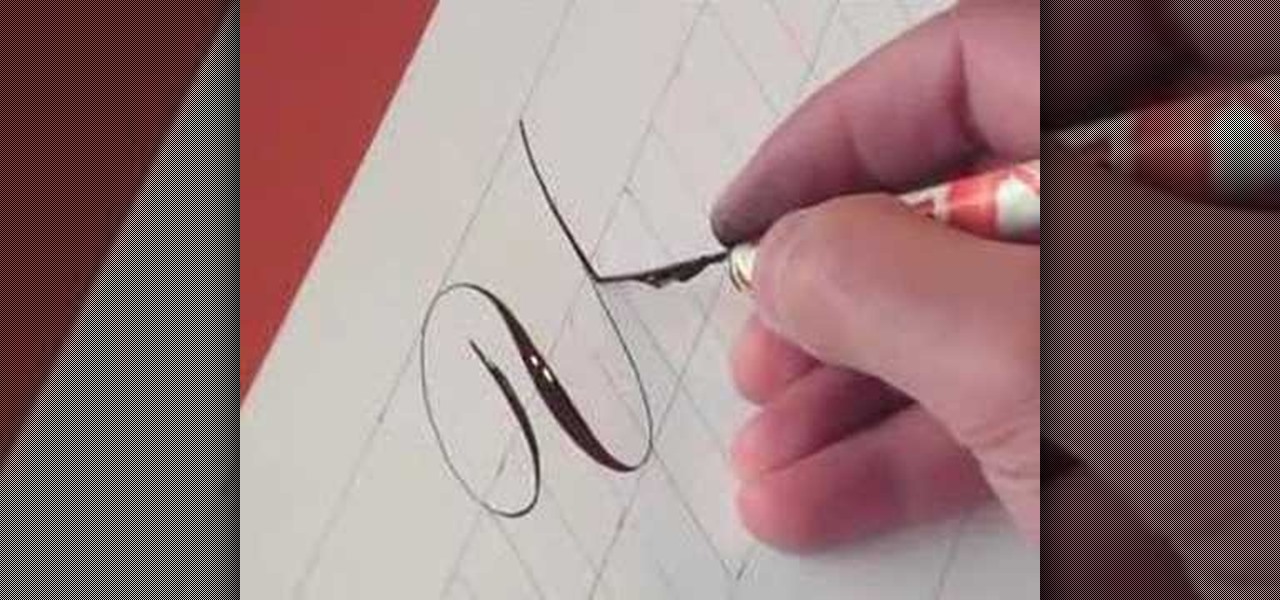
In this video, we learn how to write the letter "S" in calligraphy copperplate. First, dab your calligraphy into ink, then start to writ on a your paper. Make a large half bowl shaped curved line, then make a loop and go down, creating a curved line with a dot at the end. To make the lowercase letter, make a thin line, followed by a thick outer line that curves into the large line making a lower case s. When you are finished with both of these, you will have beautiful letters that look great ...
In this video, we learn how to write the letter "r" in calligraphy copperplate. Start out by dipping your calligraphy pen into ink, then creating a curved line with a dot at the end of it. Next, fill in the line so it is smooth and there are not ragged edges. Next, draw a large swirl on the left side next to the curved line, then draw it over to make the initial loop on the "r". After this, create a loop in the middle, then draw it back down to make the end hump of the "r". After this, draw i...
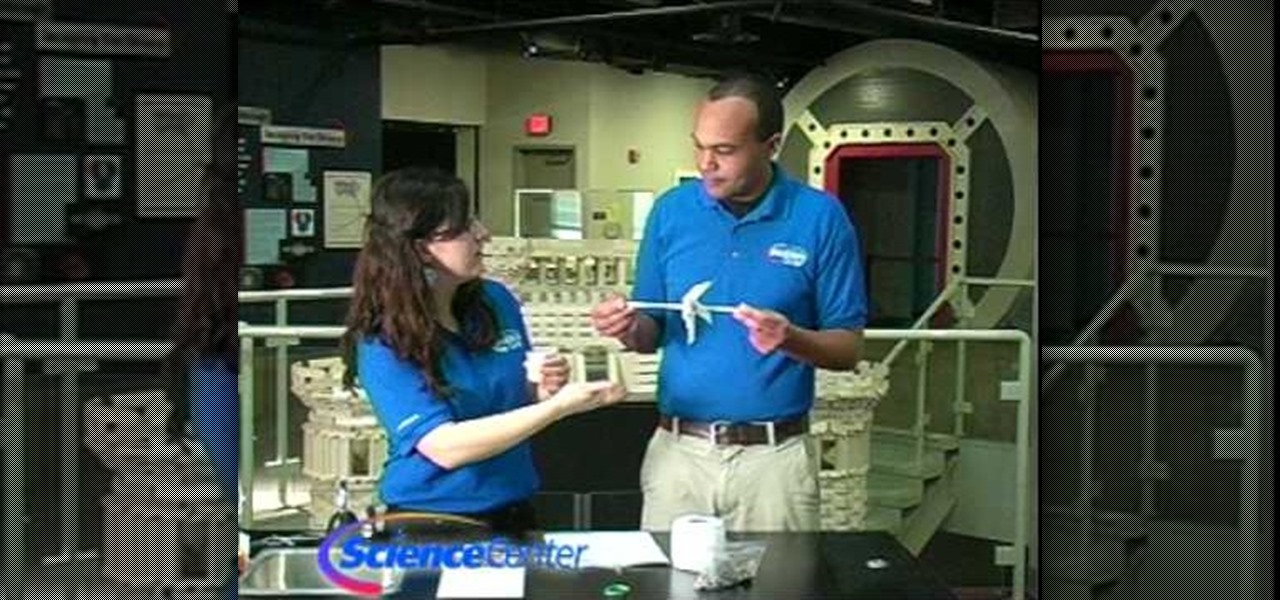
In this Home & Garden video tutorial you will learn how to build your own windmill with household materials. Materials needed for the windmill are a template, scissors, straw, some yarn, some pennies, a paper cup, rubber bands, pencil, single hole punch, a skewer and thumb tacks. Take the template, cut it out along the solid lines and punch holes on the corners as shown in the video. Now with a thumbtack and a pencil make a nice hole at the center of the template. Fold the template along the ...