This video illustrate us how to draw the incredible hulk. Here are the following steps:Step 1: First of all take a sheet of paper, pencil and pencil color.Step 2: Now draw a square with round edges representing the face of the hulk. Within the face draw eyes and a big mouth and hairy eyebrows.Step 3: Now from the bottom of the circle draw an oval with wavy structure on it showing the six-pack abs of the hulk.Step 4: Now from the down side of the abdomen extend two legs with muscular legs and ...

This video is a tutorial on how to paint nails with cheetah print and rhinestones. The tools shown by the instructor consisted of nail polish and makeup sponge. The first step taken where to cover the tip of the nail in a white polish with a burnt orange colored finish. A sharpened pencil is used as an art tool to shape round circles onto the corners and center back of the nail made of a dark brown nail polish. The instructor then takes a glittery gold color to make river like patterns runnin...
Did you lose your key or forget the combination to you lock? This tutorial is here to help you with tips on how to pick just about any combination or padlock without breaking them. All you need is a few household items and a bit of patience and you will be on your way!
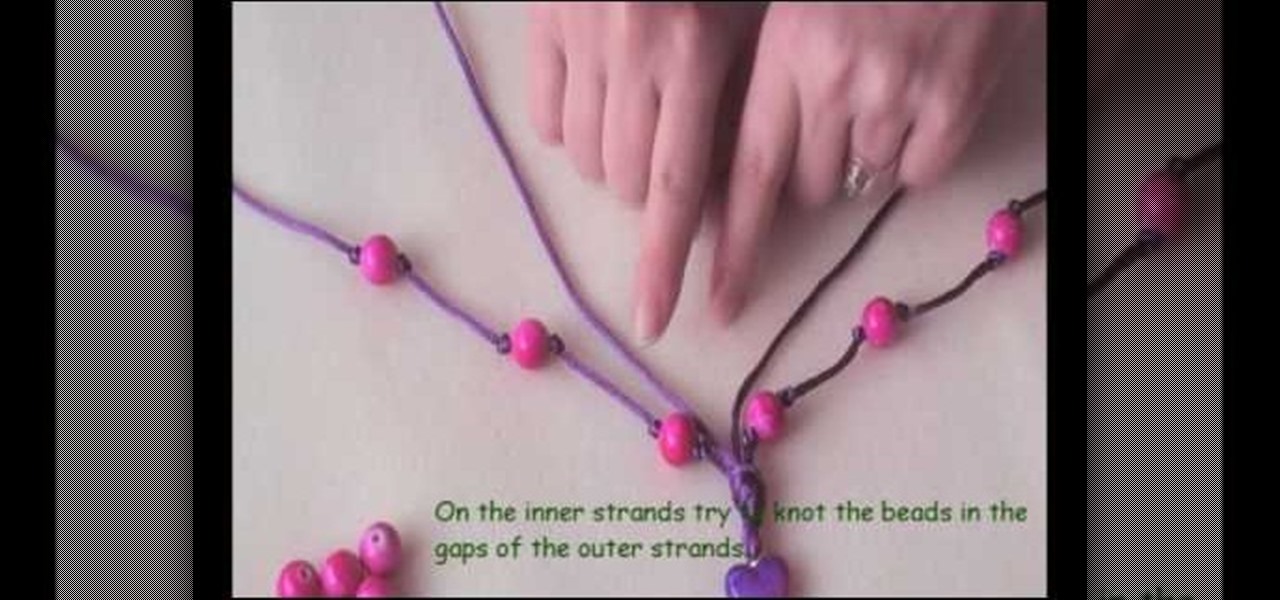
In this video the demonstrator shows how to make an alternative style rock star bead necklace. She uses purple cording, pink round beads, and a pink and purple heart bead to construct this fun, original piece of jewelry. By using a headpin and pliers, she shows how to turn the heart bead into a charm to use in the center of the necklace. She also shows us how to knot the beads in place for a polished look. Follow her unique tips including using nail varnish to sting beads easier, seed beads t...
It's summer again and it's time to get out of the house and there's no better way than with a fun game like some improvised baseball. You don't need a whole team of people all you need is a bat, a ball and another person to play with.

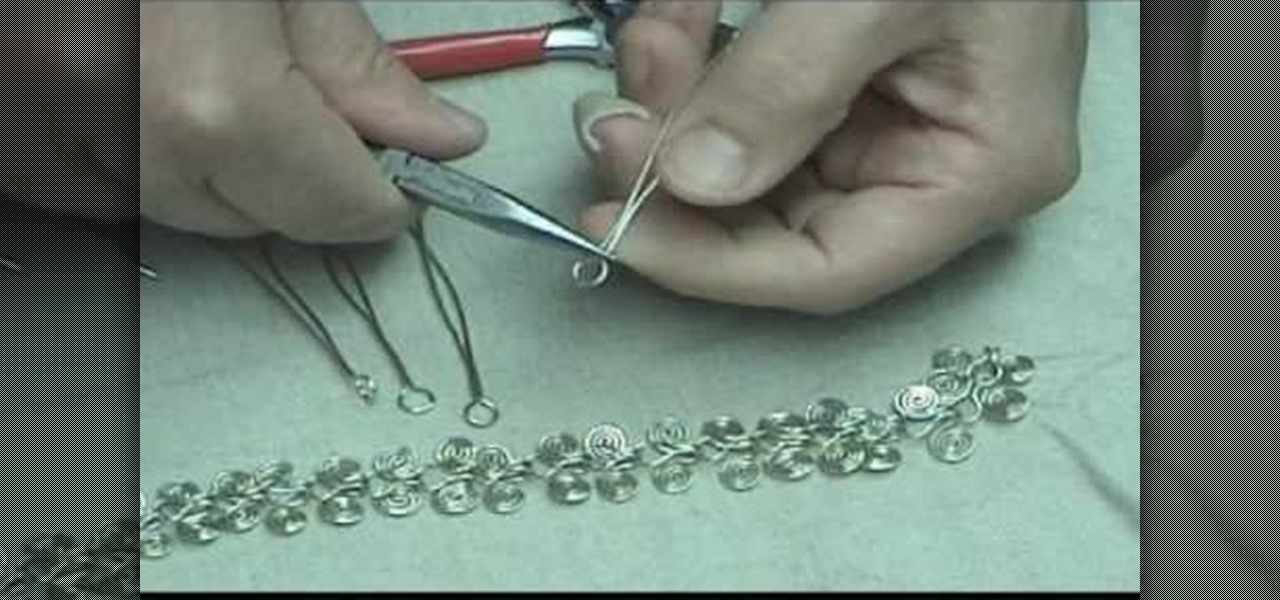
In this jewelry-making basics tutorial, learn how to make an eye pin. To create an eye pin, you will need wire. Size 24 or 22 gauge wire is the best kind of wire to make an eye pin. The thicker the wire, the more difficult it may be to work with. To begin, straighten out your wire and cut the length you need to make your eye pin. Taking some round nose pliers, you will bend the wire up while rolling it toward yourself. Do not pinch the wire too tightly with the pliers because it can leave per...

Not a very good artist? Well Joe makes it simple for anyone to create a great looking wiener dog! First he starts with the eyes. He draws two large circles then adds the dots for eyes. Joe gives them a little personality by making the eyes a little cross eyed. He next moves down to the nose where he draws a small round circle and fills it in. Next he follows his way down and creates the long body for the dog. He even includes realistic aspects such as eyebrows and a smiling mouth. Learn from ...
This video shows how to make a bay girl and boy head made of clay. The first thing you need to do is get a small round ball of clay that is a skin color color. Then you get the small black beads and place it firmly on the ball they will act as the eyes. Then make the eye creases on the side of both eyes. After that you add the other physical features like nose, mouth, ears, and eyebrows. The last thing you do is fold two square pieces of clay into the shape of a bow then place it on the top o...
This video teaches you how to make a steampunk bunny. You want to start off by making a blob with a fairly light color. Then you want to use a sharp stainless steel tool to create a round head. Make sure to make the head of the bunny is forwarded a little bit so that it looks like a bunny. Next, using your hands create a tail in the back of the bunny. Insert one of the bigger eyes using the little wire. Go ahead take your tool and carve out the nose, the cheeks and the mouth. Next you want to...
This video shows you how to make your own home made Christmas reindeer decorations. You need some floral fabric, scissors, a few feathers, and some artificial eyes. Draw a reindeer template on some cardboard, using a cookie cutter if you wish, and cut it out. Paint some glue thinly on the reindeer shape. Lay the fabric on the glue and spread it out with your hands. You can use anything for this, even wrapping paper. This crafty look is very fashionable at the moment. Attach the plastic eyes a...
Stampinmama1 shows us how to soften edges of paper with ink sponges. When you sponge, you get a little softer look onto the paper. You're going to want to use a round stamping sponge and you would want to cut it up into six pieces to have more control over them. Rub your sponge directly onto the pad, grind it on pretty hard. Go right along the edge of your paper, ink it up again and keep going. You will get a soft feathery edge instead of a fairly bland edge with no soft look to it.
Save money by making your own jewelry at home! Learn how to make yourself a beautiful Egyptian link, figure 8 necklace by following the easy to follow instructions in this two-part video. The wire used in this example is a standard 0.035 sterling silver wire. You can substitute 0.035 with an 18 gauge nickel silver wire (or you can experiment with other wire). In addition to the wire you will need three pliers to make this necklace: round nose pliers, chain nose pliers and diagonal cutters.
In this video tutorial, viewers will learn how to make a charm bracelet. The materials needed to make the bracelet are: a light silver plated chain, 100 grams of plain glass mix, 1 toggle clasp and 100 headpins. All these materials can bought from Beads Unlimited. The tools needed for the bracelet are: flat-nosed pliers, round-nosed pliers and cutters. This video is descriptive and clearly explains all instructions. This video is at a slow pace and provides step-by-step instructions that will...
Catherine demonstrates how to create an eclectic, sunset-inspired necklace in this video. To create the necklace you must gather 40 yellow bugle beads, 18 orange chip beads, 3 mm red round beads, a barrel clasp, 2 crimp beads, 2 bead covers, about 20 inches of beading wire, clippers and pliers. The design is to start by threading a clap and a crimp bead onto the wire, leaving a 2 inch tail. Then thread on 15 yellow beads, remembering to cover the tail you left with the beads, 3 orange beads, ...
Brittany Black Rainbow demonstrates how to draw an emo boy. Begin with the back ground of hair, draw it like an inverted cone, assuming like one eye is covered by the hair. Draw the second eye and brows, and now draw the nose and mouth. Complete the face. Just draw the neck and the body with a round neck T – shirt with half sleeves and the hands. Now complete the hair. It’s like thorny bush, just draw all these lightly. Give black shade to the hair with pencil itself. Now darken every thing, ...
Vanessa is teaching you how to make arm and leg warmers for babies or toddlers. She is simply using some socks that she got by going to the dollar store and buying them. They only need one seam. You need to cut off the top of the sock first. Then you cut the heel and toe off the remaining sock piece. You need to fold the bottom part of the sock in half and make it into a loop. Put the loop over the raw end of the top of the sock. This will make it so all of the round edges are together. Stitc...
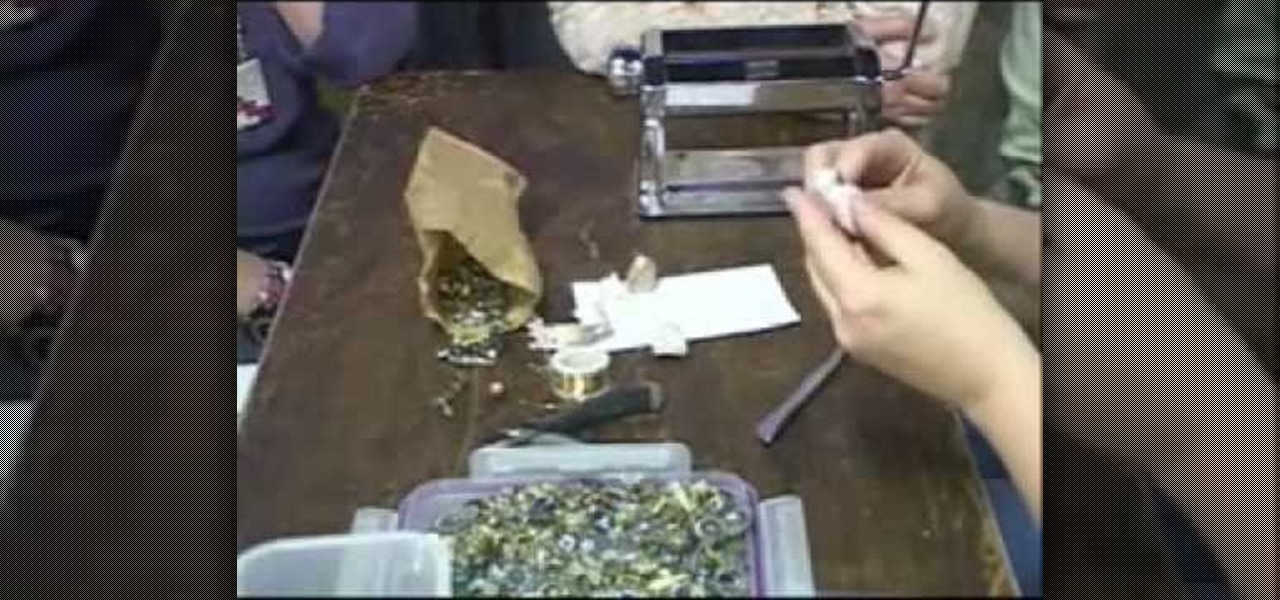
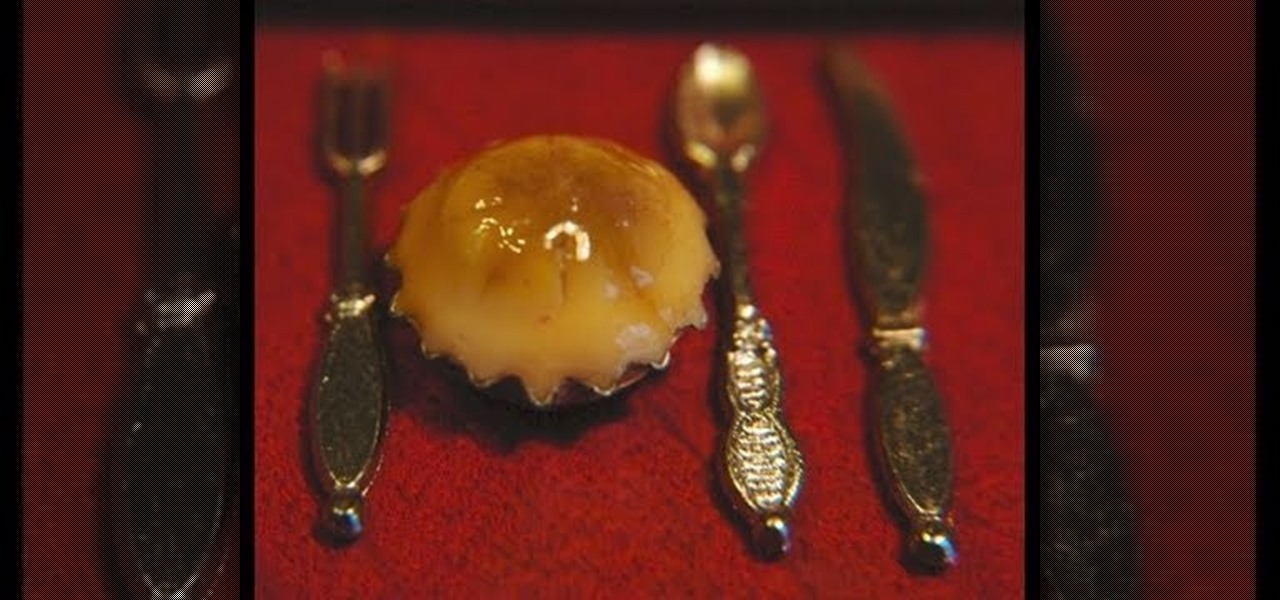
Garden of Imagination demonstrates how to make miniature polymer clay pot pies. Find miniature bottle caps in the scrap booking section of the craft store. You can use a regular sized bottle cap to make a big pie. Roll a piece of ecru clay into a ball and mold it into the bottle cap. Round the top to give it a pot pie shape. Use a small blade to create seared lines into the pie top. Brush mustard yellow pastel to tint the top of the pie. Brush a brown pastel accent on the top of the pie. Bake...
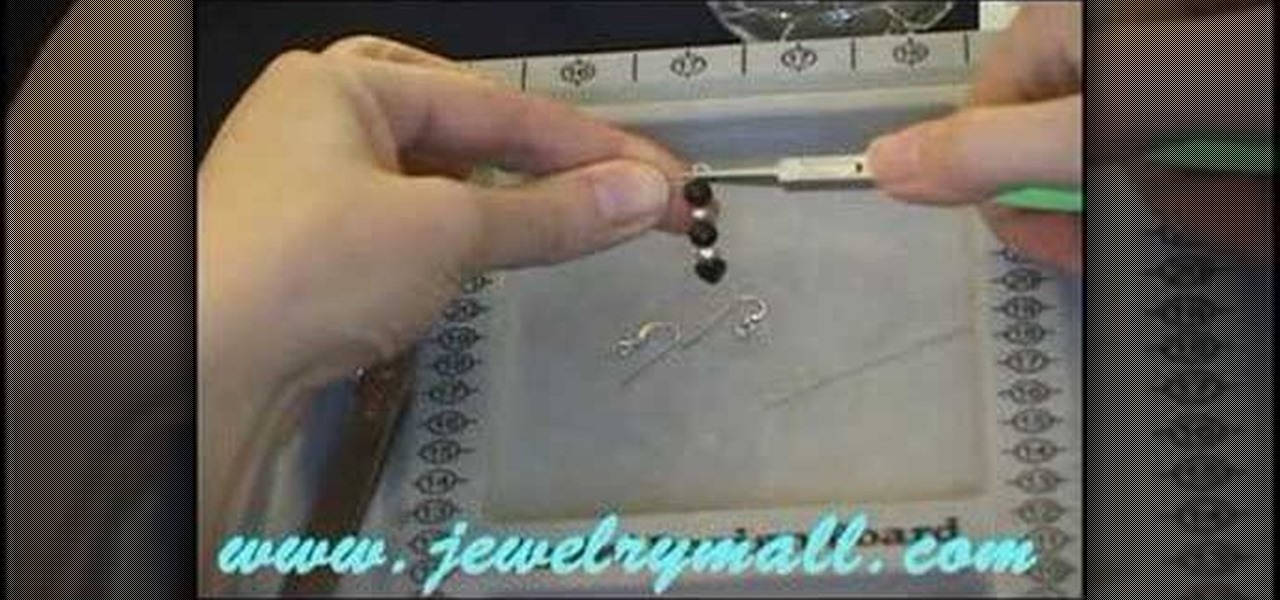
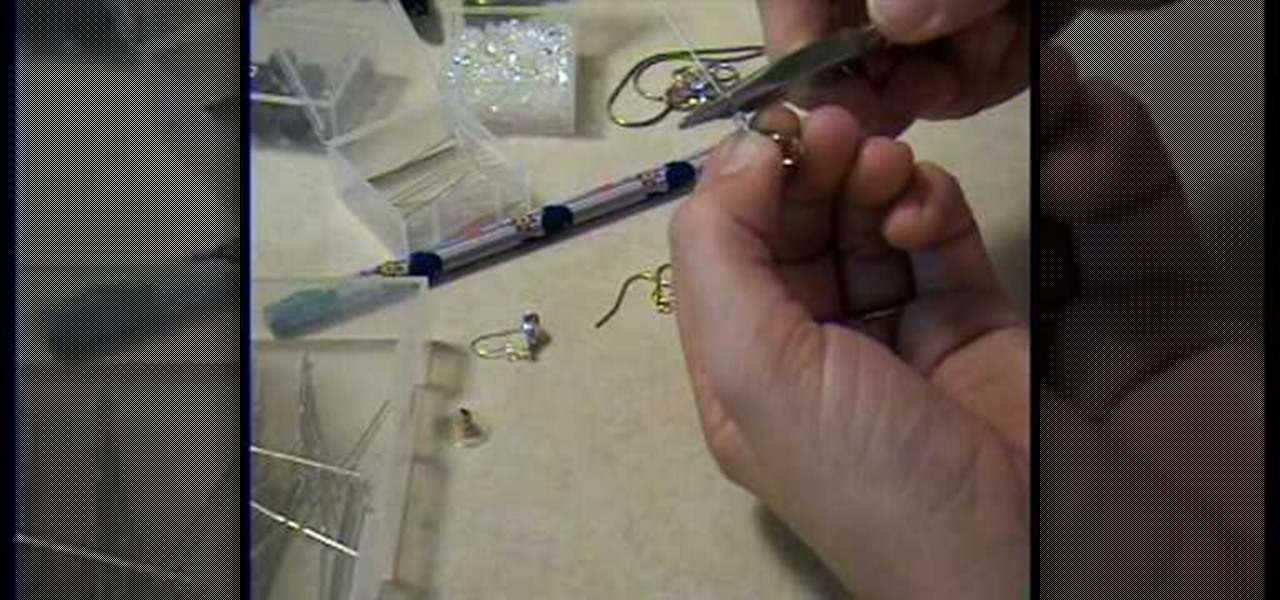
Learn how to make beautiful beaded earrings with this instructional video! The tools you will need are two head pins, ear wires, a pair of pliers, tweezers, and a nail clipper. First start off by choosing your favorite combinations of beads. Begin by stringing the beads in any order on the head pins. Next you will need to close the head pin off. The easiest way to do this is wrap it around with the pliers. You do this by easy twisting around the earring. You make sure to make a round loop whe...
This video demonstrates how to draw a fairy quickly and easily. We are taken through a simple step by step process that begins with the simple drawing of several geometric shapes. Using these shapes as a guide we are shown how you can quickly flesh out the distinct shape of a fairy by rounding off edges and adding small details here and there. We are also shown how drawing the hands should not be a daunting task as you are given a simple example to follow. There are several examples of minute...
In order to make a simple hair pin you need a couple things first, a small and big bead (although you can use other items), an ear wire and a head pin. Tools that you will need are a pair of round nose pliers and a pair of cutlets. Now take the head pin and loop the beads through it. Take the nose pliers and bend it, about half way up the head pin and gently bend it with your fingers, making a 90 degree angle. Twist the pliers up and bring the head pin over the nose pliers. Then twist it cloc...
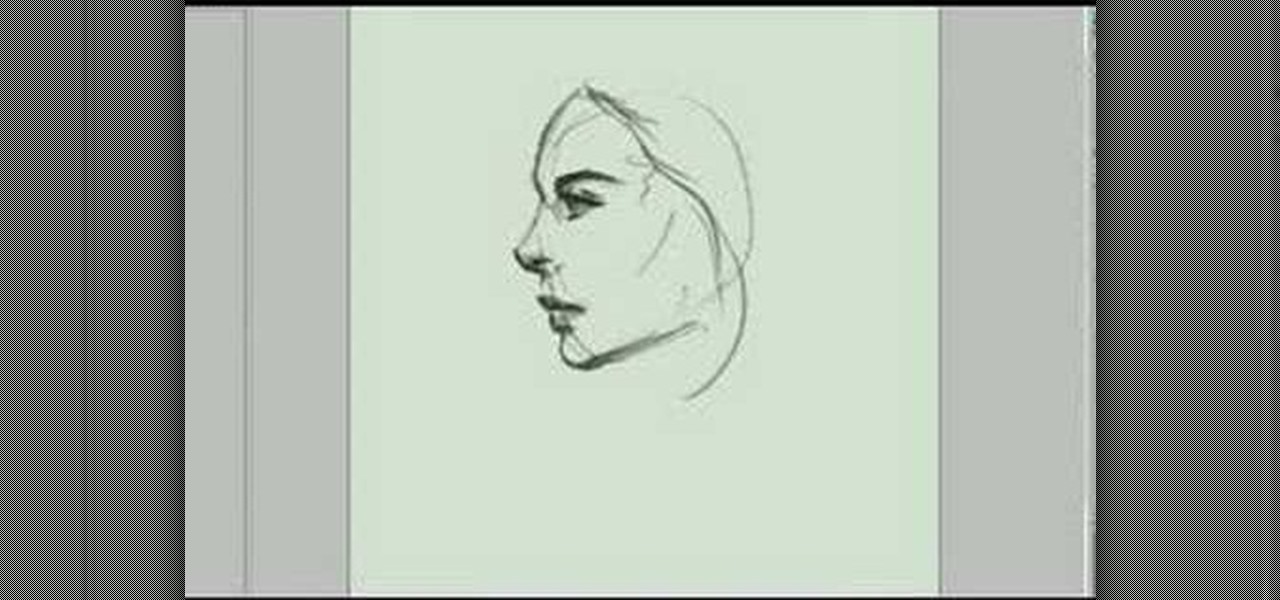
Idrawgirls demonstrates how to draw side view of a woman or a girl. This is a very quick sketch done in Photoshop. First ¾ of a round is made. Then a pointed jaw and a very rough sketch of hair one or two hair, eyes and nose are drawn. Next a thick and dark eyebrow is drawn, darken the eye lashes, and give shade to the eyes. The borders of the face are darkened. Now required shades are given to the face. Now a long slightly bended hair is drawn and given shades. There is a beautiful girl's si...
For anyone looking to dress up a card, learn how to make a paper pumpkin using punches in this video tutorial. Take a white piece of paper and distress it with Memory Mist (with the pale ale color). Use a box to distress the paper, while avoiding getting the mist all over your work space. To actually make the pumpkin use a store-bought punch (either round or oval). Make the punches with orange cardstock. For each pumpkin, you will need either three ovals or circles. Using a chalk ink to distr...
This video explains how to create a pair of Swarovski crystal earrings. You will need a tooth headpin, two pear-shaped crystals, two spacers, two diamond beads, and sterling silver ear hooks. First, slide the pear-shaped crystal onto the head pin. Follow with a spacer, a bead, then use a pair of pliers with a side-cutting edge to cut the wire and bend at a 90 degree angle. Use round-nose pliers to then create a circle at the end of the wire, then 'squash' a bit with the other pliers. Then ope...
Teresa demonstrates how left-handed people can complete a crochet project. The project is a round cap for a toy Ogeechee bear. Using her left hand to hold the crochet needle, she starts with a circle of crochet stitches to form the crown of the cap, and counts out the number of stitches needed for each row. A yarn marker is used to keep the rows organized, and Theresa shows how to utilize a slip stitch to make turns in the crochet to complete partial-rows that form a brim to the cap. She ends...
In this video you learn to make earrings out of guitar picks. You will need round nose and regular pliers, wire cutters, 2 regular picks, bead reamer, earring hooks, jump rings, and long silver strands. Use the bead reamer to make a nice clean hole on the top edge of the guitar pick. Use the jump ring through the hole you just made to attach the silver strand. This makes the earrings dangle. On the other end of the silver strand connect the earring hook with another jump ring. This completes ...
Garden of Imagination demonstrates how to make a miniature corn on the cob out of polymer clay. First, roll and flatten two small balls of green clay to make the corn husks. Make the husks pointed on both ends. Take a piece of yellow clay and roll it into a conical corn cob shape. Insert the corn on the cob into the texture piece and roll it to achieve the textured corn kernels. Wrap the corn on the cob between the two green husks. Make sure the husk leaves overlap in the front. Squeeze the c...
Rob shows us how to use a silver one inch long wire head pin to place a bead on. He uses both flat nose and round nose pliers to close the loops he demonstrates how to make. outlining the basics for loop making and the loop connection process. He slowly and clearly shows us how to make two different types of loop closures. On of the loop closures is simple and easily reopened. The other loop closure is made by making the first loop and then using tools to wrap the rest of the wire around the ...
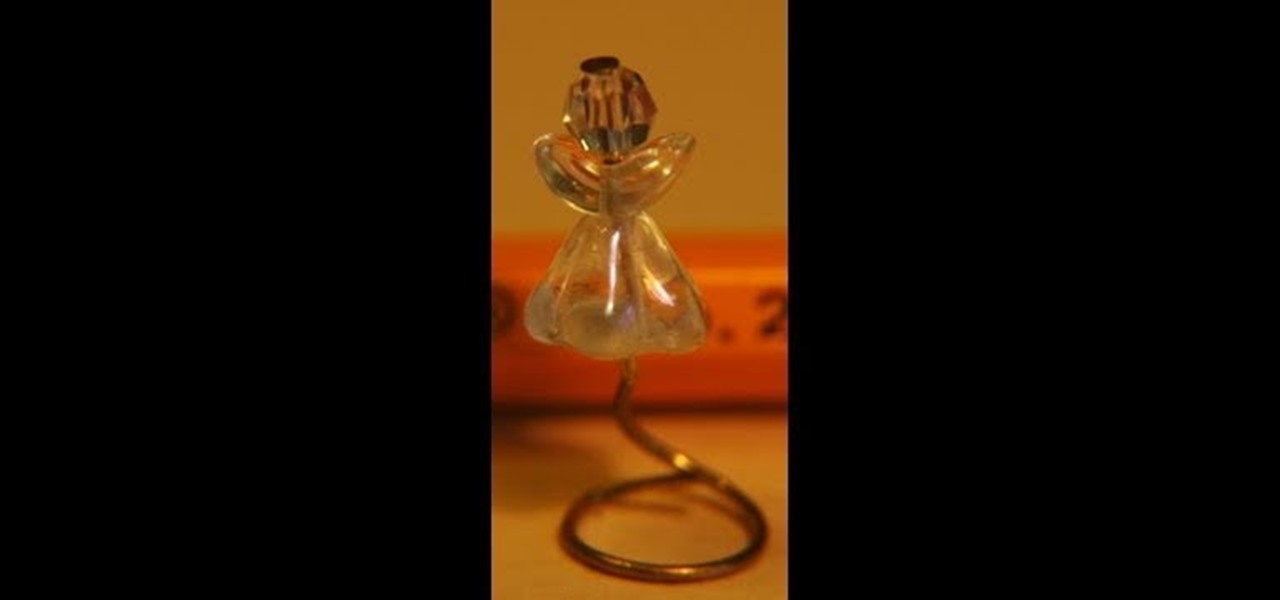
In this demonstration garden of imagination shows how to make a doll house Christmas tree angel topper ,which is less expensive and easy to be made at home .First she inserts a round bead in an eye pin which is for the crown of the angel and followed by crystal ball .after that small glass wings are inserted and then followed by a flower crystal which will be inserted upside down so it will look like an angel skirt and then inserts a bottom of an earring for the base and fixes tightly as it s...
Take an inexpensive earring and use hot pliers to ease it away from the cheap metal fastening. Take a more expensive silver or gold earwire and pull it through the loop at the top of the pendant part. Squeeze the wire closed with the pliers. Using an inexpensive earring part as a model, bend your own wire to the same shape. You then take a 4mm Swarovski crystal and attach it. Bend your earwire round a smooth pencil and make sure the bead cannot slide off from the wire. You can use the same pr...
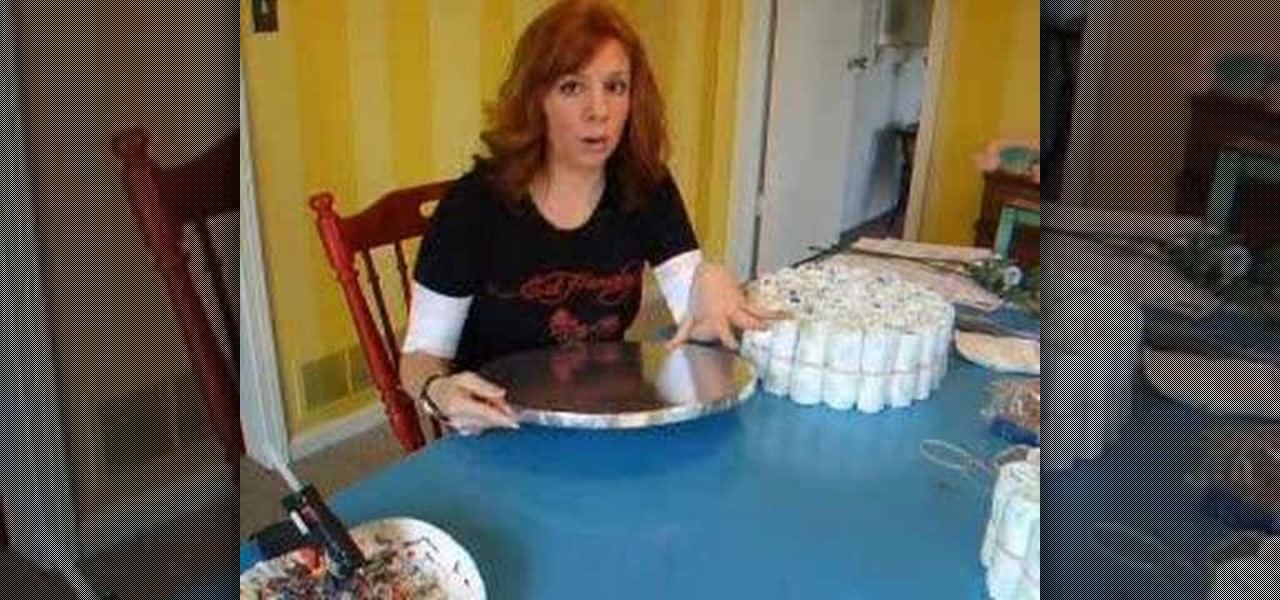
This video is a tutorial on how to make a baby diaper cake. To begin, you will need to roll all your baby diapers from the waist down and secure them with rubber bands. Your top tier will have 8 diapers, the middle tier will have 19 diapers, and the bottom tier will have 40 diapers. Use rubber bands to secure all your tiers together. Next, glue thick ribbon around the tiers over your rubber bands. Follow up with decorations such as bows and extra ribbons. Use a cake stick to secure the tiers ...
StudioMallory teaches you how to make a brass Sailor Moon tiara for cosplay. You will need a dremel with a grinding bit, a mechanical pencil, titanium covered scissors, two jewels, cardboard template and a piece of cheap metal. Trace the template on the metal using the pencil. Cut it using the scissors. Use goggles when using the dremel on the metal tiara. You have to grind it to make round corners. Now bend the metal in the shape you want. Use glue to apply the jewels. Once it's all dry, mak...
First, prep the nails. Apply the white tips to the end of your nail. Use a nail clipper to clip the edges and a nail file to round the edges so they are not pointy. Next, apply primer to the bed of the nail. Then apply white acrylic with a brush to the tips that you put on earlier. Use the brush to make sure it fits the shape you want. Next, apply nail polish on the nail bed until it is the same height as the acrylic. File the edges down again if needed. Coat with transparent pink mix (a mixt...
Chef Frank Miller shares his recipe for this spicy dish, which can be made more or less spicy depending on your taste.
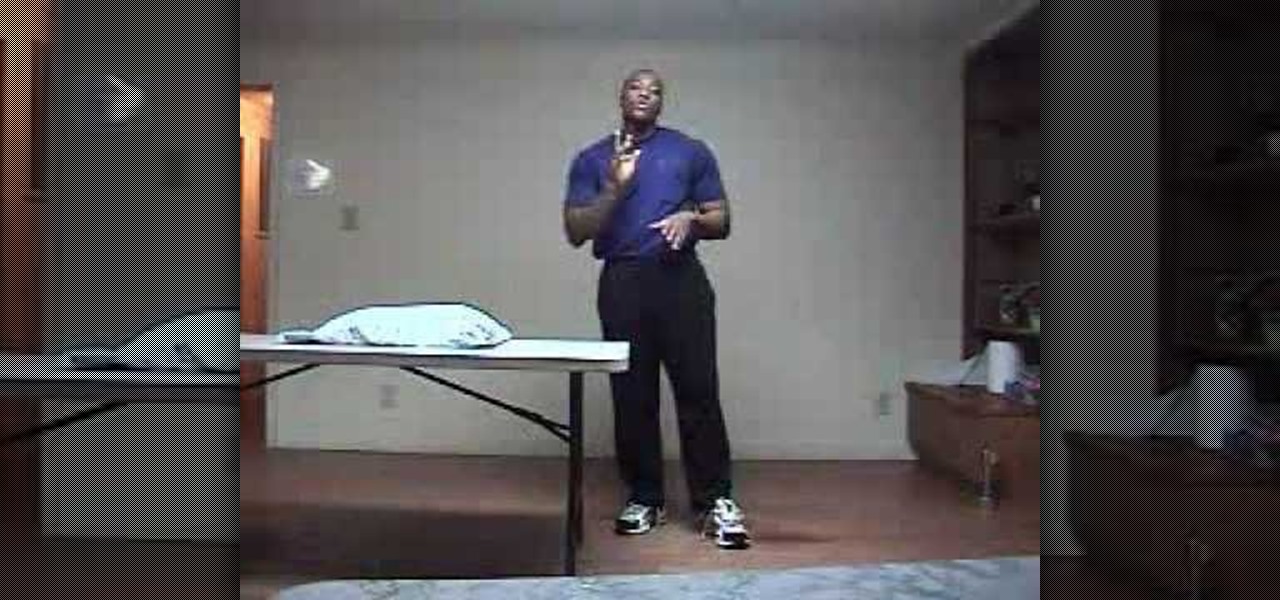
The man describes how to get a nice round sexy looking butt. He says to use a bed, but if you don't have a bed, a long table that will support you will do fine. He shows his technique on a table. Next he lays on the table, reaching up and out he grabs the sides of the table. Rest your head on the pillow for support. With the legs hanging off the back of the table raise them up as high as you can squeezing your butt and then lower back to the ground. Once you got the technique down, raise your...
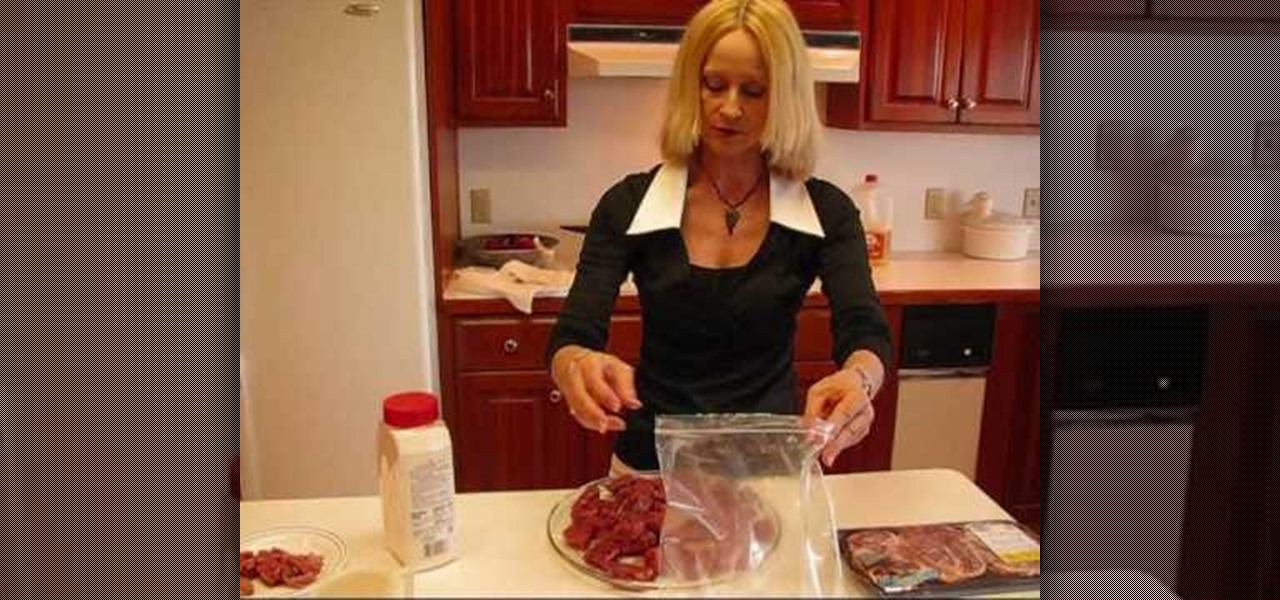
For this you use tenderized steak. She thaws out 2 pounds worth of round steak and she cuts them up into nuggets. She seasons this with meat tenderizer. She adds 1/4 cup peanut oil to a skillet. Into a plastic bag she put 1 cup of flour. She adds the nuggets to the plastic bag with the flour and shakes the plastic bag. Now you can drop the nuggets into the oil and let them sizzle. Cook until the bottom is brown and flip. Also add some ground black pepper while cooking. When cooked, place on a...
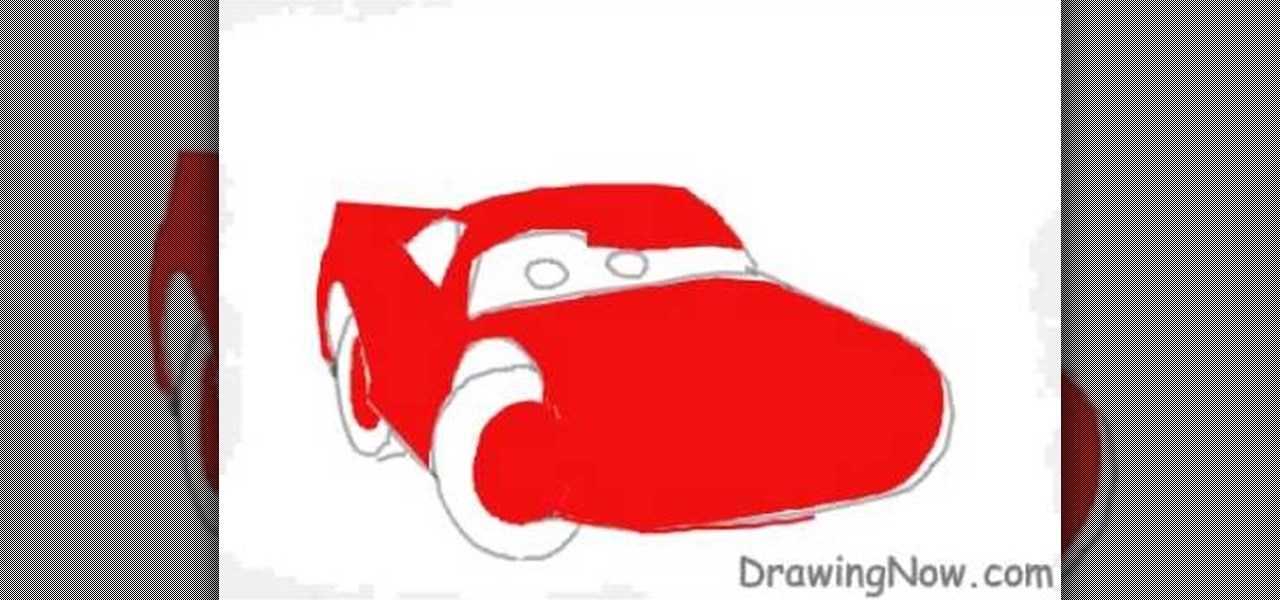
In this video tutorial, viewers will learn how to draw the character Lightning McQueen from the Disney movie Cars. Begin by drawing a 3D rectangle. Make it rounded. Add the wheels and windshield. Draw the mouth on the bumper and the eyes on the windshield. Draw the spoiler and add the details of the car. Then erase the guidelines. Then start adding the colors. Add a darker shade of red for shading. Finish by adding the details on the car. This video will benefit those viewers who enjoy drawin...
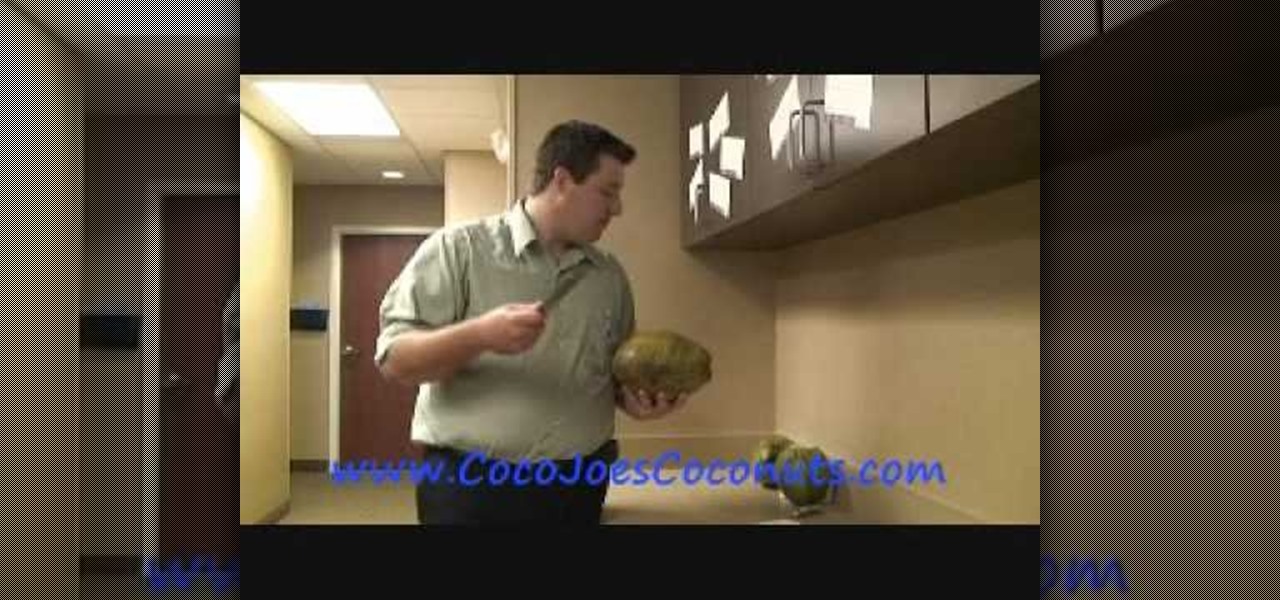
This video is presented by Coco Joe from CocoJoesCoconuts. The video starts by demonstrating the technique for getting the coconut water from young coconuts. Coco Joe first uses a coconut opening tool by inserting it into the top part of the coconut and prying off the very top of the coconut. Next, he inserts the coconut opening tool directly into the top of the coconut resulting in a nice round opening. Joe then demonstrates the same technique with a 3 inch pocketknife. Finally, Joe demonstr...
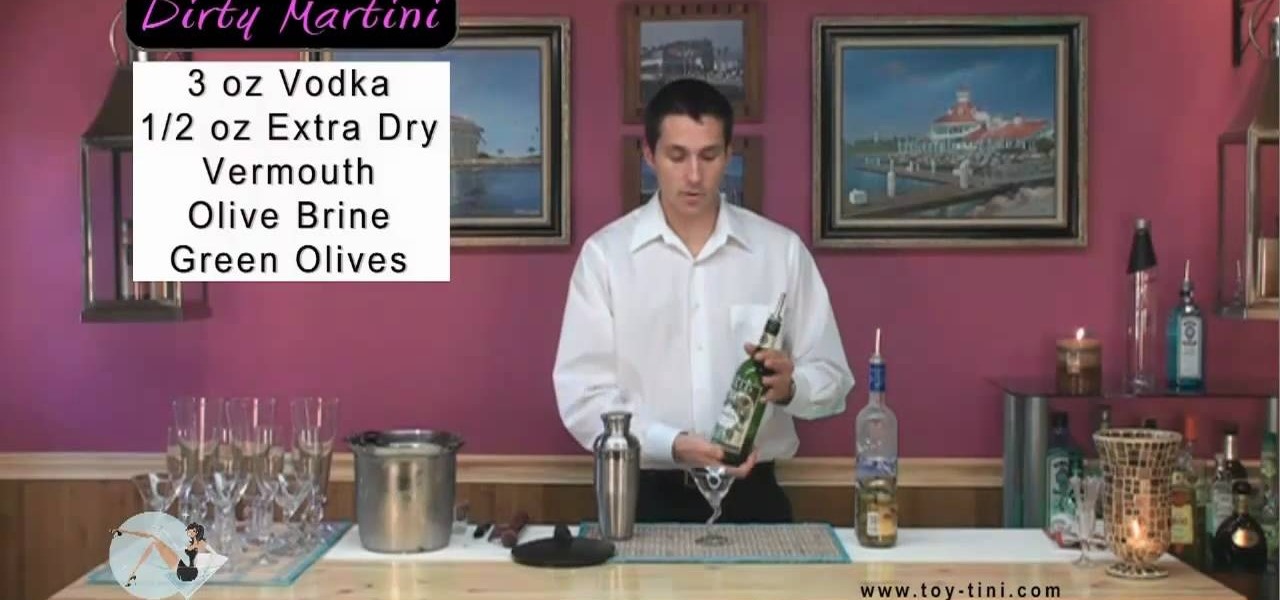
This is video showing you how to prepare a dirty martini drink. For making this drink, you need some 3 oz. vodka, 1/2 oz. of extra dry vermouth, olive brine, green olives. Start first with putting ice in the shaker. Put 3/4th portion of ice to get the liquor very cold fast. Now pour 3 oz. of vodka into the shaker, and put a splash of olive juice. Now start shaking the shaker. About 15 shakes should give a nice cold liquor. Now before serving put little dry vermouth, turn round the glass and t...
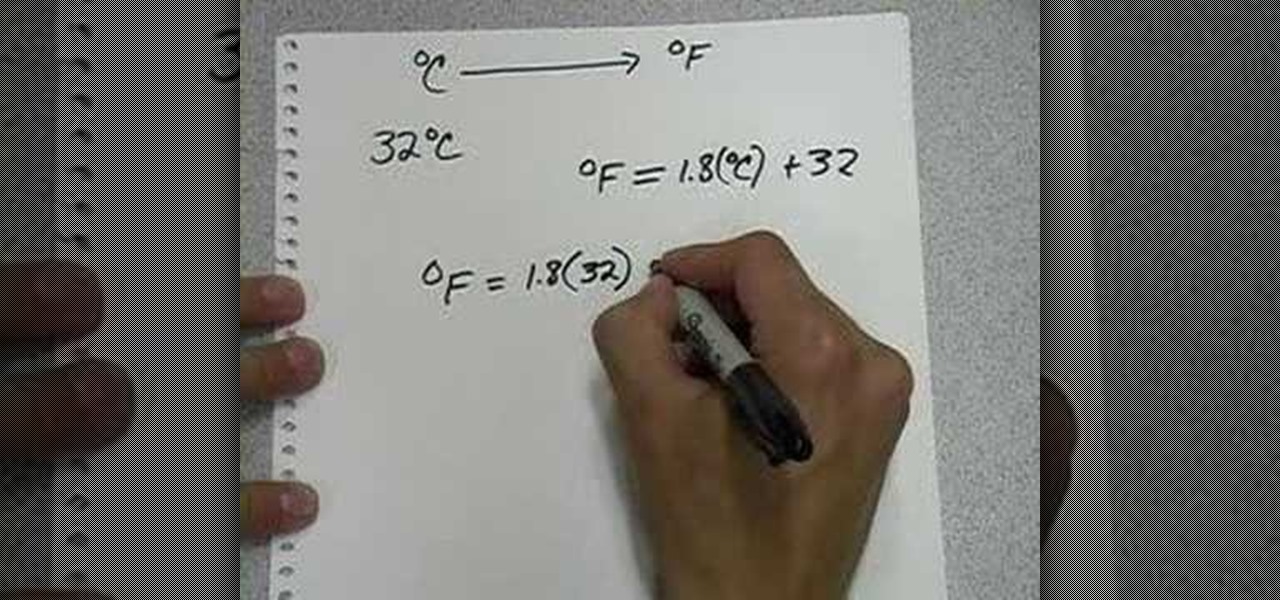
This video teaches how to convert a value in Celsius to Fahrenheit in simple steps. First take a paper and marker and keep in mind a Celsius value (e.g-32) to convert into Fahrenheit. Now use the formula to convert Celsius to Fahrenheit which is F=1.8(32)+32. Use a calculator to calculate the formula and you will get the result as 89.6 Fahrenheit. Now round it off the and your final result will be 90 degree Fahrenheit.
EnglishRyan shows you how to pronounce difficult sounds for IELTS. Using some pronunciation technique games you can learn to pronounce difficult words. The instructor says the words and tells you how to emphasis on your mouth and say the words. There is also a game you can play at the end guessing his number by listening to pronunciation techniques. Make learn these round sounds easier by playing this game and forming your mouth in the proper way to say the words.