In this video, we learn how to build a LEGO pickup truck. First, you will need to lay out all the parts that you need to build the truck. This includes small and large parts that are in gray and white colors, as well as wheels. Start off by building the middle of the car, making room for the wheels to fit in. After this, start to add on the blocks that go on the back and the front to make the headlights and different features on the truck. Add on the block for the windshield, then add on the ...

In this tutorial, we learn how to make a snowflake with beads. You will need: clear crystals, beads, and thread. First, string six beads onto the thread. After this, string a crystal next to the beads. Now, tie this and start to repeat the process on the left side of the beads. Continue to do this process until you have created a shape that looks like a snowflake. You can do as many or as few of these as you would like. This creates a beautiful necklace, or you can use it as a bracelet if you...

In this tutorial, we learn how to create and edit tasks in MS Project 2007. Before you begin, you need to set the start date by going into project information and changing the start date and end date. After this, type in your first task name, then enter in the information that goes with it. After you have entered this, press the check mark to set it up. After this, enter in the other task names that you need to specify in your project. When you are finished, you will need to save this onto yo...
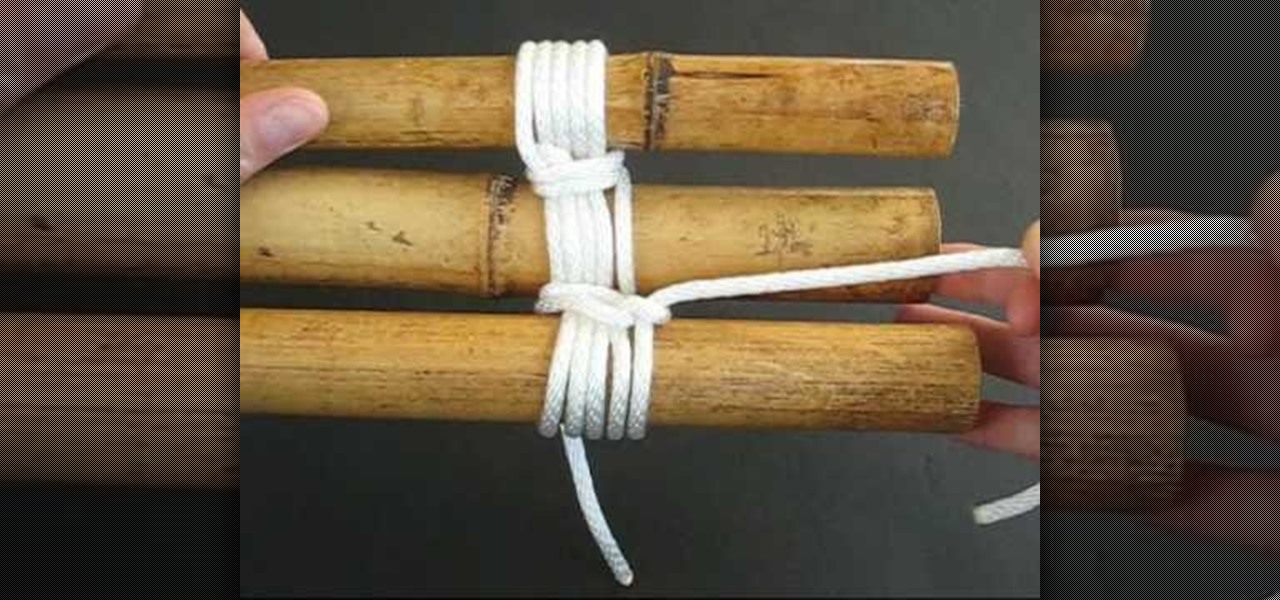
In this tutorial, we learn how to lash a bamboo tripod. First, you will tie a clove hitch by taking one piece of bamboo and wrapping the rope around it, then crossing the two sides of the string together to make a hitch. Next, you will secure the clove hitch around the third piece of bamboo. Now, you will rap all the pieces of bamboo together with the rope. Continue to do this until all the pieces feel secure together. Wrap the rope several times around each of the pieces, then wrap it in the...
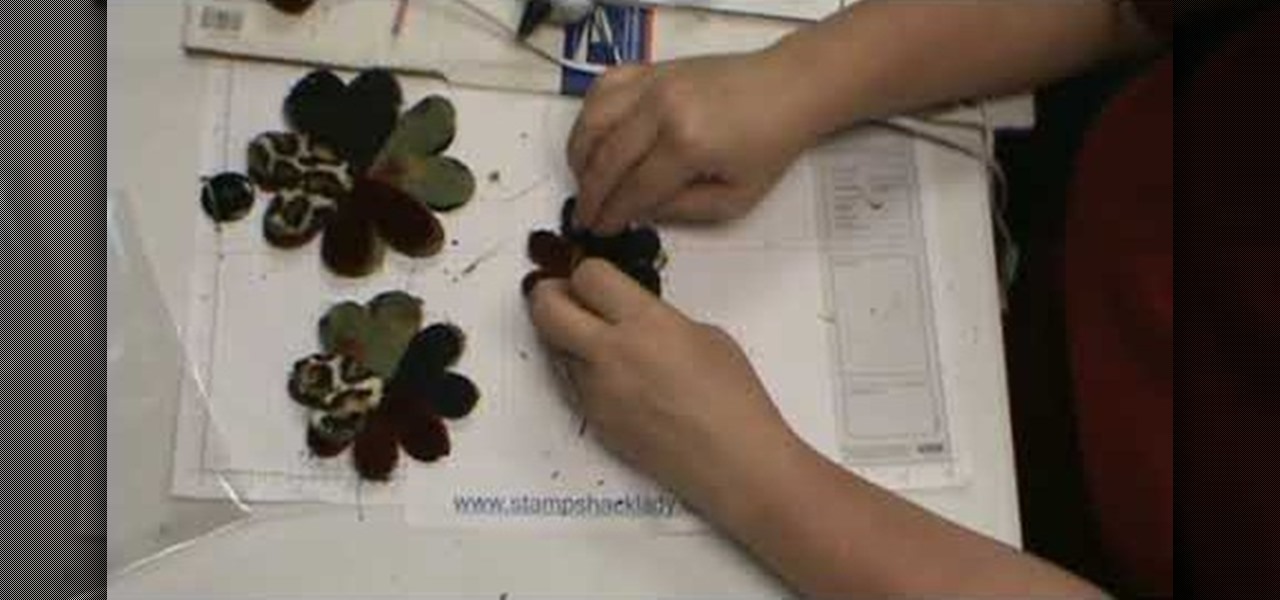
In this video, we learn how to assemble a flower-fold die-cut with a glue gun. First, cut out different fabrics in the flower shape. Put them all into different piles according to their sizes. After this, put hot glue into the middle of the fabric and fold the flowers in half. When finished, put the pieces together with hot glue going in a circle. Continue to do this with all the different sizes. When you are done, all the colors of fabrics should show, then place a button in the middle with ...

In this video, we learn how to learn keyboard shortcuts in MS Excel 2007. First, hit the "alt" key and then you will see numbers and letters at the top of the screen. Now you will see all of the pages of the keyboard shortcuts. Go to the page layout tab and hit "p". Now, you will get the keyboard shortcuts for everything on the page layout tab. Continue to do this on all the different tabs for this and you will be able to memorize the ones you use most, so you can more easily navigate MS Exce...

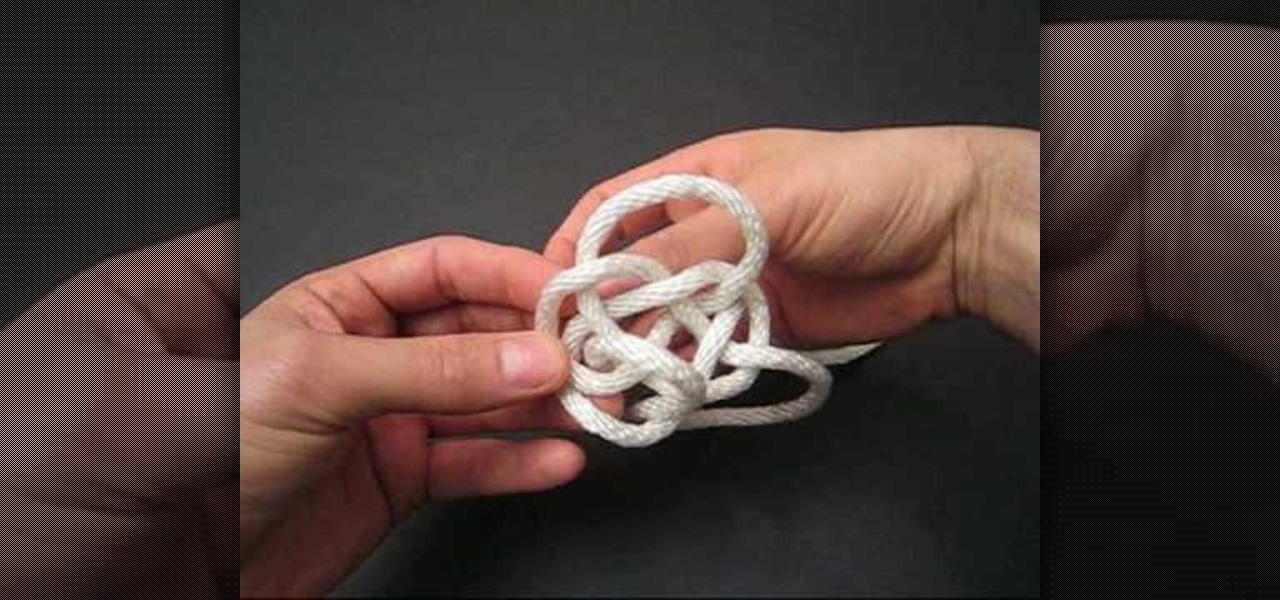
In this tutorial, we learn how to tie a compound double coin knot. First, take two strings and make a loop with the left one, then loop right right one into that. Tighten these together, then bring the end of the right working string over the loop and through the bottom of the shape, then continue to thread it through. Now, repeat this on the left side with the left string. Next, loop the right side of the string and push through the loop with the end of it. After this, tighten up the ends of...
In this video, we learn how to make a quick and easy shrimp stir fry. First, you will take your shrimp and thaw them out, then add salt, pepper, bbq sauce, sugar, and corn starch to marinate them. Leave this on the shrimp for 15 minutes. Then, take 2 tbsp salt and 2 tbsp red wine vinegar and mix together. After this, add in 2 tbsp soy sauce and 1 tbsp spicy sauce. Mix this all together until well combined, and this will be your stir fry sauce. Now, heat your wok up with oil and then place in ...
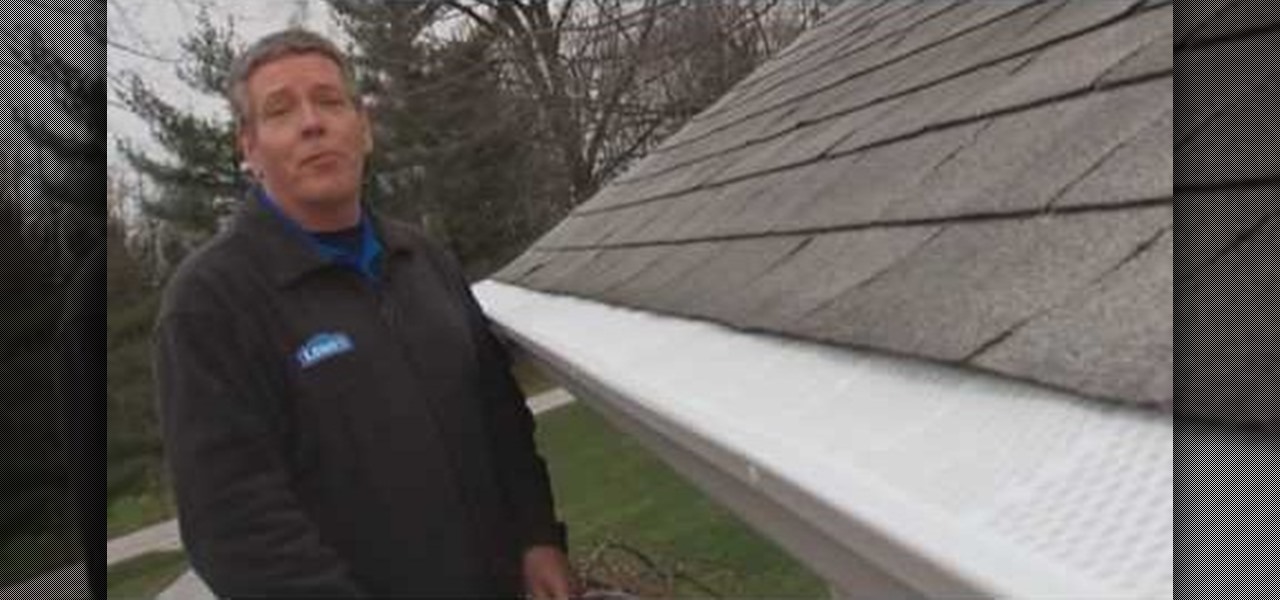
In this video tutorial, viewers learn how to install gutter screens. The materials required for this task are: tape measure, tin snips, drill with bits and sheet metal screws. Begin by measuring the gutter to determine how many screens to buy. Start at one end of the gutter and slide the back edge underneath the shingles. Then snap the edges in place and continue down the length of the gutter. Now drill holes in the edges of the screens and screw in the sheet metal screws to secure the gutter...
In this video, we learn how to apply and blend eyeshadow. First, you want to start by adding a primer to your eyelids. Now, use a large brush to brush a light shadow onto your entire eyelid. After this, use a smaller brush to brush a lighter shadow onto the inner crease of your eye and underneath the eyebrow. After this, use a brush to apply a dark shadow to the outer crease of the eye, then blend with the lighter shade. Next, paint a darker color on the outer v of the eye and continue to ble...
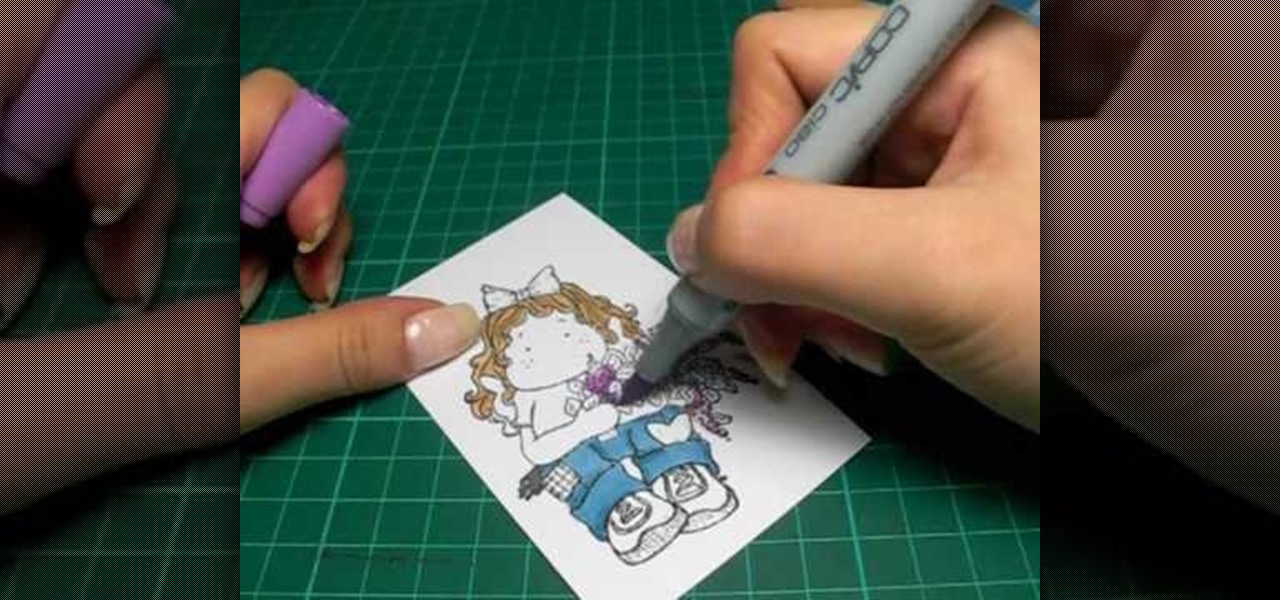
In this tutorial, we learn how to color with Copic pens. First, grab a picture that you want to color with your pens. After this, start to color in the picture with your different colored pens. After you fill in the colors, use a darker colored pen to add in shading and make the lines darker along the sides. Continue to color in your picture, adding shading where you prefer. Add in different colors and make the lines darker when you want them to look more bold. Make sure to add in highlights ...
In this tutorial, we learn how to style a cute and curly retro hairstyle. Start off by sectioning your hair off and starting on the underneath area of your side. Now, take your hair into sections and curl them into curlers. While these are sitting, take the top back portion of your hair and curl the hair, then place them into curlers as well. Continue to do this for all of the sections in your hair, pinning with bobby pins to keep them secure. Allow these to sit in your hair for around an hou...
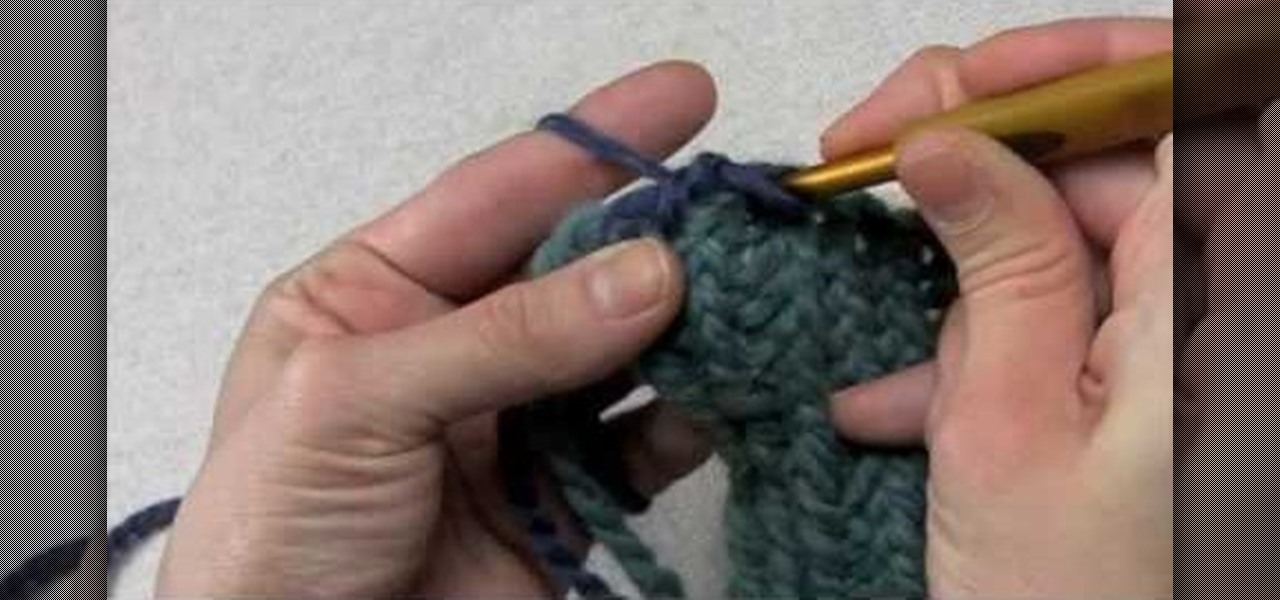
In this video, we learn how to edge a knitted piece with a crab stitch. First, attach your yarn to the left edge of your work. After this, work one chain stitch, then go backwards with the hook. Insert it into the fabric and grab the yarn and pull it through the loop. Go around the yarn again and pull it through again. Keep going backwards and grabbing more yarn as you go in reverse. You are working with one loop on the needle while going into the fabric. Make sure you're consistent with the ...
In this tutorial, we learn how to fix a dropped stitch in knitting. This can be scary if you are a first time knitter, but it can be fixed without having to restart your project and take out all your stitches. First, work back to the place where the stitch first dropped. After this, push the needles back and insert a crochet hook into that dropped stitch. Next, hook the hook into the above stitches and pull it through until it's stitched back up. After this, remove the crochet hook from the y...
In this tutorial, we learn how to use task types in MS Project 2007. First, open up the form view of all the different tasks you have. Now, look at the unit task type and see if it's effort driven or fixed units. Now, change what you want the task type to be and then click on the next button. Assign a second resource if you need to, then change the duration if you need to as well. Continue to change the task types depending on what durations you have then make sure to save this. Double check ...
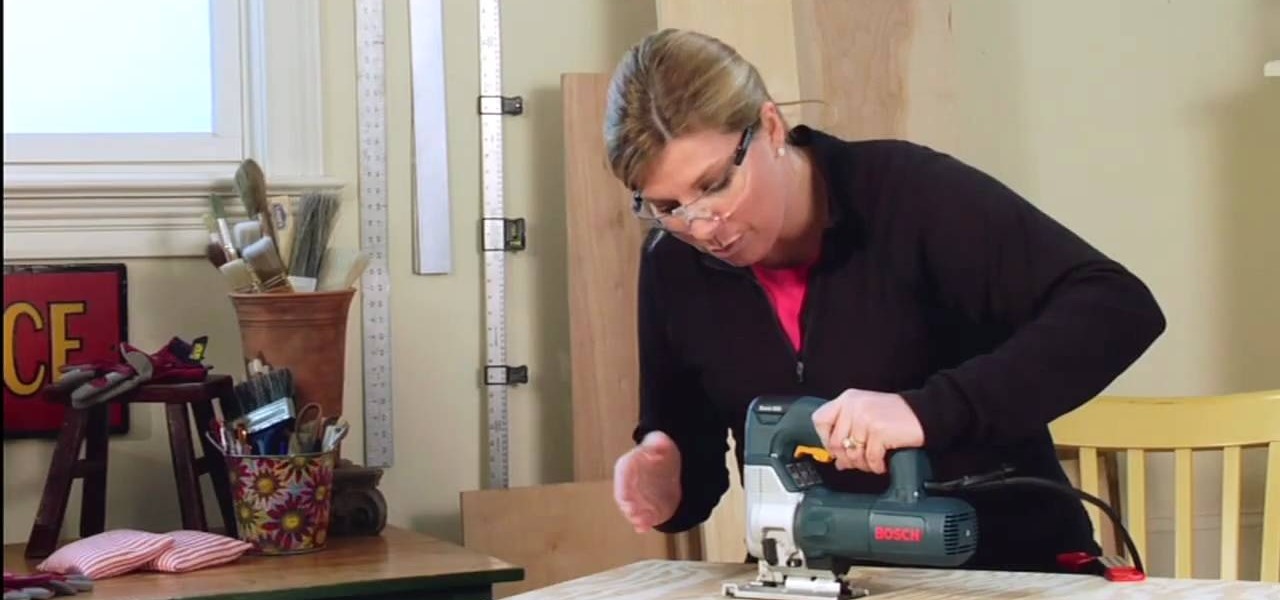
In this tutorial, we learn how to use a jigsaw. First, measure and mark the size of the circle you need to cut. You can use a compass or trace around a round object. Now, place your wood off of a table and clamp it into a place. Now, drill a starter hold inside the circle and put on your protective glasses. Now, place the saw in the starter hole and saw half way up, or to where you feel comfortable. After this, reposition yourself, then continue on. Make sure you don't force the saw, just let...
In this tutorial, we learn how to draw Ironman. Start off by drawing the feet to Ironman, making sure to pay close attention to the detail that is on the outside suit. Make sure to include bolts and screws to make the picture more lifelike. Use shading on the outside of the sides to make it darker and more realistic. Continue working your way up on Ironman until you reach the torso and the rest of the upper body. Then, draw the head onto the top followed by the large mechanical arm and the he...
In this video tutorial, viewers learn how to make themselves sneeze. Users will just need a cotton swab. This trick is very easy, fast and simple to do. Carefully insert the cotton swab in one of your nostrils. Then gently move the cotton swab around in your nasal passageway. Continue doing this until you are able to sneeze. This video provides a demonstration for viewers to easily follow along. This video will benefit those viewers who enjoy faking and tricking others, and would like to lear...
In this video tutorial, viewers learn how to do an arresting technique for handling and restraining. As the opponent begins to punch you, grab the opponent's wrist with one hand. Then push the other arm under the opponent's bicep and under the armpit. Now pull the opponent towards you and push their arm to their back. Make sure you grab over the opponent's hand. Then use your knee to push against and opponent's hamstring and pull down their shoulder to throw them down on the floor. Continue l...
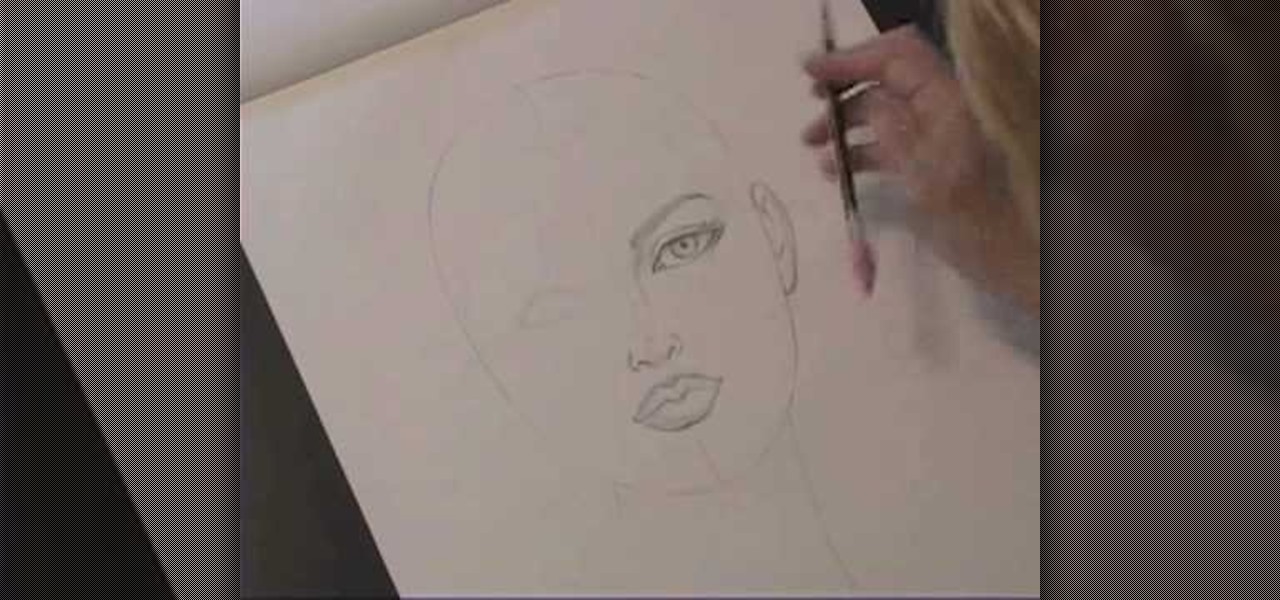
Kathryn Hagen teaches us how to draw female heads in this tutorial. Start with an oval and dissect it horizontally and vertically. Draw in the hairline, as well as the eyes, nose, and mouth. You can measure out where everything should go by using the lines as a reference point. Add details into the eye, then continue on to add more details to the nose, showing the nostrils. Draw more details on the mouth, then define the center of the lip and shape. Draw on the ears, and add a line where the ...
In this tutorial, we learn how to crochet a left hand radiant flower. First, make a slipknot, then chain four. After this, join the beginning chain and then chain three. Slip stitch through the center of the chain, then chain three and slip stitch again. Do this over again five times on your row. After this, continue making stitches until you have the shape of a flower. Add on green yarn to the back of the flower, by doing the same type of stitch. Work as many stitches as you would like. The ...
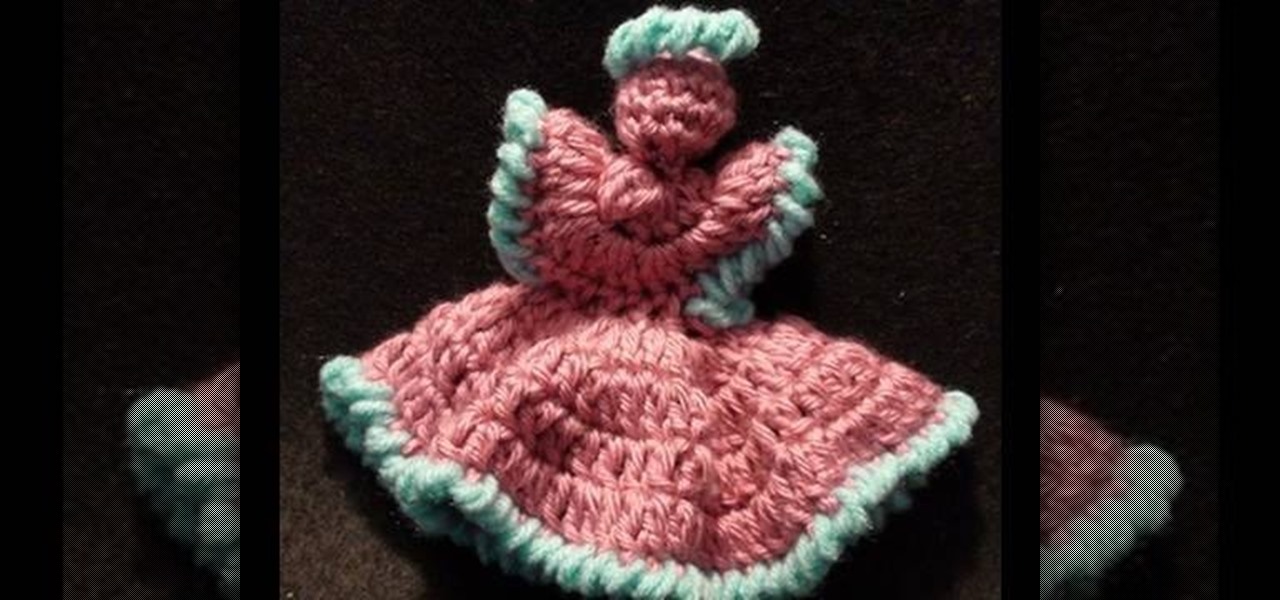
In this video, we learn how to crochet a left handed dainty angel. Use a size H 5mm crochet hook. Add a slipknot to the crochet hook, then chain three, join, and chain one. After this, work 6 single crochet through the center of the chain three. Next, join two single crochet for each stitch around for a total of 12.Now do 12 more single crochets and work an additional round with the single crochet. Continue this process until you finish, then create the dress by doing the same type of crochet...
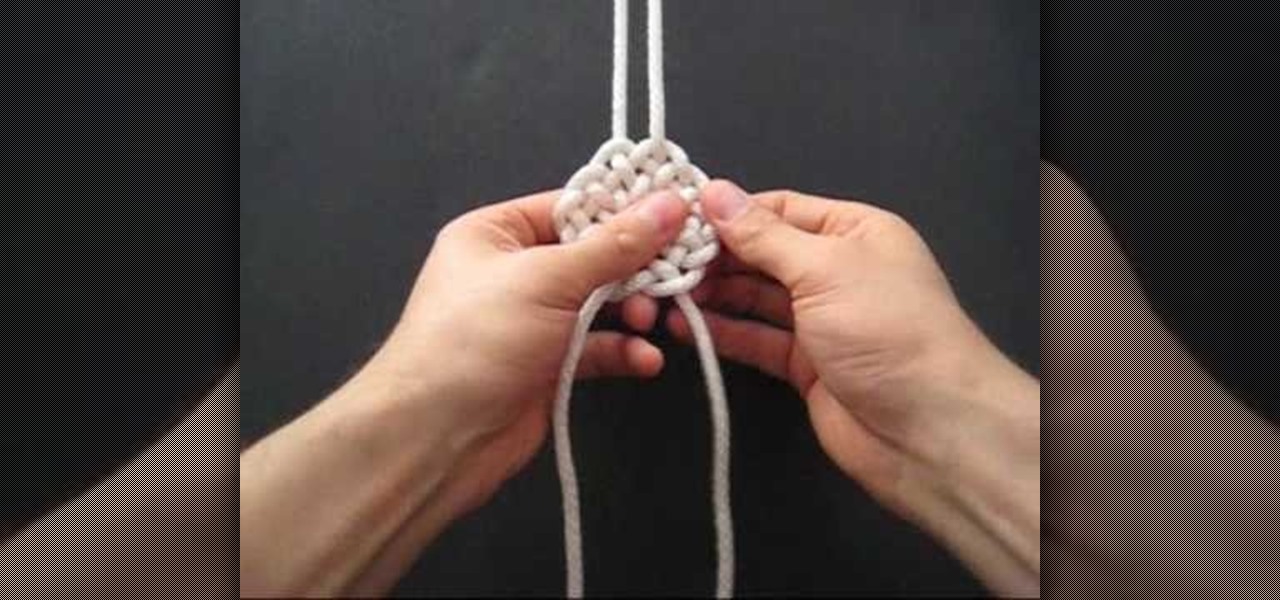
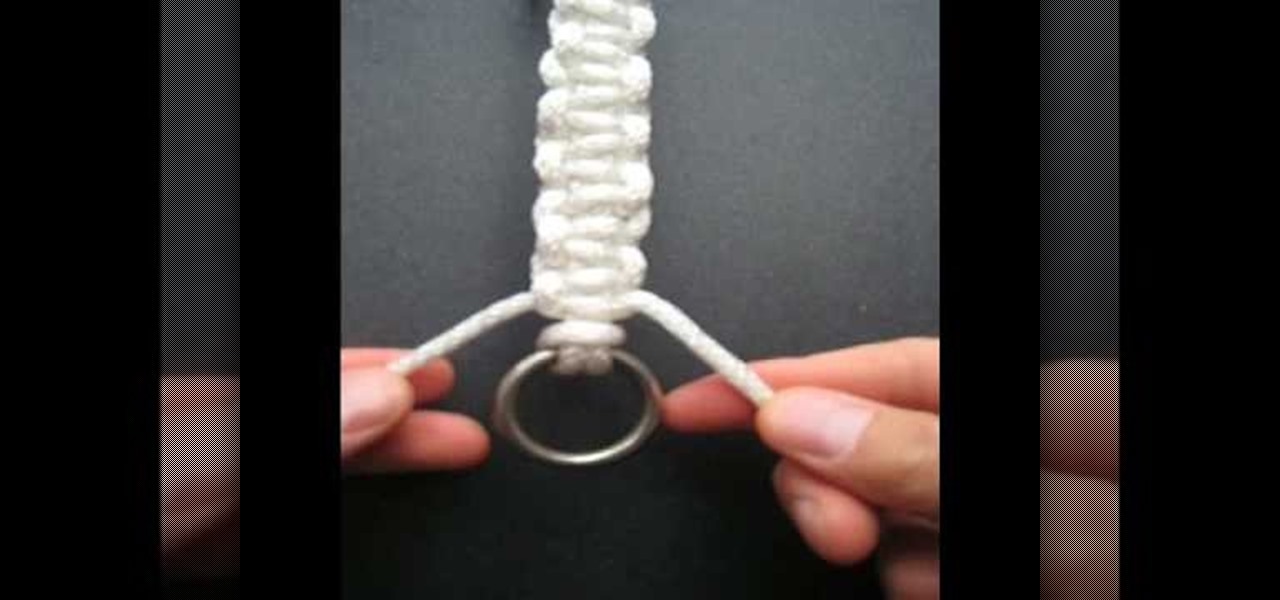
In this tutorial, we learn how to make a Solomon bar decorative knot. You will start by grabbing the ring at the end of the string, then tie it to an opposite ring. Fold the left side of the string to the right and bring the right over to the left. Pull the left into the loop to create a knot. Now, you will have two string that are more up and two that are more down. Next, tie the top strings into a knot, then bring the right knot behind the bottom two, and thread the left knot into the right...
In this video, we learn how to tie a cloud knot. Start by making a loop in the middle of the string on the left side, then wrapping the right side around it and pushing it through the middle. Next, do the under-over weaving technique by bringing the string over one loop and weaving it into another. Continue to do this several times until you have done about four or five weaves. After this, pull the sides of the string out on both sides and you will have your finished knot! Pull tighter to hav...
In this tutorial, we learn how to craft a duct tape wallet. First, tear out a 7 inch piece of duct tape and fold it so there is a sticky side just overlapping it. Next, tear out another piece of tape and fold it just over the sticky side of the other piece of tape. Continue to do this for around 10 pieces of tape, or until you have enough to make a decent sized wallet. When you reach the end, fold the bottom over itself, then cut off the sides and seal with another piece of tape. Then, measur...
Zephyr Clark-Dolberg teaches us how to stop your dog from jumping all over you in this video. When your dog comes up to you and starts to jump on you, knee him and yell at him to get off. When the dog goes to the ground, praise him for going down tot the ground. Continue to get the dog excited and jumping on you and correcting him. The dog will only take a few times to understand that you don't want him to jump up on you. This may take more time with a hyper dog, so just take time and patience!
To make your own shimmer paints, you will need the following: a paintbrush, watercolor paints, water, and Iridescent Medium.
This video tutorial is in the Software category which will show you how to insert or delete a comment in MS Word 2007. This video shows how to insert both text and audio comments in to your word document. Click on the 'review' tab on top, highlight a part of the text that you want add comment to and click on 'new comment' tab. Then you can insert the comment in the comment box. You can continue adding comments throughout the document in the same way. You can view the comments by selecting 'ne...
In this tutorial, we learn how to do a total body stretching routine with just a towel. Start off by gripping the towel shoulder width apart and pull your arms apart while tensing your body and hold this for around 20-30 seconds, the try again. For the next exercise, bring the towel behind your head and face your hand behind you and pull the hand with your right and left while maintaining a 90 degree angle with the hand that's above you. The last exercise take the towel and stand on one leg. ...
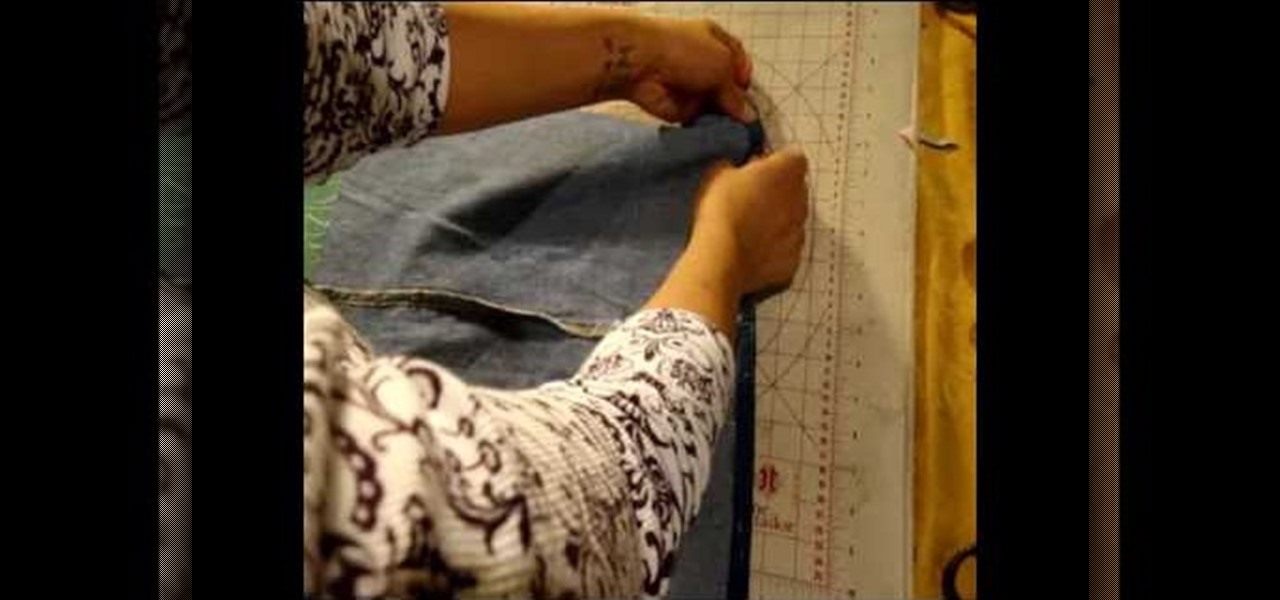
Don't want to throw away that raggedy pair of old Levi's with small paint stains and random tears all over because it's stuck with you longer than your trusty 12-year-old jack russell terrier? We totally understand. Continue to use your favorite pair of blue jeans by watching this video.
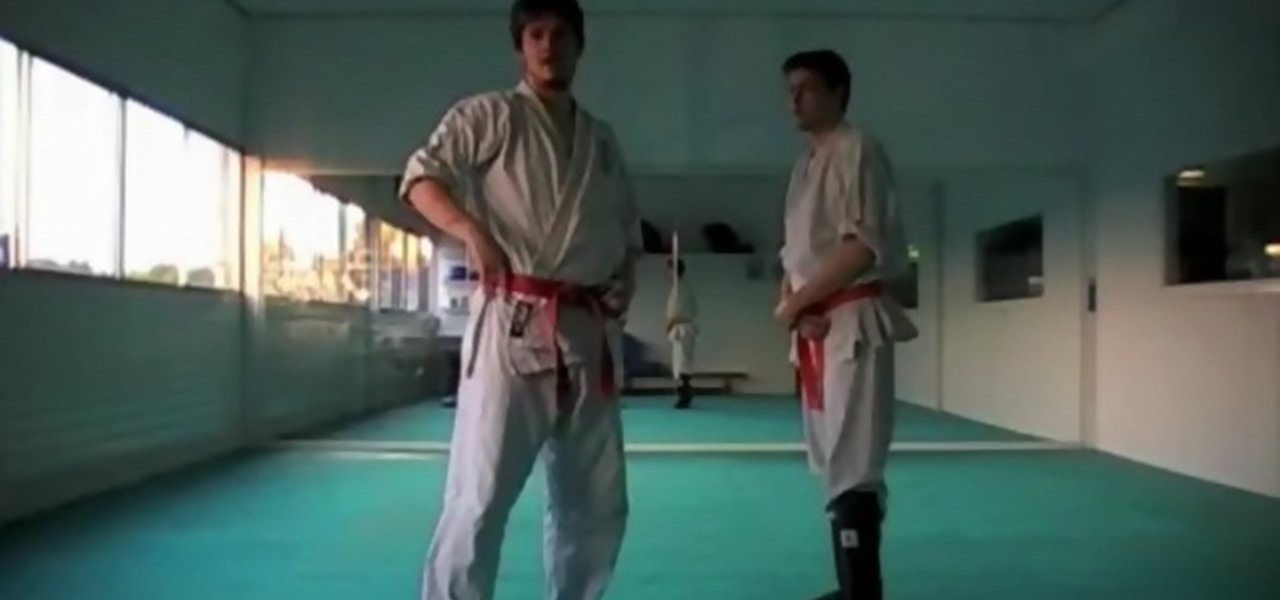
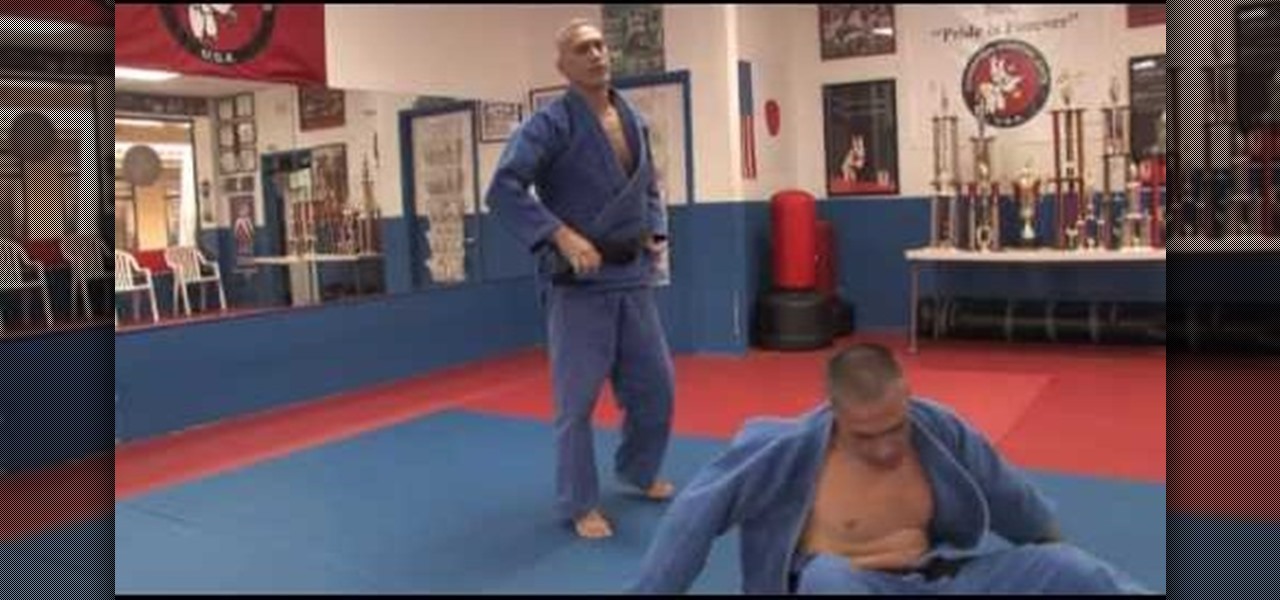
In this sports video tutorial you will learn how to execute a two handed grip shoulder throw. Sensei Angel Perez from Champion Martial Arts demonstrates this. Grip the opponent's right lapel with your right hand and with your left hand grip the opponent's right sleeve under the elbow. Keep your right foot in front and get your right elbow under the opponent's right shoulder. Then step back, bend your knees and throw the opponent over your right shoulder while continuing with the grip. The sam...
In this Arts & Crafts video tutorial you will learn how to tie a Padlock style decorative knot. Padlock knot is a clever way to achieve the look and function of a padlock without having to bother about the key. Take a piece of rope, bend it in the center and make two loops on either side of the rope. Ensure the working end is over the rope in the left side loop and under the rope in the right side loop. Now overlap both the loops so that the left side loop is over the other loop. Now pass the...
This four-part video describes, in great detail, how to develop black-and-white 120 film. With photo labs becoming rarer by the day, knowing how to do this yourself will become increasing important if you want to continue to take and develop pictures with film. Developing 120 is a bit different than developing 35 millimeter, so if you can already do that still watching this video! Thankfully, the presenter demonstrates the process in full light. Bear in mind it will be very dark when you do t...
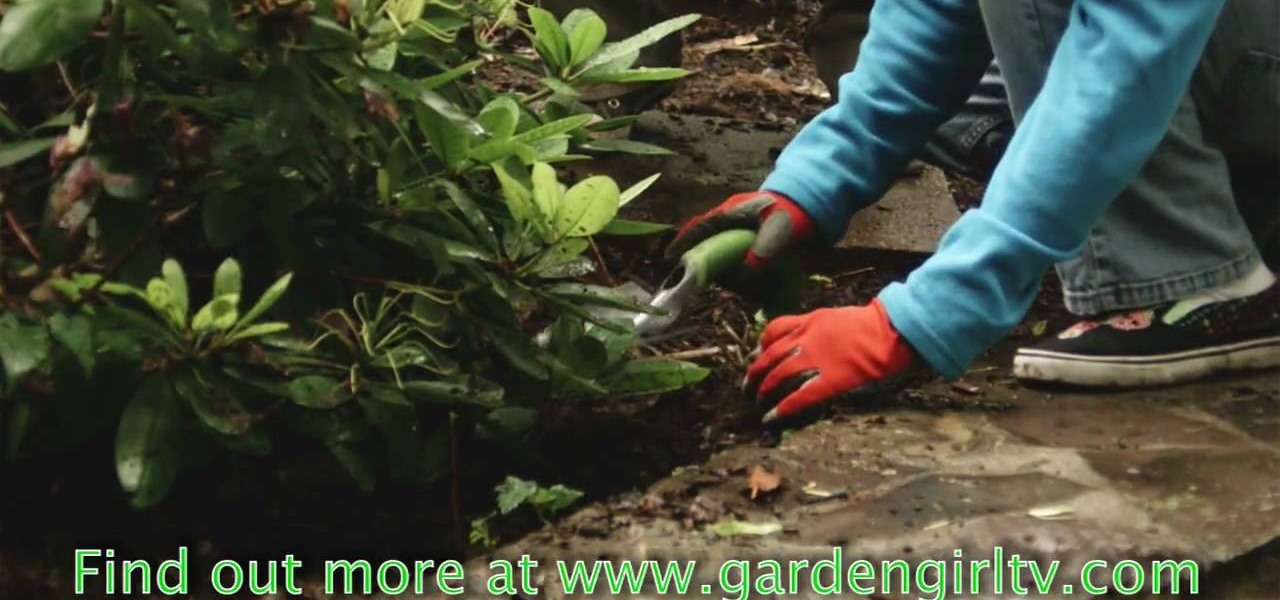
GardenGirltv shows viewers how to plant strawberries as a ground cover! With a strawberry patch or field you will have to always continually plant strawberries! The plants will last a few years and every year you should add new plants to your areas for each year. First, you need to get a bundle of strawberry plants you need to rake the area you are planting them in. Make sure you put each plant 18 inches apart. First, you should take your strawberry plant dig a trench, lay it flat and cover i...
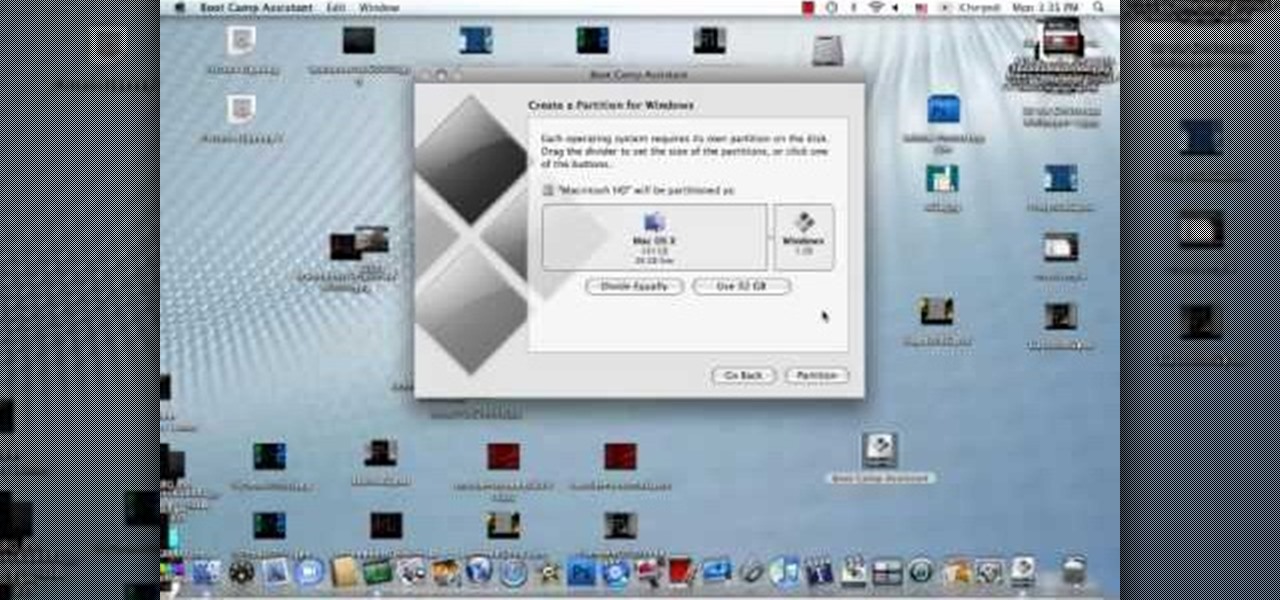
In this how to video, you will learn how to install Sony Vegas or any other Windows software on to a Mac. This will be useful if you cannot find a Mac equivalent of a Windows program. First, you will need Boot Camp Assistant. This will allow you to run any windows program on your Mac. Open the program and press continue. Next, you can select how big you want the Windows partition to be. You can select the 32 gigabytes button, or adjust it manually by sliding it. Next, select Partition. Once t...
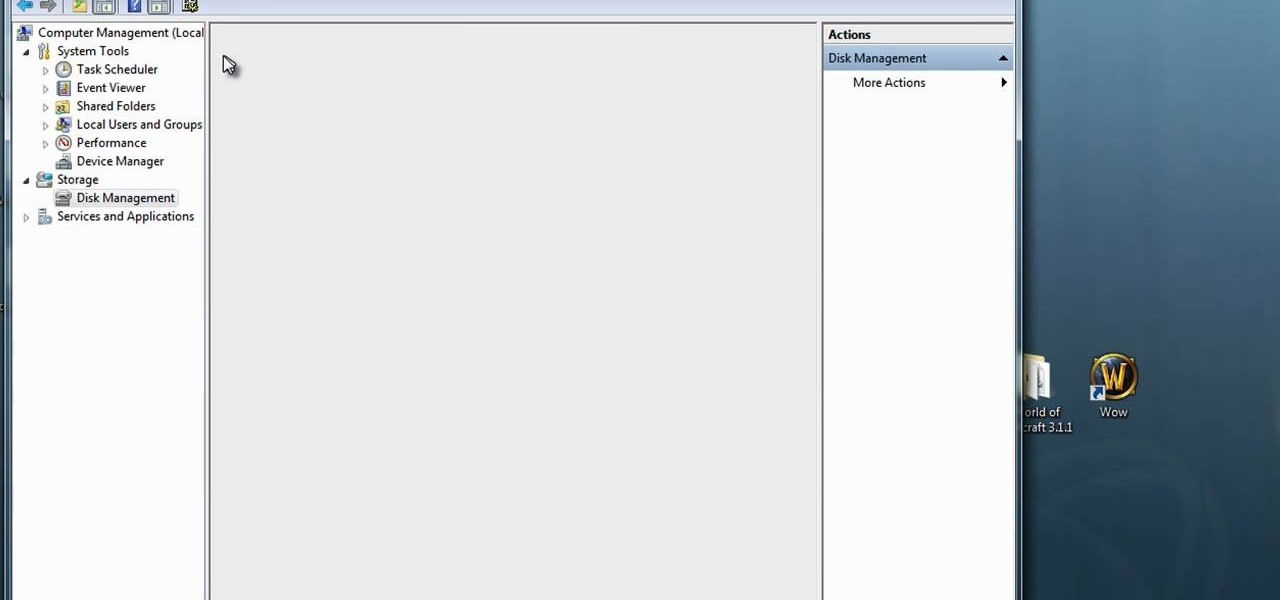
In this how-to video, you will learn how to format one of your hard drives in Windows 7. First, go to start and right click my computer. Select manage and a new window will pop up. Go to storage and select disc management. Now, right click the drive you want to format. Type in the name you want for the label and check quick format. Once this is done, press okay. Click okay to continue. This does not take too long. You have now formatted a hard drive. This video shows you the basic steps it ta...
When it comes to trimming your dog’s toenails, there are several instruments you can use. In this video, Patrice introduces you to the toenail clipper and the toenail grinder. To begin trimming your dog’s nails, pull back the hair surrounding the toenails so you can get a better look at the nails. Then separate the toes so you can work with one toe at a time. Using a toenail clipper, cut the nail enough to where you can see the jelly-like substance. You will know when you haven’t cut en...
In this video tutorial, viewers learn how to upgrade an old lamp shade into a blossom lamp. The materials required are: 1 1/2 yard of felt, old lamp shade, bias tape, glue gun and scissors. Begin by folding the bias tape in half and iron it down. Then glue the bias tape from the half fold on the top and bottom of the lamp shade. Cut the felt into 3x3" square pieces and then cut them into circles. Fold the felt circle in half and glue it onto the lamp shade. Continue doing this for the rest of...
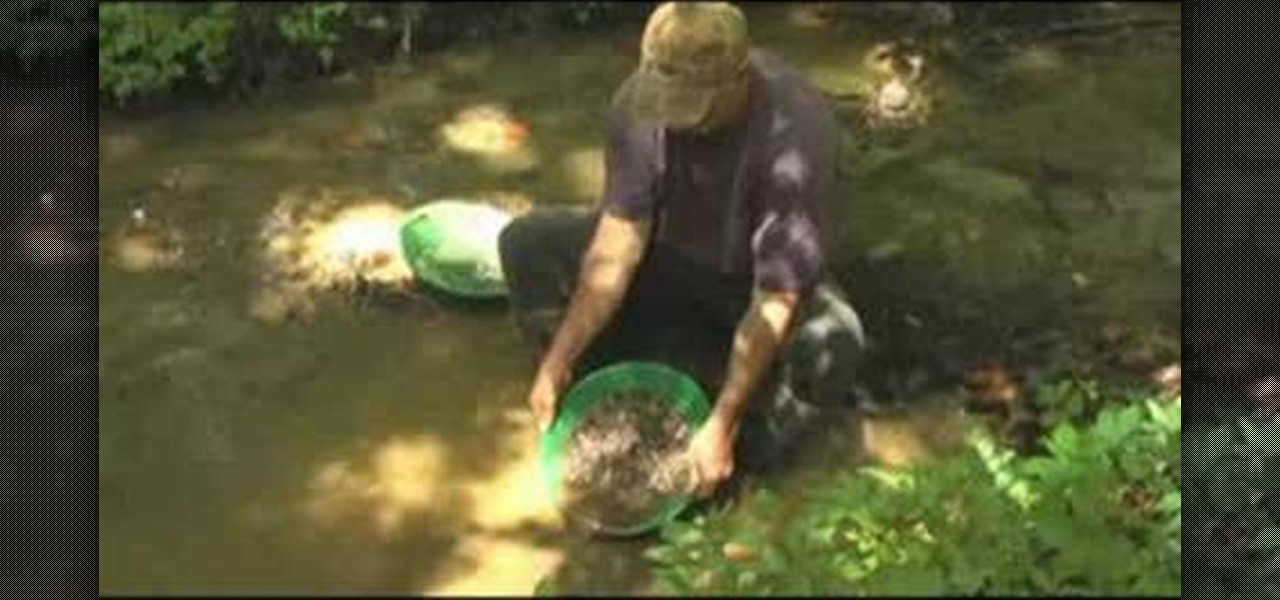
In this video, Graham shows us how to pan for gold. In a few simple steps, an individual could become rich!!! Graham is working with sandstone in Virginia in a swamp like area, but this process could be done in any river. Gold usually gets stuck in cracks in the sides of rivers, and in this case, the cracks are in sandstone rock in this swamp-like area. Shovel up some of the sandstone bed bedrock, or whatever type of material is available, place the shoveled up material in the pan. Fill up th...
This Dreamweaver CS4 tutorial takes you on a step by step process for installing an automated comment box system for your website. The system is a great way for communicating and interacting with your website users. It has a great feature that automatically sends you an email everytime someone comments in your website. Also it will allow you to post a reply by email.