Go beyond the traditional 3D workflow to an immersive creative experience with the software Modo, created by Luxology. Modo is the next evolution of 3D modeling, painting and rendering for Mac and PC. Modo includes 3D sculpting tools, animation and network rendering, and advanced features such as n-gons and edge weighting.

Go beyond the traditional 3D workflow to an immersive creative experience with the software Modo, created by Luxology. Modo is the next evolution of 3D modeling, painting and rendering for Mac and PC. Modo includes 3D sculpting tools, animation and network rendering, and advanced features such as n-gons and edge weighting.

Go beyond the traditional 3D workflow to an immersive creative experience with the software Modo, created by Luxology. Modo is the next evolution of 3D modeling, painting and rendering for Mac and PC. Modo includes 3D sculpting tools, animation and network rendering, and advanced features such as n-gons and edge weighting.
Second Class Boy Scouts work on building their outdoor survival and camping skills. Compass work, nature observation, camp tools, and swimming are areas where new skills are mastered and demonstrated. A second class scout, having completed all the requirements, should be able to lead a hike, care for his own equipment, set up a campsite, and perform basic first aid.
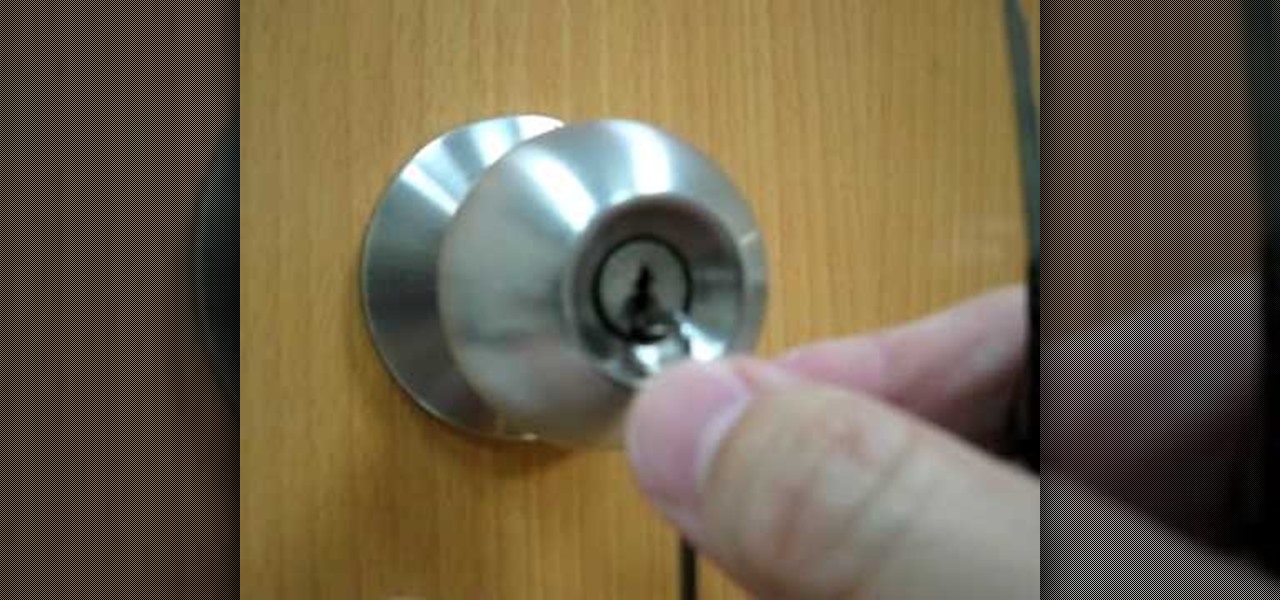
In this tutorial, we learn how to pick a door lock with a homemade tool. This tool is made with a hacksaw blade. First, take a locked door knob and try to open it. If you can't stick a pin in the bottom of the knob, then push the saw into the middle of the lock as you are turning it. Continue to do this in a fast motion, making sure not to slip and cut your hands. Within a few minutes, the door knob will come unlocked and you will be able to open the door and go into the other room!
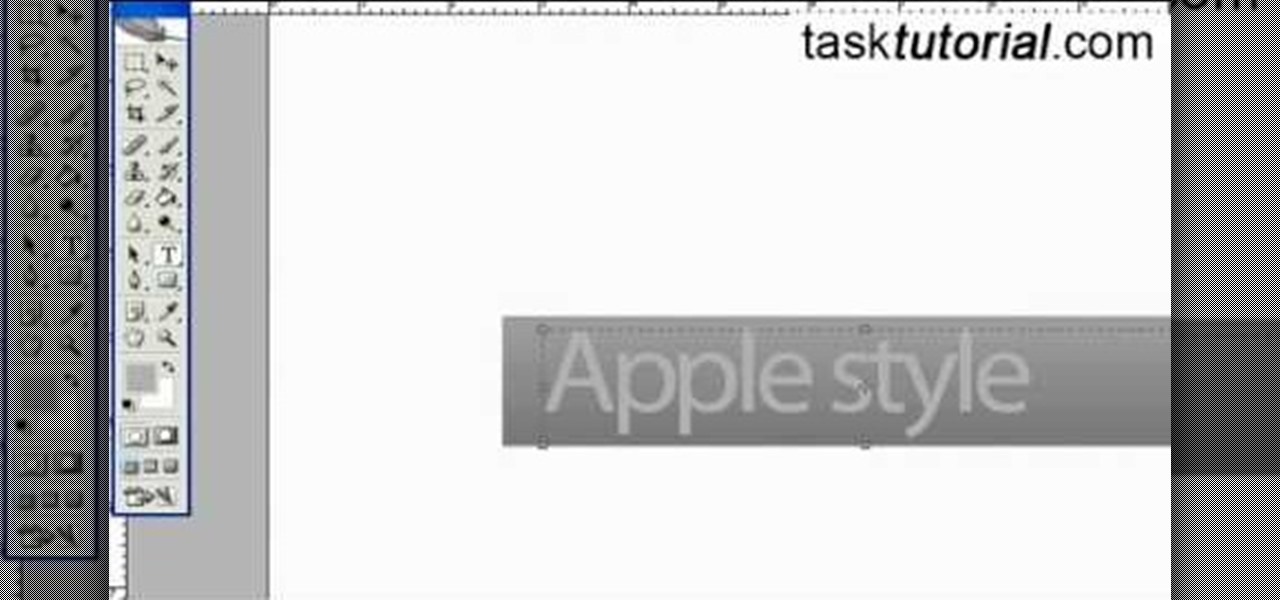
First select the rectangle tool and draw the bar. Now you have to open up the layer style and choose gradient overlay. Now you need to edit the colors as showing in the video and then go to drop shadow option, you have to change the opacity of it to 20%, distance to 2 and click ok. Now type "Apple style" in new layer as showing in the video, set the size of text to 72pt. Now open layer style for the text and choose color overlay and set its color to dark grey, go to drop shadow and choose nor...

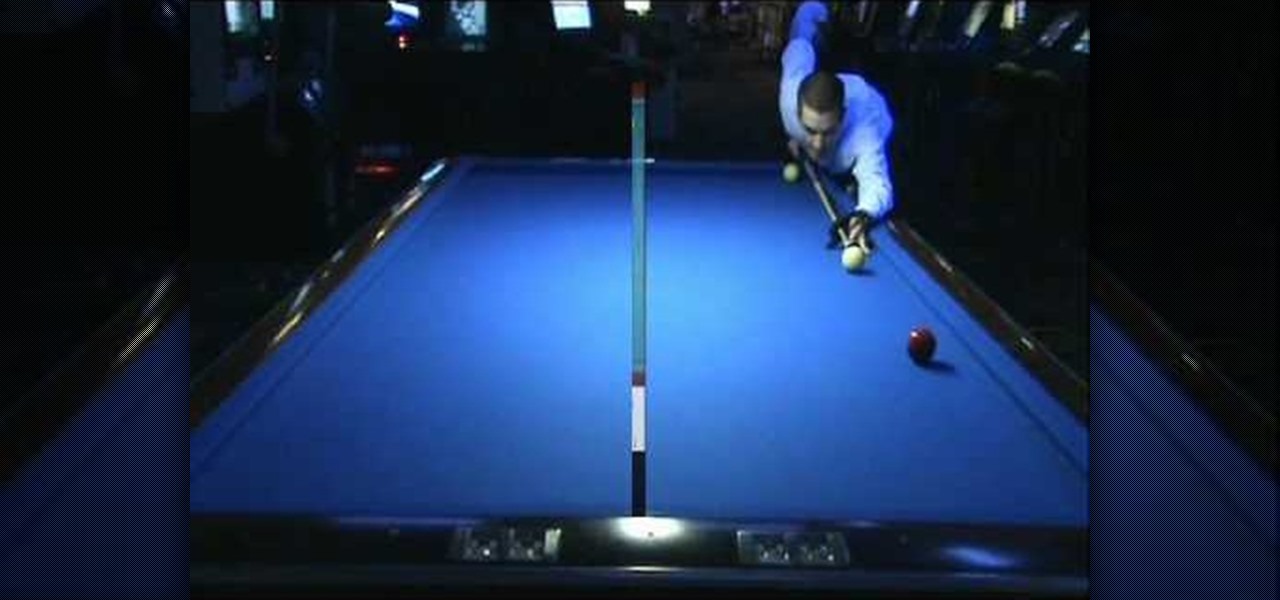
In this video, we learn how to play Straight Rail & understanding crowding patterns. All that is needed to score a point in straight rail is making contact with the other two balls in the same shot. If you can get all three balls close together in close position, the shooting player can score an indefinite number of points. First, strike the cue ball below center using right English and a moderate stroke. This will create a close crowding pattern with the two balls. You can also strike the ba...
In this video, we learn how to use Hindi words for: Where, here, there, come and go. As you learn how to say these different words, you will need to look at a visual key so you can see how they are written in Hindu. You will also need to listen to how the words are said, because there is a very different dialect with speaking Hindi than there is when speaking English. These mean the same things as they do in English, and can be used in the same sentences as well. Once you get the hang of lear...
In this video, we learn how to play pool with the down the rail drill. First, set up the balls in numerical order along the rail. Begin to run the balls using a drawing combination with right English. Do this each time for all of the balls and be careful not to scratch in the side pocket. You can also do this drill by doing follow and left English. This is a reduced version of different drills, to do the full drill set up all the balls along the entire rail. Run them in numerical order, then ...
This video tutorial belongs to the software category which is going to show you how to darken the background in Photoshop using the burn tool. This is an example of how to improve your dodging and burning using the adjustment layers.
In this tutorial, we learn how to remove and install a free wheel. First, take out the skewer from the wheel. Then, take off the nut from the inside of the hub with a cone wrench. After this, go to the other side of the axle and loosen it up. Now place your free wheel tool onto the wheel. Firmly secure the free wheel tool onto the wheel until you're sure it won't come off, with any tools you have available. When you are finished, put your nuts and bolts back onto the axle, then use bicycle lu...
Yanik Chauvin teaches us how to color correct product shots in Photoshop in this tutorial. First, remove some of the black from the image by using your crop tool. After this, if your image is too wide, duplicate your layer and use the marquee tool to edit. Remove any dust spots from your image, to make it look more clear so you have an image that is impeccable. You can do this by creating a new layer and then adding a feather to the image. Continue to go through the editing tools available un...
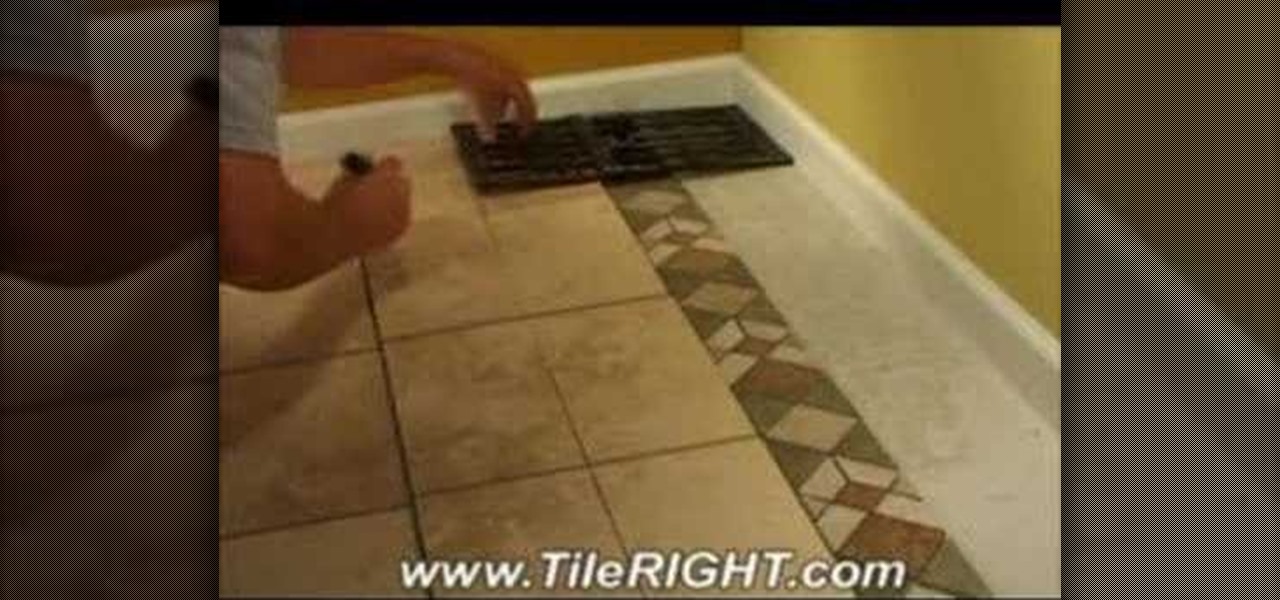
In this Home & Garden video tutorial you will learn how to install a decorative tile border. Decorative borders add a beautiful accent to any room. Start by setting the "measure right pro' tool. Slide the tool open to cover the entire tile and the width of the border. Next move out one eighth for the wall space and lock the tool. Now place the fill tiles on top of the set tiles. Then you slide the "measure right pro' along the wall and mark the tiles. Write the sequence numbers on the tiles a...
This video is about getting customize working on ANY iPhone/iPod Touch
In order to insert Word Art, into your document, using Microsoft Word 2007, you will need to begin by opening your document. Next, find "Insert", at the top of your screen. Click on it. This will take you to the Insert Tool Bar. Find Word Art. Choose the style that you would like to use, from any of the styles in the style gallery. When the window opens, you can choose your font style at the top, if you want to change from the default setting. You can also change the font size. Write the word...
The Dremel 300 series multi tool is basically a shrunken down version of a power drill. With a tinier drill and several different speeds, this tool can be used to create holes in even the toughest of surfaces.
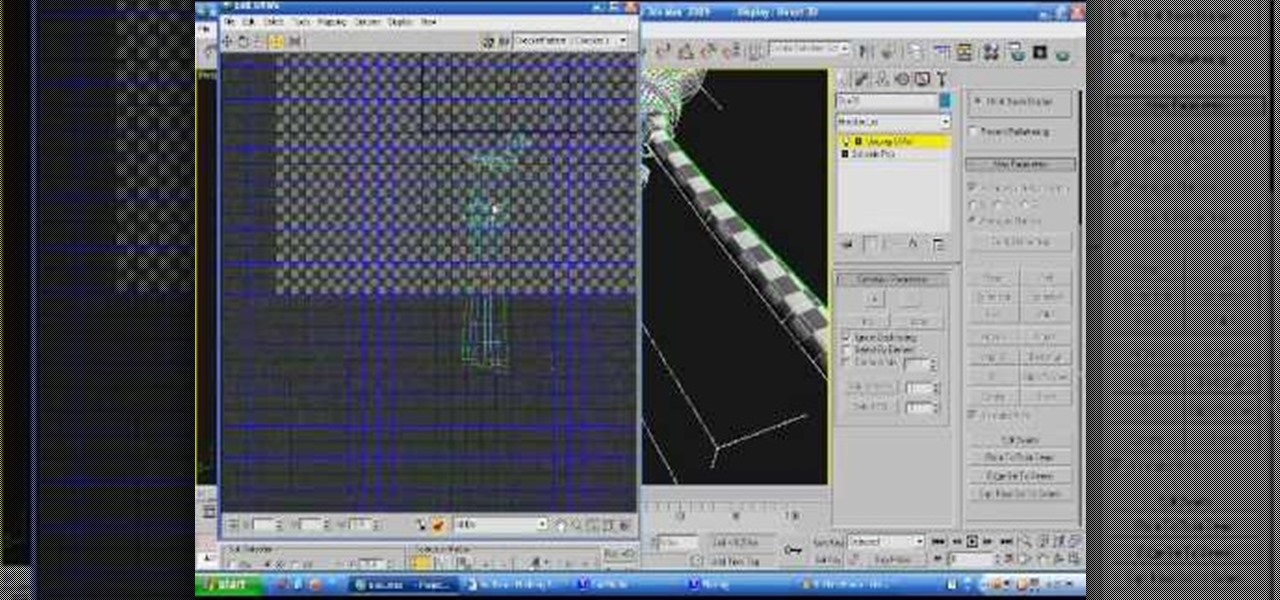
3D Studio Max is a powerful, but daunting tool for creating beautiful 3D art assets on the computer. This video will teach you how to use one powerful tool in the 3DSMax toolbox, the unwrap tool. Specifically, you will learn how to use it in pelt mapping using an axe as an example.
Check out this tutorial and make Windows 7 you're own by customizing the log in screen. This is fun to do and will, no doubt, make you feel more connected to your PC.
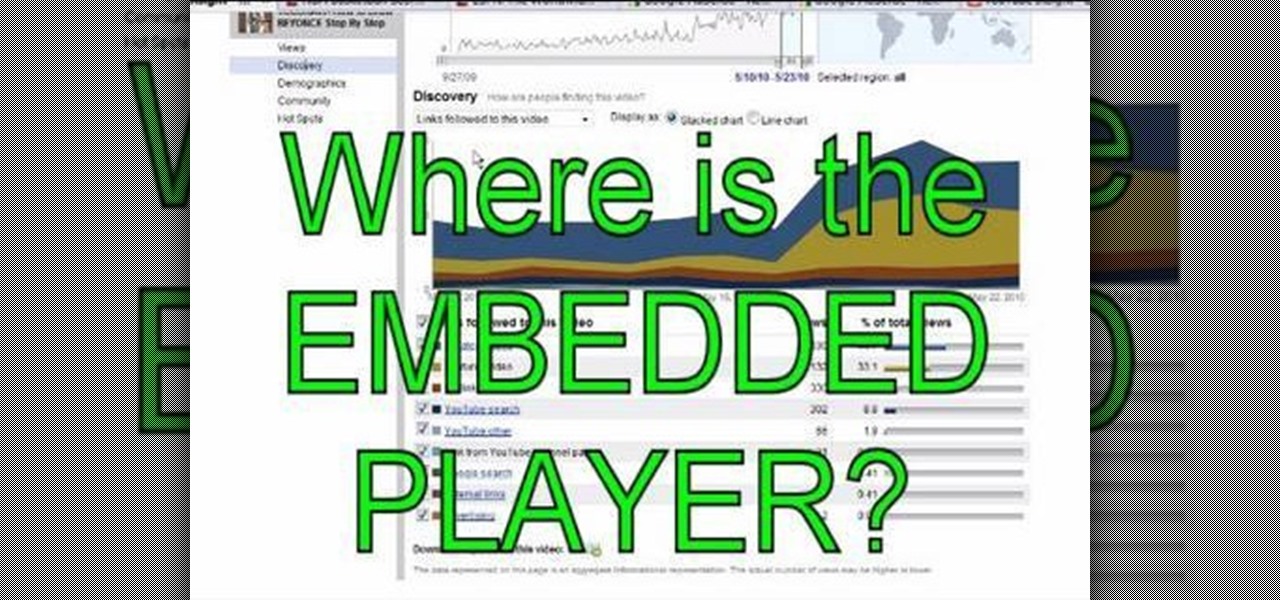
Are you a frequent Youtube poster? Then tracking which blogs and other sites have embedded you videos can be helpful in determining who is interested in your videos and increasing your number of views. When Youtube changed their site recently, they moved the Embedded Player tool that allows you to track that information and used to be under the Insight tab to a new place, causing mass confusion. This video shows you where to locate that tool in the new site layout, allowing you to track where...
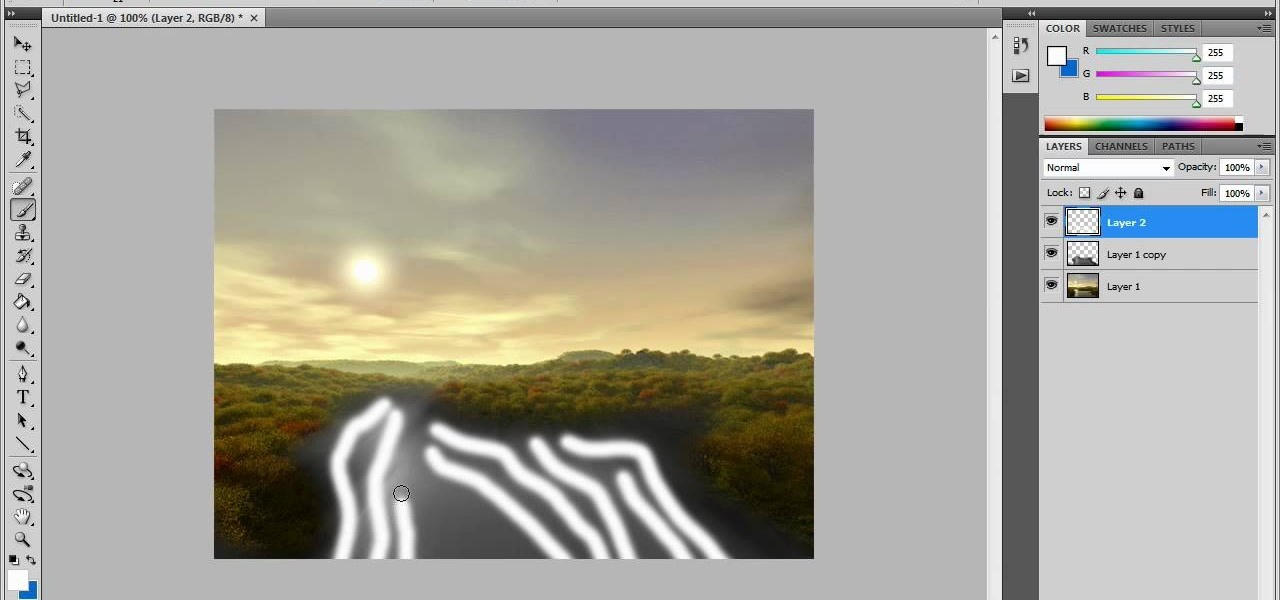
In this video tutorial, viewers learn how to create fog using Adobe Photoshop. Begin by importing the image into the program and duplicate the image. Now go to Filter, select Blur and select Radial Blur. Set the amount to 100, Blur Method to Zoom and Quality to Best. Now select the rectangular marking tool and select the sky. Then open the Hue/Saturation menu and set the Saturation to -100. Use the eraser tool to remove the gray from the edges. Now use the paint tool and paint white streaks o...
In this video tutorial, viewers learn how to change the color of lips in Adobe Photoshop. Begin by importing the image into the program. Select the quick mask tool and then select the brush tool. Now color the part that you want to retouch. This will allow the mask to create a selection. No click on the masking tool to create a selection. Then select the marquee tool. Right-click the selection and click on Select Inverse. Right-click the selection again and select Feather. Make it 1 pixel and...
In this how to video, you will learn how to use Daemon tools lite. First, download the program and install it on to your computer. Click, next and agree to the terms. From here, select what components are going to be used. Click next until you are finished installing. Now you can run the program. It should be on the system tray. The virtual drive should automatically be installed and be called device 0. You will see it if you right click the icon on the system tray. Now you can mount ISO file...
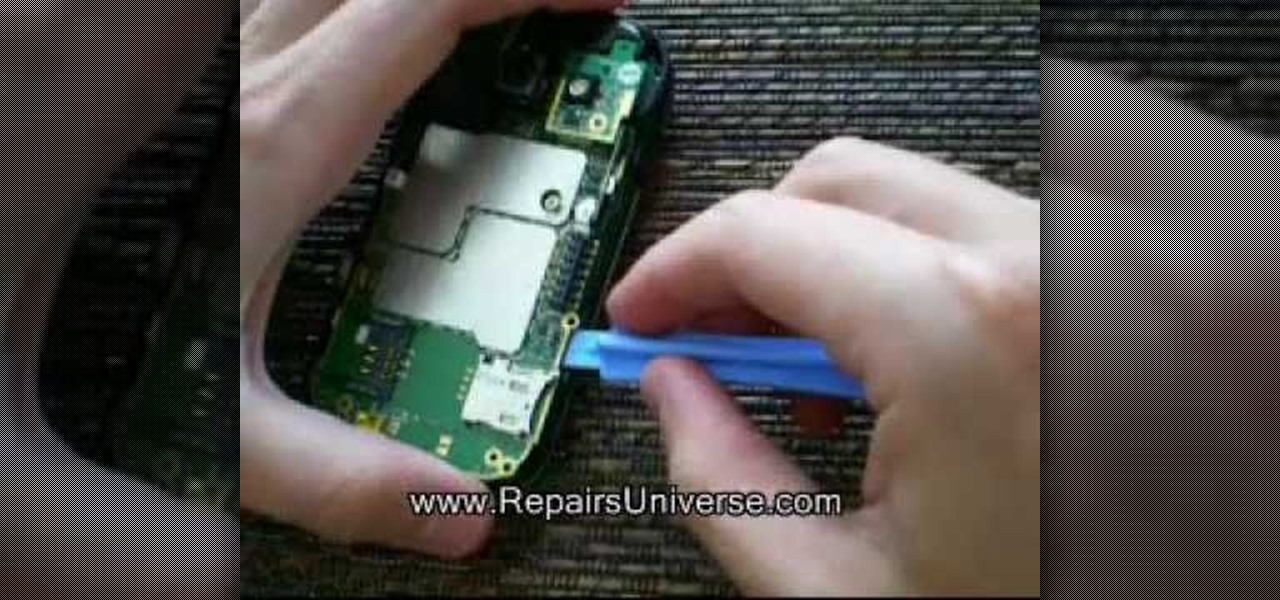
Repairs Universe demonstrates how to remove a Sony Ericsson LCD screen. First, remove the battery from the device. Use a safe pry tool and run it along the side of the phone to unclip the clips and release the top cover. Then, slide the phone forward and release the top cover. Next, remove the keypad from the device. Then, remove the LCD screen by prying the clips oven with the safe pry tool. Use the pry tool to pop the pop clip to fully remove the LCD screen. The new LCD screen is now ready ...
This video shows how to make a real 3d text in Photoshop. First open up Photoshop. Create a new document File > new. Then select width then OK. Fill the background with black. Then go to the text tool and write whatever we want. Choose a font with fat letters. Right click on the text layer and go to "Blending options". Then edit the text in our way. We can create a Gradient Overlay, Contour, Stroke and Outer Glow. We can add any effect we want. Again right click on the text layer and click "R...
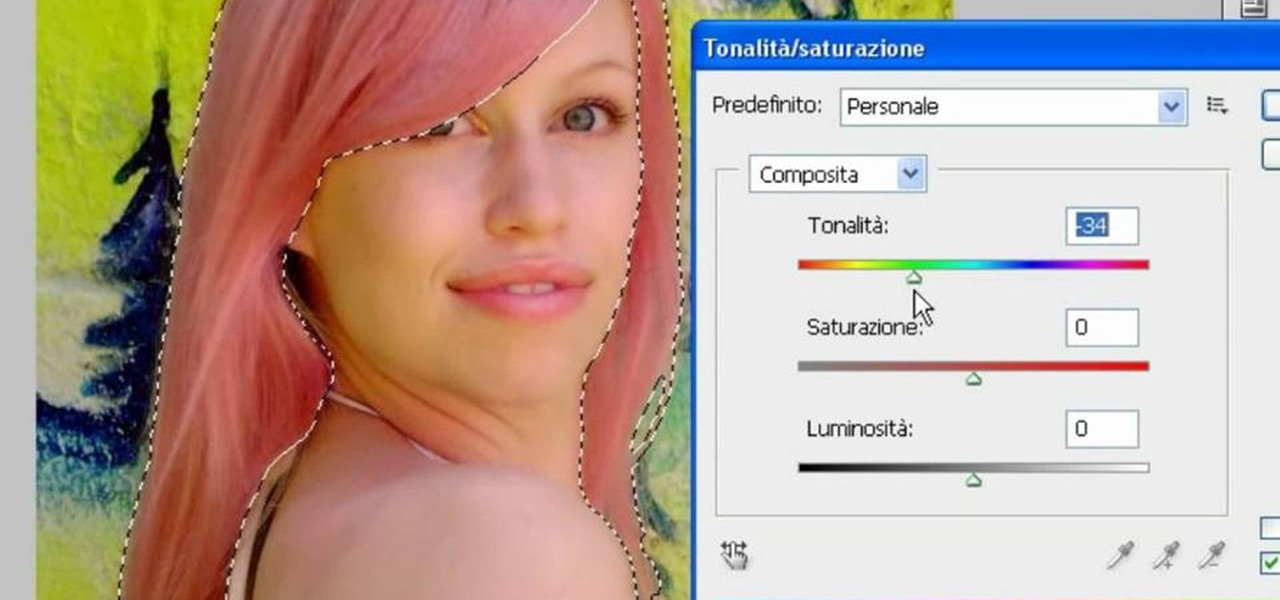
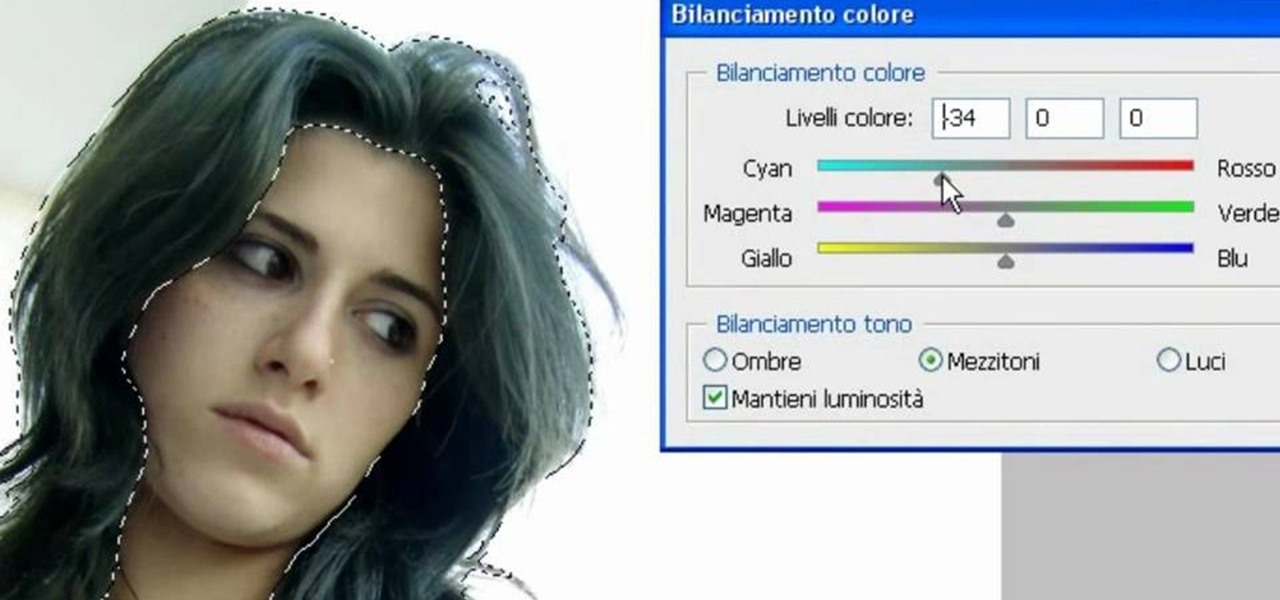
In this video, we learn how to use PhotoShop to change hair color.. First, select the mask tool inside PhotoShop. Now, zoom in on your picture and brush the hair that you want to change the color of. Zooming in and using smaller or bigger brushes will help you be more precise. After this, zoom out and press on the mask tool to create your selection. Then, select the marquee tool and right click and choose "inverse selects". Now, click on "image", "regulations", then "tonality/saturation". Now...
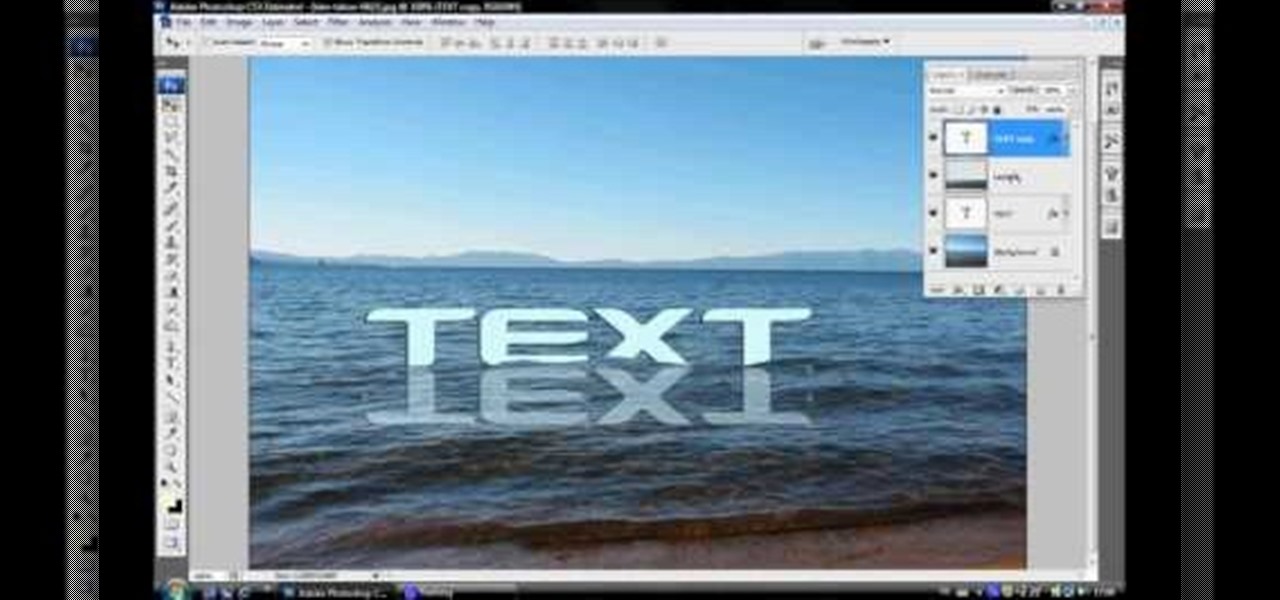
In this video tutorial, viewers learn how to make floating text on water. Begin by importing the water image into the program. Begin by selecting the polygonal lasso tool in the toolbox and select the top of the water. Once you have made the selection, right-click on it and select Layer via Copy. Then select the text tool and type in your text. Create a contour to make the 3D and give the text a light color. Then place Layer 1 over the ext layer and use the selection tool to place it behind t...
In this video tutorial, viewers learn how to use the Tile Visuals tool with the Voice Over application on a Mac OS X computer. This feature will dim the screen so that the user will be able to go over the Voice Over commands. To enable Voice Over, press the Command and F5 key. To tile the visuals, press the Command, Option and F10 key. Now when users navigate through the screen, only the contents over the Voice Over cursor can be visible. To return to the normal view, press the Control, Optio...
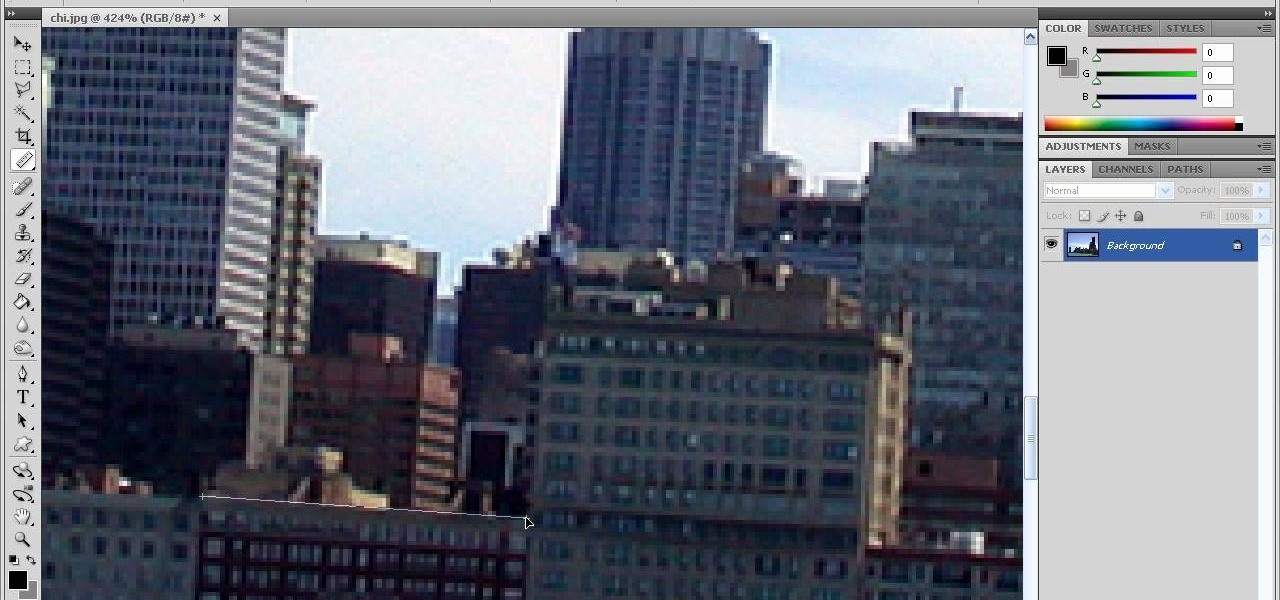
In this how-to video, you will learn how to straighten crooked photos in Photoshop. First, open the photo you want to straighten in Photoshop. Next, use the ruler tool under the eye dropper tool. Select it and zoom in to an area. Find a crooked line to straighten, such as a building rooftop or ground line of some sort. Click, hold, and drag. Next, zoom out. Go to image, image rotation, and arbitrary. Click okay and your image will be adjusted. Go to the crop tool and crop out the spaces. Hit ...
The shape stamp tool in Photoshop is similar to using old fashioned clip art. Shapes are extremely easy to access and you will get the hang of them quickly. These shapes can be used to enhance your existing photos or to create graphics like banners and icons. In this tutorial, you will learn exactly how to access and use the shape stamp tool in Photoshop CS3. You will no doubt have this down pat in no time and will soon be on your way to using stamps - just one of Photoshop's many helpful tools.
In this video, we learn how to change the color of dark hair in PhotoShop. First you will want to open up PhotoShop and open up the picture you want to change, zooming in so you can see the hair up close. Next, open up the mask tool, then use the brush to color the hair. This will only highlight the hair to change the color in the future. Use different sized brushes when you need to. Once you've done this, click on the mask tool to create the selection. Now, select the marquee tool and click ...
River City Graphix Tutorials demonstrates how to make a reflection in Photoshop. First, fill the background layer with black. Then, select the text tool and a color of your choosing. Type the words that you would like to reflect. Next, duplicate the layer to make a copy of the layer. Hold shift and bring it down, setting it on the bottom of the other layer. Select the rectangular marquee tool, right click to get the free transform tool. Right click again and then flip the image vertically. Se...
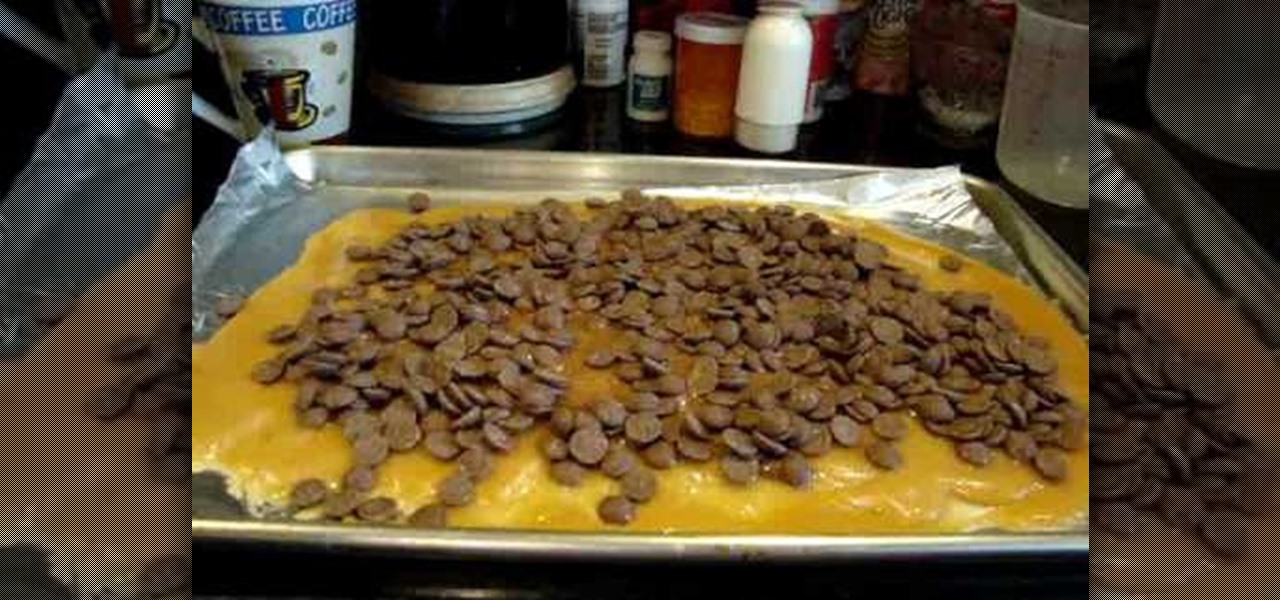
In order to prepare A Simple English Toffee, you will need the following: a large heavy pot, a candy thermometer, a spoon, a dash of salt, a baking sheet, 2 cups of butter, 2 cups of sugar, and 2 cups of chocolate.
To open the Windows Task Manager the long way
In this how-to video, you will learn how to remove tattoos using Photoshop. First, open the image in Photoshop. The patch tool is the easiest for removing these type of tattoos. If the tattoo is very ornate and complicated, it will take longer to remove. First, select the patch tool, which looks like a band-aid. Hold it down and select patch tool. Zoom in on the tattoo and draw a selection around it. Once it is selected, click the left mouse and hold it down. Drag the selection to an area sim...
This how to video shows you how to take apart an HTC 8525 and replace the LCD screen. First, remove the SIM card and the battery. Next, remove the screws in the back. Using a pry tool, slide it along the edge of the phone at the bottom to release the clips. Once they are released, remove the back piece. To remove the motherboard, release the ribbon connector with the pry tool. Carefully lift the motherboard from the case. Remember that it is still connected to a ribbon that must be released. ...
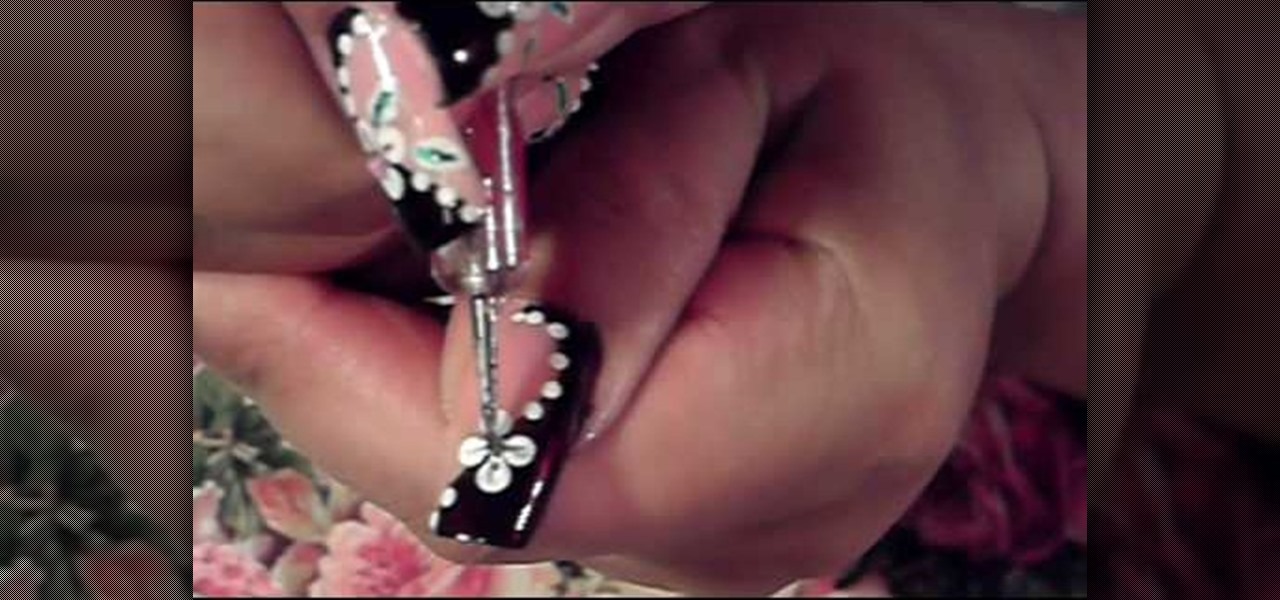
dark brown and pink white flowersdark and rich colors are used: brown, pink, white and green. firstly lightest color is used for the base polish then dark colors applied. first, with dark brown polish a simple curved line drawn on the nail from bottom to top then dark brown polish applied to fill the back part of the previous line. then put some white polish onto a white paper and use it with dotting tool to put flowers petals as a dot on to your nail. then with another dotting tool put dots ...
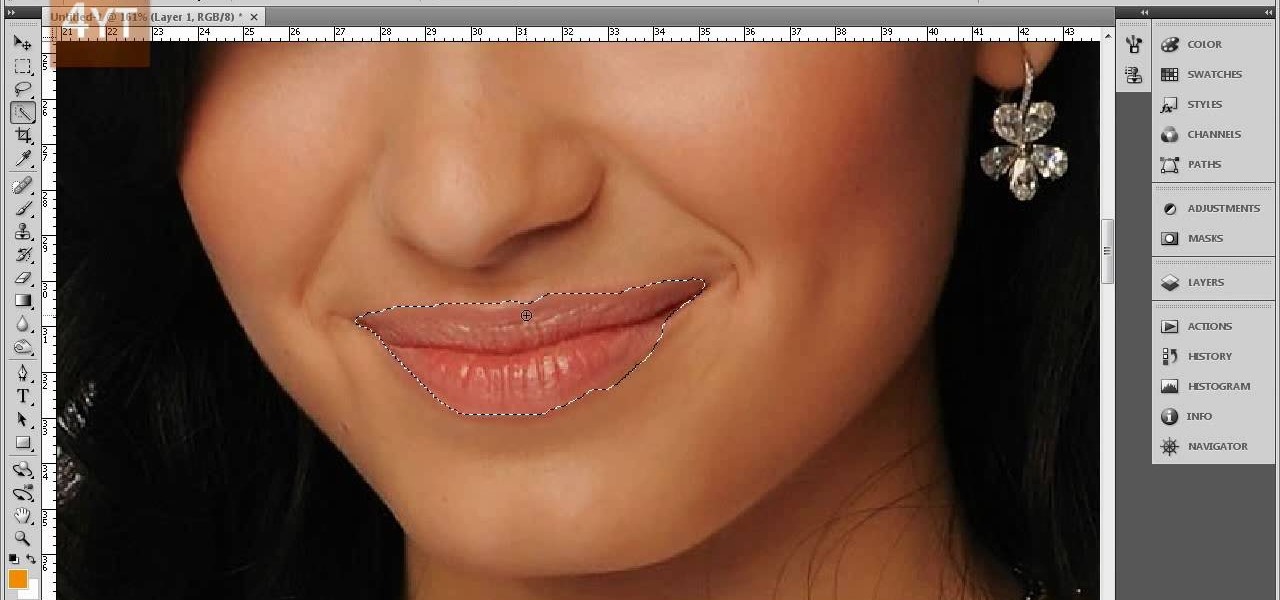
Forget to put on lipstick before a photo? Or perhaps you want to spice up an old photo of someone you love. Well their is a way, as 4YouTutorial demonstrates step by step using Photoshop CS4. First upload a photo or image into Photoshop. Next access your Photoshop layers and delete the default locked layer. After, activate the zoom tool and zoom in on the photo where the lips are located. Next choose the quick selection tool (make sure it's on plus) and drag it over her lips. This process can...
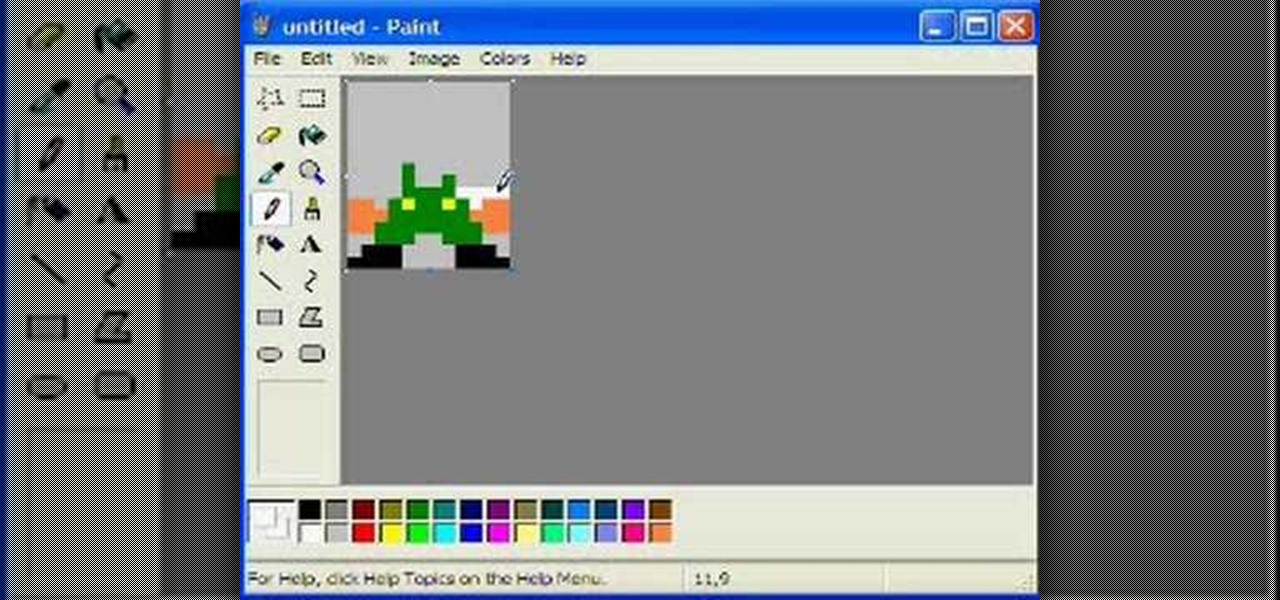
This simple tutorial teaches you how to create a classic 8-bit Luigi from the Nintendo franchise Super Mario Brothers in the Microsoft paint program. To start, open Paint. Select Image-> Attributes and change the image width to 12 pixels and the height to 16 pixels. Use the zoom tool to zoom in 8x and select the paint bucket tool to make the background gray, because a large portion of Luigi is white. Then use the pencil tool (set to 1 pixel) to begin drawing Luigi starting with his black shoe...
In this how-to video, you will learn how to crop an image using Adobe Photoshop CS4. First, open Photoshop and open the image you want to crop. Next, press filter and select the edge hollow tool. Carefully draw around the image you want to crop. Once this is done, click on the fill tool and left click in the middle of the image. Now, press preview to see if you missed any spots. You can clean these spots up by pressing the clean up tool. This will allow you to erase these particular spots. On...
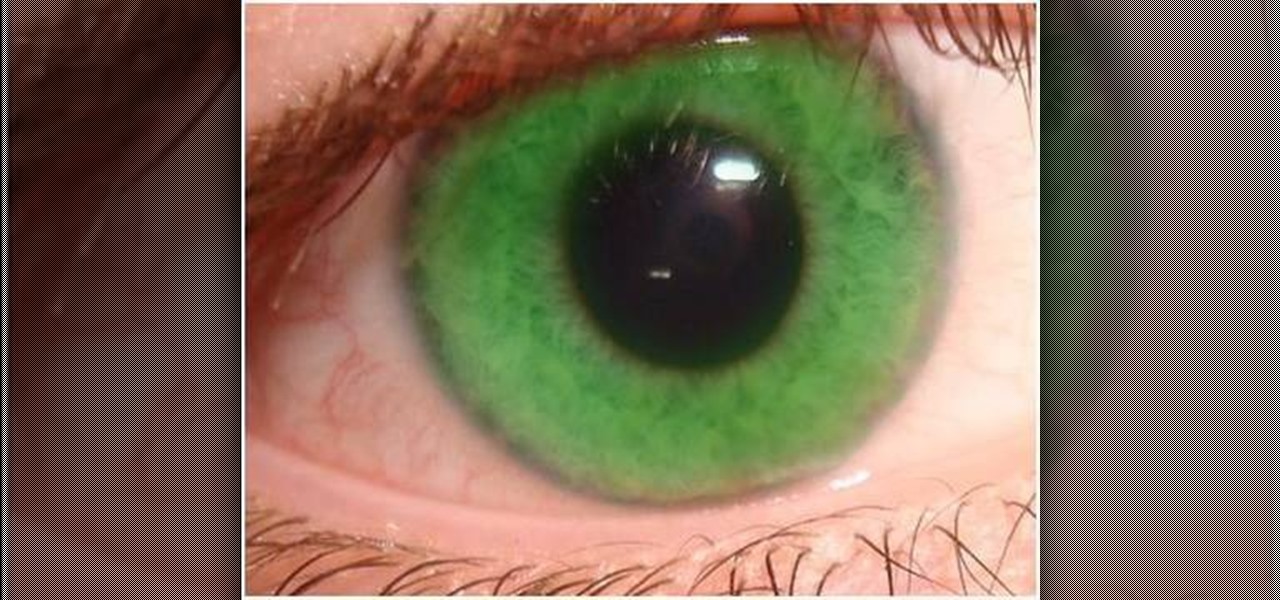
Stevmay09 will be teaching you how to digitally modify your eye color for free using GIMP. First you need to zoom in on the eyeball then click on the free select tool. Then start on the corner of the eye and make your way around the entire eye. Once you have the area around the eye selected you need to create a new layer. Make sure its filled with transparency then select the color you would like the eye to be. Then get the paint brush tool and select the icon shown then increase the scale an...