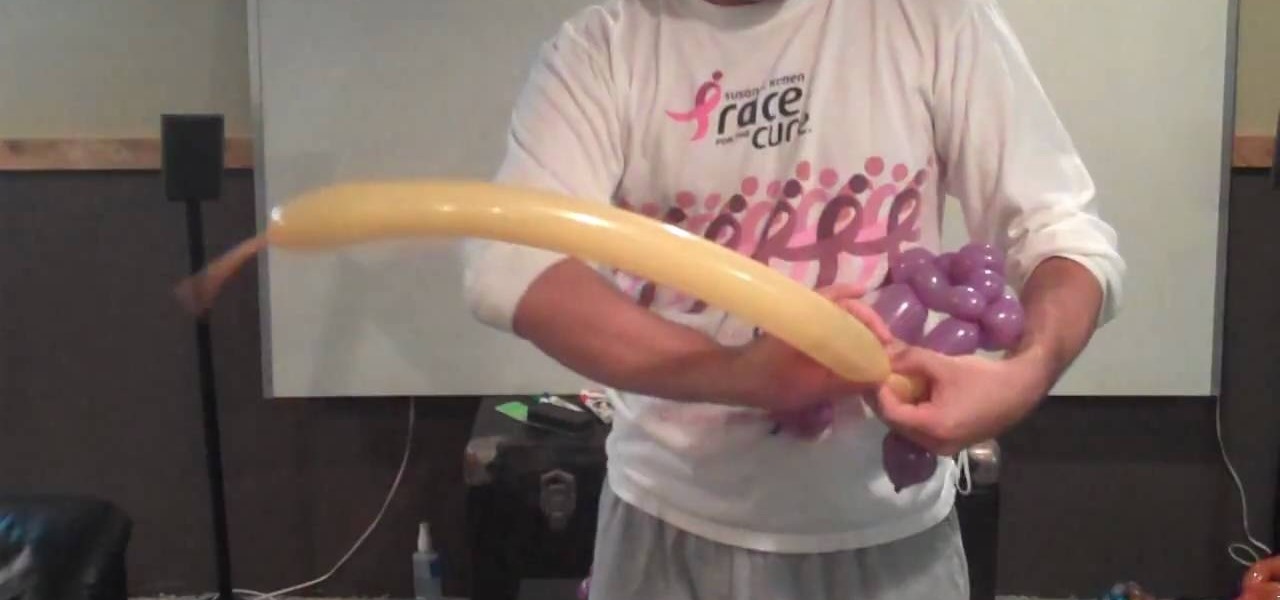
In this video we learn how to make a balloon monster truck. If you're new to creating balloon creatures, this may be a bit difficult for you so follow along. Start out with a tan colored balloon and a purple balloon. Twist these together to start creating the truck. You will be twisting many bubbles into both of the balloons so you need to make sure you keep space in the balloon for air. Once you finish this, you will twist four more brown balloons into circles on the sides to make the tires....
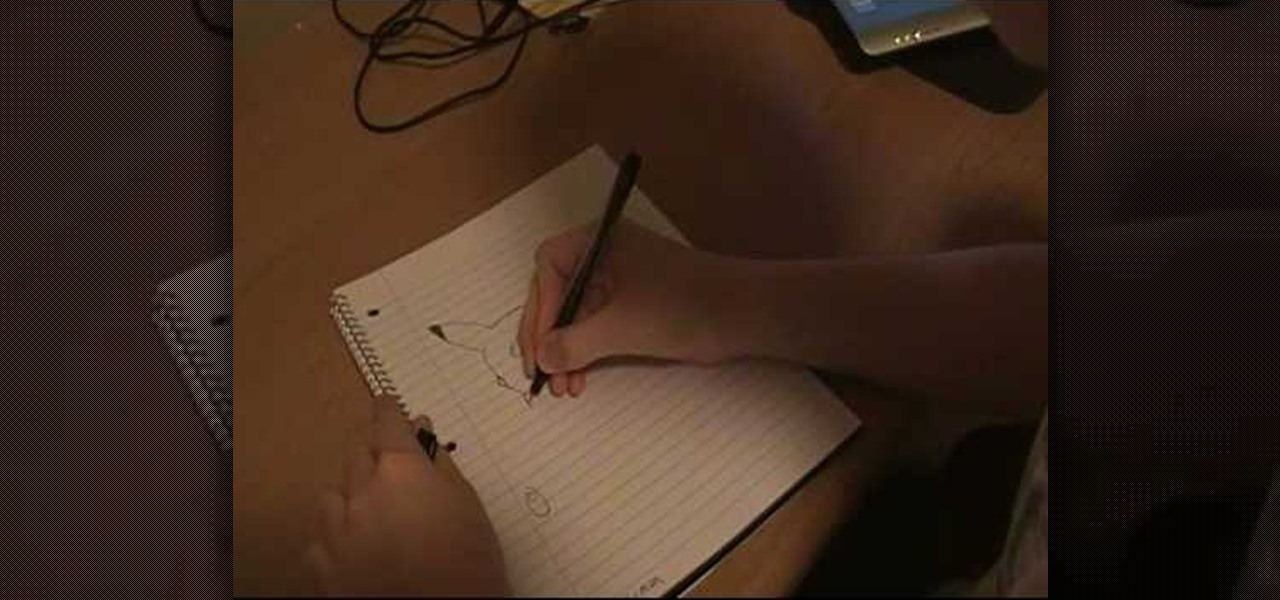
In this video we learn how to draw Pikachu from Pokemon. First, draw the ears and the top of the head. After this, create the sides of the head and color in the tops of the ears. Draw in circles for the eyes and then draw in the nose, cheeks, and smile. Continue on to draw the rest of the body and the details of the chin of the character. Add in the details for the side of the body and then add in shading and body lines wherever possible. When you are finished, share this with others and be a...

You'll be the queen of the jungle once you don this sexy and cute lioness makeup look for Halloween. This makeup look is a costume in itself, with a cute pink black nose and incredibly large eyes with mega thick lashes and sharp feline tearducts.

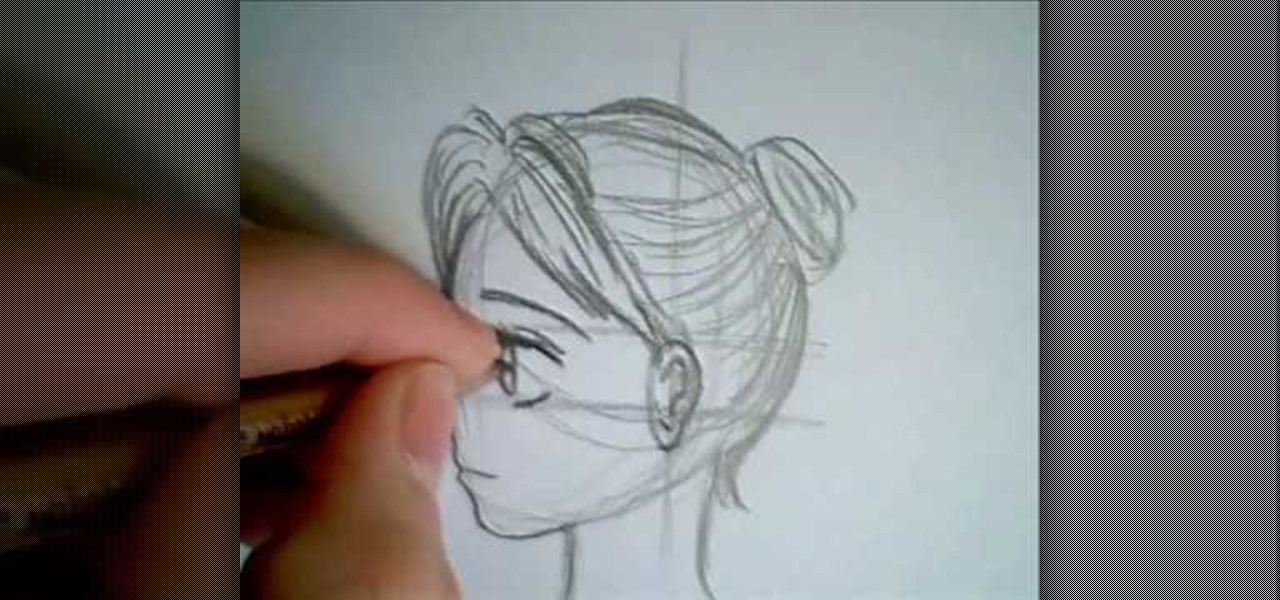
In this tutorial, we learn how to draw Tenten. To start this character, draw a light circle along with lines in the middle for reference points. Use a bolder line to draw the chin and then the eyes, nose, and mouth. also make sure to draw in slight eyelashes and eyebrows above the eyes. After this, draw a line around the head and erase the background lines. Draw ears on the top and then start to fill in the hair for the bangs on the front of the face. Finish this off with a headbands, then dr...

In this tutorial, we learn how to draw PokŽmon heads. Start out by drawing a circle for the head, then drawing intersecting lines in it to create a reference point for the features of the face. Next, draw the ears coming out of the head and then draw the eyes, nose, and mouth. Once finished, you will need to fill in the eyes so they have the correct look, then add in further details along the face. Make sure to add lines to the edge of the head to make it look like it has fur, then add in any...

In this tutorial, we learn how to draw manga basics. First, you will draw a circle for the head, then make a point at the bottom for the chin. After this, draw in lines on the face so you can reference where the eyes, nose, and mouth will be. Then, you will need to decide what expression you're going to use. Once you have decided, you will need to draw in the eyes, creases of the eyes, and eyebrows. Then, you will draw in the nose and the mouth. The female eyes look different from the male's,...

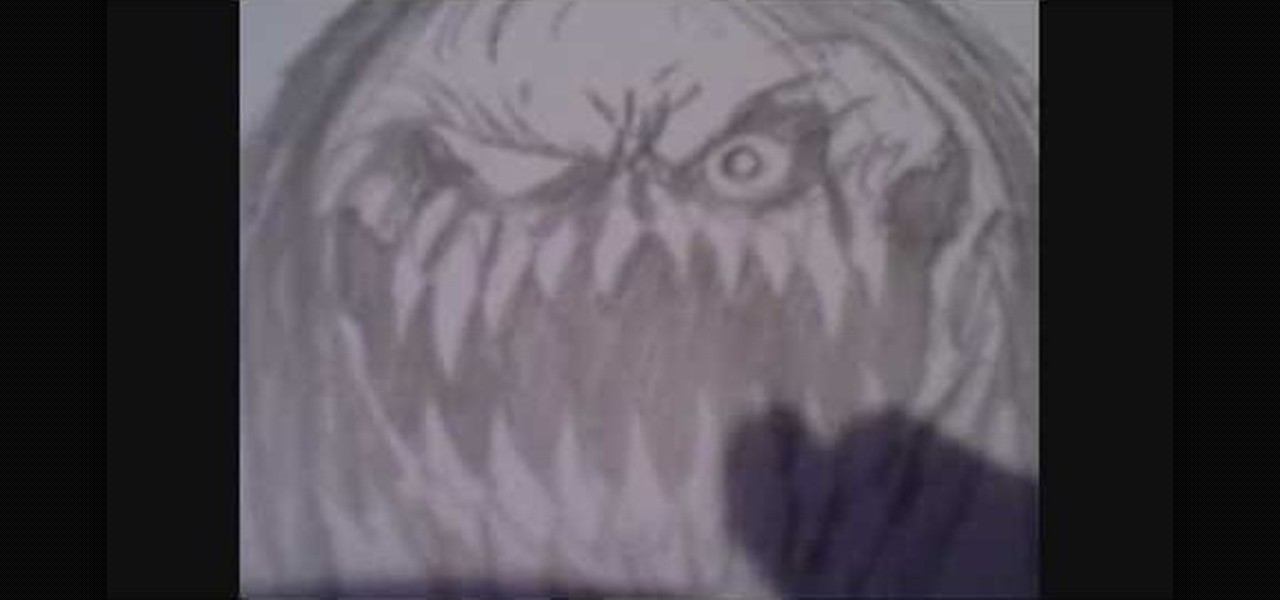
In this tutorial, we learn how to draw a scary demon mother. Start off by drawing a circle for the face with huge sharp long teeth and small evil eyes. Add in details around the face to create a more realistic feel and creases in the eyes. Next, draw in the hair by using your pencil and just drawing in straight and straggly hair. After this, add in additional details to the eyes and the rest of the face, creating a nose and other features you want. After this, draw in lines on the bottom of t...
In this video, we learn how to draw Rukia. Start out by drawing a circle with a triangle shape at the bottom. Then, draw reference lines in the face to measure where the features of the face are going to be. After this, start to draw in the details of the face. Draw the eyes, mouth, nose, eyebrows, and any other details you need. Make sure the eyes match the original character and leave white for the pupils to show. Draw in the hair to finish up the drawing, making sure to draw the eyebrows a...
In this tutorial, we learn how to draw a basic dragon. Start off by drawing the head of the dragon, then draw the neck and the rest of the body in a simple outline. Use circles throughout the body of the character to create a large body that looks realistic. Next, draw in details of the body of the character and the fur that is on the outside of it as well. Draw in the claws on the feet and the lines along the body to create a more realistic look. As you continue, erase any background lines a...
In this video, we learn how to draw Toad. Start out drawing toad with the out line of the body. Make sure to incorporate the mushroom helmet on top of the head. After you have the basic outline finished, draw on the features of the outfit. Include the pants and the scarf around the neck. Also, add on the features of the face and darken up the eyes. Next, draw in half circles on the mushroom helmet and then shade around the character to make it look 3D. Practice drawing this to perfect the cha...
In this video, we learn how to finish a crochet never ending granny square. There is a spiral effect happening in this, because there is no place that is stopping, it's going in a continual circle. To finish one of these, you will see that the corners should be perfect. But, you will need to choose one corner to finish it off at. Go across, then choose a side to stop at. Then, chain over and double crochet in. When you come across with another color, you can weave in the end so that you can't...
In this tutorial, we learn how to draw Marik Ishtar. Start with the outline of the head (in a circle shape) and draw the reference lines around the front of the face. After this, draw in darker lines around the features of the face and start to add in details throughout the entire head. Draw in hair, a nose, eyes, ears, and everything else. Once you have finished with this, draw in the neck of the character and then the shoulders. After this, finish the hair off on the back of the had, then a...
In this tutorial, we learn how to draw Death the Kid from Soul Eater. First, you will need to draw in circles around the body where the joints would go. After you do this, draw the outline of the body around the joint markers. Next, you will start to draw in the arms for the character and add in the full detail of the arms and machinery. Next, use a darker line to create the details in the body and the outline as well. When finished, you will need to add in the details of the face as well as ...
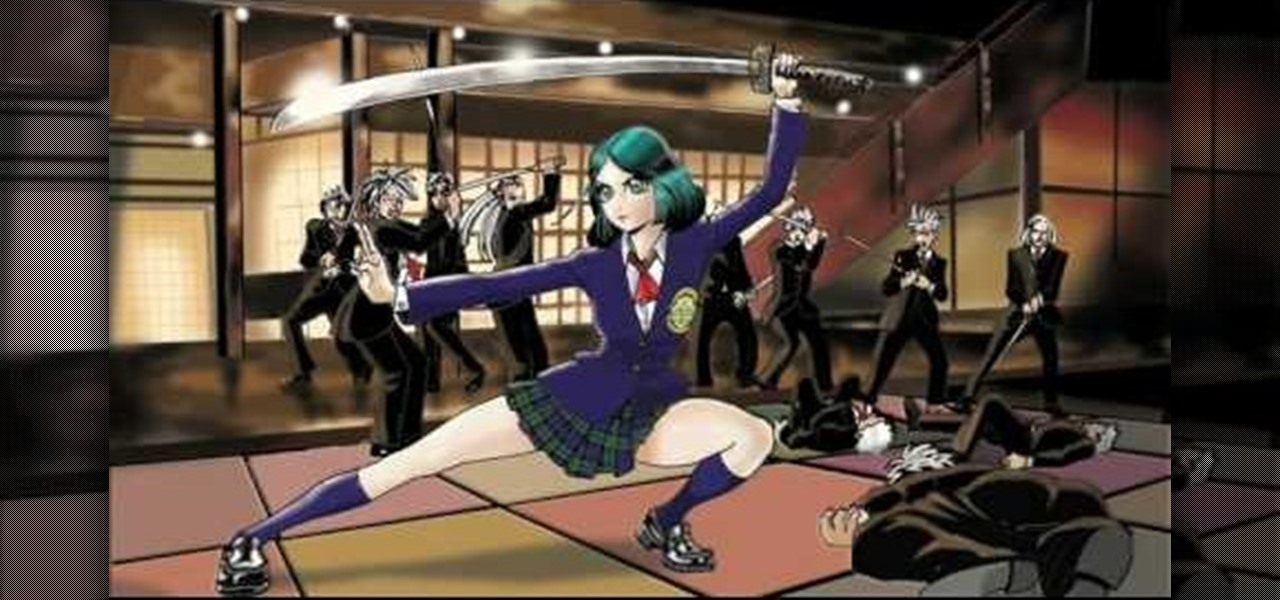
In this tutorial, we learn how to draw a female anime or manga school girl. Start out by drawing the outline of the character, then drawing in the details along the middle and the body of the character. Use circles inside the body to create a references as to where the body joints would be. Then, draw in clothing on the body and add a sword in the hands of the girl. After this, draw in additional details to the drawing and then focus on the face. Draw in the facial details, then add the hair ...
In this video, we learn how to draw a Pikachu PokŽmon. First, you should have a picture of the character in front of you so you can better draw it. Start out by drawing the eyes and filling them in with marker. Next, draw in the rest of the face, including the nose and the mouth. After this, draw the ears at the top of the head, then connect in the middle to create the head shape. Draw the sides and bottom of the head, then draw the body. Add in circles for the cheeks, then continue to draw u...
In this video, we learn how to draw Gaara. Start off by drawing the head of the character, then creating your reference lines. Next, you will draw the neck and then create circles for where the shoulders are at. Now, draw around these to create the outline for the entire body. Next, draw in the details of the upper body, using lines to show where the pecks are and then draw in the outfit that Gaara is wearing. Next, draw in the chin and the jaw bone, then the ears and all the facial features....
In this tutorial, we learn how to slip stream while cycling. The normal air flow around a single cyclist is broken at the front, then circles around the person and goes back to normal behind the person. While slip streaming behind another cyclist, your effort can be reduced up to 30%. To get the full effect, you will need to follow the other person very closely. You must be very careful and make sure you never hit their wheel. If there is a side wind, set to the side of the person by you so y...
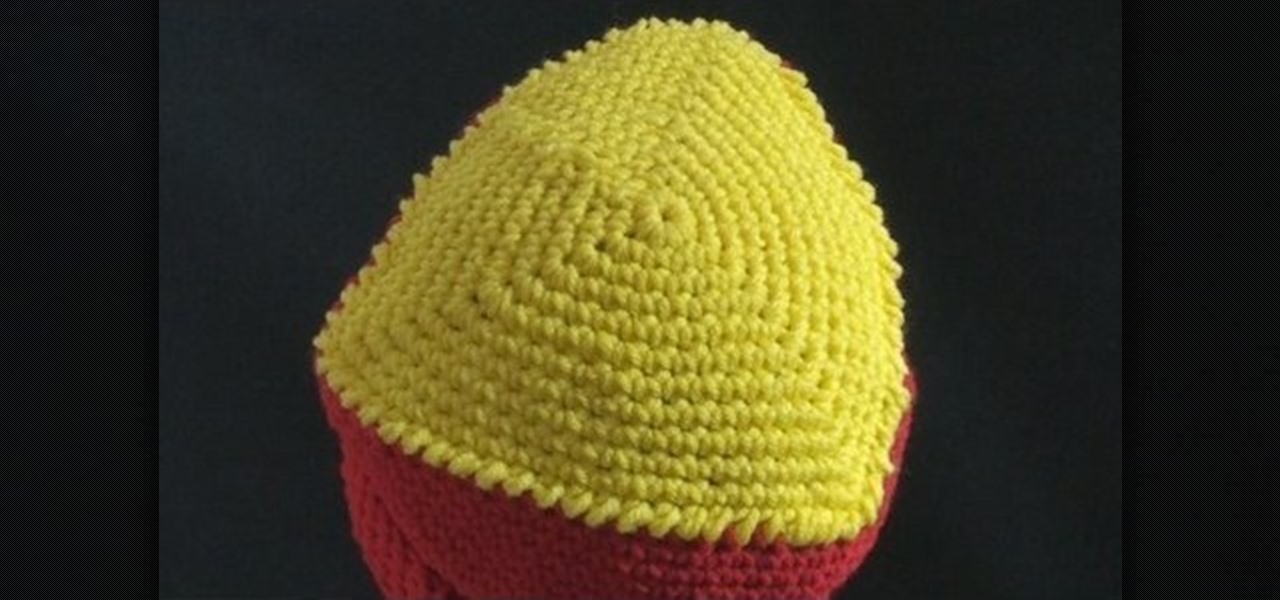
In this video, we learn how to crochet a triangle-shaped bikini beanie hat. First, crochet nine single crochets through a simple loop. After this, join with the beginning single crochet and work a single crochet three times. next, work one single crochets in each of the next two, then three single crochets in the next stitch. Now, go join with the first single crochet. Continue to go around until you have a large circle shape, going down on the sides to make the entire beanie shape. After thi...
In this video, we learn how to make a beaded 7 petal faerie flower pendant. First, string 14 beads on an 18 inch piece of string. Next, create a circle in the beads, then tie it off. After this, add three blue beads to your first pico stitch, then go through two more beads after this. Continue to do this all the way around the bracelet until you reach the other side. After this, go through the first pico stitch and add one red bead, followed by blue and red beads to make petals. Continue this...
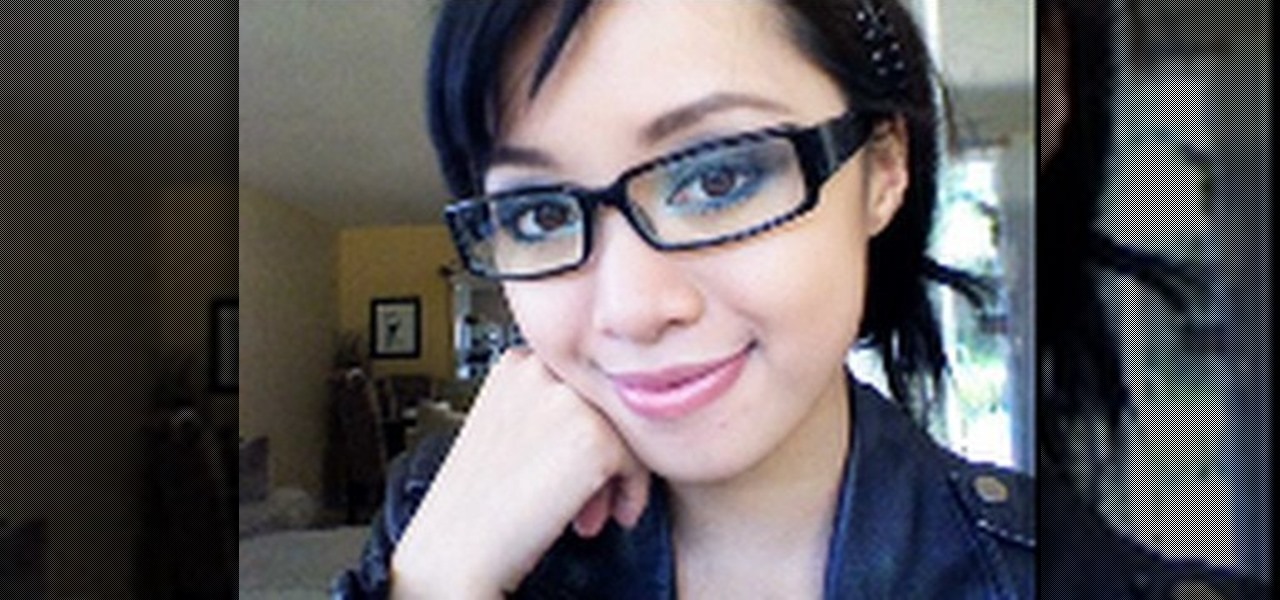
In this video, we learn how to wear smoky royal blue eyes with glasses. First, find the dark circles of your eyes and apply concealer to them to cover it up. Next, apply concealer to the face and define your eyebrows. After this, apply a silver shadow to the eyes, followed by a blue to the crease of the eye and on the inner corner. Apply a gray shadow to the crease of the eye, then take a bright blue shadow and blend it into the eyelid, avoiding the middle of the lid. Next, apply a black shad...
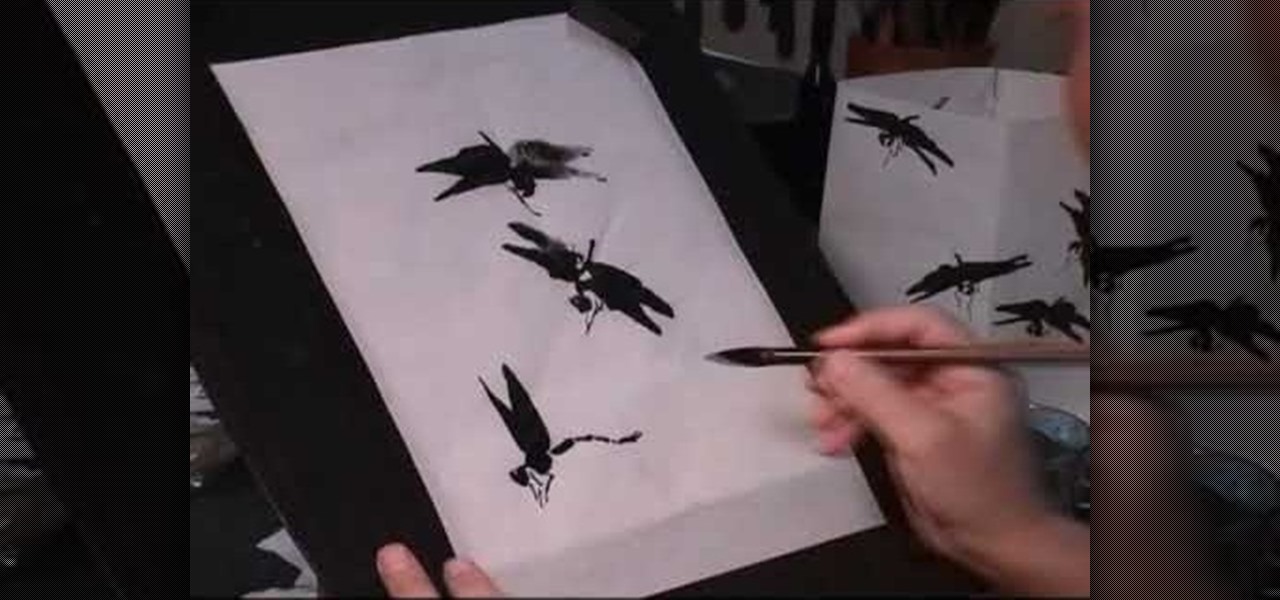
In this video, we learn how to draw dragonflies in Chinese painting. Start out with rice paper, then soak your medium sized combination hair brush in water. Next, squeeze the moisture and then push the ink out. Now, position the brush so it's comfortable and touches the paper lightly. Draw the wings on the insect first, then draw the tail on the bottom. After this, paint a small circle shape for the head and continue to draw the other dragonflies. You can vary how these look by making the win...
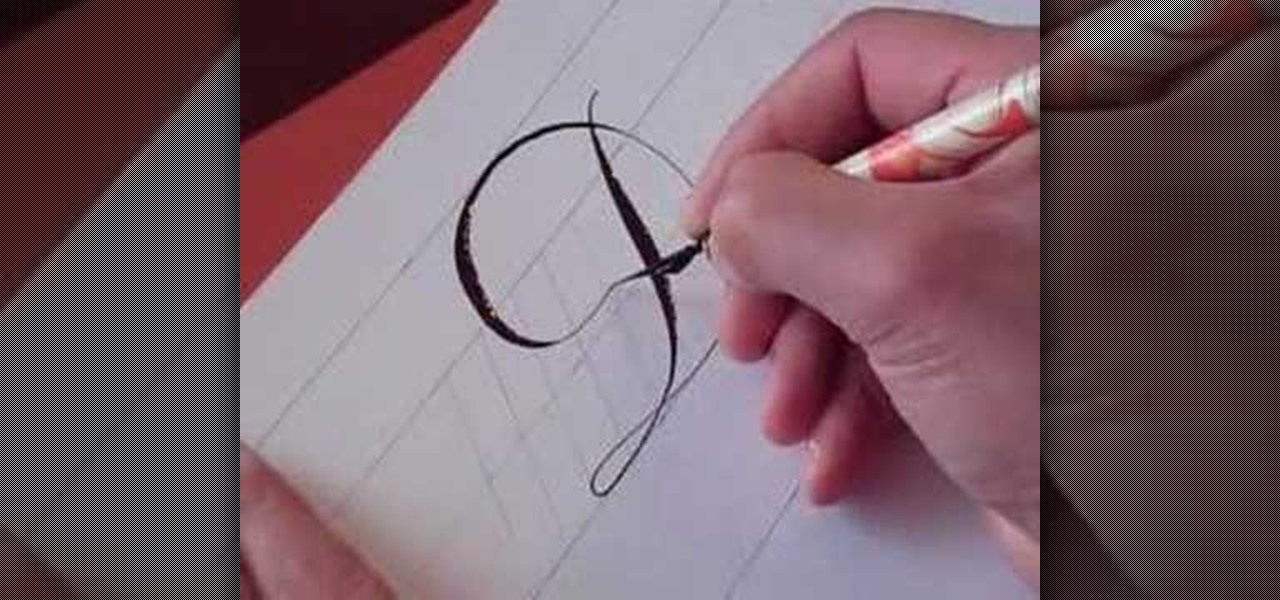
In this video, we learn how to write the letter D in calligraphy copperplate. Start off by drawing a thin line down the paper, pressing on the pen harder to make a thicker line in the middle, then thinning out at the end. Drag the line to the left making a thin line, then loop it around to the front of the line and make the D shape. After you make the shape, bring the line to the back of the original line and loop it. Do make a lower case letter, make an oval shape with a thick line on the le...
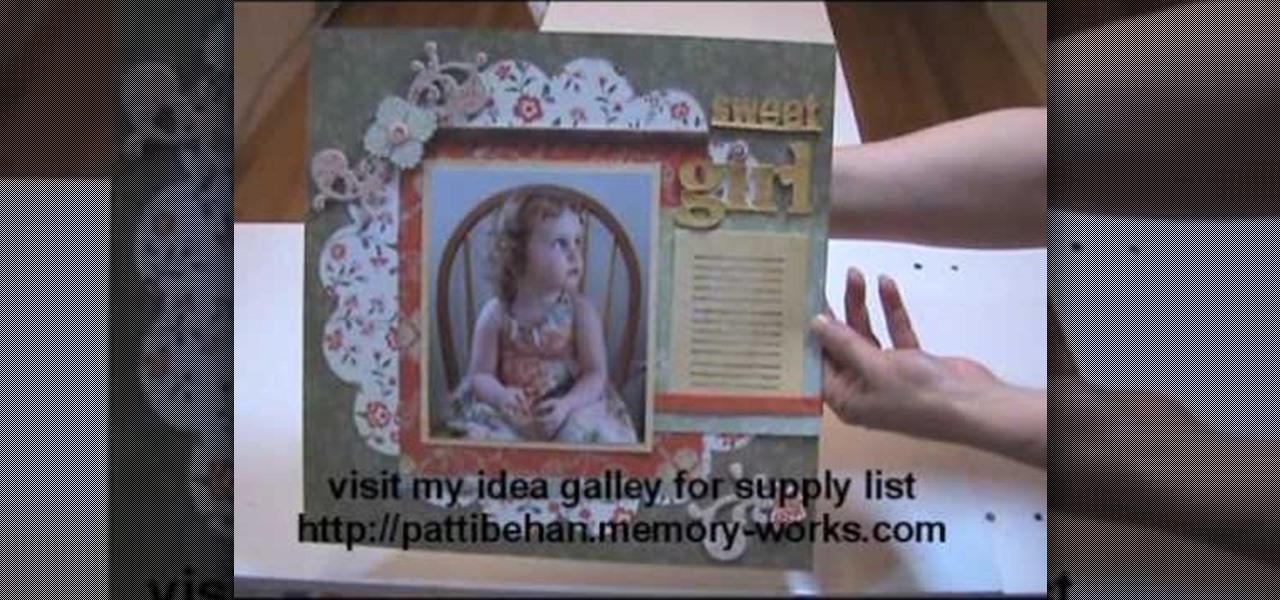
In this video, we learn how to use your Cricut to save money on scrapbook paper. First, place the mini monogram cartridge into your Cricut machine. Then, place your paper onto the 12x12 cutting mat. Now, load your paper into the machine, then press the scalloped circle and the fit to page buttons. Then, press cut and let the machine do all the work. Once it's finished, unload your paper from the machine and remove the outside portion of the image. Now, adhere it to the white piece of scrapboo...
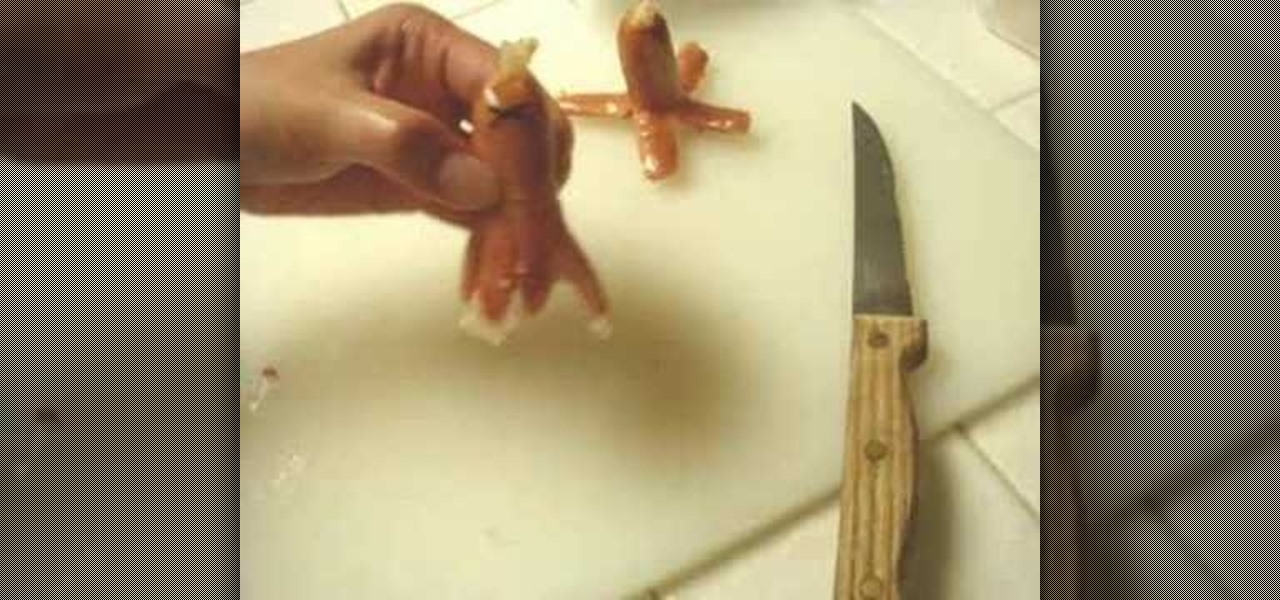
In this video, we learn how to make bento. First, you will need to purchase small quail eggs from a Japanese market, then place dried seaweed cut into two small circles on the top. Next, cut the middle of the egg with a knife, then pry it open to make it look like a knife. After this, take a small sausage and cut it at the bottom so there are eight pieces hanging, and it looks like a squid. Place an "x" cut out of seaweed on the top and cut the middle to make a mouth. Slice a strawberry while...
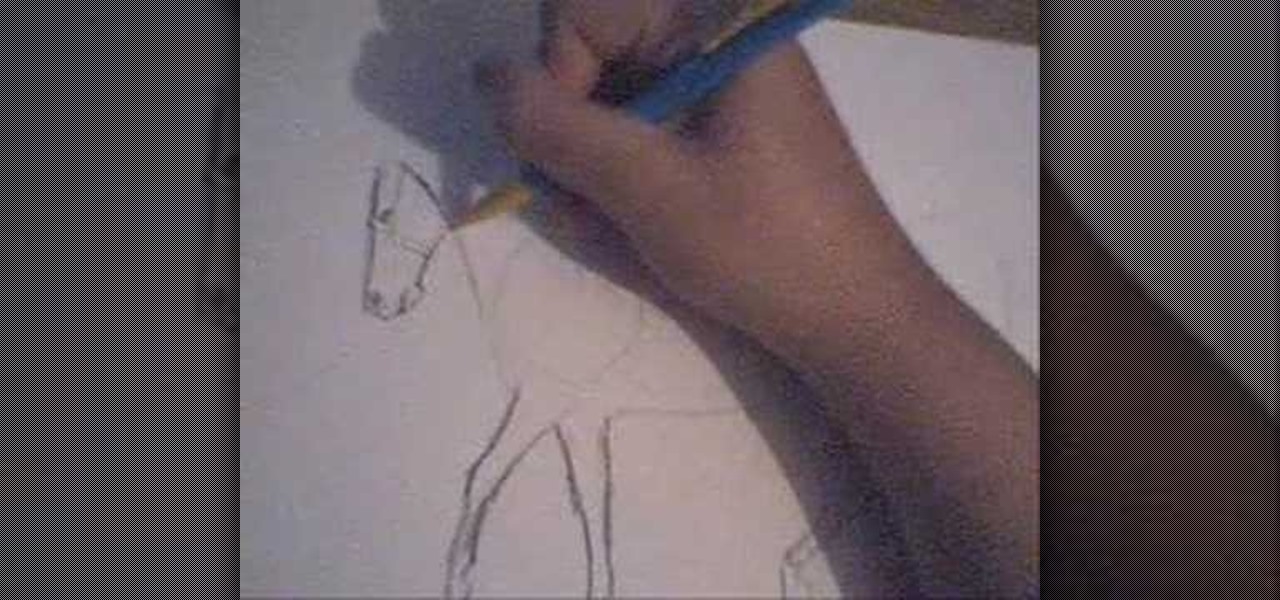
In this video, we learn how to draw a horse. First, draw the outline of the horse's body. Start with a circle for the head and wispy lines for the rest of the body. Make large shapes that connect to see where the mass of the body will be. Next, draw in the head, tail, back, and legs of the horse. After you have the outline finished, erased the lines inside of the picture. Now, draw in details on the horse. Add in lines to show where the hair is, then draw in the nose and eyes to the face. Als...
In this tutorial, we learn how to polish your boots to ROTC standards. You will need: Kiwi black shoe polish, scissors, and an old t-shirt or cloth. First, take your scissors and cut out a section of the t-shirt to make it the size of a wash cloth. Next, rub some shoe polish onto the cloth after flattening it and wrapping it around your index finger. Now, place your shoe on the table next to you and start to shine it over the entire shoe. Make sure you dip the cloth in water before and after ...
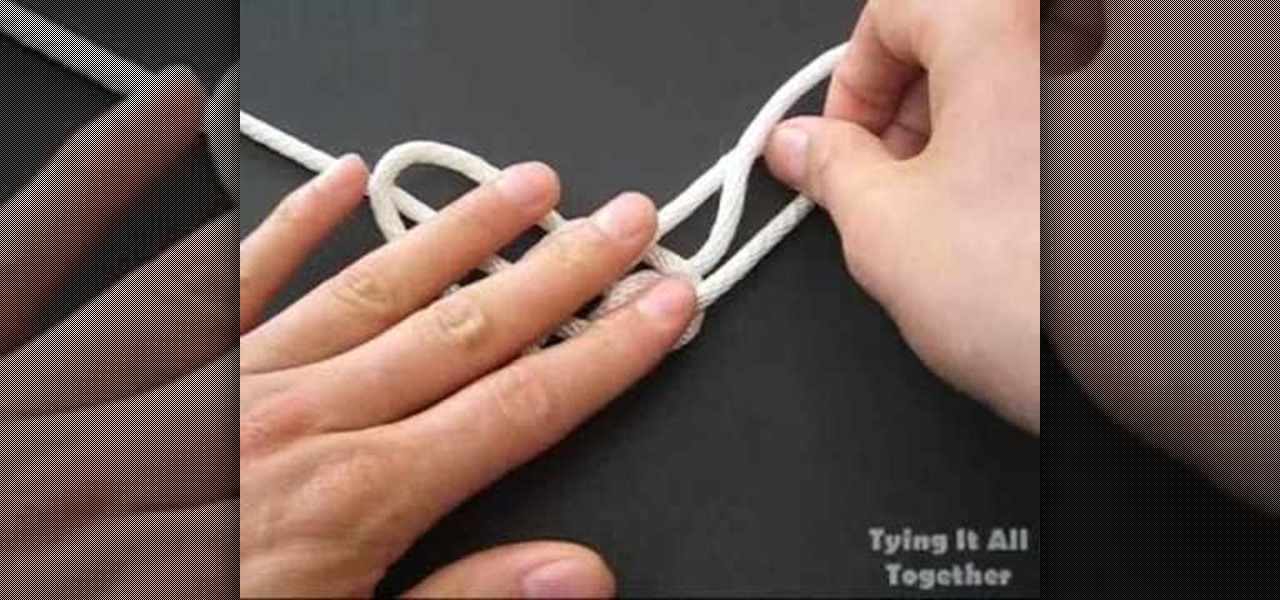
In this video, we learn how to tie the longhorn knot. First, make a spike with your rope, then push the rope around it and through it, making a circle. Then, push the loops on the bottom down and make a pretzel shape with it. Bring the left hand side string down and pull it through the loop, then do the same with the other side. Next, pull the strings on the top up to make larger loops, then pull the string through the left loop. Now, do this to the other side of the rope as well. To finish t...
In this video, we learn how to draw Naruto. Start out by drawing a circle as the outline. After this, draw the jawline. Next, draw lines in the middle so you know where you are going to draw the eyes and the rest of the facial features. Next, define the features on all the different parts of the face. Start to add in shading to the face, then draw in the hair. Next draw in a hair band at the top of the head, followed by spiked hair coming out of the top and ears on the side of the face. When ...
In order to make a ribbon tree, you will need the following: 50 2" pieces of ribbon, scissors, a hot glue gun, hot glue sticks, and a floral tree.
In this video, we learn how to draw a wolf step-by-step. First, draw out an outline of the body using circles and lines to show where the legs will go. Next, make the snout for the nose and then draw in the ears and the eyes. Next, draw in lines around the outside of the wolf to show that it has fur. Next, use a darker pen to outline the wolf, then add in details to the legs and the rest of the lower body. Add in a tail that is curved but not high in the air. When you are done, you will have ...
In this video, we learn how to draw a manga face sideways. start by drawing a round circle with a light pencil. After this, draw a chin that is from the side view. Next, add on the nose and make the chin look more prominent, like you are seeing the profile of the face. After this, draw on the ear to the center of the face, then start to add in further details. Make the eye and add shading by the nose to make it appear as though there's another eye. Add in eyelashes, then start to add in hair ...
In this tutorial, we learn how to draw different kinds of eyes. If you are drawing an eye from the side, make sure you show the eye bulging out of the eye, and show the long eyelashes and layers of the lids. If you are drawing an eye looking up, make sure to show the socket of the eye and the layers underneath the top of the eyelid. To draw an eye closed, you will show the brow bone and crease of the eye, as well as the lashes and the circles underneath the eye. There are a lot of different e...
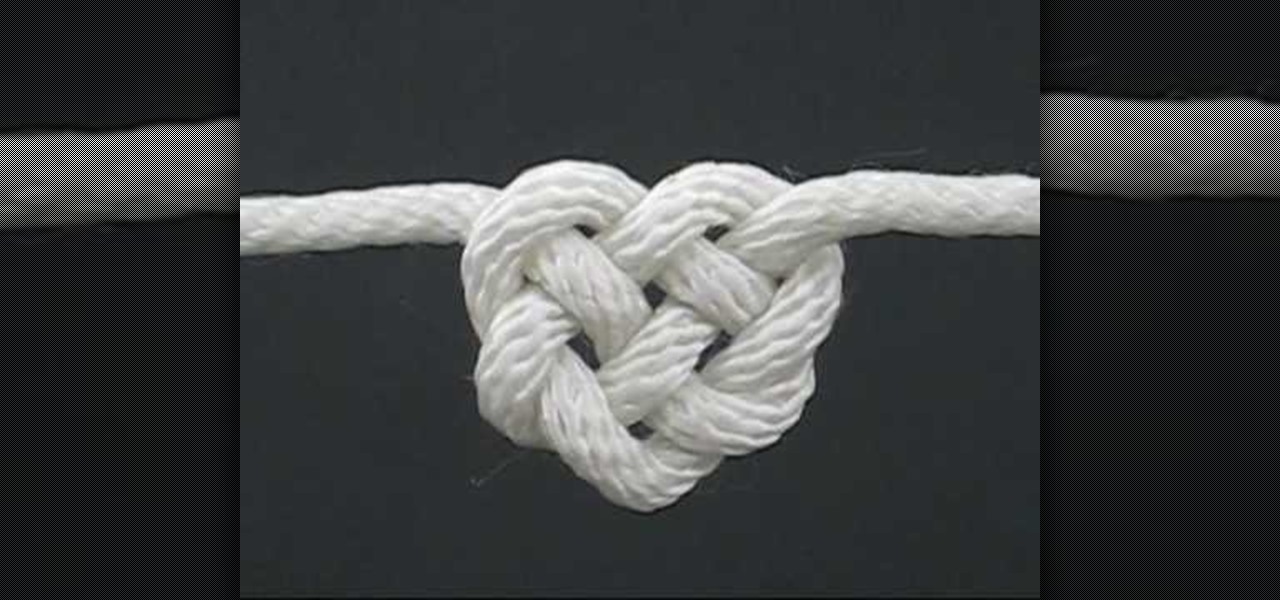
In this video, we learn how to tie the Celtic heart knot. Start off with your rope and make a loop in the middle of it. Now, bring the working en on the right side into the loop so you have a circle. Now, bring that end back into the knot and braid it through the other loop. Next, push this through the bottom loop, then braid it through the lines that are on the shape. After this, you will see a heart shape start to form. Pull gently on the heart with both sides of the rope and shape the midd...
In this video, we learn how to draw a cartoon fish with scales. First draw a circle for the body of the fish, followed by the details of the face and then the fins and tail. After this, color the background to look like the color of the sea. Now, take a black paintbrush and outline the details and body of the fish. Start to add in scales around the body that are small and colored red. After this, draw bubbles coming out of the fish's mouth. Color the fins and tail yellow, then color the eye b...
In this video, we learn how to make friendship bracelets adjustable. First, tape both sides of your bracelet onto a flat surface. After this, bring both ends into a circle shape at the ends. Now, take any color of string and make a loop with it over the ends of the bracelet. Now, put one end over the other and then put it through the bracelets and into the loop. Then, pull the end of the thread and put the bottom over and under the top piece. Then, put it through the bracelet and tighten it. ...
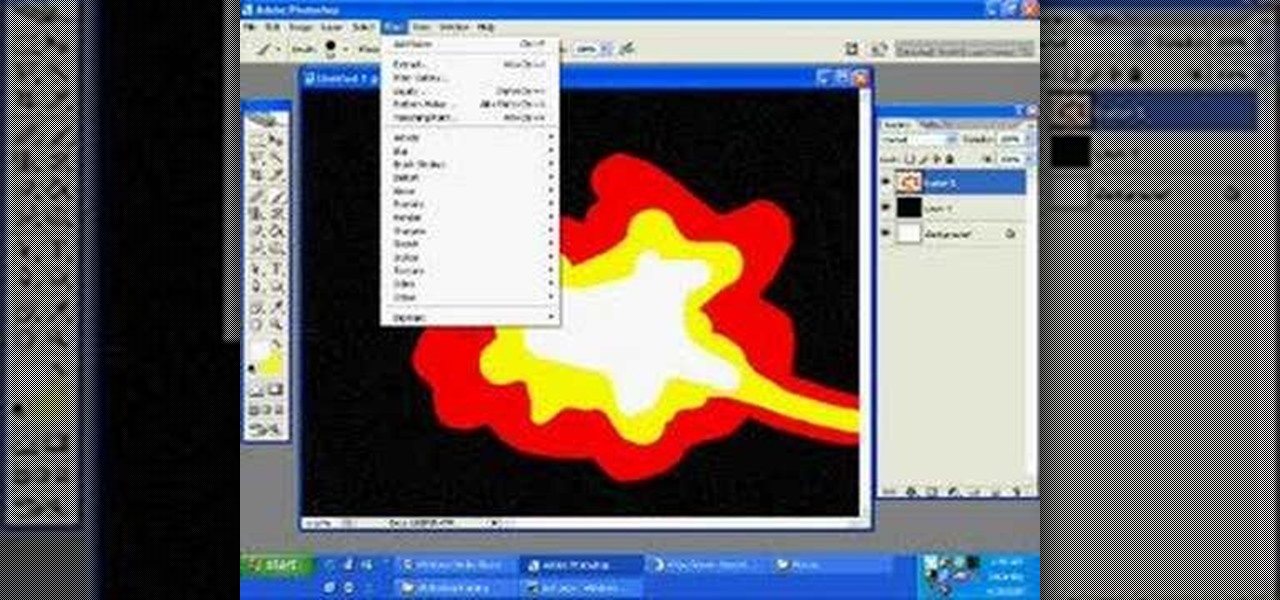
In this tutorial, we learn how to draw a galaxy in Photoshop. First, open up a new project and color the background black. Next, create different lines and circles inside of the black, and then blur out the image. Now, it will look like a galaxy in black space. Next, color a new background black and white with spots and mix it into the galaxy image that was made. Continue on to change different settings on the picture as you prefer, changing the opacity and different settings as you wish. Whe...
Drawing cylinders, like drawing circles, is easy stuff. But drawing perfect cylinders, minutely calibrated edges and angles and all, is often impossible unless you have the right method and the right tools. Rather than lazily sketching your way to a mediocre cylinder, why not improve your drawing and drafting ability by crafting a perfect one?
In this tutorial, we learn how to draw transparent objects. Start out using light pencil markings, and draw the basic shape of the bowl. After you have the round top and have make it three dimensional, add shading to the bottom circle in the bowl so that you can see the bottom of the inside. After this, add shading to the side of the bowl to give it a realistic feel like it's sitting on a table. Next, use your eraser to remove some of the shading, then fill in darker pencil marks onto these s...
In this tutorial, we learn how to draw Timmy Turner. Start off by drawing the head, making the front round and the body will be a triangle shape. The back of his head should be a triangle as well. Draw two large circles on the face, followed by arms and legs coming off of the body. Next, draw ears onto his face followed by a shirt and pants on his legs. Draw Timmy's mouth with a large smile and two teeth at the top. His eyebrows should almost touch in the middle, then don't forget to add on h...
In this tutorial, we learn how to make eyes for clay animation puppets. First, drill a hole inside of a block of wood, then insert a bull so it fits snug inside of the hole. After you have done this, use a drill to make a hole that goes half way down through the pupil. Now, use paint to fill in the hole where the pupil would be at. Push the balls into clay to hold them in place while painting. Make sure the dots you have on both eyes are even. When finished, paint a black circle around them, ...