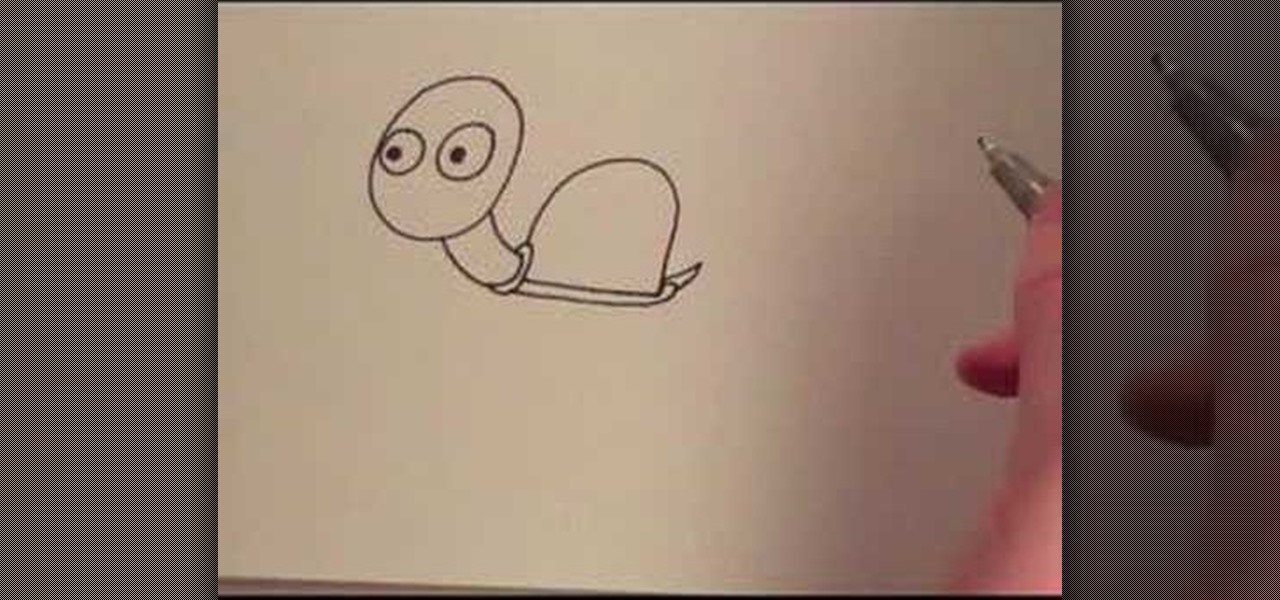
In this video, we learn how to draw a cartoon turtle. Start by drawing a circle with two large circles inside of it for eyes and a head. Next, draw a long neck for the turtle leading into a small shell. Make the bottom of the shell flat and a small tail sticking out of the back. Next, draw four feet coming from the bottom, then shade the back feet. Draw scales onto the shell, then draw a cute smile onto the turtle. Next, draw toes onto the feet and you will be done with your cute turtle. you ...
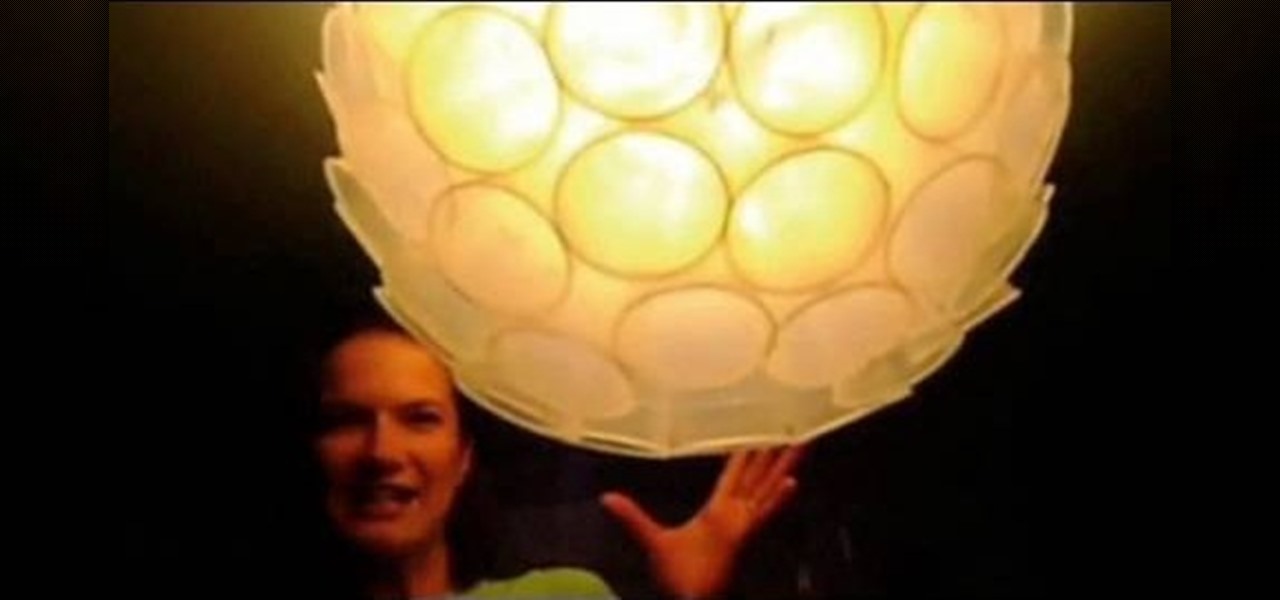
In this tutorial, we learn how to make a lampshade out of plastic cups. First, you will need to purchase clear plastic cups and use a stapler and tape. To start, lay your cups on the ground with the bottoms facing up. Now, take your tape and tape the cups together two at a time, then connect all the cups in a circle. Next, use your stapler to staple the cups together, going two at a time. Start adding more cups around the circle of original cups using the stapler. After you get to two cups wi...
This is a video tutorial that is showing its audience how to draw Winnie the Pooh from Disney. The first step in drawing Winnie the Pooh is to draw a light circle that will end up being Winnie's head. Then draw construction lines through the circle for the mouth, eyes, and nose. Next you should draw the eye line off of the construction line that you made earlier. Next lightly sketch his other facial details such as his mouth and nose. Then you should draw his ears on and detail his facial str...
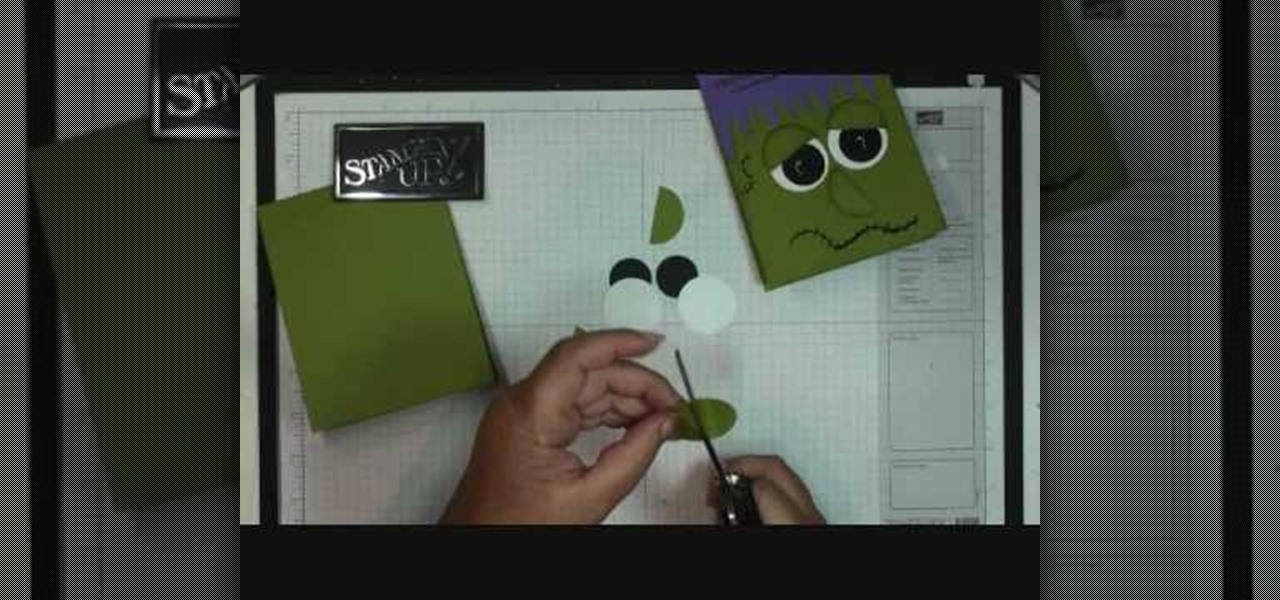
In this video tutorial, viewers will learn how to make a Frankie card. This video provides all the materials required to make the card. The materials required include: old olive card stock that is cut at 4 1/2" x 11", lovely lilac card stock that is cut at 2 1/2" x 5 1/2", stylus tool, Smarty Pants stamp set, 1" circle punch with 2 black card stocks, 1 3/8" circle punch on whisper white and old olive card stock, glue and a black market pen. This video will benefit those viewers who enjoy art,...
Want the beautifying, bag-reducing benefits of green tea eye mask but, you know, without all the green tea? You're in luck! With prepared tea bags, you'll never have to taste a drop of delicious, salubrious tea ever again.

In this tutorial, we learn how to draw skulls the easy way. First, draw a round circle on the page followed by a smaller one connected at the bottom. From here, draw in two sideways triangles on the middle of the large circle. Then, draw in lines on the face and create the section of the nose. After this, draw in large teeth on the skull and then connect lines around the circles to make the jaw line. After this, draw on lines around the skull to make it look like it has depth. Then, shade in ...

In this tutorial, we learn how to draw Sango and Kilala. Start out by drawing a circle and reference lines for the head, then draw a stick for the body and draw a half circle going off the bottom of the page. Then, draw circles on the upper body to create the hands and draw fingers coming off of those. Now, draw in the neck and the clothing that is on the character. Erase the background lines, then all in the features of the face and the hair around the head. Also make sure to draw on the ear...
In this video, we learn how to draw Karin. First, start drawing a circle and then add the eye line to help you place the eye. After this, draw in a triangle at the bottom of the circle as a reference to where the chin will go. Then, draw in a line for the body, then circles for the body and shoulders. After this, draw in the neck and then draw the rest of the body. Now, draw in the hair and the details of the face. Once you have finished this, erase the background lines from the face and then...
In this tutorial, we learn how to make a paper snowflake from scratch. First, take a CD and trace around it on a piece of paper so you have a perfect circle shape. After this, take your scissors and cut out the circle. Next, take the circle and fold it in half, then fold it from the right to the left in half again. Then, take it and flip it so the "v" is pointing towards you, then take it from the right to the left and fold it again. After this, face the point away from you, then use your pen...
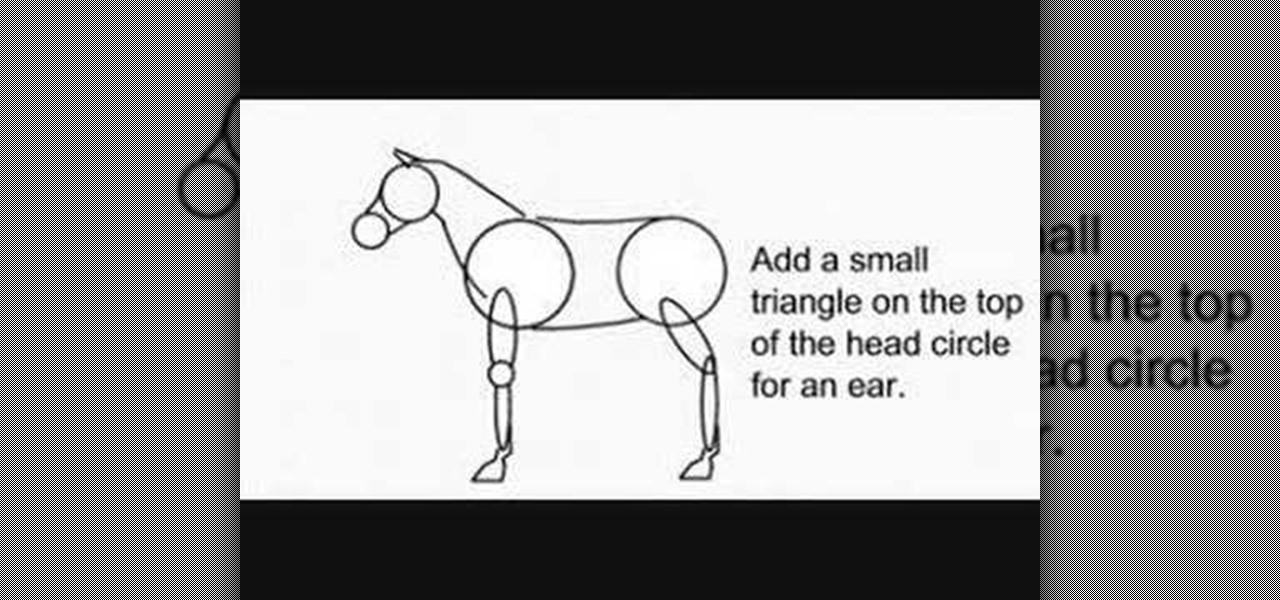
In this video, we learn how to draw a decent horse. First, start with two circles connected by two curved lines. Next, add a sausage for the top of each leg and add a small circle for the front of the knee. Then, add another for the lower part, and add two hoof outlines at the base of each leg. Then, add the back of the hooves. Next, draw two more lines that are far apart at the bottom and narrow at the top for the neck. Then, draw two circles for the top of the head and the muzzle. Join the ...
This is a video tutorial in the Arts & Crafts category where you are going to learn how to make mini album pockets. Take a 6 x 6 piece of card stock and cut it at 3 1/2. Now score it at the halfway mark and fold it backwards. Next score it at 1/2 from both longitudinal edges. Then you cut out along the 1/2 score line on one half of the card. Take a 2 1/2 " circle punch and punch a circle out of scrap paper. With this draw a semi-circle on the wider half of the card and watch the video for fur...
The circle of fifths sounds like some sort of "Lord of The Rings" council of high elves, but all this term really denotes is how major and minor scales are connected on the piano (a lot more boring than the high elf stuff, we know).
In this tutorial, we learn how to draw a daffodil for St. David's Day. Start off by drawing a circle to measure out where all of the different petals are going to go, then draw a circle in the middle you know where the middle will go. Next, start to draw out the petals onto the circle. After this, draw the middle of the daffodil with the seeds that are in the middle. After this, draw the lines that are in the middle of the leaves. You might want to use a real flower for a reference picture on...
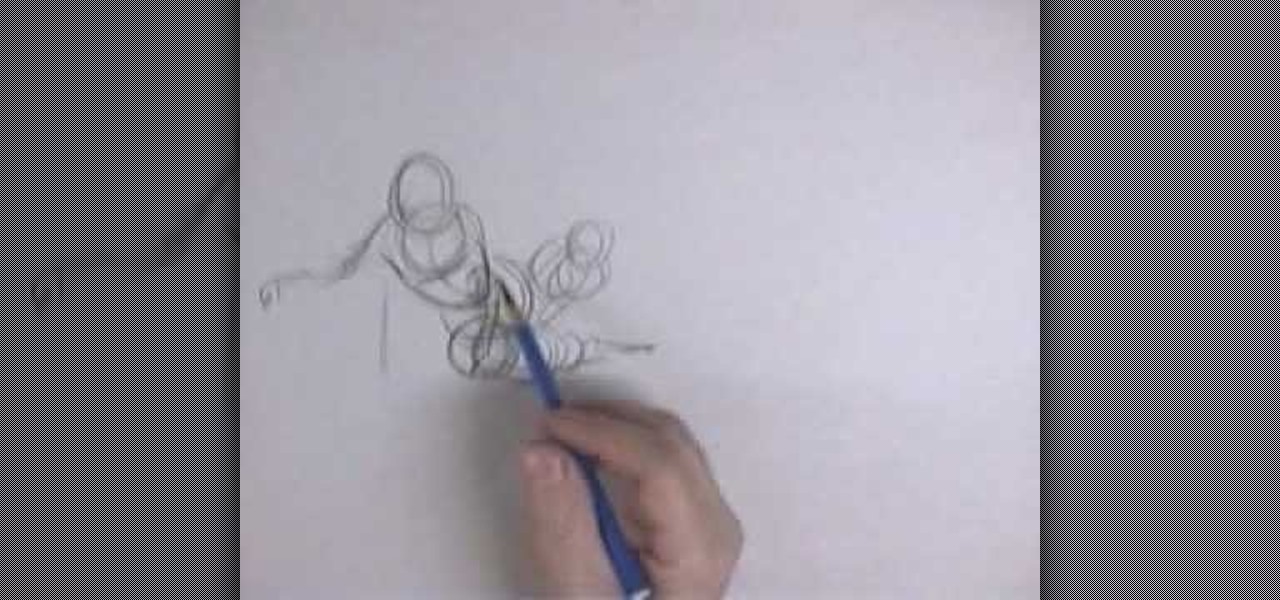
In this video, we learn how to draw foreshortened figures. First draw a circle and then continue drawing other circles to connect them together and make an out line. After you have drawn these, you will start to outline the circles so you see a body detail coming out of the drawing. Draw in the legs and the arms as well as the head. Don't worry about adding details to this, it's all about drawing just the figure. Shade on the different areas and add in lines to make the figure look more reali...
In this tutorial, we learn how to rotate and revolve cameras in Maya. First, go to create primitives on the menu at the top. Next, create a camera and pull it out onto the circle. Now, click the camera and then the circle, then hit the 'p' key on the keyboard. Now, you can rotate your circle around and it will rotate on the y axis. To set this, click on 50, then type in 360 on the 'y axis' space. After this, hit 's' an you will have a key frame. You can change the settings as you prefer, then...
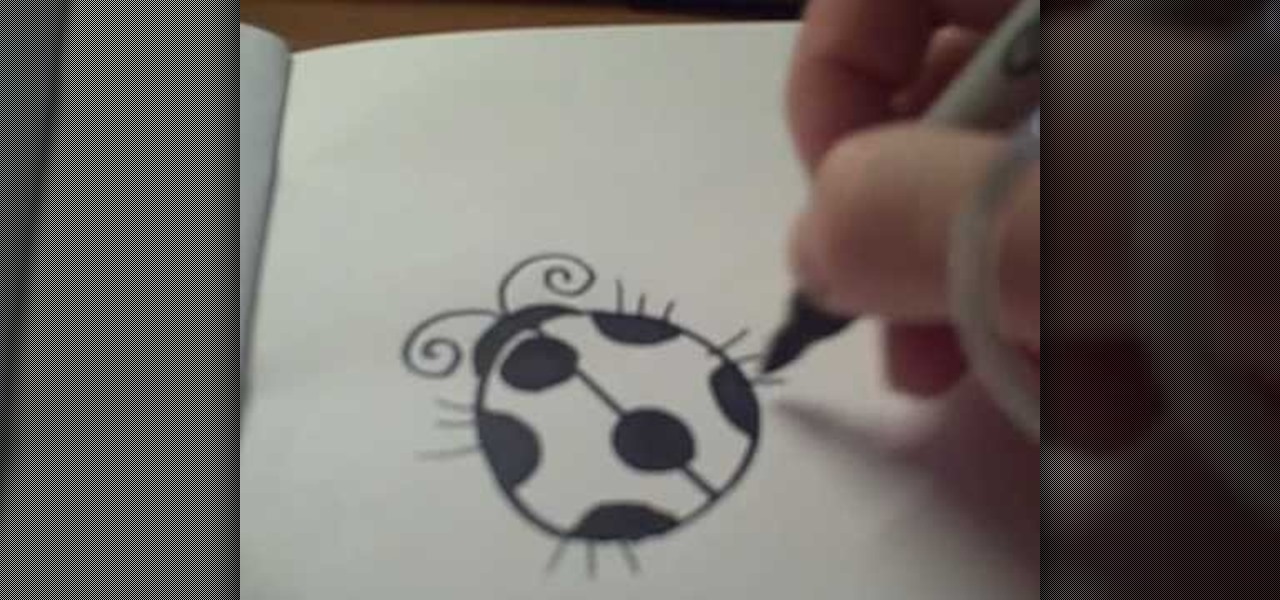
In this tutorial, we learn how to draw a cartoon ladybug. Start out by drawing a circle, then draw a line down the middle. Next, draw and color in some dots all over the circle. After this, make a head by making a half of a circle over the straight line. Now, add antennas to the head and color in the head. You can also add in legs to the ladybug if you prefer, or keep them off. When you are done with this, you will have a cute ladybug in just a few minutes. This is a very easy picture for kid...
In this tutorial, we learn how to draw a fun bunny doodle. To begin, draw an upside down triangle with two straight lines coming out of the top middle. Next, draw a half circle over the eyes, then draw two large bunny ears on top of the half circle. Then, connect the curls on the end of the ear to the bottom of the head. Now, do an additional line to make the inside of the ear. After this, draw another circle around the bottom of the face, then draw a line with two humps at the bottom of the ...
Creating skirts just got easier. You can even make a skirt reminiscent of the ever-famous Marilyn Monroe. Become a chic stylista just by wearing this adjustable circle skirt. This video provides the steps required to make a circle skirt, otherwise known as the Marilyn Skirt.
Have you decided to learn how to draw? Are you looking for a cute new character to doodle during math class? Well, you have clicked on the right video!
Hayley P. shows her viewers how to apply makeup with a foundation brush to reduce the appearance of dark circles around the eyes. If you follow her instructions, you will reduce the appearance of dark circles and you will look more awake.
A compelling and quick moving tutorial on making the Windows Vista logo with Adobe Photoshop. The logo can be made quick without going too in depth into some of Photoshop's more advanced features. Starting with a circle a gradient shade is layered over the shape. Two circles are cut out and shaded white to give the circle a 3D feel. Then adding a drop shadow to the entire shape really gives it the logo's appearance. The windows themselves within the logo are cut to shape and copied and moved ...
This video demonstrates how to paint a rabbit in leftover ground ink. The style used is called sumi-e. Using a the side of a thick brush, create a filled in circle in the center of your page. This will be the head. Below this circle, add an elongated abstract oval shape for the body. Add a small circle at the back bottom area of the body for the tail. From the top back of the head, add two long thick lines for the ears. Using the thin tip of a brush add the details of the face including the n...
This is a video about how to make a greeting card in circle shape. First take the card and fold it into half. Next take the colluzle and place it on the card. Mark a circle using colluzle on the card. Cut the card on the marking and leave some space at the folding of card. Take the design paper to place on the card. Next cut the design paper in round shape. Make sure that the shape should smaller than the card you have already prepared. Next stick the design paper to card. Next take one ribbo...
This illustrate us how to make paper mache mirror. Here are the following steps.Step 1:Take a piece of cardboard and make two circle on it with two different circumference.Step 2: Now cut through the outer circle as well as the inner circle to obtain the rim.Step 3 : Now take a sheet of cardboard and cut it in shape of a flower.Step 4: In the center of the sheet place the rim.Step 5: Now along the petals of the flower stick a pile of rounded newspaper.Step 6 : On this newspaper and cardboard ...
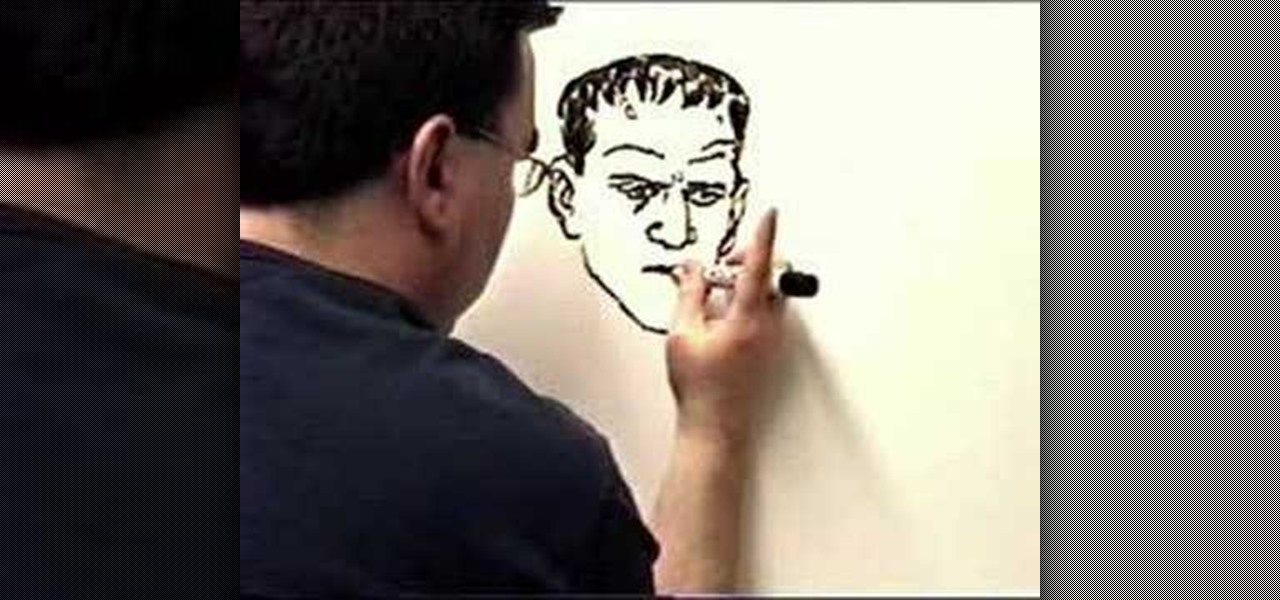
`This video illustrate how to draw Frankenstein's monster. Here are the following steps.Step 1: First of all take a sheet of paper and a pencil.Step 2: Now draw a oval circle representing the face of the monster, draw a big circle within the face showing an open mouth.Step 2: Draw small circle within the face representing the eyes.Step 3: Now draw a free hand mid part from the lower face .Now from this mid part extend two hands with waves to represent masculine look.Step 4: Draw two legs from...
This video illustrate us how to draw a graffiti character. Here are the following steps:Step 1: First of all take a paper and start drawing a semi circle and then from this semi circle draw another semicircle bigger then the previous one.Step 2: Now draw two oval within the semicircle and one small square showing the face and the belly of the character.Step 3:Now draw two lines sideways to the character and draw a small circle on these lines showing a tree.Step 4: Now write free hand letters ...
Ian shows us how to draw Yoshi from the Mario Brothers video games. First, you draw three quarters of a circle, for the snout. Next, on the top right edge of the circle, before the opening you've left, you draw two ovals on top of it for the eyes. Next, finish out the circle (snout) by connecting the bottom end with back of the farthest-right eye, using a outward-bulging line. Draw a smile at the bottom of the circle, then fill in the eyes with a black oval in the bottom right corners of both...
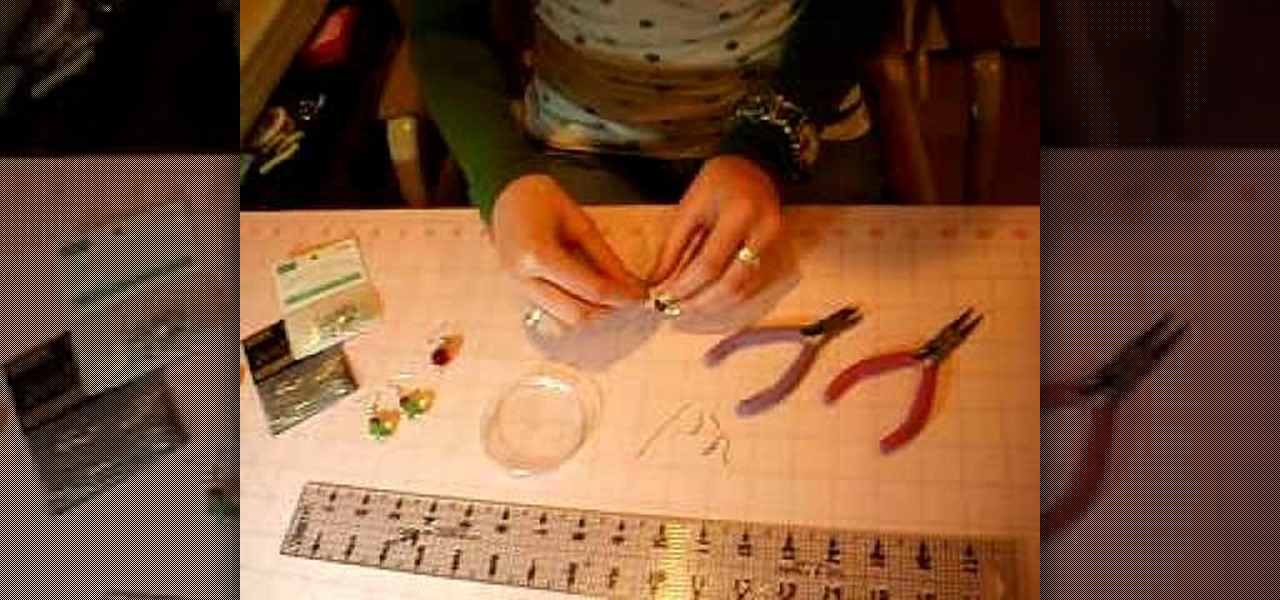
To begin you will need to gather the following supplies: needle-nose pliers, wire cutters, two fish hook wires, two head pin wires, and a few beads of your choosing. First take the head pin and string your beads onto the head pin. Once all of the beads are on the head pin bend the top of the pin at a 90 degree angle, then cut the wire about 3-4 cm from the top of the wire. Next use the needle nose pliers and bend the wire into a circle, place the fish hook wire on top of the head pin wire to ...
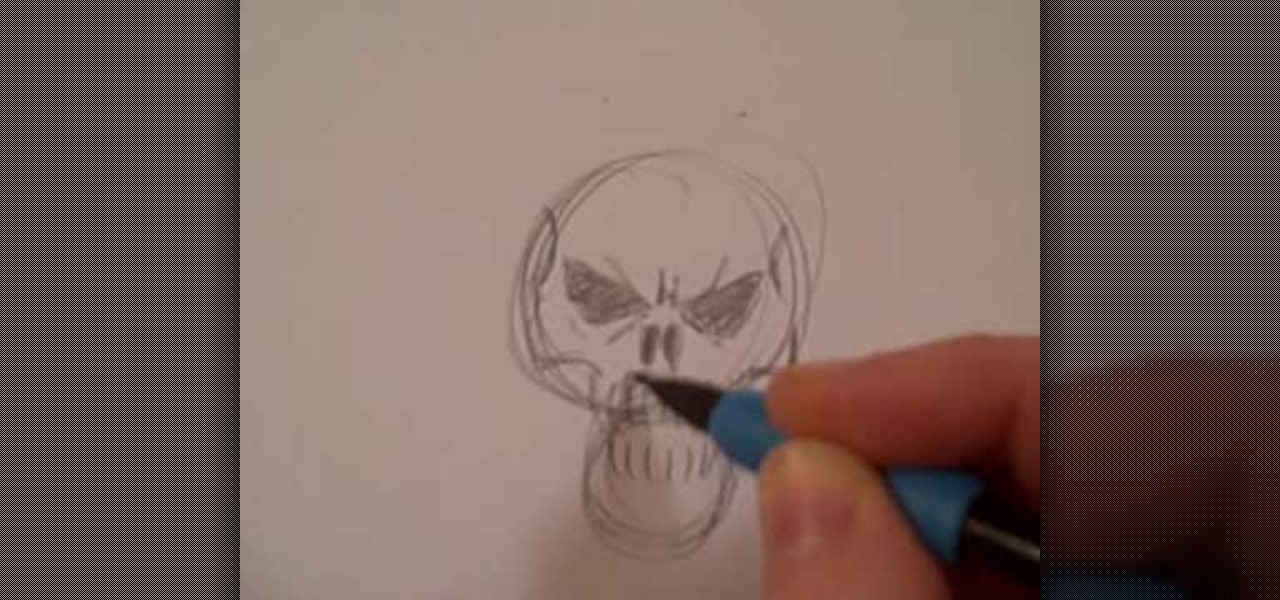
This short video shows how to draw a skull with a pencil. The video contains no spoken or written description of the process the artist in the video is going through, so to duplicate his drawing, you'll have to just watch and draw along. The artist starts the drawing by making two circles vertically, the lower circle being about half the size of the upper circle. He then adds the nostrils, eyes, and teeth, before going on to add some definition to the jaw area, making it look like a complete ...
Here you'll be shown how to take the equation of a circle, and convert it into standard form. Also, it will be explained just what standard form is, while running through the process of conversion. You'll be able to use techniques to quickly work off the numbers on the equation, one by one, until it's simplified enough to understand. Complicated algebra functions become much simpler when you see these easy to use techniques, that will help you rearrange the equation into a form that is actual...
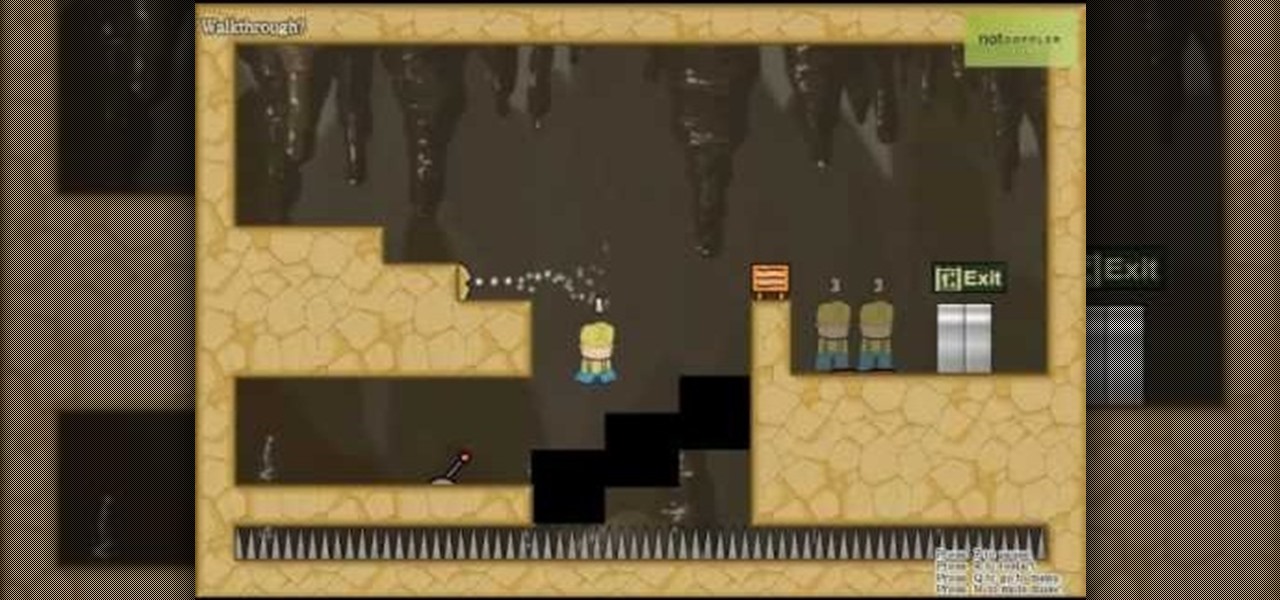
In this video walkthrough guide, see the flash game Best Friends Forever 3 being defeated. An odd game title, isn't it? But that doesn't mean it isn't fun. So, if you need some help winning against Best Friends Forever 3, then watch both videos. In the first video, watch Levels 1-17 defeated. Then watch the second to see Levels 18-33 beat. To get the bonus circle on level 6, you'll need to get a later bonus circle that unlocks the "high jump" ability. Same with the level 21 bonus circle.
You will need the following materials: a Green Galore #101768, cut at 4 1/4" by 11' scored at 5 1/2", a piece of Whisper White #100730 cut at 2 1/2" by 1/4", Real Red #102482 cut at 2 3/4" by 1/2", a piece of Whisper White for the door to release the treats from the card, cut at 2" by 2/12", a strip of Real Red cut at 1" by 5 1/2" and a circle of Green Galore with a 1 3/8" circle punch #104401. First use the larger piece of white and the stamp set #120780. Use the clear block #118485 and Gree...
The first thing you have to do is draw a line of the same length as the radius of the circle you want to draw. Then, open the compass the same size as the line length you draw is. Rotate the compass and you will create a circle. Please note that drawing this on a single sheet of paper can be difficult because the paper can move. Also, you can try rotating the paper, instead of the compass.
This video shows you how to easily draw a Pokémon step by step. The first thing you have to do is draw 3 circles for the head, tail and body. You can always start off the ears with little circles, and then add the little pattern on the face, which consists in two circles, one near the other. Then, make the ears (please note that the ears are very sharpen). Then the face legs and belly. The front legs are kind of pointed, while the back legs are roundish. Draw the tail, which looks like an axe...
To create Converse shoes nail design, you will first apply a base coat in the color you want the shoe to be. Tape off to create a shoe top and paint white. Pull off the tape, but not too soon or line will be uneven. Take a darker color of base coat make a curve on both sides leaving the middle so it's shaded. Repeat on the other side. Using black outline the white nail tip. Using silver make circles, while the polish is tacky make holes in the circles. Using white make little lines for stitch...
Mike gives us useful tips to make different sizes of baby socks with this video tutorial. Directions:
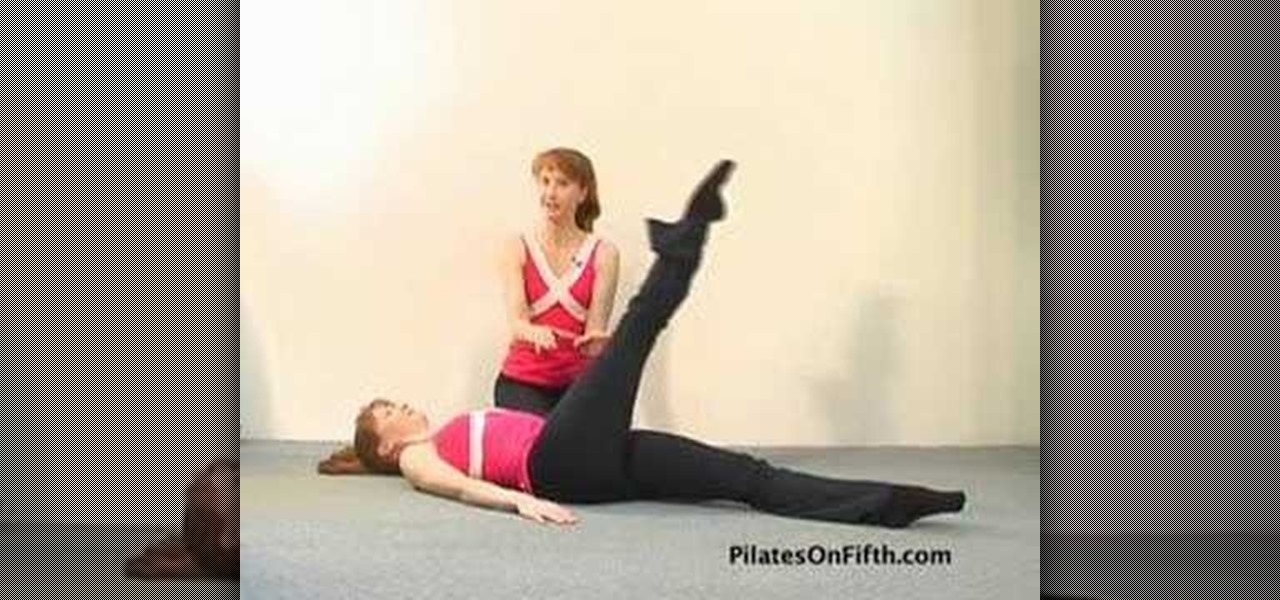
The one leg circle is an original pilates exercise that challenges stability of the pelvis in neutral to strengthen the core and flatten the abdominal muscles. Pay attention to the modifications we mention so that you can choose to bend one or both knees as necessary to make sure you get the most out of this exercise. Though hamstring flexibility is important, it isn't the goal here. Watch this how to video and you will be toning your body with the one leg circle pilates exercise in no time.
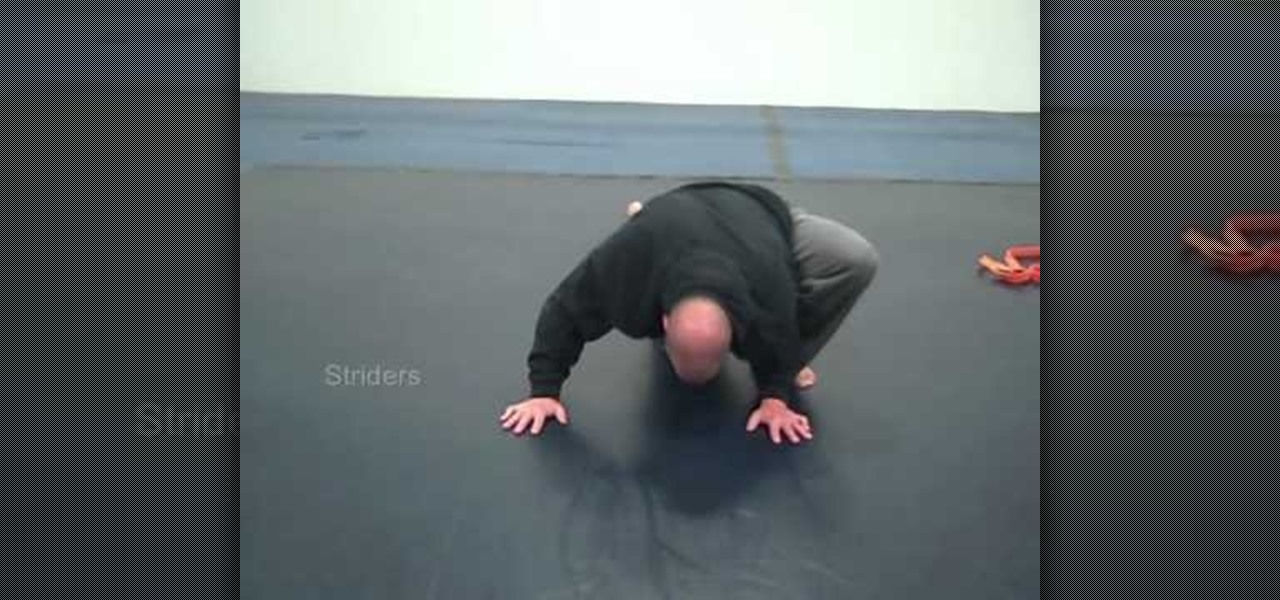
Whether you're preparing for a thirty minute bout of interval running or for an intense weight lifting session, warming up is vital to building heat in your body so your joints are lubricated and there is less of a chance of injury. Warming up before exercising also boosts your metabolism so you get your heart rate up early and burn more calories during your workout.
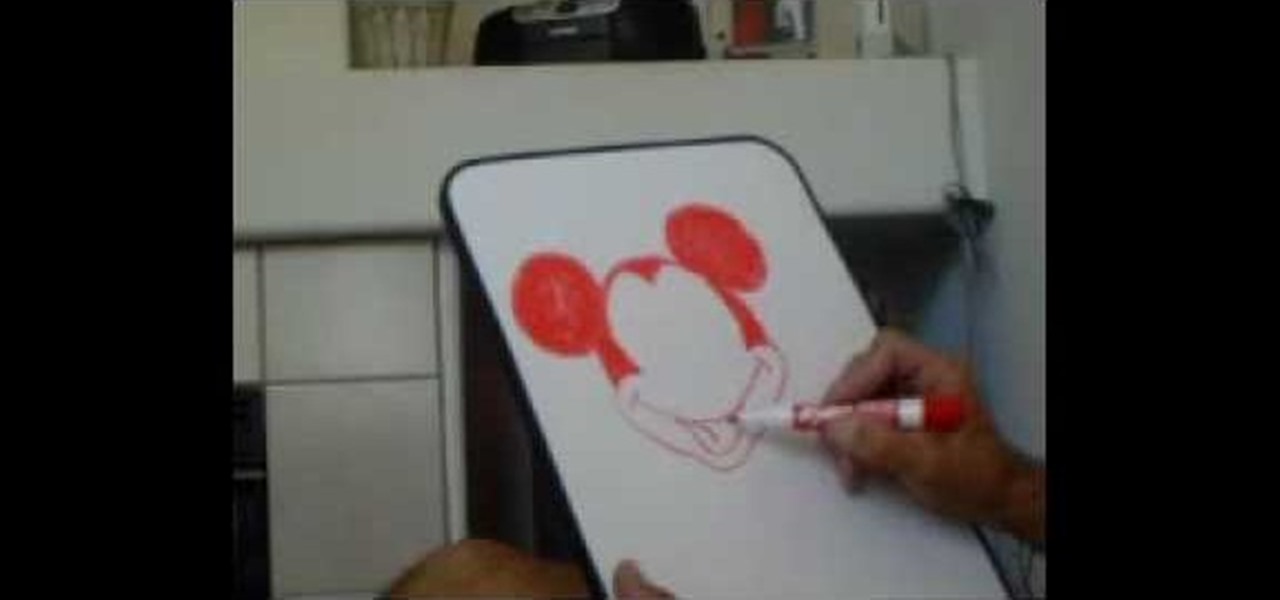
In this video, we learn how to draw Mickey Mouse on a dry-erase board. Start off by drawing a circle on the left hand side of the board, then draw a half circle with another circle connecting to that on the right hand side of the board. Now, connect another half a circle around the sides, to help shape the face. Next, make an "m" shape on the top of the face going down to the sideburns and fill this in. Color in the ears as well, then make a rounded v-shape at the bottom of the face to make t...
This video shows how to make a cute vintage looking jewelery box. A cardboard cheese box forms the body of the jewelery box. Other items you will need include mod podge, white glue gesso, masking tape, ribbons, a mirror from a compact, some fabric, and some faux pearls and flowers. Begin my removing the labels from the box. Paint the inside and outside of the walls of the box and the lid. Paint the areas of the box that you just primed with gold metalic paint. Now use the box to trace three c...