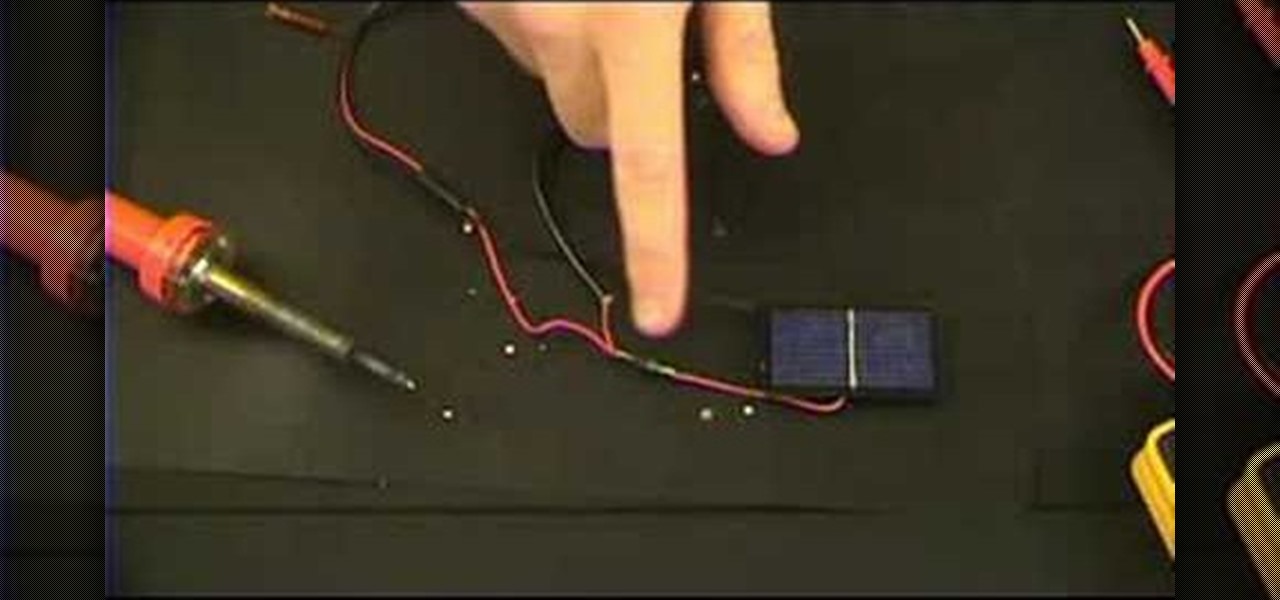
An emergency battery charger for your mobile phone comes in handy, but it's not the ultimate solution; once it's dead it's useless (what a waste). If you want to really get off the metaphorical grid, you can follow the steps in this video to construct a more robust circuit that will not only bail you out of an inconvenient situation but also recharge in between uses. The simple addition of a low voltage solar panel and rechargeable batteries makes this possible. Enjoy!

This CAD software tutorial shows you how to work with lights and materials in Pro/DESKTOP. This is an advanced tutorial that will show you how to add materials to a figure, add lighting, backgrounds and export the image. Rendering completed images is an important part of working in ProDESKTOP since it showcases your final products. Learn how to make your models good with lights and materials in this Pro/DESKTOP tutorial. This video is best viewed full screen.
This video shows how to make a spinner out of a piece of paper. Fist take out a normal sheet of paper. Then fold it in half. Cut at the crease for it to make two equal pieces. Fold both pieces in half. Then fold the two edges of the paper to make a triangle. Then do the same to the other piece. Now put one piece on top of the other. Fold in the flaps one by one but leave the final flap alone. Instead of folding the final flap tuck it under the black pocket. Fold the paper in to a triangle and...
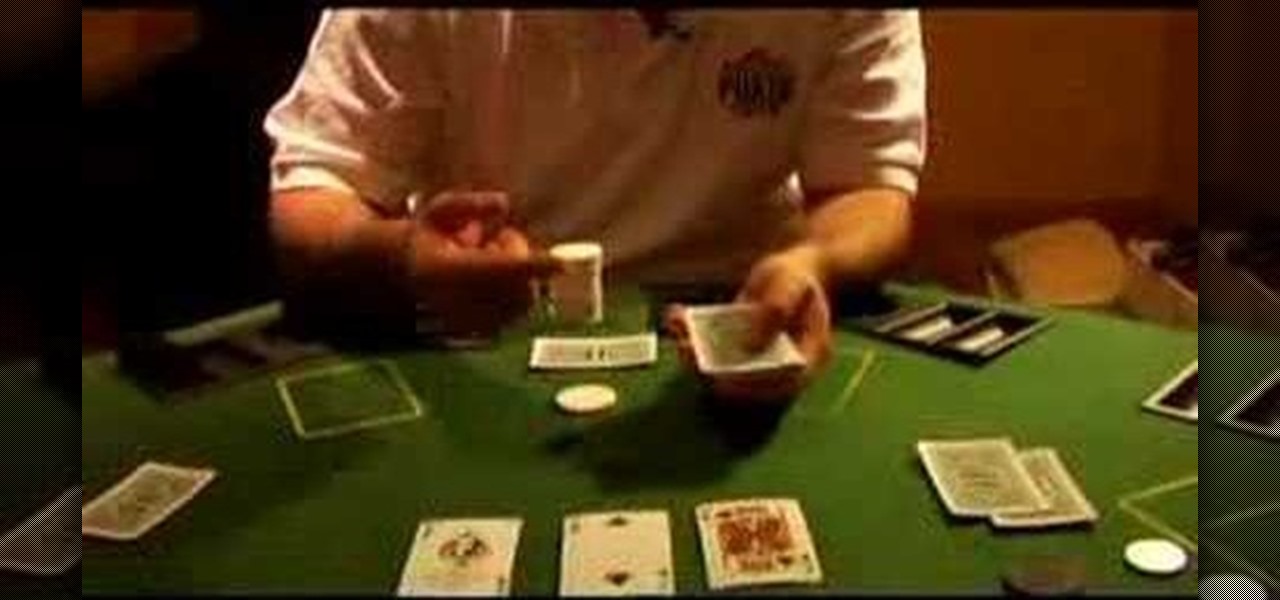
This video shows you the basics of dealing a hand of Texas Hold 'em. When dealing you always start off dealing the cards to your left; deal two cards to each player to start the initial round of betting. After the round of betting is over you "burn" one card by placing it face down, then turn over three cards called the "flop". This is followed by a round of betting. Then you burn one card and flip over one card called the "turn". This followed by another round of betting leaves you to burn o...
While Apple's AR wearables development continues clandestinely, its mobile ecosystem is laying the foundation for the software side of its smartglasses, with Apple Arcade serving as the latest example.
Update 6/20/17: Olixar, a smartphone case manufacturer, has released images of an iPhone 8 case design. While at first glance this might seem to confirm the iPhone 8's final design, 9to5 Mac reports that Olixar admits they produced these renders based on "information and schematics they've acquired through their factories and contacts in the far east."

Like previous installments in the Pokémon series, as you progress through Pokémon GO you'll be able to evolve your Pokémon into more-powerful monsters with new and more-damaging attacks. However, unlike older entries in the series, your Pokémon won't simply evolve when they reach a certain level. Instead, you'll have to "feed" them a certain amount of character-specific candy to induce the transformation.
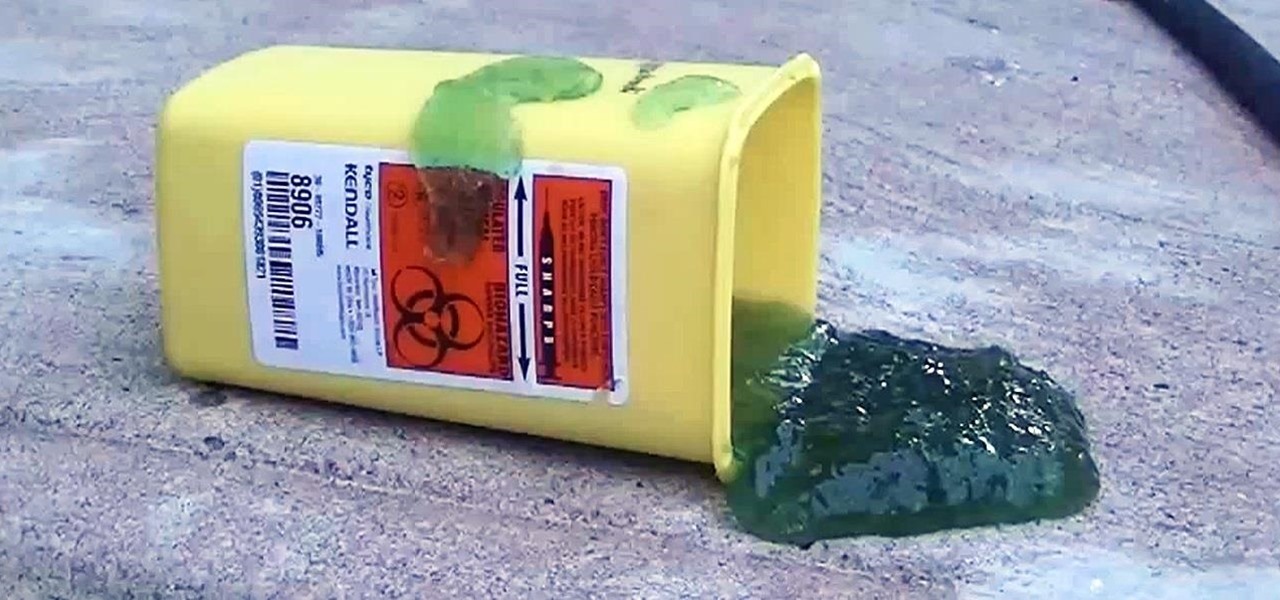
This slime is toxic-free and can be used as either a kid toy or to make a great prank. This slime can be made in just a few minutes and doesn't require much for materials. Our video explains in detail how to accomplish this project with step-by-step instructions.
Your average sit and go player will probably stick to the single, 9 or 10 person tables that are commonly found at all the popular online poker rooms. However, your more adventurous players aren’t afraid to try out the multi-table sit and go’s like the 180 man SNGs when they get a chance. But there are a few things players should keep in mind before starting out with the MTT SNG tournaments.
If you've ever taken a university course with an awesome professor, you're more than likely acquainted with the precious and all-glorious cheat sheet. Like the midterm, the professor usually allows a one-sided cheat sheet for the most important exam of the class—the dreaded final. I should work on my final, but I'd rather just sit here and be a douchebag.
Yeah, it's not done yet! But it will be soon!!! I had an exam today and that was my last one so I will hopefully be done before I leave for Perth this weekend! :)
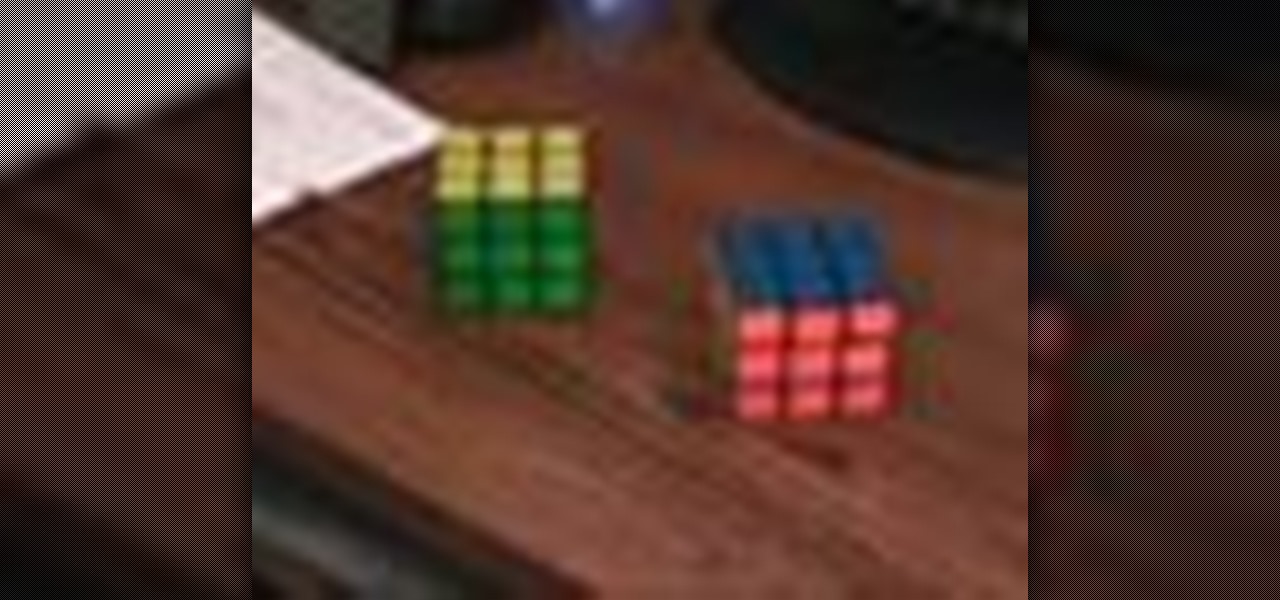
Want to solve that pesky Rubik's Cube? Well, look no further. This four-part video will tell you all you need to know about solving it.
Can you believe this popular new iPad or iPhone game was designed and created by a thirteen year old? There are two separate ways to solve the final puzzle in the game Bubble Ball, and this video shows you both.
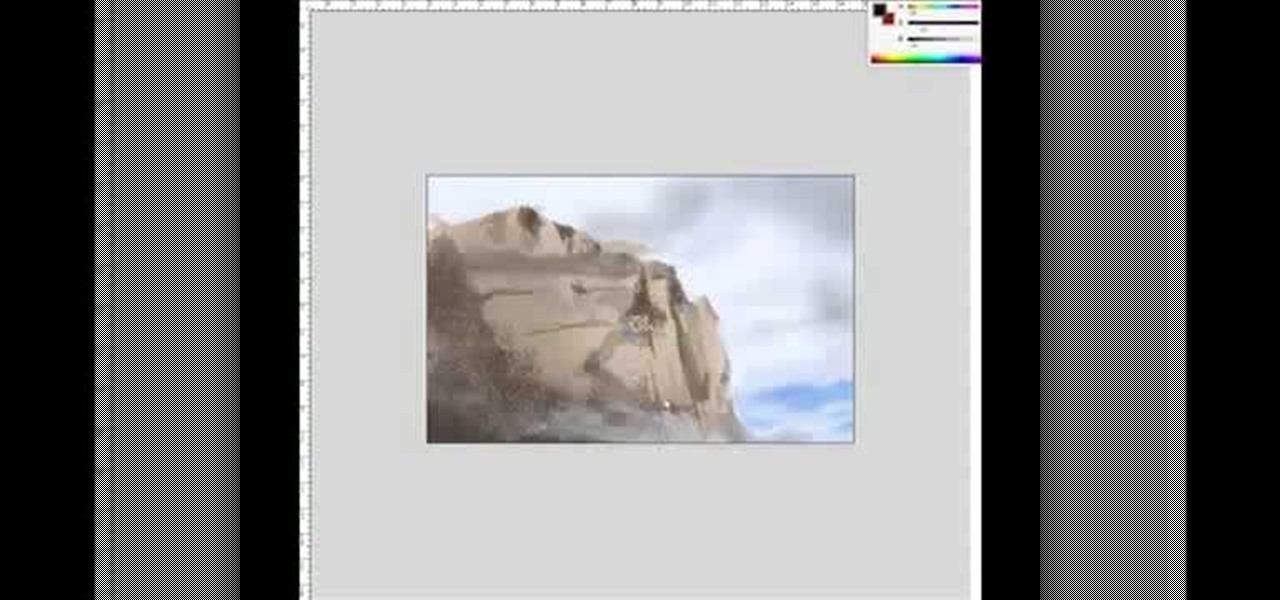
How to draw and paint rock cliff mountain environmental concept background. This landscape scene is created in a video demonstration using Photoshop. his step by step video shows you laying down the base color, blocking in shape for painting, assigning value and color composition, and refining detail for the final concept painting.
The first step to create a boomerang paper airplane is to take a square piece of paper and measure to make sure it is a perfect square. You must then fold all of the corners of the cut of paper into the middle and then fold in half. The wings must then be folded down on the two chosen side. The final step is to fold the wings up to give the crease and cut of paper it's boomerang like shape. The video ends with examples of the type of flight that can be expected from a boomerang shaped paper a...
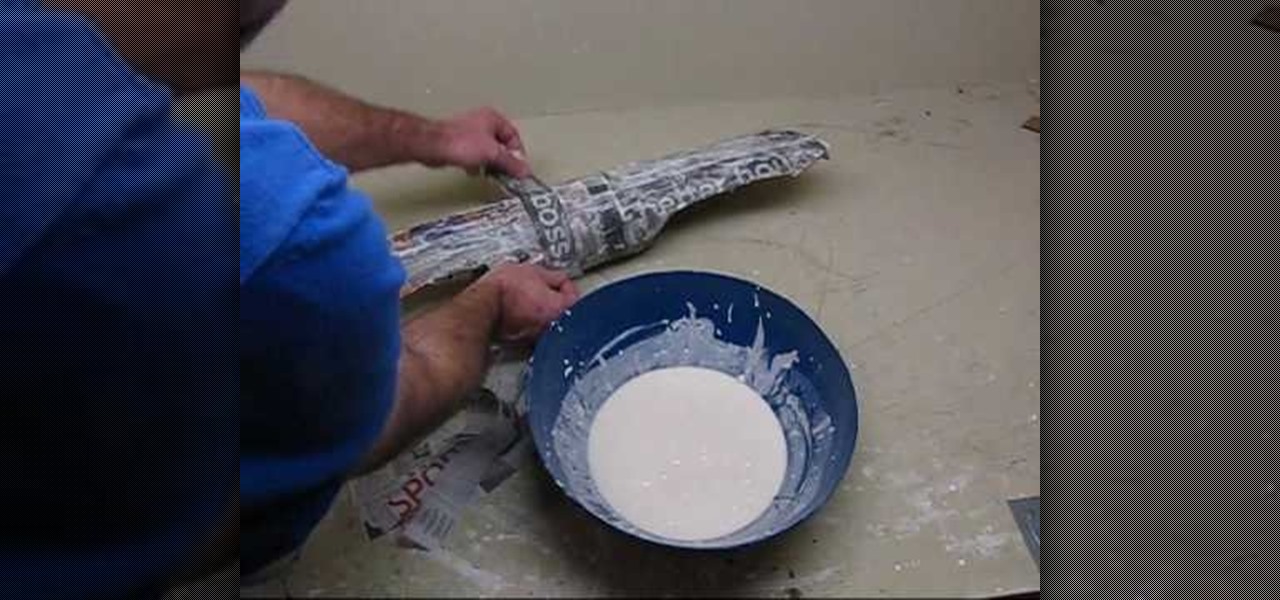
The first part of the video shows examples of completed Spartan leg guards. The materials needed for this project include boxes of cardboard, two liters of soda pop, gold paint, masking tape, scissors and wire. you must first print out the template shown by the narrator and use it to cut out the leggings to the appropriate size. Now use the two liters to fold the cardboard around the two liters to give the legs their shape. Once the cardboard has shape use the wire to hold to the paper in it'...
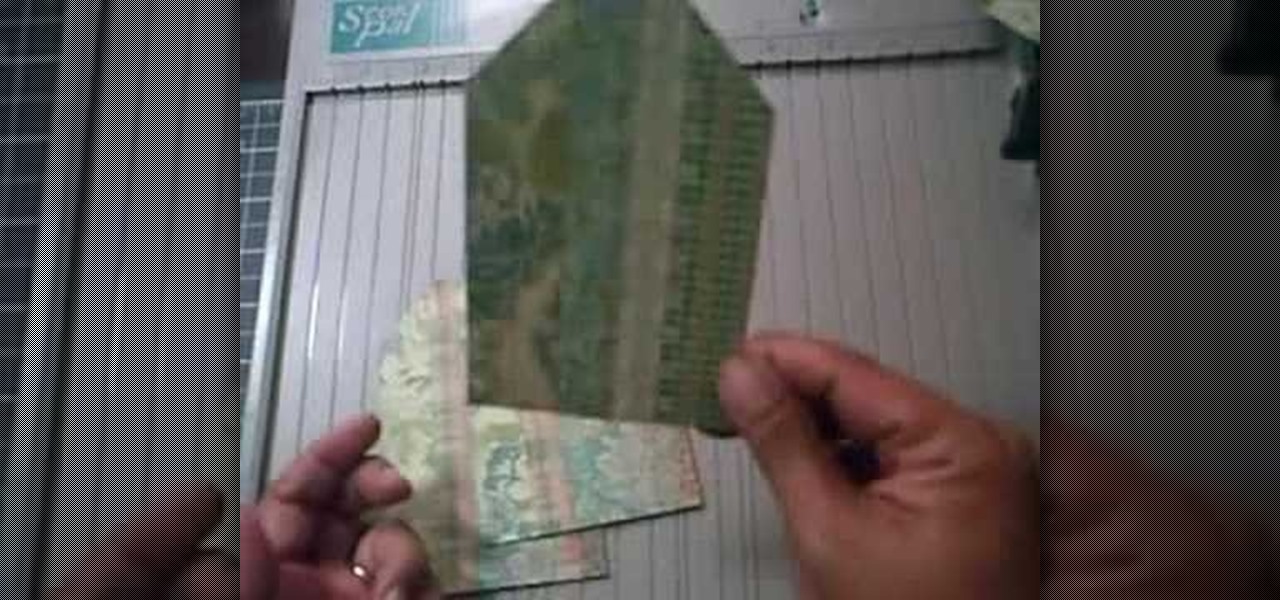
This video explains how to create a 4z4 tri-fold mini album. The first step is to score your designer paper at four inches and then fold along the score mark. The previous step is completed three more times until you have four score marks along your paper. Three separate pieces of paper are then cut measured at three and half inches. Your chosen picture is then glued into the center of your original twelve inch panel. using the three individual pieces of paper you must glue them around the pi...
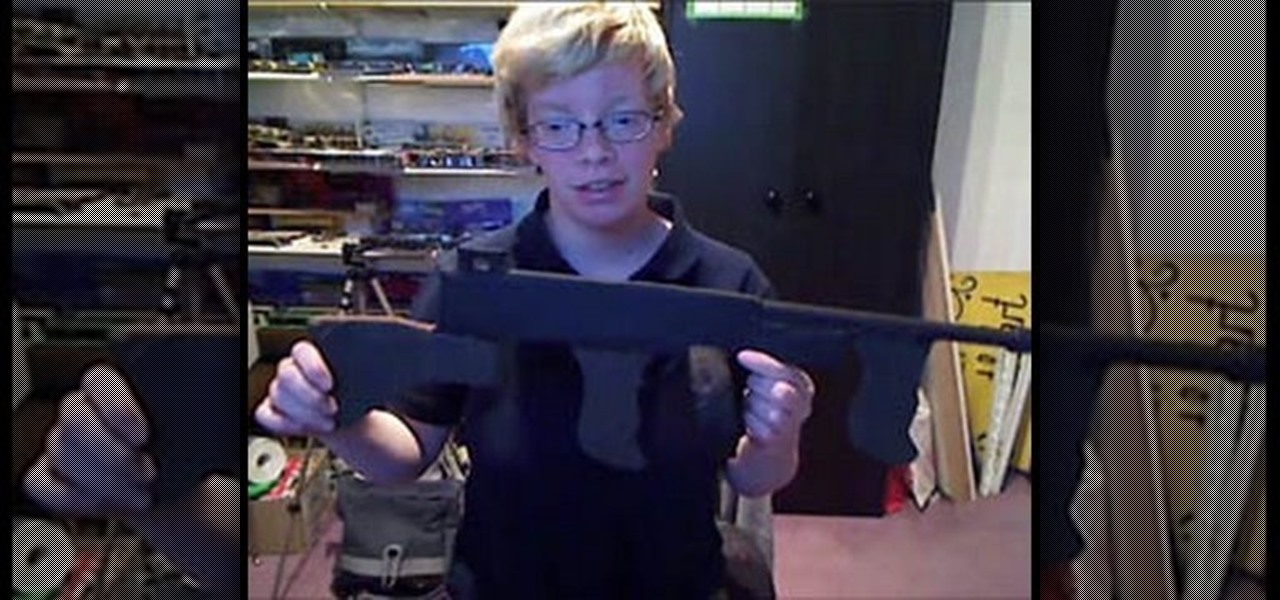
This video begins by showing the necessary tools needed to make a prop tommy gun out of a cardboard base. The first step is to trace a simple handle shape on the cardboard and repeat eight more times until you have eight exact copies of the handle. Then using an image of a tommy gun make an outline on the gun to cut in another piece of cardboard. You must cut and make eight more copies of the entire gun body to have the appropriate thickness for realism. The handle must be glued to the gun bo...
This video explains how to create loose curls and hair waves using only a curling iron. The first step is to treat your hair with some heat treatment spray so the curling iron cannot burn the hair being curled. The next step is to hold all of your hair up above your head and remove hair until your bundles are only an inch thick. After you make your hair into around seven one inch strands you can start to use the curling iron to straighten the hair. The last step is to roll your hair around th...
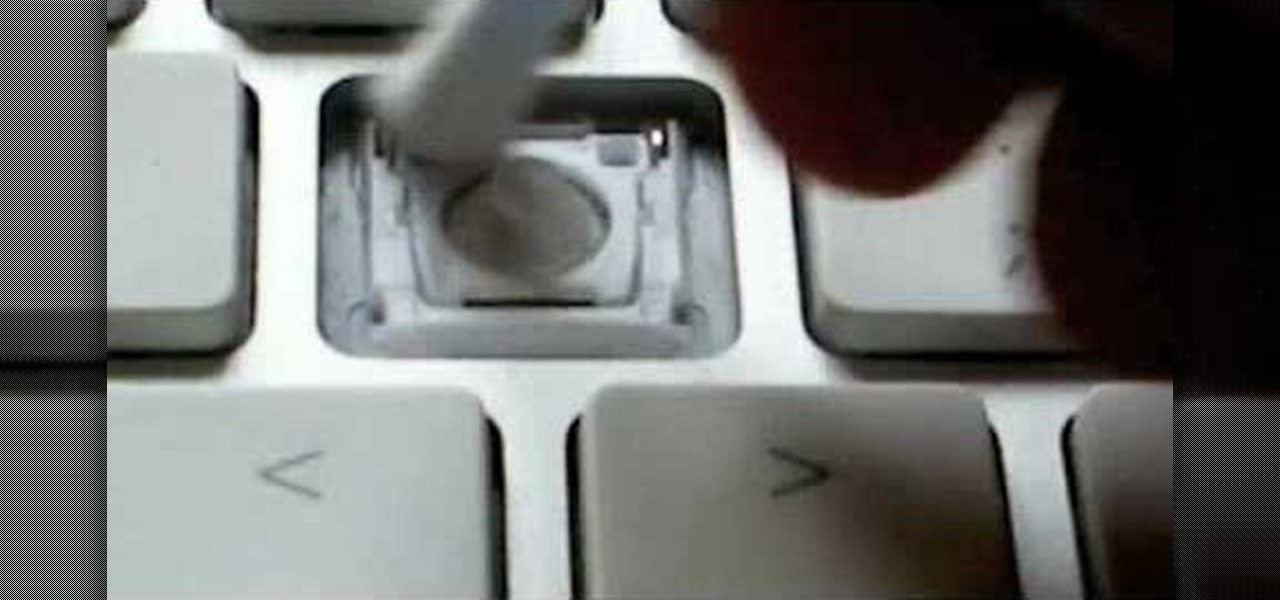
In this video, we learn how to clean your Mac computer keyboard. You will need to have iKlear and iClean to do this, along with a microfiber cloth. To start, you will take off the tops to each of the keys one by one. After you remove one, you will place the cloth over the top of it and then spray it. From here, you will clean the key off and then replace it back on the keyboard. After this, repeat for each of the keys until you have cleaned the entire keyboard. Give it one final wipe and then...
The first step in this video is to draw a rectangle on a piece of paper to gauge the length of the hair stokes. The artist then makes long pencil marks along the inside of the rectangle that are much less defined towards the middle. It is explained that you need to go in one direct with your pencil strokes as going back and forth gives an unrealistic final product. It is shown that you must begin at the beginning of the hair source and bring the strokes downwards for more realism. Four exampl...
This video begins by showing what a folding painting canvas looks like and what the final stretched canvas should look like. The first step shown is to make sure the bars are measured and marked with a simple A and B for easy measurement recall. After a wood frame is added over the canvas you must fold the material over the back of the wood and nail in place. Once the canvas is nailed to the frame you must add A, B, C and D markings to continue proper alignment procedure. The last step shown ...
This video contains different techniques to draw Naruto Sage Mode. The first step is to draw the basic outline of the characters face along with the ears and nose. After completing the basic outline the eye outline and details are then placed. The Lips and nose are drawn third to finish the basic features of the character. Dark shading around the eyes must be completed to give Naruto sage mode more realism and detail. The hat is one of the last parts of the character created involving a simpl...
You've made it! The final confrontation with Lord Vader is upon you, here in level 9 of Star Wars: The Force Unleashed 2. If the Dark Lord of the Sith is giving you trouble, watch this video for a walkthrough of the last level of the game.
For all of you who are knot fans, here comes a video tutorial showing step by step and in detail how to tie an Emperor's hat knot that realistically resembles one of the hats worn by Chinese emperors in the old days. In this video, a white piece of rope hanging from a hook is used against a black background. You will see each one of the twists and turns in slow speed (not in slow motion) so that you can easily follow what is being shown. The final result is a complex knot done in less than fi...
In this tutorial, we learn how to draw a Chibi Orochimaru from Naruto. Start off by drawing the outline for the character, then add in the details for it as well. After this, you will start to draw in the shading and the additional lines to give it more details. Then, you will need to erase the background lines that you used as a guide to draw the final product. From here, you will start to shade in colors on the character and then draw in any additional details or facial features. To finish ...
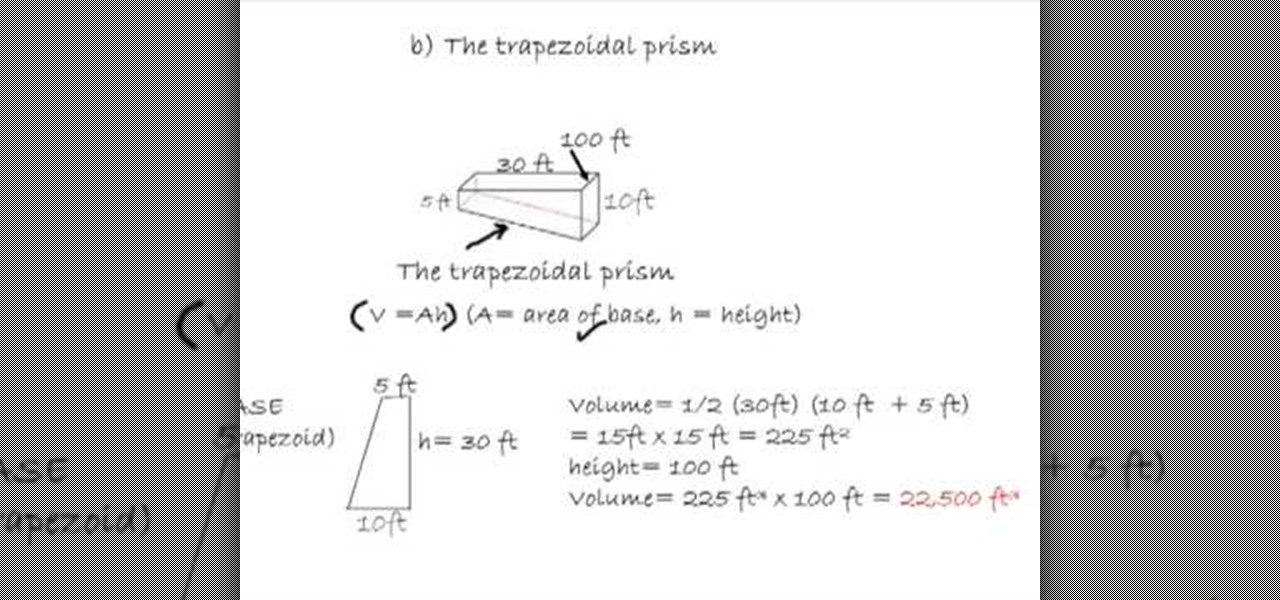
In this video, we learn how to find the volume of a swimming pool. To do this, you will first need to find the measurements of all the sides that are on the pool. After this, you will plug in the measurements that you found into the equation to find the volume. This equation is: V=AH, volume= area(height). So, plug in the area and the height to the equation for A and H and then multiply these two together. Once you do this, you will find the answer! Don't forget to label the units on the fina...
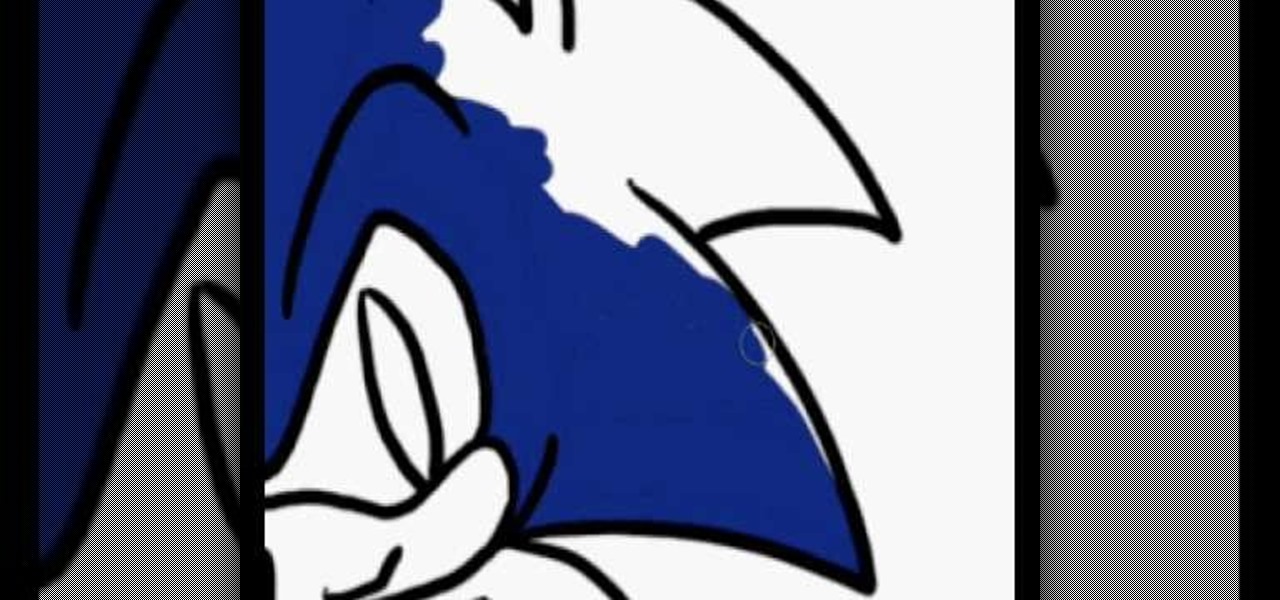
In this video, we learn how to draw Sonic the Hedgehog in Photoshop. First, draw a circle on the page and then draw the eyes onto him. After this, draw on his ears and then his hair around his head. After this, draw in the rest of his body and his feet. From here, use a darker paint brush to create the final outline of the character. Draw in the lines around Sonic to make him appear more realistic. Then, color him a dark blue color with red on his shoes. When finished, save this drawing and y...
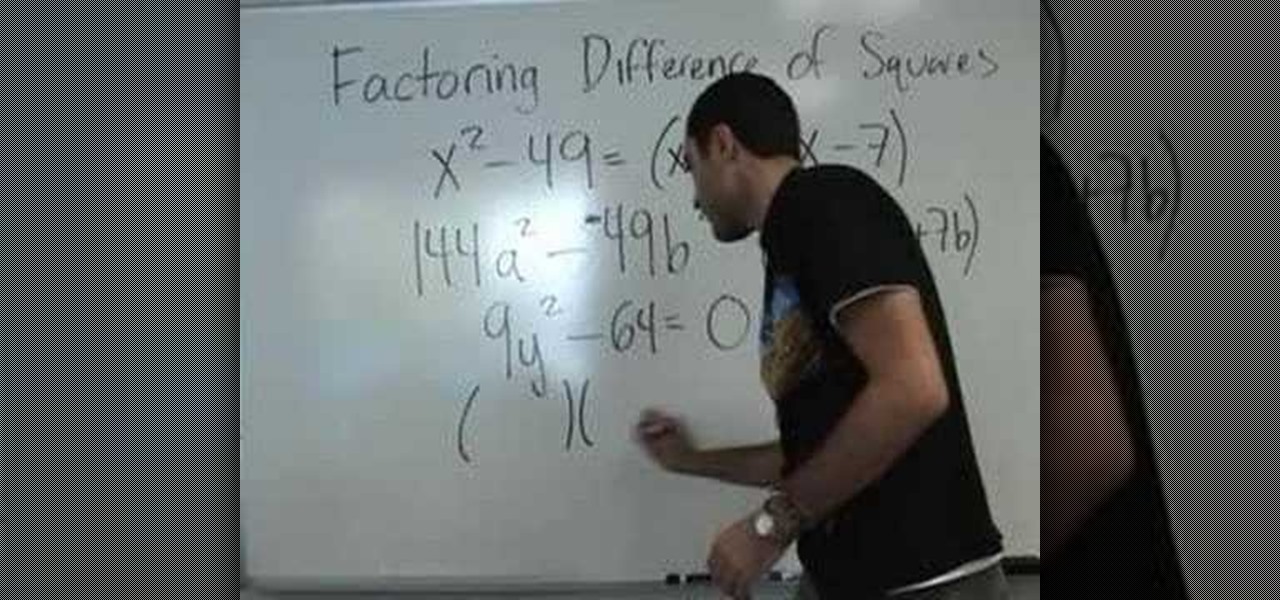
A video that demonstrates one of the basic techniques involved in factorizing an equation that contains the difference of two terms which are also perfect squares themselves and are equated to 0.
In this tutorial, we learn how to draw Danzo. To start, you will draw the outline with the light touch of the pencil. After this, draw in the final outline darker and then erase the background lines. Next, you will add in the details around the character and then add in lines to show creases and make it look more realistic. From here, you will add in shading to make the drawing have some more depth. After this, you will finish up by cleaning any stray lines with an eraser. You can also use th...
Factor a trinomial by grouping
In this video, we learn how to draw Naruto Fuuton Rasen-Shuriken. To start, you will first draw the outline with a light pencil. Then draw it darker over the outline with more details to make the final outline. From here, start to add details into the middle and then draw on the entire body. From here, draw on the clothes and make sure to put the lines on to show the folds and creases of them. Draw on the details of the face and finish off cleaning up any lines that aren't needed. Shade in wh...
In this tutorial, we learn how to draw Naruto 4-tails. First, draw the outline of the characters and the four tails. After this, draw in the rest of the outline in the final stages using a darker stroke of the pencil. Start to add in the details of the figure of the body and then add in the shading around the sides. Make sure you draw in the hands and the fingers as well as the facial features to make it look more realistic. Add in any more details that you would like to make it unique, then ...
This is it… the last level in Lara Croft and the Guardian of Light. It's called "Xolotl's Stronghold", and it's the last thing you'll see before the credits (hopefully). This Lara Croft / Tomb Raider game is available only from the PlayStation Network or Xbox Live Arcade. If you can't quite make it past the final mission, watch this walkthrough to see how to defeat Xolotl and win the game. For previous levels, check out the other walkthroughs for Lara Croft and the Guardian of Light.
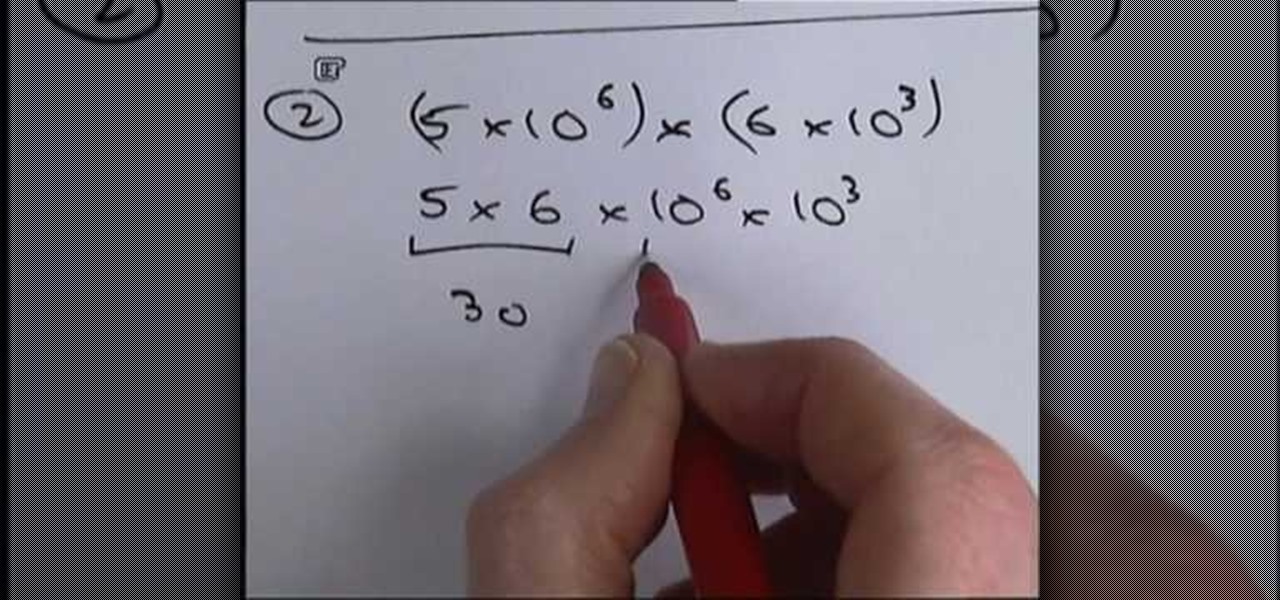
When a number is expressed in the form of x multiplied by 10^y such that, x < 10 and y is an integer, the number is said to be in standard form. Standard form of expressing numbers finds its use in scientific and statistical fields. This video demostrates how to express, as well as perform basic mathematical operations namely, addition/subtraction, multiplication and division of numbers in the standard form using four examples/mathematical problems. The first two examples demostrate multiplic...
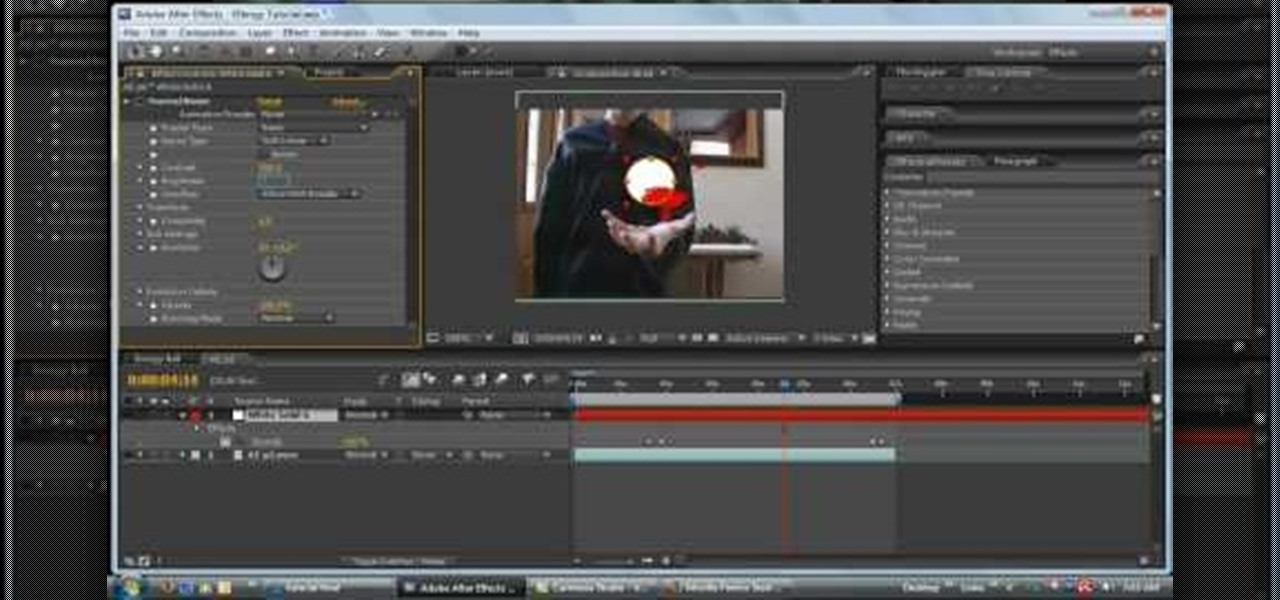
In this tutorial, we learn how to make an energy ball in Adobe After Effects. First, load a movie of someone pretending to hold an energy ball in their hands. After you do this, you will select a new setting and change the color. From here, you will select a round circle tool and add it where the hand looks like it's holding it. Then, change the effect to make the ball move around with the hand. After this, add the tracker to the hand and position it with the hand. After this, change the cont...
In this tutorial, we learn how to multiply fractions. First, you must know that the number on the top is called a numerator and the number on the bottom is the denominator. First, write out your equation with the fractions listed horizontally next to each other. After this, multiply the numbers straight across. The numerator will multiply with the numerator and same for the denominator. After this, when you get the final fraction you will need to reduce this further if you can. If you end up ...
In this video, we learn how to change a mountain bike tire. Start by shifting the rear cassette to the smallest gear. Then, remove quick release and remove the wheel. After this, remove the tire with tire levers or strong fingers, then check inside the tire rim for foreign objects. Inflate the new tube slightly, then put the tire in. Put both of these inside the rim, then inflate the tire to the correct PSI. After this, install the wheel on the bike and then tighten quick release. Do the fina...