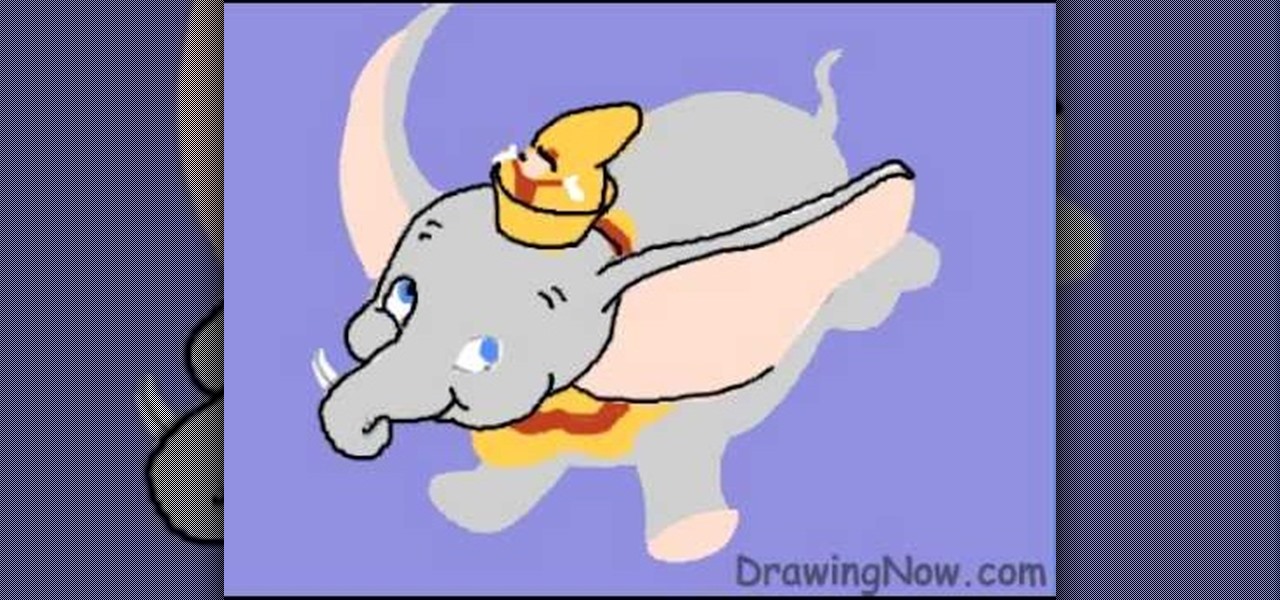
In this tutorial, we learn how to draw Walt Disney character, Dumbo. First, draw the ears flying out in the air, then draw the head outline around it. After this, draw in the trunk outline, the eyes, and the hat. Next draw in the body and legs of the character as well. Next, color the background of the drawing and then start coloring the character in with gray. Next, use a paintbrush to outline the body, then add in any details you see fit. Color in the inside of the ears and then color in th...
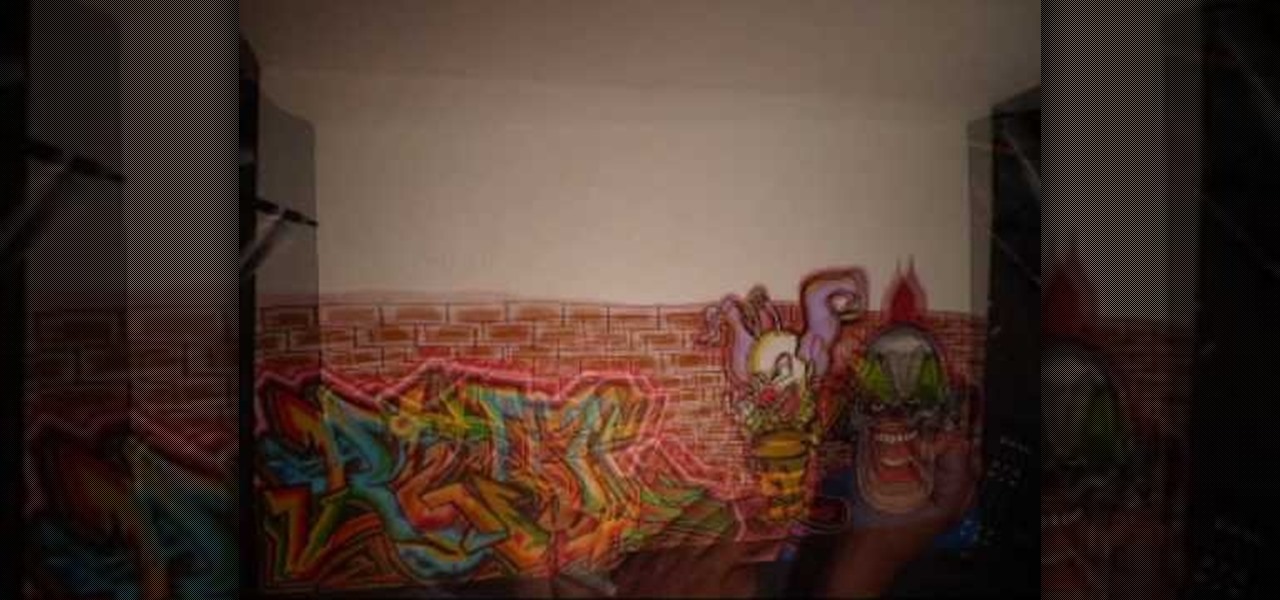
For this fun drawing tutorial, graffiti genius Wizard does two things he's never done before: 1. He graffitis his own last name, "Real," and 2. He colors in his graffiti, which includes clowns that could scare the pants off of the Joker, a bumpy brick wall, and a teeny bumble bee/clown hybrid who's more creepy than cute.
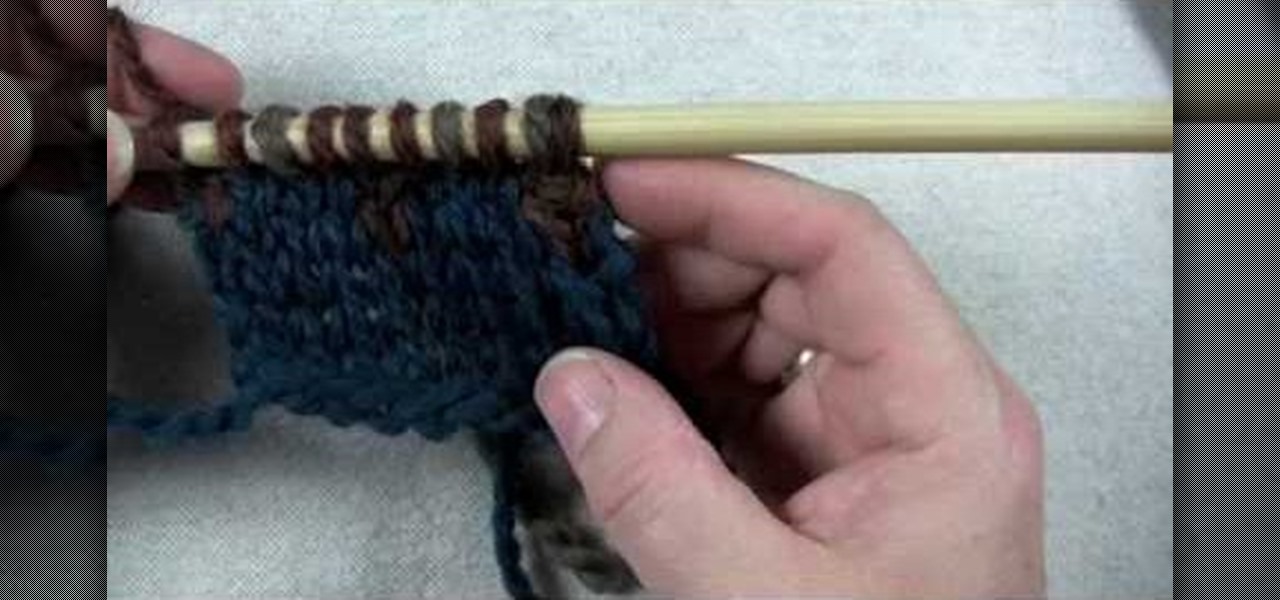
In this tutorial, we learn how to use a stranded color work pattern. Start with a basic pattern to help you learn how to do this. Use a chart to help you keep track of where you are and what you have done. Use a sticky not over the rows so you don't get ahead of yourself. Start off with the color that is first, then continue on to do the other colors that are on that row. When finished with this, remove the sticky note and continue onto the other colors that the chart shows. On the first stit...
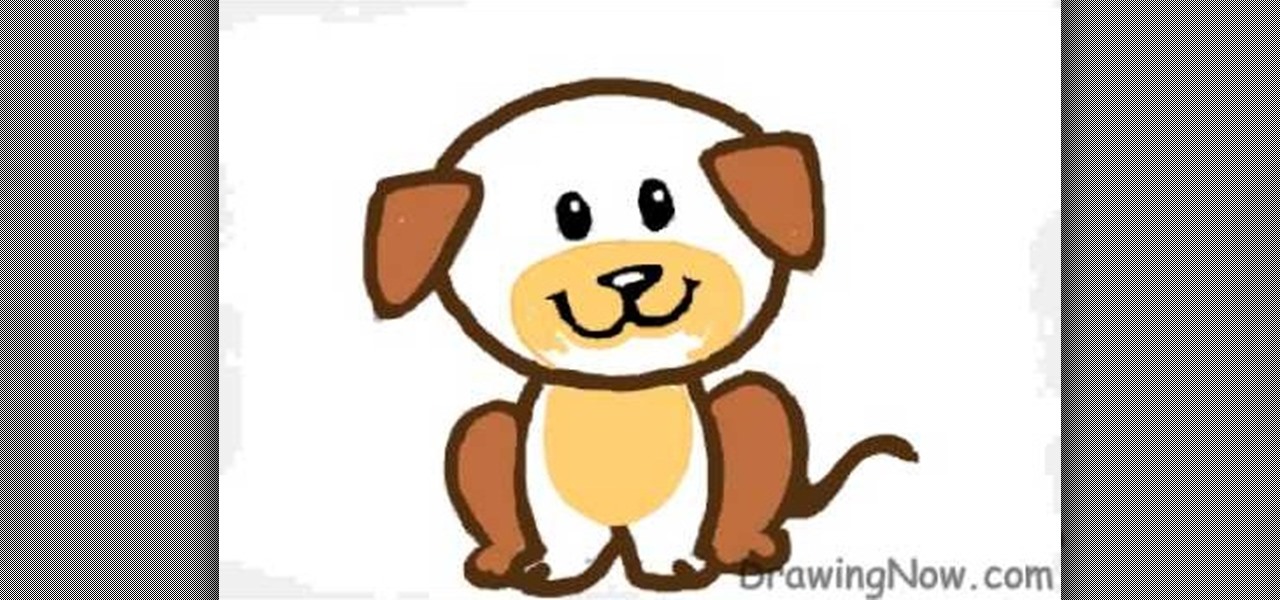
In this tutorial, we learn how to draw a cartoon puppy First, draw the oval head, followed by triangles for ears. next, draw the body underneath with four legs coming out of the bottom like the dog is sitting down. Add on a squiggly line for the tail next to the leg. Now, color the ears and back legs light brown, then add eyes, a nose, and a mouth onto the face. Draw a circle around the nose and mouth, then color in with lighter brown/tan color. Now, color the rest of the dog a darker shade o...
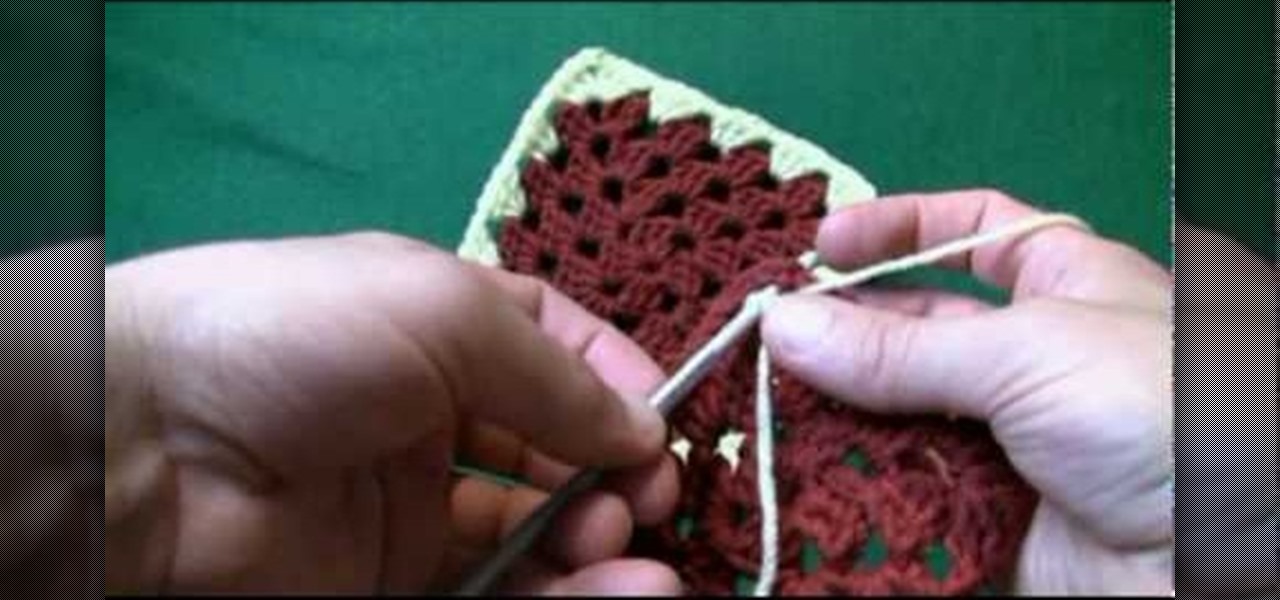
If you've proven yourself beautifully adept at making snug and cozy granny squares (usually used as coasters), then why not add some spice to your crafting by adding different colors to the mix?
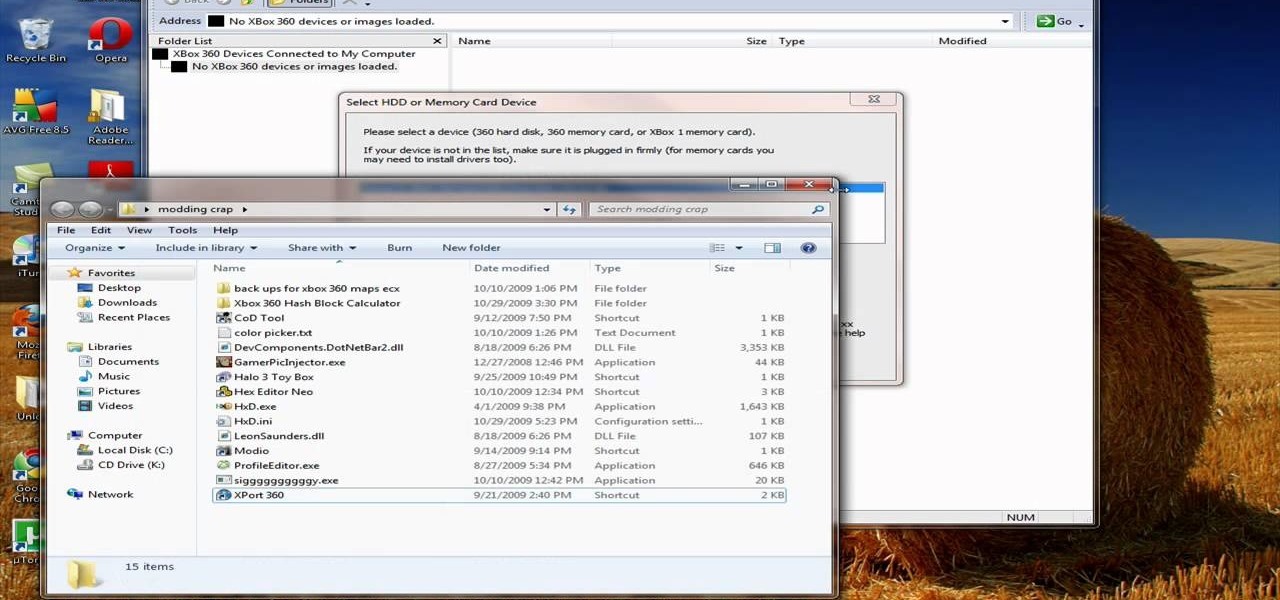
XBox 360 avatars were added a couple of firmware updates ago, and added all sorts of new options for customizing your presence on XBox Live. Do you find them too limiting? This video will teach you how to mod your avatar's skin and hair color using your PC and some free software:

First, outline the upper portion and lower portion of the right eye. Make the upper line darker than the lower one. Copy and paste this to create the left eye of your anime artwork. Create the eyeball using the Circle tool. Create two more circles inside the eyeball - one bigger and the other smaller. Make eyelashes by using a set of curved lines. Create at least three thick strands of these eyelashes. Create another circle inside the eyeball that intersects the two smaller circles created ea...
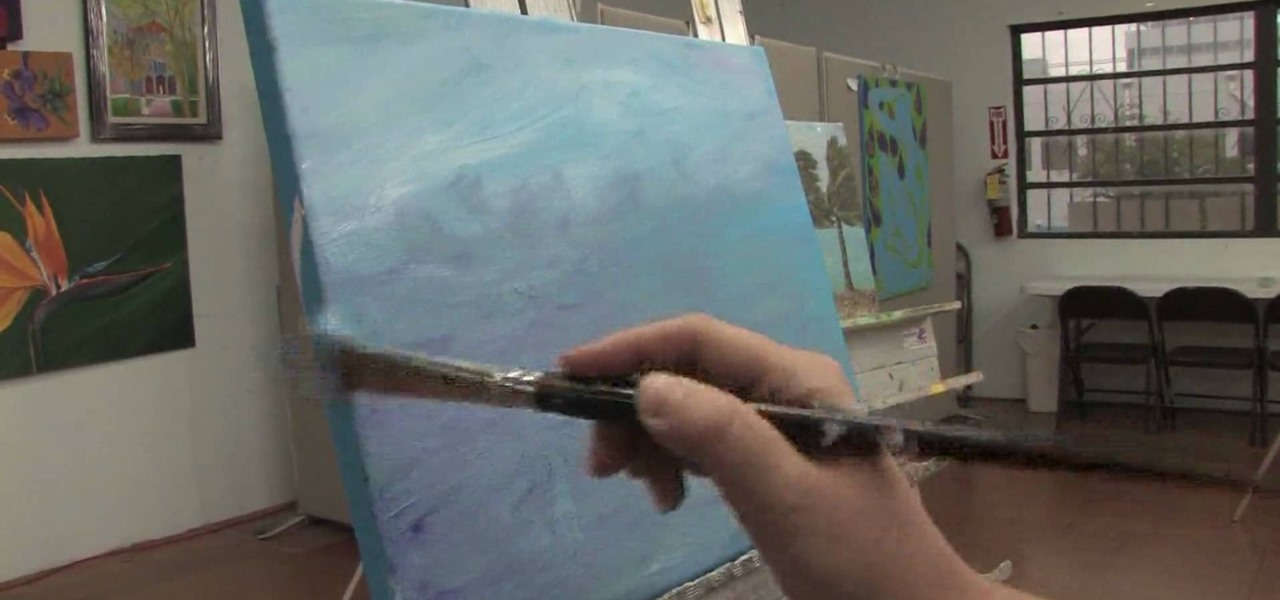
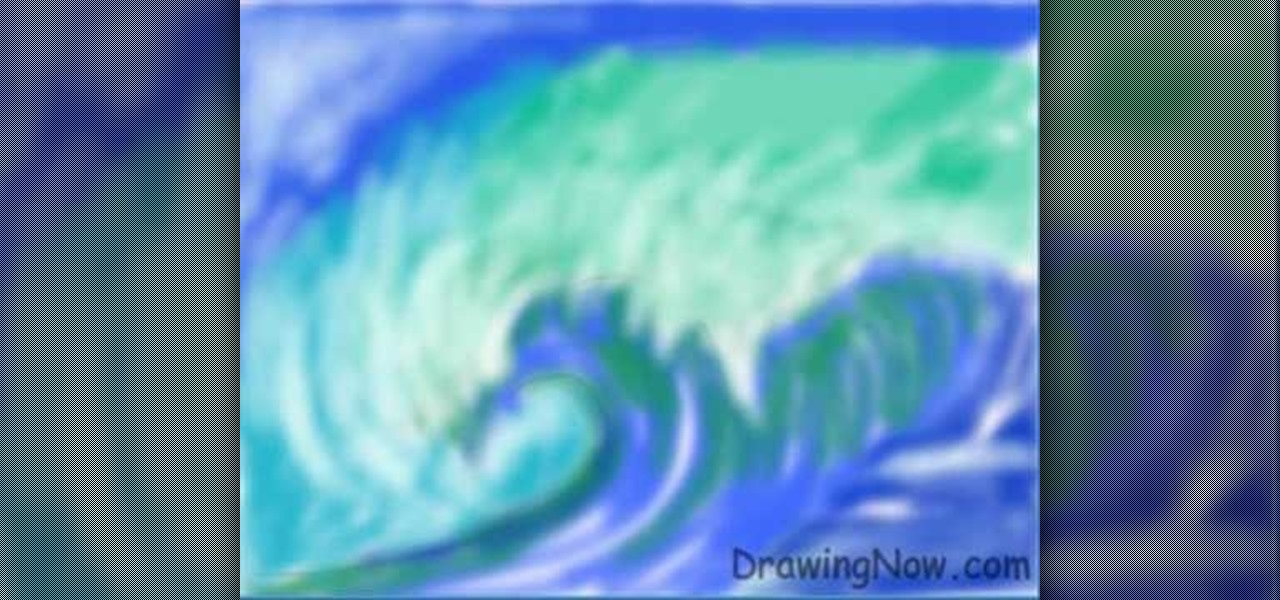
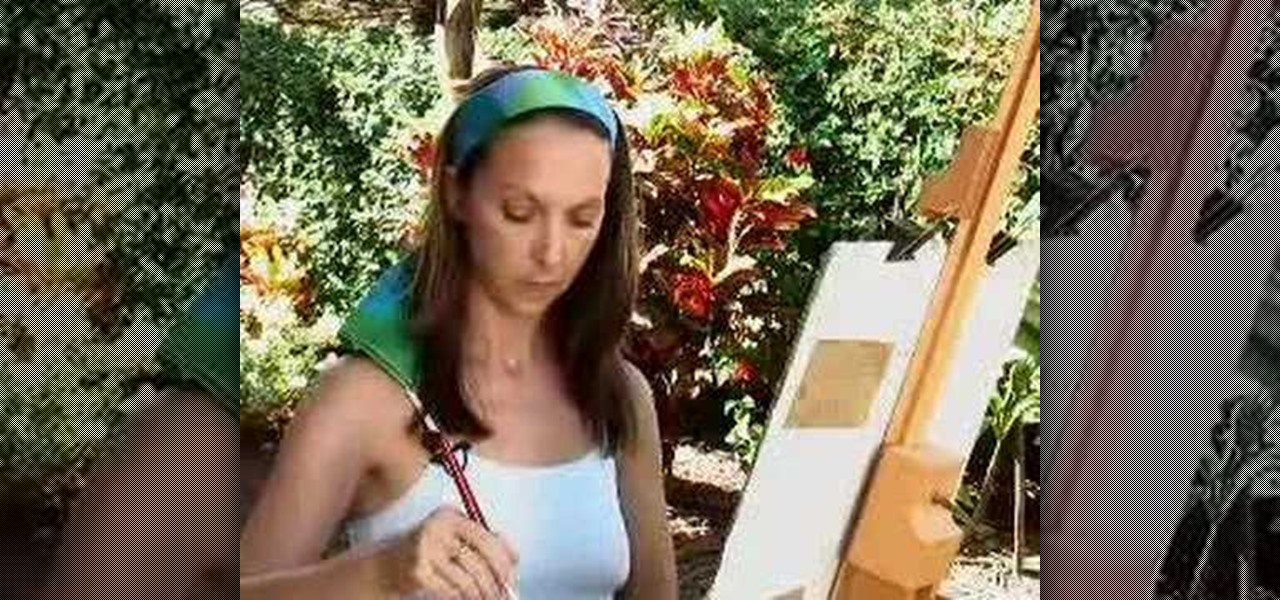
In this Fine Art video tutorial you will learn how to paint an ocean in your composition from Angeline-Marie Martinez, a professional artist. She shows one of the ways of painting an ocean in this clip. Her canvas is already painted with a back ground of the sky on top and water at the bottom. Her palette has a lot of colors like light and dark shades of blue, green and white. Take some white paint on the brush and pick up some of the other colors as well and paint on the canvas. The waves of...
Choosing which paint is right for your room, is easier than it is today than in the past. Instead of just using paint swatches to help determine what color your room should be, buying paint samples from the store is a great way to see quick results. There are some other methods, too, when trying to select the right wall color for your room, so check out the video to find out more. Enjoy!
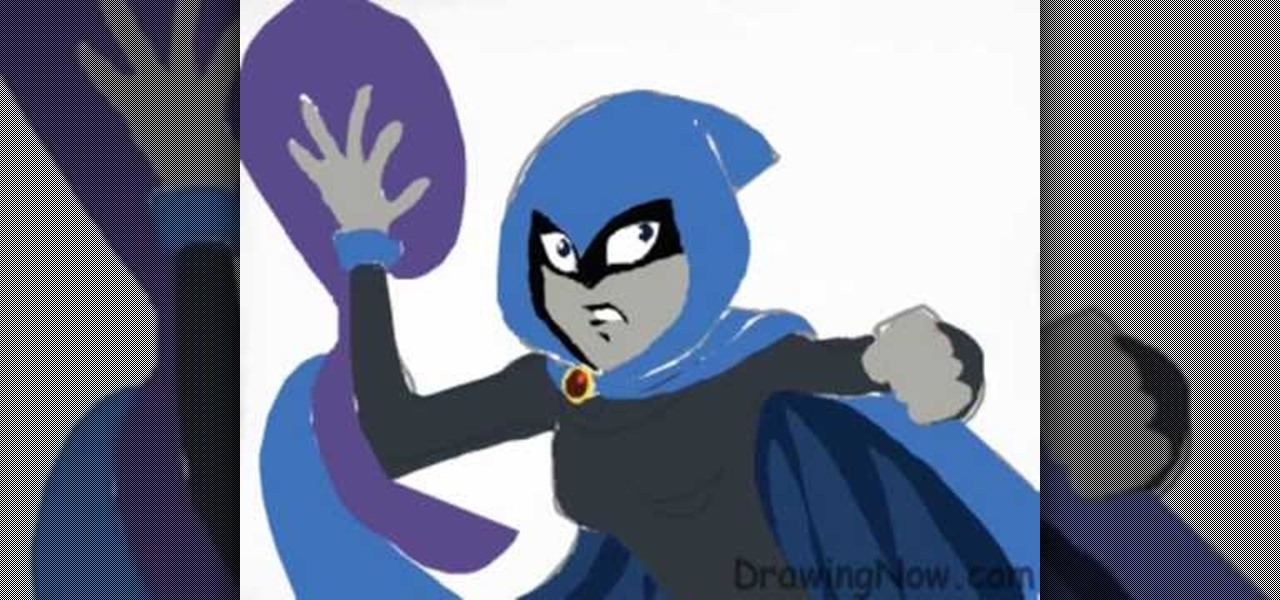
Teen Titans is one of the most tragically underrated American children's cartoons of all time. Fortunately, Drawing Now one of our favorite art instruction groups, has created this video tutorial on how to draw one of the shows iconic characters, Raven. Here are the artist's step-by-step instructions:
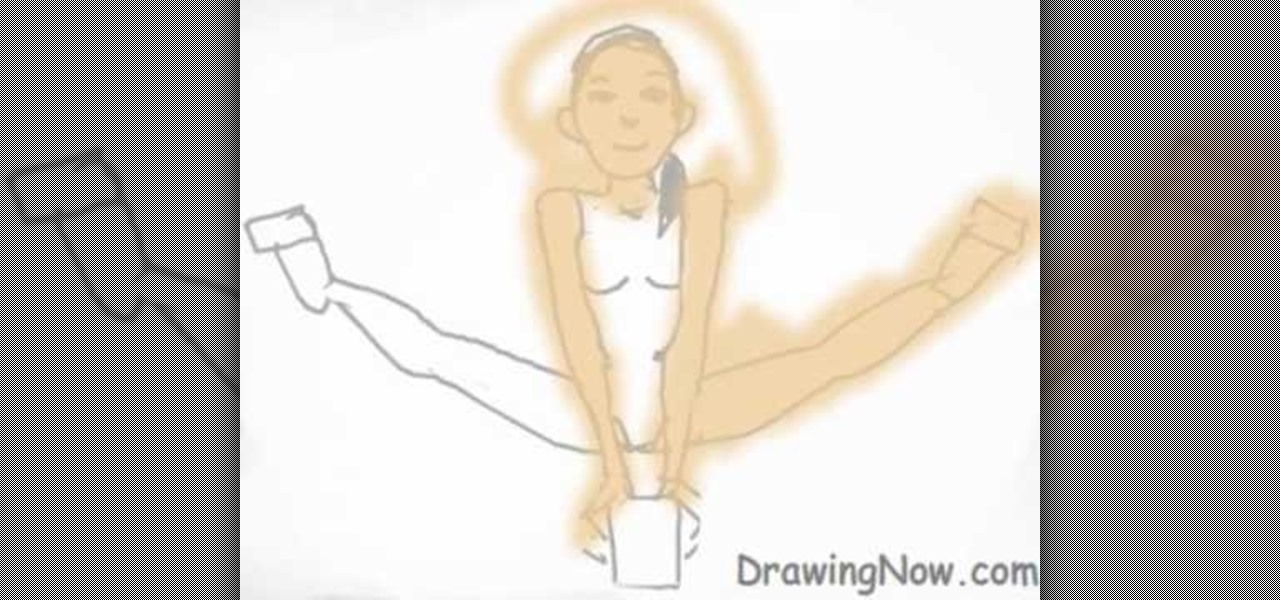
This video tutorial from Drawing Now demonstrates the drawing of a gymnast doing a routine on the balance beam. Her look of concentration evokes the drama and strength of both will and body required by this ancient sport. Learn to evoke that same feeling in your drawing by watching this video. Here are some instructions from the artist:
The video is basically showing how to get a look like Demi Lovato with makeup. The makeup being used is BYS. You Start off with a light Grey make up under your eyelids,then you take the black color makeup and put it under your eyelids where you put your first coat of Grey under and blend them in together. When you use the black color makeup you have to really pad it on, not so much brush it. Then you use the darkest black color and put a light amount under your eyelids. Then finally you want ...
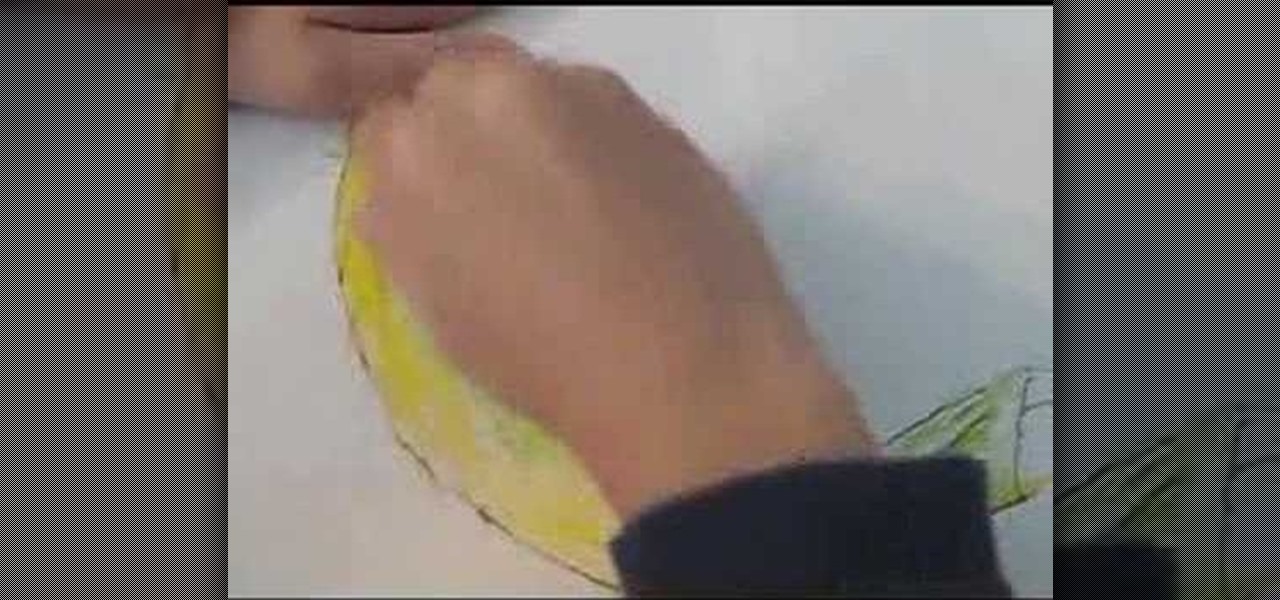
If you want to color with oil pastels you should first make sure you have a sketch book, oil pastels, cotton swabs and an eraser. First, you should place a banana or your choice of object on the sketchbook paper and trace the outline. Next, you should color in the banana or object the color you want to. You should add in detail to your object, by first coloring along the bottom of the banana with yellow. Next, add in a little green to add detail to the banana. You can blend the two colors to ...
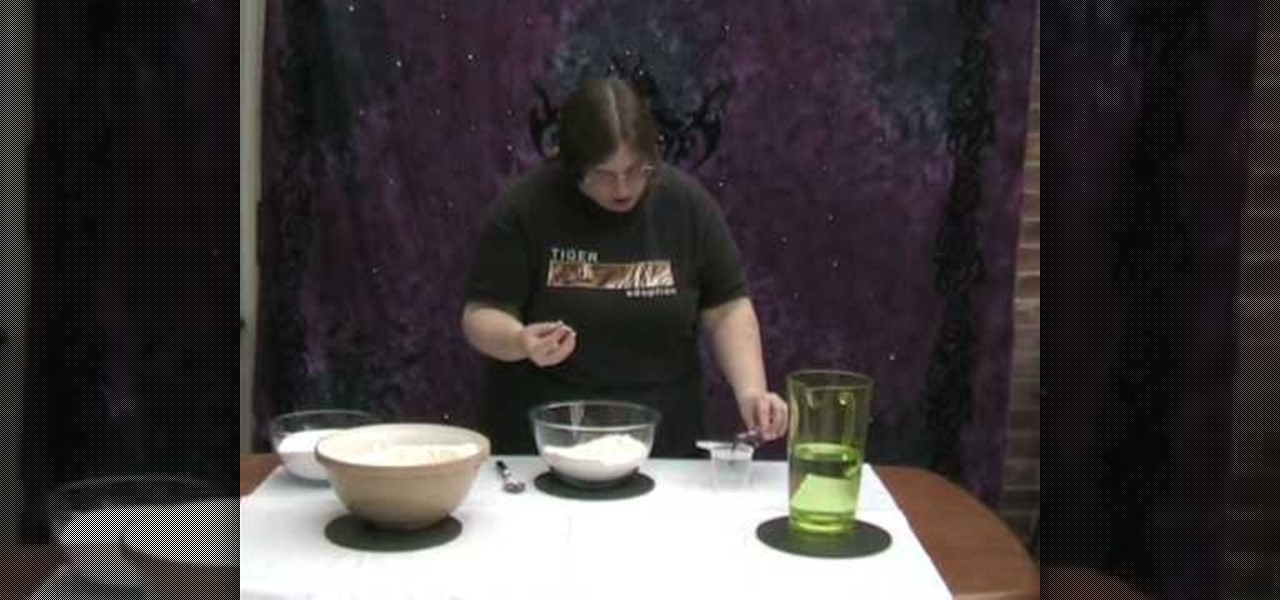
Salt dough can be used like clay for craft. This video demonstrates how to make salt dough. The ingredients required to make salt dough are a cup of salt, two cups of flour, a cup of water and food coloring. Make sure to cover your working surface with old newspaper and use a painting apron as this can get messy. Add the salt and flour in a bowl and mix with a spoon. Then measure one cup of water and add quite a good amount of food color to get the desired color and mix it into the salt-flour...
Jenniesbarn has created a video tutorial about how to make hand-dyed crinkle seam binding. She says that crinkle seam binding is popular because it has a vintage look. To begin, she uses a mister to spray water on a ribbon strip in order to allow the strip to crinkle easily and allow color to absorb more evenly when dyed. Afterwards, spray the dye and tossle the ribbon at the same time. It is possible to blend different colors by spraying a different colored dye afterwards. Once the desired c...
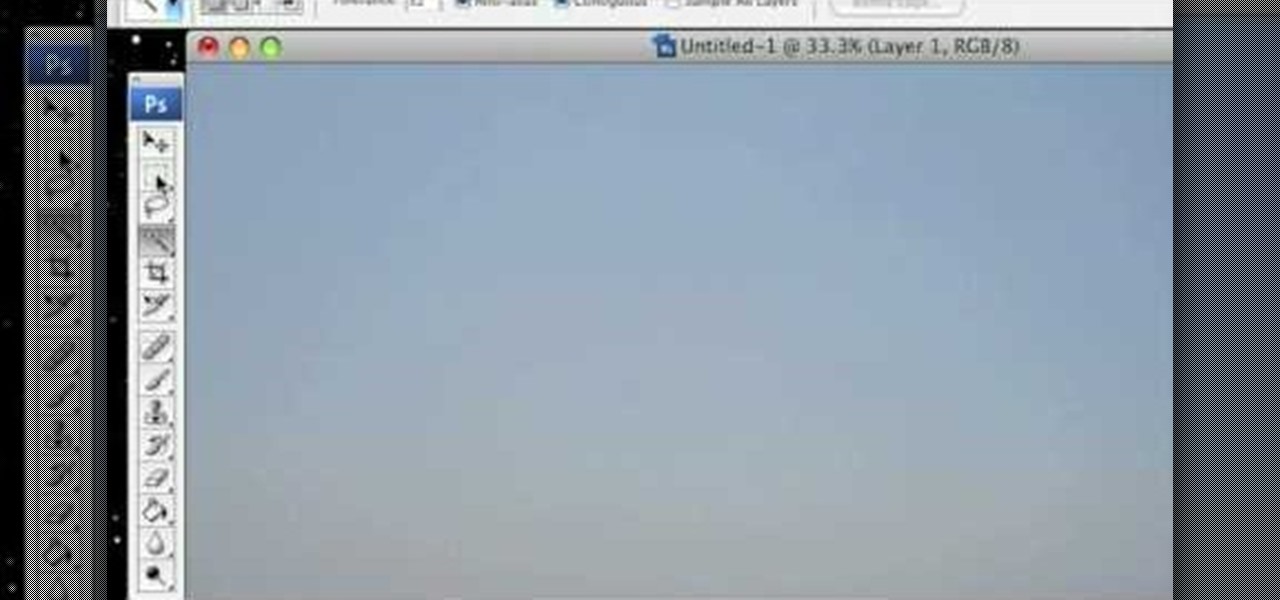
This video shows us how to turn parts of a color photo into black and white and keep the colors for the parts we choose. Start by choosing the polygonal asso tool in the tool box. Now create borders for the parts of the image that you want to keep the colors. Hold the ALT key while clicking to draw borders around a second or third object. Once all the borders are created, right click on your selection and click "select inverse". Now go to "image menu, highlight "adjustment", and then click "b...
In this how to video, you will learn how to create a rainbow effect in your photos with Photoshop. First, open the image you want to edit in Photoshop. Next, edit the hue and saturation. Make sure to desaturate the drawing. Next, create a new layer. Select a brush and choose a blue color. Make sure in the new layer that color is selected. Color the top part of the image. Next, select a purple or pink color and color the middle part. Choose a yellow color and color the bottom of the middle par...
One of the things you can do to manipulate your images in Photoshop CS3 is to change and replace colors. You can use this tool to edit your photos to your liking and enhance their appearance.
This is a video about how to create a simple water color painting. First we have to select the seen that we are going to paint on the paper. Next give a rough sketch on the paper about the scene that you have imagine or select to paint with a pencil. Next take the water proof marker give the outlines to that paint. Then you have to give two washes to your paint. First one is warm wash. For that you have to take yellow, orange, and red colors. First wet the paper with the water. Next splash on...
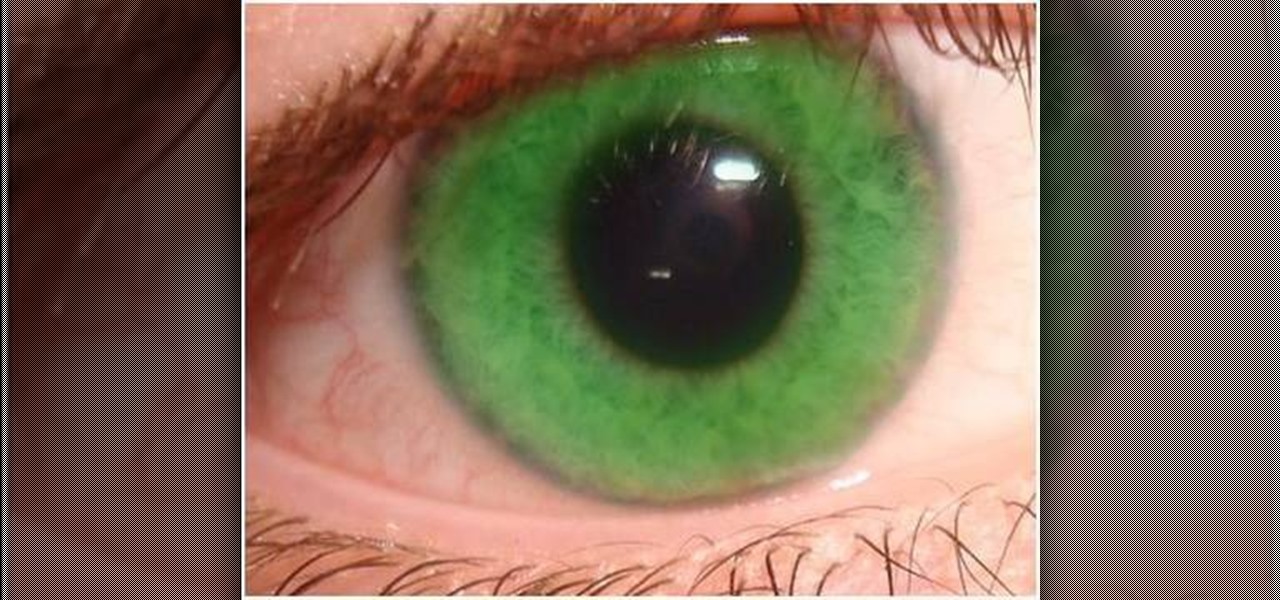
In this video tutorial, viewers learn how to change the color of eyes using Adobe Photoshop. Begin by selecting the Magnetic Lasso tool and create a selection around the eye. To create a second selection without losing the first one, hold the Shift key. Now go to Image, click on Adjustments and select Hue/Saturation. Now adjust the hue and saturation of the eye to change the color. This video provides a visual demonstration for viewers to easily follow along. This video will benefit those vie...
In this video tutorial, viewers learn how to tan an image using Adobe Photoshop. Begin by opening the image in the program and create a new layer. Then select the brush tool and select the tan color. Click OK and apply the color over the areas that are wanted to be tan. Then apply another layer with the same color to darken the image. Finish by configuring the Opacity to a lighter color and blend it to the image, This video will benefit those viewers who enjoy editing images to enhance them a...
If you do any sort of graphic design, photo or video post-production work, it's imperative that your monitor display colors in an accurate, predictable manner. One way to ensure that this is so is through a color-managed workflow. This video tutorial will teach you how to use monitor color calibration & management.
In this how-to video, you will learn how to draw Madara Uchia. First, start off with an oval shape for the face. Next, draw several spike shapes for the hair and bangs. Now, move on to the armor of the character. From here, draw a circle behind the body. Now you can fill in the details of the character. Move into the face and draw the eyes, nose, and mouth. Outline the armor in more detail so you can see straps and metal folds. Erase any of the previous lines that were used for guides. Once y...
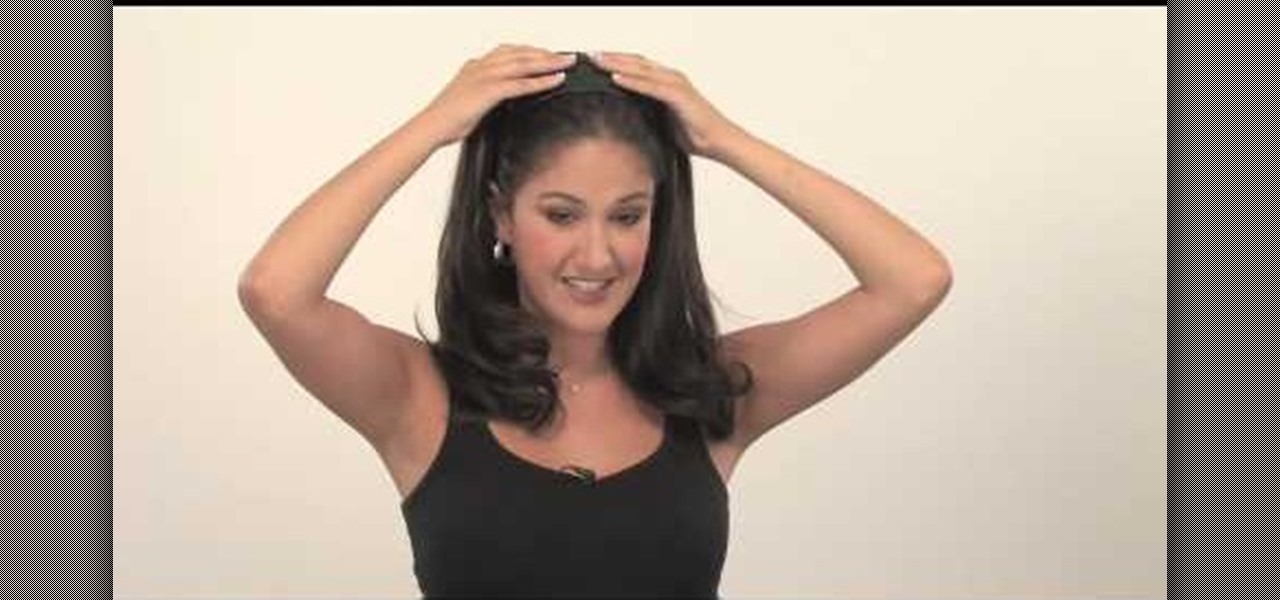
To create almost any headband look, start by using a real human hair headband with extensions. Mostly, the extensions will come with an interchangeable headband for different colors. Now, start by pinning back the front crown area of your hair, if you have bangs you can leave them out of the hair that you are pinning back. Secure the crown of your hair with bobby pins. The headband with extensions should have three little combs. These will help secure the extension and the headband onto your ...
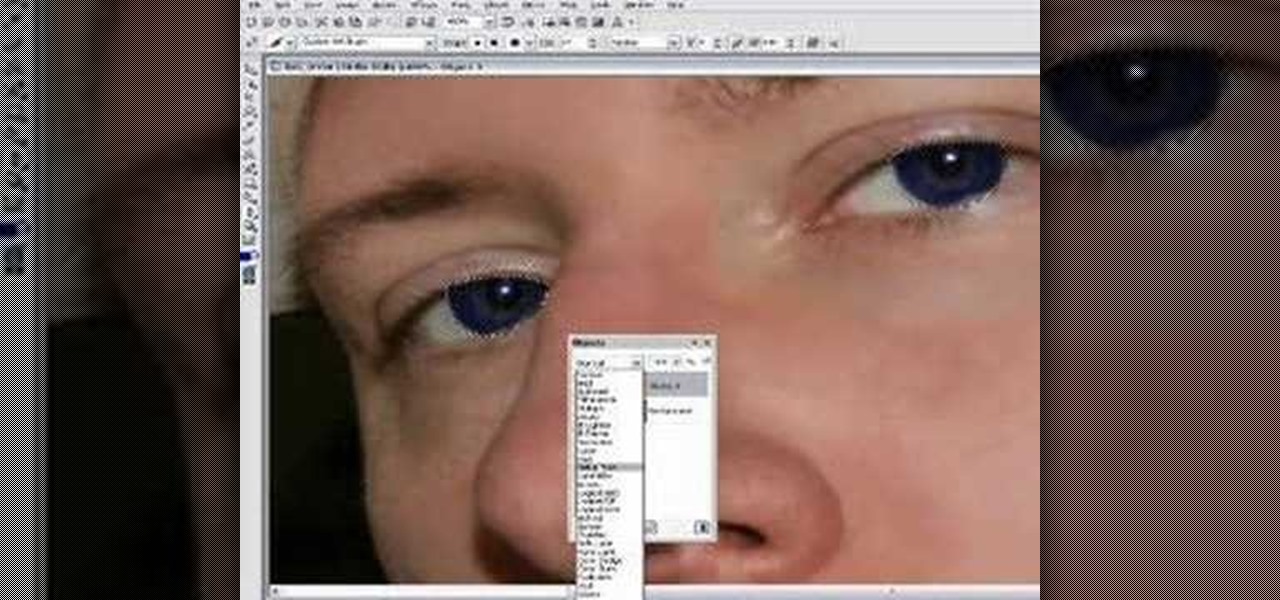
In this video you will learn how to change eye color or removing red eye in Adobe Photoshop. First, to change the eye color you must enter in Adobe Photoshop, open a photo, select the zoom tool and zoom in near the eye. We will use the first tool and make a circle of the eye. By holding shift key remove the areas you don't want to paint. Now go to layer, then new ant the layer you want to copy. Now select hue/saturation. Now slide hue until you are happy with the color, then hit ok and that's...
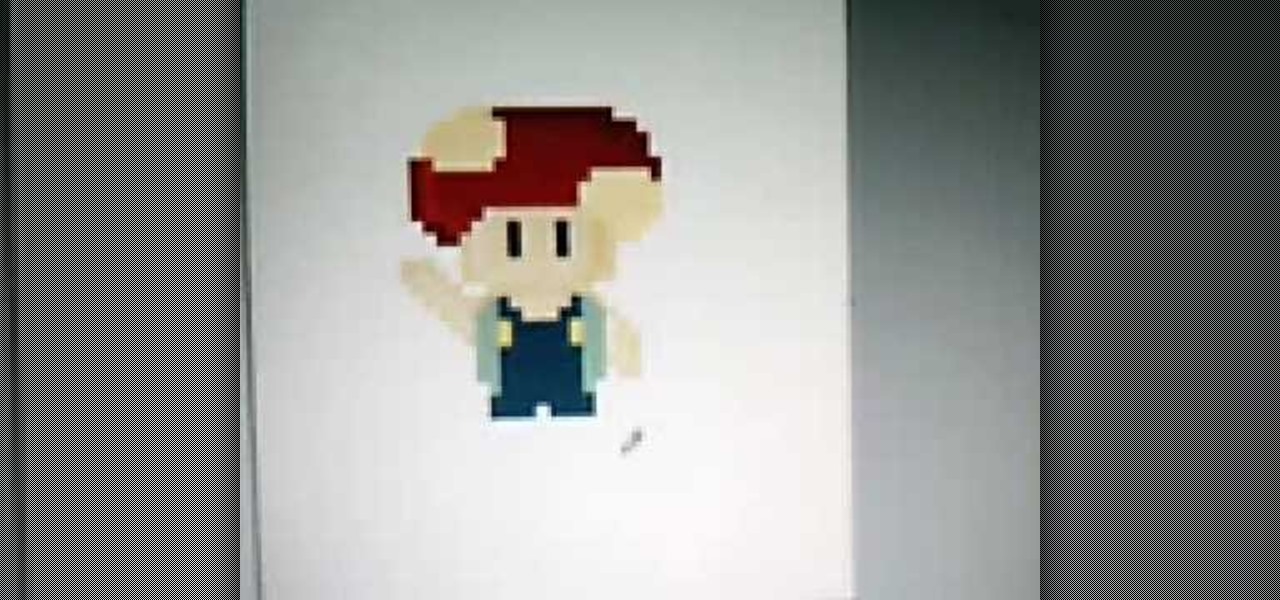
Drawing an 8 bit toad seems very easy from the video of Mario brothers, first you draw two short standing lines which are the eyes and are black in color using freehand draw option. Then you draw a somewhat oval shape using the same option around the eyes which would look like a face using the color light yellow then you provide darker shades on each side to give the face a 3d effect. Then the cap is drawn after which you draw the rest of the parts the body, dress, hand, shoes etc and finally...
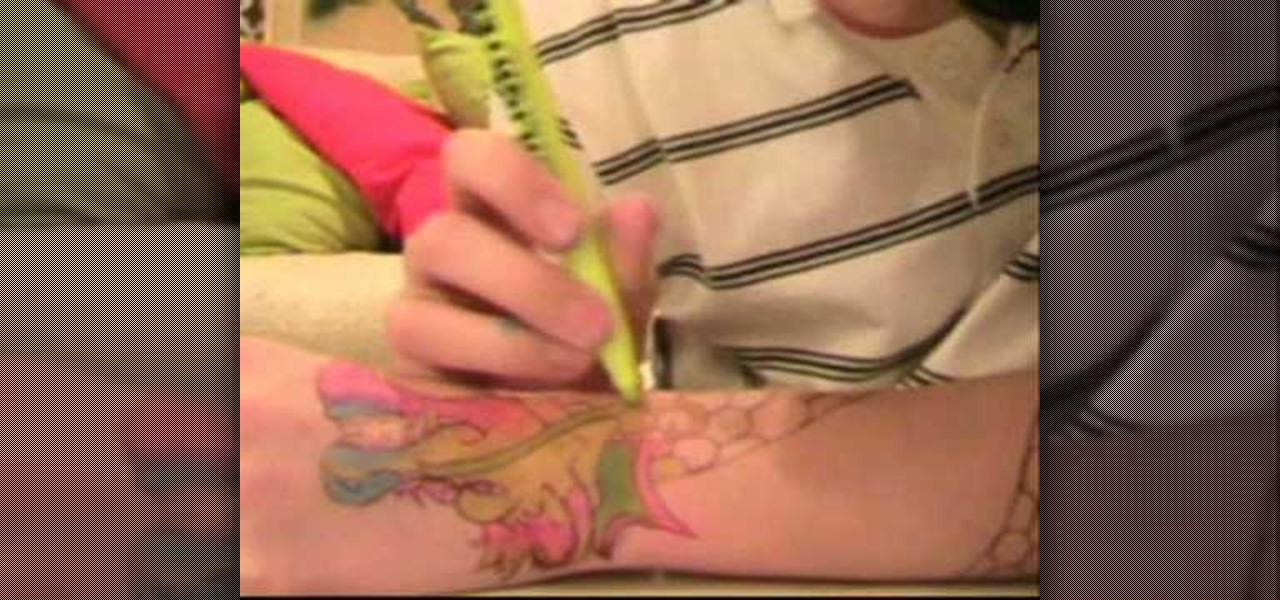
Learn how to draw a ‘Fake Tattoo’ using a ballpoint pen and some colored highlighters, by watching this video. Begin by drawing a faint design of your choice at the back of your palm, using a ballpoint pen. Darken the outlines when you are done with the image drawn. Now according to your choice, fill colors in the drawing using colored green, blue, yellow and pink highlighters. Begin with the yellow color and blend it together with the other color applied in each area, using your fingers. Use...
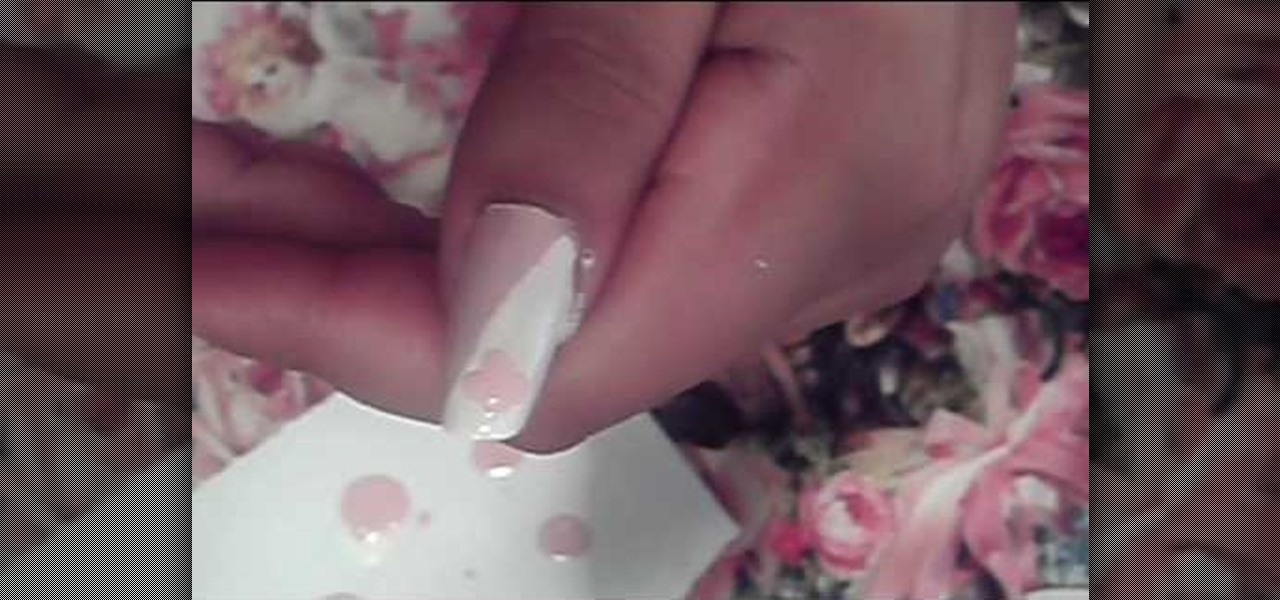
Love4Nails demonstrates how to paint nails with a pink and white sparkly design. First, apply a hydrating base coat. On top of the base coat, apply the color of your choice like a light pink color. Then, create the side swipe which is about half of the nail. Create a straight side swipe in a white color. You may need to do two coats. Then, create a flower with the background color on the white polish. Add a pink rhinestone to the flower. Repeat the technique making a white flower on the pink ...
In this Software video tutorial you are going to learn how to change eye color in Corel Photo Paint X3 with masking. Select your picture and the 1st thing you will do is to create a mask around the eyes. Select the standard paint brush tool. Adjust the picture so that it is large enough and both the eyes are visible. Now press Alt and hold down to select the entire eye. Do the same for the other eye also. Then go to subtractive mode and fix the outer edges of the iris of the eyes. Now select ...
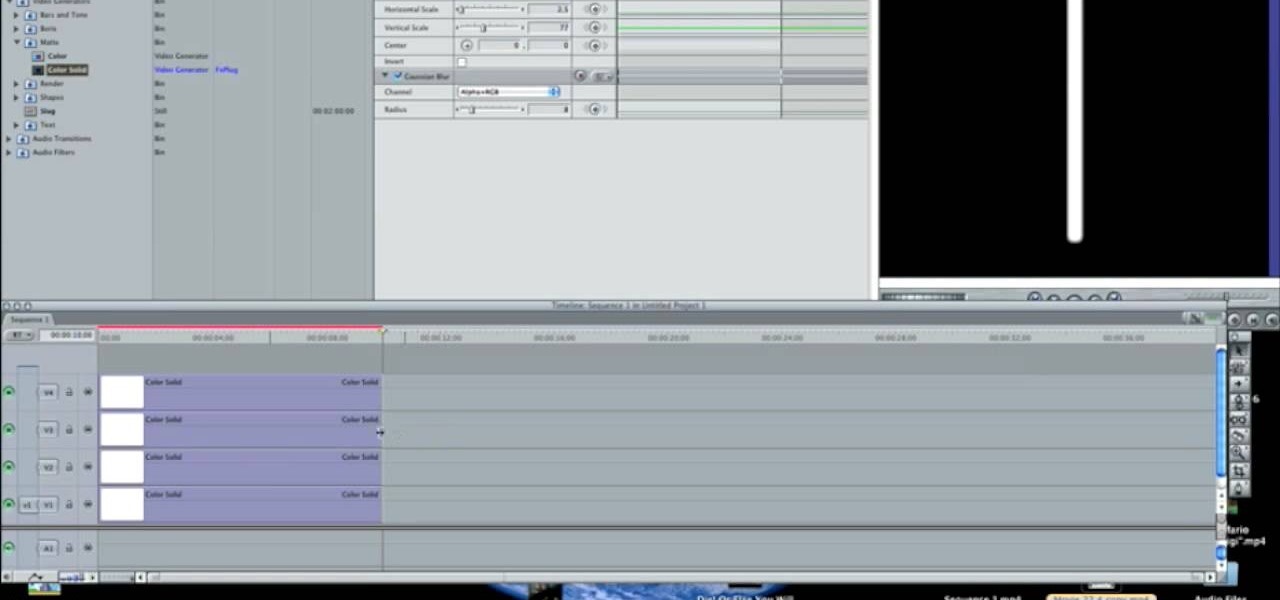
In this how-to video, you will learn how to make a light saber or similar image in the Final Cut Express program. First, go to the effects tab and go to video generators and select color solid. Drag this to the viewer. Go to the control tab and select the blue color. Now drag it to the time line. Double effect the color solid and go to mask shape. Select filters and change the effects settings to 2.5 horizontal scale. For the vertical scale, select 75 to 85. Go to the effects, video effects, ...
This is a clear video showing how to easily draw a 3D letter 'B'. First of all you start by just writing the letter 'B' normally; and then you double outline all of the lines you have drawn, both inside and outside of the letter. Color it in with a block color for a 2-dimensional letter. Then its time to make it 3D! In the middle you just add lines parallel to the 2D letter, and also around the top and left sides of the shape; color this in with a darker color, and voila! You should now have ...
Stevmay09 will be teaching you how to digitally modify your eye color for free using GIMP. First you need to zoom in on the eyeball then click on the free select tool. Then start on the corner of the eye and make your way around the entire eye. Once you have the area around the eye selected you need to create a new layer. Make sure its filled with transparency then select the color you would like the eye to be. Then get the paint brush tool and select the icon shown then increase the scale an...
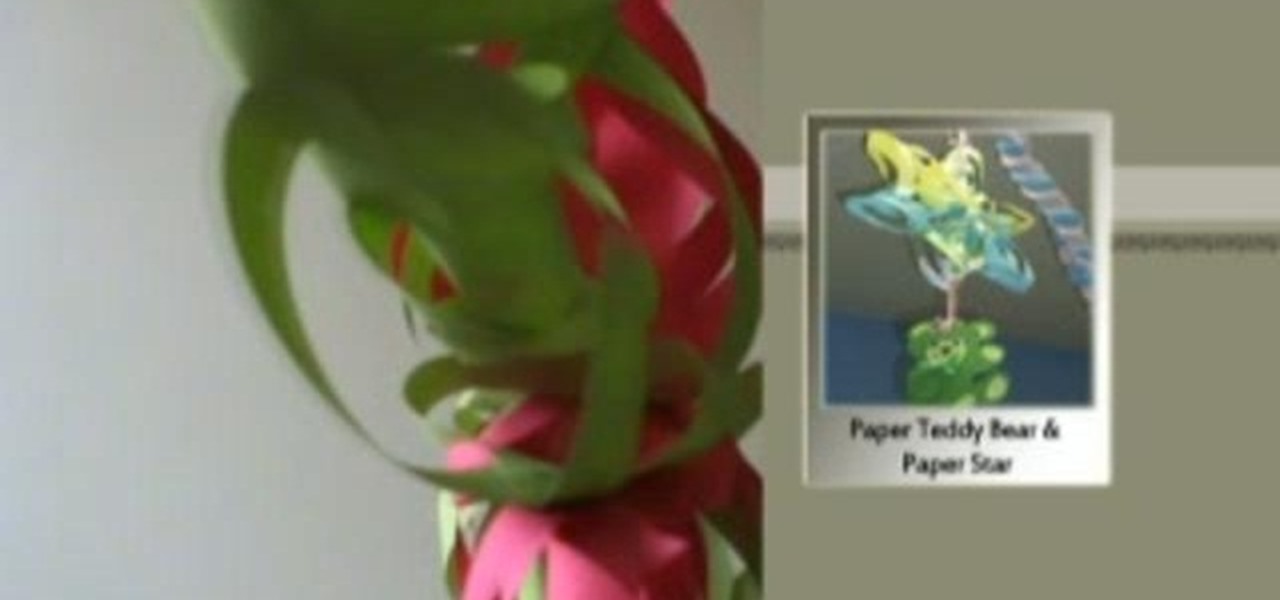
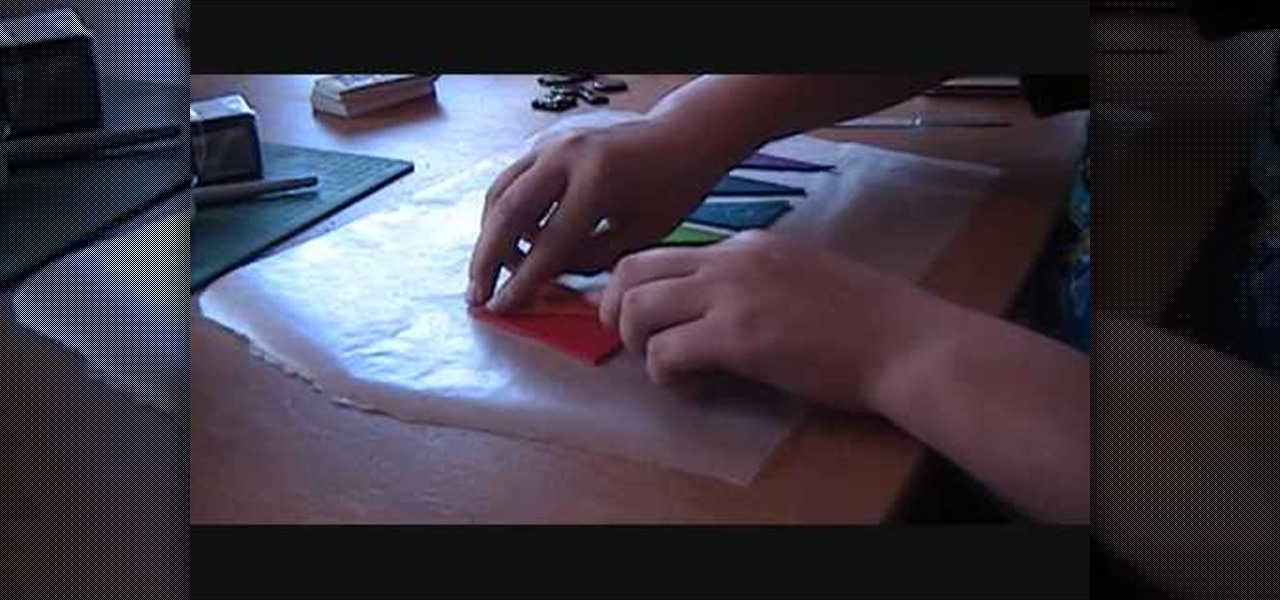
This is a great instructional video on how to make a decorative paper star. The materials you need are color papers, ruler, stapler, scissors, adhesive tape, pencil and cutting pliers. Take a paper and make a square of 20 cm side. Now fold the paper twice and get a triangular shape. Now draw four lines on it. Then cut along the lines with the help of scissors. Take the middle square and staple it. Then go to the back side and staple the ends. Repeat this process and get a star. You can make t...
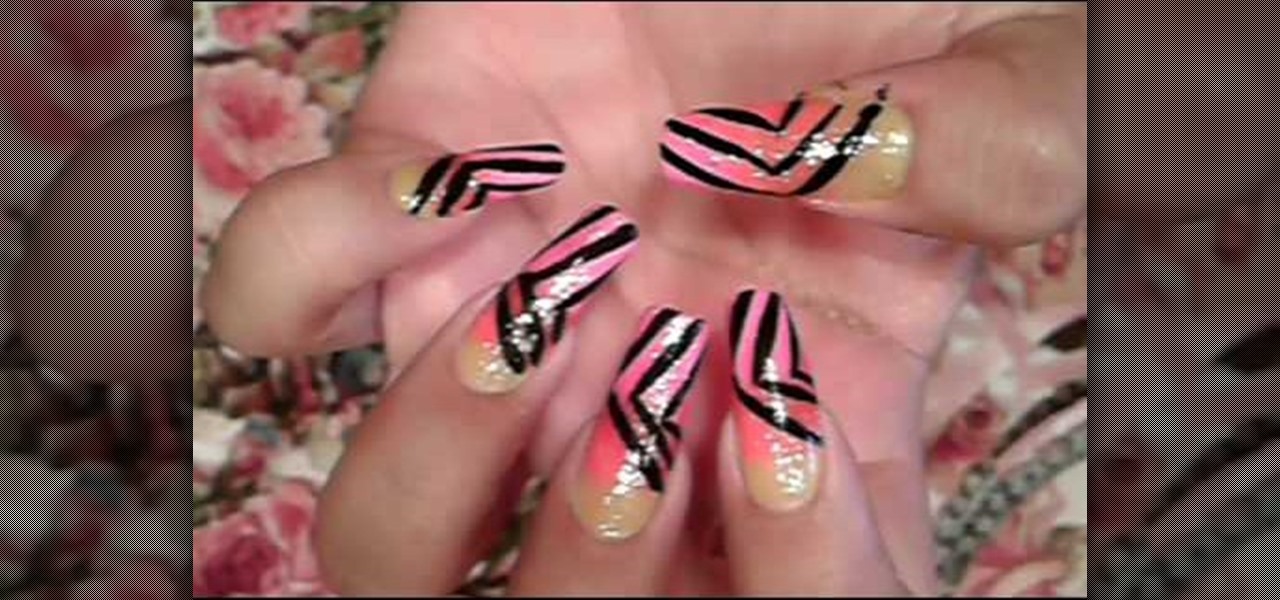
This video on nail art shows how to paint your nails with a summer rainbow stripe design. The nail colors needed for this design are yellow, orange and pink, a glittery color, a transparent clear polish and a black thin nail polish. The first step is to color only the bottom of the bare nail with yellow, here neon colors are used. Next the middle portion with orange and the tip with the pink color. Quick drying polishes can be applied one after the other or else the colors are applied after d...
Learn how to make a River Bar bracelet, which is also known as a Paracord bracelet, by following the steps outlined in this video tutorial. To start your bracelet, you will need to tie a reef knot. This is done by taking two loops (in two different color strings) and then placing one loop within the other, pulling this through the first loop to secure the two loops together. This knot creates the end of your bracelet. To actually make the River Bar design, bend the two colors of string so tha...
This video explains how to make a polymer clay "rainbow cane," which, amongst other things, can be used to make jewelry or pendants. First, you must run a conditioned piece of each color of clay through a pasta machine. Then, cut each color into a square, and from there cut each square diagonally, creating triangles. Arrange the triangles side by side and attach them together, so that you create a large rectangle of the colors. Run this rectangle through the pasta machine several times, until...
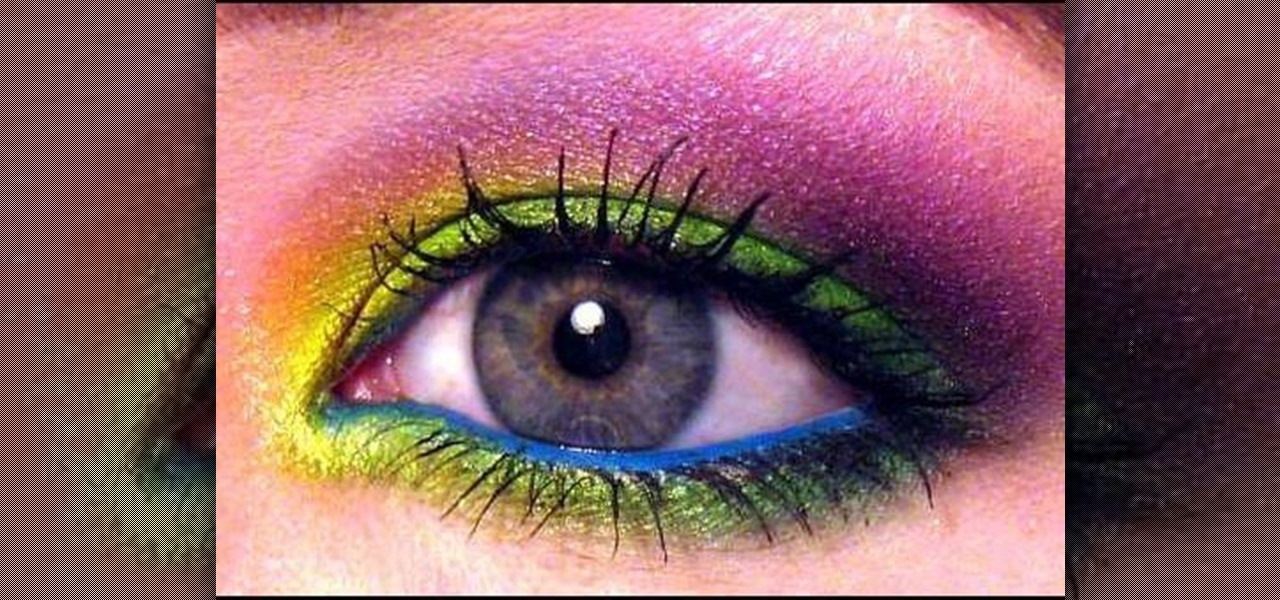
To apply this particular Mad Hatter inspired makeup you need to start first by applying a lime green color from the mayron pallet to your lid. Then you just take the brush and feather out the edge you created. Taking sun yellow color from ben nuys, apply it to the inner third and inner corner of your lid. Then take the chartreuse color, applying it to the middle third of your lid taking the brush blending it slightly into the sun yellow. After this, take a jade color, applying it to the outer...
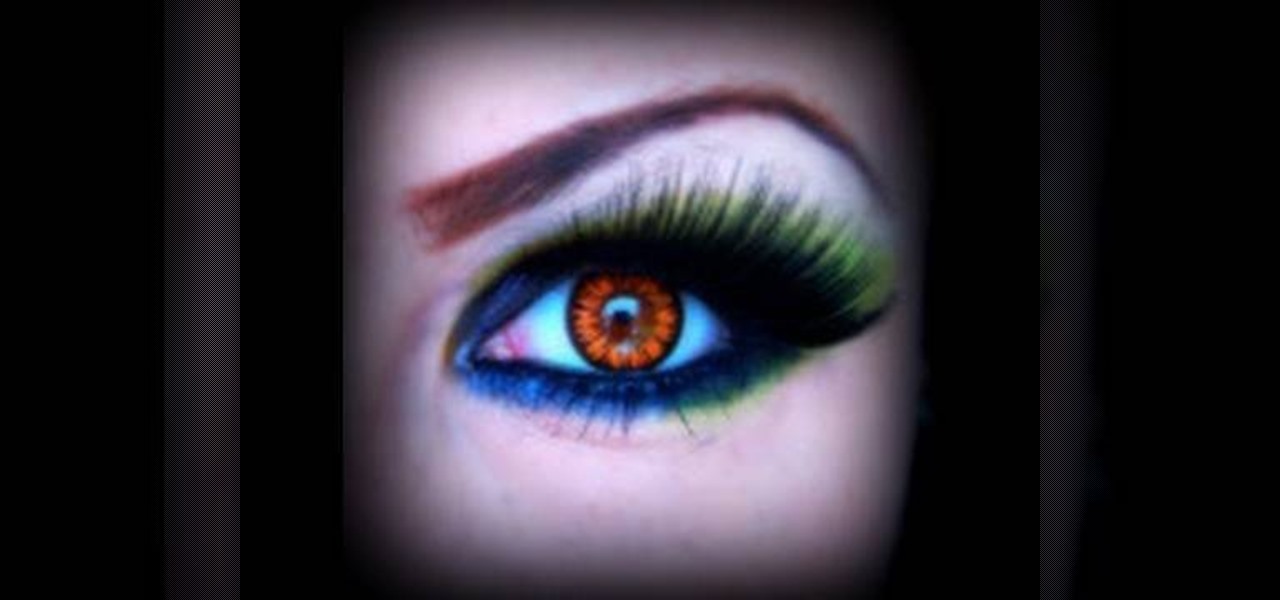
In this beauty tutorial, learn how to get the dramatic eye synonymous with Ed Hardy-Inspired makeup. The first thing you will need to do is apply a foundation over your entire eye area. Because so much makeup is being used, you really want to make sure there is a foundation in place to keep all of the color in place. Then, with a no. 217 brush, sweep a dark navy blue color over your entire lid as well as the crease. Line your lower lash line with a dark blue cream eye shadow and also fill in ...
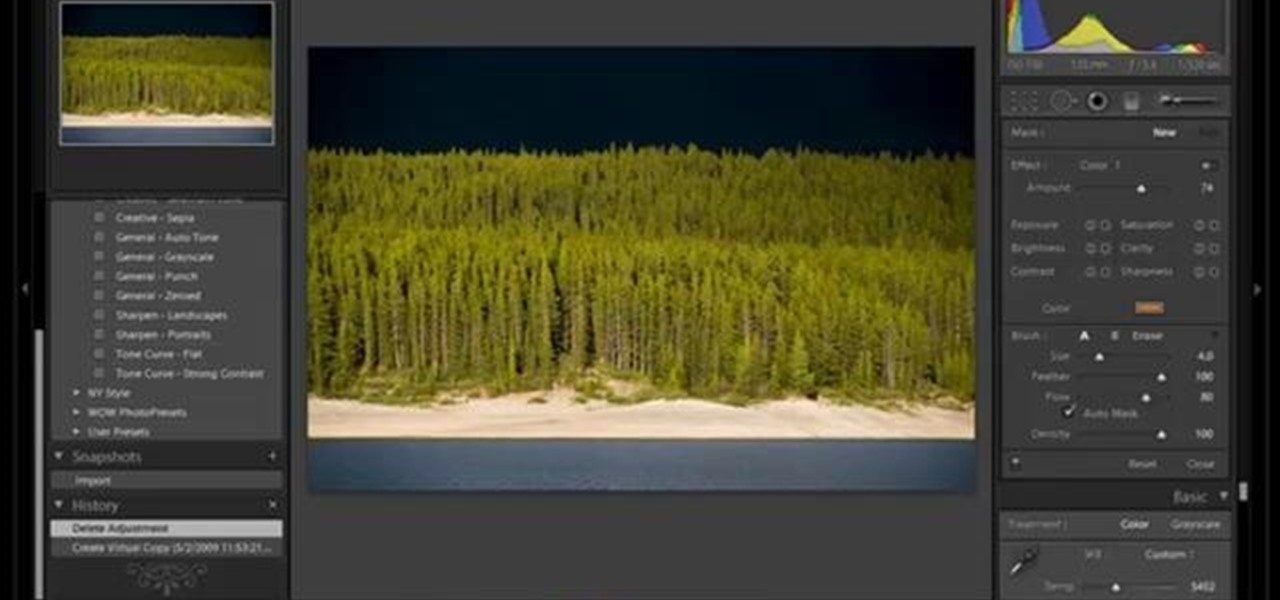
In this video tutorial Yanik Chauvin of Yanik's Photo School shares a discovery he made while using the software Lightroom. This quite simple technique of adding hints of color to black and white photos can make them striking. By adding a color screen on top of your photo, using either the adjustment brush or a gradient filter, you can create a lovely conversation piece for your home that will confound your visitors. "Is this photo black and white or sepia or ... what?" He also shows a trick ...
YouTube user goldiestarling teaches you how to apply a purply sugar skull makeup look inspired by Sylvia Ji's Purple Crush painting. Use a white eyeliner to create the sockets of the skull, then go around the nose area. Color the whole face using a creamy white pencil and add red blush on the cheeks. Use a creamy purple color to fill in the sockets and the tip of the nose. Draw small flower petals on the edges of each socket. Use a black color to draw a spider web on the forehead. Then draw b...