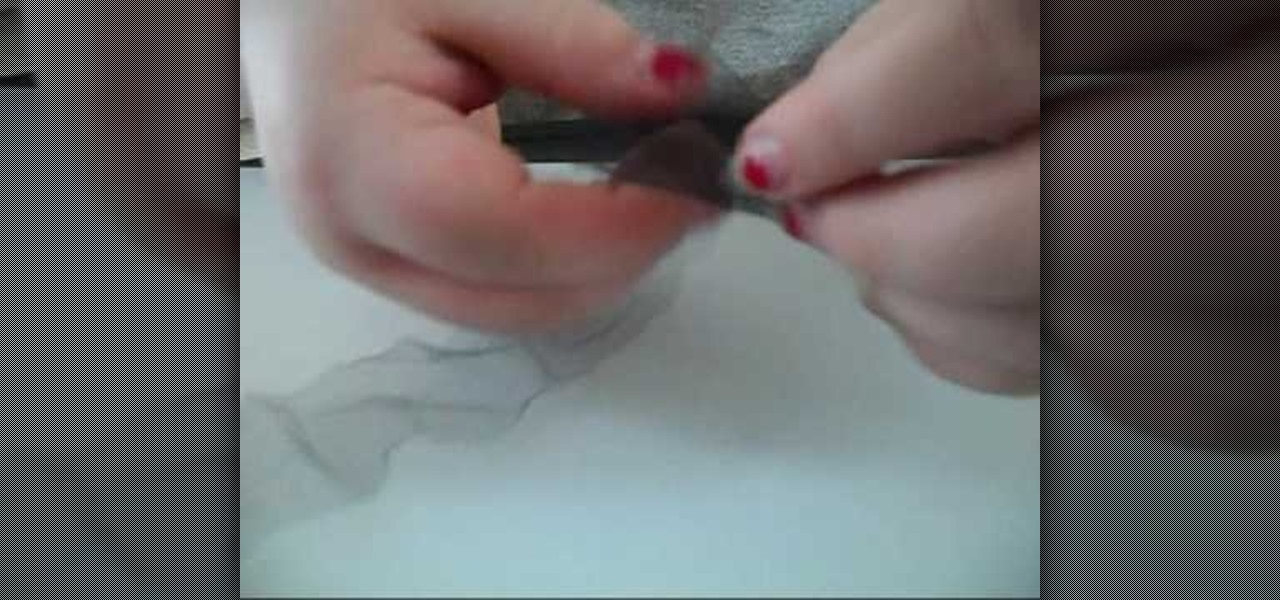
This is a video tutorial describing how to construct a mini loofah for your dollhouse. The first step is to gather your supplies. You will need a needle, scissors, thread, and tulle. The tulle and the thread should be the same color. Next your tulle should be cut to be 1.5 feet long. Then bunch up the tulle so that it is small and compact just like a loofah. Next you should thread your needle. Next sew the tulle so that it stays in the shape that you would like it to be in. Finally cut off al...
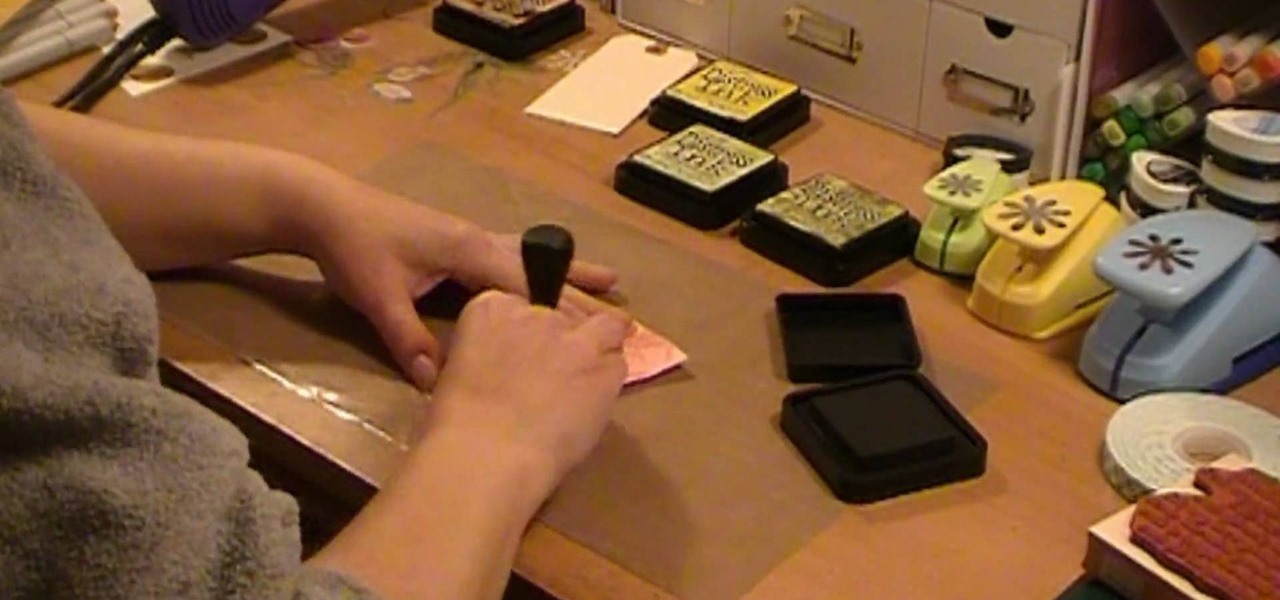
Donna50242 shows us how to make an amazing looking tag to use on different things. This video is in response to another one posted earlier. This tag is made be crinkling up an ordinary brown paper tag and then flattening it out to create the worn out wrinkle effect. Using a distressing inking tool with a foam pad, we apply the ink in a swirling motion. using different colors from the ink set (Mahogany, Mustard seeds, green etc), we can create amazing effects. And that's it, your done! Try exp...

This video illustrate us how to make ribbon woven headbands. Here are the following steps:

Christine from ExploreModeling.com shows you how to tweeze your eyebrows yourself without painful waxing or expensive treatments. First, you need a high quality tweezer with a very small point and a tweezer with a wide point. The small point tweezer is good for plucking single hairs, and the wide point tweezer can pluck a few hairs at at time. The first area you need to tweeze is the area between your eyebrows. Don't go too far into your actual eyebrow area. Then, to make your eyebrow natural...
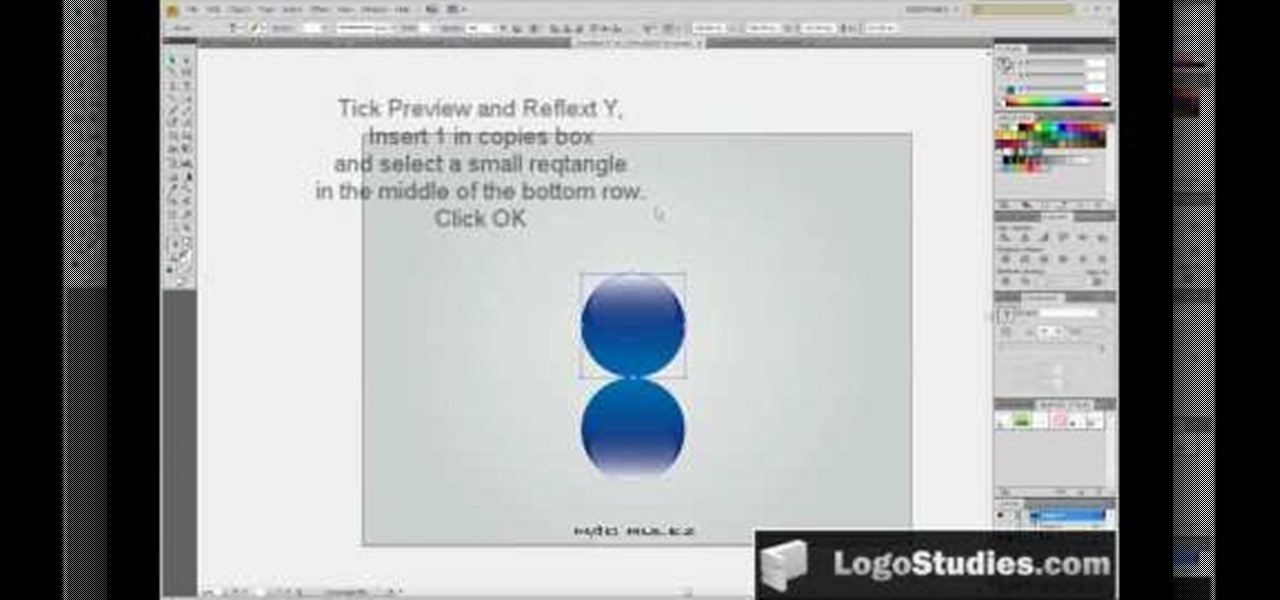
In this video tutorial, viewers learn how to create a 3D sphere and reflection in Adobe Illustrator. Begin by using the ellipse tool and create a circle. Select the black and white gradient, and drag the colors that you want into the gradient panel. Now hold the Alt key and draw a smaller circle inside. Fill it with white/transparent gradient. Select the sphere and go to Object/Group. Now go to Effect/Distort and Transform/Transform. Tick the Preview and Reflect Y, insert 1 copies box and sel...
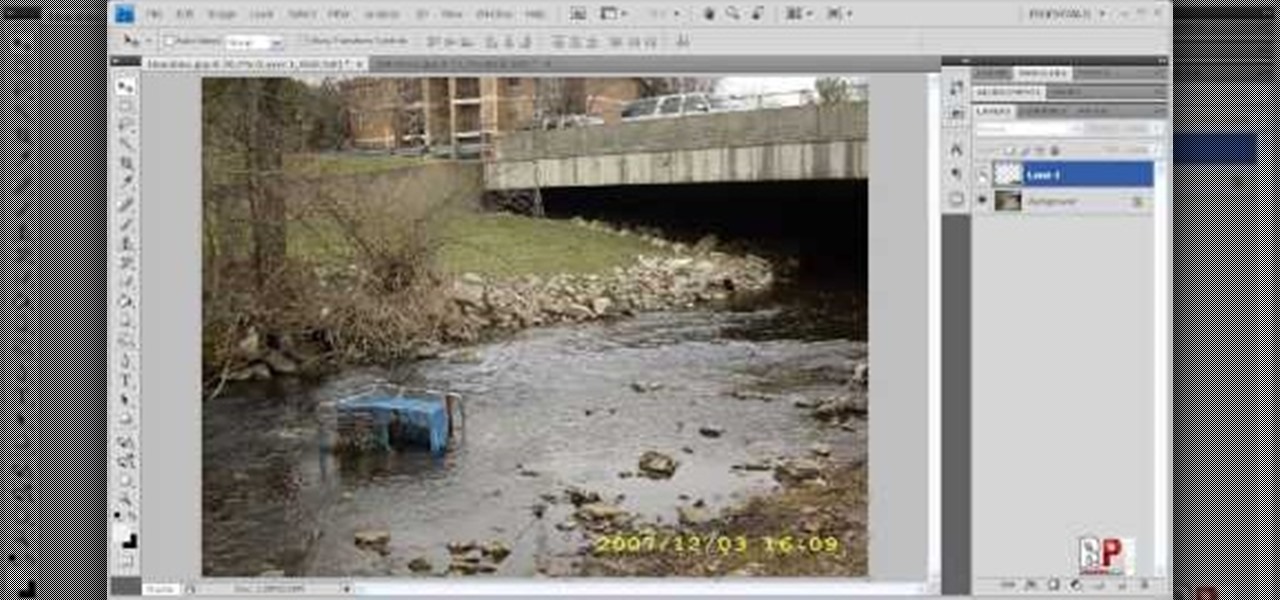
There are various ways to remove the timestamp on your photos using Photoshop. You can use the crop too and crop out the photo, but then you'll lose parts of the photo as well. You can use the patch tool, and draw a border around the date, then drag the date to another area, let go and press ctrl+D. The time will disappear and the area will be patched up with surrounding colors. Another method is to use the spot helium brush tool, and simply just brush over the text, and the spot helium brush...

In this Arts & Crafts video tutorial you will learn how to create a box to hold a mini album or small cards. Take a shiny card stock 10.5 x 6 inches. On the 6" side, score at .5" and 1" on both sides. On the longer side, score at 3, 3.5, 7.5 and 8 inches. Cut out the corners on the flap side of the card as shown in the video. Do a step cut on the other side of the card as in the video. Round the four corners with a corner rounder. You can do some stamping now if you want or you can also glue ...
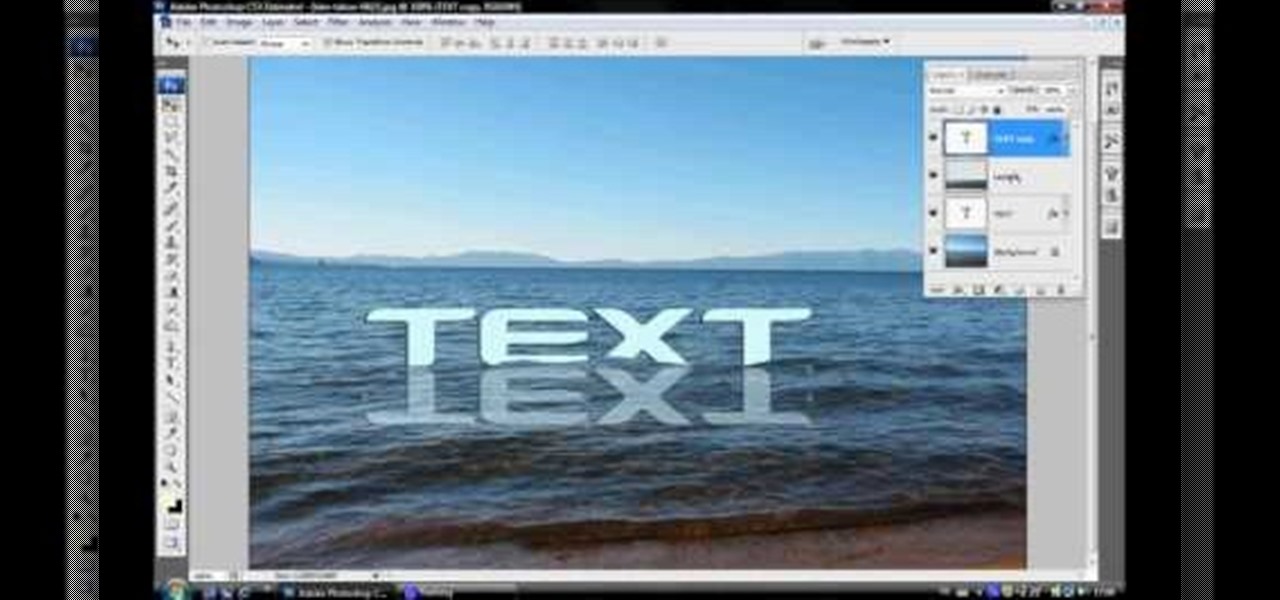
In this video tutorial, viewers learn how to make floating text on water. Begin by importing the water image into the program. Begin by selecting the polygonal lasso tool in the toolbox and select the top of the water. Once you have made the selection, right-click on it and select Layer via Copy. Then select the text tool and type in your text. Create a contour to make the 3D and give the text a light color. Then place Layer 1 over the ext layer and use the selection tool to place it behind t...
Following are the steps to describe how-to make small jewelry with head pins: 1. Materials needed are long head pins, beads, wire, cutting player.
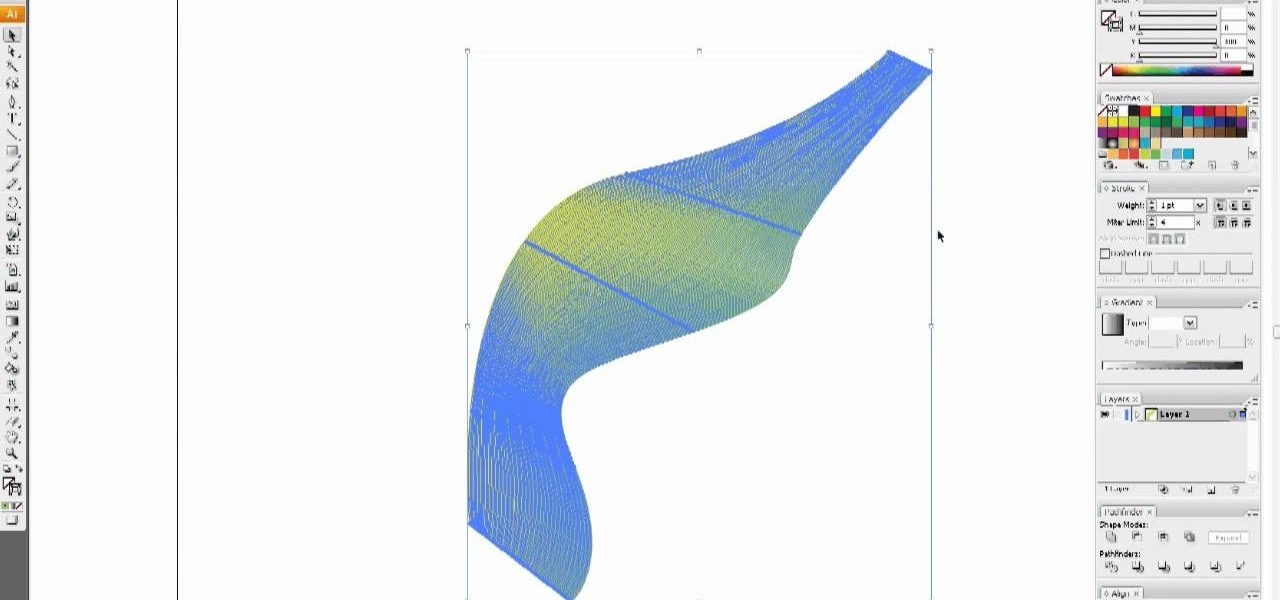
In this video tutorial, viewers learn how to use the blend tool in Adobe Illustrator. The blend tool will allow users to create objects between two strokes or filled objects. When you double-click on the blend tool, there will be 3 options to select from. Select the spacing and press OK. The three spacing options are: Smooth Color, Specify Steps and Specified Distance. Users are also able to select the amount strokes between the two objects. Now select the points of the two objects and it wil...
How to start a square or cube lanyard is demonstrated in this video.There are other videos to demonstrate how to stitch.
The great thing about hair is being able to do almost anything you want to it. From dying it a certain color, to adding a bunch of hair bows. Hair can be fun to play with. Another great way to style your hair is by wrapping it in a pattern or style that not only is comfortable, but also looks good as well. Find out how to dutch braid your own hair in this hairy tutorial. Oh and the French braid is woven into the hair, the Dutch braid lays ON the hair. Enjoy!
Kayden demonstrates how to do navy blue gradient French tips with silver glitter. For this you need a base coat, top coat, navy blue nail polish and some glitter.
In this Family video tutorial you will learn how to make a spiral sun catcher. Take a contact paper and draw a spiral on it starting at the center and drawing out wards. Now remove the backing of the contact paper and lay it down sticky side up. With markers, color in the spiral. Then take the contact paper and lay it on top of the backing and smooth it out. Now cut along the line of the spiral with scissors. Tie a piece of ribbon to the inside end of the spiral and now you have a spiral sun ...
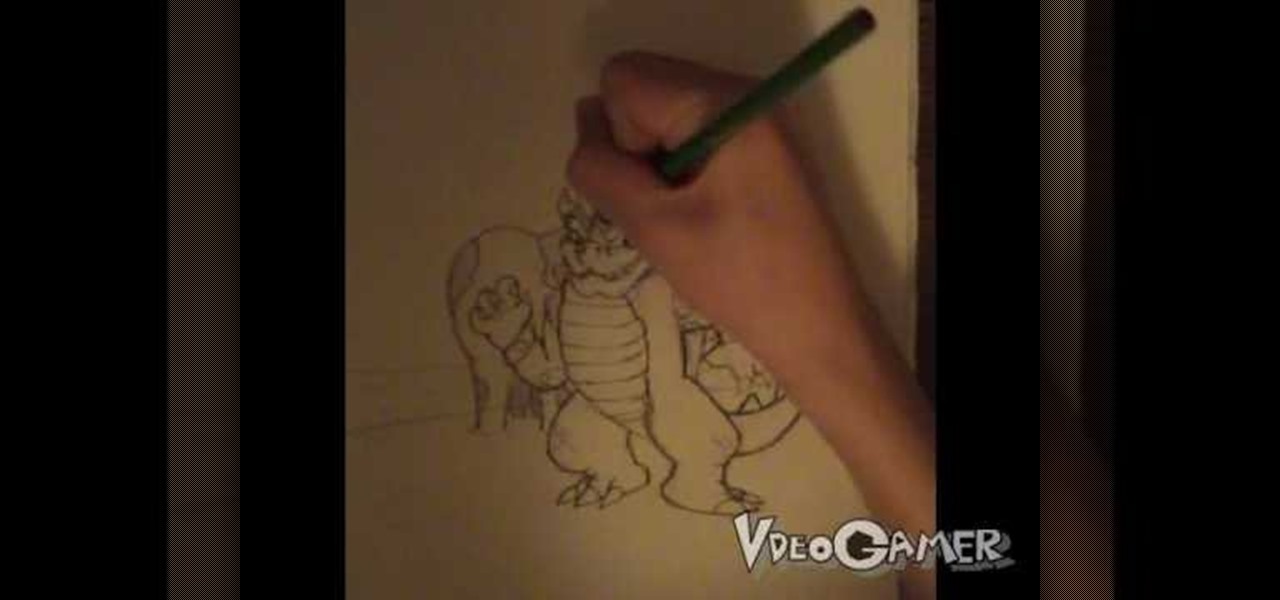
This video illustrates how to draw Bowser from Bowser's inside story. Here are the following steps: Step 1: First of all take a sheet of paper and pencil and start drawing the character.
In this video, we learn how to make objects transparent in Flash. First, open your object up and convert it to a symbol in Flash. It doesn't matter if it's a graphic or movie clip, just make sure it's a symbol. Next, click on the symbol you just created and go to "properties". Find the section called "color effect" then find the drop down menu. You will see several options, choose "Alpha". Once you do this, you will have the ability to tweak how transparent you want your object to be. Use the...
A compelling and quick moving tutorial on making the Windows Vista logo with Adobe Photoshop. The logo can be made quick without going too in depth into some of Photoshop's more advanced features. Starting with a circle a gradient shade is layered over the shape. Two circles are cut out and shaded white to give the circle a 3D feel. Then adding a drop shadow to the entire shape really gives it the logo's appearance. The windows themselves within the logo are cut to shape and copied and moved ...
Kengi shows us how to make kielbasa and cabbage, in this video.Take two kielbasa susages and cut into small pieces.Take a cabbage,cut it into halves and then slice both the halves into strips.Heat a skillet and add some oil to it.Put in the sausage pieces and some sliced onions.Cook until the sausages attain a brown colour. Once the sausages are browned add the cabbages to it.Spread the cabbage slices on top of the sausage.Cover the skillet with a heavy lid, lower the heat and let it cook.Onc...
In this how-to video, you will learn how to draw Homer from the television show, The Simpsons. You will need a piece of paper and something to draw with, such as a pen or pencil. First, draw two circles for his eyes. Next, move on to his nose and mouth. From here, you can draw the outline of his head. Add the lines for his hair. Move on to his ears and neck. You can also fill in the pupils. Next, draw Homer's collar. You can shade in the color of Homer's skin if you want. This video shows you...
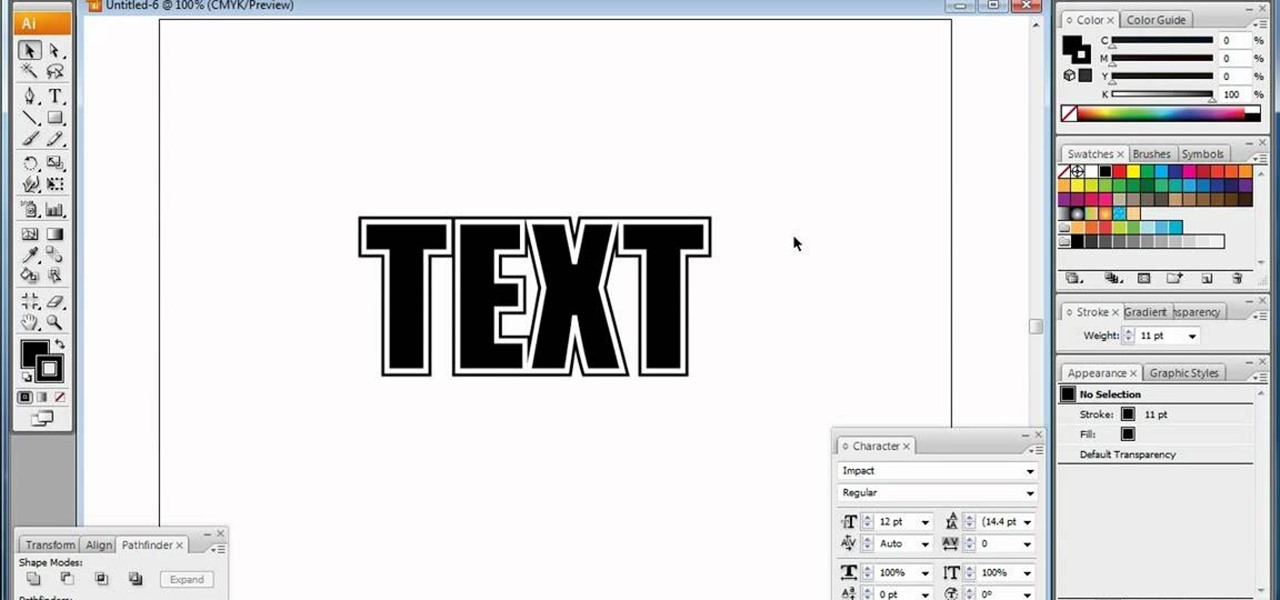
In this video, we learn how to do basic text effects in Adobe Illustrator. First, open up Adobe Illustrator and make a new document. Now, type in your desired text and change your font to one that you prefer. To make your text turn into a radiant, you will click "file" then "type" then "create outline". Now you will click on your text then click your radiant swatch. Then, go to "gradient" and adjust your colors to which you prefer. You can now put a stroke on it using the "stroke" tool and ch...
In this how to video, you will learn how to turn a photo into a line drawing in Photoshop. First, open your image in Photoshop. Create three layers of the same photo. The top two layers will be worked with. The bottom layer will remain the same. Take the top layer and change it to color dodge. Select control and I on the keyboard to invert it. Go to filter and blur to choose Gaussian blur. If you have dark lines, use a small amount of blur. You can use a lot of blur to get a unique look. Clic...
In order to make a Cuttlebug Smoosh Card, you will need the following materials: card stock (at least 3 different prints or colors), a ruler, distress tool, double sided tape or glue, distress ink, watermark stamp pad, decorative accessories, and scissors.
To do fading in flash, first drag an image onto your main window. Shrink it down so it fits on the window, then right click your image and hit copy frames, then come out to frame 15 and hit paste frames. Right click in the middle of the set of frames and hit "Create motion Tween" Go to the first frame and click on what you want to fade. Go to the color tab and then select alpha. If its not on 0, drag it down to 0. Now go to frame 15 and make sure its on 100. Now if you drag from left to right...
Using a huge jar and with water colored with die in it you can make clouds. To do this set up the apparatus as shown in the video. Now open up the top valve and blow air into the jar. Now this causes the air inside to be compressed as we are pushing more air into the confined jar. This creates a high pressure inside the ball. To understand how clouds are formed you need to know two concepts. The first concept is that as pressurized gas expands it cools. The second thing is that warm gases can...
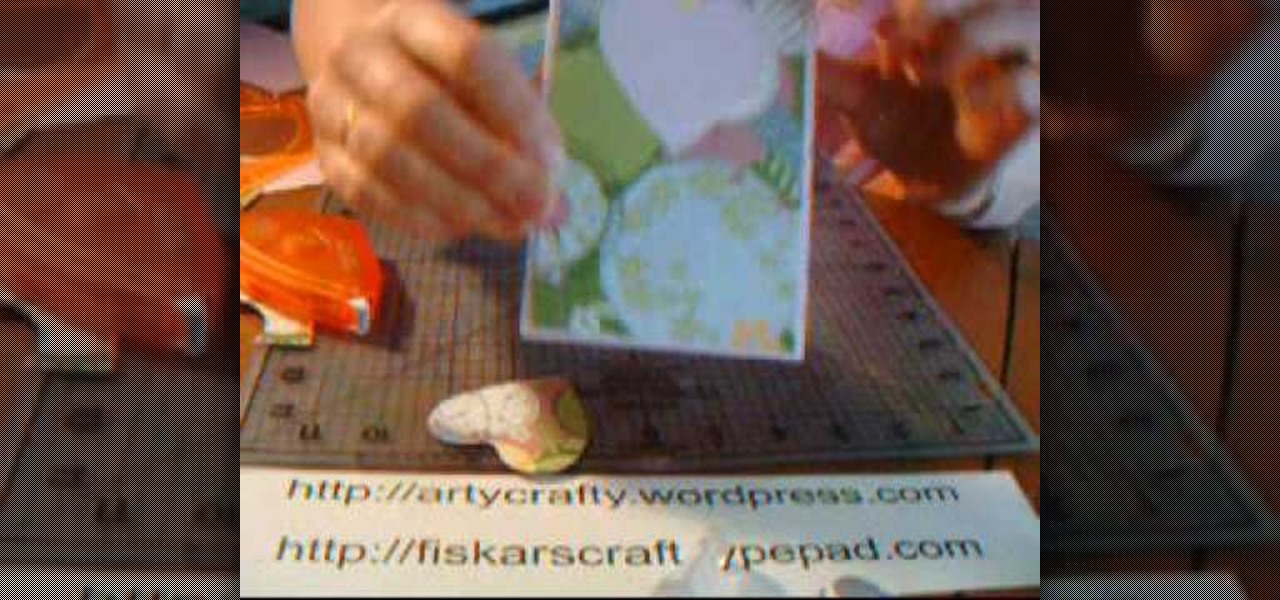
In this Arts & Crafts video tutorial you will learn how to make window cards. Supplies needed are trimmer with scoring blade, Fiskars templates, Fiskars ultra shape xpress, glitter, cardstock and embellishments. Take a 81/2 x 6 inch cardstock , score the center at 3‚Äù mark and fold it. Take a colored paper about ¬O‚Äù smaller than the card, cut out a 2.5 heart with the help of the template and glue it on the card. Then open the card and cut out a 1.5 heart from the center of the 2.5 heart. N...
Taylor and Lily demonstrate making fizzy bath bombs. Ingredients needed are one cup of citric acid, one half cup of corn starch, one cup of baking soda, and one quarter cup of a light vegetable oil. Food coloring and flavored extracts or essential oils can be use to scent them. First mix up all of the dry ingredients in a non reactive bowl. Then add the vegetable oil. Mix with a nonreactive spoon, whisk, or gloved hands. If food coloring is being used, add four drops. If using an extract or e...
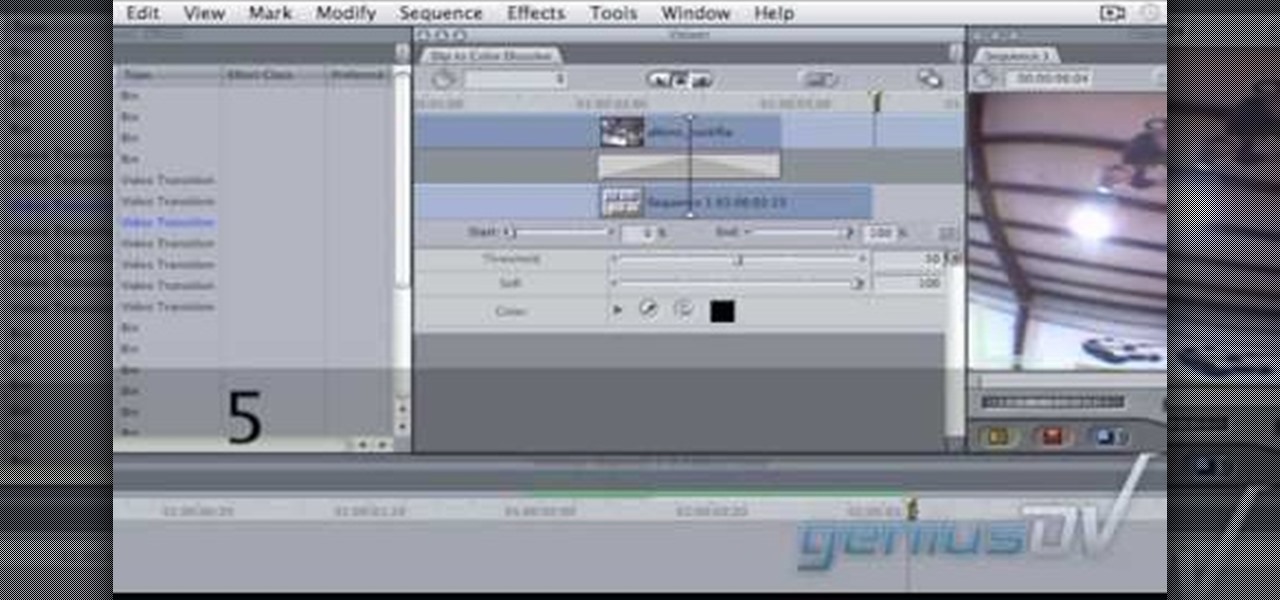
In this video tutorial, viewers learn how to create a freeze-frame effect in Adobe Final Cut Pro. Begin by placing the time line indicator to where you would like to place your freeze-frame. Press Shift and N to create the freeze-frame. The default user preference is 10 seconds. To change it, change the time and click on the insert button to splice the new freeze-frame time into the time line. Now click on the Effects tab and select the Dip to Color Dissolve under Video Transitions and Dissol...
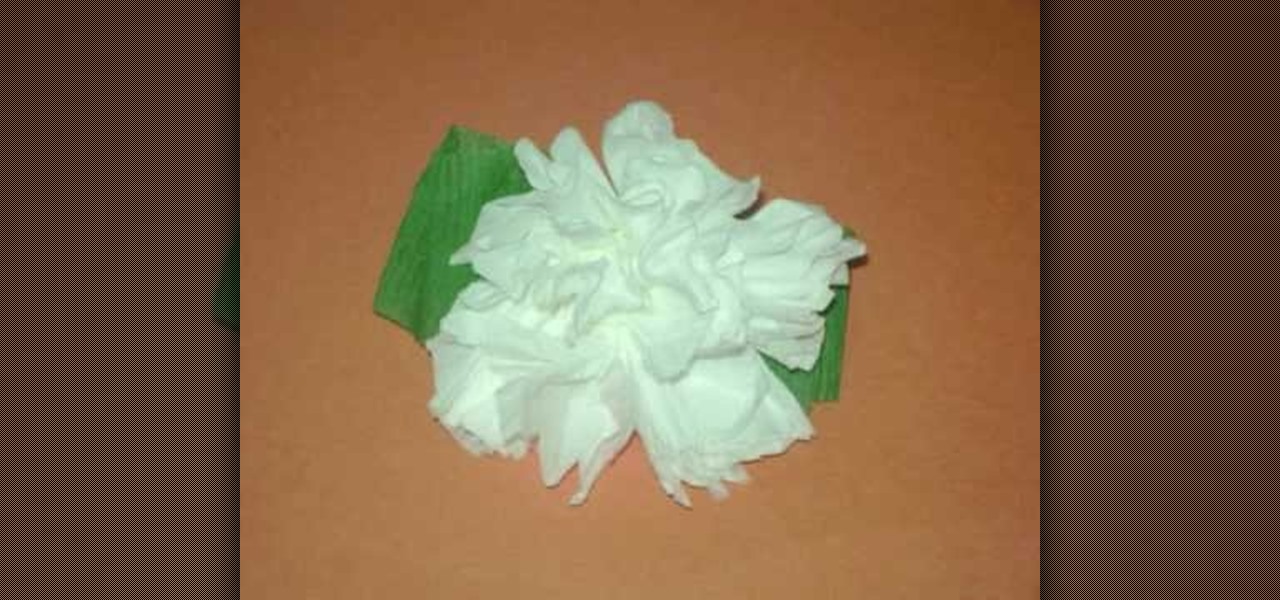
One of the most fun activities when you are a kid is making something pretty to bring home to mom. In this tutorial, learn how to make carnations out of toilet paper for a fun kid's craft. Carnations make a great craft for Valentines or Mother's Day and are easy to make with even the youngest elementary students.
Kale is a hearty and delicious vegetable that packs tons of health benefits. Kale is inexpensive to buy, can feed many and is hard to ruin because its leaves are so strong.
In this tutorial, we learn how to paint a guitar! Before you begin, you will want to take your guitar apart. Once you've done that, go outside and clean your guitar removing any dust on it. Your next step is to smooth the whole body of the guitar with 100 grit followed by 150 grit. After this, hang your guitar up somewhere and apply 4 layers of sanding sealer (which should equal one can). Make sure to sand down the 150 grit between each layer once it's dry, so the next layer has a grip to sti...
Shelley Lovett explains that reindeer food is, and demonstrates how it is made. Reindeer food is something you can make and then sprinkle on the snow or grass in your yard in order to help Santa's reindeer find your house. All have to do is mix some quick oats with a little red and green colored sugar to make it sparkle. Then you put in in a bag and tie with a ribbon. She has a little tag she ties onto the ribbon that explains what reindeer food is and how to use it. You can print the tag fro...
Japanese kimonos are a beautiful and whimsical clothing full of tradition and grace but are not really appropriate to wear in everyday life. Luckily you can make a cute and hip kimono inspired dress with the help of this video that is perfect to wear out anytime. You will need a large piece of fabric whatever color you would like the majority of the dress to be. Use a t-shirt to sketch out an outline for the top of the dress. You will then only need to finish sewing the dress with some accent...
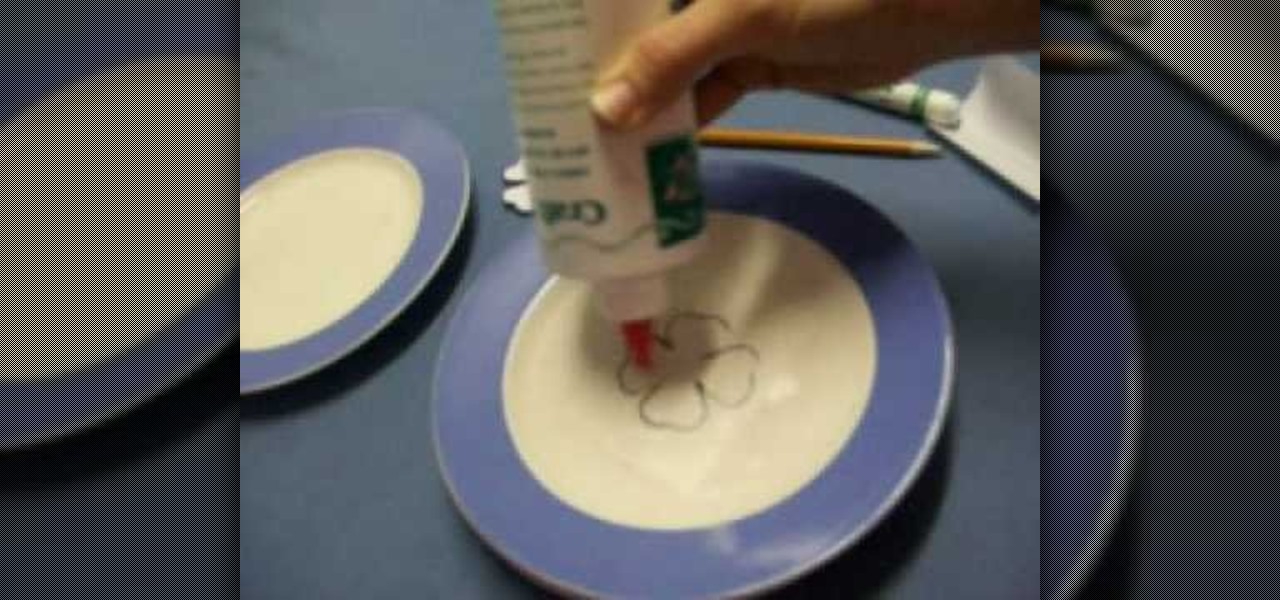
In this how-to video, you will learn how to make a four leaf clover pendant. Start off with contact paper and place it on a smooth flat surface, such as a large plate. Trace a four leaf clover shape onto the paper using a pencil or pen. Fill the entire shape in with glue. Once it dries, you can color the pendant with a green marker. Finally, you can peel off the contact paper. The four leaf clover shape will come right off with it. Viewing this video will show you the fastest and easiest way ...
This illustrate us how to make paper mache mirror. Here are the following steps.Step 1:Take a piece of cardboard and make two circle on it with two different circumference.Step 2: Now cut through the outer circle as well as the inner circle to obtain the rim.Step 3 : Now take a sheet of cardboard and cut it in shape of a flower.Step 4: In the center of the sheet place the rim.Step 5: Now along the petals of the flower stick a pile of rounded newspaper.Step 6 : On this newspaper and cardboard ...
Love4Nails shows step by step tips for achieving this look. Begin by choosing a background color. On top of the base, apply white polish. Then apply a smile line on the top portion of the nail as you would when doing a French manicure. Then fill in the nail. If its not perfectly straight its ok because it will be covered. Next, apply glitter polish on the white area of the nail. With the white polish make three dot and use a dotting tool to extend them, creating flowers. With the original blu...
Love4Nails starts off with pink, silver, and black nail polish. First choose one of your colors to create a French tip manicure. She next takes the silver polish, starts at the bottom and creates a swirl around the nail. Swerve the silver in a way that it covers the French tip part of the nail. Then get the pink glitter and apply only on pink polished area. Place black rhinestones on the swirled area of the nail. Because you're using the pink glitter polish, if you choose not to add rhineston...
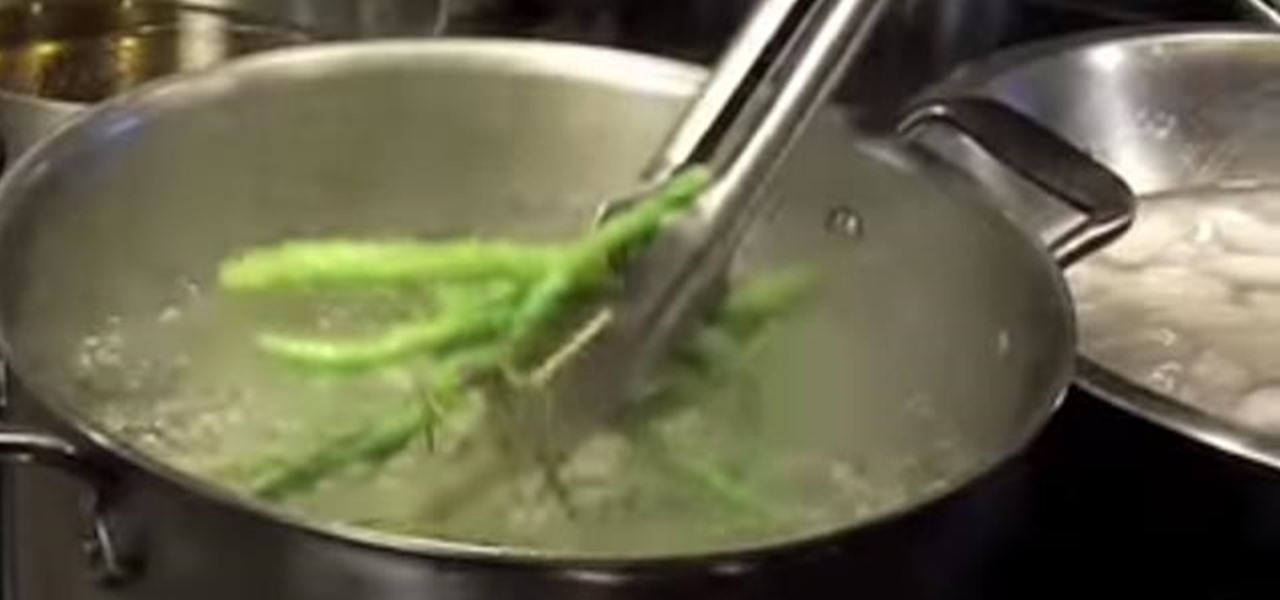
Chef Stephen Gibbs shows you a good cooking technique: blanching and shocking vegetables. Blanching is letting vegetables in hot, boiling water for a short period of time. Shocking is putting hot vegetables in ice cold water. These methods are used together in order to precook certain vegetables or even take the skin off.
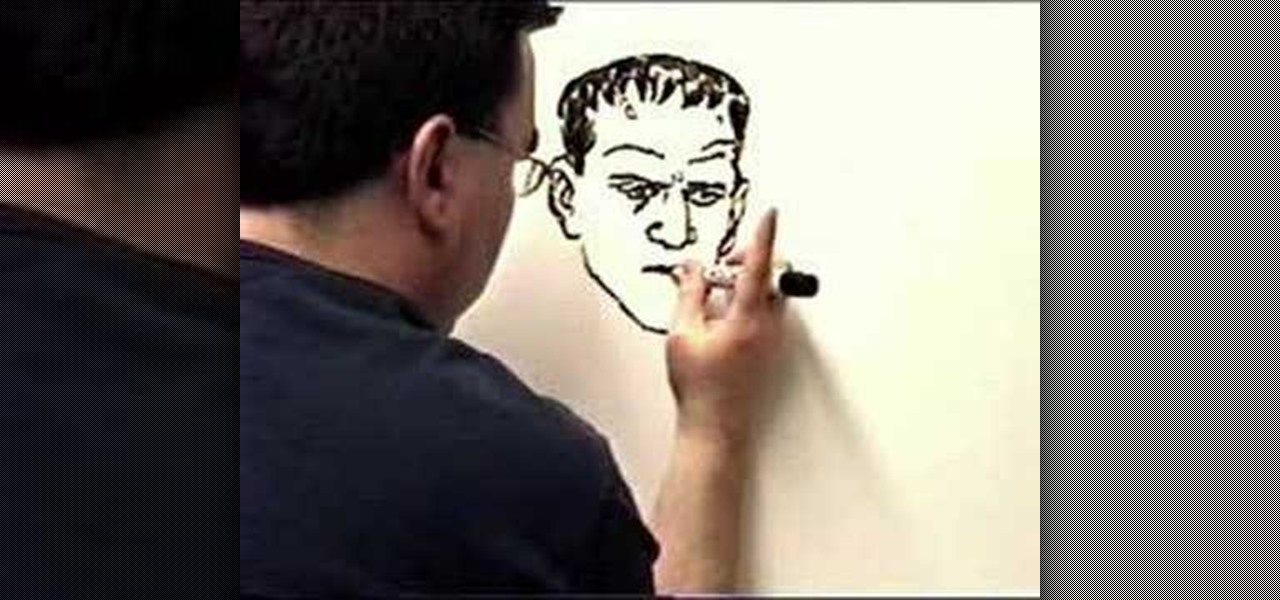
`This video illustrate how to draw Frankenstein's monster. Here are the following steps.Step 1: First of all take a sheet of paper and a pencil.Step 2: Now draw a oval circle representing the face of the monster, draw a big circle within the face showing an open mouth.Step 2: Draw small circle within the face representing the eyes.Step 3: Now draw a free hand mid part from the lower face .Now from this mid part extend two hands with waves to represent masculine look.Step 4: Draw two legs from...
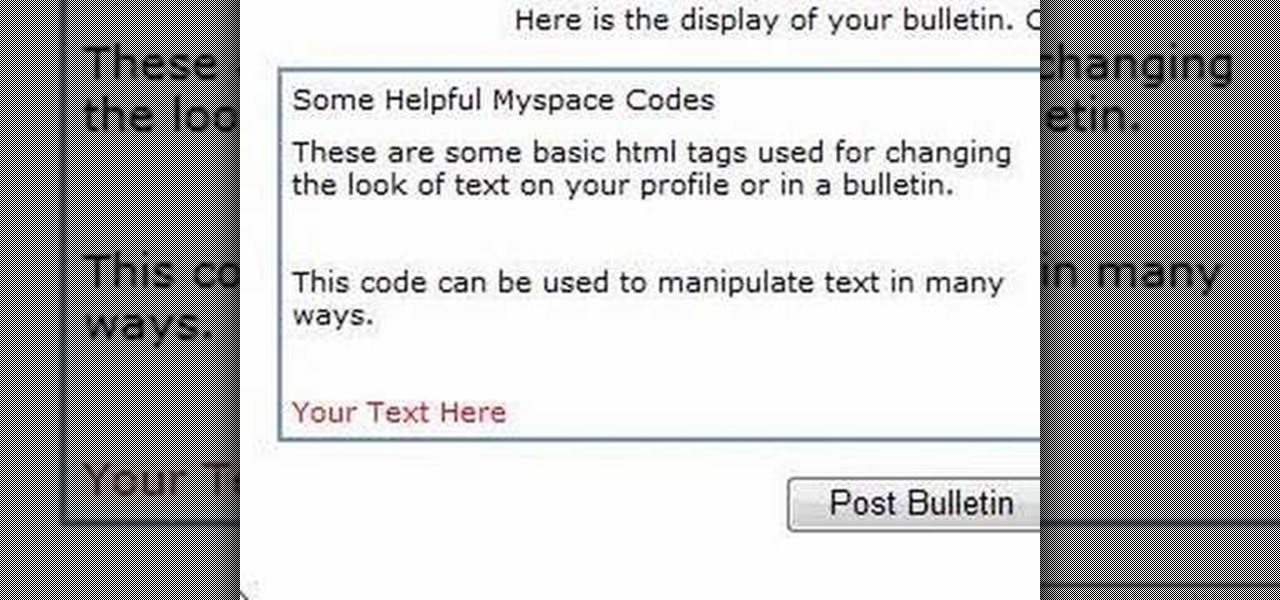
In this Computers & Programming video tutorial you will learn how to alter text on MySpace using HTML codes. Here are a few basic html codes used to change the look of text on your profile or in a bulletin. <b> for starting bold text and </b> for ending bold text. <i> this text will be italicized</i>. For underlining text use the code <u> </u>. <b><i><u> This text will be bold, italicized and underlined </b></i></u>. To change color of your text to ‘red’ use the code <font color=”red”> </font...
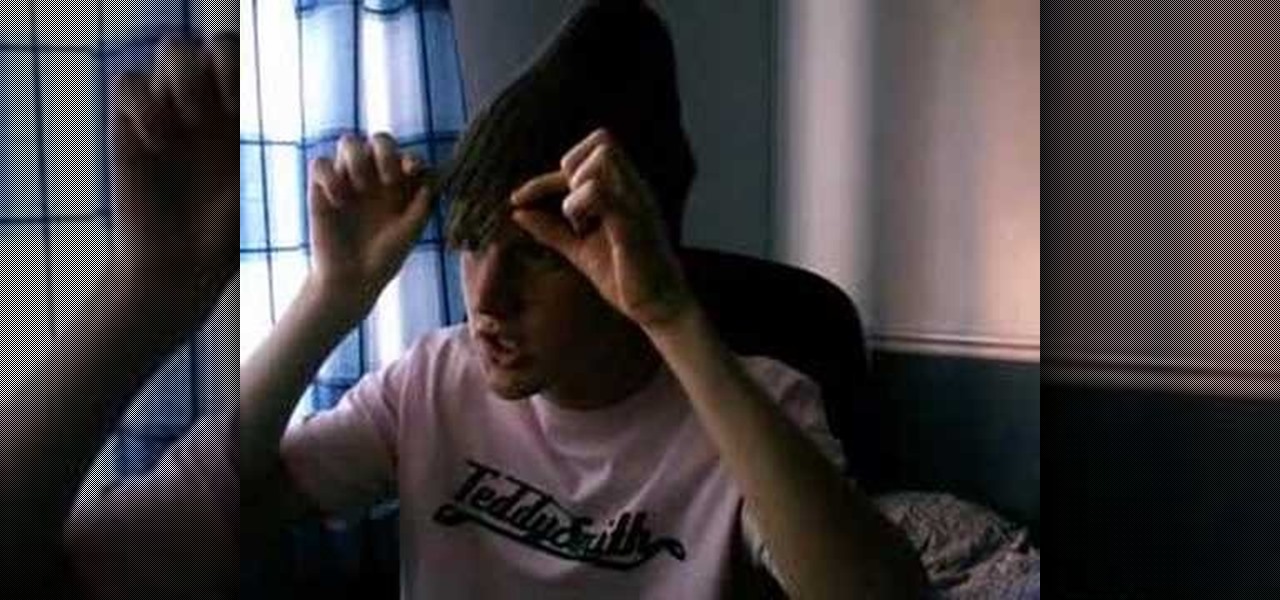
In this tutorial, Topman shows us how to wear an over sized beanie. One great way for a guy to wear an over sized beanie is to bring the beanie and drag it all the way down on the back of the head. Pull it further than you would any other beanie and it will look great. You can let your side hair and bangs come out of the front if you want to have a different look. You can use this with any color of beanie and you can also do it whether you are a guy or a girl. Make sure when you pull the bean...