When you want to see something far away with a little more clarity or you're having a hard time reading small letters right in front of you, you can point your iPhone's camera at the subject and "pinch" to zoom for a better look. But there's actually something built into iOS for the exact purpose of magnifying objects, and it goes above and beyond the normal camera features.
Instead of a tutorial this is really a card idea for what to do with large stamps/images/rub ons/stickers etc.. and a really quick & easy option. Step 1: Items Used
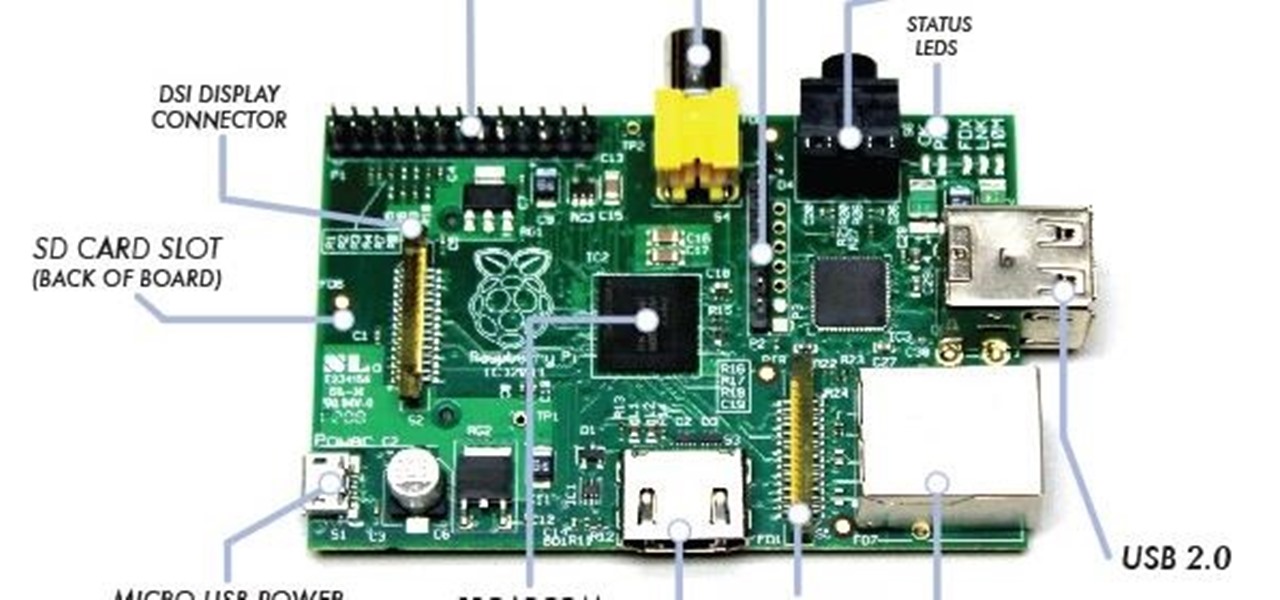
Most of you probably heard about Rasberry Pi and if you haven't; what is wrong with you? But nothing less a Rasberry Pi is a computer a very small computer. Despite these size limitations, the Rasberry Pi is to not be underestimated. Not only can it do anything like a normal laptop or desktop, but, in my opinion on of the coolest features is that it boots off a Micro SD card. It can do anything that you want, but it's built to be played with. A hacker heaven.
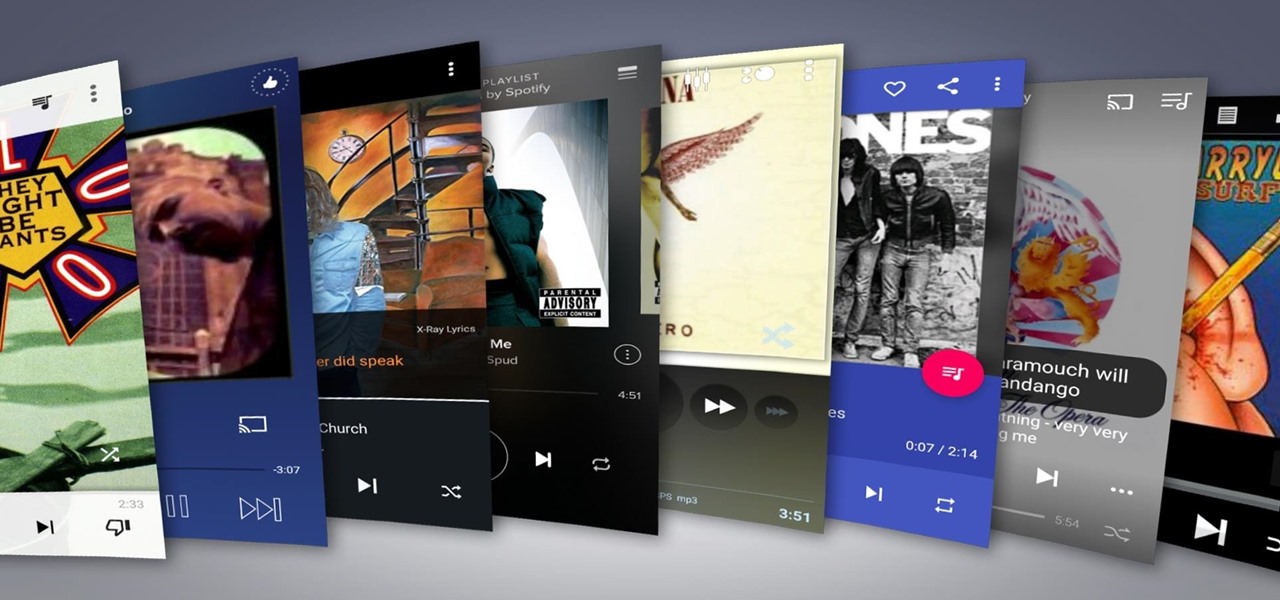
Remember portable MP3 players like the classic iPod? Seems like forever ago that they were all the rage, and I don't think I've seen a real one in the wild for a good 5 years now. These devices died out so quickly as a direct result of the onset of smartphones, which allow us to do everything that an MP3 player could do and then some.
Macs, like pretty much all Apple products, are notorious for not having a highly customizable UI. They do this to keep a consistent look and feel across all of their devices, but I've grown bored of it over the years.
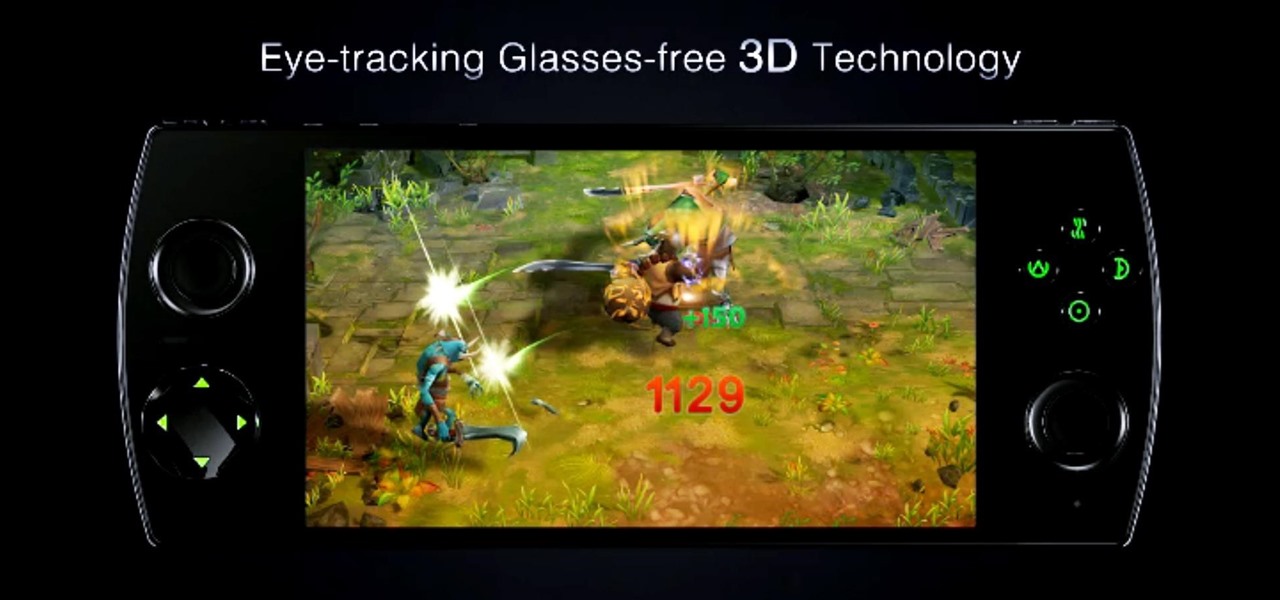
The upcoming W3D gaming smartphone by Snail isn't like anything you've ever seen before. It's pretty much a cross between an Android phone, Nintendo 3DS, and PlayStation Vita. It runs on Android, has a 3D screen similar to the 3DS, and gamepad controls like the Vita, making it one hell of a portable gaming device (that's also a phone).

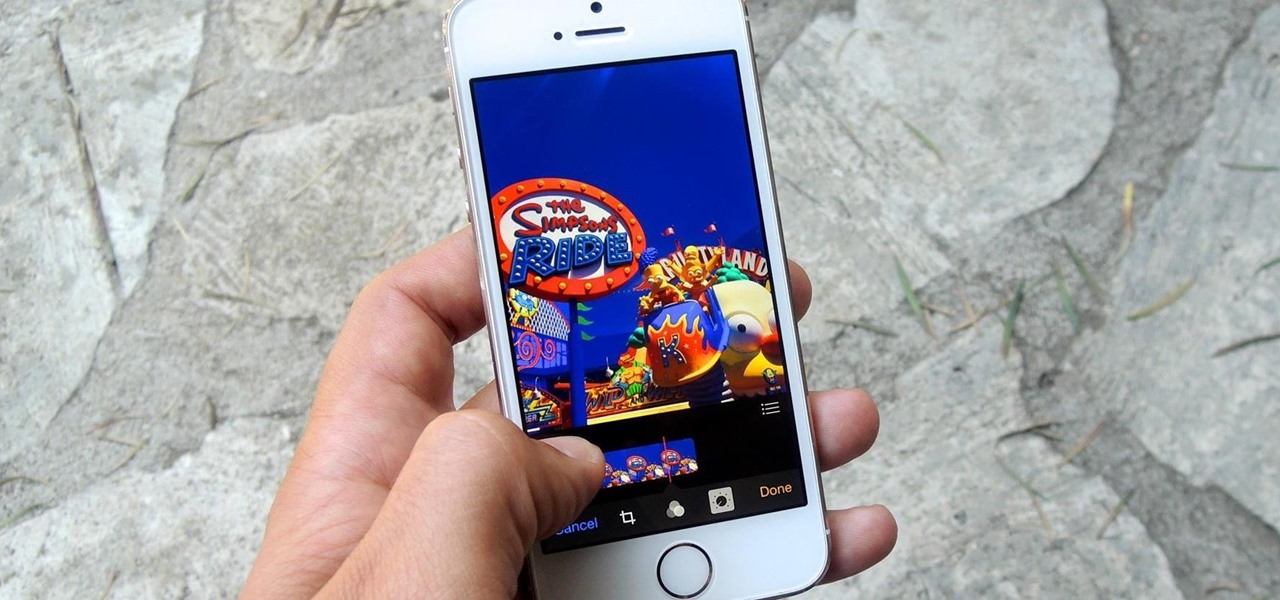
The new Camera app in iOS 8 has a few really great features, but some of the best photo-centric features were packed into the iPhone's photo editing tools. These new editing features can create even more dynamic images than before, no Instagram required.
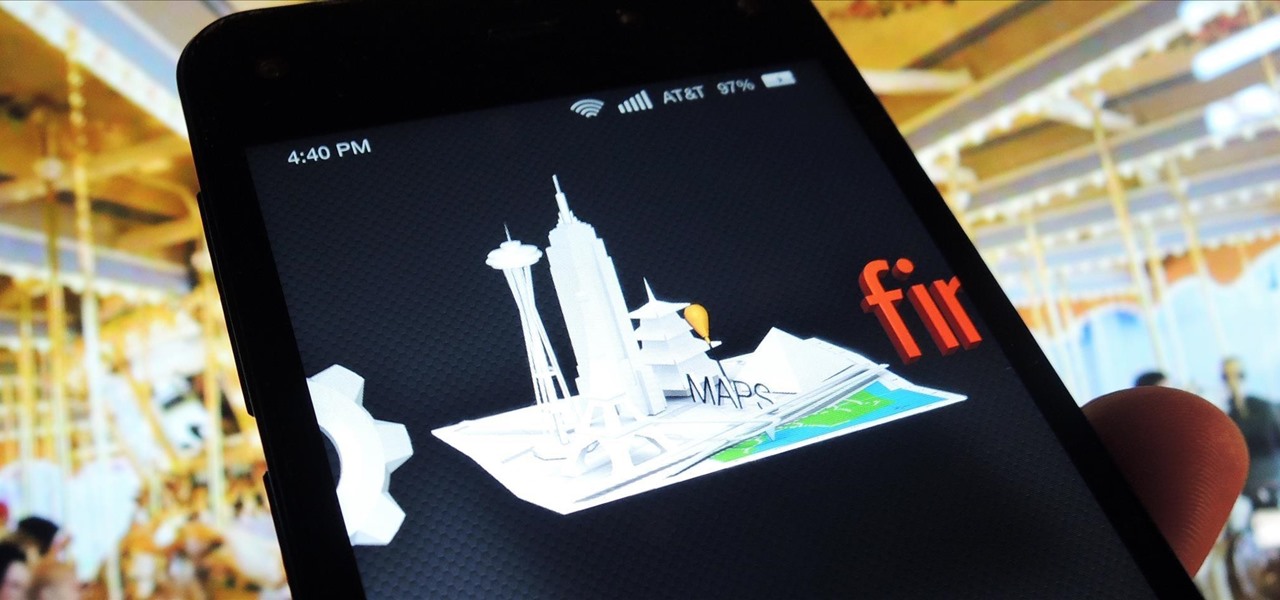
The latest software update to the Amazon Fire Phone packed a lot of new and enhanced features, one of which makes the Carousel (a favorite feature of mine) much more useful.
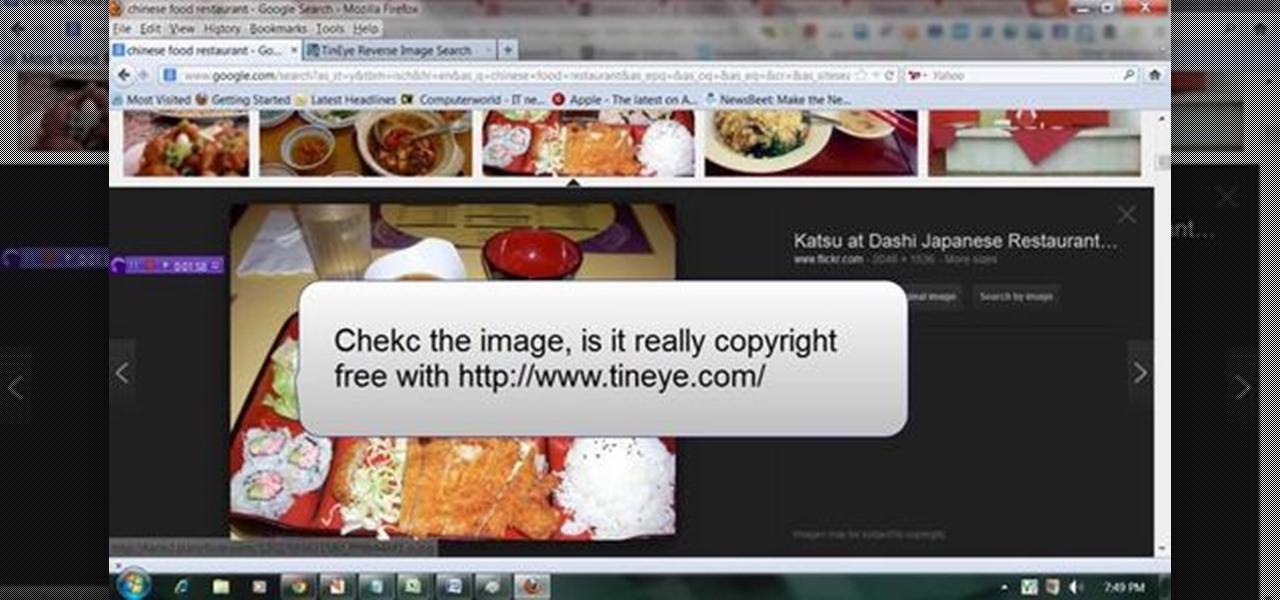
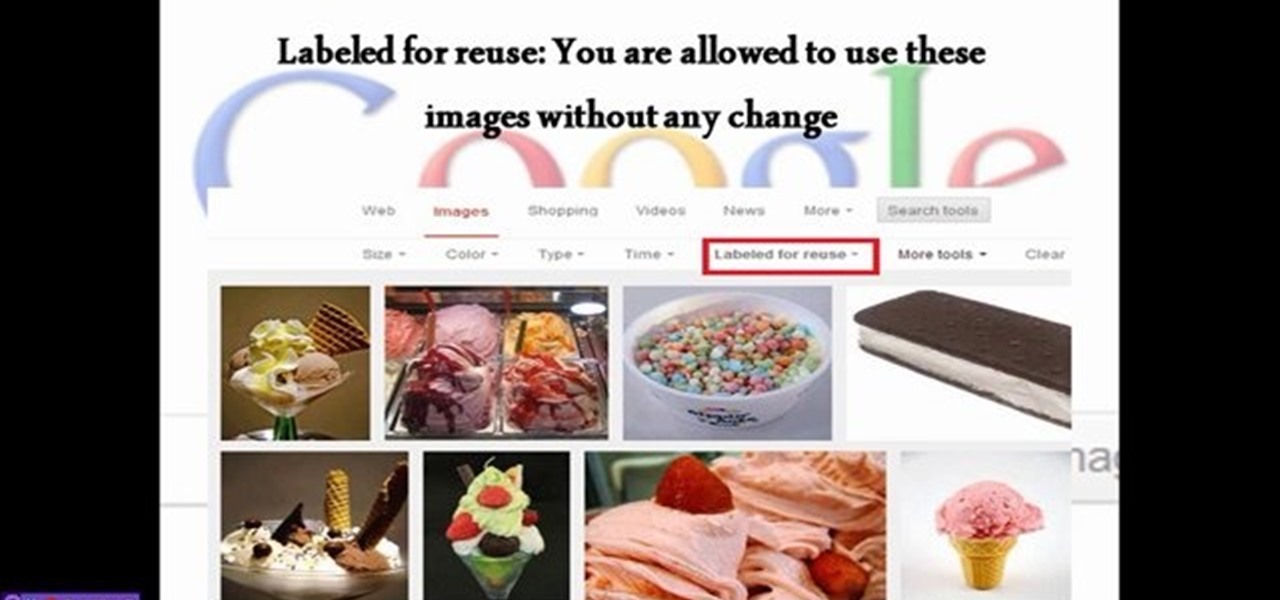
This video will describe you how to search for a Copyright free image. Google advanced image search gives you the opportunity to find free images from any category. Copyright free images are free to use in personal even as commercial purpose. Watch the video and follow the steps.
This video will help you how to create system image backup in windows 7. If you create an image of your system you could restore after crashes. Watch the video and follow the steps to create system image backup in your PC.
As I begin my move across the country, I find myself dodging all kinds of Craigslist scams, particularly in the apartments and housing classifieds. Fortunately, I've discovered a little trick that will tip me off to a scam before I lose $1,000 in a fake security deposit.
Google's new camera, aptly named Google Camera, has been all the rage since it was released onto Google Play last Friday. The main reason is the amazing Lens Blur feature that adds depth-of-field Lytro effects to photos, without the use of any expensive accessories or extra hardware, like on the new HTC One M8. The camera does this by utilizing a depth map through the processing of multiple images. Frame your photo, move the camera (phone) in an upward tilt or motion, and the software capture...
This how-to article is about changing you Mac icons. It goes into detail on how to make your dock icons a different image, like your favorite sports team or just a cool looking image.
Forgot the passwords to your email or your other favorite websites? If you typically store your passwords in Internet Explorer (IE9 or other versions) it can be tricky to get your passwords back -- but this tutorial makes it really easy!
Forget the callsigns and titles from previous Call of Duty video games, Black Ops gives you something new to play with— playercards. Playercards allow you to create virtually any emblem you can possible think of because they're fully customizable, and emblem images can be colored, moved, rotated, flipped, resized and stacked on top of each other, with up to 12 emblem images layered at once. And if you're making Kyle Broflovski from South Park your playercard emblem, you'll need all 12 layers!
Fall is now in full swing, which means that the vibrant, colorchanging leaves on all the trees in your neighborhood are taking center stage in the fall scenery. In lush hues of orange, red, sienna, and emerald green, leaves are the most colorful and multidimensional seasonal treats.
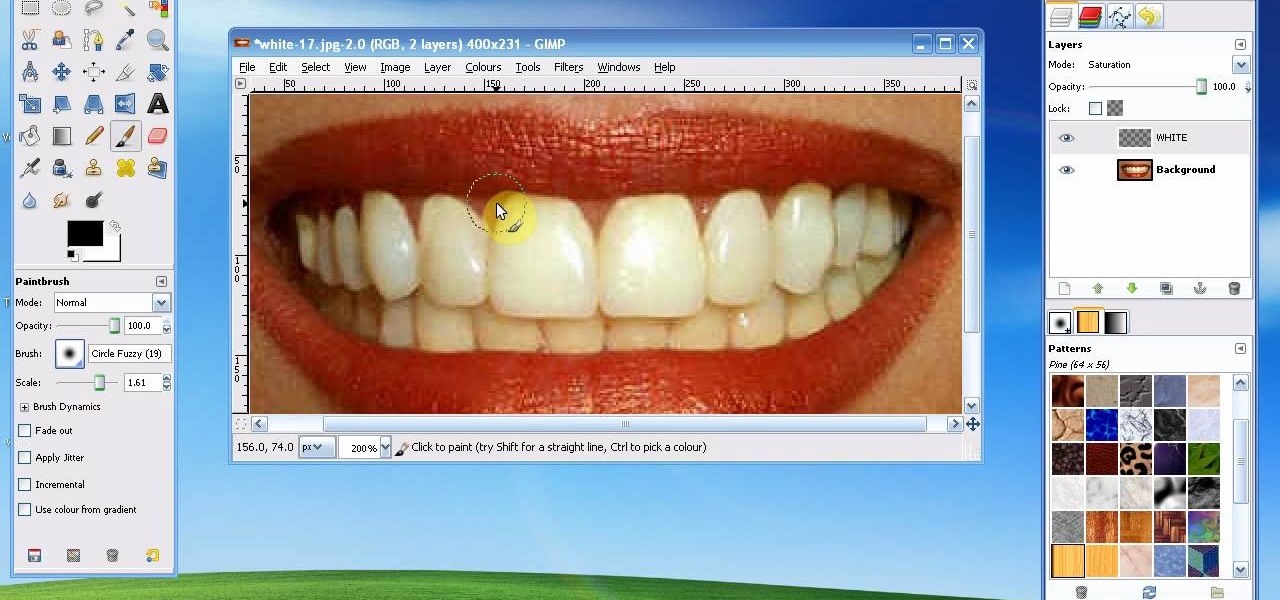
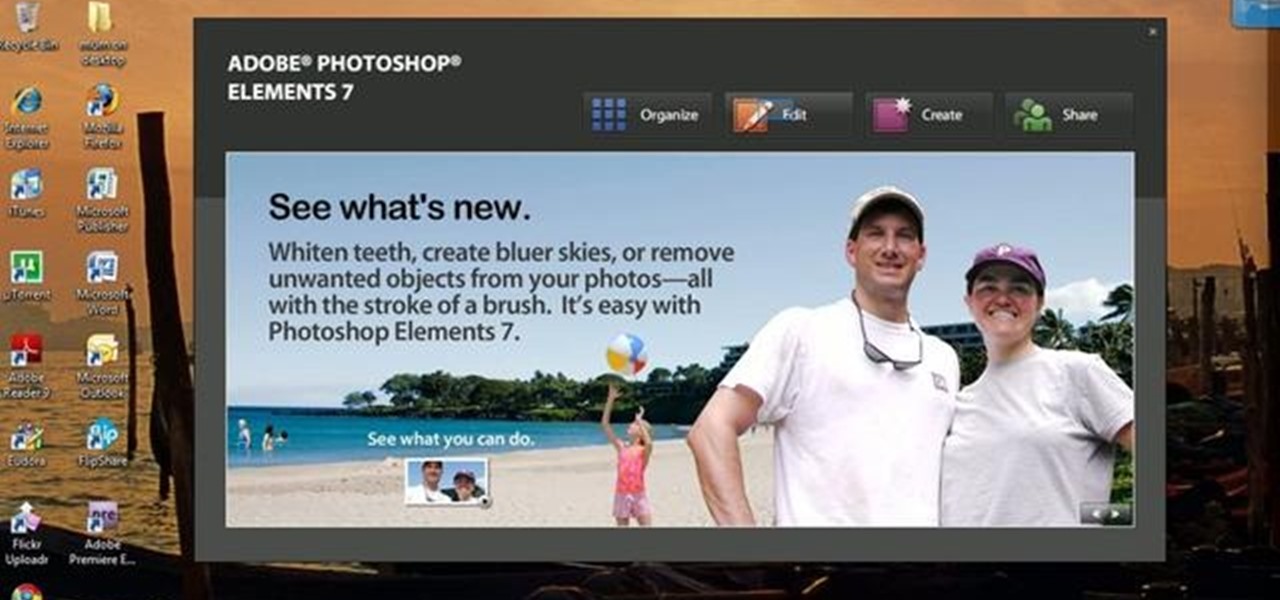
In this tutorial, we learn how to whiten teeth in the Gimp image editor. First, open up GIMP and zoom in on the teeth of your image. From here, create a new layer named "white", making sure it's transparent. Now, make sure the white tab is on the top and go to "mode" then "saturation". Select the brush named "circle fuzzy 19". Put the scale around 1.5 or 1.6 and then draw on the teeth, which will make them white! Do this for all of the teeth, then when you save you can use this as your image ...
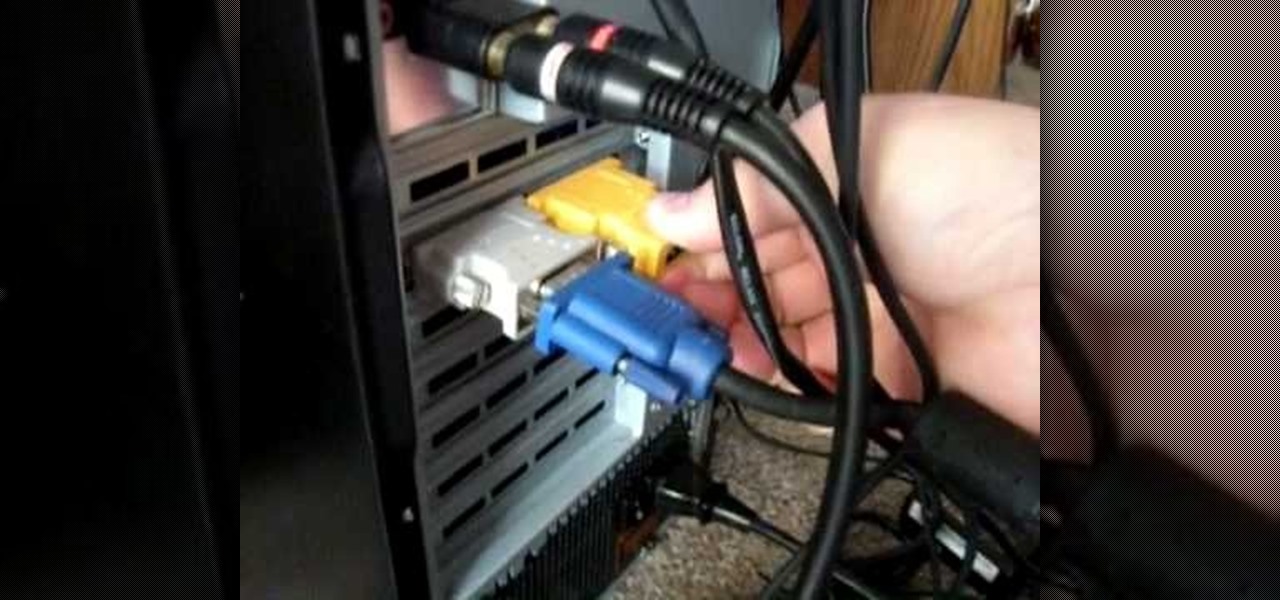
In this video, we learn how to connect a computer to an HDTV using an HDMI cable. Start out by plugging your HDMI blue port in the back of your computer monitor. Also, plug in a yellow DVI to HDMI converted with a cable connected to this. You can buy these on Amazon or New Egg for only a few dollars, get the generic version. After you have these plugged in, it's as simple as that. Plug these into the back of your television, then use your computer. You will now see the screen of your computer...
You don't need a wide lens anymore to create your own panoramic landscape shots. This tutorial uses a few beautiful shots of the Aegean Sea and shows you a few techniques available in Adobe Photoshop to create your own panoramic images.
Have you ever tried to erase the background on an image so you can use the object image to layer with another document? You can do it in Adobe Photoshop, but if you don't know what you're doing, it could take hours… days to extract that image you want. But with Photoshop Elements, there's a handy tool called Magic Extractor that helps you get some of the dirty work out of the way, so you can concentrate on the finer details. Watch this video to see how it's done.
In this tutorial, we learn how to tune your car in Photoshop. First, open up the image of your car and then add in a picture of different wheels. Then, place these wheels over the existing ones on the car and blend them in, then change the color as you prefer. Do this for the wheels that you are able to see on the image. After this, lower the car and add in a bumper to the front of the car, importing images in from various sources. Continue to add in parts to the vehicle, using shading and bl...
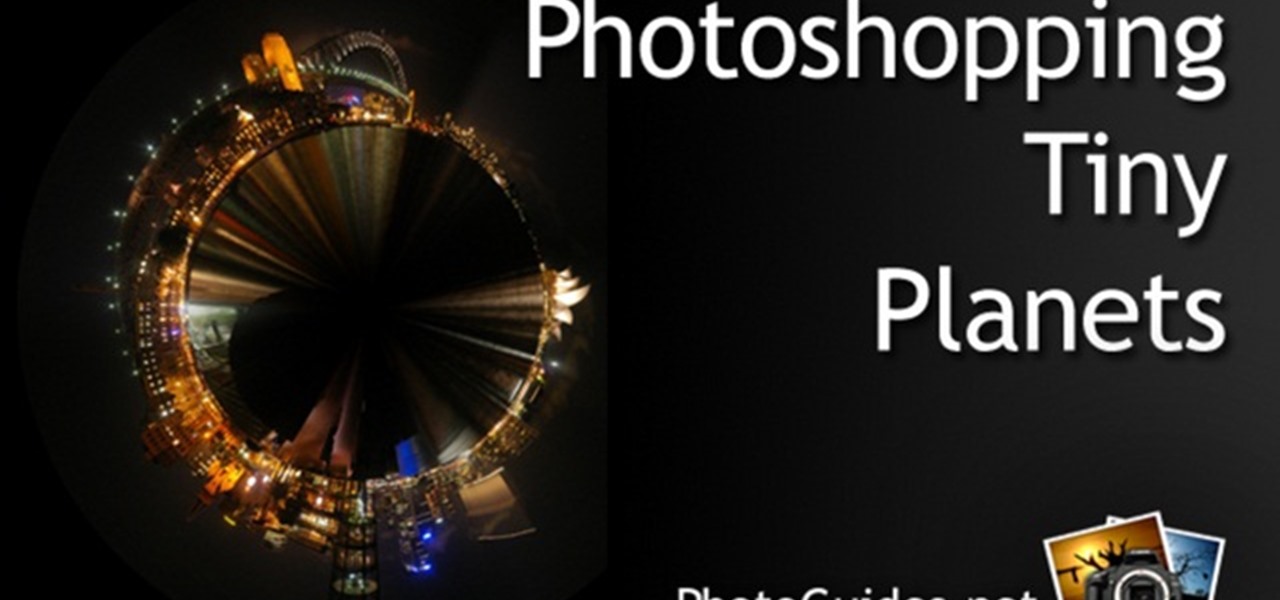
In this video, we learn how to create tiny planets in Photoshop. First, unlock your background layer and create a line in the middle of the image. Now, select the bottom that is underneath the line and drag it down to the bottom of the canvas. After this, make your image into a square by resizing the image with your tools. After this, you will need to rotate the image 180 degrees, then select "polar coordinates" in the distort tools. After this, you can rotate your canvas back around 180 degr...
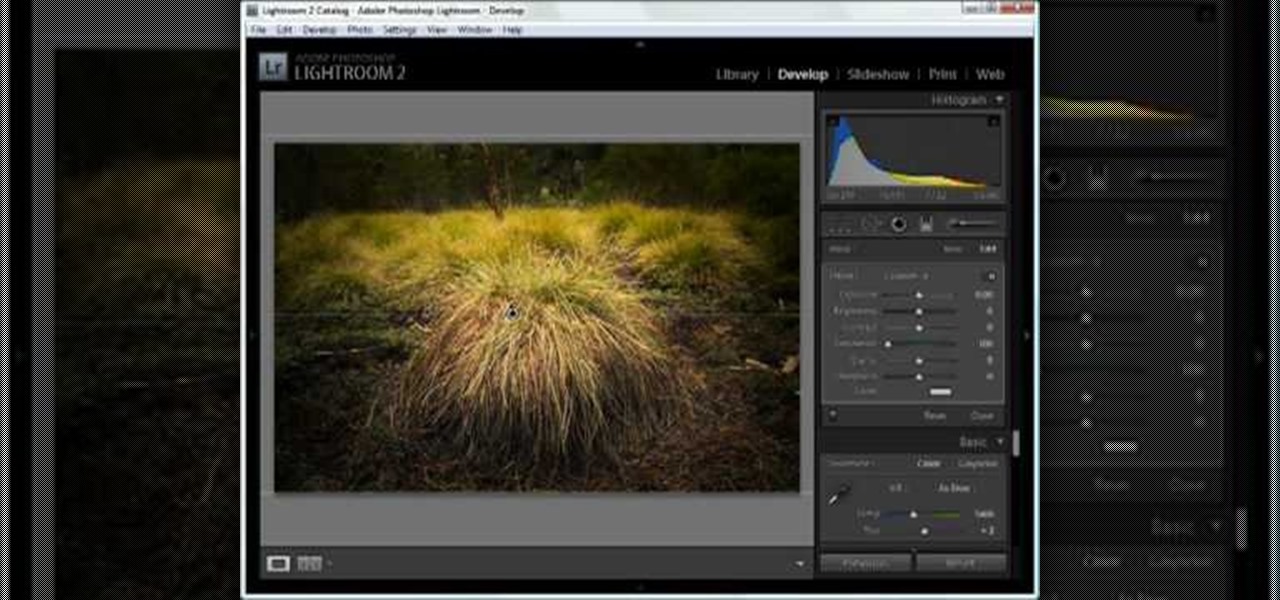
In this tutorial, we learn how to dodge and burn in Lightroom 2. First, open up your image in Lightroom 2 and use the brushes to change the saturation and the colors in the image. You can also use the graduated filter which you can use to apply effects across the image itself. Next, you can add a tint onto the picture and apply a second filter to make the top of the image darker, then make the middle of it brighter. Change the exposure and saturation to make the picture look more realistic. U...
In this tutorial, we learn how to insert pictures and format text in Fusion Essentials. Start by selecting your image and then clicking inside the text box. Select an image, then it will appear in the text box. From here, click on the picture and go to the alignment section. Choose how you want the text arranged around the image. You can justify it to the left, center, and right. You can also wrap the text around the image. Preview the page after you align it, then see if it allows the page t...
In this video tutorial, viewers learn how to add watermarks to videos in Sony Vegas. Users will need to begin by creating the watermark image in a photo editing software. Once created, make the image into a transparent background and save it as .PNG format. Now load the video into Sony Vegas and place it into the time-line. Then open the image in Sony Vegas and add it into the video time-line. Finish by panning the watermark image to a smaller size in the corner and extend the play time. This...
To remove the DRM from a Kindle, you will need the following: Kindle for PC software program and Python scripting program.
In this video tutorial, viewers learn how to create a carbon fiber desktop wallpaper using Adobe Photo-shop. Begin by creating a 20x20 pattern with the rectangle marquee and gradient tool. Then go to Edit, select Define Pattern and name the image. Now create a document with the dimensions of your monitor screen. Then go to Edit, select Fill and select the pattern that you have created. Then go to Filter, select Render, click on lighting effects and configure the image's lighting. This video w...
So, you're browsing the web on your iPhone using Safari, and you come across a picture you really want to keep forever and ever… what do you do? You can save it directly to your phone! But how do you download that web image? Best Buy has answers. The Best Buy Mobile team explains how simple it is to save web images from Safari on your Apple iPhone.
Photoshop is one of the most powerful and widely used program out there on the market. Not only can people use it to make their own photos look better, but they are able to take other pictures and images and enhance them to whichever way they want. That can be seen as both bad and good. Somtimes, to do so it involved using the layers and moving a picture to a new image. In this tutorial, you'll find out how to move a layer to a new image using Photoshop. Enjoy! It's quick, easy, and will be a...
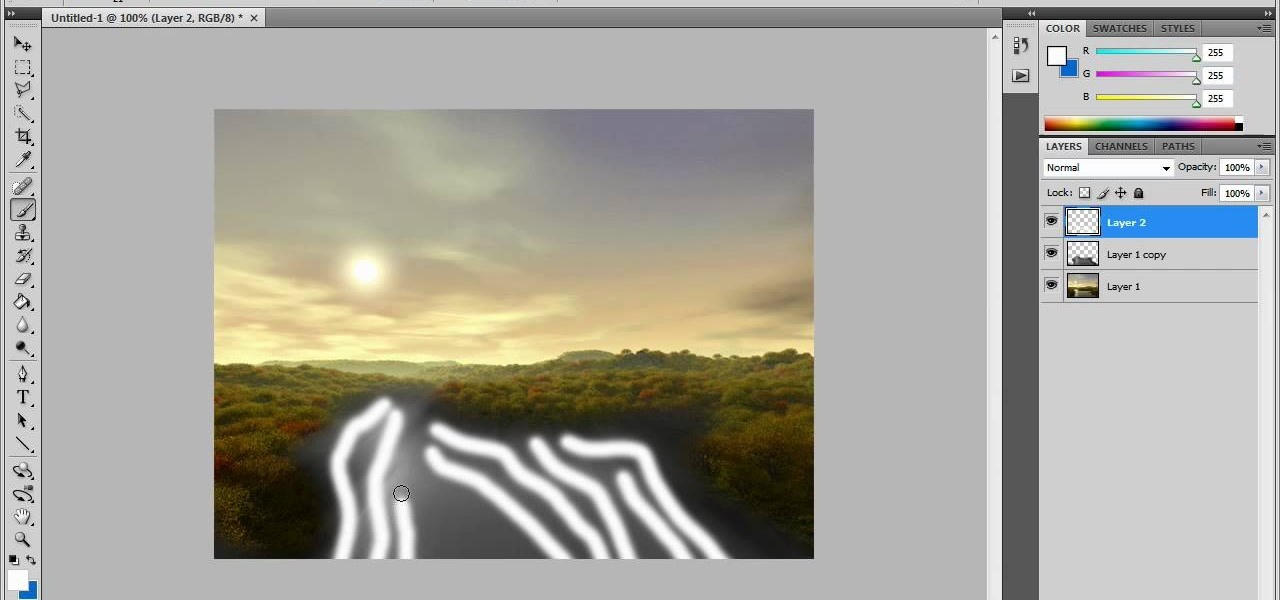
In this video tutorial, viewers learn how to create fog using Adobe Photoshop. Begin by importing the image into the program and duplicate the image. Now go to Filter, select Blur and select Radial Blur. Set the amount to 100, Blur Method to Zoom and Quality to Best. Now select the rectangular marking tool and select the sky. Then open the Hue/Saturation menu and set the Saturation to -100. Use the eraser tool to remove the gray from the edges. Now use the paint tool and paint white streaks o...
In this Software video tutorial you will learn how to sharpen blurry images using Photoshop. Open the image and duplicate the original layer. Then go to filter > other > high pass. In the window that pops up, enter a value of 4 – 6 pixels. Now simply change the blending mode of that layer to overlay by clicking on ‘layers’ and selecting ‘overlay’ from the dropdown menu. You will notice that you have a much clearer picture. Then go to filters > sharpen > ‘unsharp mask’ to add som...
This video tutorial from adamstechvids shows how to resize photos in Windows using Picasa application.
In this how-to video, you will learn how to hide a file inside an image file. You will need a program like WinZIP or WinRAR to do this. First, create a new zip folder. Drag the file you want to hide into the zip folder. Open the command prompt. From here, type in the location of your file. Now, type in COPY /B followed by the name of the image, a plus, and the name of the zip folder. Press enter to do this. Now, you can delete the zip folder. The image will now actually be a zip folder. This ...
1. First of all you need to have a folder containing stock of various photos downloaded from the internet. The width of these images is ‘780’ and you need to resize them to ‘550’.
In this how to video, you will learn how to liquify an image using Photoshop. First, open the image in Photoshop. Next, go to filter and select liquify. Use the forward warp tool to press pieces of the photo. Use the reconstruct tool to bring the image back to the original state. The twirl clockwise tool can be used to twirl pieces in the photo. You can adjust the pressure to twirl more. The pucker tool can be used to push sections into the image. The bloat tool can be used to pinch sections ...
In this how-to video, you will learn how to quickly set up the background image on your Apple Macbook Pro. First, right click the desktop and select Change Desktop Background. A new window will pop up where you can change it. Also, you can go to system preferences and selecting desktop and screen saver. To change the image, select any of the options available. This includes solid colors to large images. You can also go to your iPhoto albums and choose any picture in there. You can also go onl...
In this video tutorial, viewers learn how to make an animated GIF file using Adobe Photoshop. Begin by opening the program. Then click on File and select New. Choose the size of your image and click OK. Now create your picture or text image. Once finished creating your image, click on Window and select Animation. Now click on the button on the right side of lower window and select Make Frames from Layers. change the time of each frame to 0.5 sec. Now edit it and save it. This video will benef...
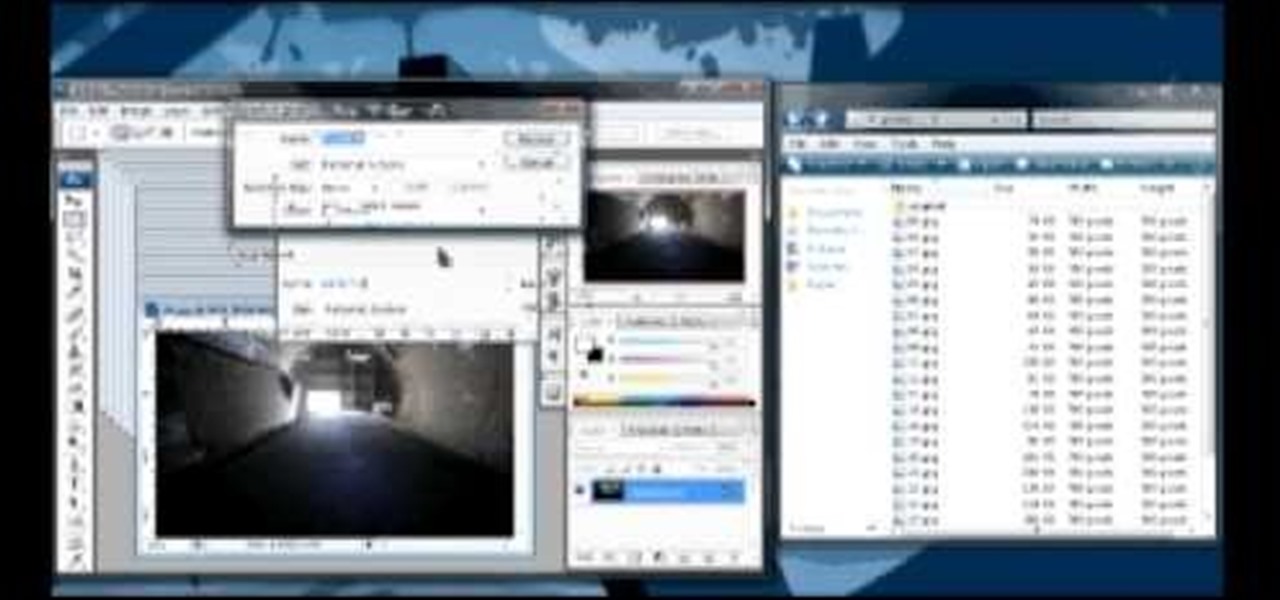
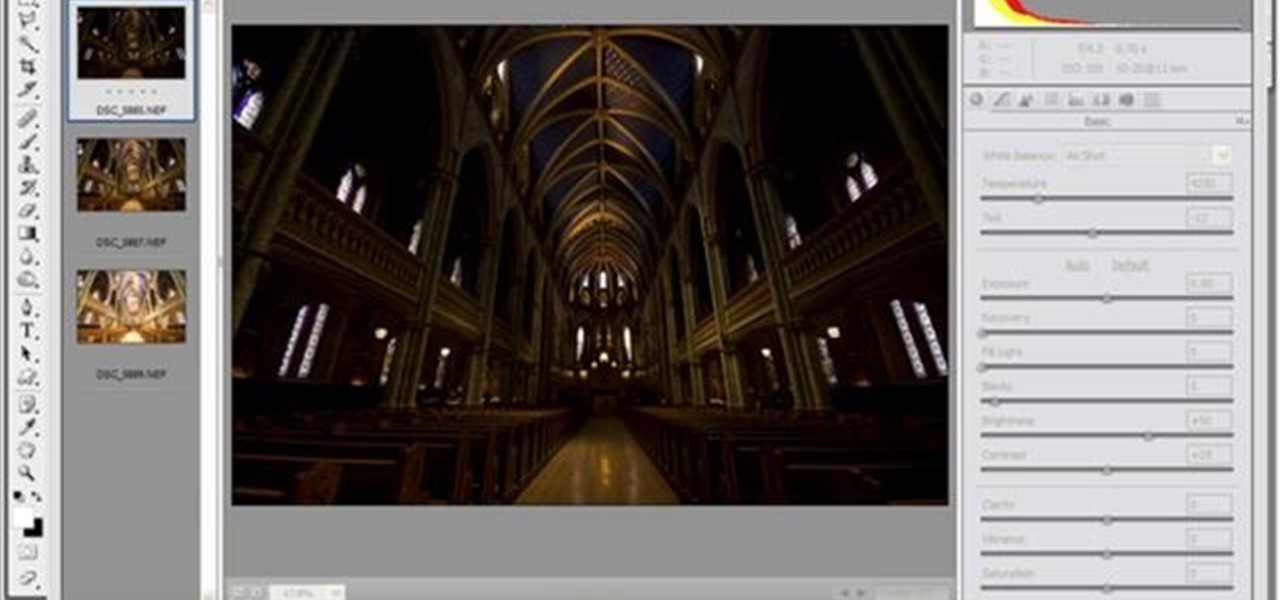
Yanick's Photo School demonstrates how to use Photoshop to make HDR images in Photoshop CS3. This tutorial first explains that HDR means "High Dynamic Range" which is a process to get details from a photo from both the highlights and shadows of a particular scene. The first thing that is necessary is to take multiple views of the same image with different exposures. To start off, you will take three exposures: one that is two stops down, one that is normal exposure, and one that is two stops ...
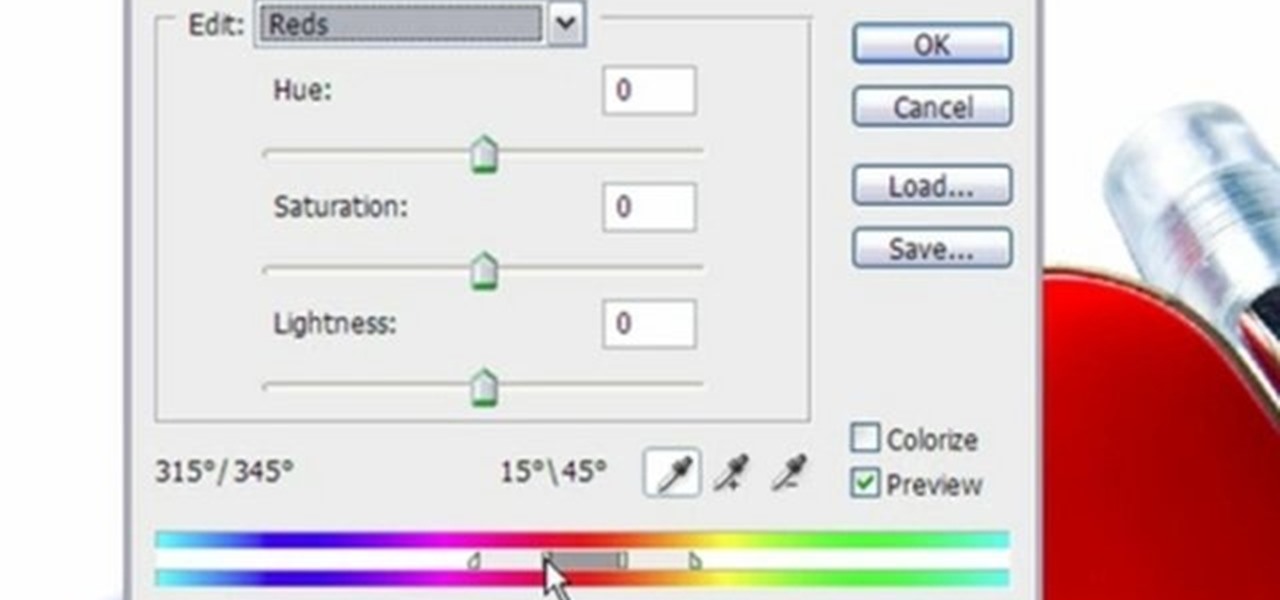
This video shows three ways to change the color of an object in Photoshop. The first method is of hue and saturation. Go to 'Image' & 'Adjustments' and choose 'Hue/Saturation' or press Ctrl+U as shortcut. Go to Edit and choose the color you want to change. As you select the color, a grey bar appears in between the rainbow bars at the bottom representing the color you want to change and the feathering which it will cause. You can change it by sliding it outwards. Slide the 'Hue' slider to chan...