In this video, we learn how to paint your favorite sports team logo on a racing shell. First, you will take your shell and trace out the logo on it with a Sharpie marker of your choice. Use tape to cover the areas that you don't want marked, so the lines come out cleaner and straighter. After you have done this, paint the logo onto the racing shell with small brushes and your choice of paints. Leave the tape in place until all of the paint has dried. Then, remove the tape from the shell and y...
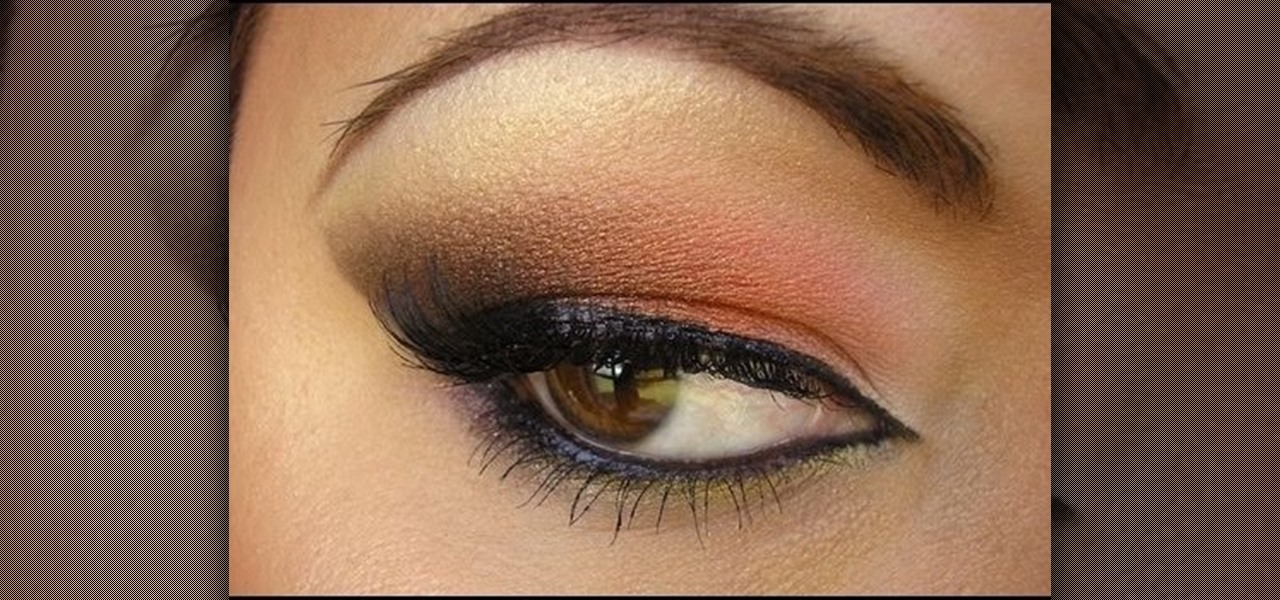
Dip into the sultriness of Arabic women with this Fall look that's sure to drop jaws. It's a smokey Arabic-style look with vivid purples and reds. It's the perfect autumn makeup look when wearing dark colors. Watch this video for the step-by-step instructions for applying this eye makeup, and check out the products used below.
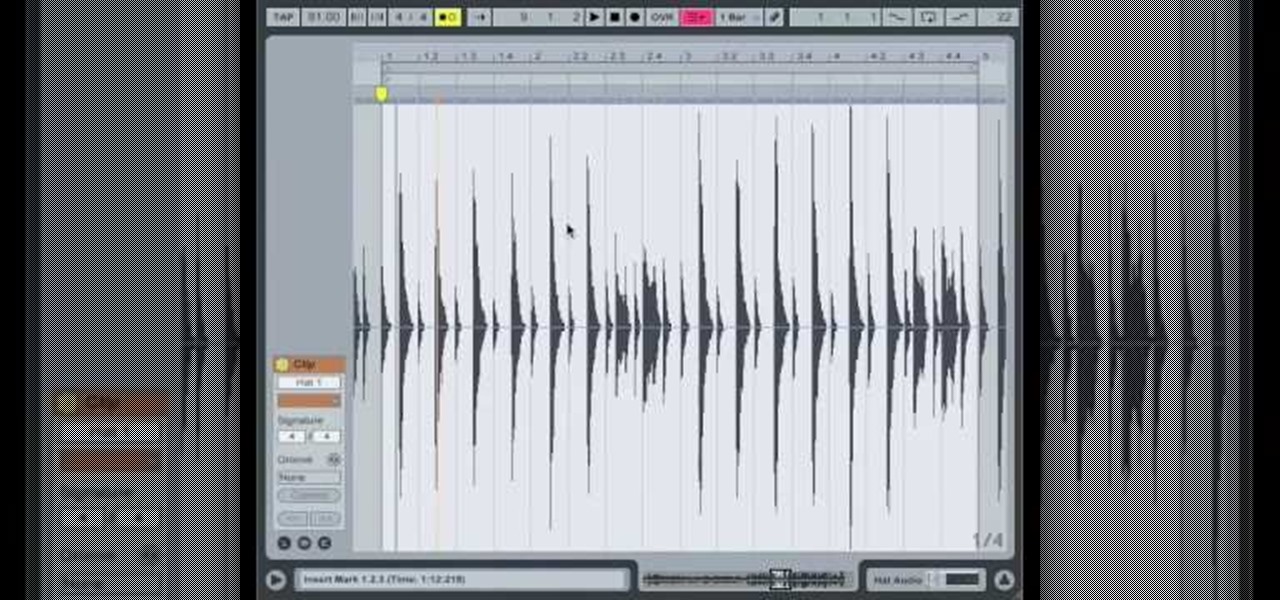
In this video, we learn how to use Ableton Live 8: Quantizing audio. To find the bars you want to use, find the up and down arrow keys. These will jump the loops back and forth based on the width of the loop race itself. Press play to search around for the best four bar section in your music. Now, set your first attack in your loop by zooming in on the hit. Hover over the audio and create a warp marker to drag from each of the bars. Label it as the beginning of your clip to the end, then save...
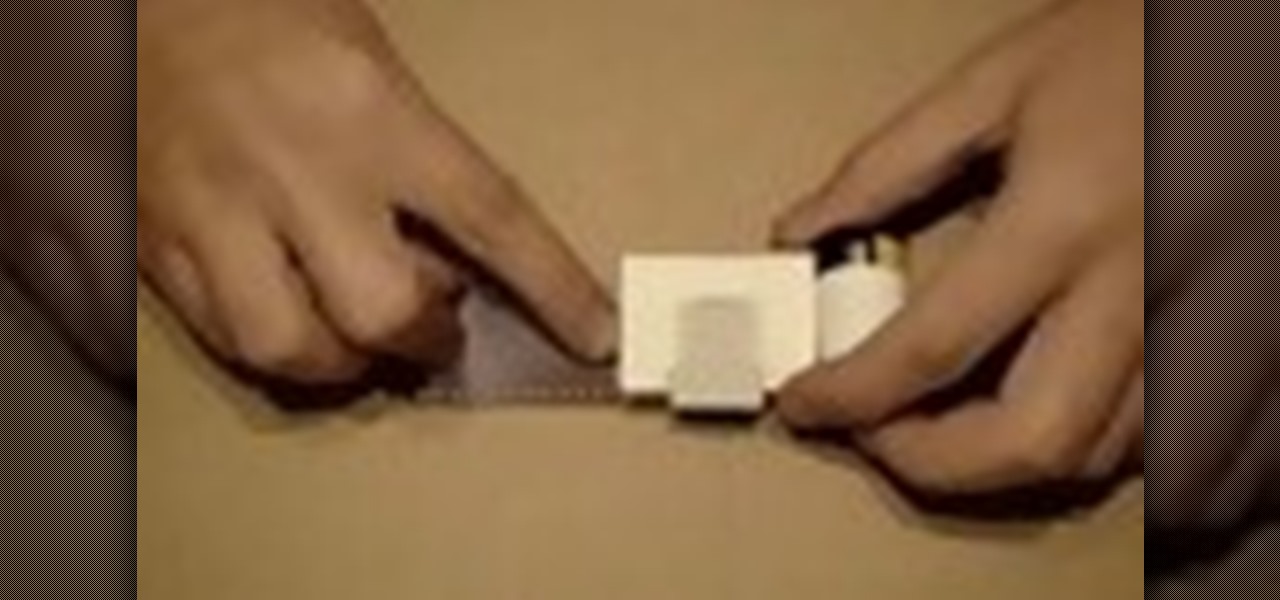
In this tutorial, we learn how to covert a matchbox into a camera. First, take your matchbox and cut out the bottom, then cut out a square piece. After this, paint the inside of it black with a marker. Next, cut a small hole in the top of the box. After this, cut a small square out of a soda can and hammer a small hole in the metal square. Now, tape the metal to the match top box, then cut the excess tape off. After this, take the bottom off of the top and place it over the metal hole in the ...

In this Family video tutorial you will learn how to craft felt frog puppets with your kids. The materials you will need for this are felt (pink, dark and light green), a piece of red lace, 2 large white pompoms, 2 small black pompoms, scissors, glue and marker. Take two layers of dark green felt and draw out the outline of half of the left palm. Fold the felts in half and cut out the outline. Stick the two pieces along the edges to make a glove. Next cut a rectangular piece out of the light g...

If you've ever worn gloves, you know that doing certain tasks with them on can be quite a hassle. Not only are you not able to grip things properly, but sometimes it makes it difficult to press buttons or text message on a phone. So in this next tutorial, you'll find out how to make fingerless mittens.

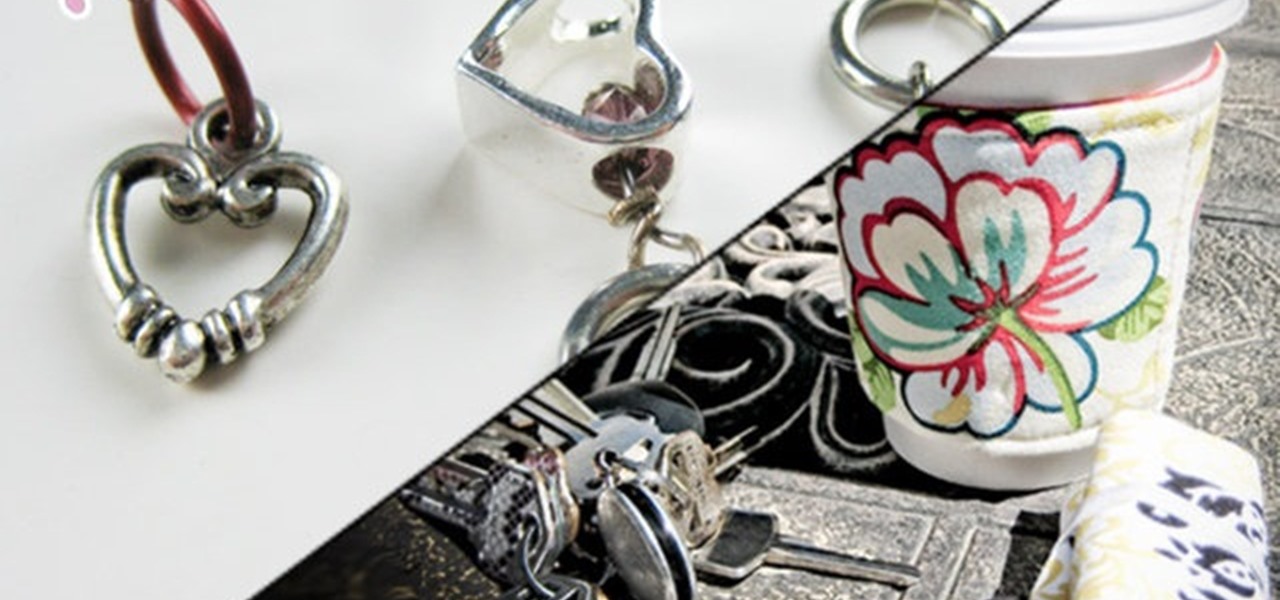
In this clip, you will get a double lesson. You will learn how to create a cute sleeve for your coffee cup out of fabric so you don't burn your hands as well as a homemade stitch marker with a fun heart design. The sleeve is not only stylish, but also saves all that cardboard you waste every day at places like Starbucks. So, follow along and make your very own accessories to help you get on with your day in style.
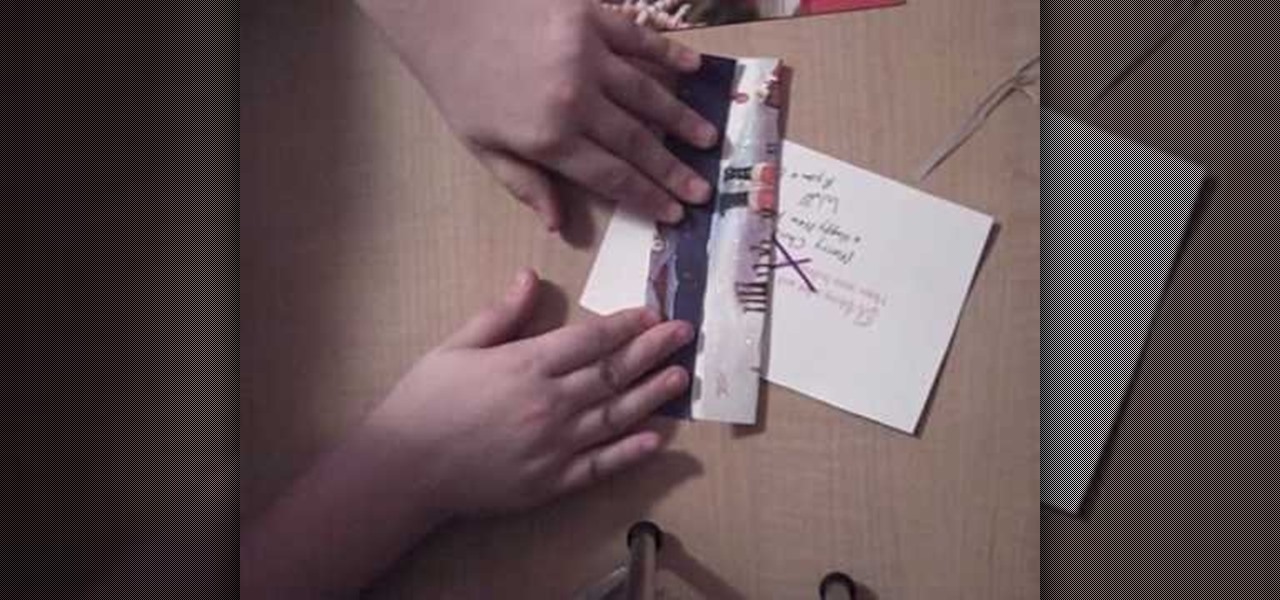
This video shows us how to make a homemade jewellery box out of a Christmas card.For that you need a pair of scissors,a tape,a christmas card,a marker and another card to draw your X with.First take the card and cut it straight down the middle into two pieces.Now take the back side piece of the card and cut off 1/4 of an inch from the left and the bottom portions.This will help to fit the cards together.Next use the extra card and trace an X on both sides of your card piece,in the middle.Take...
If I had kids, this is something I would totally use to not only entertain them but give them something fun to look at during dinner. This fun tutorial shows you how to take some simple foam and use glitter, markers, and other items to make cool placemats. Enjoy!
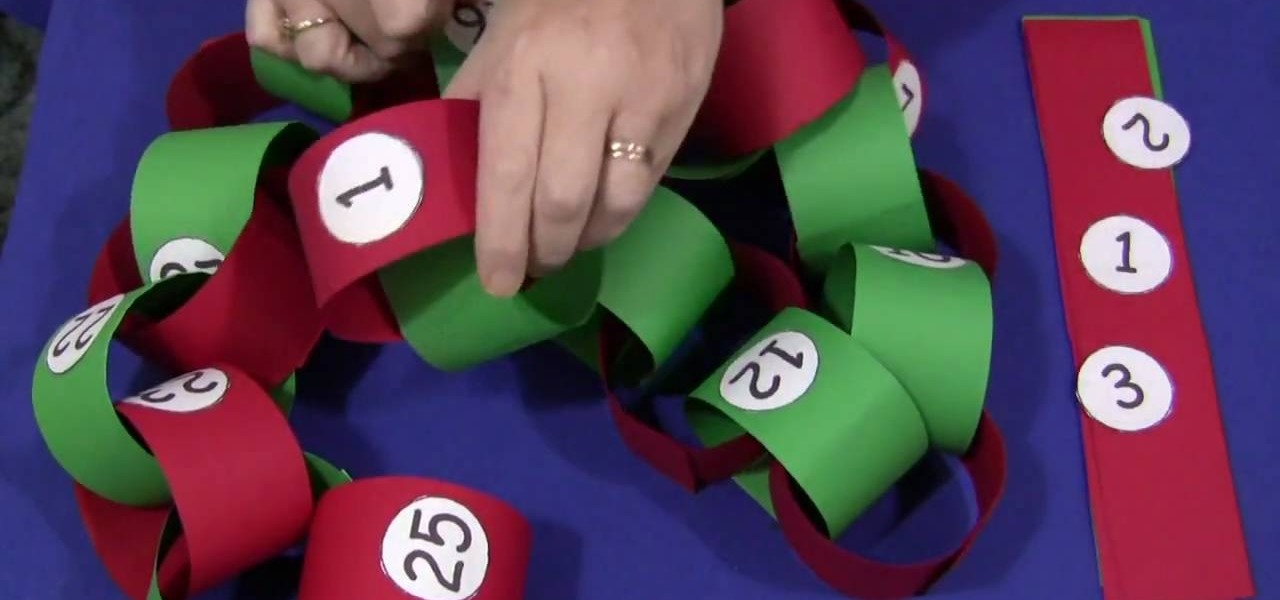
In this video tutorial, viewers learn how to make a Christmas countdown chain. The materials required for this craft are: construction paper, paper cut into small circles, glue and marker (optional). Begin by cutting the green and red construction paper into even strips. Users may choose to write out the numbers or print them out onto paper. Then cut out the numbers into small circles and glue them in the middle of the strips. Alternate the color of the strips each day. Then put the edges of ...
In this how-to video, you will learn how to draw a duck or a swan in the easiest way possible. To do this, you will need a writing tool such as a sharpie, pen, or pencil and a piece of paper. First, draw a v like shape smoothly. Next, Follow the shape once more, except make the outline of the swan. Next, fill the top in to complete the drawing, as well as the eye of the swan. You can add water to the drawing with a blue pen or marker. This video shows just how easy it is to create this drawing.
Why buy something when you can just make it yourself? Instead of a store bought mini dog/cat bowl, you can easily make it for yourself. Buy some polymore clay and roll it into a very small ball. Now take your finger, and press it down on the clay until its flat, not too thin although. Next take a marker and with the bottom of it, press down so you have the bottom of it, make sure you don't go right through it. Next center a circle cutter around the pen and cut straight down and through the cl...
Predicting the future is always cool.. what if you could do it with just a piece of paper? With this tutorial, learn how to fold an origami fortune teller and at least pretend you can predict what will happen! All you need is a single sheet of paper and some pens or markers to record your fortunes and you are on your way. This is a great little thing to make anytime you are bored with friends - work, school, on the bus, anywhere!
Butterflies are some of natures most beautiful creatures. How would you like to make one of your very own? Check out this tutorial and learn how to origami your very own paper butterfly and impress your friends. Grab a piece of paper - and some pens or markers if you wish to decorate your unique butterfly - and start folding! Making an origami butterfly is not as difficult as you would think, but you would never know that from the great results. Have fun!
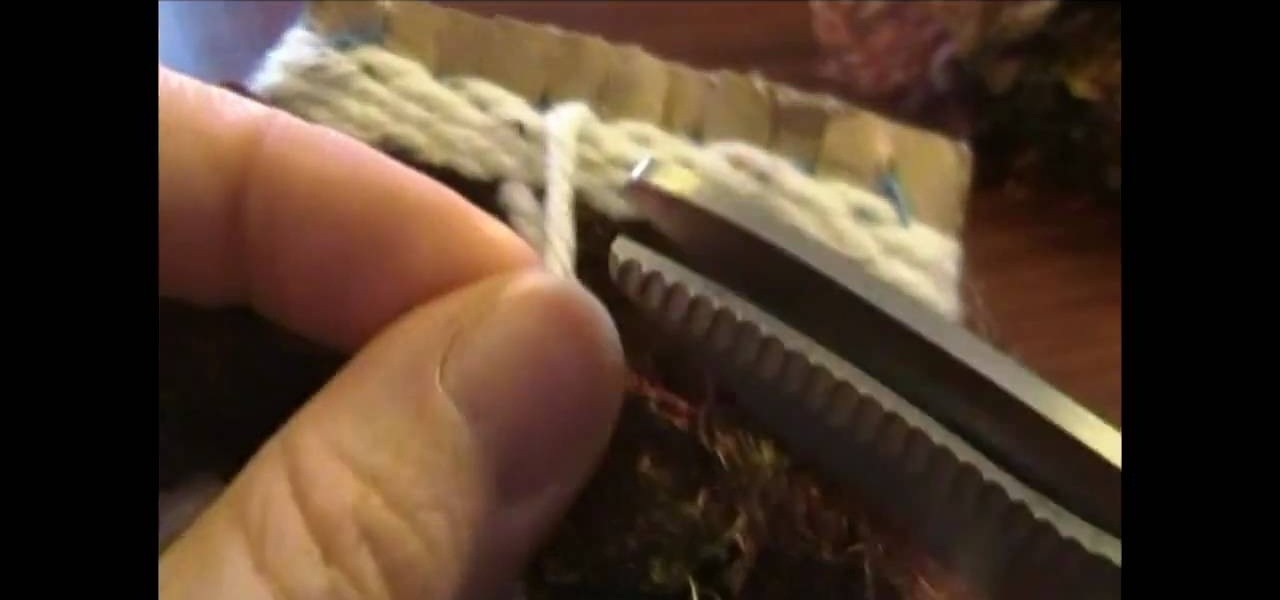
In this video tutorial, viewers learn how to weave a pouch for an MP3 player. The video lists all the materials required to make the pouch. The required materials include: cardboard, a ruler, scissors, yarn needle or bodkin, scraps of yarn or 10 crochet yarn and a marker or pencil. This video provides voice narration and a visual demonstration for viewers to easily understand and follow along. This video will benefit those viewers who enjoy homemade accessories. This is for those who enjoy we...
Create a rotating 4-sided pencil holder that tells what's up at your desk. Is it a homework zone? An art zone? Are you Homework FREE? Learn how you and your kids can make a cool pencil holder that announces what is going on in your room with this arts and crafts tutorial. You will need Crayola Color Surge paper and markers, a recycled juice container, scissors, and washable glue. With this how to video you will be able to make a labeled rotating pencil holder with your kids.
Build stones & cinder blocks for a diorama. Papa Tom teaches viewers how to make a building look like it is made of stone or cinder blocks using the Building and Structure Kit from Scene-A-Rama. This is super easy and tons of fun for all ages. It's great for school or class projects. Use a ruler, a fine point marker, a hobby knife, and a paint brush.
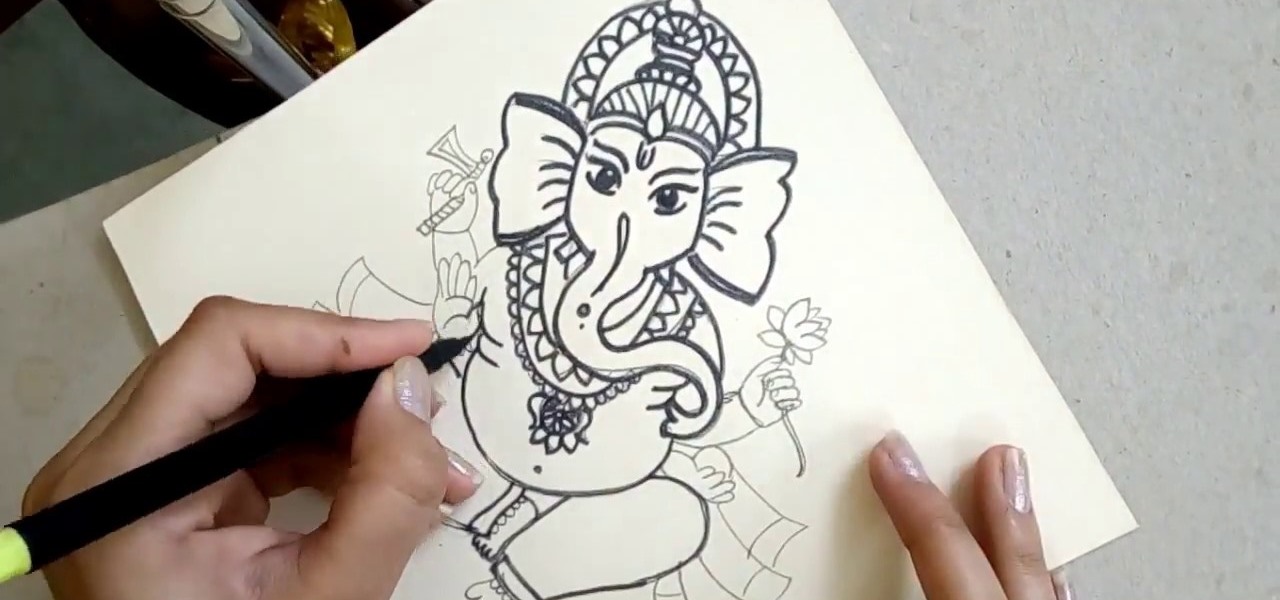
Personification of the Infinite Consciousness. Lord of Hosts. Master of the Universe. These are just three of the hundred-odd titles of the Hindu god Ganesha. Luckily, drawing the Hindu deity Ganesha isn't so complicated.
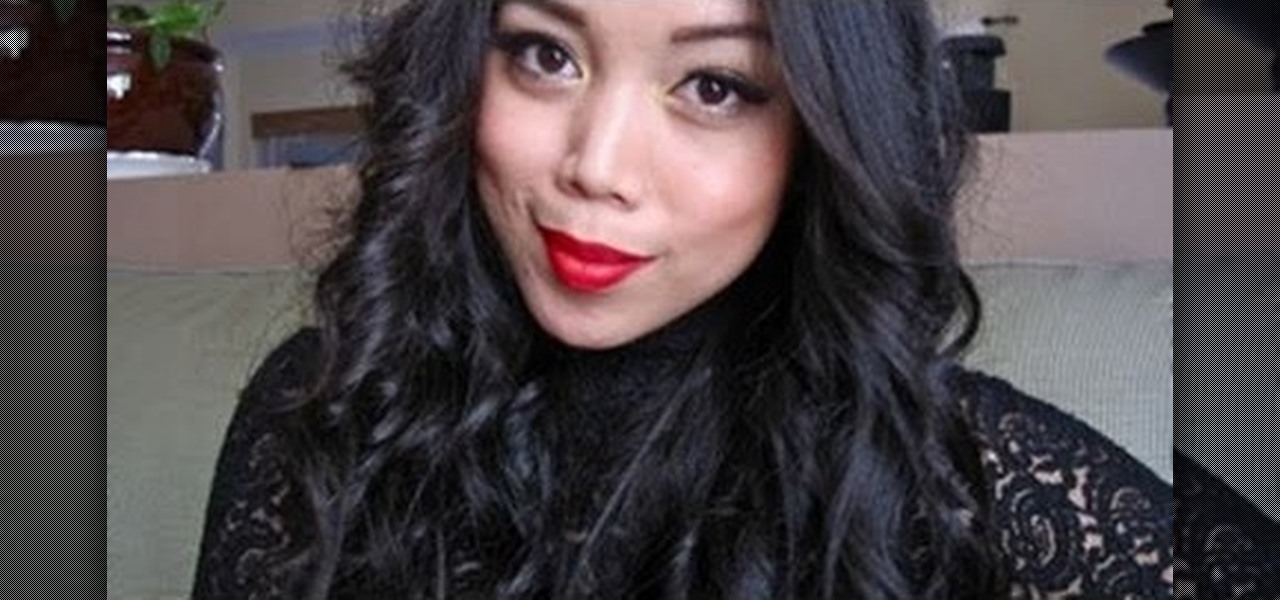
When it comes to dressing up your face for the holidays, your LBD of makeup looks is without a doubt the classic neutral eye and red lip combo. Beautiful since the days of Marilyn Monroe, this look is timelessly feminine and sultry.
In this video, we learn how to do an Easter basket art activity with your kids. First, grab some white paper bags and have the child cut a line across the top of the bag. You can also use decorative scissors for more of an Easter effect. After this, let the child use paint, cookie cutters, glue, glitter, crayons, and markers to paint all over the bag! Let them make any design that they would like for the upcoming season! Once finished, let these dry and then open them up! These can be used fo...
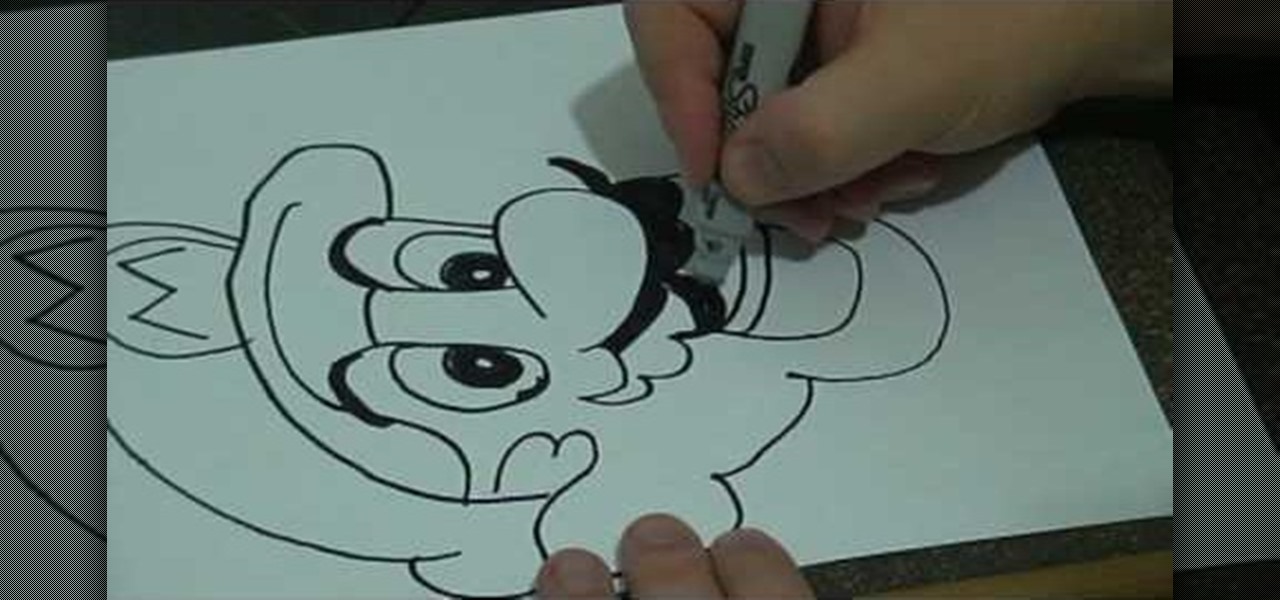
In this tutorial, we learn how to do a basic line drawing of Mario. To start, draw the basic outline of the face with a black marker. Draw in the details of the mouth, don't forget the teeth, tongue, and inside of the mouth. After this, draw in the nose and then the eyes. Draw in the pupils and then start to draw in the mustache and eyebrows. After this, create the hat and then draw around to the side of the head to draw the ear in. When finished, you can leave empty or color in with appropri...
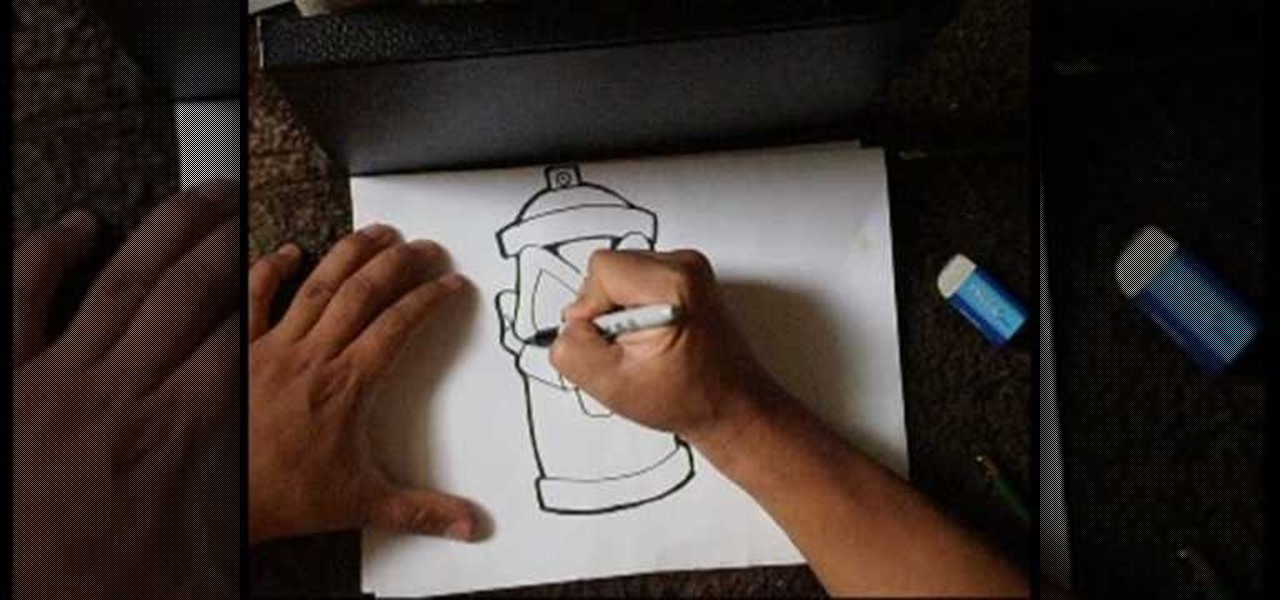
In this tutorial, we learn how to draw a spray can sketch. First, draw the face of the can on the piece of paper, drawing the eyes, nose, and mouth. After this, draw the surrounding parts of the can around the face. Draw the bottom and the top of the can as well as the top with the middle open area where the spray will come out. After this, draw in as much detail as you would like on your spray can. Use a black marker to shade in on the sides and make lines darker. When finished, save and enj...
In this video, we learn how to change hair color in Photoshop CS3 and CS4. First, open up your image and zoom in on the hair. From here, you will click on the selection tool with a circle to select your image. Now, make sure this is the perfect size for the entire image. Right click and make sure it's sized out right. Now, select the hair and a red marker will appear. Select the whole surface of the hair, and as you get to the short hair use a smaller circle tool, don't worry about the smalle...
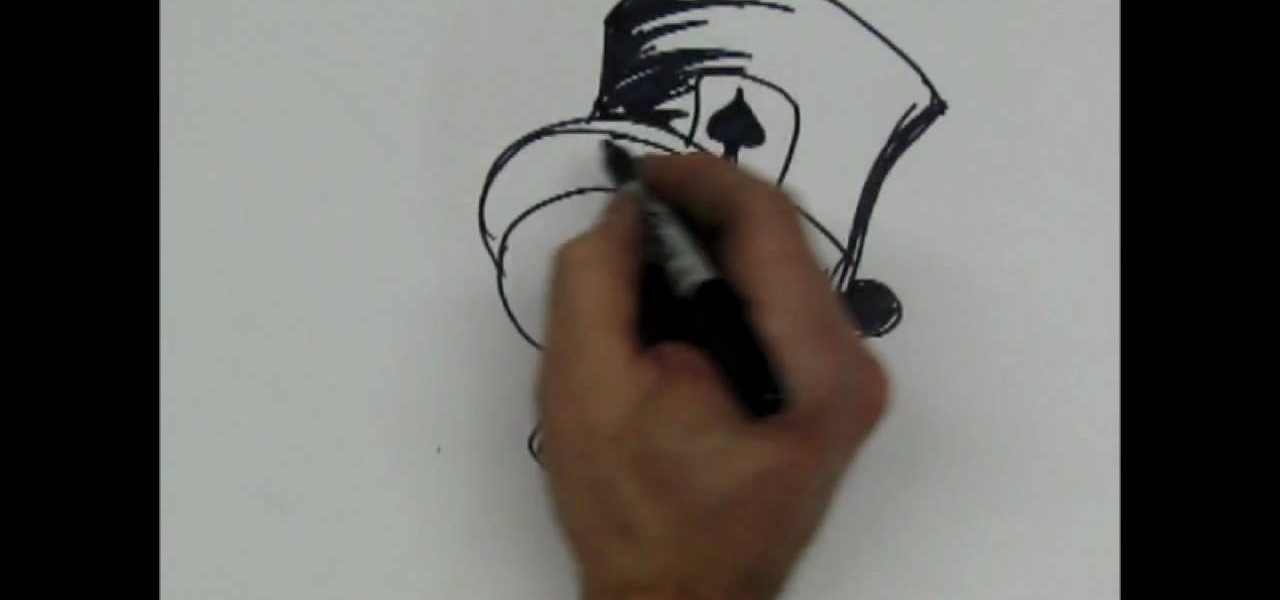
In this tutorial, we learn how to draw a skull with a top hat. First, use a Sharpie marker to draw the nose of the skull and then the eyes. Color these in completely black, since you want be drawing eyeballs in them. After this, draw the skull around it. Draw in the teeth clenched together and then add in lines around the head of the skull to show cracks in the bones. After this, add in additional details around the jaw line and on the head of the skull. When finished, draw on the hat to the ...
In this tutorial, we learn how to make a Deadpool sword. To do this, you will need: a marker, scissors, hard plastic, cardboard, silver spray paint, duct tape, saw, electrical tape, sandpaper, and hot glue gun. First, cut the plastic into three thin knife shapes. Then, use sandpaper to smooth edges. Then, use the cardboard to create three layers of a rectangle. Make the corners round and then tape around them with duct tape. Put a hole in the middle and then put it into the plastic. Now, glue...
In this video you will learn how to draw a Batman cartoon in a quick and easy way. In order to do that just follow these instructions from the video: The first thing that you will need to do is to draw the head of the cartoon. Now draw the body lines and the hands of the cartoon. The next thing to draw are the legs and the cape. Use a marker to draw over the sketch and complete the drawing with all of the details. The last thing to do is color the drawing with the colors used in the video.
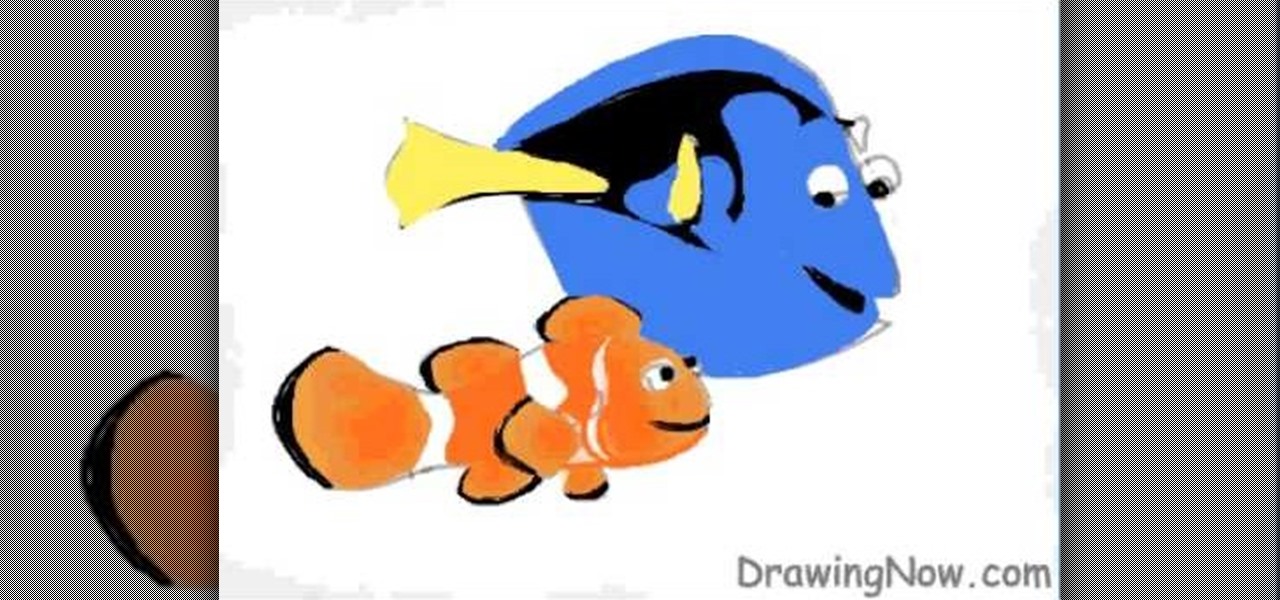
In this tutorial, we learn how to draw Nemo and Dory from Disney! Start off by drawing the bodies of both Dory and Nemo. Make sure to get the pattern of Nemo draw out correctly. After this, draw on the eyes and the fins for both of the characters. From here, use a black marker to draw on the scales of the fish as well as the rest of the details on the face. After this, color in Dory with yellow, black, and blue. Then, color in Nemo with orange, black, and white. When finished, color in the ba...
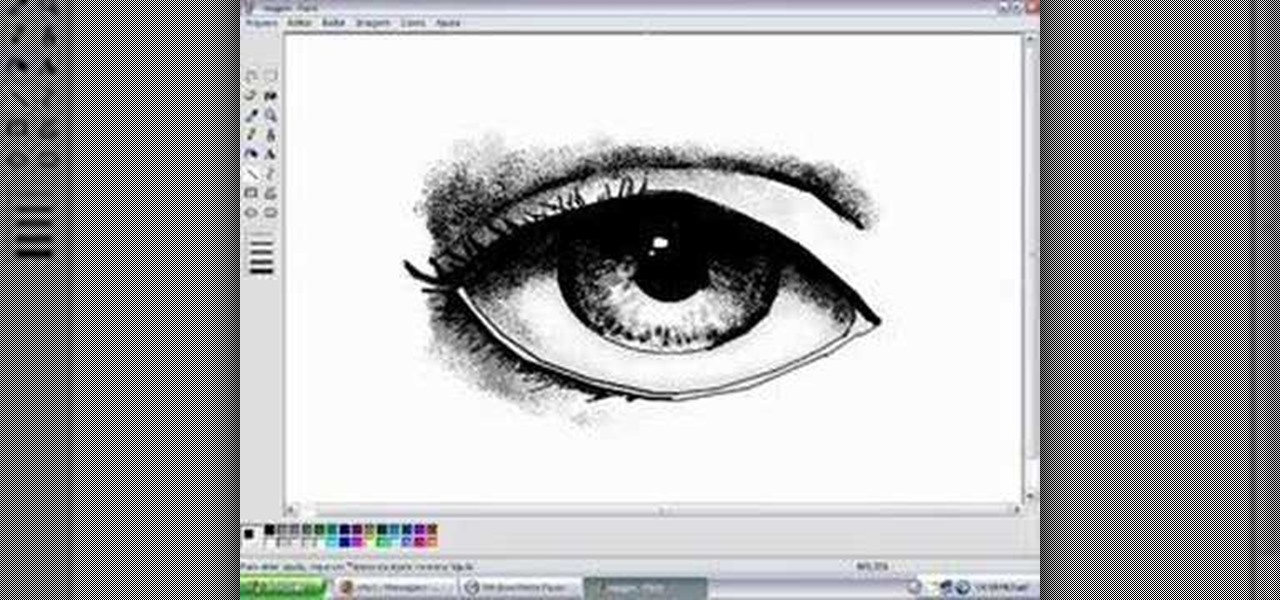
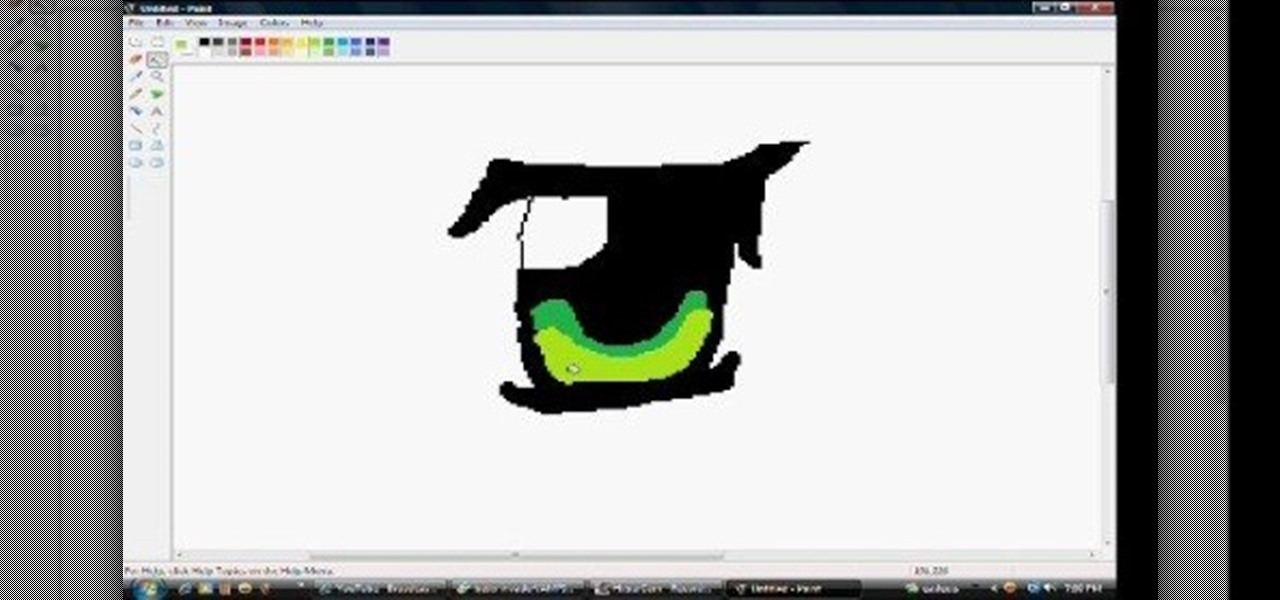
In this tutorial, we learn how to draw eyes in MS Paint. Start out by drawing the outline for the eye using a thin marker. After this, draw on a thicker line at the top of the eye and then draw on the crease of the eye above this. Now, draw in the details of the middle of the eye and start to shade in around the crease of the eye and the middle of the eye. From here, draw in the eyelashes on the top and the bottom of the eye, making them longer if they are for a woman. When finished, save thi...
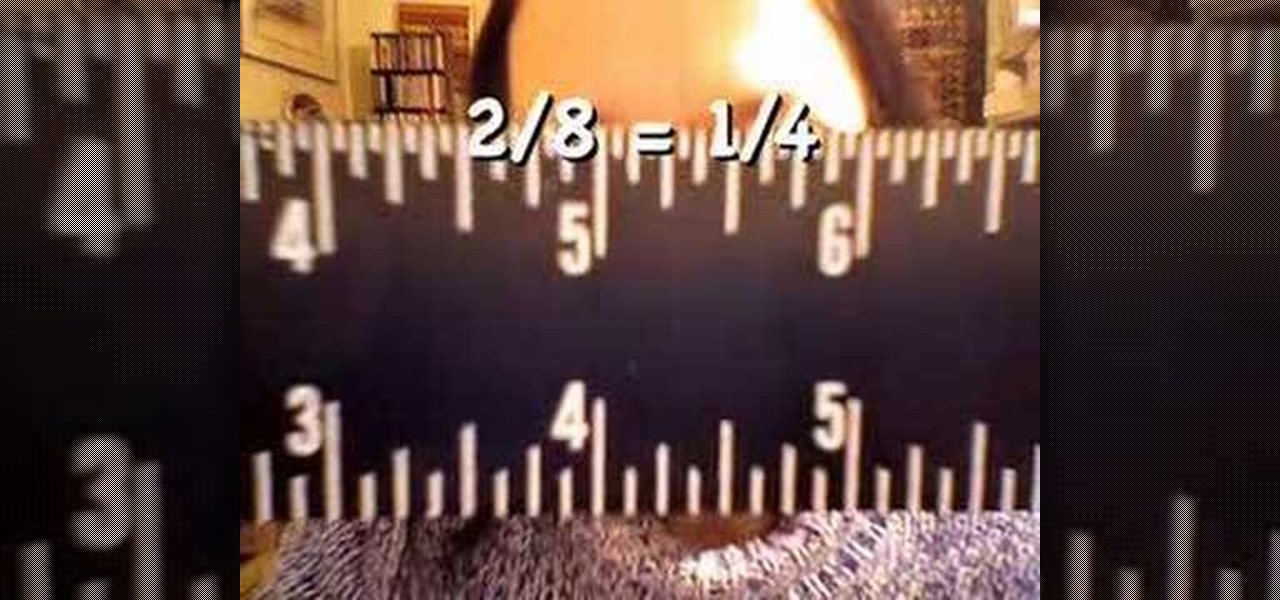
In this video, we learn how to read a ruler. First, grab you ruler and look on the top and the bottom of it. The top is divided into different marks that shows inches, half inches, and quarter inches. If you aren't familiar with reading this, just use the markers at the top to help you count between 1/4, 1/2, 1/8, etc. The other side of the ruler is used for centimeters, which you usually will not use in the United States very often. Learning how to read a ruler can help you get better with f...
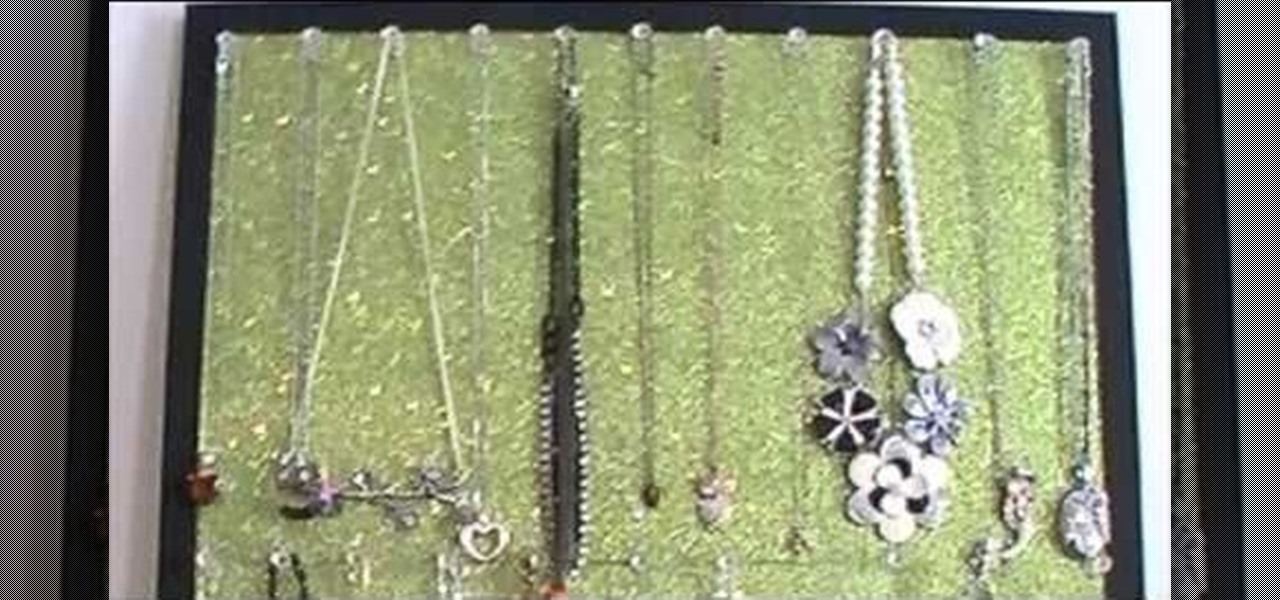
If you're anything like us, then it takes you forever and a day to find that perfect earring and necklace you want to go out, not because it's hard to decide which one, but because everything's so tangled up together you can't make out one necklace from another.
In this tutorial, we learn how to draw anime eyes in MS Paint. First, open up MS Paint and then grab a marker that is thick. From here, draw in a thick line that will be the top of the eye. Then, draw in the round area underneath the eye and the pupil inside of this. Draw in the bottom lash line of the eye, then start to add detail to the middle of the eye. Use the dark line to create a thicker line around the pupil, then fill the eye in with black. Leave a white part to make the eye look glo...
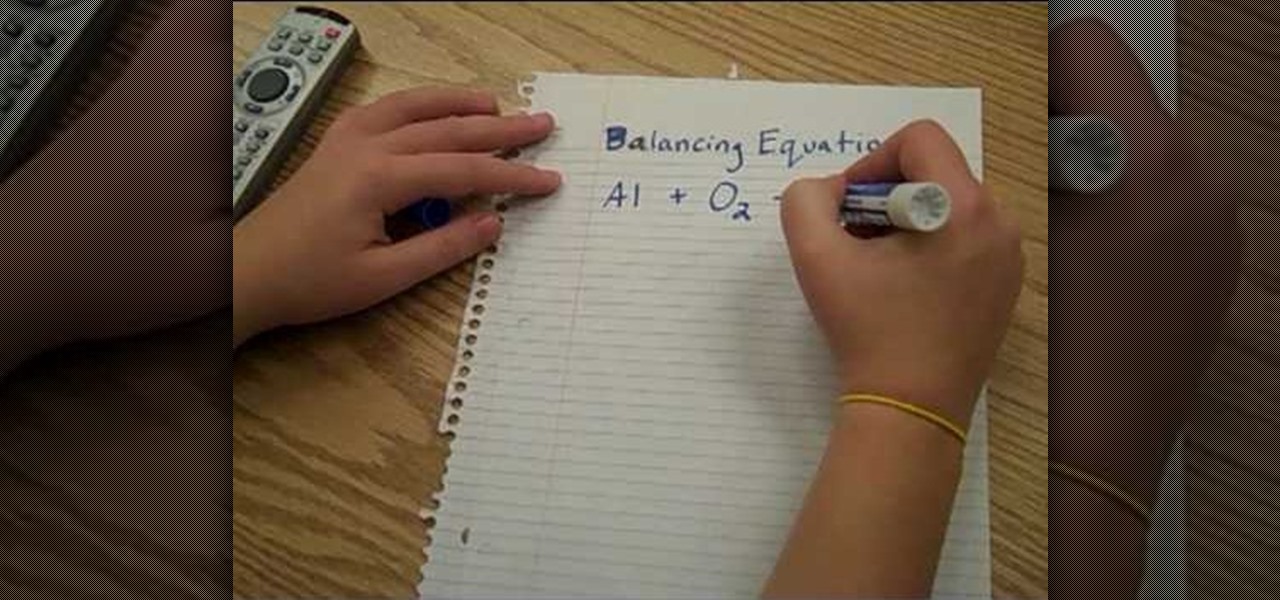
In this video we learn how to balance chemical equations the fun way. First, remember that matter cannot be created or destroyed. Take two different types of chemicals and put them on opposite sides of the equation. If you have more mass on one side than the other, these will not balance out. Once you have equal amounts of mass on both of the sides, you will be able to balance the chemical equation. Remember this rule whenever you are balancing out chemical equations. Use visual markers to he...
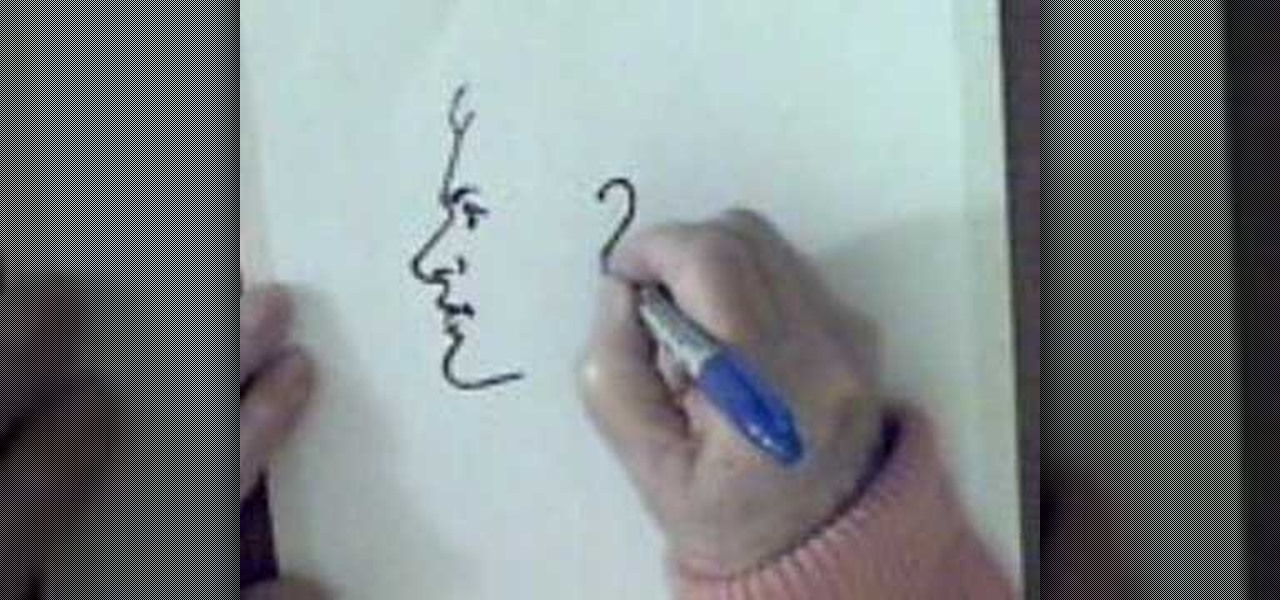
In this video, we learn how to draw a man's face in profile. With a Sharpie marker, first draw the bump to show the forehead of the face, then the bump for the nose. After this, draw the upper lip, then the bottom lip. Draw in a crease around the mouth the make the shape of the lips. After this, draw in the chin to the specifications you would like. After this, draw in the detail of the eye and the eyebrow around the area of the forehead. Next, draw in the nostril of the nose and then a creas...
In this tutorial, we learn how to draw Death the Kid from Soul Eater. First, you will need to draw in circles around the body where the joints would go. After you do this, draw the outline of the body around the joint markers. Next, you will start to draw in the arms for the character and add in the full detail of the arms and machinery. Next, use a darker line to create the details in the body and the outline as well. When finished, you will need to add in the details of the face as well as ...
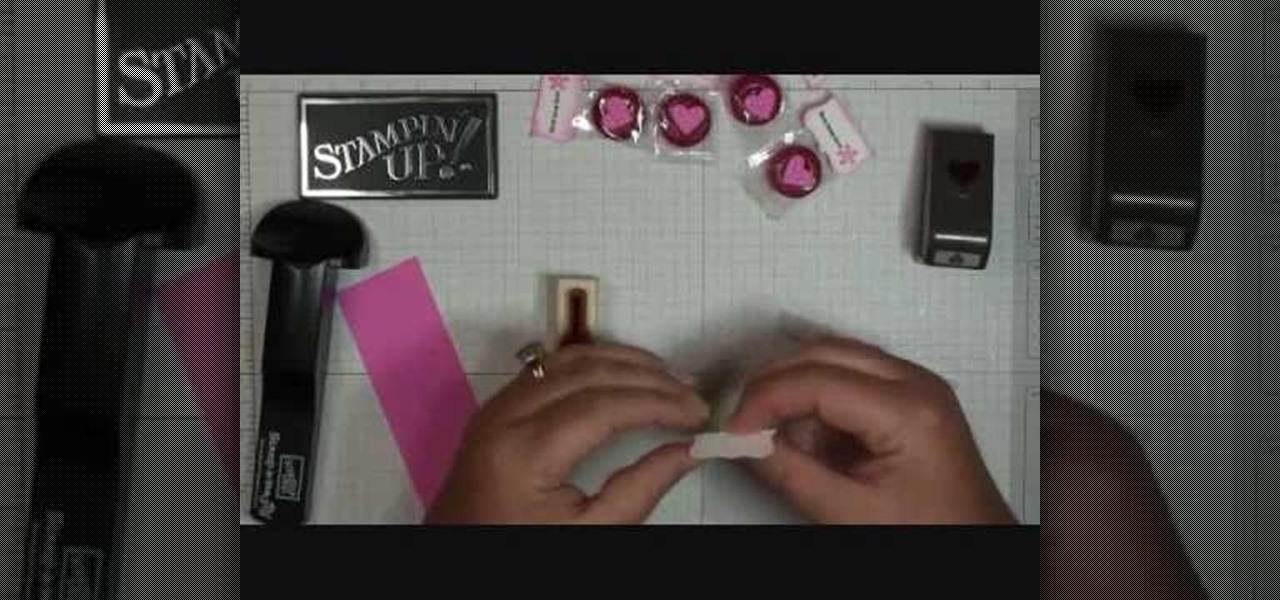
In this video, we learn how to make Life Savers treats. First, use the curly label punch and punch it out of a white paper. Next, fold this in half and then use your stamp-a-ma-Jig on card stock with a love and flower stamp. Use a black and pink marker to fill in the colors of the stamp. Next, stamp this on the piece that was folded in half, then punch out a heart and use sticky strip to adhere the individual life saver to the middle of the sentiment. Once finished, apply the heart and you ar...
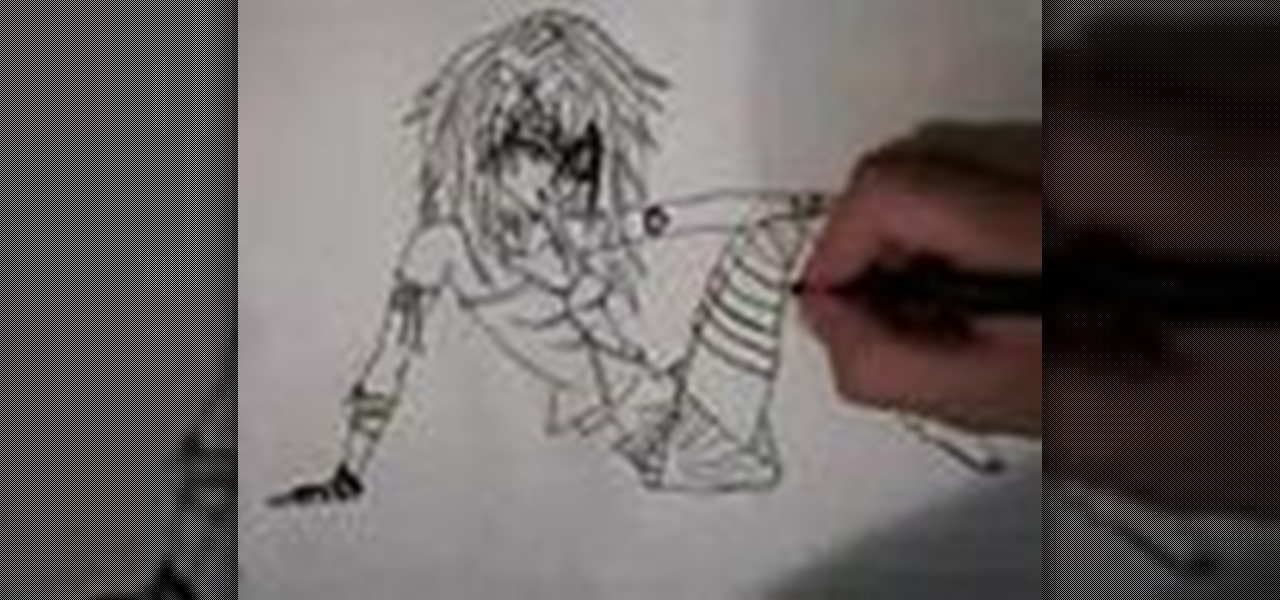
In this tutorial, we learn how to draw a manga cute emo girl. Start out by drawing the outline of the body, then add in the surrounding details. After this, use a darker marker to draw in the outline and the rest of the details inside the character. Make sure to draw in hair and all of the facial features to make her look feminine. Draw down the rest of the body, giving her a woman's shape and cleavage. Also make sure to draw on a pleated skirt and a tank top. Draw on the legs and feet, with ...
In this video, we learn how to draw a Pikachu PokŽmon. First, you should have a picture of the character in front of you so you can better draw it. Start out by drawing the eyes and filling them in with marker. Next, draw in the rest of the face, including the nose and the mouth. After this, draw the ears at the top of the head, then connect in the middle to create the head shape. Draw the sides and bottom of the head, then draw the body. Add in circles for the cheeks, then continue to draw u...
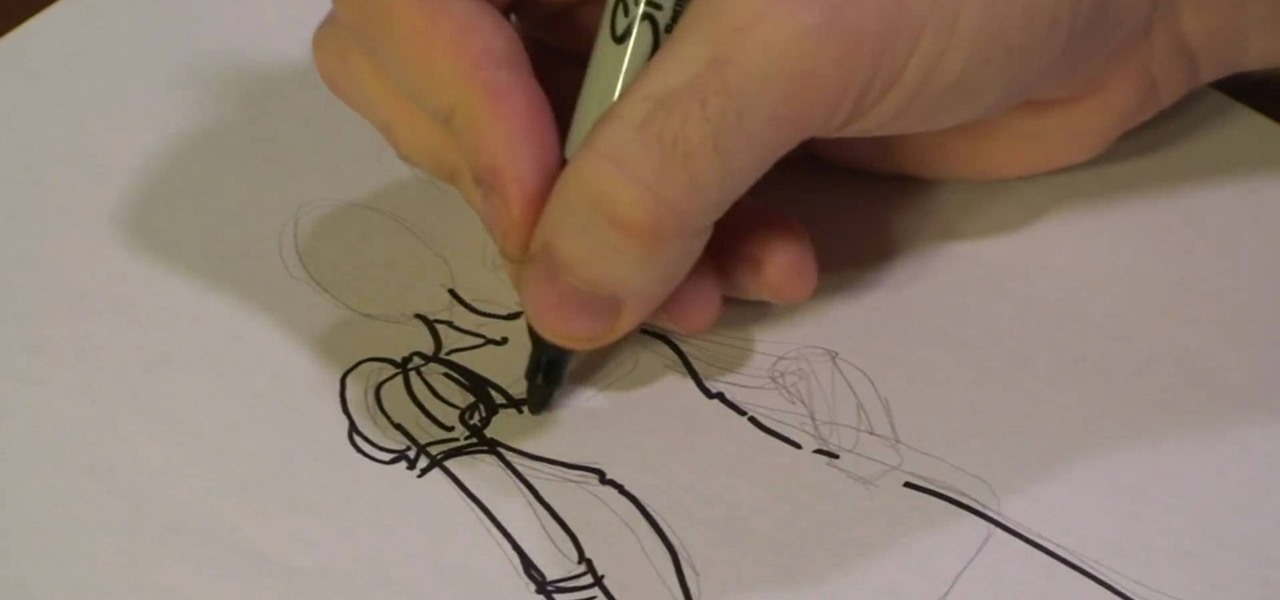
In this tutorial, we learn how to draw a variety of prom dresses. First, you will need to start out by drawing the dresses on different body shapes. Make dresses that are long, short, and knee-length. After this, use a marker to draw the outline of the body and the dress, then start to add in the pleats and the dress details. Add on scarves and other items to the different types of dresses, then continue doing this for the different types of dresses and body shapes. When you are done, draw in...
In this tutorial, we learn how to draw the anime character Tobi. Start off by using light pencil markings to outline the face and the head. After this, use a marker to draw in the eyes and pupils. Next, draw in the eyebrows over the eyes, then make a small mark for the nose. Draw in a line for the mouth, then make one of the eyes a diagonal line, like the character is winking. Start to outline the chin, then draw in the ears and start making the hair. The hair should be spiked and going down ...
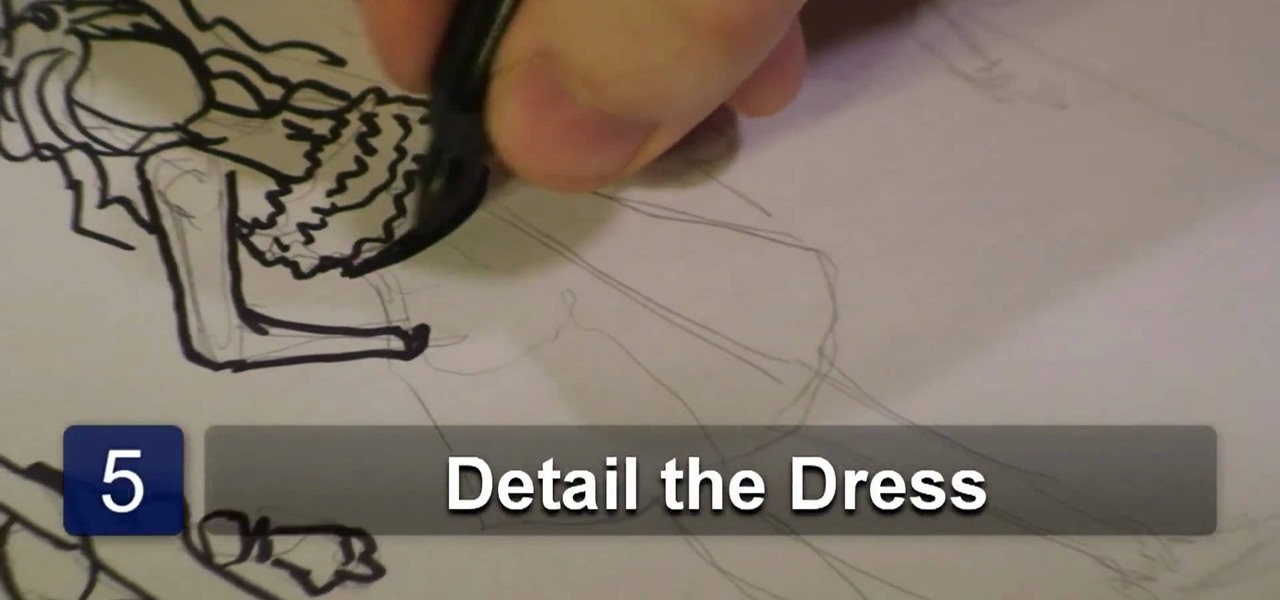
In this tutorial, we learn how to draw couture dresses. First, sketch the body onto the paper and then outline it with a black permanent marker. Make the lines soft and outline the body to have curves like a real woman. After this, start to add in the details of the dress, making the shoulders poof and adding accents to the side shoulder. Next, start to polish up the drawing by defining any lines and making different shapes. Make sure to draw the dress exactly how you want it, showing how it ...