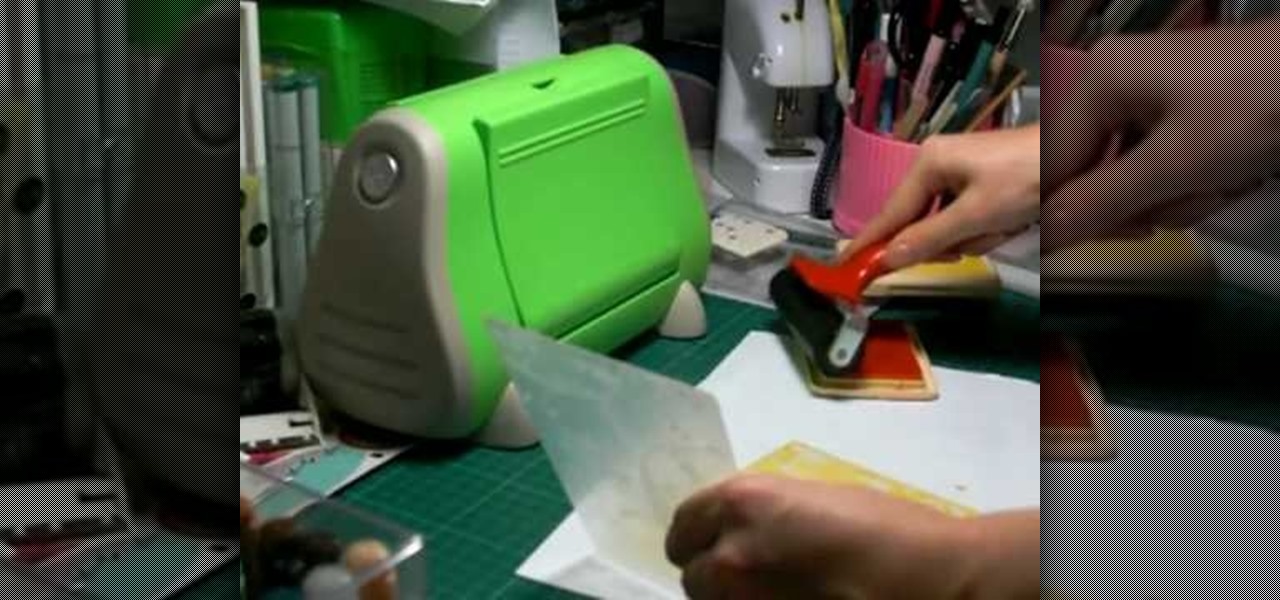
In this Arts & Crafts video tutorial you will learn how to do the Cuttlebug 'smoosh' technique. For this project you will need a brayer, ink pad, an embossing folder and a Cuttlebug. Ink the brayer well and with it apply the ink on the embossing folder. Make sure the ink is applied thoroughly on the whole surface. Get the Cuttlebug ready, place the card stock inside the embossing folder, place a couple of ‘C’ plates in the Cuttlebug, put the embossing folder with one more ‘C’ plate ab...
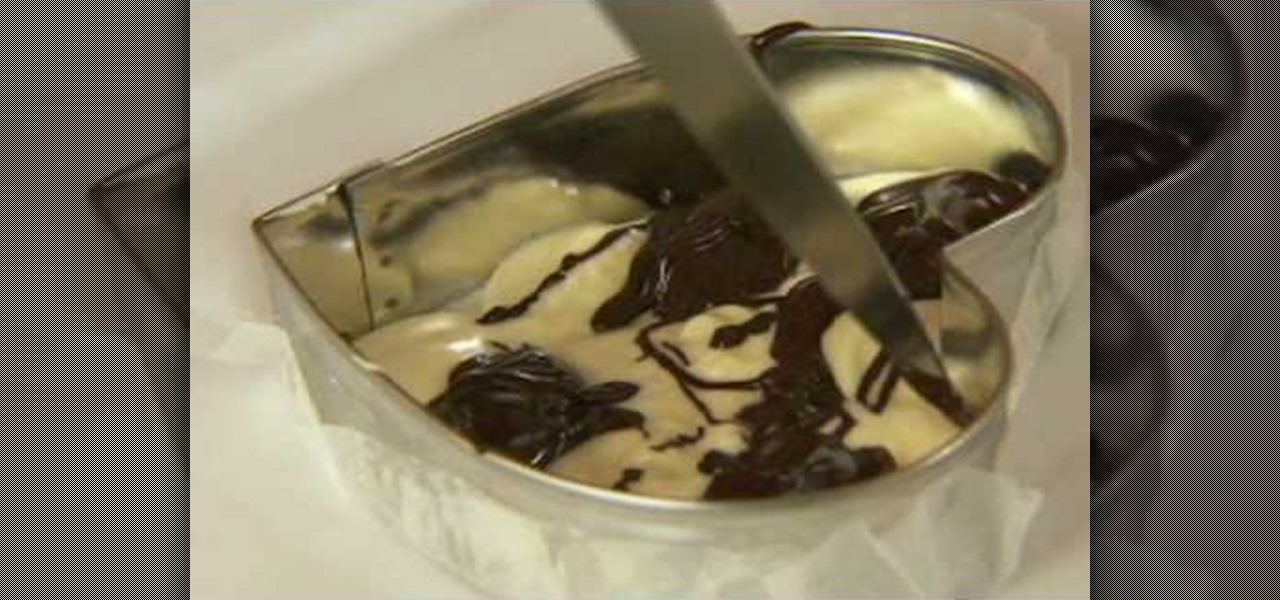
In this video tutorial, viewers learn how to make swirled chocolate heart cake decorations. Users will need a heart shape cookie cutter. Brush some oil inside the cookie cutter and some butter one the outside. Then press on some wax paper on the outside of the cookie cutter to create mold. Now pour in some melted white chocolate and fill in the heart shape. Now add the chocolate. Using the sharp point of a knife, swirl it around the chocolate to create a swirl design. Place the cake into the ...
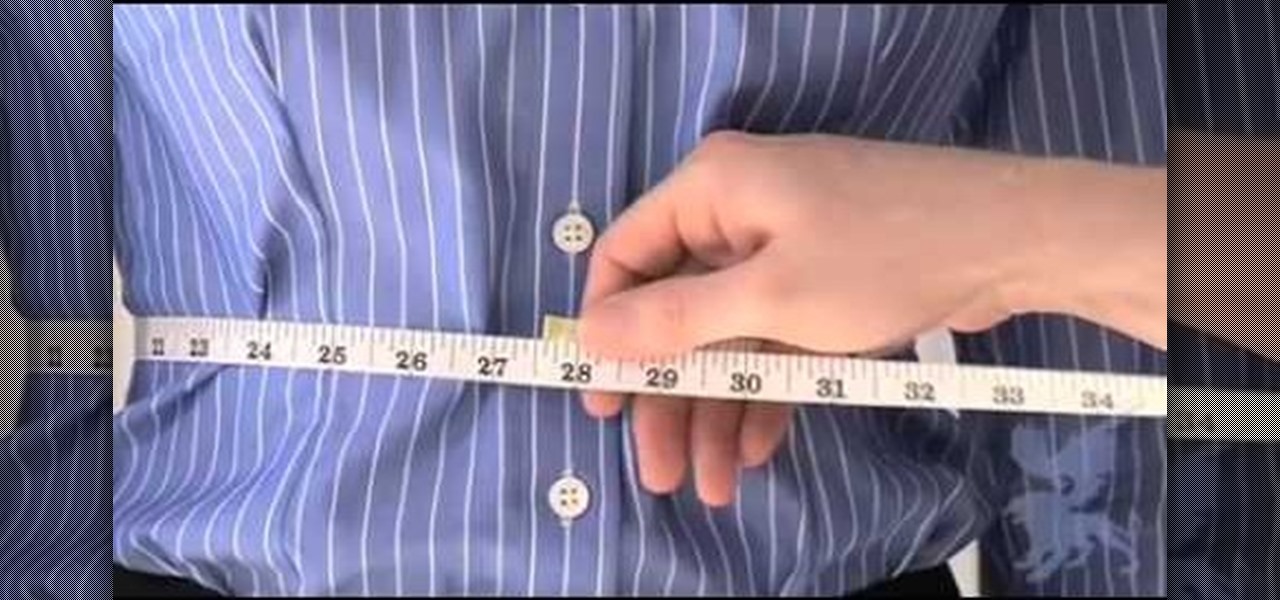
When being fitted for clothing, it is important to get a true measurement of your waist. On a woman, this can be confusing, as our waists are actually inches higher than where we typically wear our trousers.

In Part 6 of a series of video clips, `ClickHerePhotography` gives tips on how to select the right tripod for various outdoor environments and conditions like snow, rain (hail and thunderstorms), mud, dirt (dust) and waterbodies (river,streams or oceans). It is important to use a sturdy tripod designed to withstand the elements. After using the tripod for the day, it is essential to clean it. For instance, sand or salt water will weardown the legs of the tripod if left for long periods of tim...
The Concrete Jungle guide to making concrete moulds and ornaments as a hobby or business is presented here. This is a short excerpt of a longer film. Mixing the concrete is presented. It is important to get the correct consistency to make the ornament successfully. Other features include the ingredients used and the filling of the latex mould and removing the mould. The mixing ratio for the cement is 4 parts gravel (6-10mm), 2 parts coarse sand, 1 part cement and water. The consistency should...

This video describes how to make a fancy-looking stationery card set holder. First, take a card and cut it down to 10*6.5 dimensions. On the 6.5 inch sides, score 1" each. On the 10 inch sides, score 1", 7" and 8". Using a pair of scissors, cut flaps on the 10" side on the scores upto 1". After cutting these slits, you can do any designs on the card in order to make the holder look beautiful. Now fold the card along all the scores to make creases. Now, using glue, stick the flaps together. Fo...

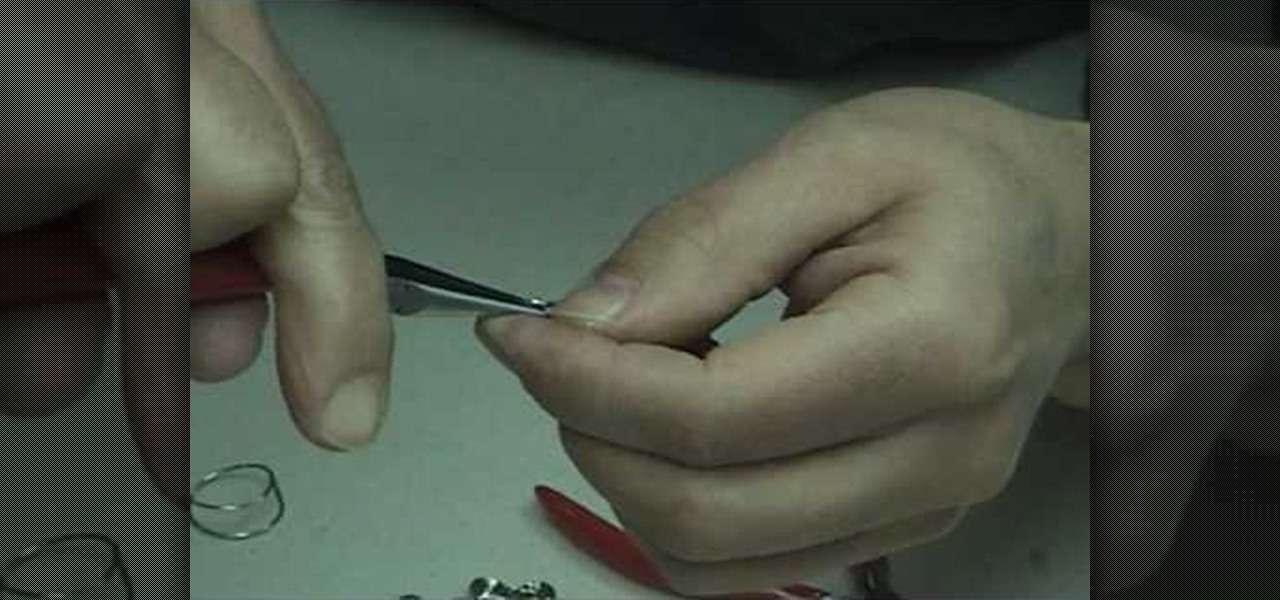
The video describes to make wire hoop earrings. Take a steel metal of anything and take a eighteen gauge wire and wrap a few length of it around the taken piece of metal which is cylindrical in shape. Cut the wire at the desired part and remove from metal.The wire takes the shape of a standard spring. Again cut it into two or three pieces. Hold the wire again and straighten the edge and after that once again bend it down holding at the place where bent begins. Put some on it to design and the...
In this Arts & Crafts video tutorial you will learn how to make a vertical Easter greeting card. Take a 6x6 yellow card and fold it in half. Using the Valentrio Fiskars corner punch, you can punch one corner. Cut a 2 1/2” wide metallic cardstock, a 1” wide paper strip, stamp a picture or a design and punch it with Fiskars punch. Punch the 1” wide strip with the Fiskars border punch and glue both the pieces above and below the metallic card stock. Glue the metallic card stock and the pic...
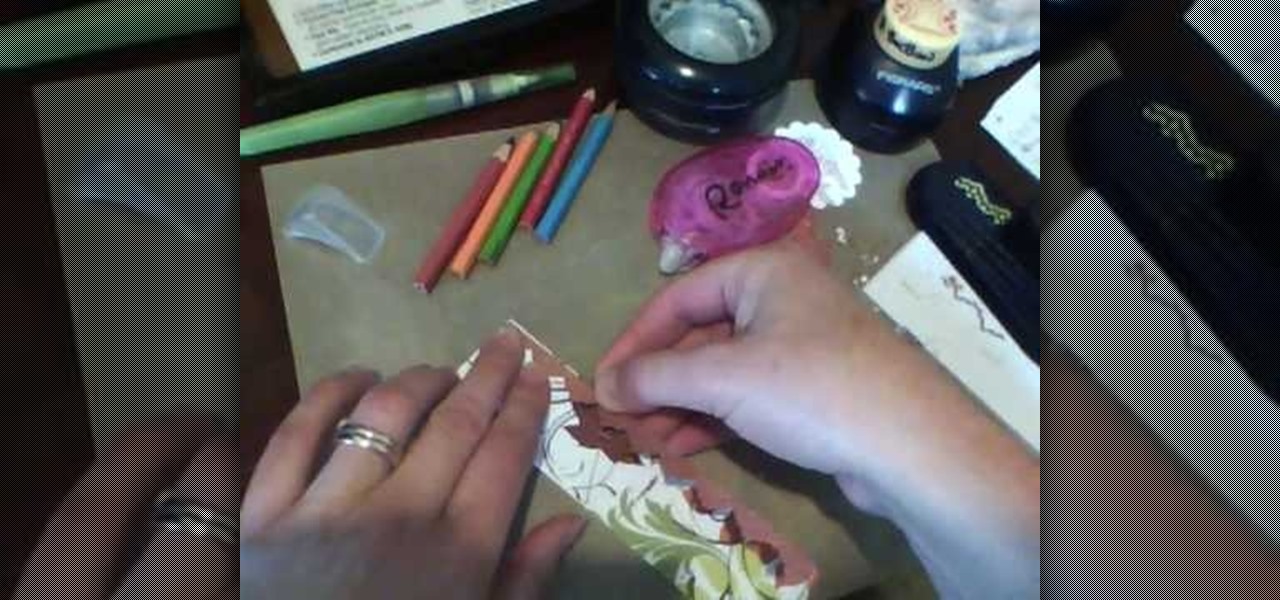
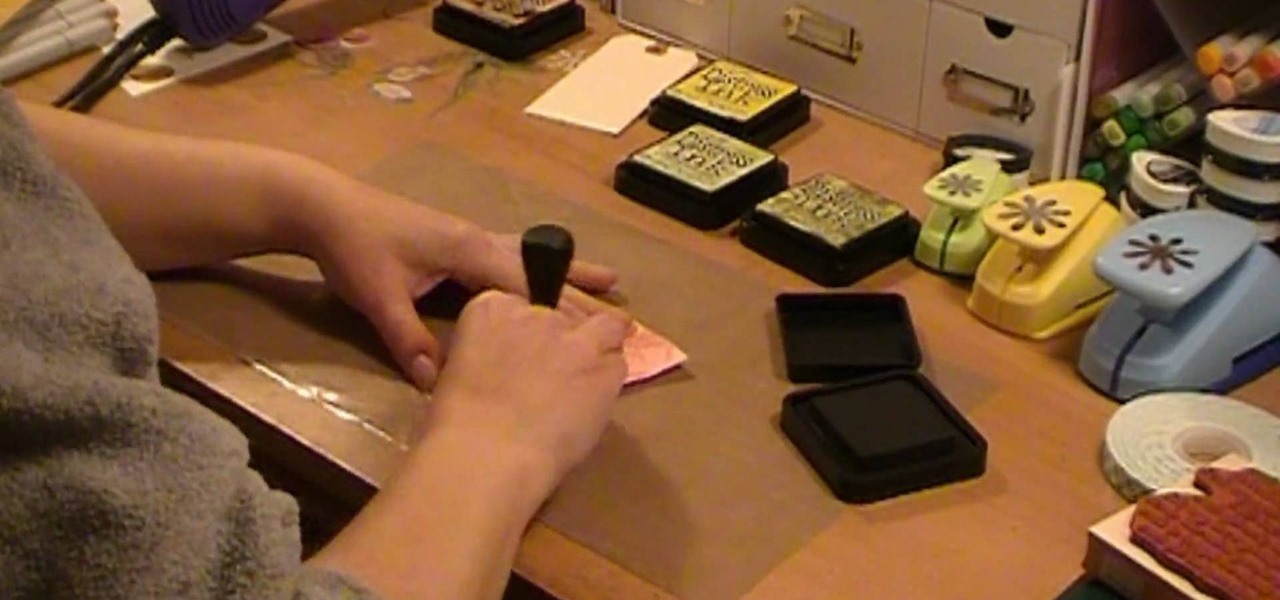
Donna50242 shows us how to make an amazing looking tag to use on different things. This video is in response to another one posted earlier. This tag is made be crinkling up an ordinary brown paper tag and then flattening it out to create the worn out wrinkle effect. Using a distressing inking tool with a foam pad, we apply the ink in a swirling motion. using different colors from the ink set (Mahogany, Mustard seeds, green etc), we can create amazing effects. And that's it, your done! Try exp...
Jailbreaking an iPod Touch or iPhone can have its advantages. Some apps that you wouldn't be able to use before could be downloaded without a problem. Issues that you may have had with yoru phone about design or looks, gone! In this tutorial you'll find out how to jailbreak dna unlock your iPod Touch/iPhone with 3.1.2 firmware. But be advised that doing anything with you phone like this, can potentially damage it so be careful!
In this Arts & Crafts video tutorial you will learn how to create a box to hold a mini album or small cards. Take a shiny card stock 10.5 x 6 inches. On the 6" side, score at .5" and 1" on both sides. On the longer side, score at 3, 3.5, 7.5 and 8 inches. Cut out the corners on the flap side of the card as shown in the video. Do a step cut on the other side of the card as in the video. Round the four corners with a corner rounder. You can do some stamping now if you want or you can also glue ...
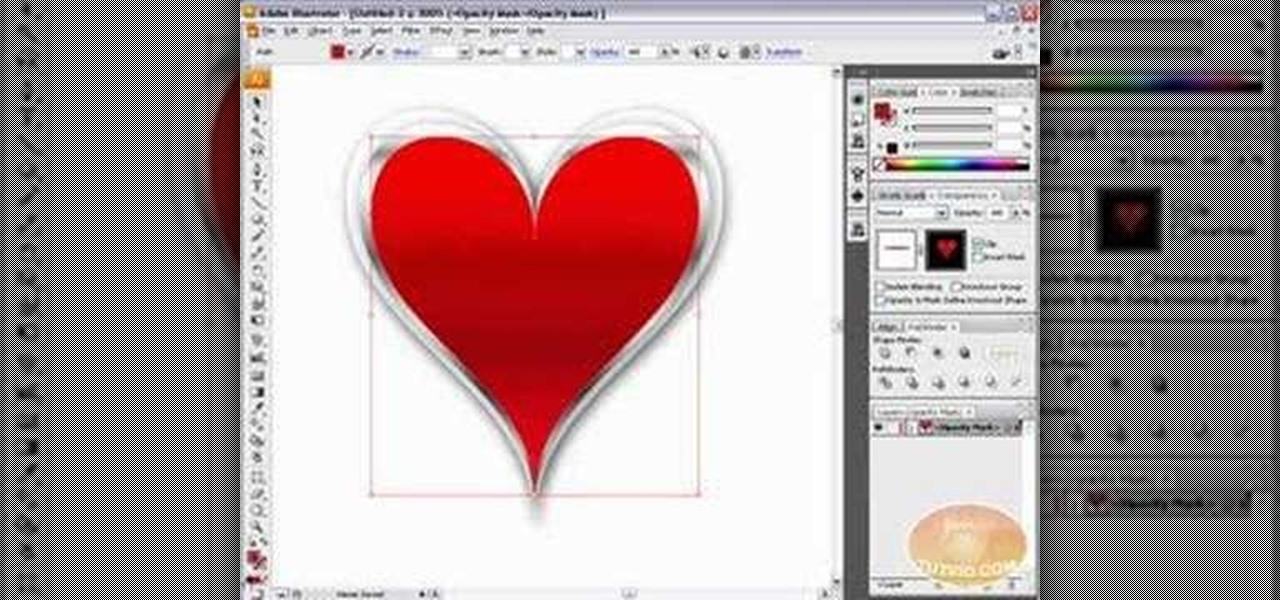
Check out this video and learn how to draw a very cool graphic using Adobe Illustrator. This tutorial will show you how easy it is to draw a vector heart without having to download anything extra. All you need is Adobe Illustrator and some time!
preparedpantry describes the process of covering sugar cookies with fondant.
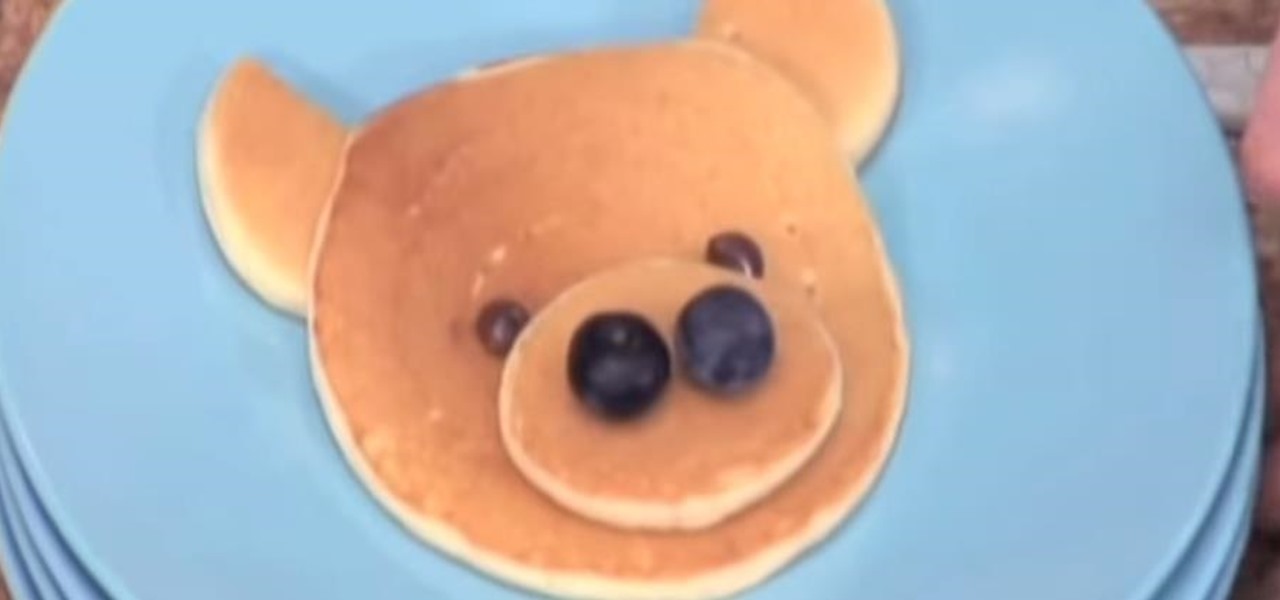
Liv Hansen with Betty Crocker TV demonstrates how to make pancakes in fun shapes that kids will love. Make sure to pour your pancake batter into a squeeze bottle for better control when creating your pancake shapes.
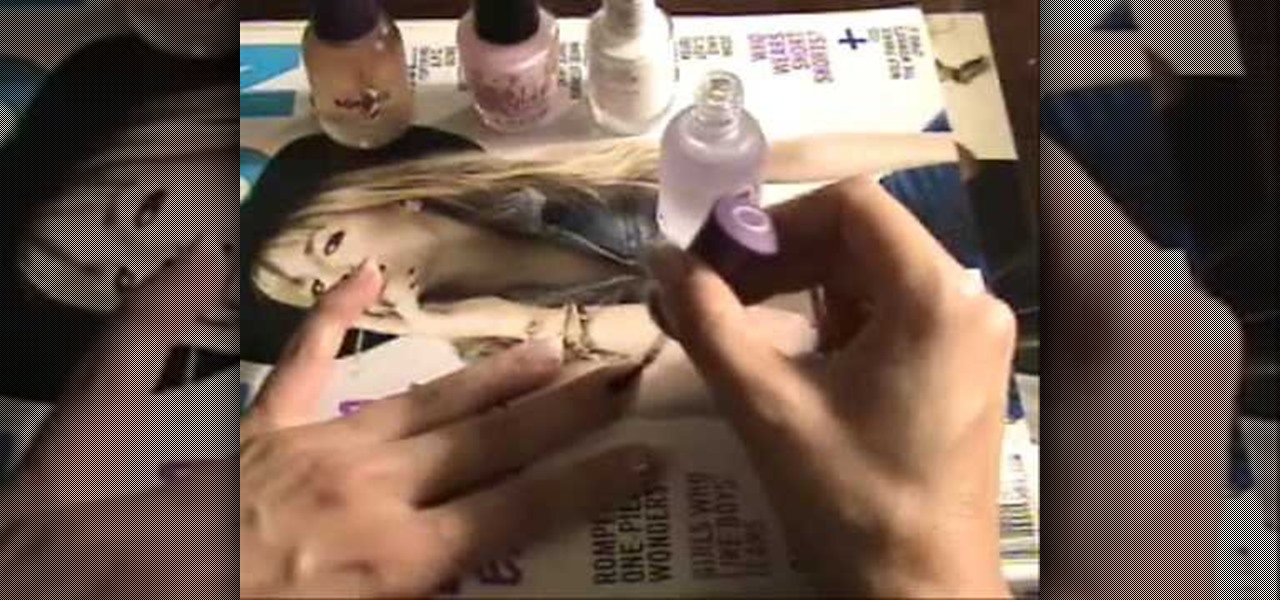
heartkayden demonstrates French tips with a newer and sexy flame effect. She leads you through the different steps perfectly starting off by applying a clear nail varnish as a base coat. Next she applies a thick layer of nail varnish, and then uses a toothpick to make the flame design, allows it to dry, After that the white nail polish is applied that is used to give the classical French tip look. But here comes the the flame effect. It is done by using a toothpick to make alternate C's on th...
Are you having a Halloween party? Looking for a spooky dessert to serve to all of your friends? In this tutorial, learn how to make a cake shaped and decorated like a mummy. This mummy design is very realistic looking and will make a perfectly spooky addition to any Halloween festivities. Allow Ronda to take you step by step through the process of creating this deliciously scary dessert and be the hit of the holiday!
James from DreamWeaverTutorial.co.uk shows you how to use collapsible panels with the spry module in Dreamweaver CS4. The spry collapsible panel works similarly to an accordion widget, except it only has one section which features a tab panel and a content panel. When you click on the tab panel the content panel either appears or disappears (toggles on and off). You can add background colors, text colors, images, rollover effects and more, and James shows you exactly how to do all that in thi...
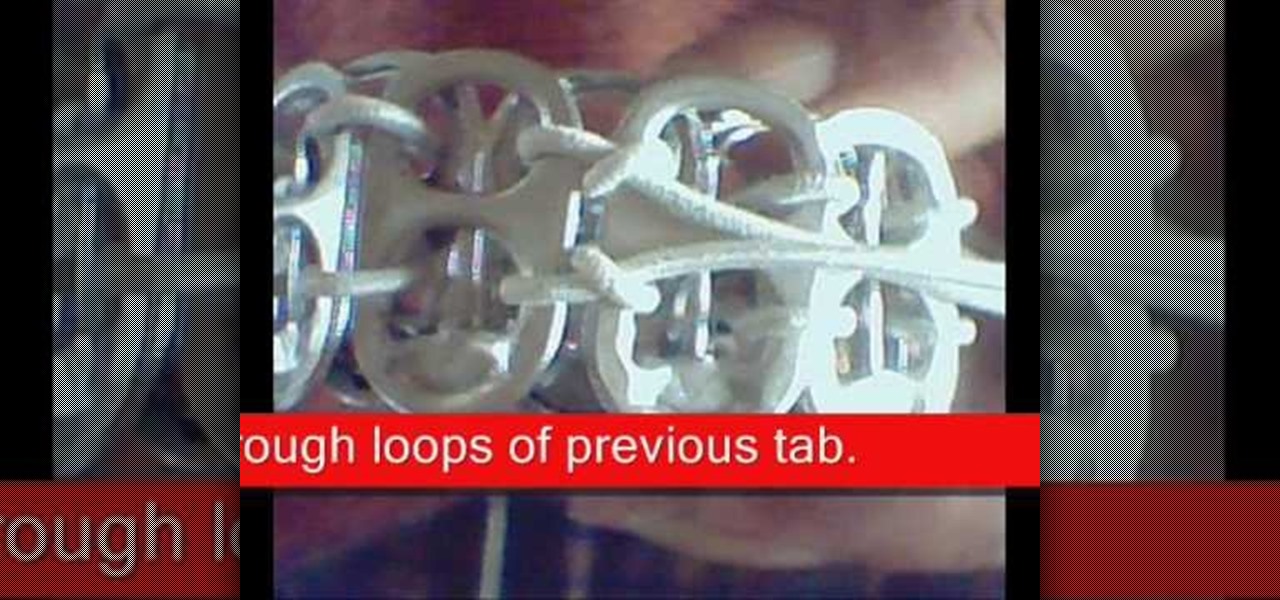
It's time to be Earth friendly! This tutorial will show you how to save the tabs from old soda cans and make really cool jewelry out of it. Follow along with the video and learn how to make a bracelet from soda tabs. So, start recycling and raiding your neighbor's trash for tabs to make more fun designs. Just don't forget to recycle the rest of the can when you are done!
Dirt Design Graphics will show your how to draw a firey hotrod flames. Flames are like a series of water drops. There are many different types of flames you can draw. You can see the difference in the more angular tribal flames which you get by adding a kind of hook at the end. You can do some long seaweed like flame, intertwining flames, double flames, and realistic fire flames all by changing up that same basic pattern. There easy and will make anything look like it’s going really fast so f...
If you’re in need of a fancy napkin setting then try this pleated standing fan design. It only takes seconds to make. Start by folding on inch folds back and forth. Then fold the pleating in half, flip the mess over and let it spread out naturally. You’ll need cloth napkins and it often helps to have starched napkins when doing decorative folds. This will really dress up that dinner table.
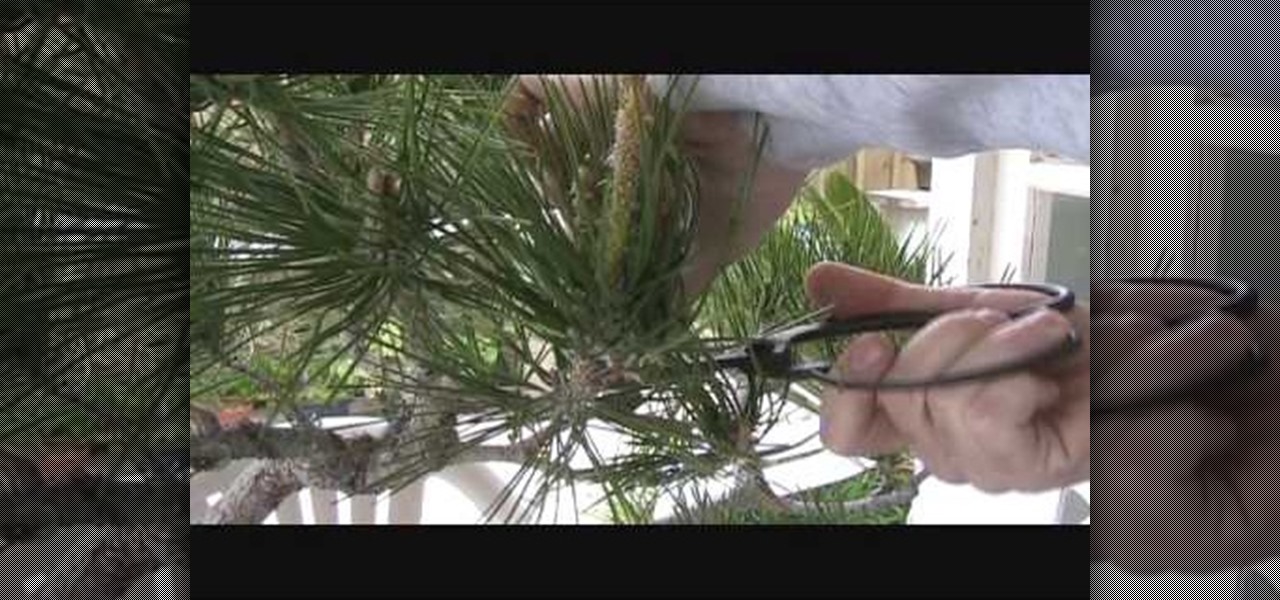
In this Home & Garden video tutorial you will learn how to prune & clean a Japanese black pine bonsai for spring. First you got to prune off the branches that you don’t want and allow only the branches that you want in order to design the tree. After about a year of pruning off the branches cut off the studs created by the left over branches so that the area is flush with the rest of the trunk. Then cut off any dry stubs around the foliage. Next cut off the foliage that is growing out of the ...
This video teaches you how to achieve an eye catching stained glass nail art effect without attending a nail salon. To achieve the striking effect, one needs between 4-7 nail polish colors, and a fine lined nail art nail polish in black. Beginning with the base color, one applies the desired outlines for the "panes" using the nail art brush. Once that is dry and you are satisfied with the outlines, you can begin applying your desired colors to the "panes" achieving the effect of pieces of sta...
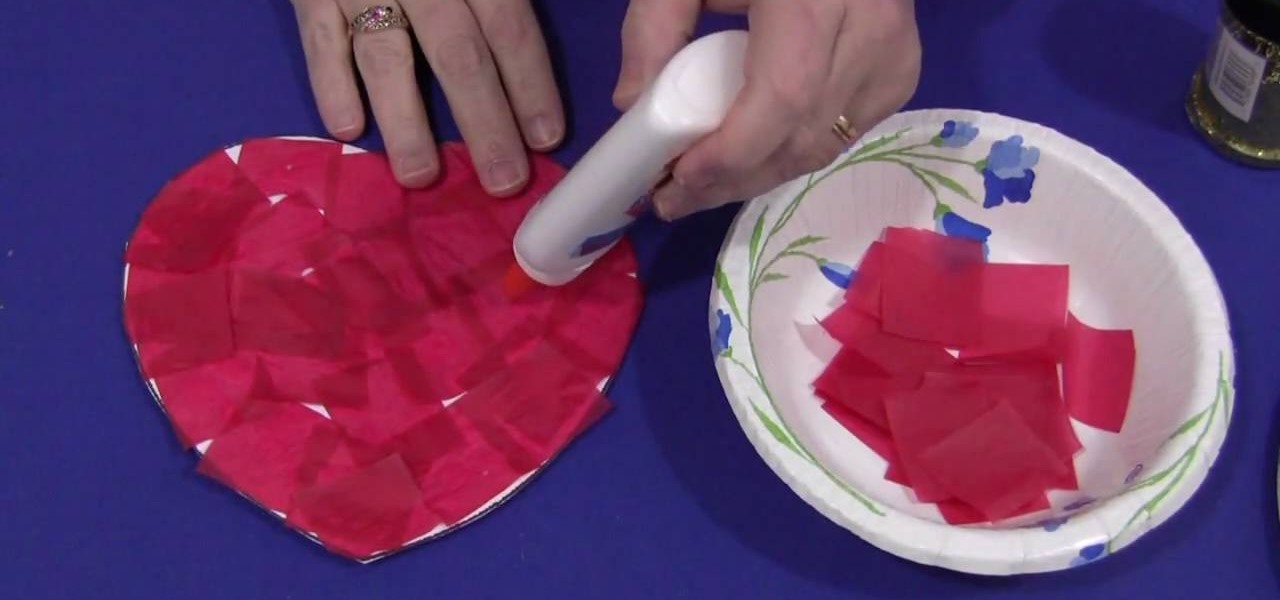
This video explains how to make a tissue paper heart with your kids. The first step taken by the instructor is to cut about thirty small tissue paper squares with the color of your choice. The instructor then takes a large piece of construction paper and cuts out a basic heart design then puts light dots of glue all over the construction paper heart. The heart is then covered in the tissue paper squares until the entire heart is evenly covered with the colored tissue squares. The last step is...
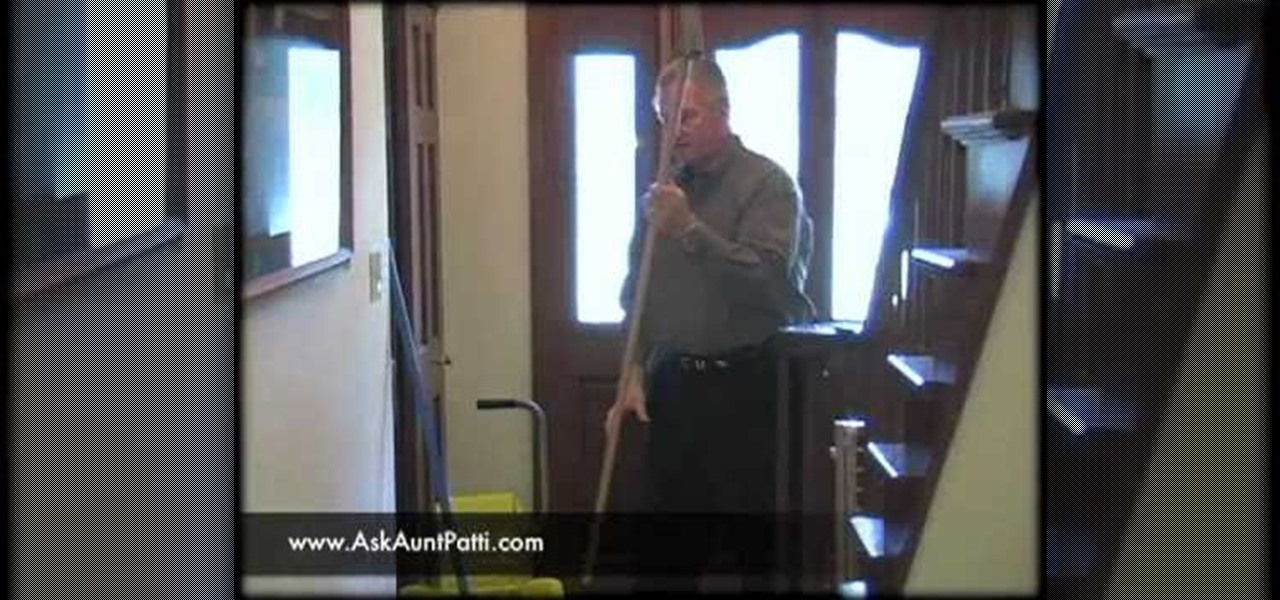
In this video Rich explains how to maintain a grout and tile floor. He uses a chemical cleaner which he describes as a "grout-smart type product." For regular maintenance of the floor Rich recommends using only 1oz of the product per gallon of warm water but for really badly stained floors using up to 12oz per gallon of warm water. Rich mixes the chemical into his water then applies the mixture to the tile using an ordinary deck scrubber, he then uses an angled scrubber which has bristles tha...
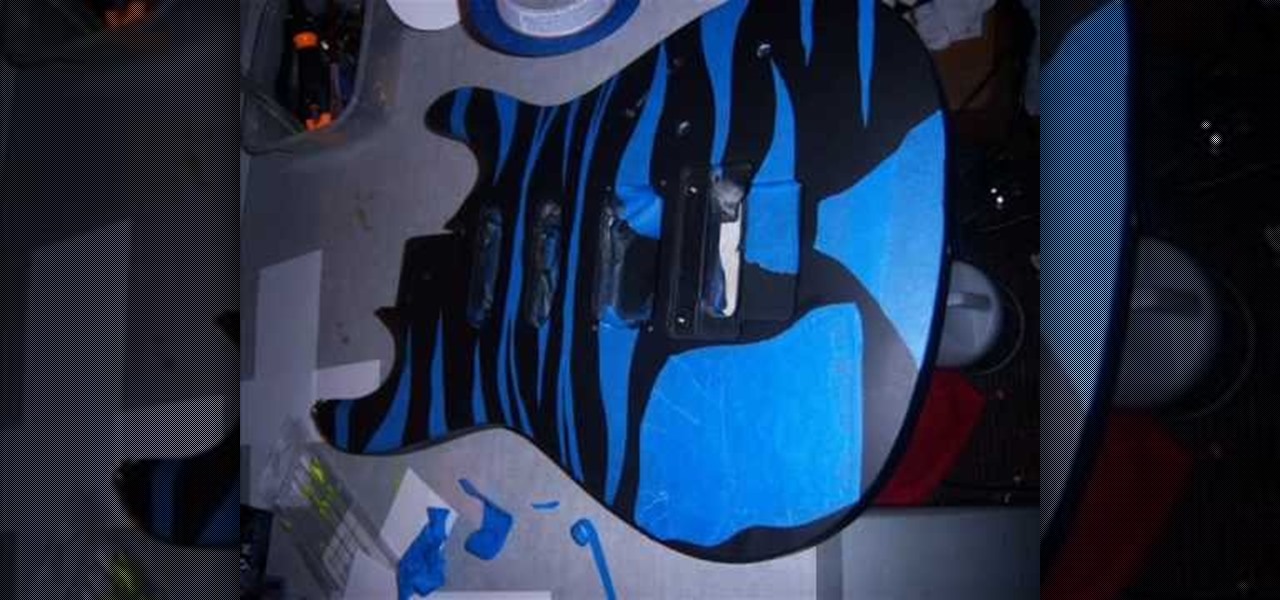
In this video Teddy Zane shows you how to paint a guitar with spray paint. It begins by painting the whole guitar with one color of flat paint, and then creating a panel where you want the picture, out of tape. Next lay your picture on top of the tape and use a scalpel or razor to cut out the design as a template carefully ensuring you do not cut the guitar, only the image and the tape. Once the entire image is cut, pull off the tape to expose the guitar beneath. Cover the rest of the guitar ...
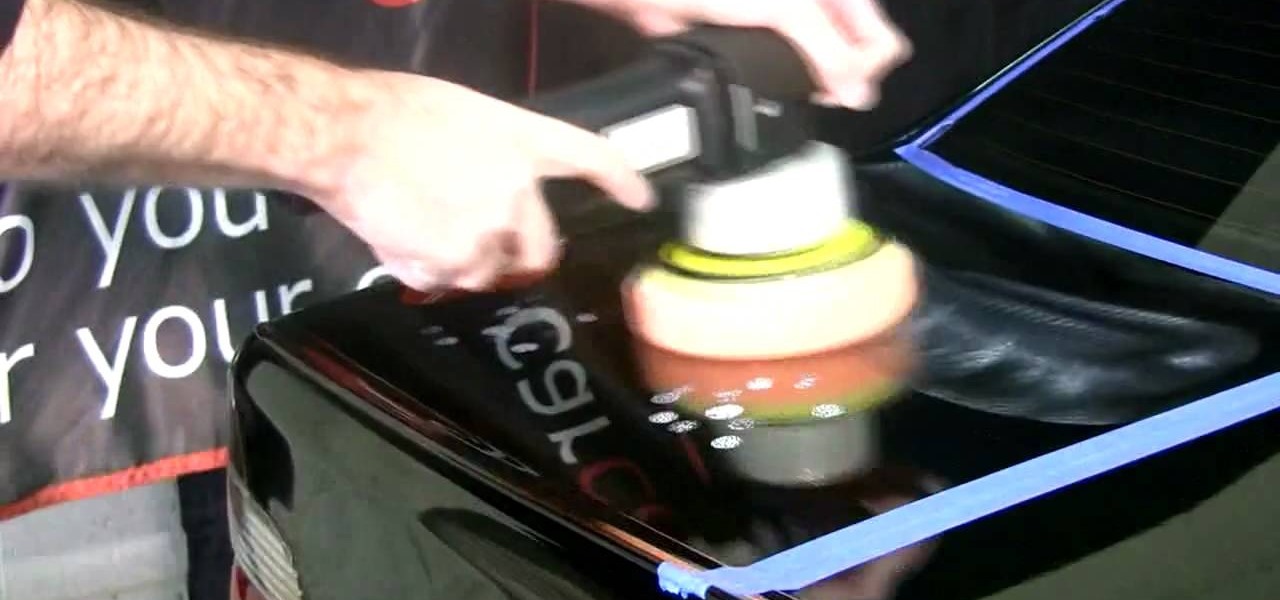
In this video tutorial, viewers learn how to polish a car with a round orbit polisher. This polishing technique will remove the swirls on the car. Before polishing, users should wash the car and wipe it clean. Then tape the areas that you do not want polished. Now attach an orange medium cutting pad to the polisher. Apply the polish on the pad and dab it onto the areas that you want to polish. Start the polisher at a low speed and gradually turn the speed faster. Then attach a honeycomb waffl...
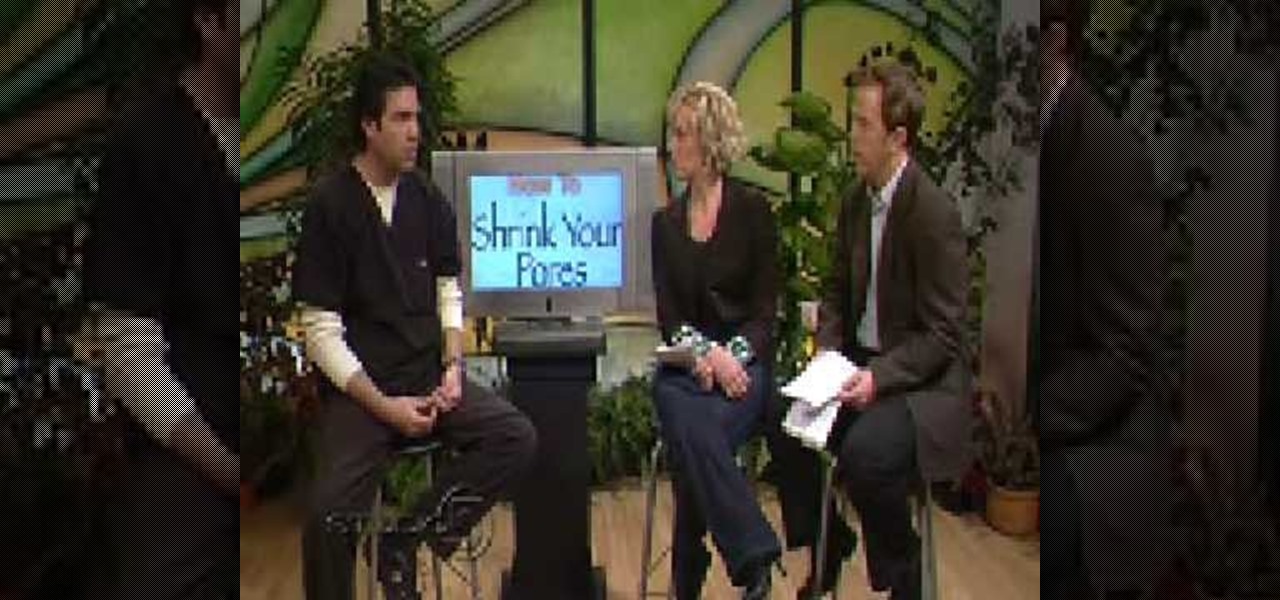
Dr. Steven Jepson explains what you can do to shrink your pores. Pores are small openings in your skin that can become infected or get clogged with makeup or dirt if they are too large. In order to shrink the visible appearance of skin pores you need to clean the dirt and gunk out of the pore. First you need to cleans and exfoliate your face twice a day using a cleanser designed for the face. Exfoliators are mildly acidic and help to dissolve the dirt so that it can be removed. Dr. Jepson war...
In this tutorial, we learn how to set rhinestones using a Bejeweler. To do this, you will first need to prepare your Bejeweler and the fabric you are using. Lay out the pattern on your fabric and use tape as a guide for any letters you write. The rhinestones may move during this, just push them back in with tweezers. Once the Bejeweler is plugged in, rest it in a stand since it will become hot. Once it's ready, place it over an individual rhinestone for around 15 seconds. When time is up, lif...
Stephannie teaches us how she prepares her "not so famous" mini cupcakes for a nephew's birthday party. After mixing up the yellow cake mix and putting it into a large plastic bag, you cut the end off the bag and squeeze the batter into cupcake cups within a pan. You should then proceed to cook them at 300 degrees F for 15 minutes until they are done. With a bit of humor Stephannie shows us how to mix food coloring into white frosting and a neat icing trick. By placing it in the microwave aft...
In this how-to video, you will learn how to groom your dog. Grooming is important for any kind of dog. It is important to find a groomer if you cannot do it yourself. Hair under the arms should be trimmed, otherwise it will become dread locked. It is also important to brush your dog's teeth on a regular basis. You can feed your dog with a brand that is good for teeth care. Purchase and use a brush specially designed for dogs. This will help keep your dog's hair from becoming matted. Teach you...
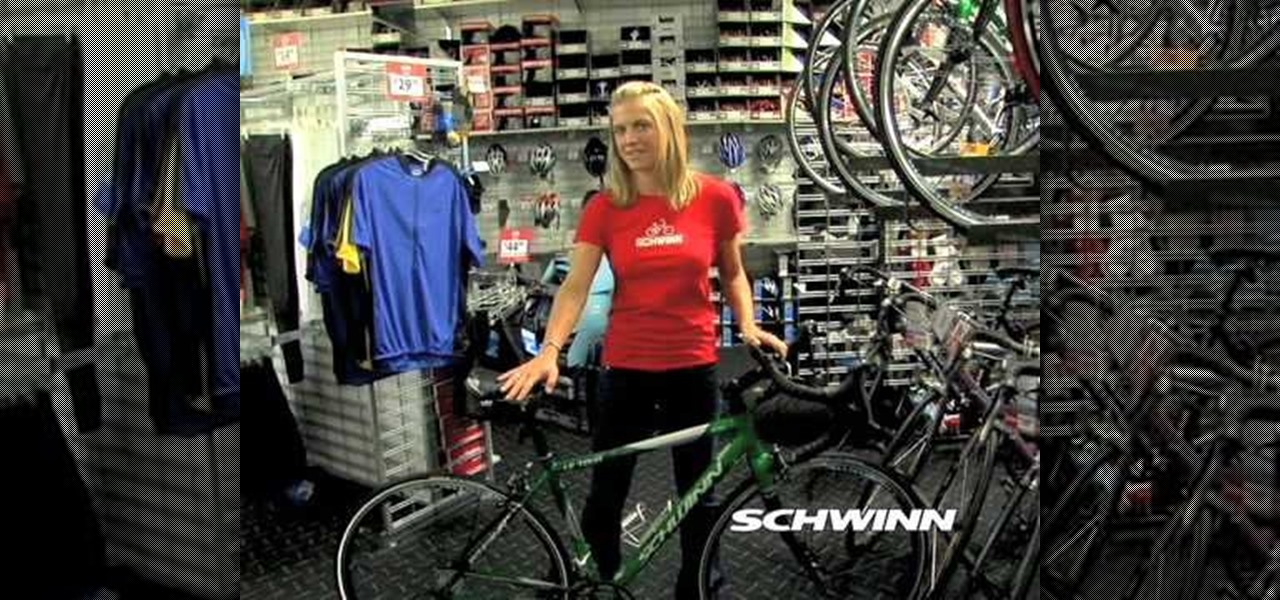
This video discusses how to find the right type of bike for you. There are four different types of bikes: road racing, multisport, comfort sport and flat bar road bikes. Road racing bikes typically have lighter weight frames. They have steeper angles for more aerodynamic positions and higher components. Multisports also have light weight frames and higher components. They also have more aerodynamic tubesets in the fork and airwires which allow for a more aggressive position for races. Comfort...
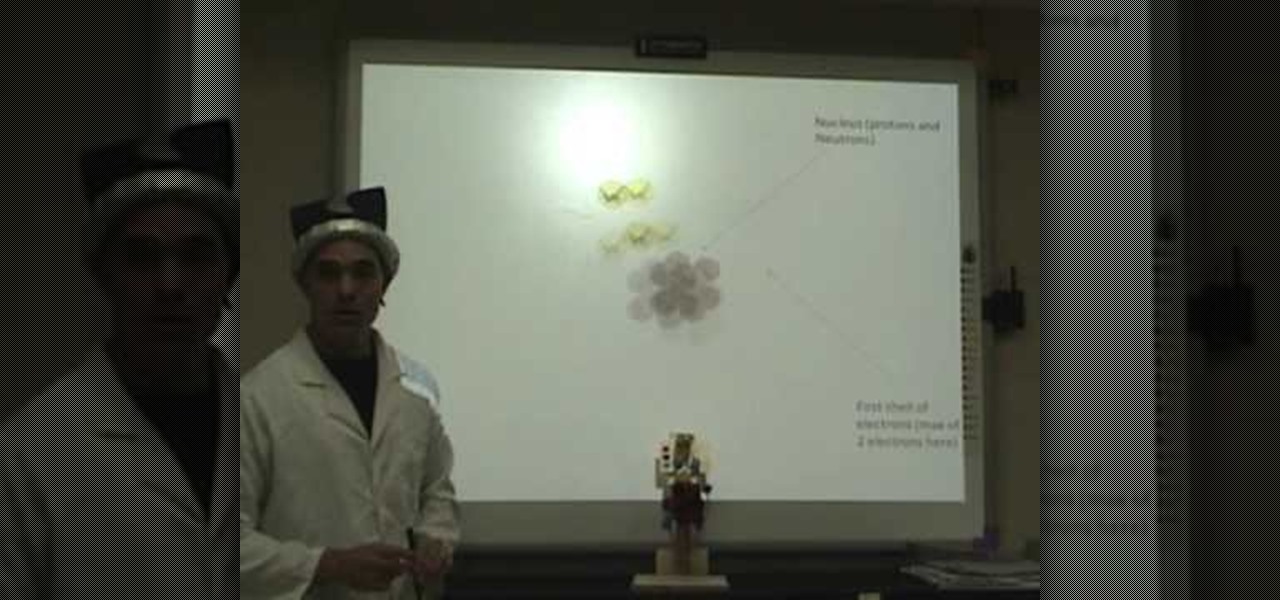
An atom is a basic unit of matter consisting of a dense, central nucleus surrounded by a cloud of negatively charged ions. The nucleus itself is a mixture of positively charged protons amd electrically neutral neutrons. Different groups of elements have respective atomic numbers. You can use the periodic table as a tool to draw atoms of elements. The periodic table is organized into periods, groups and families. This video is a tutorial that reviews the subatomic particles found in an atom. I...
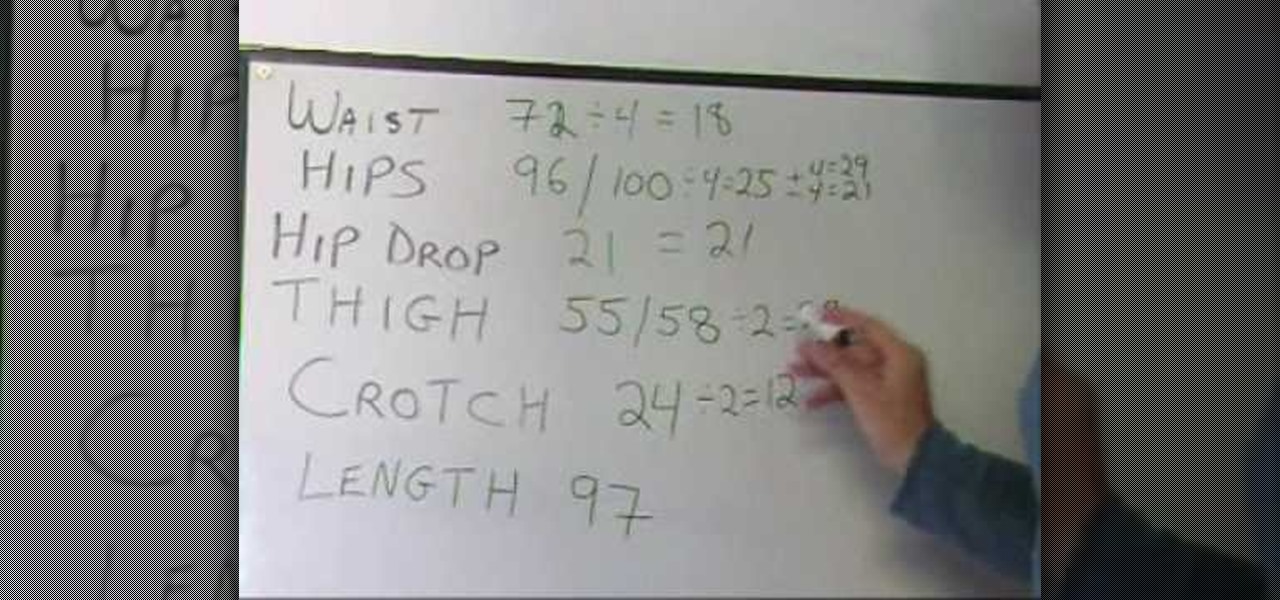
In this three-part sewing tutorial, learn how to make a pair of pants that fit like a glove! In the first video, you will learn to take measurements and calculate measurements to plan out your pattern. In the second video, learn how to draw the pant pattern based on your measurement calculations, make a test pant and finalize your pattern design. Lastly, in the third installment of this series, learn how to sew on the zipper and button and stitch the legs of your pants.
Learn how to make a River Bar bracelet, which is also known as a Paracord bracelet, by following the steps outlined in this video tutorial. To start your bracelet, you will need to tie a reef knot. This is done by taking two loops (in two different color strings) and then placing one loop within the other, pulling this through the first loop to secure the two loops together. This knot creates the end of your bracelet. To actually make the River Bar design, bend the two colors of string so tha...
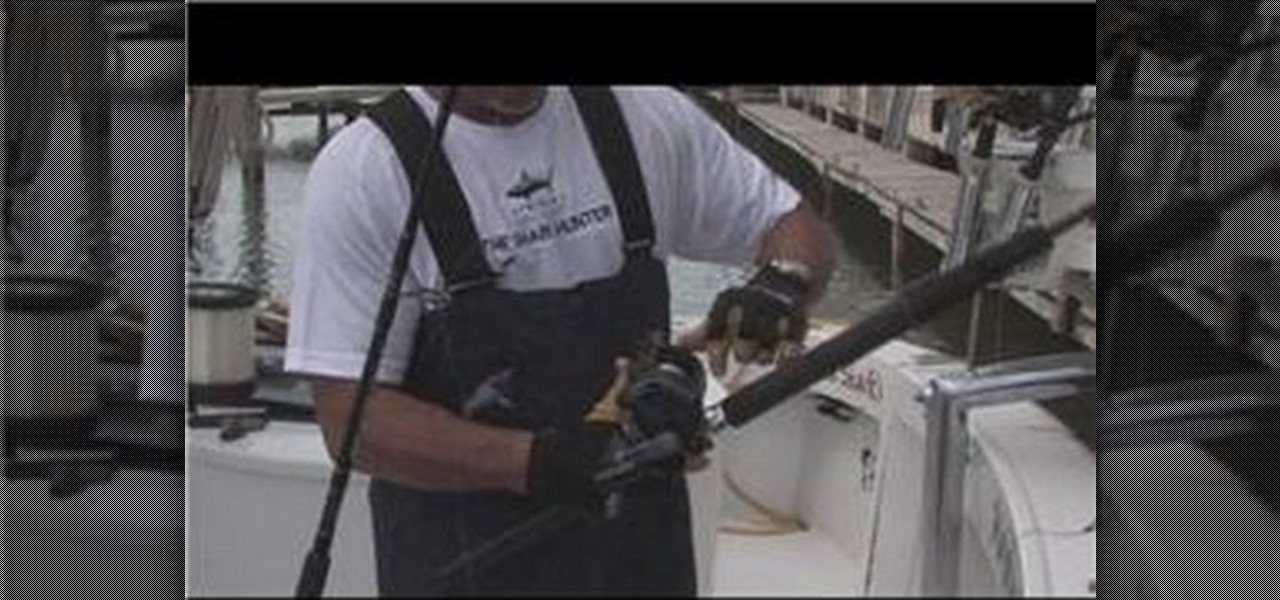
In this video tutorial, viewers learn how to identify the different parts of a fishing rod. This video introduces 2 types of rods, spinning rod and conventional rod. The spinning rod is used for light tackle fish. The line comes off from the bottom of the rod. The rod is designed to bend flexibly. The conventional rod is used for bigger fish. The line comes off from the top of the rod. The rod bends more stiffly. This video will benefit those viewers who enjoy fishing and would like to learn ...
In this tutorial from brickboy518, viewers are shown how to construct a table out of fourteen LEGO bricks. The following bricks are required: 4 1x1 spokes, two 4x1 strips, a 4x6 thin, a 2x4 thin, two 4x1 thins from the LEGO Racing Legacy sets, and 4 1x1 spokes. First, the builder must apply the 2x4 thin to the center of the of the 4x6 then. Next, they must attach one of the spokes on each corner of the 4x6. Then, the car strips must be applied face-inwards to the sides of the 4x6. Thus, this ...
Joey Logano paints the #20 Home Depot Toyota race car with Home Depot orange color. 1. Paint up the chassis. 2. Dry the paint for about 4 days using a grill specially made to fit the body of the car. 3. Bake the chassis in the oven for 160 degrees F. 4. Get some orange stickers that is exactly the Home Depot orange color. Design the body and headlights.
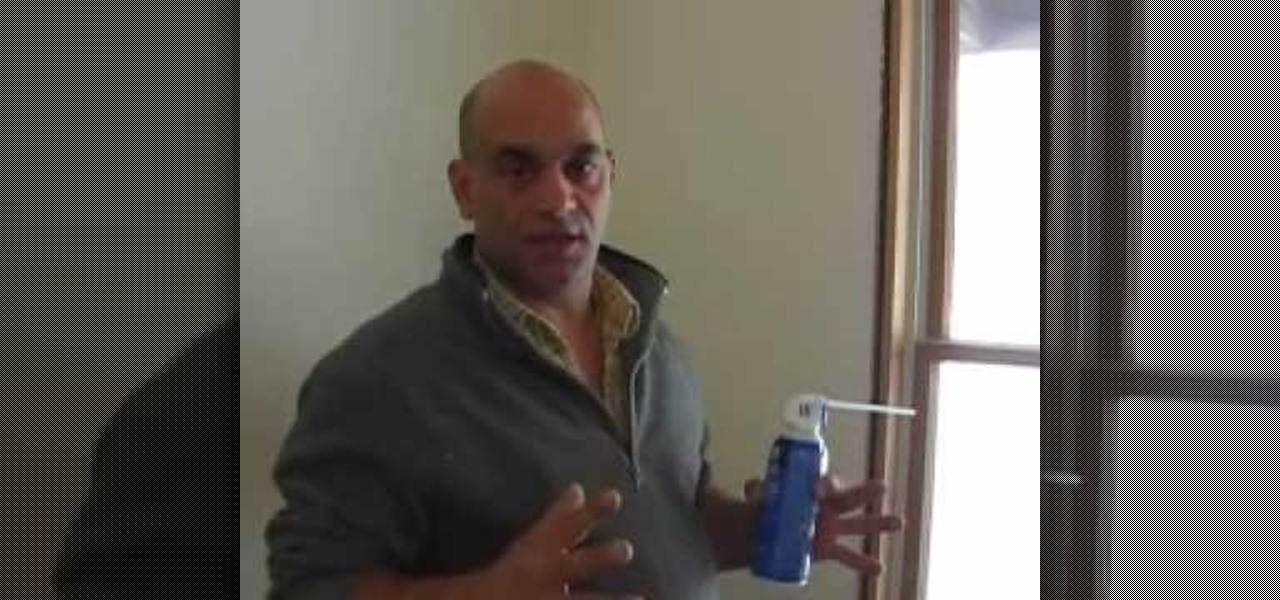
In this video tutorial, viewers learn how to seal gaps in houses using DAP foam sealant DAP 3.0 Weather seal caulk. The DAP products are designed to meet the tough standards demanded for professional window & door installations while effectively sealing large cracks, gaps and voids. Users learn to use the foam sealant to seal in gaps from inside the house. The gaps found behind wall trims. The seal caulk is used outside around windows. This video will benefit those users who want to learn how...
Catherine demonstrates how to create an eclectic, sunset-inspired necklace in this video. To create the necklace you must gather 40 yellow bugle beads, 18 orange chip beads, 3 mm red round beads, a barrel clasp, 2 crimp beads, 2 bead covers, about 20 inches of beading wire, clippers and pliers. The design is to start by threading a clap and a crimp bead onto the wire, leaving a 2 inch tail. Then thread on 15 yellow beads, remembering to cover the tail you left with the beads, 3 orange beads, ...
Those interested in learning how to make their own jewelry, can learn how to make a floating illusion necklace by following the steps in this video tutorial. You will need a beading board, beading wire, crimp beads, beads of your choice, a barrel clasp, wire cutters, and crimping/flat-nosed pliers. First measure out how much wire you will need. The tutorial is making a 16-inch necklace. Make sure to cut extra wire. For a 16-inch necklace, this means you should cut approximately 20 inches of w...