Who could forget the spectacular conclusion to the "Back to the Future" trilogy? The scene where Marty and Doc Brown use a train to push the DeLorean to 88 miles an hour so Marty can return to the 1980s has become iconic. With this tutorial, you can recreate the scene in miniature using fairly inexpensive props.
Go beyond the traditional 3D workflow to an immersive creative experience with the software Modo, created by Luxology. Modo is the next evolution of 3D modeling, painting and rendering for Mac and PC. Modo includes 3D sculpting tools, animation and network rendering, and advanced features such as n-gons and edge weighting.

This modo tutorial shows you how to detail paint textures maps on meshes and how to bake them using the render engine. Modo leverages its high-quality rendering engine for baking tasks as well. Check out this tutorial which shows how to leverage said baking during the painting process.

This is a simple video on spray painting a moon.
If you're a big fan of home improvement, then you've you've probably painted a wall or item in your day. Not only can it get expensive, it's also time consuming, and very often just plain boring. Waiting for paint to dry so that you can add another coat is, well…like waiting for paint to dry.
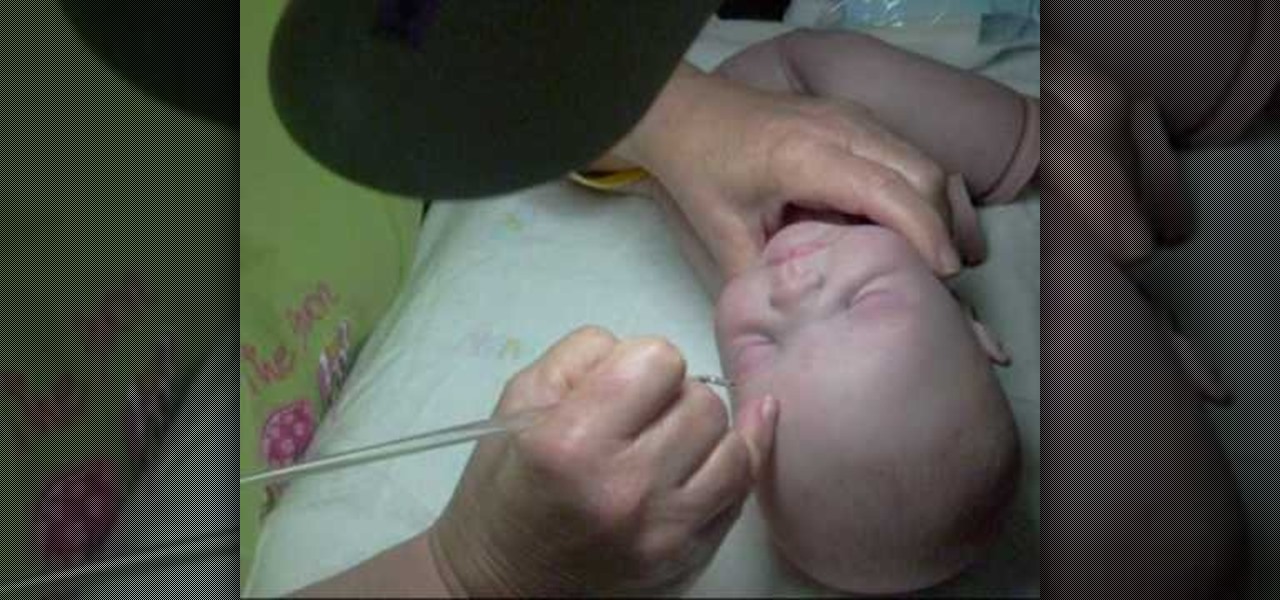
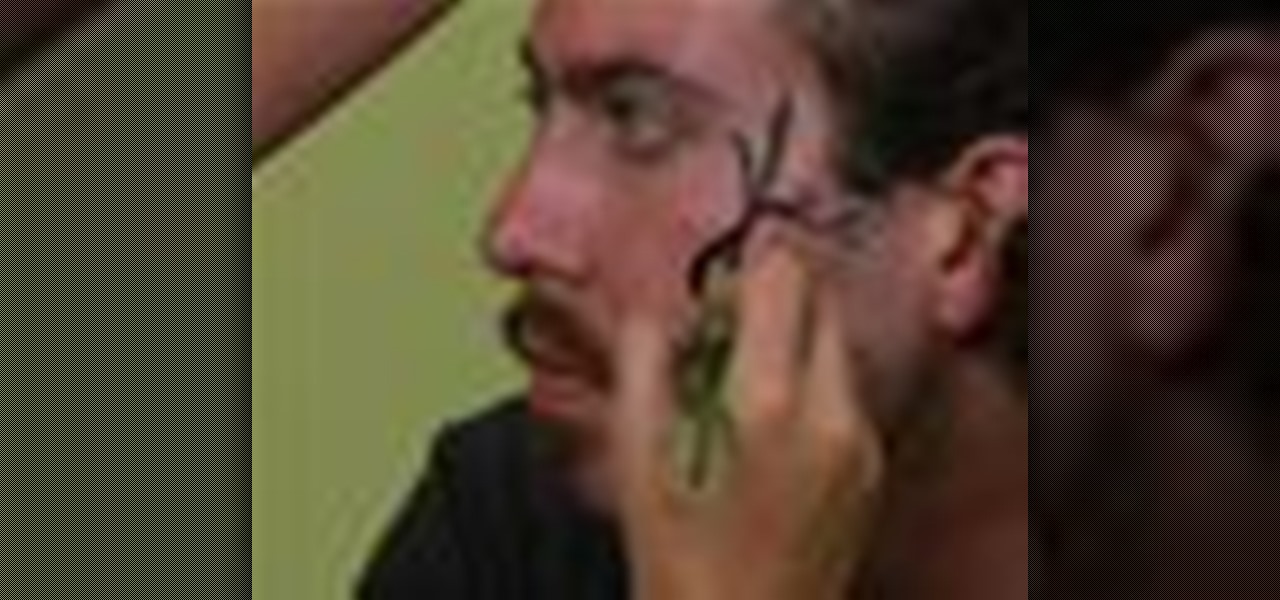
The importance of paint cannot be underestimated when it comes to correctly constructing a reborn baby doll. There are many tutorials showing you how to correctly replicate the hair on your baby doll's head, but what about the eyebrows? This tutorial shows you how to use a variety of paints and fine tip brushes to correctly achieve realistic eyebrows as well as head hair for your next reborn project.

Basketball shoes are expensive, so if you want to use something like Dunks (a big, beautiful white leather canvas) for a custom painted sneaker project you better know what you want to do before you start. Enter Photoshop. This video will teach you how to use Photoshop to plan your kick design out before you paint, helping ensure that you kicks come out the way you want.
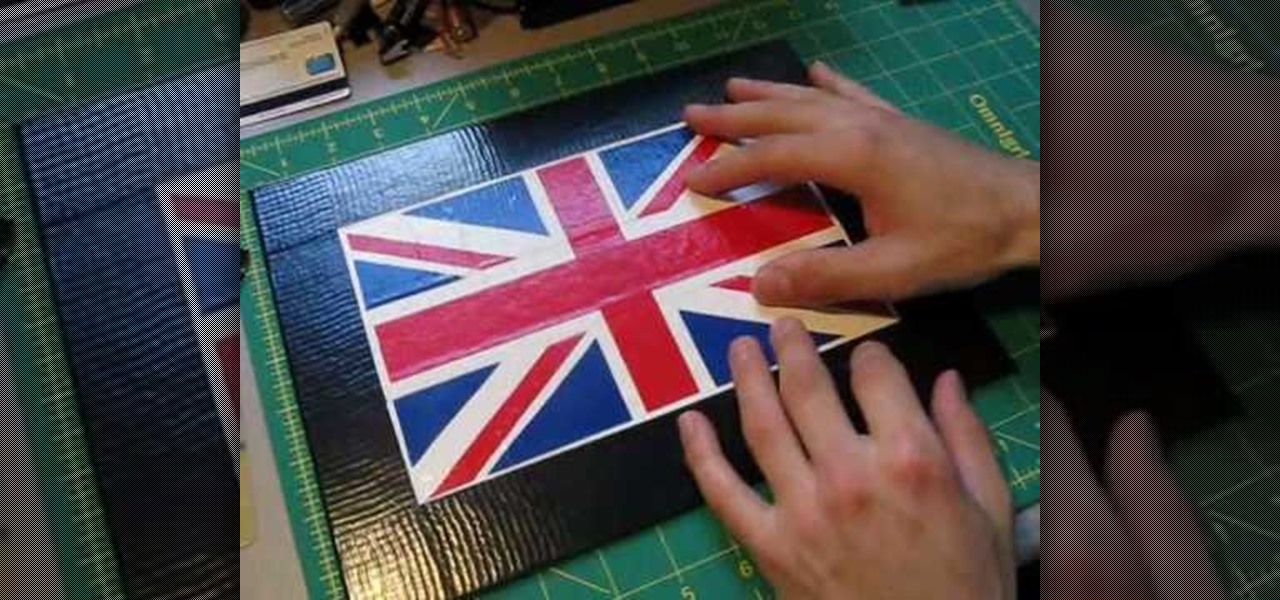
Spring-loaded clothespins are used for more than just clothes. If you looked in anyone's home, you'll see these springy wooden clothespins used for things like chip clips, photo holders and even for attaching sports cards on bicycle spokes. They're even used in the film industry (called C47s or bullets) for clamping colored gels or diffusion to hot lights on set. So, there's a million uses for these wooden clamps, but that doesn't mean they have to look the same— drab and unoriginal.
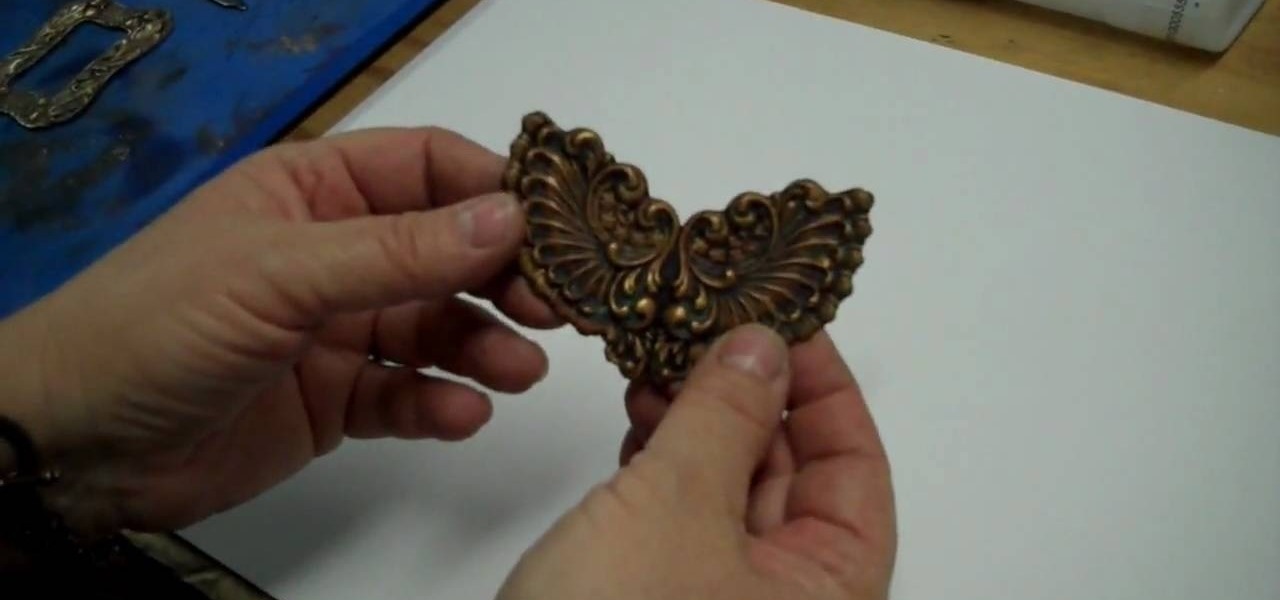
Adding a patina to brass stampings is what gives it an aged, beautifully vintage look. If you've never worked with patinas before, then check out this jewelry crafting video to learn about how to use different types of patinas - including resin and acrylic paint - to make a flower you can attach to a pin to make into a brooch.
In this tutorial, we learn how to apply Jack Skellington skull Halloween makeup. Start off by applying black eyeliner around your eyes on both the top and the bottom in thick lines. From here, draw a circle around the eyes with black paint and then draw a white circle around the face. Next, fill the white circle completely in with white paint. Now, fill in the black circles with black paint until it's completely finished. Then, use a thin brush to paint on the smile with black and draw on sti...
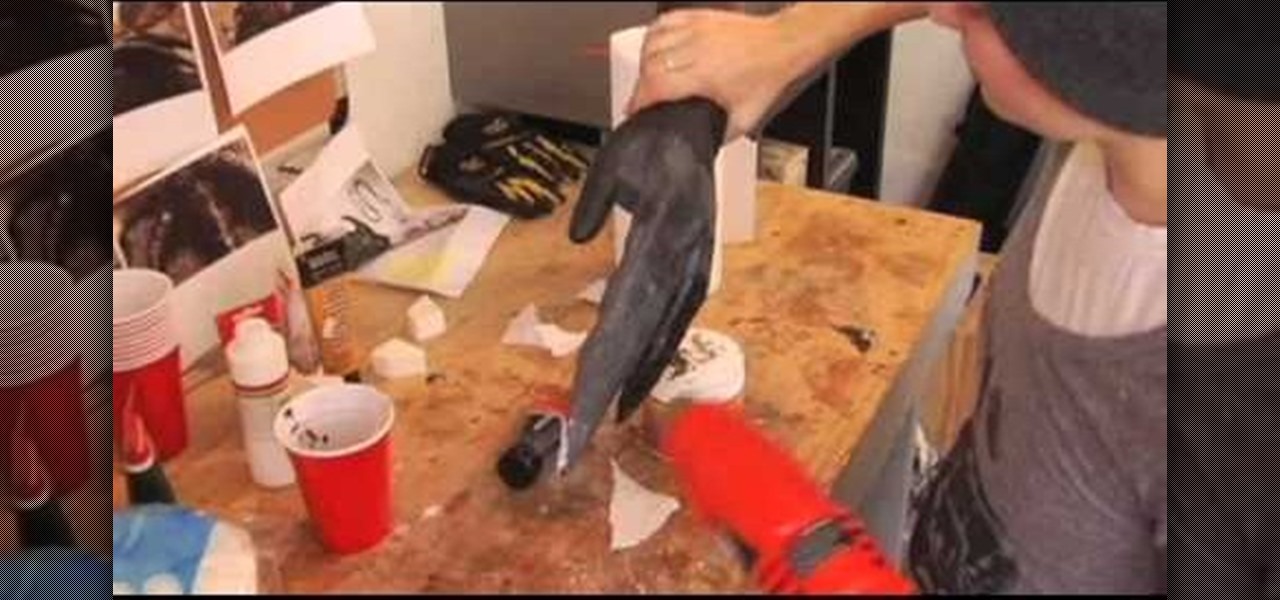
You will need: rubber glove, paper towels, liquid latex, paint, and newspaper. First, fill the glove with newspaper, then secure the fingers with electrical tape to make only 3 fingers. Then, mix up the liquid latex with black paint and apply it to the fingers. Then, place the paper towels over this in coats and shape them so they are pointy. Add in some texture using paper towel strips and cotton balls. Continue to paint over with the liquid latex/paint until you have made your desired textu...
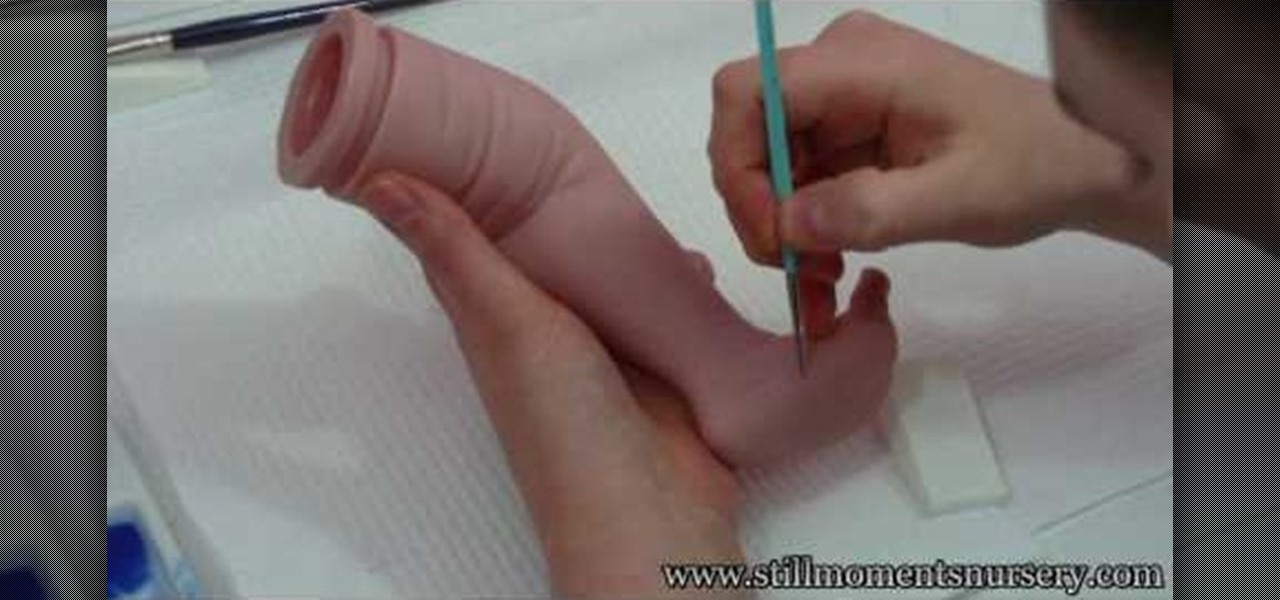
In this tutorial, we learn how to apply veins to a reborn baby doll. Gather up all your materials, then mix the proper paint for the veins. After you're finished mixing, use a very fine tip brush to add the veins onto the baby's chest and stomach. Use a sponge to dab onto the paint after you have painted the veins onto them. When finished with the chest area, start to apply the veins to the limbs of the baby. Continue to do this until you have painted realistic veins on all the appropriate pa...
In this video, we learn how to mottle with a sea sponge on a reborn baby doll. Start out with gathering all the tools that you need, then mix up your paint to the correct red tint. After this, apply some of the paint to the sea sponge using a paint brush. After this, grab the limbs of the baby doll and start to push the paint onto them, avoiding the soles of the feet. Continue to do this throughout all of the different limbs, then the chest and stomach of the doll. When finished, you will hav...
Painting a pattern on your hardwood floor can be a great way to give it some flair without ripping up the floor. This video will show you everything you need to know to measure out, mark, and paint a pretty diamond pattern on your hardwood floor yourself
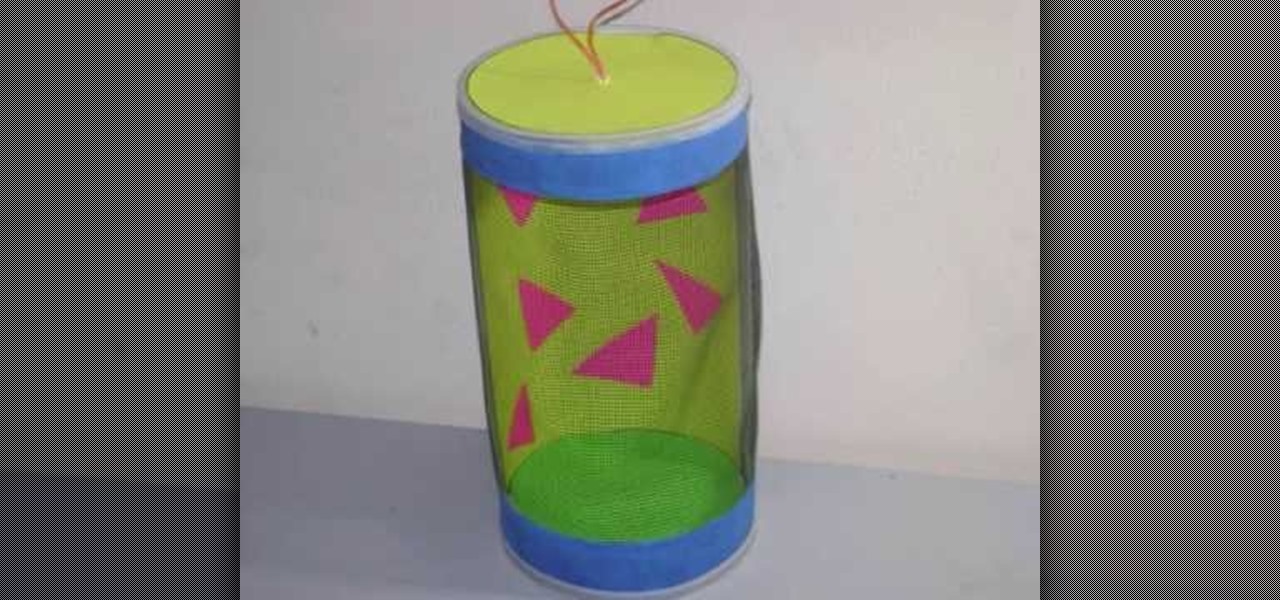
In this tutorial, we learn how to craft a bug barn or bug habitat. You will need: 1 Quaker oat box, masking tape, paint, mesh netting, poster board, ribbon, scissors, and a paint brush. First, cut one side of your box out and apply mesh over it with masking tape. Now, paint over the paint and over the entire box with your preferred colors. After this, decorate the inside of the box with paper. Cut a hole in the top of the box and place a string at the top to easily take it off. When finished ...
Okay, just to clear things up before you head over to watch the video, duct tape painting does not involve grinding up little pieces of duct tape to make paint.
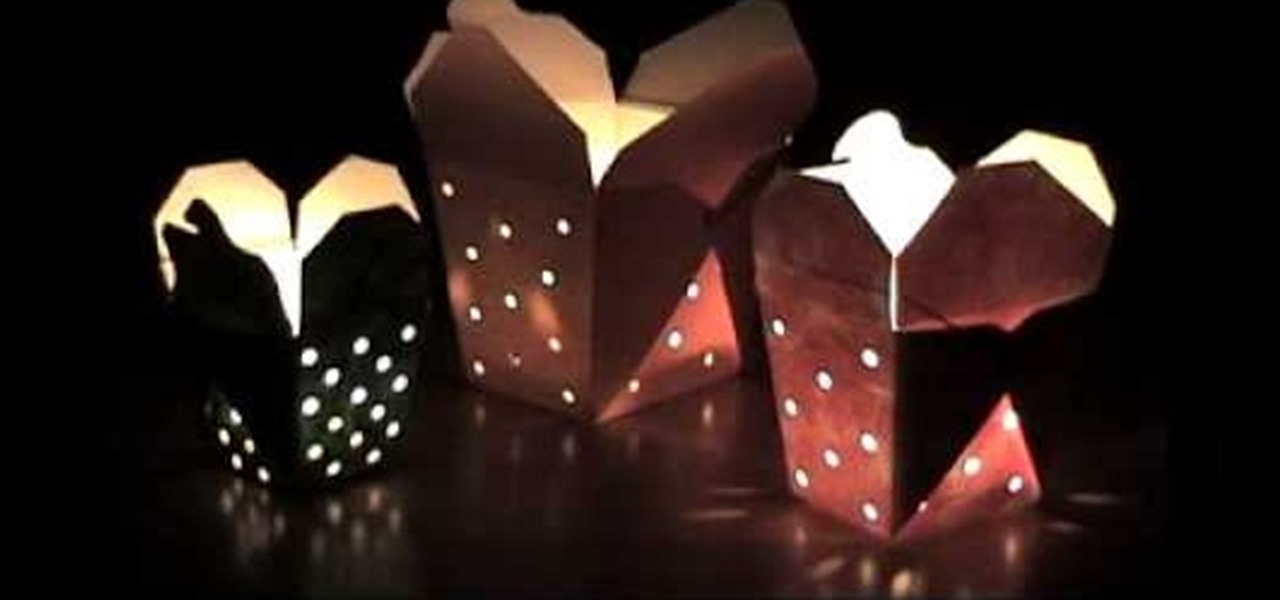
For this project you will need a Chinese takeout container, a hole punch, paint brush, paint, a container for the paint and newspaper. Flatten the Chinese takeout container. Use your hole punch to make holes in it, choosing any pattern you would like. Place the container on the newspaper and paint the outer surface, using any color you prefer. Once you have allowed the pain to dry you can reassemble the Chinese takeout container, back to it's original look. Then you simply place a tea light i...
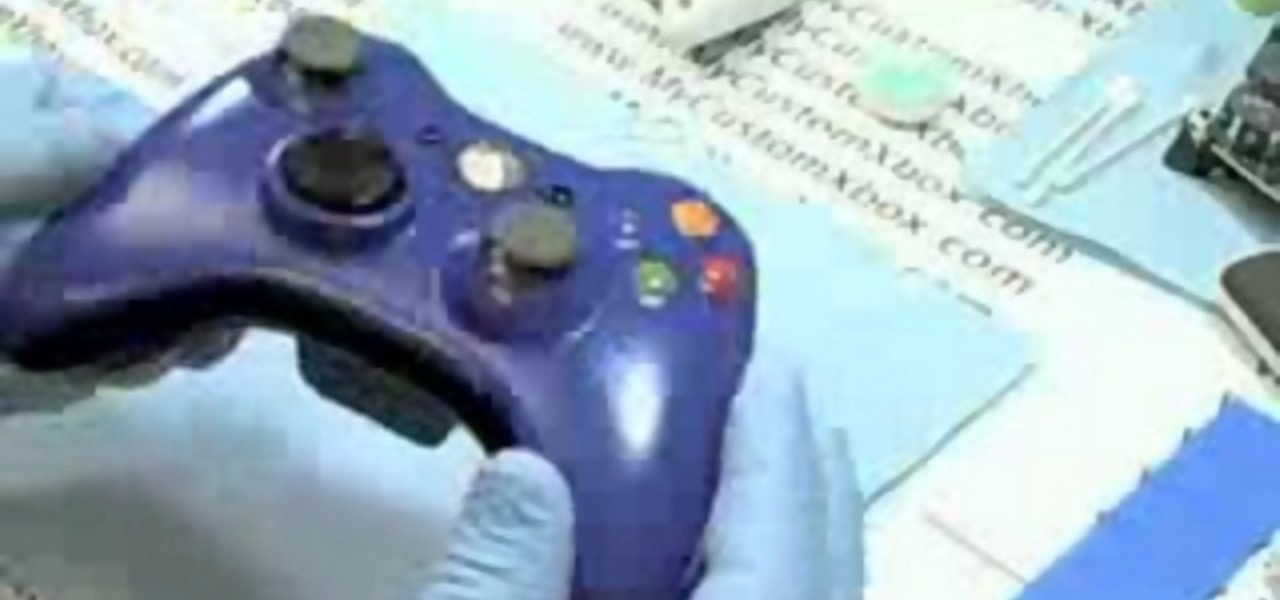
This is a step by step tutorial on how to prepare the different parts of an Xbox 360 Controller for painting.
In this video, Linnea Rose teaches us how to paint in a Norwegian folk style called "rosemaling". With this, you will double load your brush and do the strokes in the correct way. To double load your brush, first dip one corner into a color, then dip another color into the other color. After this, stroke again in between the two colors. Next, go to your canvas and simply stroke a looped shake on the paper. Firmly press down with your brush and as your curve around you lift it up to the chisel...
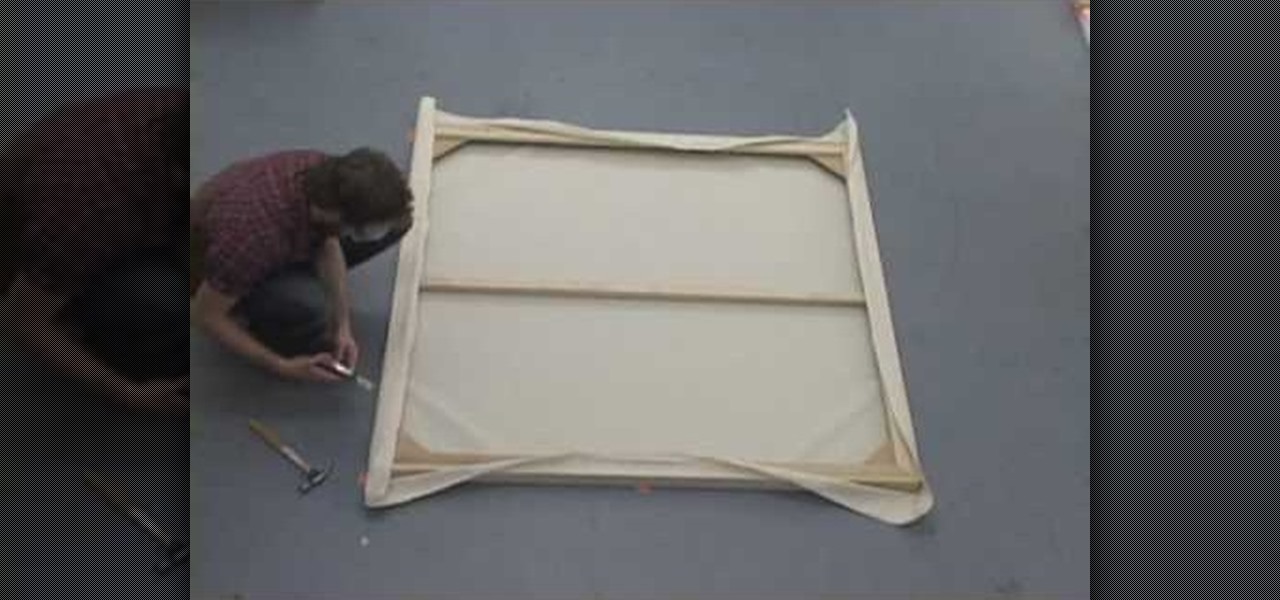
In this tutorial, we learn how to stretch the perfect canvas. First, measure the canvas. After this, center the canvas and make sure there are no wrinkles. Then cut the canvas and staple it to the frame. This will take several minutes, and you will work your way from the inside to the outer corners. After you are finished stapling hide the folds on all of the corners with the stapler gun. When you are finished with this step, you will be done and ready to paint on your new canvas! These steps...
Get creative with face paints and make a dragon face painting. Learn how to paint a dragon in this free face painting video series.
Making your own pottery creations can be fun! In this free online arts video about making pottery, learn how to paint your pottery creations using enamel glaze as taught by expert potter Jennifer Gravel.
It's always difficult to paint neatly but it is especially difficult to keep the paint off of glass. Removing paint from glass windows and cabinetry can be a real pain. With this tutorial you will learn how to paint around glass. Keep your paint job nice and neat with this how to video.
From Prime It Up and for the beginning painter, an end to end tutorial about painting a 40K Ork to a tabletop standard. This tutorial warhammer video covers how to paint the leather on the ork.
Demonstration of painting techniques for boats. Part 1 is a general outline of the process, the following parts provide more detailed instruction.
In this tutorial, we learn how to paint a kitchen cabinet. First, you need to take the cabinets off from the base using a screwdriver and removing the hardware from them as well. After this, you will need to sand down the entire area of the cabinets and then number the door so you know where to put it back at. After it's sanded, you will need to paint the entire area of the door until it's covered. Paint on another coat if you need to. When finished, let dry and then paint the other side. Whe...
In this video, we learn how to paint your nails in a pink and purple French manicure. Start off by cleaning your nails from any dust, debris, or colors. Then, you will paint on black to one side of your nail with a fine tip brush. After this has dried, paint pink on the other side of the nail, a pink glitter color would be the best. Next, you will wait for this to dry and then paint on a white line in between these two colors. From here, you will apply three small rhinestones with nail glue t...
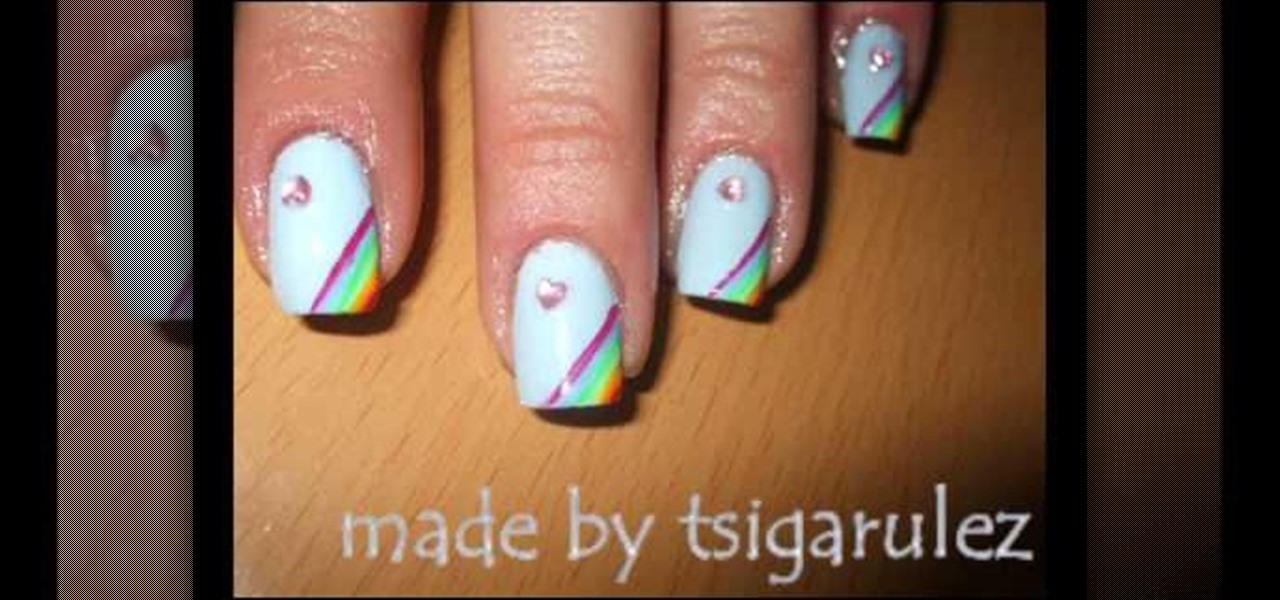
In this tutorial, we learn how to paint rainbow nails with rhinestones. First, paint the nails light blue and let them dry. After this, grab several other colors, enough so that you have the colors of the rainbow. Now, paint lines onto the left hand corner going diagonally across the nail, making each line next to one another. After you get to the very tip of the nail, let the colors dry completely. Next, paint on a clear coat on top, then apply a pink heart rhinestone on the bottom corner of...
In this video, we learn how to paint blue and white corner flames on your nails. First, paint a pearl base on the nail and let it dry completely. Now, grab the black nail polish and paint waves on the nail going from the top to the bottom. Next, grab the white nail polish and do the same thing, making the mark next to the black marks. Let this dry, then grab light blue nail polish and fill it in on the corner of the nail. Let this design dry, then paint white on the blue to make small lines a...
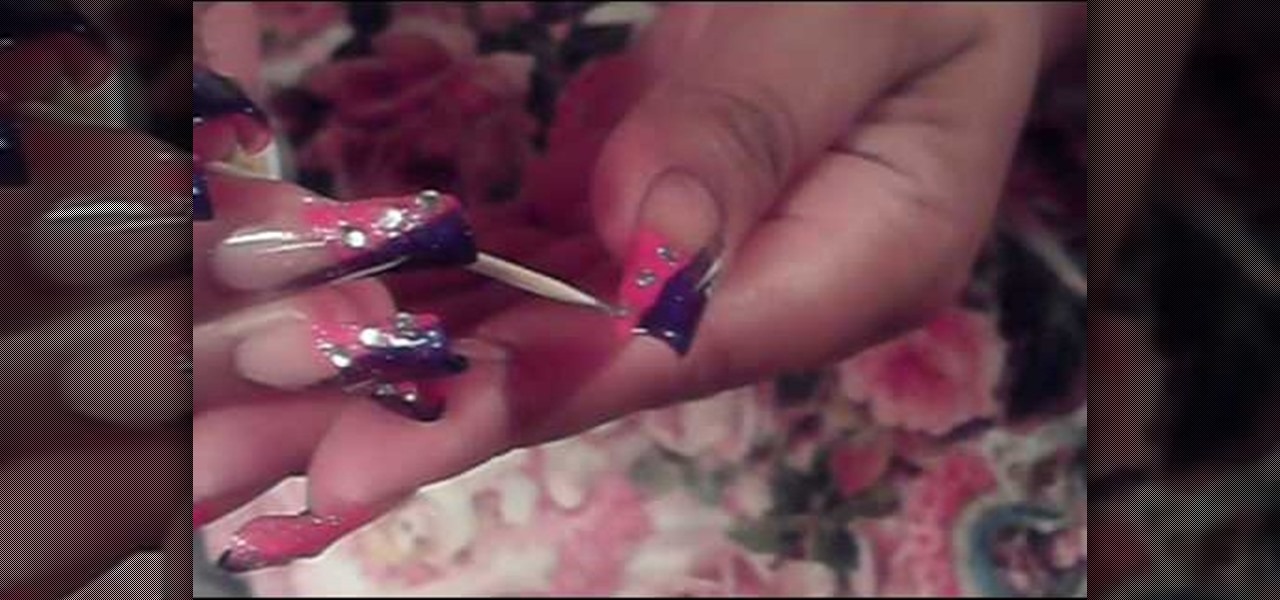
In this tutorial, we learn how to paint a black & pink French manicure with flowers. Start by painting the nails with a light pink nail polish, adding a couple layers so the color shows on top of the nail. Wait for this to dry, then paint black nail polish in a diagonal line across the top corner of the nail. Now, allow this to dry and take a sparkly purple nail polish and paint it in a line directly underneath the black polish. Next, use a toothpick or dotting tool to dot white nail polish i...
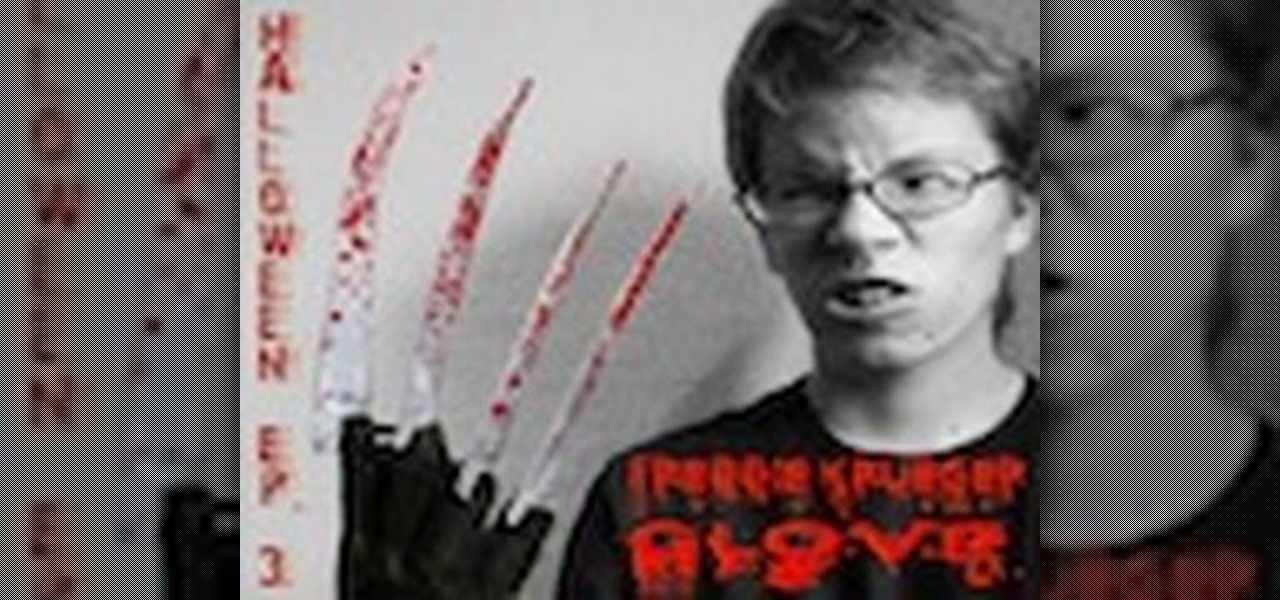
In this tutorial, we learn how to make a Freddie Krueger glove. You will need: a saw, sandpaper, silver spray paint, black paint, brown paint, old glove, tin from a can, plexi glass, shiny cardboard, and a hot glue gun. Start off by using your paper roll to cut off a strip of it that will start on the joints of your hands, then cut this in half. After this, make a cut in the top of it and on the sides of it. Do this again for the four fingers, then wrap it around the glove fingers. After this...
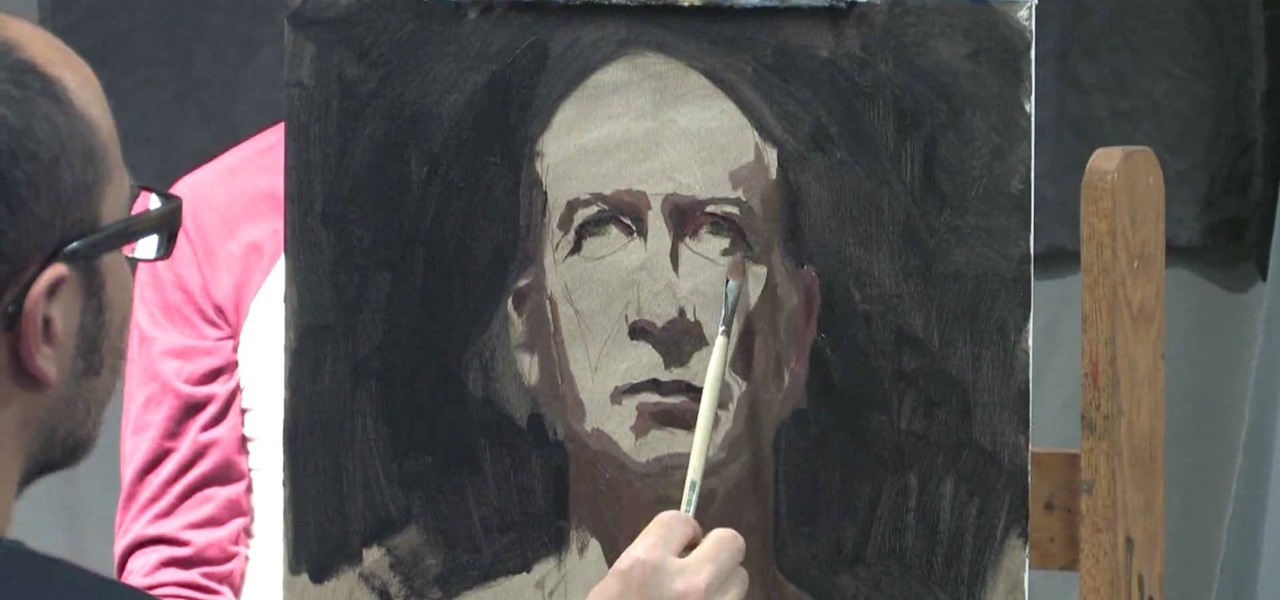
In this tutorial, we learn how to paint a portrait. Start off by having a subject to draw, then hold your paint brush loosely. Start to outline the face of the subject, then paint in the facial features. Shade around the eyes and cheekbones, and add the ears to the face. Use the paintbrush to create different types of strokes to the painting that fit the face you are looking at. Use shading to your advantage, because this can make a person look older or younger, depending on where you place t...
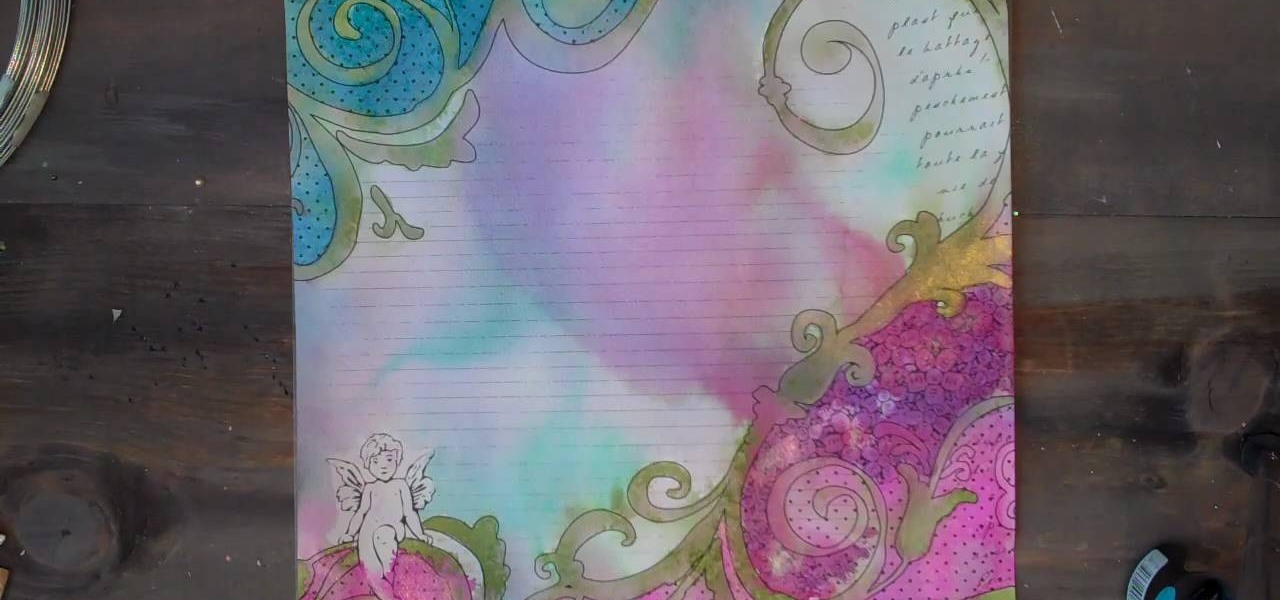
In this tutorial, we learn how to use Prima Paintables paper. These are meant to watercolor on and are very thick pieces of paper. You can take a paint brush and open up a bunch of different paint colors. Start to paint your picture, then allow it to dry. When finished, you can spray a water bottle on it to bleed the picture and make it look unique and your very own. This is something that is fun to do and makes it easy to paint your own creations using this paper that is made just for painti...
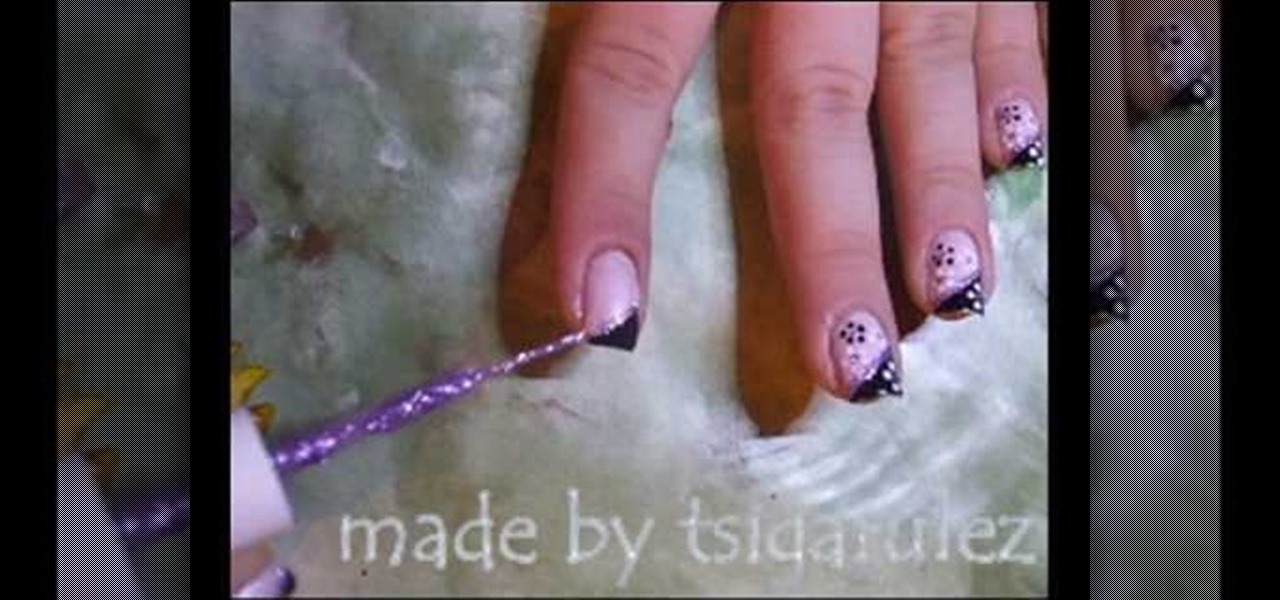
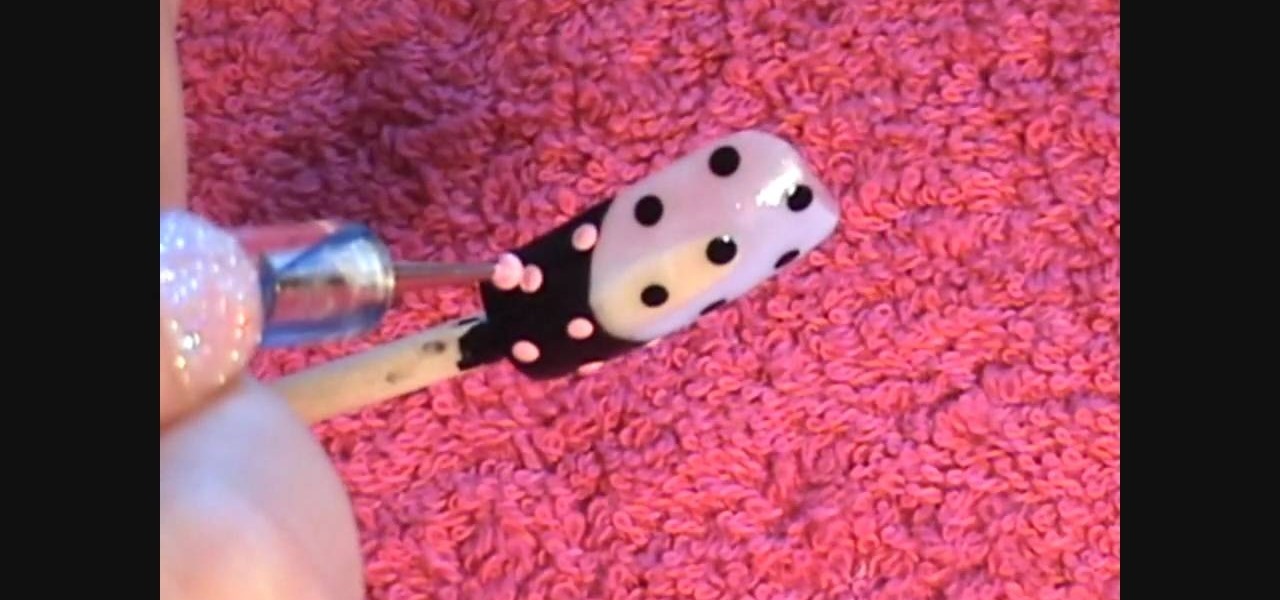
In this Beauty & Style video tutorial you will learn how to create cute polka dot acrylic nails. For this you will need acrylic paint and acrylic nails. First paint the lower part of the nail with black paint in a curved manner. Then you put three black polka dots in the unpainted area along the centerline of the nail. Now put two more black dots on either edges of the nail. Then you put light pink dots over the painted area in line with the black dots. Paint the smile line and the bow with l...
In this tutorial, we learn how to make a Victorian hat from a lampshade with Gwen. You will need: a lampshade, scissors, acrylic paint, paint brushes, glue, a compass, and cardboard. First, take the compass and make the circle as wide as you want your hat to be, then trace your lampshade on the cardboard. Now place the small end of the lampshade around the large circle that you drew. Next, cut these circles out of the cardboard. Leave extra room, don't cut it out exactly on the line. When fin...
To prepare a bedroom for walls to be painted, remove as much furniture and objects from the room. You can leave the larger furniture in the center of the room, covered. Fill in any holes or cracks in the wall with a patch. Also, remove any hardware or outlet plates from the wall. Next, place masking tape at the base boards so you can paint below the carpet level. Tim suggests using a drop cloth rather than a plastic cloth to cover the floor. Drop cloths last much longer and are more convenien...
In this video, Deana teaches us how to distress furniture. You will need the furniture you want to distress and then paint over it with green furniture paint in the parts you want to change. Apply the paint thinly and let it sit for 10-15 minutes, or until dry. Now apply your stain onto the green paint, then add distressing to any parts you want to change, then wipe off with a rag. Buff off all excess oil you have leftover and you're finished! You can use this technique to distress any of you...
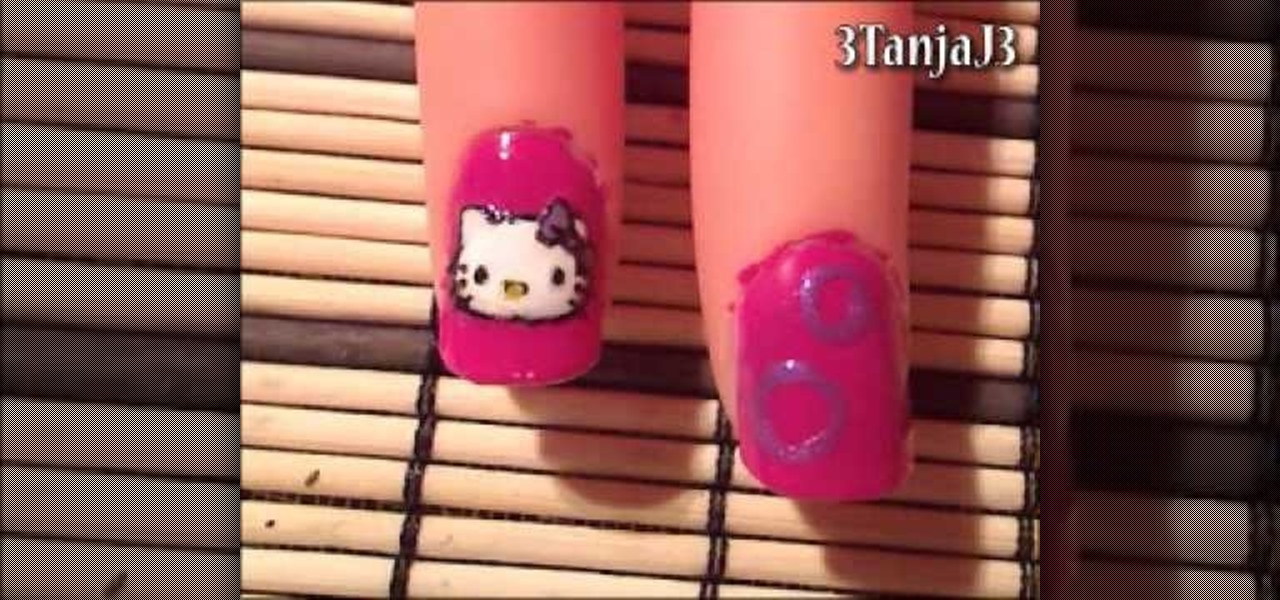
This video illustrates us how to paint Hello Kitty on your nails. here are the following steps: Step 1: First of all collect all your requirements in one place that is nail paint in various colors ,nail art pen, primer, and toothpick.
Making your own Mondrian-inspired cushion cover is demonstrated in this clear and concise crafting video. Materials required are a plain cushion cover( preferably in a tight weave such as canvas or cotton; water; medium size, firm, flat edge paint brushes; scissors; one inch wide masking tape; a sturdy piece of cardboard , saran wrap and 4 jars of textile paint - one color should be black or graphite. You may choose plain or glitter paints. Cut the cardboard about one inch smaller than the si...
Learn how to draw a flower in MS Paint in this video tutorial from Shannon. In the first step, you will need to draw a circle with the shape tool. To create the petals, you will need to draw additional circles surrounding the first circle. Use the paint brush tool in green to create the stem and leaves, which you will draw free-hand. Using the bucket tool, fill in the leaves and the petals of the flower. Shannon also shows in this video how to draw a bird next to the flower with the paint bru...