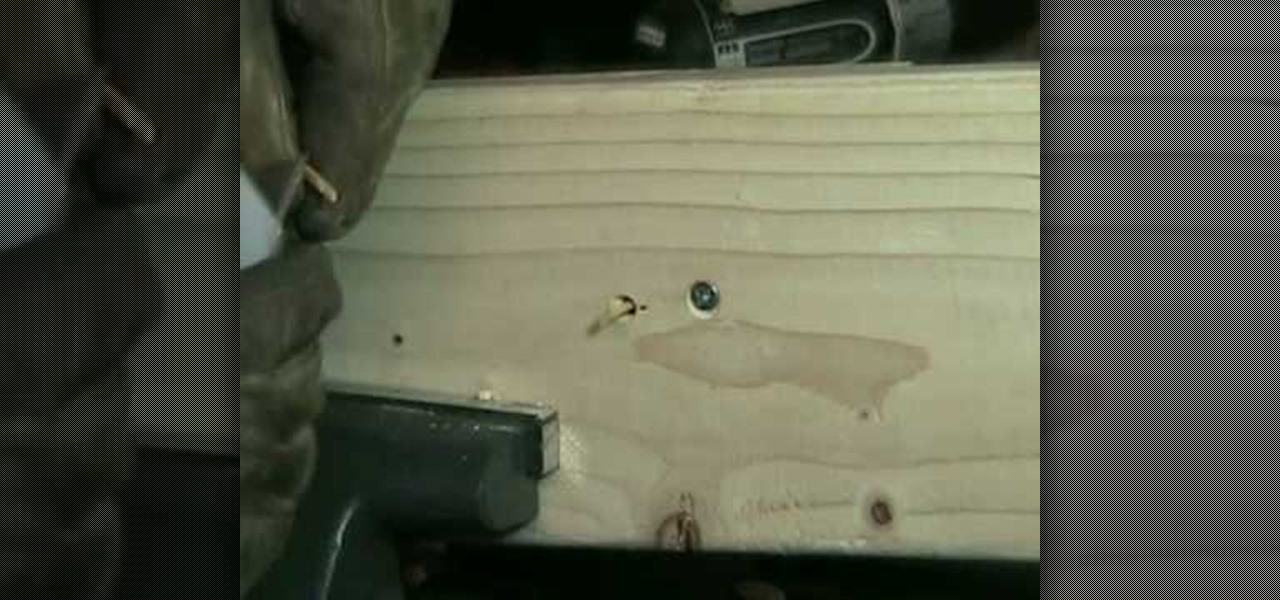
This how-to video is about how to repair a leaky faucet. One of the most common problems with the faucet is the replacement of the rubber washer, which is located on the bottom of the valve unit. First, stop the water supply by turning off the stop valve at the bottom of the sink. Then, turn on the faucet until the water stops flowing. Next, remove the handle. To do this, we first need to remove the decorative cap using a screw driver or sharp pointed knife to expose the screw. Then, remove t...
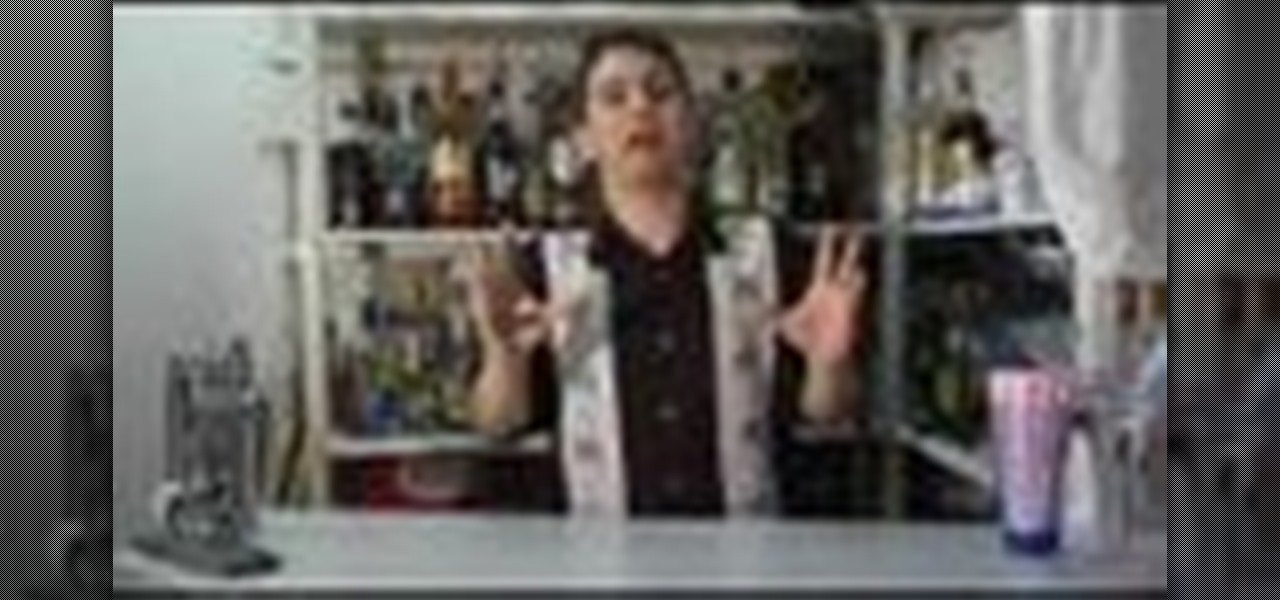
Rob "Riki Tiki" Roy takes the amateur bartender through the steps of making the Screwdriver, the Sloe Screw, the Sloe Comfortable Screw, the Sloe Comfortable Screw Up Against A Wall, and the Harvey Wall-Banger. Also, a Hanukkah treat! You'll need vodka, sloe gin, Southern Comfort, Galliano, and orange juice. Start making some cocktails.
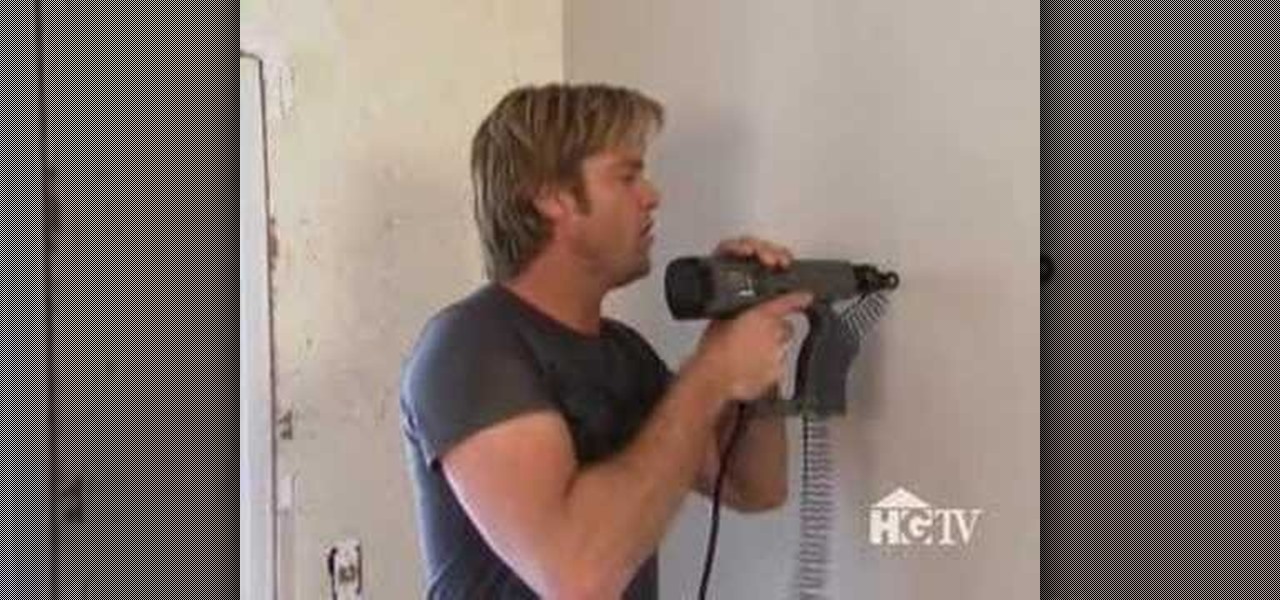
The traditional method of installing drywall typically calls for a hand held screwdriver and a box full of drywall screws. This Home & Garden how to video demonstrates the proper operation of the automatic screw gun for installing drywall. Cut remodeling time in half by learning how to use an automatic screw gun.

A reverse drill bit can make quick work of a stripped screw. Tim Carter demonstrates how easy it is to remove damaged screws with a reverse drill bit. You won't be frustrated any longer by ruined screws.

In this video, we learn how to install a toilet seat. Start off by screwing the screws into the knots on the base of the toilet seat. After this, you will lay this down gently on top of the toilet and line up the screws. After this, you will go underneath the toilet. While you're down there, you will need to place on the screws to make sure that the toilet seat and the toilet are down securely. Once you are done, your toilet seat will be installed and it will be brand new and ready to use. En...

In this video, Mark Donovan shows us how to mount a mirror on a door. First, take the mirror and position it the height you want it located. Then, mark the top with a pencil and make sure the mirror lines up with lines on the door and it's in the center. Now, screw in the door attachments in the thickest part of the mirror. Attach the mirror and screw the screws so that the mirror is completely secure. Now, you can hammer in the screws to make sure they are completely attached to the door and...

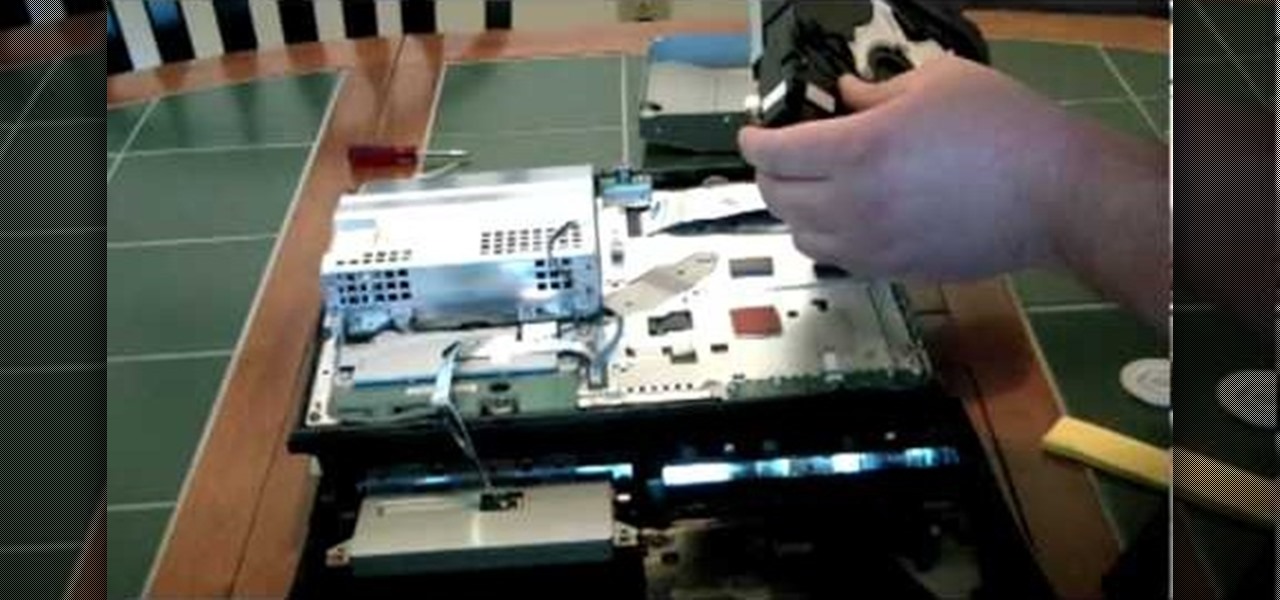
This video shows how to take apart a Play Station 3 (PS3) in order to clean the disc reading lens. First locate the sticker that says "void if removed" and remove the plastic cover from this point with a screw driver. Once this cover is removed there is a second cover which is removed by unscrewing the nine screws which hold it into place and rotating the cover towards the front of the device. Disconnect the disc housing on the right by pulling out the smaller cable then remove the five screw...
We have all experienced a screwed up heart, and in this episode of "Look Learn & Create" we learn to turn that experience into some cute art!
Bob Schmidt teaches the secrets to tighten & keep tight those loose bolts in simple steps. First buy a removable blue thread locker and keep it ready to use. Check for any loose door locks or bolts in your house and remove its screw. Squeeze some thread locker out and apply it to the screw and stay away from carpets while squeezing it out. Let it set on the screw for about 5 minutes and fit the screw back. It can also be used in nuts and bolts and bath accessories.
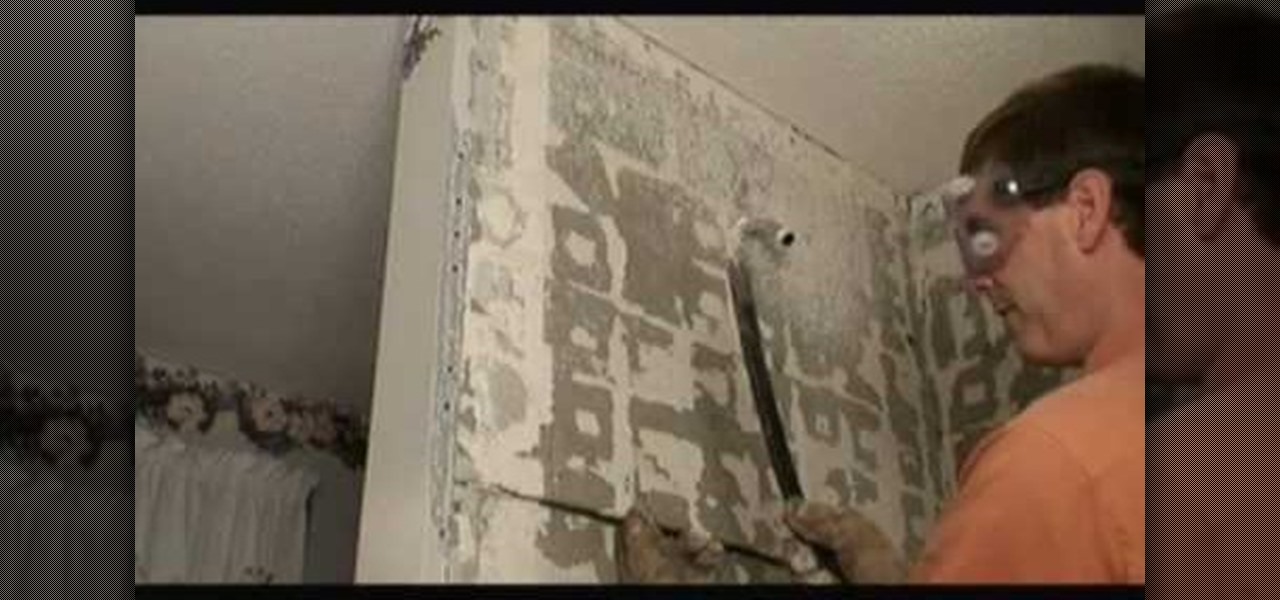
Mark Donovan is remodeling a ceramic tile shower, and shows how to remove the old backer board. First remove the old screws, starting at the bottom of each board and working your way up (leave a few screws so the board doesn't fall). Sometimes screws may be hiding under old mortar. Score the joint between the top board and the ceiling with a utility knife to prevent ceiling damage. Use a pry bar to gently remove the old backer board, being watchful for pipes. Remove the last screws, then the ...
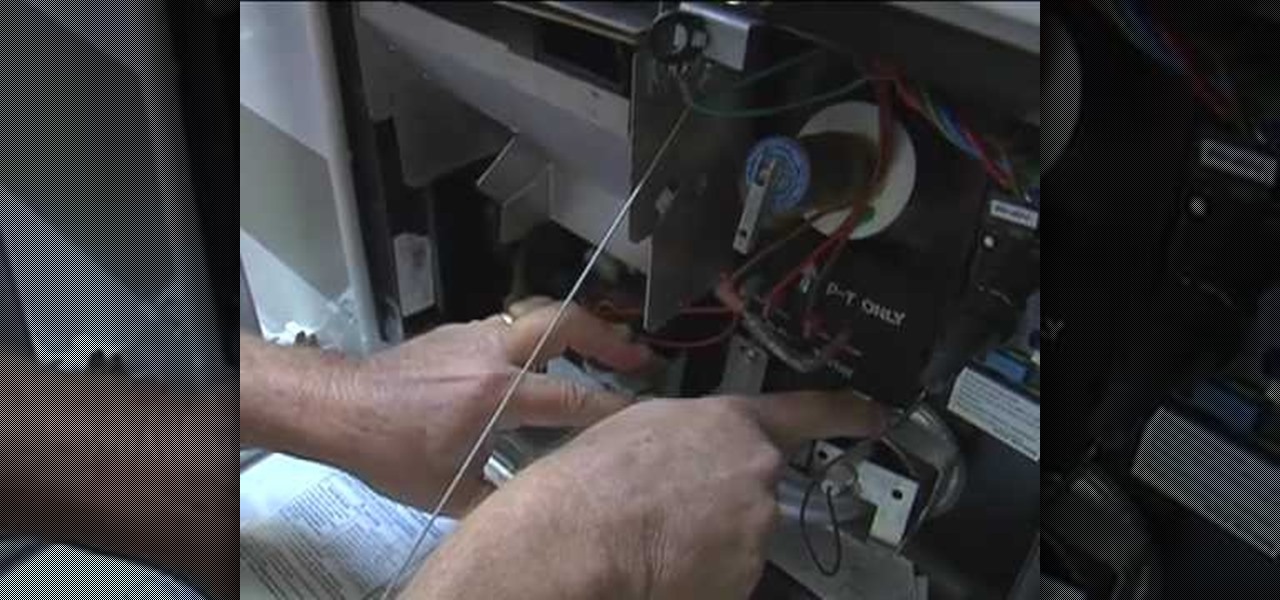
RV water heaters can be easily made more efficient by loosening one or two screws that hold the U-tube tight. Sometimes the orifice that connects the gas valve and the U-tube is not aligned properly with the U-tube, and the loosening of one screw or the other will allow the straight alignment of the orifice and U-tube. After loosening the screws and realigning the U-tube, simply tighten the screw and the water heater will be more efficient because the perfect gas and air mixture will be present.
A CNC router machine is probably the most useful tool a hobbyist can own, but the price for a CNC machine on the market is way more than the average hobbyist is willing to spend. You can build your own CNC with very basic tools, little knowledge of machinery, mechanics, or electronics, but be warned, these machines are inherently dangerous, so wear the proper protection and use common sense. At the very least, read the instructions and precautions on every tool you use.
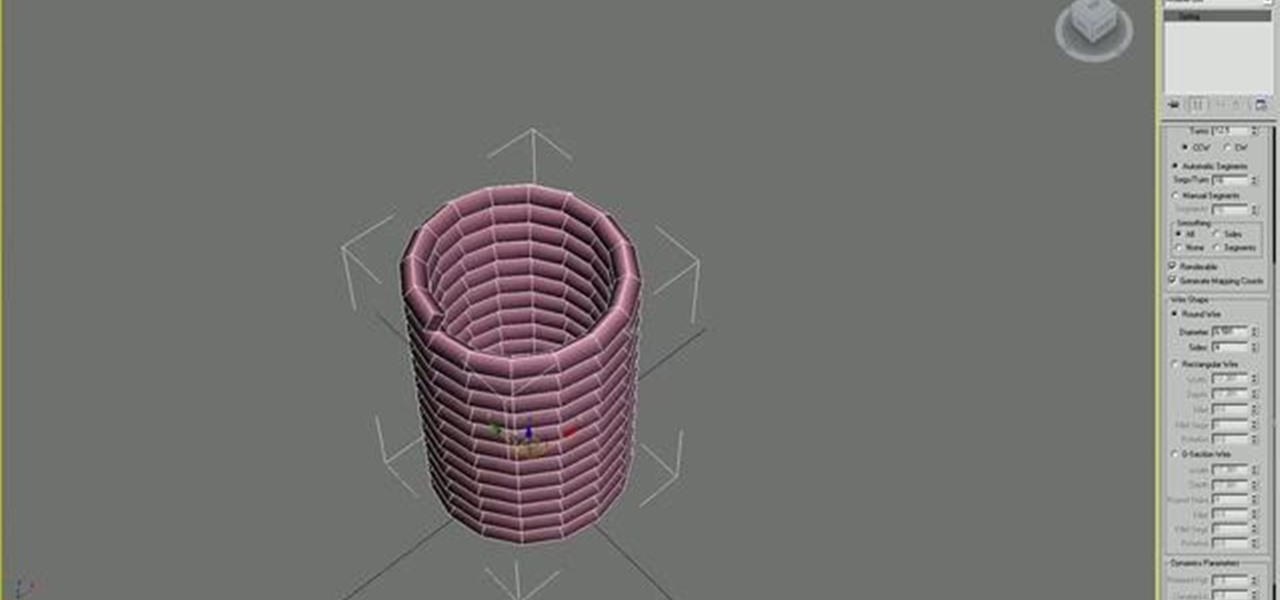
This is a quick tip on how to model a screw within Blender. But more so on covering the “threading” of the screw itself. Whether you're new to the Blender Foundation's popular open-source 3D computer graphics application or are a seasoned digital artist merely on the lookout for new tips and tricks, you're sure to be well served by this free video software tutorial from the folks at CG Cookie. For more information, including step-by-step instructions, take a look!
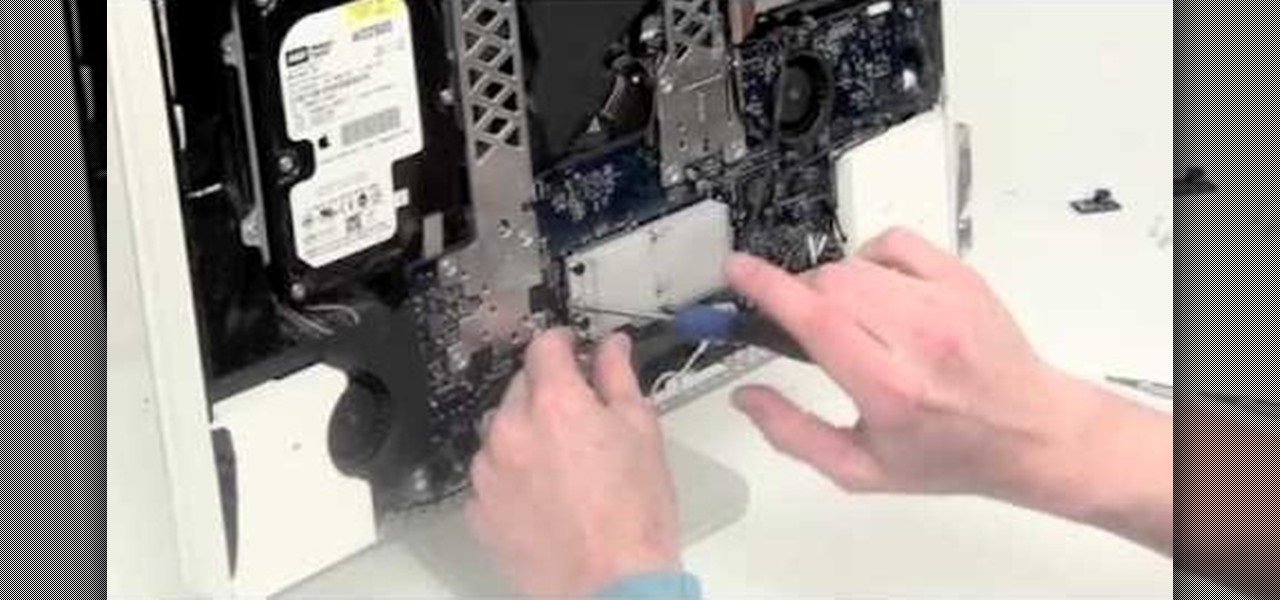
In this video tutorial, viewers learn how to remove the speakers on a G5 i-Mac computer. In order to remove the speakers, user will need to first remove the ambient light sensor. Remove the 2 torx 6 screws and remove the middle bracket. Now on each speaker, users will need to remove 2 torx 8 screws. Once the screws are removed, the speakers simply slide out of place. Under the right speaker, there will be a cable that will need to be unplugged from the logic board. This video will benefit tho...
In order to make a door alarm out of a mouse trap, you will need the following materials: a mouse trap, a clamp, 2 screws, caps, a piece of string, scissors, a screw driver, a drill bit, a hex-head screw, an a piece of aluminum from a soda pop can.
First of all the tutor suggests that this tutorial is easy and you can complete it only fifteen minutes. However you need to use proper anti-static precautions when you are performing this upgrade. You have to ensure to discharge static electricity before beginning. You must also work on a static free surface. You need a "#00 Philips screwdriver" which you can find in the “Newer Technology” 11-piece tool kit. It is available from macsales.Gather all your materials and then shut down your comp...
Many of us often faces the electric problem and one of them is power plug problem. When it goes down you need to change it.
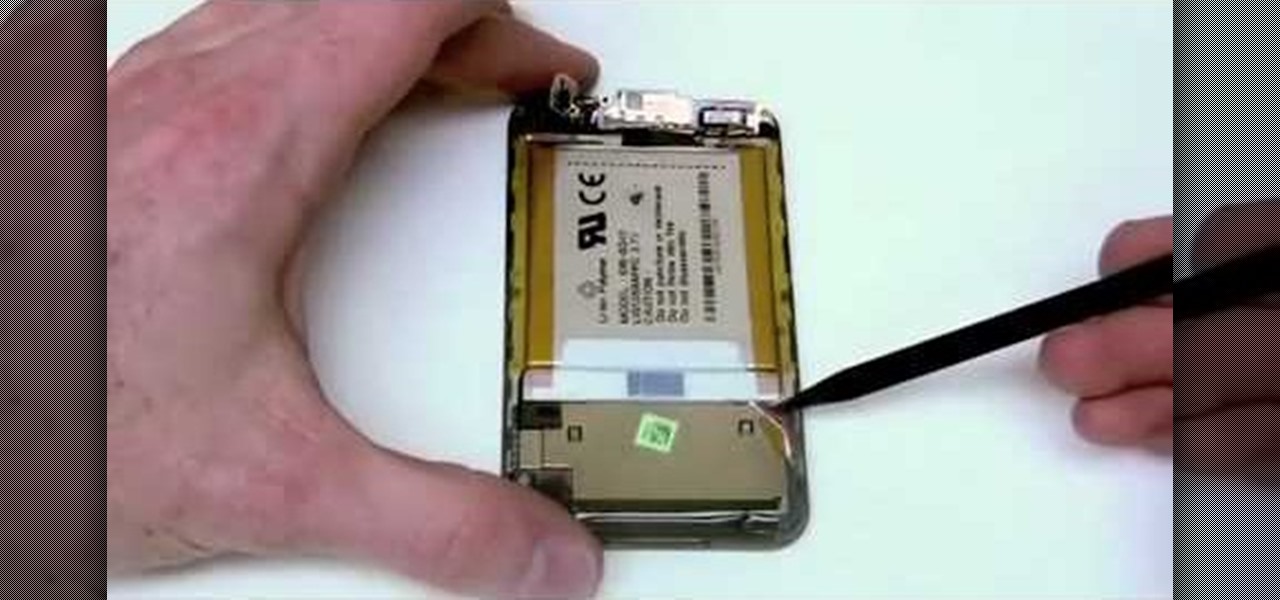
In this how to video, you will learn how to replace the touch glass screen digitizer on an iPod Touch. First, use a pry tool and run it along the sides of your iPod Touch. Once this is done, remove the cover. To remove the battery, run the pry tool along the edges and gently pry it out. Remove the black tape from the bottom to reveal screws. Now use a screw driver to remove the screws shown. Remove the screw hidden by the wires connecting the battery to the board. Next, remove the metal shiel...
bghoo8313 describes how to swap an imac G3 hard drive. Unscrew knob on the hatch on the back of the computer unit. Remove the RAM and the card. Take out 4 screws, 2 on the top and the other 2 under the guard. Pry it open with a screwdriver. Take out the outer screws under the guard. Open the unit from the "Apple" logo on the back. You will hear snaps, but the unit is not damaged. There are 6 radiation screws, take them out. Use a magnetic head screwdriver to avoid dropping screws. There are 4...
Board up a window for protection against strong storms and hurricanes. Learn how to board up a window.
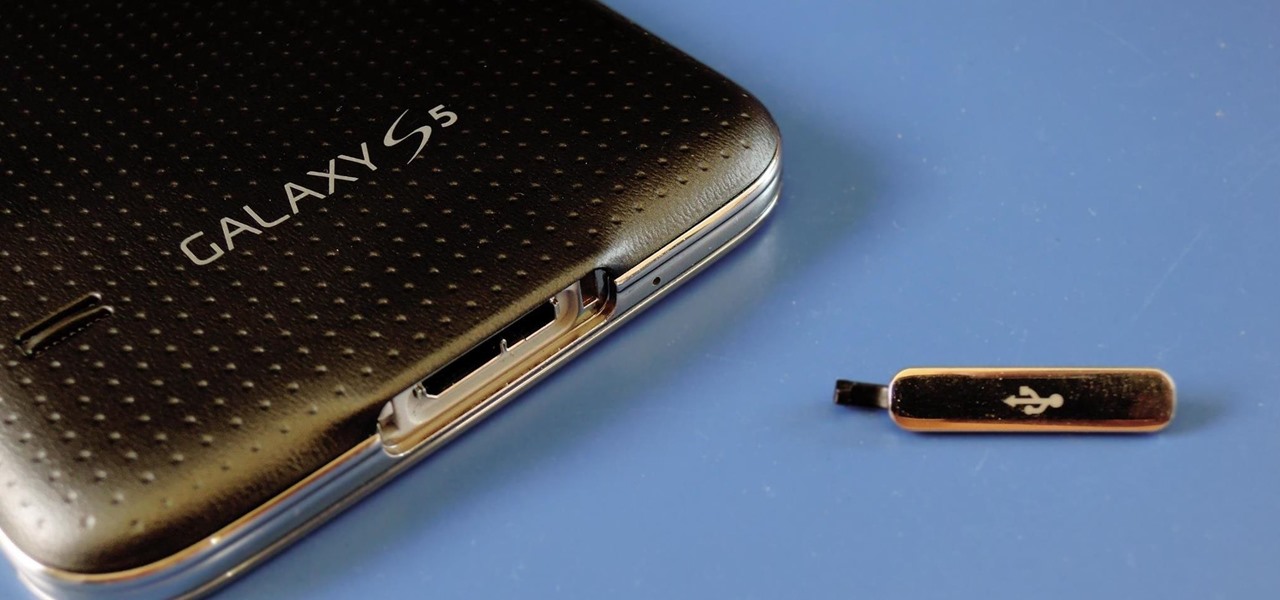
Having a dust- and water-resistant phone is truly useful, but it comes with a price. In order to achieve this functionality, Samsung had to literally plug up any holes in the Galaxy S5, and this included the charging port.
How to repair a stripped screw hole. Look, we've all bought a crappy chipboard piece of furniture in our time that has fallen to pieces because the screw holes are so worn they no longer hold the screw, or have had an old door that is about to fall off because the screws holding up the door have been stripped out of their hole.
In order to repair stripped screw holes in wood, you will need the following, a hammer, screws, matches, awl, a flat headed punch, a utility knife, and side cutters.
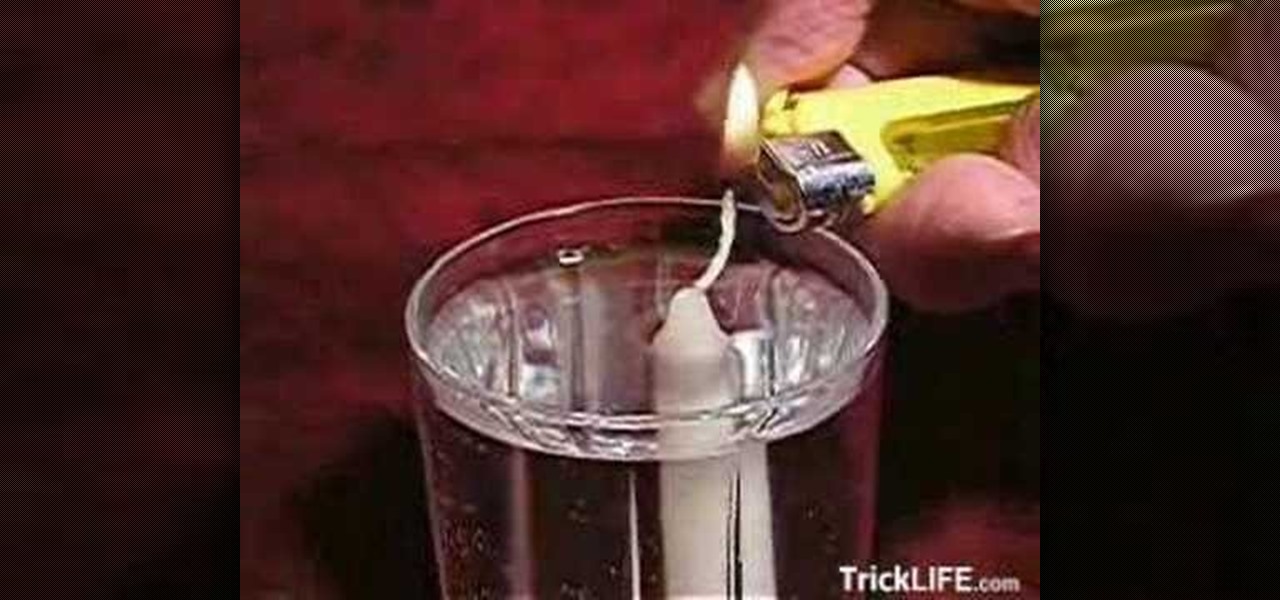
To make a floating candle you will need a screw, a candle, and a glass of water. If you take the candle and just put it down in the glass of water the candle will not float. To make the candle float take the screw and screw it into the bottom of the candle. Then you can take the candle and put it down in the glass of water. With the screw screwed into the candle the candle will stand upright in the glass of water and the wick will float just above the water line. So now you can light the cand...
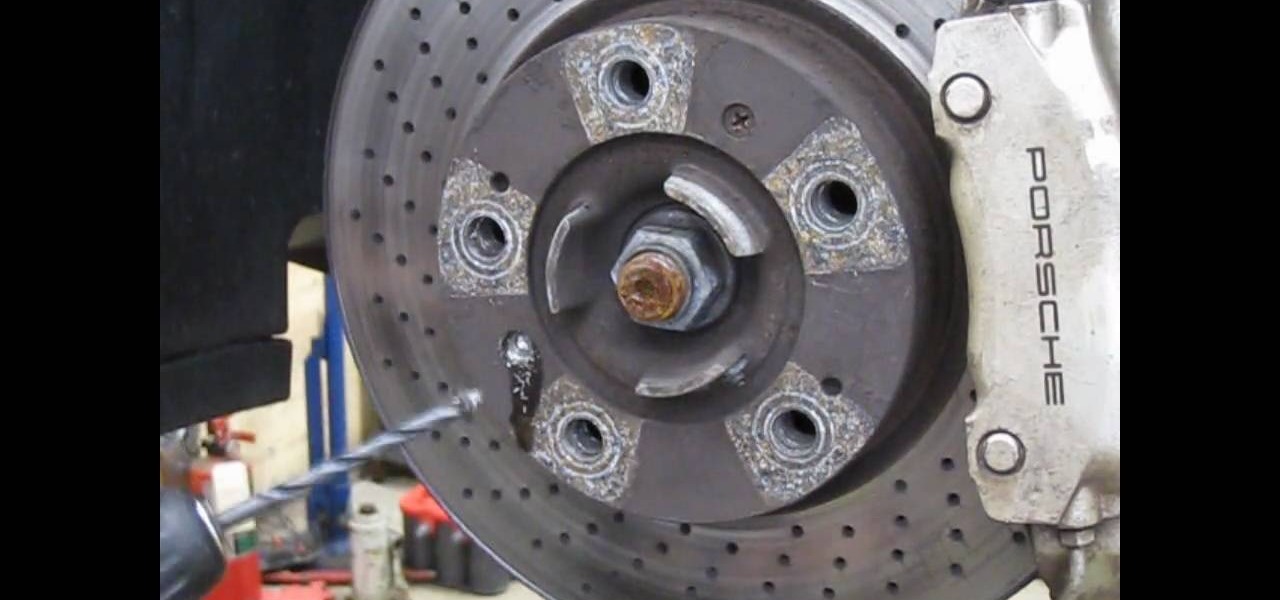
When working on a vehicle, you can come across screws that are stripped or stuck making it very difficult to remove the brake rotors. These need to be removed and replaced sooner than later.
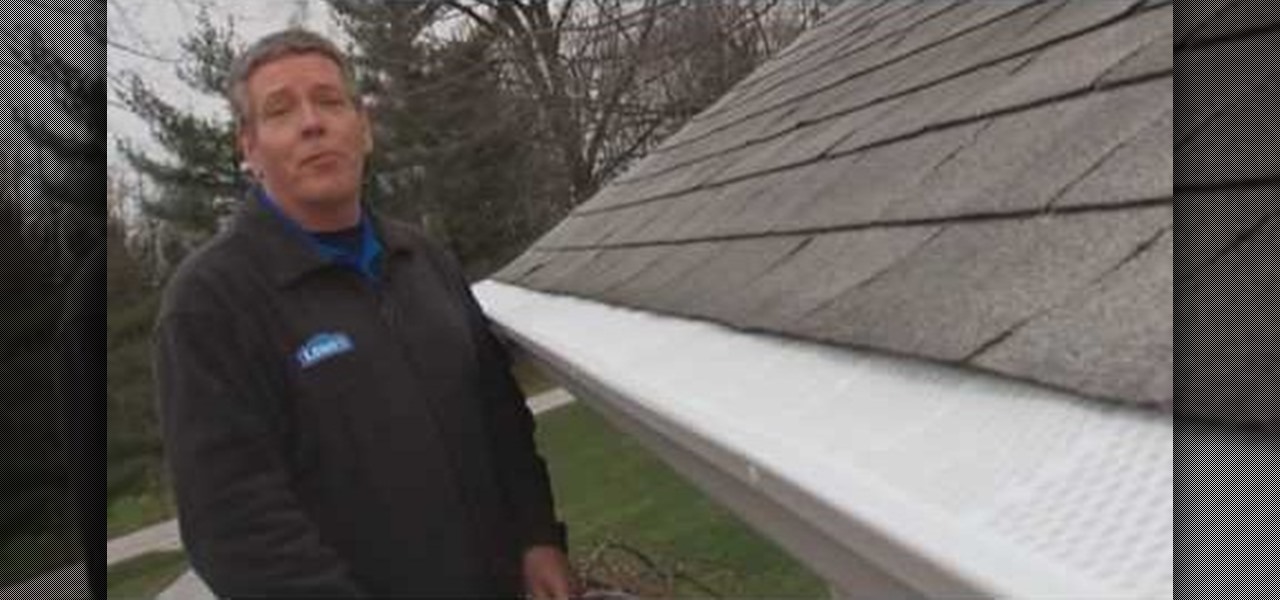
In this video tutorial, viewers learn how to install gutter screens. The materials required for this task are: tape measure, tin snips, drill with bits and sheet metal screws. Begin by measuring the gutter to determine how many screens to buy. Start at one end of the gutter and slide the back edge underneath the shingles. Then snap the edges in place and continue down the length of the gutter. Now drill holes in the edges of the screens and screw in the sheet metal screws to secure the gutter...
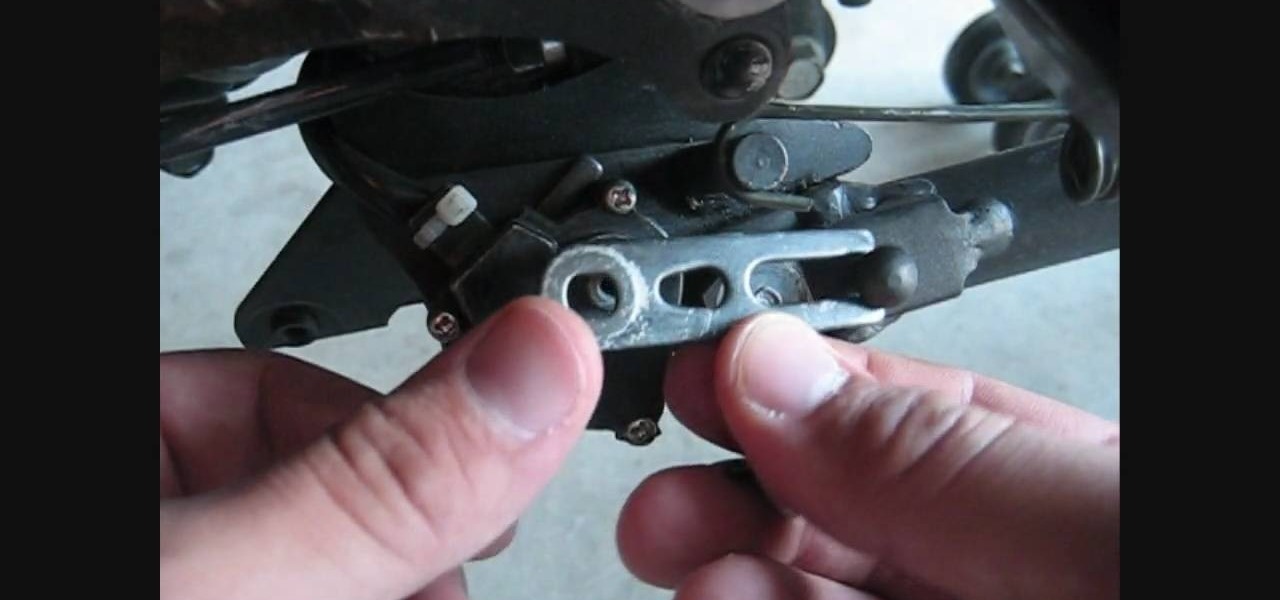
In this tutorial, we learn how to replace the kickstand safety switch on a Ninja 250R. When this is broken, it will turn your engine off when you put it into gear and cause your motorcycle to not run properly. First, remove the screw from around the safety switch until you can remove the switch from the bike. After this, replace a new switch onto the bike. Next, replace the bolts and screws back on the switch where they originally where. Use clamps or a screwdriver to help replace the screws....
In this Video Games video tutorial you will learn how to access your Xbox 360 hard drive. You need four tools for this. They are an exacto knife, T6 torque wrench, T10 torque wrench and a small fly head screwdriver. With the exacto knife cut a hole in the sticker as shown in the video so that you have access to the screw underneath it. Remove the 4 screws with the T6. Pull out the back, with the screwdriver pop up the two clips on top and remove the back. Now remove the 4 screws with the T10....
In this how-to video, you will learn how to replace a broken axle on a Volcano SV. First, take off the wheel. Next, remove the axle piece out with a hex wrench. To get it entirely out, use your hex wrench to move out the long screws. Make sure you take them out at about the same time, or you will break one of the screws. You can remove the screw to free the upper suspension arm. This will make it easier to remove the broken axle. Next, replace it with a new axle. Clean the axle before making ...
This video describes how to take apart a first generation iPod. To open the iPod, the video recommends using a putty knife or similar flat tool to gently ply open the casing. The presenter recommends being especially careful if this is the first time opening the casing. Once you have the first side open slightly wide work your way around the casing, making sure the entire casing is spread evenly around. Once all the sides are loose, the back casing just slides off. There are then two componen...
In this video tutorial, viewers learn how to reassemble an XBox 360. To begin, put the mother board onto the bottom plate of the console. Plug in the fan and put on the fan cover. Now plug in the DVD drive. Screw in the RF module on the front of the case. Place the top of the case on and screw it in. Now place on the top piece and screw it in. Then place the bottom piece on. Finally, place on the side panels and face plate. Make sure while assembling, all the pieces are secured and fit proper...
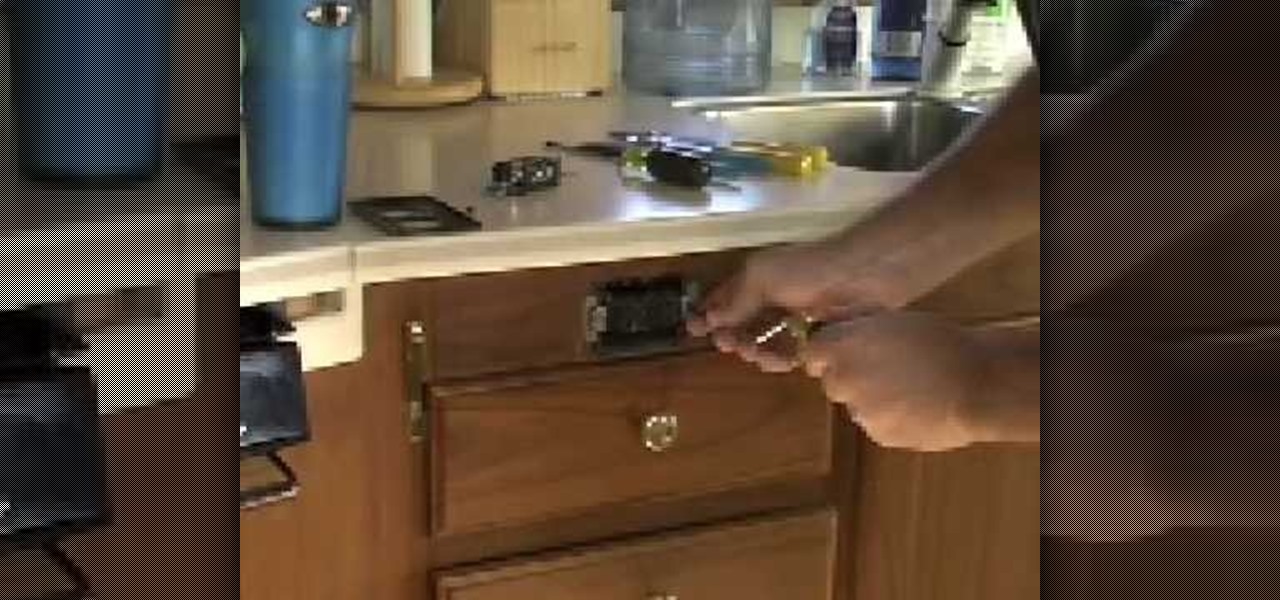
You can very easily replace your normal light switch on the wall with a dimmer switch. The first step is to turn the power off at the circuit breaker. To prevent anyone from accidentally turning the circuit on put a piece of tape over the fuse switch so that it is clear that it is to stay turned off. Remove the screws that hold the switch plate and use a tester to make sure that none of the wires are still live with electricity. Remove the two screws that are holding the switch itself in plac...
Three hundred people die every year from carbon monoxide poisoning. Don't risk being a part of that statistic.
Watch this video to learn the perfect mix to a slow comfortable screw. All you'll need for this drink is orange juice, vodka, Southern Comfort and sloe gin.
Try these simple fixes to salvage your specs. Learn how to fix your eyeglasses with this helpful guide.
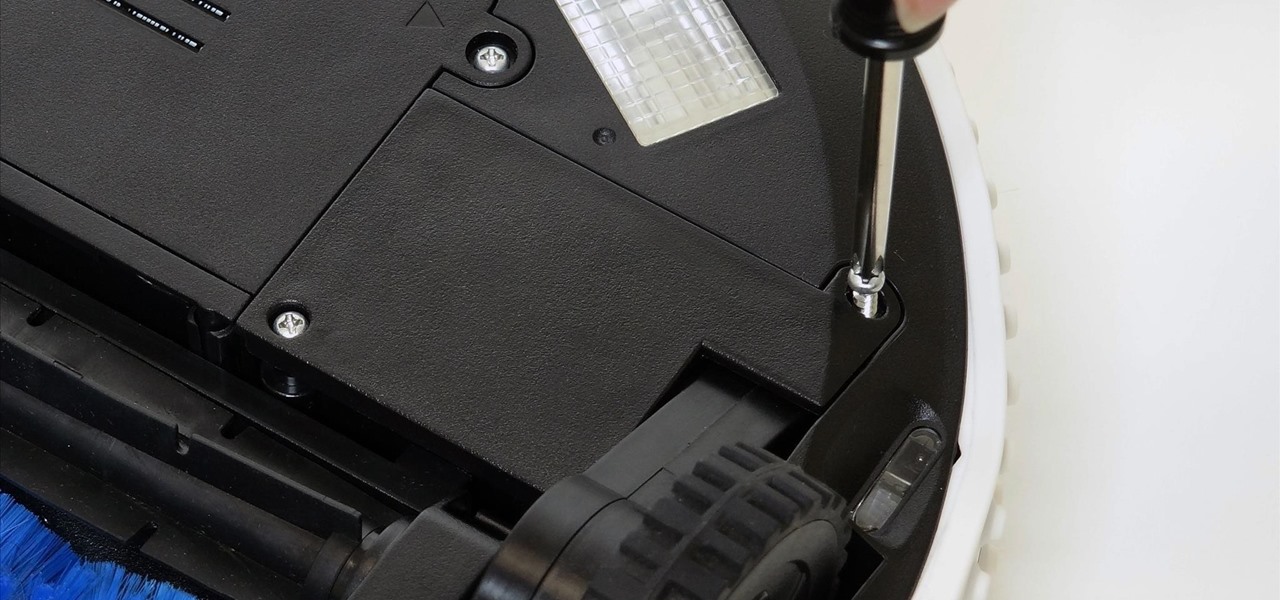
With just a Phillips head screwdriver and this walk-through, you can open and close any bObi robot vacuum. So long as you have a replacement wheel, follow these steps to install it yourself.
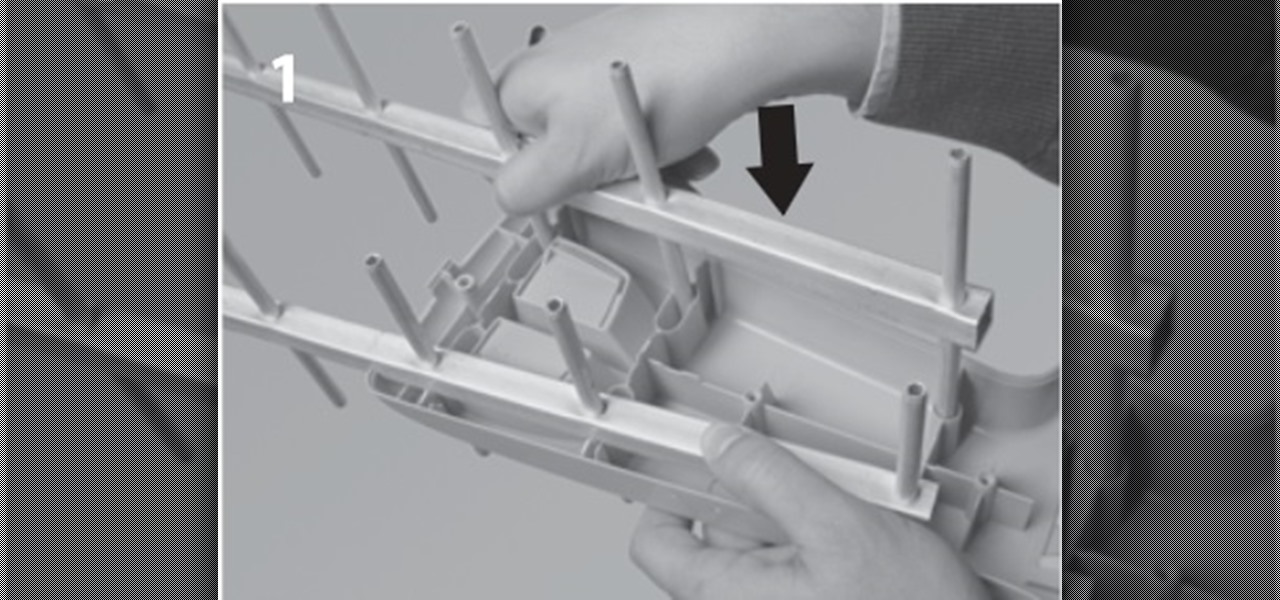
In this post I'm going to explain the assembly of an UHF antenna, step by step. Assembly of v HD Antenna of TELEVÉS We will need a Screwdriver and wrench.
Connecting your sprinklers to the water line is actually fairly easy when you're installing your own sprinkler system. Basically, you just go to your outside tap, screw it off and screw in your house connection.
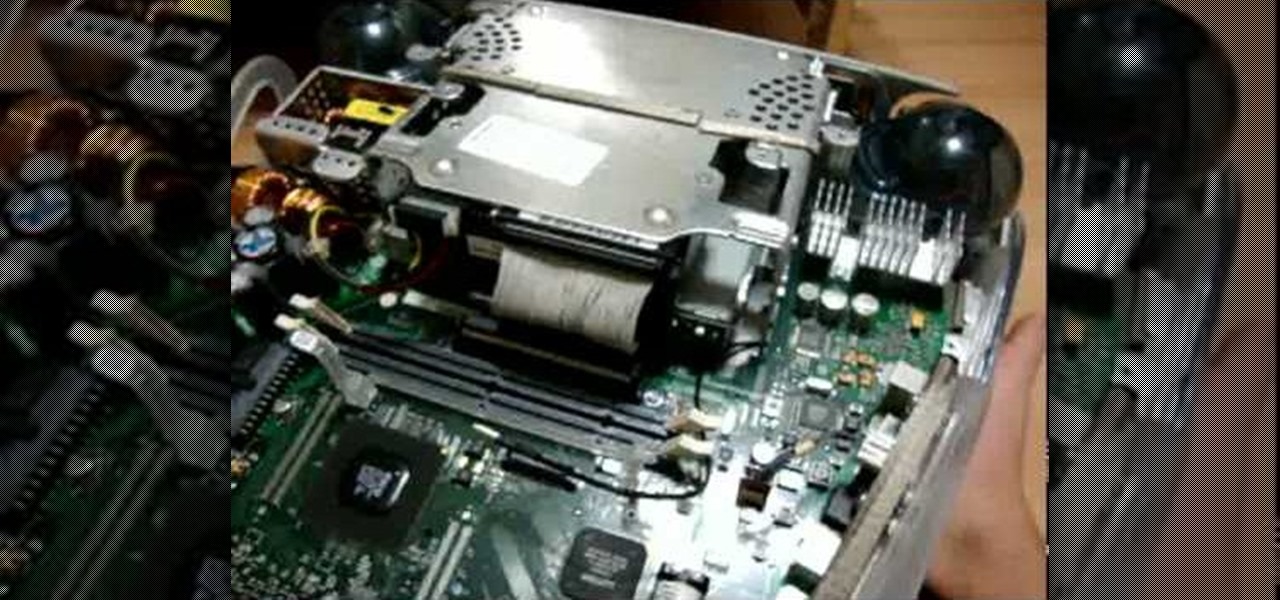
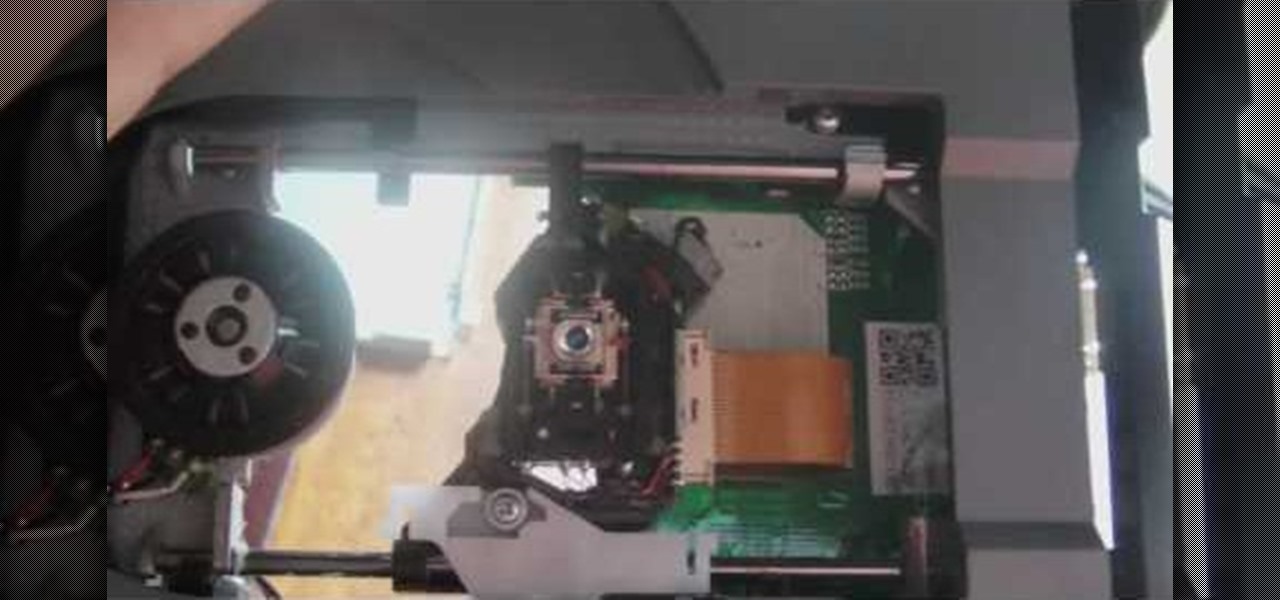
In this video we learn how to fix the Xbox 360 open tray error. First, open the console up and find the laser power. There are two screws around this laser that need to be changed. The left one should be screwed up a slight amount until it's slightly lifted. Once it's lifted, put your entire console back together. Once it's back together, you will notice that the open tray error stops coming up on your screen. You may also need to place something inside of the screw so it stays slightly up. E...
Bob Schmidt teaches us how to install cabinet knobs, handles & pulls in this video. You can easily spruce up a new cabinet or door my just changing out the handles or knobs. First, always take off your hardware and take it with you to the hardware store so you can grab a similar one to fit the right size. Once you find the right handles and screws you will be ready to install the new handles. Place the screw into the appropriate holes on the handles. After this, twist the screws into the hole...