The one thing that can make your home garden flourish is by taking care of it and meeting the needs of your plants. One of those needs is great fertilizer. And the best fertilizer comes from the heart, not the store. Get great results in your garden by making your own fertilizer and compost at home.

Piping cones are indispensible when applying flowers, leaves, and frilly trims on cupcakes and cakes, and cones with particularly fine points can be used to apply henna in intricate patterns.

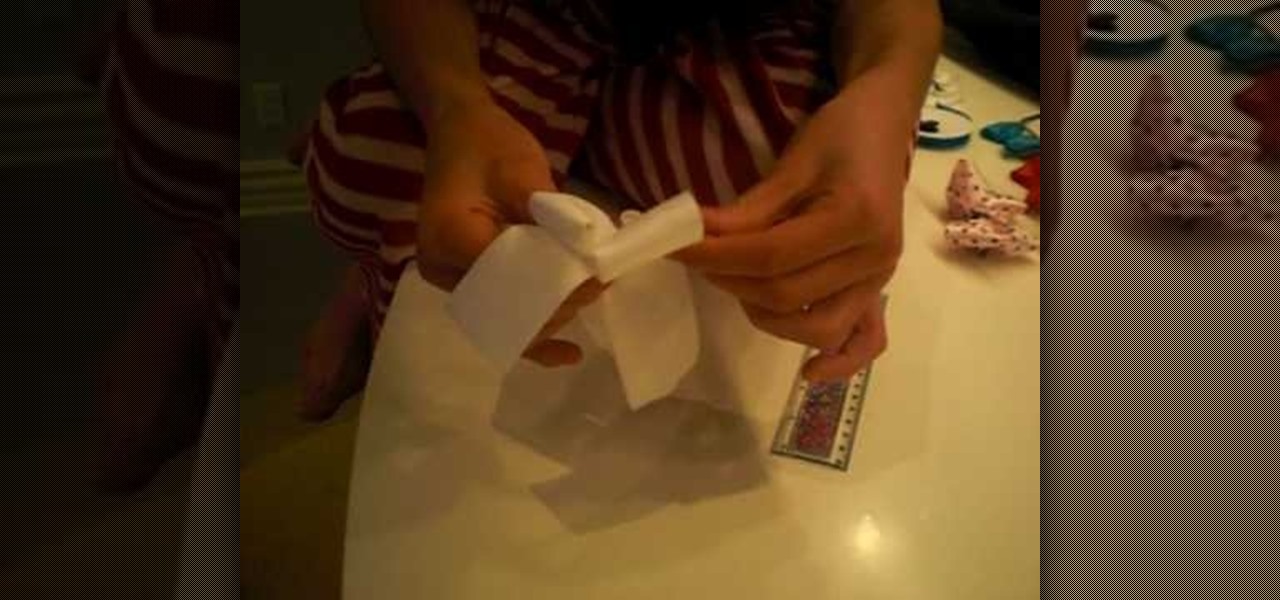
This is a video tutorial that is showing its audience how to make their own frosting plug for when you need to decorate cakes, cookies, pies, or cupcakes. The first step in making your own frosting plug is to put a piece of plastic wrap onto your counter. Spread it out so that it is in a square shape. Next put a dollop of frosting onto the piece of plastic and roll up your plastic. Next after the plastic is rolled into a tube you can get your plastic bag with your attached frosting plug and c...
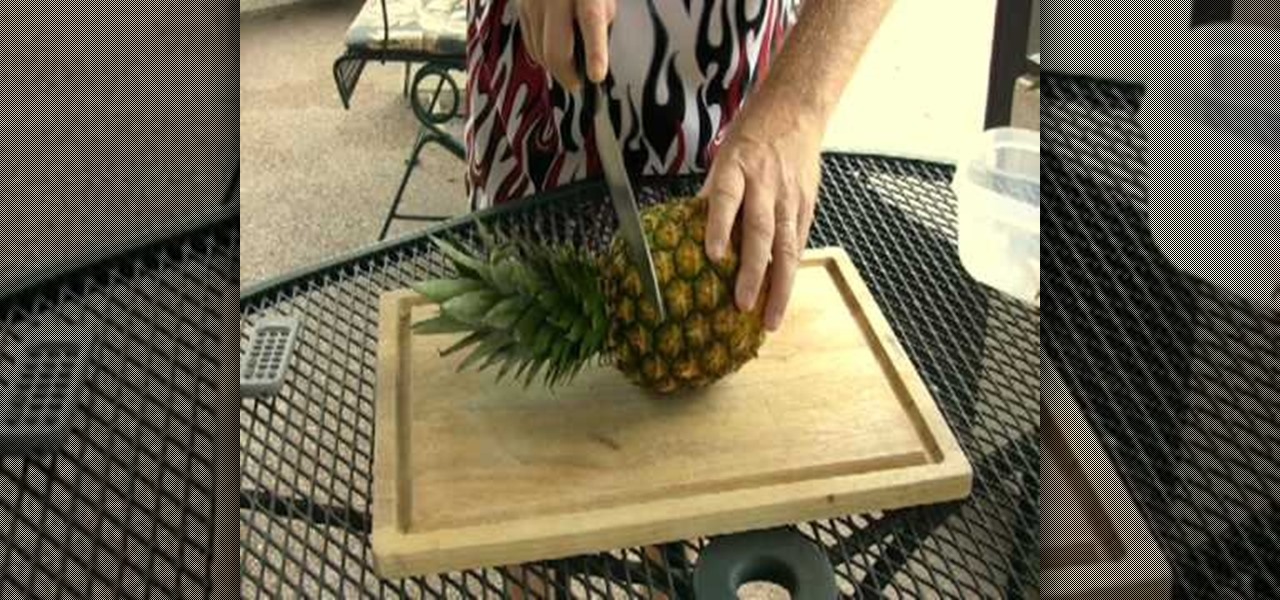
In this video Jack in the Net shows how to grow your own pineapple using just the crown. Find a nice firm, strong pineapple with no brown leaves. With a very sharp knife, cut straight through about an inch down from the crown. Then trim the flesh all the way around, leaving only the solid round core in the middle, being careful not to cut into the crown. The roots will grow off of the crown so all the fruit needs to be removed.

In this video, we learn how to take care of hibiscus plants. These can grow anywhere from 3-10 feet tall, so make sure to take care of these! Some extra steps to help are to: plant these in a well drained area and water it, let it drain and water it again. During the winter, mulch the flowers and it will survive. Make sure you pinch the flowers that are dead to keep your plant looking gorgeous and make sure you trim any dead branches that make the tree look dead. Doing these small steps will ...

You will use an old work glove to make the string. First cut the seems of the glove to the finger tips with scissors. Cut out the palm part of the clove. Remove the elastic off of the back with a knife. remove the hem with your scissors. Next, start cutting at the edge up around the shape of the glove. Keep going round until it starts turning into one long piece. Go back around the leather and trim up the rough edges and corners. He ends up with about seven foot of string. It's a cheep free w...

This video gives a demonstration of how to make a double bow for scrapbooking. First, cut a short piece of your ribbon off the end. Make this piece about 5 inches long. Next, after leaving a tail of ribbon bend a longer piece of the ribbon over and over, smoothly, until you have 2 loops on each side which creates the double bow. Cut off the end of the ribbon, leaving a tail. Pinch the middle of the double bow. Use the short piece which you cut earlier to tie around the middle of the bow. Adju...
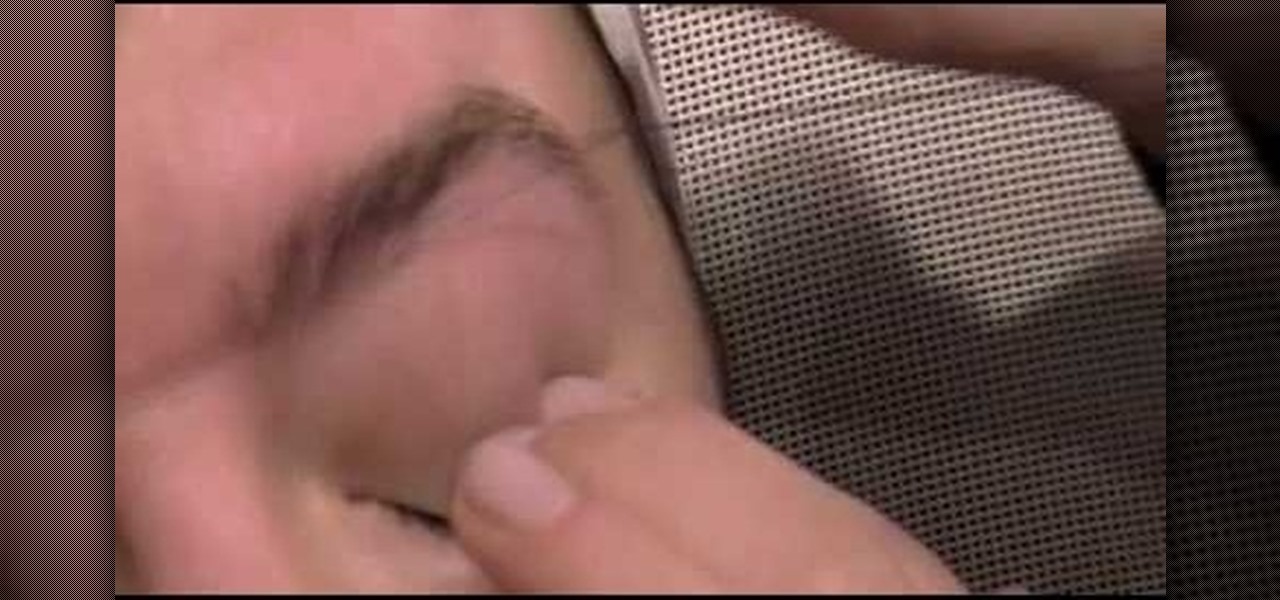
This video demonstrates the new technique of threading, an alternative to waxing, shaving or electrolysis. Threading uses two threads to pluck unwanted hairs in a fast and painless manner. First the technician will follow the natural arch of your eyebrow removing any stray hairs above the arch. Holding your eyelid slightly taught will allow the technician to remove any unwanted overgrowth underneath your arch, as well as between the eyebrows. Threading is also used to remove unsightly hairs f...
In this video, we learn how to dress if you have an apple shape. Go for styles that show off our cleavage, like a deep v-neck top. An empire line will disguise your waist and make your bust the focal point. A coat with a belt around the wait will trim your waist in no time. Long dark top will draw attention away from your waist and light jeans will pair nicely. Use as many accessories in bright colors and you wish. These accessories will draw any attention away from your waist and make you lo...
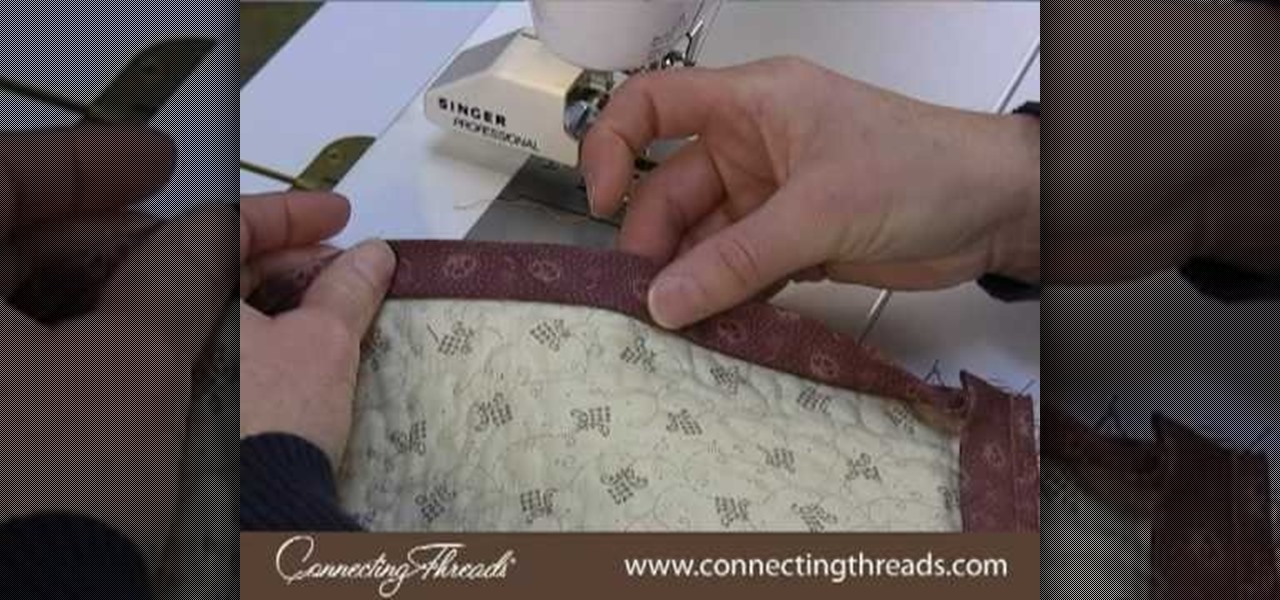
In this video we are shown how easy it is to complete the finishing join on a quilt binding. Just before the final join 6 inches of binding should be left over at the beginning and the end, while the rest of the binging should already be sewn down. The two ends of the binding should overlap by at least 6 inches. You will then need to cut the thread and remove the quilt from the machine, then measure the binding width and overlap the two pieces and cut off the excess binding to match the width...
Japanese kimonos are a beautiful and whimsical clothing full of tradition and grace but are not really appropriate to wear in everyday life. Luckily you can make a cute and hip kimono inspired dress with the help of this video that is perfect to wear out anytime. You will need a large piece of fabric whatever color you would like the majority of the dress to be. Use a t-shirt to sketch out an outline for the top of the dress. You will then only need to finish sewing the dress with some accent...
In this how-to video, you will learn how to make jewelry using cord in less than four minutes. Corrine Bradd shows you how to easily do this. First, take a satin braid and tie it in a knot. Trim the excess off with scissors and take a cord end. Place the knot inside the groove and then clamp the cord end with a pair of pliers. Turn it around and do it again for the other side. These cord ends come with a loop on top for further use. These look great on jewelry such as charms. You can use a sl...
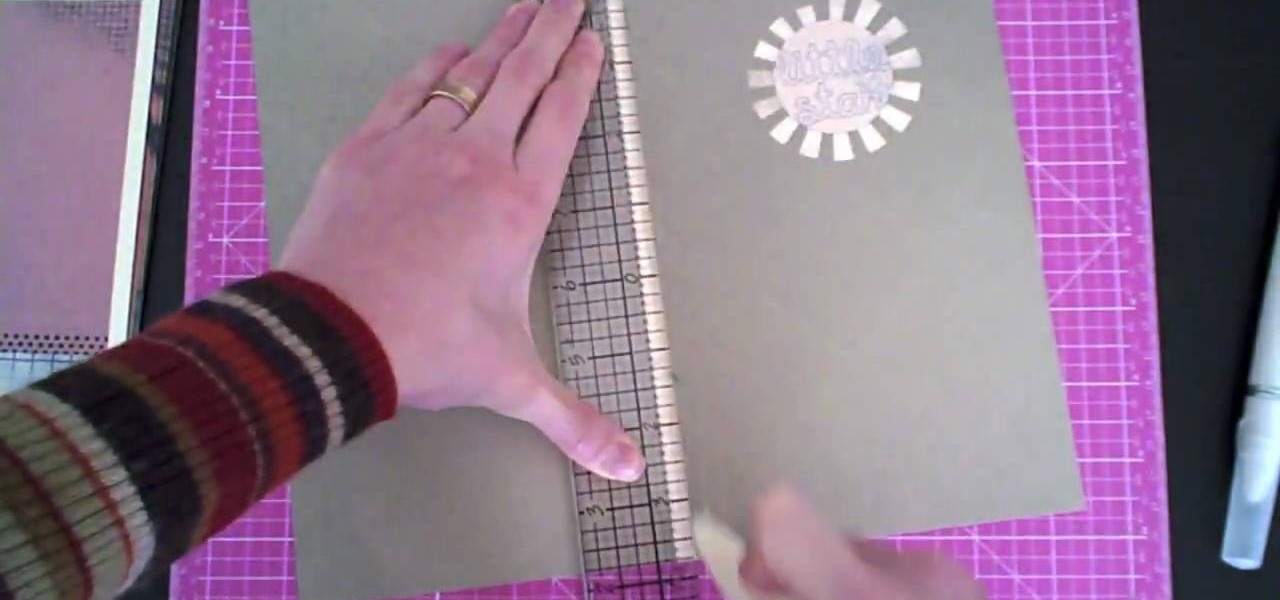
Creativity Prompt demonstrates how to make a hybrid board book. First, select printed paper of your choosing. Cut off the excess paper with a cutting blade and crease the paper for the spine. Fold and burnish the paper. Apply a generous glue stick layer to a recycled board book and adhere the paper to it. Burnish the paper with a brayer to strengthen the adhesion. Let the glue dry and trim off the excess paper. Cut the rest of the paper for the board book pages. Cut out photos and titles for ...
In this tutorial, we learn how to make crock pot chicken fajitas. First, you will need 1 1/4 pounds of chicken, 2 onions, 3 cups salsa, crock pot, 1 large red pepper, 1 package of tortillas and your favorite condiments. First, chop up the onions and pepper into thin slices. After this, trim the chicken and cut it into thin slices. Now, you will take the veggies, chicken and salsa and place into a crock pot for 6 hours at low heat. Make sure you stir well to cover all of the veggies and chicke...
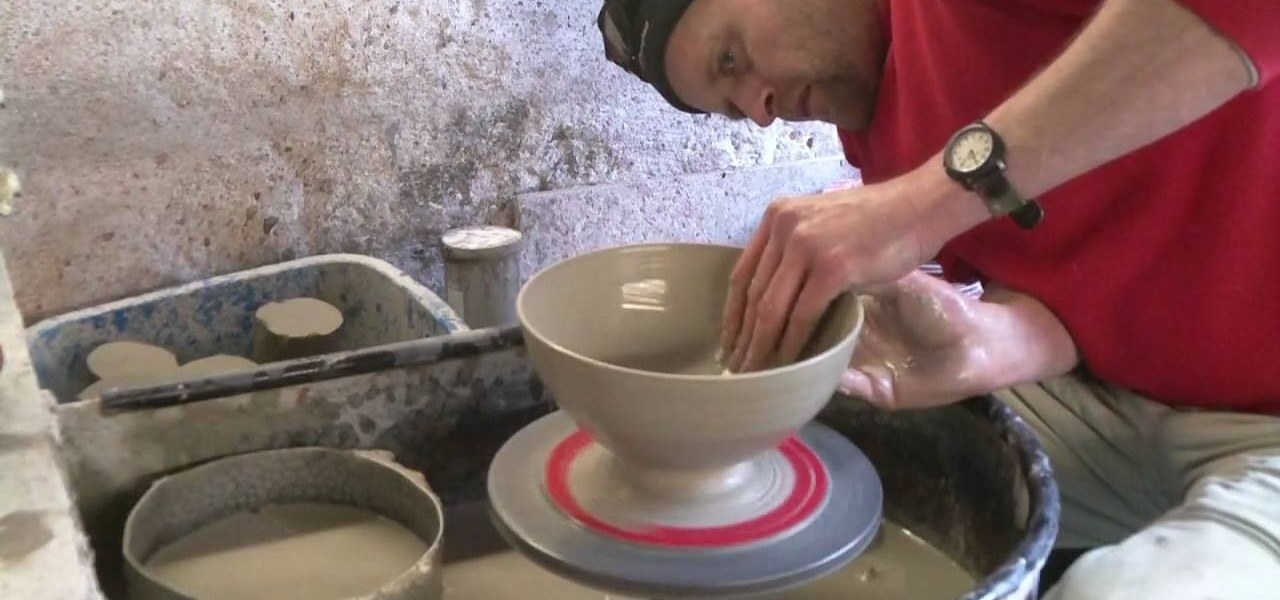
To throw a clay pottery fruit bowl, place a lump of clay on the potter's wheel and wet it with water. Use the foot pedals to spin the wheel while shaping the clay with your hands. Draw the clay up and then use your thumbs to create an indentation in the center of the clay. Apply slight pressure and the clay should assume a bowl form. Use water as necessary to create the right clay consistency. Draw the clay up to make the bowl walls thin. While shaping the bowl walls with one hand, create a r...
Watch this video and teach yourself how to make an easy and cheap clutch wallet using duct tape. The materials required for this are a pair of scissors, a rod, Velcro sticky tacks and duct tapes of different colors and you can use as many colors as you want. Cut out 12 inch strips of duct tape and stick five of them slightly overlapping one over the other. Then stick five more of the duct tape strips as in the above procedure so that the sticky sides of the two layers will be stuck together. ...
In this how-to video, you will learn how to groom your dog. Grooming is important for any kind of dog. It is important to find a groomer if you cannot do it yourself. Hair under the arms should be trimmed, otherwise it will become dread locked. It is also important to brush your dog's teeth on a regular basis. You can feed your dog with a brand that is good for teeth care. Purchase and use a brush specially designed for dogs. This will help keep your dog's hair from becoming matted. Teach you...
This video shows how a piece of glass can be cut using a pair of scissors into the shape that you want. First, use a permanent marker to draw the outline of the shape you want on the glass. Next, submerge the part of the glass that you want to cut into a basin of water. Using a pair of scissors, start cutting the general outline of the shape on the glass. After you are done with the general outline, you can then trim the glass with it still submerged in the basin of water. Remember to be care...
The video shows how to finish garments with serger or French seam. If you have a serger sewing machine then you can straight away place the seam along the seam and stitch on the machine. The advantage of this machine is that it gives 3 fledge serger stitch at one go. If do not have a serger machine then you can use the French seam. First the rough seam is stitched on the wrong side of the fabric and frayed edges are trimmed. Now the fabric is turned over and ironed over the stitch and a strai...
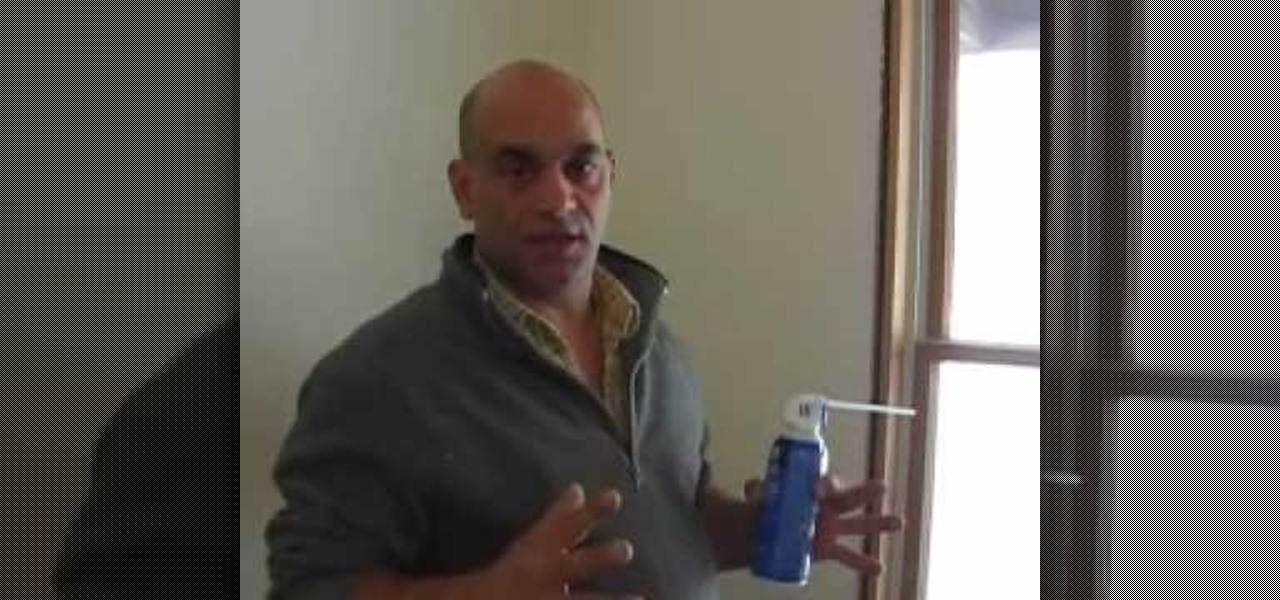
In this video tutorial, viewers learn how to seal gaps in houses using DAP foam sealant DAP 3.0 Weather seal caulk. The DAP products are designed to meet the tough standards demanded for professional window & door installations while effectively sealing large cracks, gaps and voids. Users learn to use the foam sealant to seal in gaps from inside the house. The gaps found behind wall trims. The seal caulk is used outside around windows. This video will benefit those users who want to learn how...
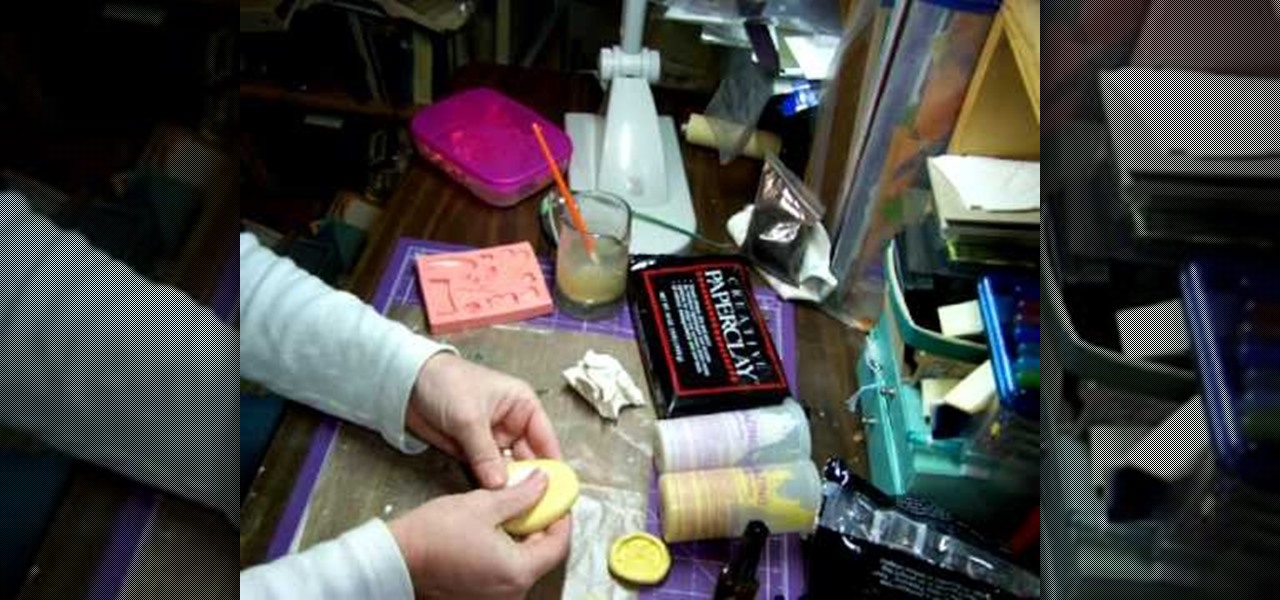
Terri Sproul shows you how to Work with Paperclay and Molds. Make a ball of paperclay and push it firmly into the center of the home-made or ready-made Mold. Make the surface of the Paperclay level with the surface of the Mold, adding more Paperclay if necessary, and removing any excess with your fingers. The molding putty that the Mold is made from is flexible, so hold the edges of the mold with your fingers and gently push the center of the Mold with your thumbs, this will push the molded P...
This video tutorial by HelpVids, Dave Andrews shows you how to use the transfer files and settings wizard in Windows XP. This program enables you to transfer your documents and settings from various programs and the 'My Documents' folder between computers if you wanted to do so. First go to the start button select all programs, accessories, system tools and select the files and settings transfer wizard. Click next and check old computer to select the PC your currently on and click next. Wait ...
In this tutorial from Mark the Shark, viewers are shown how to apply a hook to a fishing pole. One such method is using a Fishermen's knot, and wrapping the hook around the line eight times, and then wetting it with saliva, before it is tightened. Then, the user must make sure than the knot comes all the way down to the hook, to make sure it does not rotate. Next, pliers must be used to eliminate excessive line, and then the line must be searched for crinks, or any imperfections. Mark the Sha...
In this video tutorial, viewers learn how to add hemp twine to accent a scrapbook photo. Users will only need a line of twine and tape. Put the twine on one side of the picture and tape the back to hold it. Now wrap the twine in a diagonal pattern (right and left). Then wrap it down the middle and tape the back again to hold it. Trim off the extra twine and tape all the strings of twine at the back, so that it won't move. This video will benefit those viewers who want to add an embellishment ...
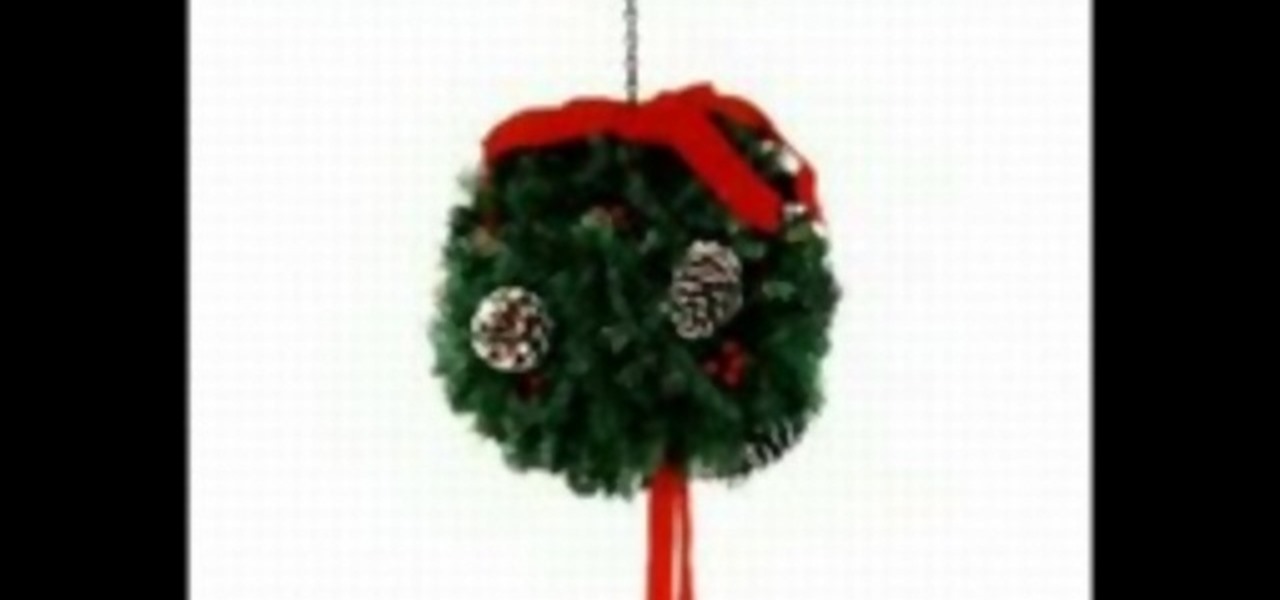
Learn how to make a kissing ball for Christmas with these steps outlined in this video tutorial. A kissing ball is essentially a bunch of pine boughs in the shape of a ball decorated with red ribbon and pine cones that can be used as seasonal decorations. You need to cut the boughs of pine in the desired lengths you want. The longer the boughs, the larger the ball. You will need a florist's Styrofoam ball soaked in water, which will be covered with the pine boughs. Once the ball of pine is fo...
In this video molly1216 explains her method of repairing a hardcover book hinge. She mentions that this method should be used for inexpensive books that are not worth being sent to professionals.
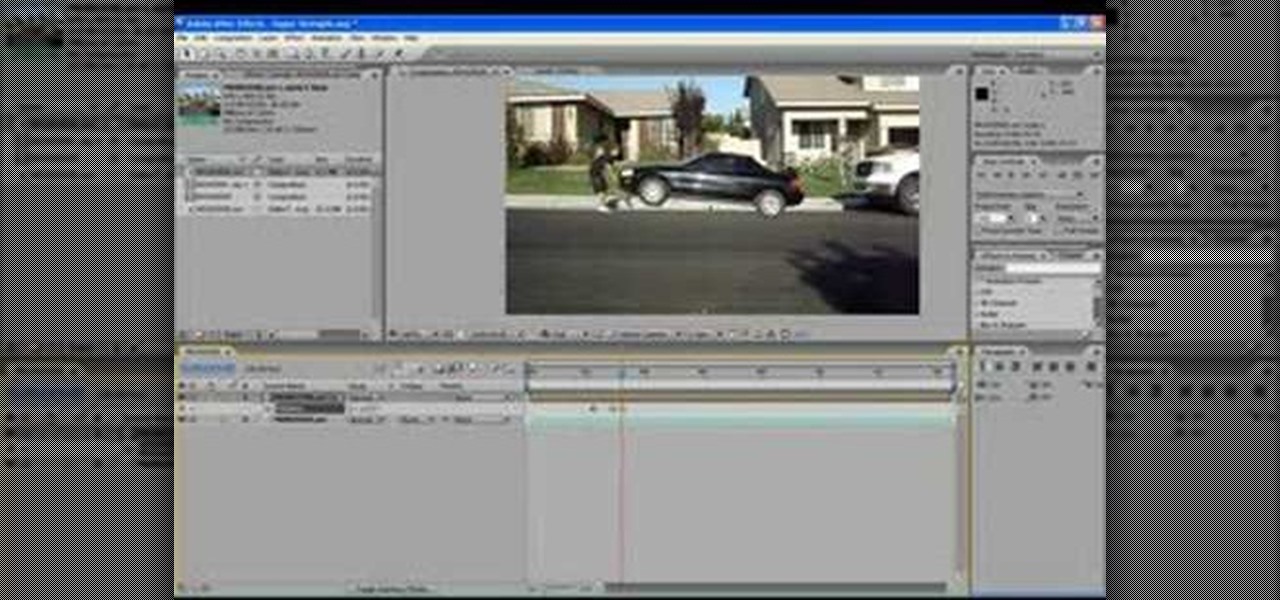
The end result of this tutorial is a video of a person lifting a parked car. The tutorial demonstrates how to create this super strength effect using Adobe After Effects. It is part of a series made by ajones8126 of super hero effects for Copilot.net. First, the narrator, AJ, creates a still from a clip of the parked car using time stretch. Then he trims a clip of himself "lifting" the absent car. He masks out the car, and pre-composes it into the other clip. The car is then carefully rotated...
This instructional video shows us how to make a Japanese flag fan. The materials required are: Foamy (Red and white), four popsicle sticks, glue and scissors. First cut two circular shapes (with one straight edge) from the white foamy, then glue on the popsicle sticks to the straight edge of one of the circles to make the handle. After this, glue down the other white circular piece of foamy to cover the tops of the popsicle sticks. Then cut out two smaller circles from the red foamy and glue ...
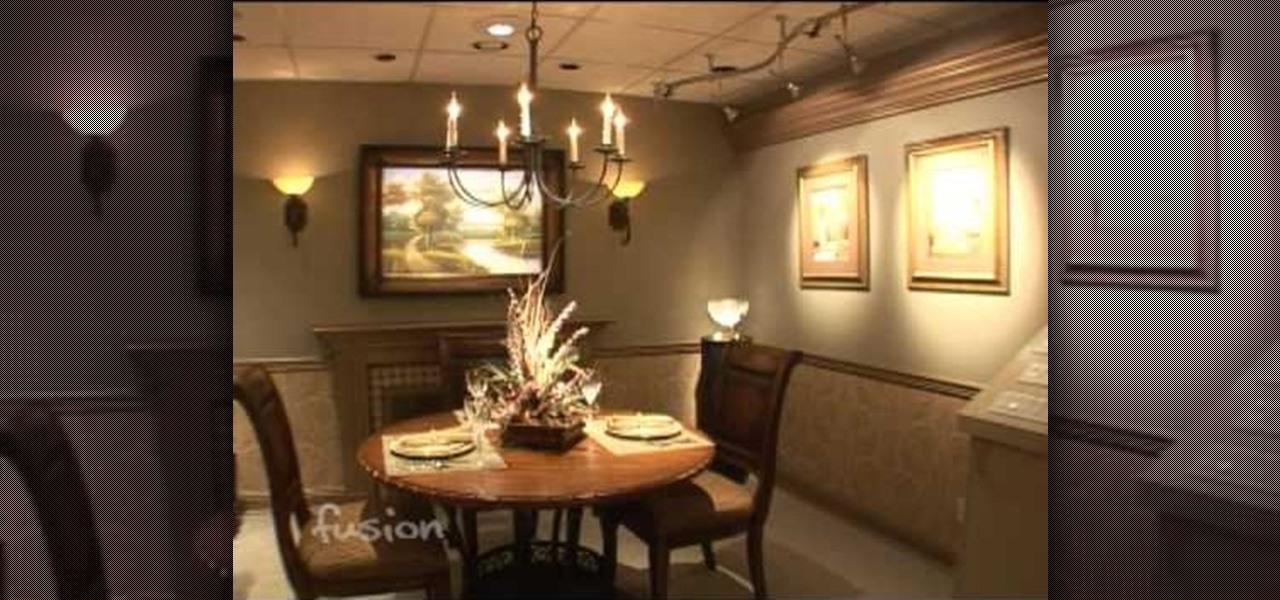
This video shows how to improve light in a room for different moods and effects. You will see how the lighting will fit the design of different
This video demonstrates the proper technique to shave your head without getting cuts. First the presenter starts by shaving his head a pair of clippers. After the hair is trimmed he fills the sink with water to clean the razor off. The presenter suggests you take a shower before shaving your head to open the pores and loosen the hair. Then you apply the shaving cream to your head and massage it into the scalp. The presenter begins shaving the sides of his head, washing the razor after ever on...
This video teaches the viewer how to make a bow for your hair. You need a few materials to do this including 12 1/2 inches of ribbon that is approximately 1 inch wide, Two to three inches of contrasting ribbon for your center piece, a glue gun, 5 inches of craft wire and a hair clip. You can chose the colors or create several different ones to coordinate them with your wardrobe. They take only about 5 minutes to complete as long as you have all the materials on hand. Make sure to have a pair ...
The following are the steps to be followed to organize a linen closet: 1. First, you need to clear a work space. This works really well because you need to remove the contents from the linen closet.
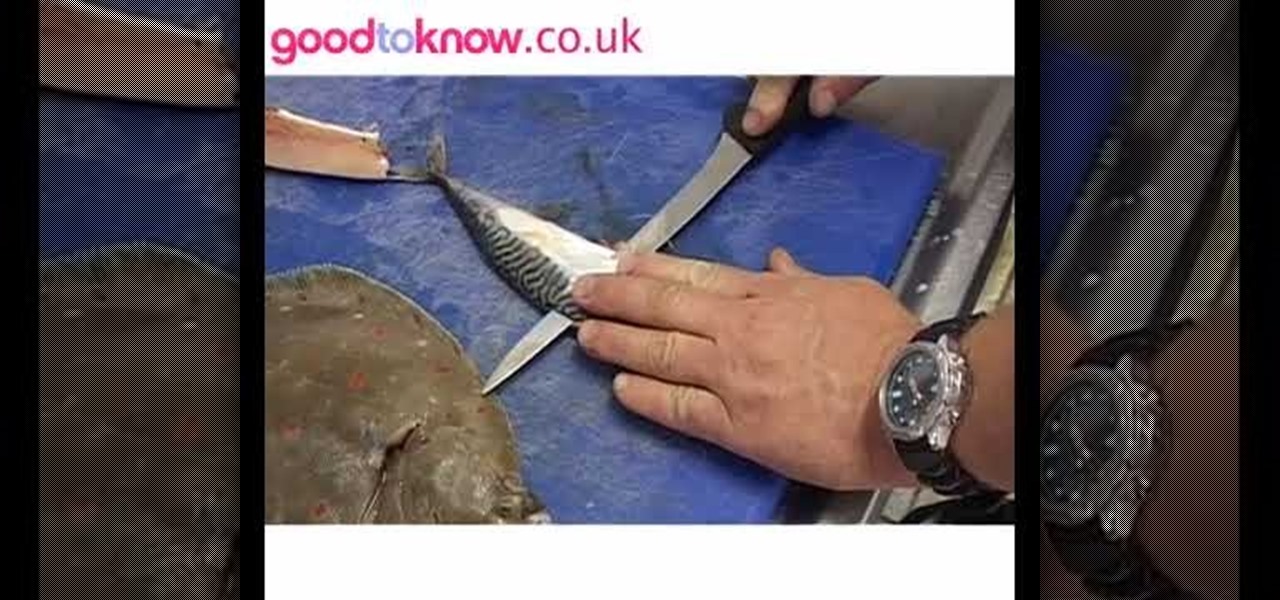
There are two classical fish cuts. There is a flat fish and a round fish. Having a sharp knife is important, because a work done by a blunt knife does not look good and it might look like a laced curtain at the end of the day. You cut a line parallel across the fish's gills. Then you dig in a little bit and cut across the body of the fish down to the fin. Then you take that piece aside and trim off the stomach area. Thus, you have one piece of fillet! Do the same procedure for both sides of t...
FK describes how to make a Yoshimoto cube. First, print out the template. Then, trim the paper with scissors along the perimeter and glue the edges into a 3D pyramid. Repeat these steps until you have 48 cubes. Fix 3 pyramids together 16 times. Arrange pyramids in groups. Repeat 2 times and color 8 of the pyramids. Place adhesive on the joints of the cubes. Arrange the pyramid groups into a cube. Now, you can perform neat tricks with the cube, like changing the cube from white to colored with...
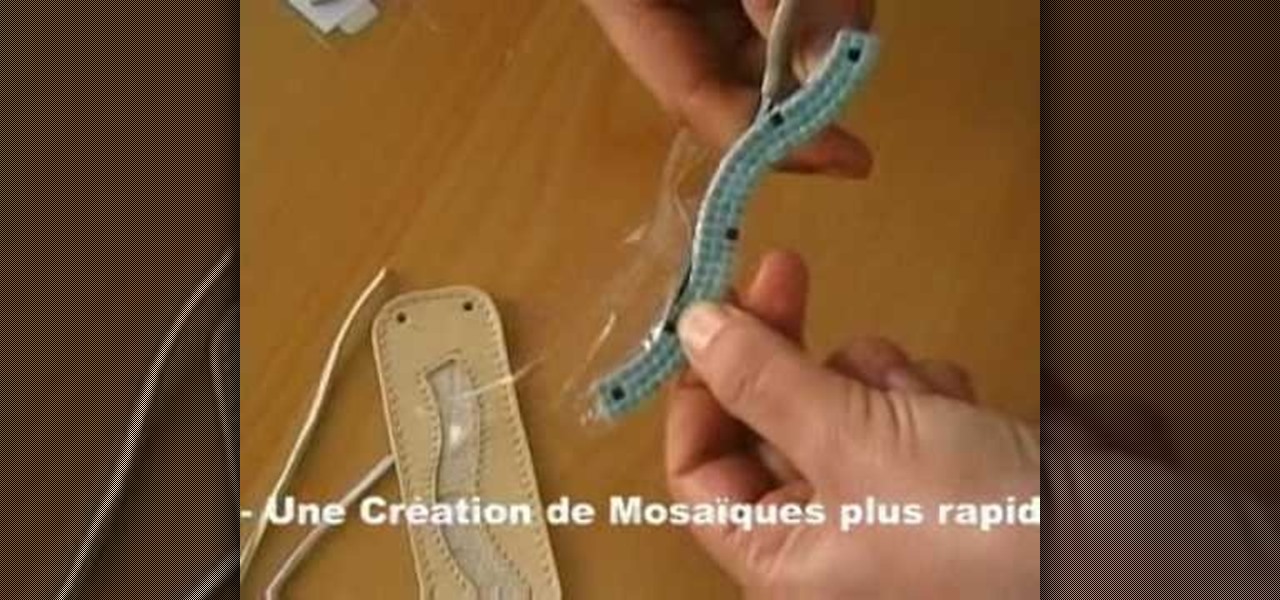
Alea Mosaic shows you how create a beautiful stone-inlaid jewelry bracelet. This video clearly and concisely lays out the steps. First, you affix a pattern underneath clear adhesive foil. Next, you peel the the cover off to expose the adhesive. You then place the stones according to the pattern, and fix a transparent foil on top. Once that is done, trim the plastic from around the stones. Then, you apply glue to the bracelet base, then place the stones inside.
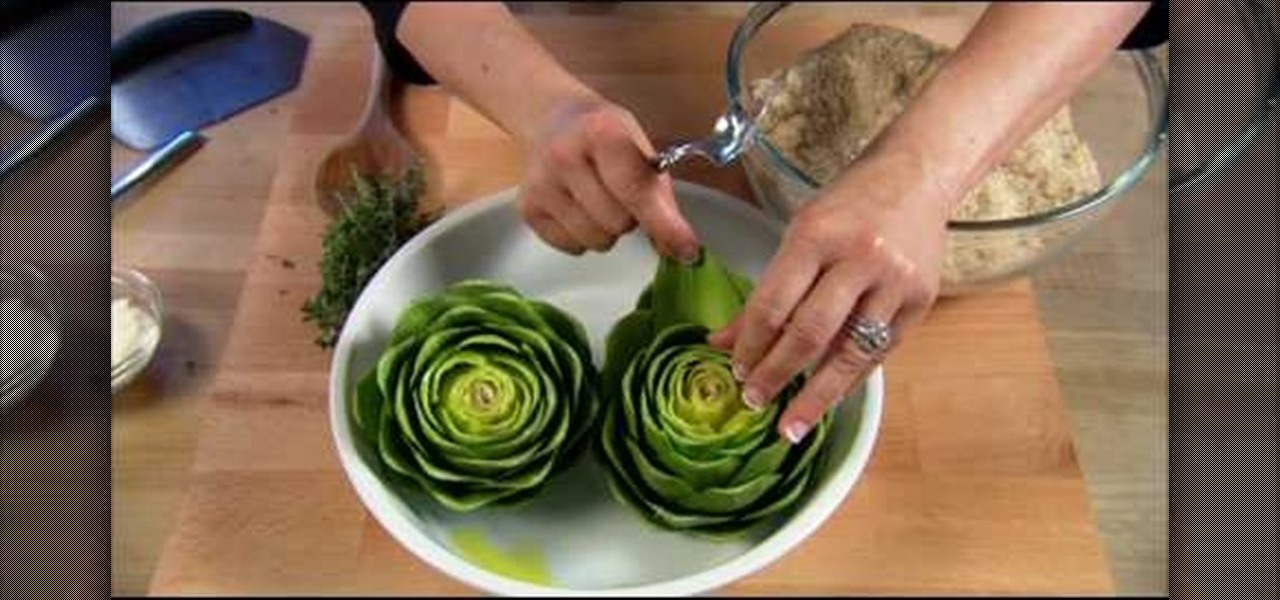
This video will show you how to make Italian Stuffed Artichokes. Follow these directions to stuff an artichoke in the classic Italian way: In a large bowl add Parmesan cheese to Italian Style breadcrumbs and chopped garlic. Mix well. Gently open up the leaves of a washed and trimmed artichoke. Drizzle with olive oil. Open up the petals and spoon the stuffing inside each petal. Put the artichokes into a steaming basket and steam for 30-40 minutes. Drizzle with melted butter and Parmesan cheese.
In this how-to video, you will learn how to build your own custom Pochade box for oil painting. You will need 10 feet of 3/4 x 1/2 trim, 1/4 underlayment plywood,, a table saw for squared cuts, a cordless drill, a dowel no smaller than 3/8, a set of hinges and screws, an Allen bolt and nut for triPod mounting, a piece of glass for the palette, gorilla glue water, and chemical proof. Pre-drill everything to make sure the wood does not split. Make sure that when you drill the hole for the dowel...
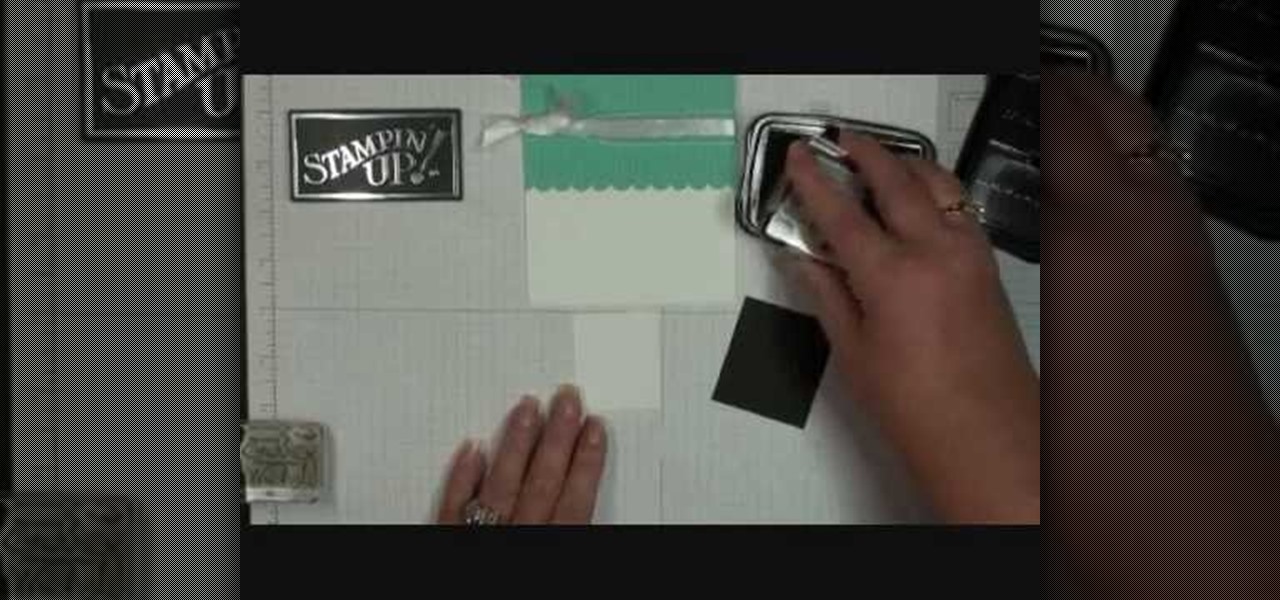
Demonstrator Dawn Griffith offers a short tutorial on how to make a simple and cute birthday card. First you will use white paper to make your base card. Then use a scallop edge punch to scallop some green designer paper, which you will glue to the top of your card. Tie some white ribbon around the top and trim for a clean look. Use a greeting stamp to stamp a message onto the bottom right front of your card. Create a center image by adhering white paper on black card stock, stamp the white p...
Betty's making a classic meal, but true to form, she's putting a signature twist on it. Instead of ground beef, she's using sirloin. Sounds delicious!
This video shows how to make a very realistic looking bowl of ravioli out of polymer clay, to be used in a doll house. She starts with flesh tone clay and uses a piece of plastic needlepoint to press the pattern of square ravioli into the clay. She trims off the edges and then cuts out the tiny ravioli. She uses the fluted edge of a toothpaste tube to imprint the edges of the ravioli. She uses a mixture of liquid polymer clay and red and brown pastel chalk to make the sauce. She puts the ravi...