You'll have to forgive me if I sound a little overexcited about this, but in my opinion, Google's "Now on Tap" is one of the most innovative™ smartphone features that I've seen in years. Sure, Microsoft heard about the feature being in the works and rushed out a similar Android app so they could say they were first, but that solution pales in comparison to this one.

Here's a short and to the point tutorial teaching how to Bass Boost your songs with Audacity. To download Audacity for FREE you can go to the official Audacity website. You may want to Bass Boost your songs for many reasons, so here's a tutorial on how to do just that with the popular, Free, and easy to use software called Audacity.
Lollipop brought a complete visual overhaul to Android, and while the vast majority of changes have been met with praise, some UI tweaks missed their mark.

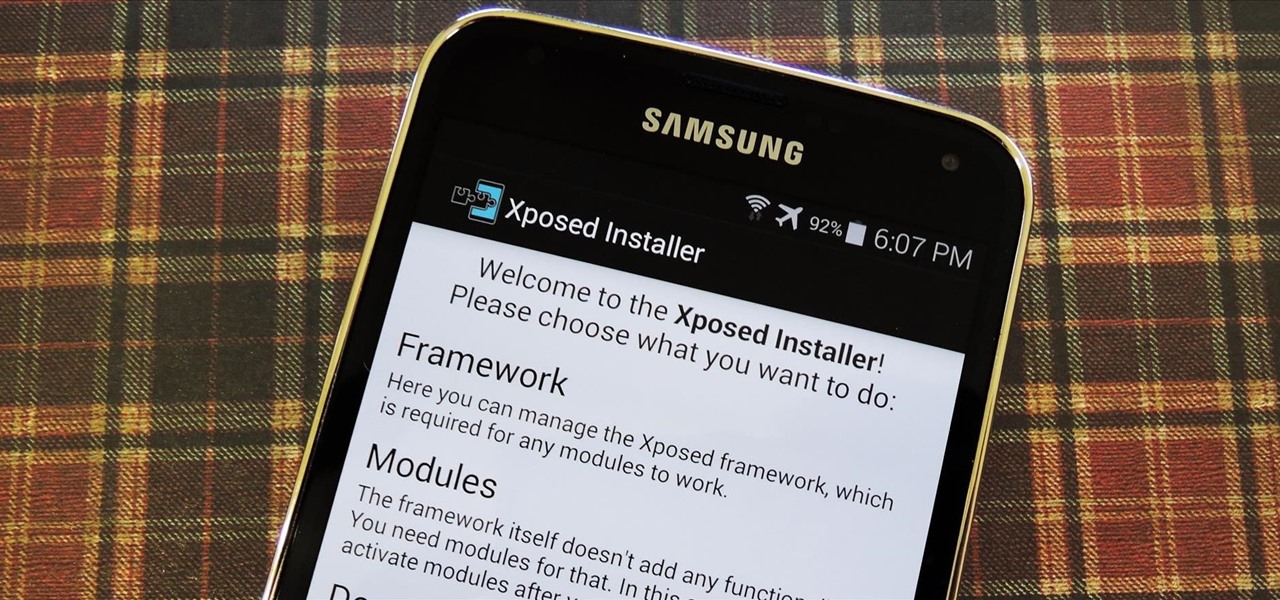
The lack of Xposed support on Android Lollipop has left modules like GEL Settings incompatible with my Google Play Edition HTC One, so I've had to find a new launcher to meet all of my needs. While I can safely say I will never find the perfect launcher for me, Blinq comes pretty damn close.
Now that all variants of the Galaxy S5 have finally been rooted, we can start exploring all of the tweaks and hacks that Superuser privileges open up to us.
Converting Movies To Psp Format. Hey again, this is a real quick guide for anyone interested to get a movie onto there PSP without all the fluff i have seen elsewhere. I just watched Africa the Serengeti on my PSP and heres is the lowdown.

First you need to do is to open up the HD video file of Canon HV20 and then you can set the project properties. So go to file, import, media and open up the video file. Now drag it to the timeline and go to file, properties, click on the file folder called "match media settings" and open the same video file which you just opened. Now click on apply and then ok. But now video proportion is not fine. To fix it go to option, preferences, click on video tab and check the box which says "simulate ...
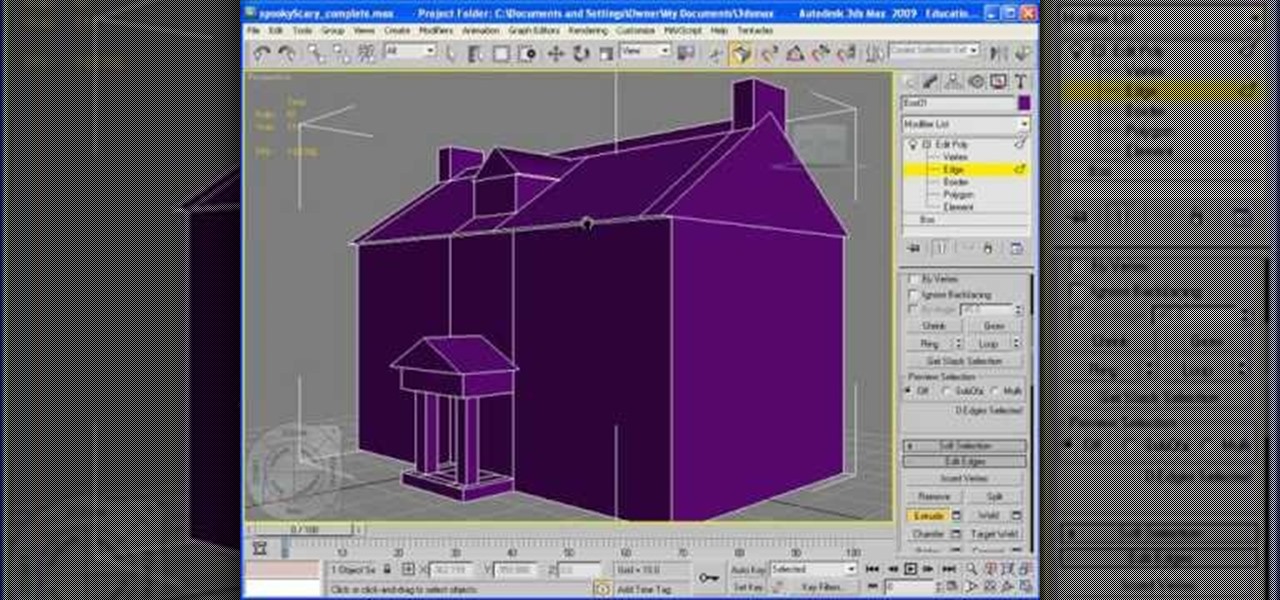
In this video, we learn how to add texture to a model house in 3D Studio Max. After you have created the model, press 7 on your keyboard. This will activate a new menu telling you how many polygons are in your model. Then, edit the edges and remove them so you have less polygons. After this, save the model under a name you want, then select everything on the model. Go to the parameters and click "edit". Now, go to mapping, then flatten mapping. The presets should be fine, then click "ok" and ...
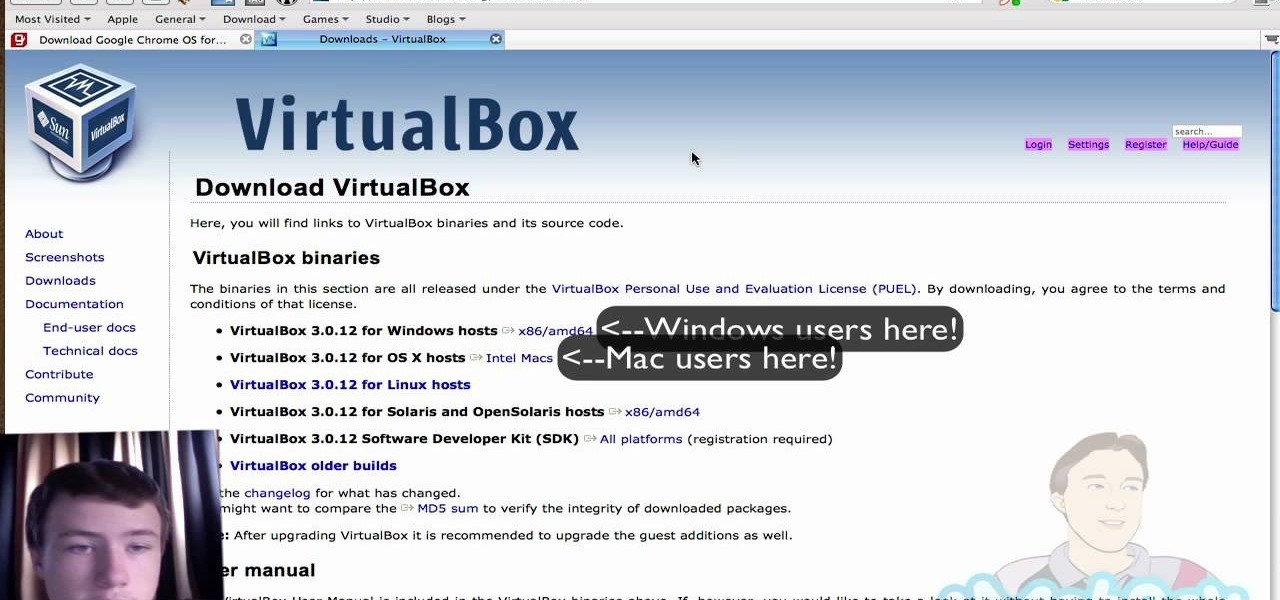
First download the virtual box, download it for Mac and install it. Now download the Chrome OS and extract it. Now launch your virtual box and click new. A "create new virtual machine" wizard will open, click next, put the name of the OS and choose Linux in operating system and Ubuntu in version now click next. Now give memory atleast 1000 MB and click next. Select "use existing hard disk" and tick the "boot hard disk" and choose the OS file by clicking the folder icon next to it, click add a...
In this tutorial, we learn how to create a warm grunge background in Photoshop. First, create a large circle on a burnt orange background in Photoshop. Now, go to layer, adjustment layer, then levels. Hit "ok" then the level's adjustment layer will be masked. Now, go grab the bottom black slider and brighten up the middle. Use the overlay to create a center glow. Next, bring in texture using a brushed metal texture from this photo. Now, even the image out by going to image, then image rotatio...
You can resize keyframes in Adobe Flash and you can do this for anything like images, animation etc. So to do this first click on your first keyframe and hold down the shift key and then click on the last keyframe. Now select the free transform tool and resize that as showing in the video but it only resize the keyframe on which the header currently is. So now this time right click on the keyframes and choose copy frames. Now make a new layer and hide your old one. Now select the pencil tool ...
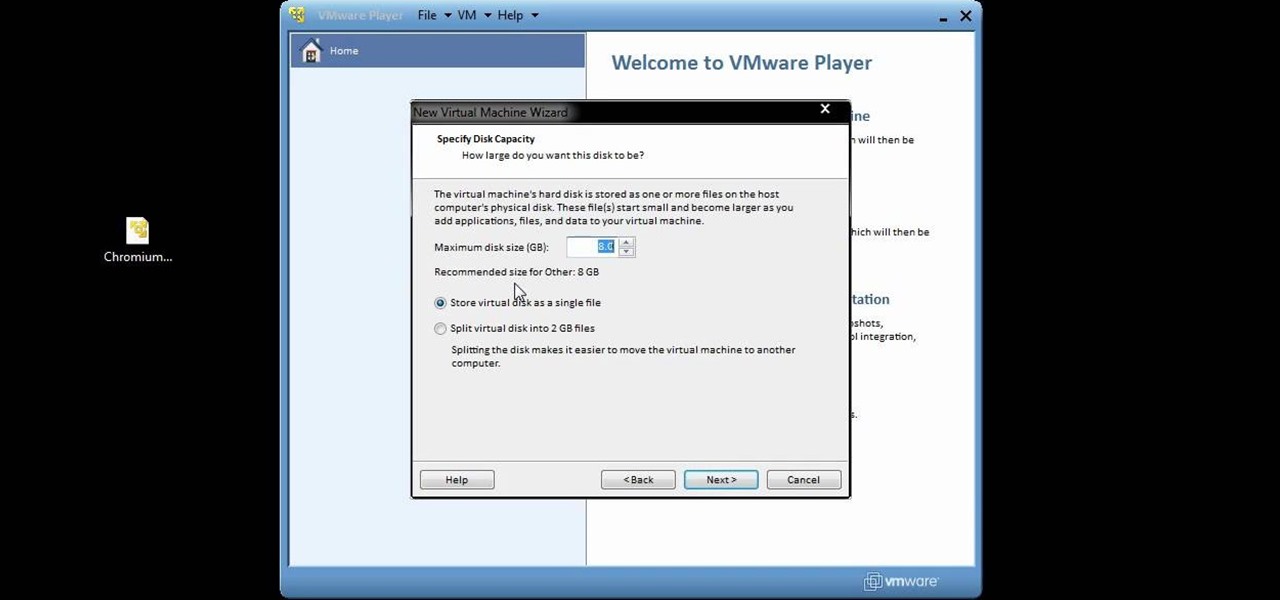
You can setup Chromium OS in a virtual machine. So first go to the download site for Chromium OS and VMWare download for the VMWare Player. Now run the VMWare Player and click on "create a new virtual machine" and select "i will install the operating system later" and click next and then next.
In this video, we learn how to automatically clear browser cache in Internet Explorer. This will help your internet run faster and it will also help protect your computer from your personal information being store. First, open up Internet Explorer, then click on the tools drop down menu and go to internet options. From here, go to temporary internet files and click on the button that says "automatically", then adjust the disk space to use to what you prefer. After you have changed the setting...
In this video tutorial, viewers learn how to create drop down menus in Microsoft Excel. This task is very easy, fast and easy to do. Begin by highlighting a desired cell. Then click on the Data tab and click on Data Validation under Data Tools. When the Data Validates window opens, click on the Error tab and deselect "Show error alert after invalid data is entered". Then click on OK. Now simply type in the data into the selected cell. This video will benefit those viewers who use Microsoft Ex...
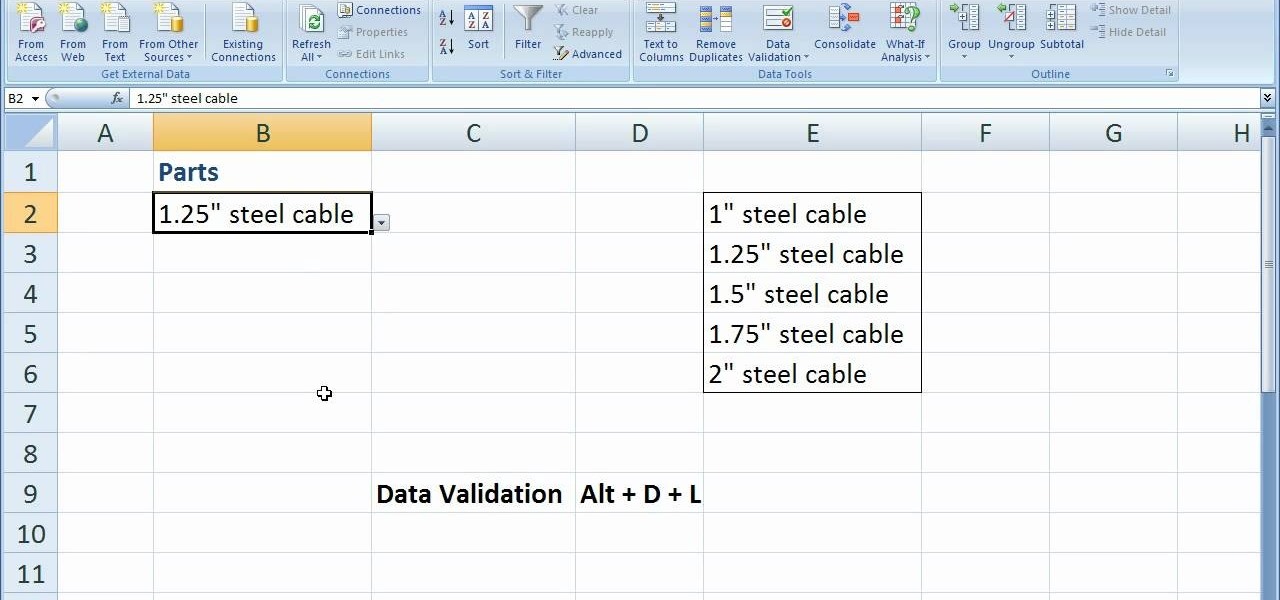
In this software video tutorial you will learn how to create drop down menus in Excel using Data Validation. This example will show you how to display a list of parts in a drop down menu. Create the list of parts somewhere in your worksheet. Then in the cell underneath the one where you want to display the parts, go to the data validation window and enter the data. For this select the cell and then press 'Alt + D + L' to bring up the data validation box. Here you click on 'settings' and selec...
In this tutorial, we learn how to lock and unlock cells in Excel. First, right click one cell and click on format cells. Go to the protection cell, and then un-check the locked category. Click ok, then go to protect sheet, inside of tools. Now, do now allow locked cells to be checked. Now, you will not be able to select cells in the worksheet except cells that are unlocked. This is a great way to protect your information, so it won't accidentally get deleted or ruined. You can do this for ent...
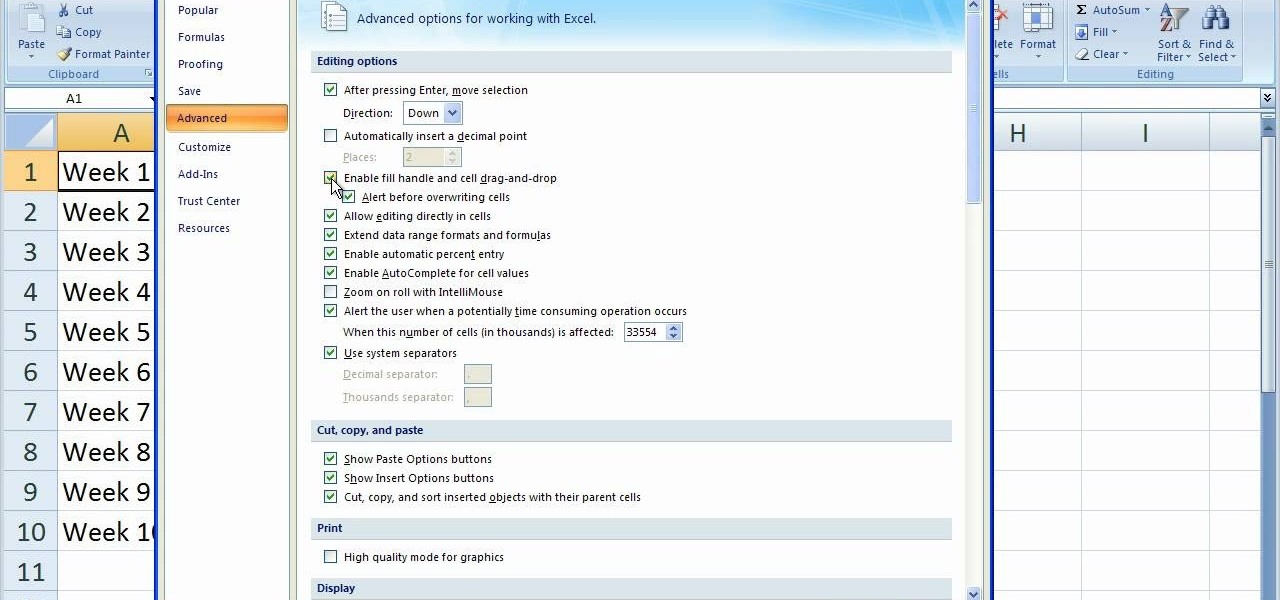
In this video tutorial, viewers learn how to disable the quick fill handle and drag and drop option in Microsoft Excel. This task is very easy, simple and fast to do. Begin by clicking on the Office button and click on Excel Options at the bottom. Then click on the Advanced tab and deselect "Enable fill handle and cell drag and drop" option under Editing Options. Finish by clicking on OK. This video will benefit those viewers who use Microsoft Excel for their work, and would like to learn how...
This video tutorial belongs to the software category which is going to show you how to add a watermark in Camtasia Studio. Open up Camtasia Studio and either import a video or open up a saved video to add a watermark. You got to edit your video and be ready to publish it because adding a watermark is the last step. Now click on 'produce video as' and the production wizard will come up. Here you can select a preset mode or create a custom one. Then you go to 'add / edit preset' and click on 'e...
In this video tutorial, viewers learn how to increase the rendering speed in Adobe Final Cut Pro. Begin by right-clicking on your current sequence and click on Settings. Click on the Video Processing tab and select "Always Render in RGB". Then click OK. This change will only be noticeable when working with really high quality high definition footage or film. Even then, you are able to re-render at a higher bit rate later, without having to affect the original image or export. This video will ...
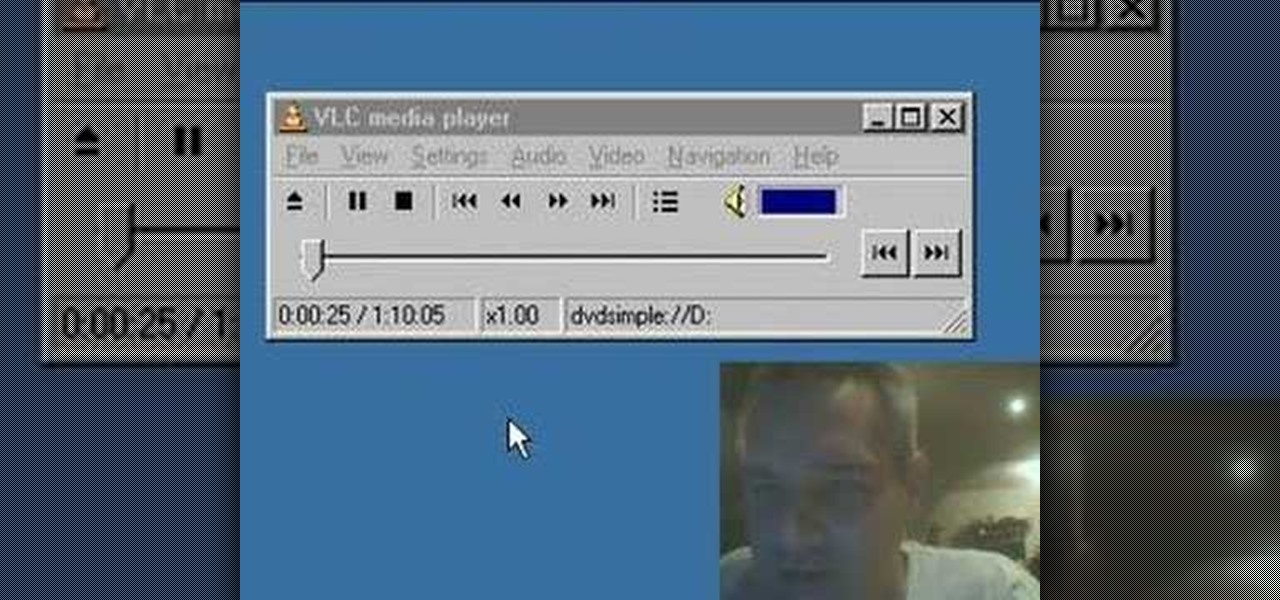
Learn how to stream DVDs to AVI using the VLC media player in this video tutorial. To begin, open your DVD disk on the computer. Save the stream and save it to a file (save it somewhere where you will remember it). Then, go with the default and press "OK.". Locate the file you just created and launch it. Then, launch the DVD. The VLC media player will open and you will hear your DVD. During this process, the media player will be transcribing your video, which will take a few seconds. To learn...
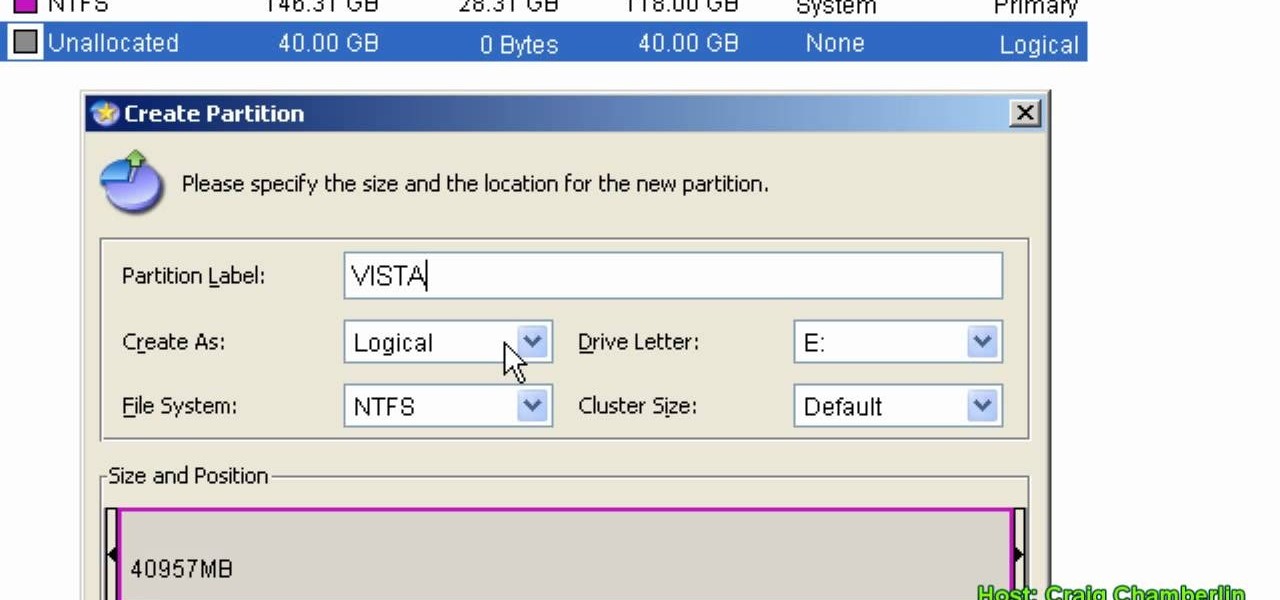
In this Computers & Programming video tutorial you will learn how to format a hard drive to boot a second operating system. First, do a Google search for EASEUS partition master, download and install it. Launch the program. Right click on the unallocated space on your hard drive and then click ‘create’. Now create a new partition for the new OS. Name it Vista, select ‘primary’ in the ‘create as’ window, choose ‘NTFS’ in the ‘file system’ window, select drive letter as ‘V...
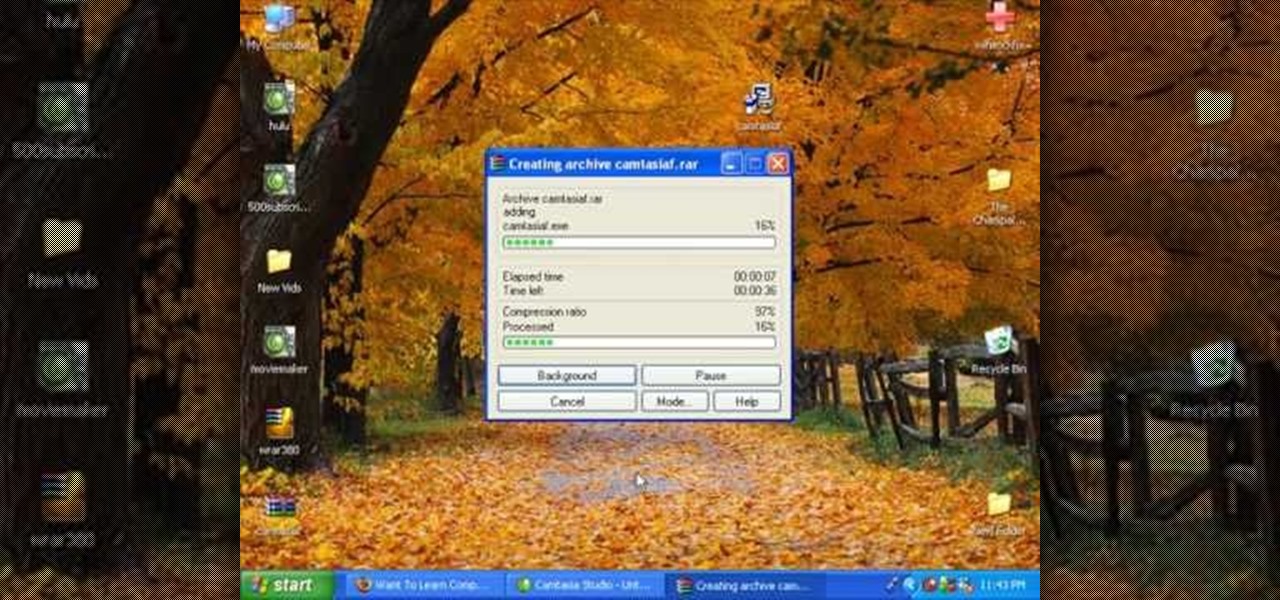
In this video tutorial, viewers learn how to break up large files to easily send through email. Go to the website: and search "winrar". Download the program. Then double-click the file and follow the instructions to install it. Now right-click the file and select Add to Archive. Users will have an option to split the files into volume bytes. Then press OK wait for the program to compress the file into several parts. This video will benefit those viewers who...
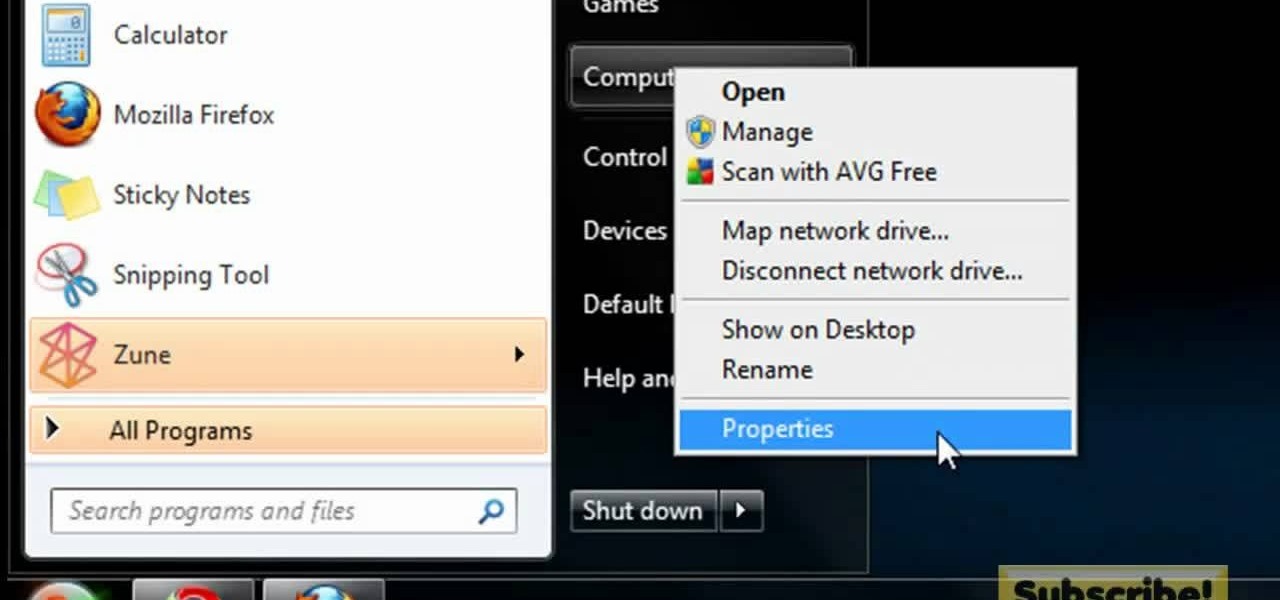
In this video tutorial, viewers learn how to make the System Restore feature use less space in Windows 7. Begin by clicking on the Start menu. Right-click on Computer and select Properties. Under Tasks, click on System protection. In the System Properties window, select the hard drive and click Configure. Under Disk Space Usage, drag the slider to the left for a lower amount. Then click on Apply and OK to confirm. This video will benefit those viewers who have a Windows 7 computer and would l...
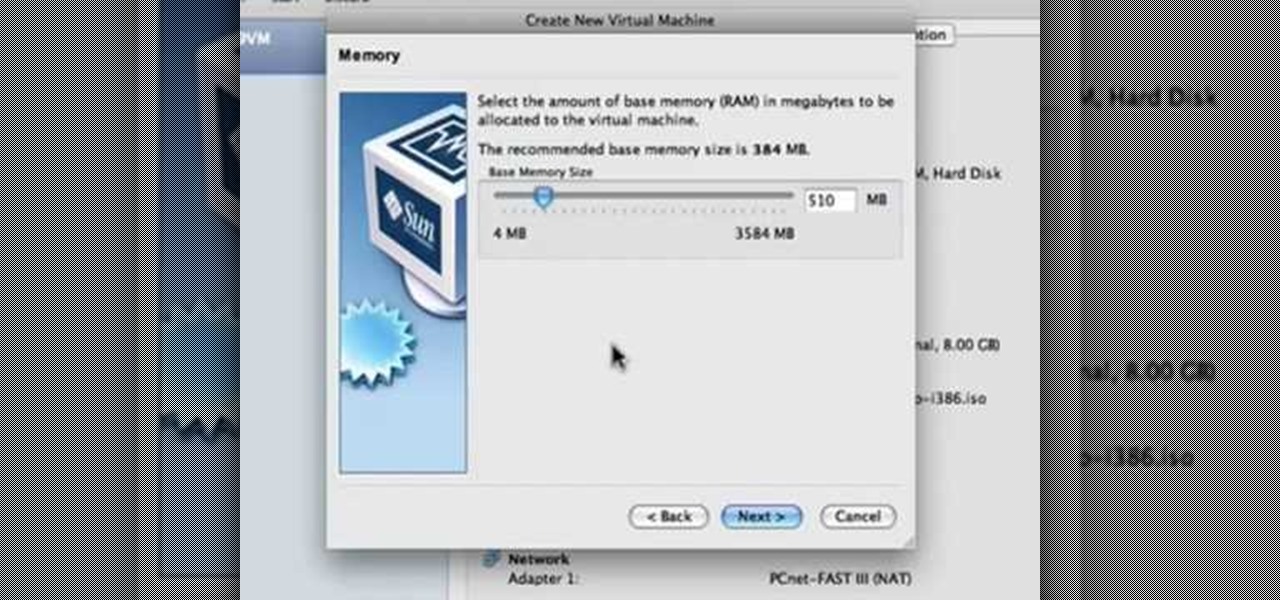
In this Computers & Programming video tutorial you will learn how to create a virtual machine for free using the virtual box in Mac. Open the virtual box and click on new. Click next, put in a name for the virtual machine and click next. In the next window, it gives a recommended memory, increase it slightly with the slider and click next. Click next in the subsequent 4 windows that come up and finally click ‘finish’ and click ‘finish’ again on the next window. In the next window click CD/DVD...
In this Computers & Programming video tutorial you will learn how to hide and lock folders in Windows. When you want a private folder that you don’t want any one else to open and see. You will need this feature. For this open a new folder. Open the folder, right click on it and go to ‘customize’. Then select ‘change icon, click on a blank icon, click OK and ‘apply. Now you will see that your folder icon on the desk top will disappear; only the name will be visible. Now rename it with a small ...
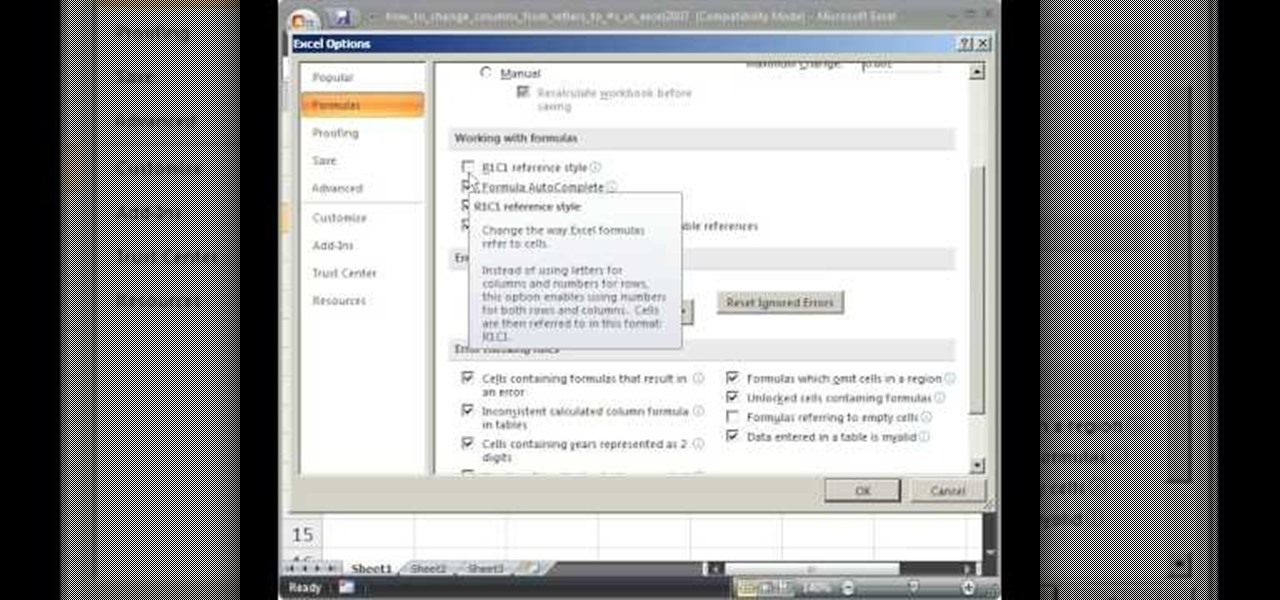
Teach Excel demonstrates how to change the columns from letters to numbers in Excel 2007. The first step is to click on the Office button in the top left part of the window. Next, you click on Excel Options and click on the Formulas tab. There should be a heading labeled "Working with Formulas." The checkbox for R1C1 reference style should be unchecked by default. Check that box and click OK. This changes the column headers from letters to numbers. In order to change back to letters, simply g...
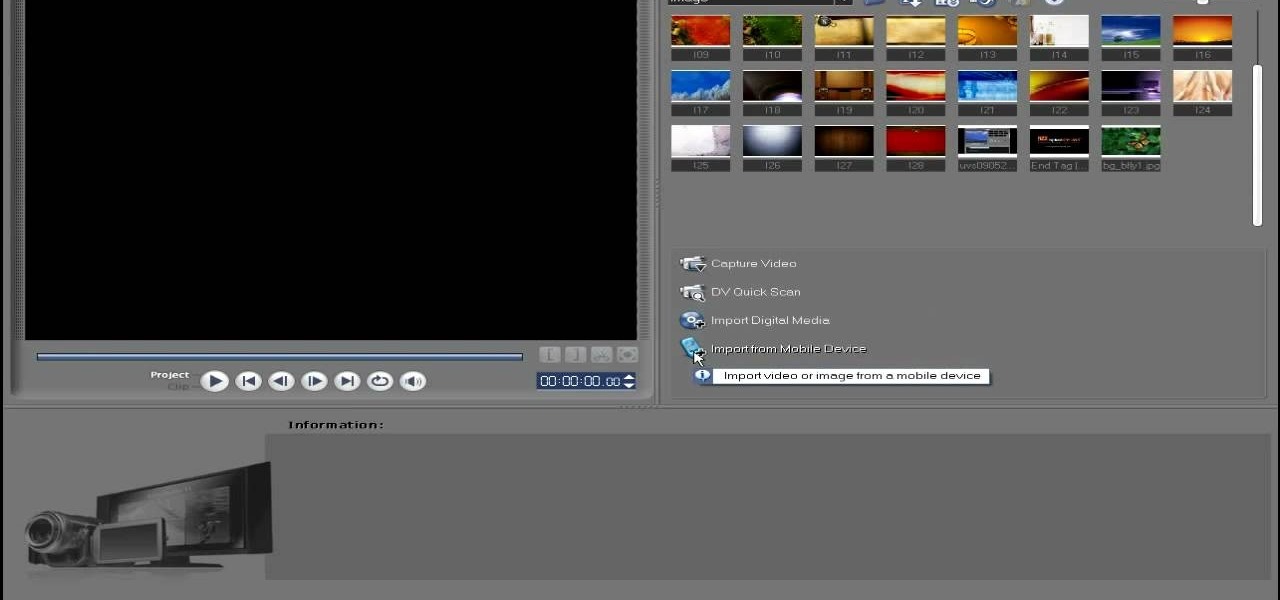
In this video tutorial, viewers learn how to import media from devices in Corel Video Studio. Begin by connecting your mobile device to the computer. It can be any device with a memory card or hard drive. Open the program and click on the Capture tab. Click on the option, Import from Mobile Device and select the device that you want. Select the file(s) that you wish to import and click OK. The program will then import the media to your selection window. This video will benefit those viewers w...
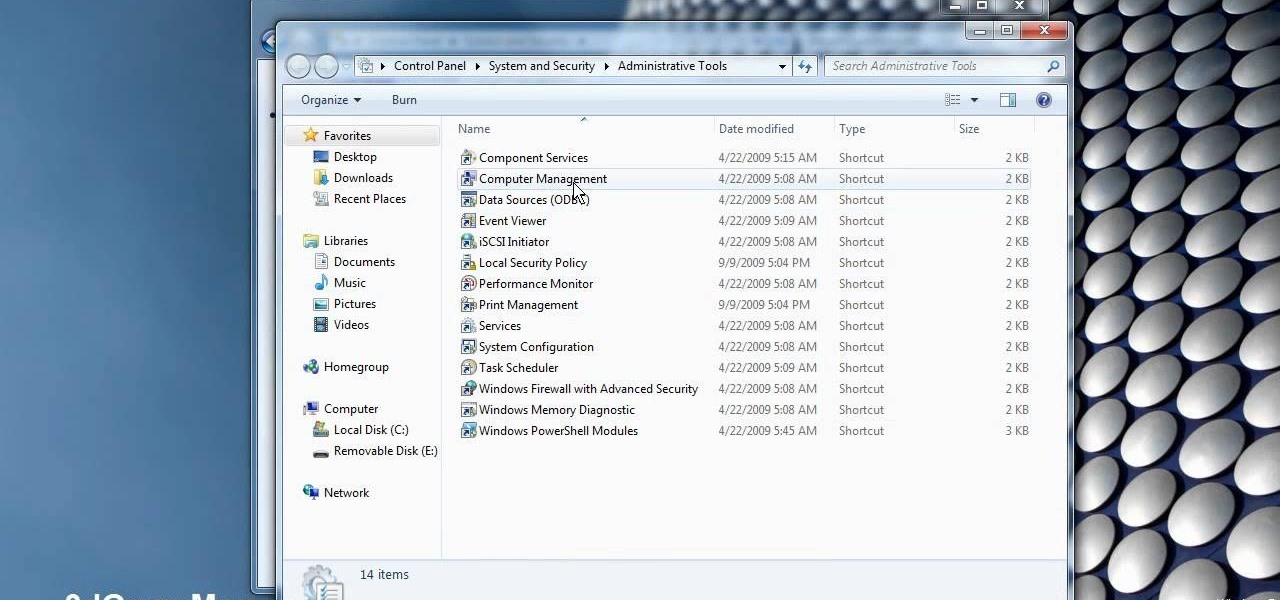
This video demonstrates how to change a drive letter to a certain drive in your Windows 7 computer. On you Windows 7 computer, go to Start > Control Panel. In the Control Panel, select System and Security then open the Administrative Tools. Look for and open the Computer Management tool. On the left side pane of the Computer Management window, select Disk Management. Look for and right click on the drive you want the drive letter changed. Select 'Drive Letter and Paths...'. Click change and s...
This video shows you how to assign a letter to your USB flash drive (or memory stick) or how to change it in Windows.First of all, connect the flash drive in the computer's USB port. Click on the start button, then right click on My Computer and choose manage. Once the window opens, go to Disk Management. There, you should be able to see the USB drive as "USB DISK". Right click on it and choose "Change drive letter and paths...". Now click on change and select the desired letter for the drive...
This video is showing you how to hide or show tiles on your homepage of your HP TouchSmart. You can look at all your available tiles on your homepage by tapping on the "personalize" button. The tiles that are dimmed means that it is hidden, and the tiles that are bright mean that it is showing. To hide a tile, just tap on it and it will go dim. To make a hidden tile shown, just touch it and it will turn bright. When you are finished choosing which tiles to show and which tiles to hide, click ...
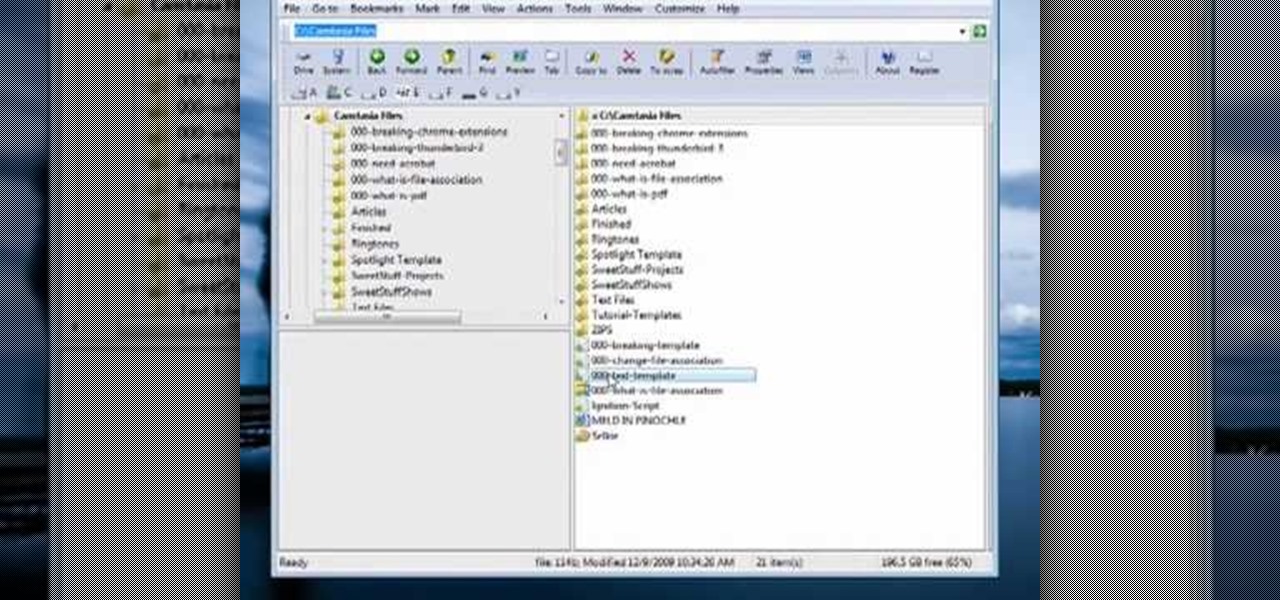
This video tutorial from butterscotch presents how to change file associations on your computer.File association is a link between a certain type of file (.doc, .gif, .txt) with a particular program.For example text files are by default associated with Notepad application.So if you double-click text file it will be automatically opened in this program.In case you want to open this file in a different type of program, you need to change the file association.To do that, right click the file, th...
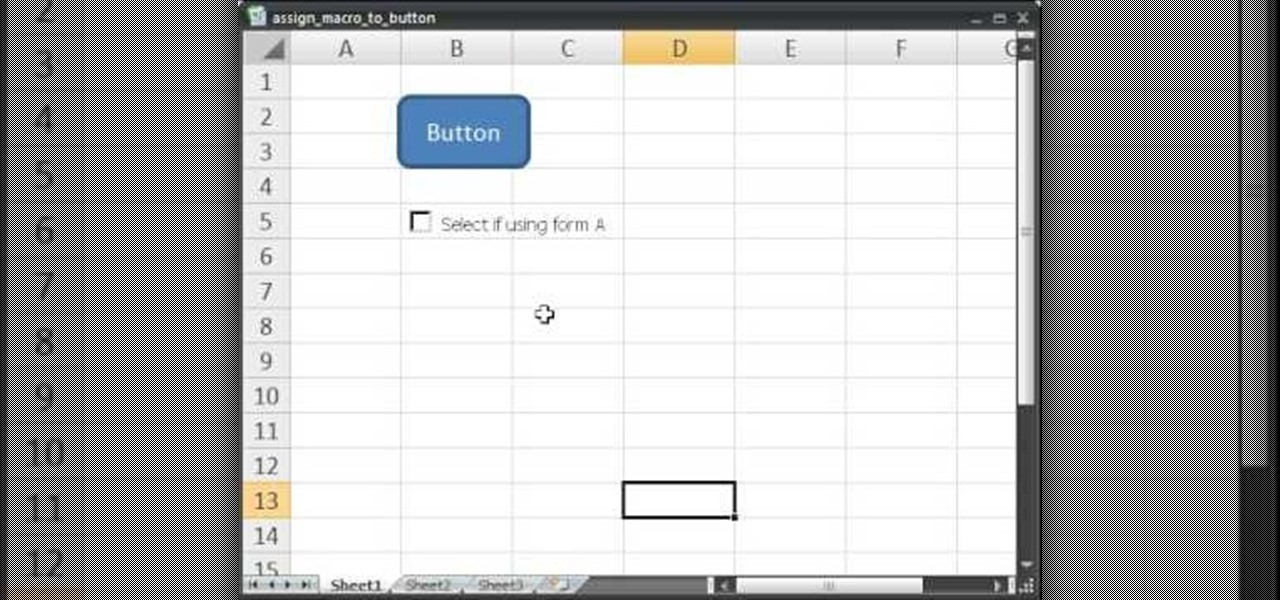
In this video tutorial we learn how to assign a macro to a button or a check box in Excel. The first thing you want to do is to place the macros you want to use in the spreadsheet. You can assign a macro to any object within Excel. Next draw the shape in the spreadsheet that you will want to assign the macro to. Then, right click on the shape that you've drawn. Then go down to assign macro and select your Macro in the pop up box and click OK. Now, anytime you click on the button the Macro wil...
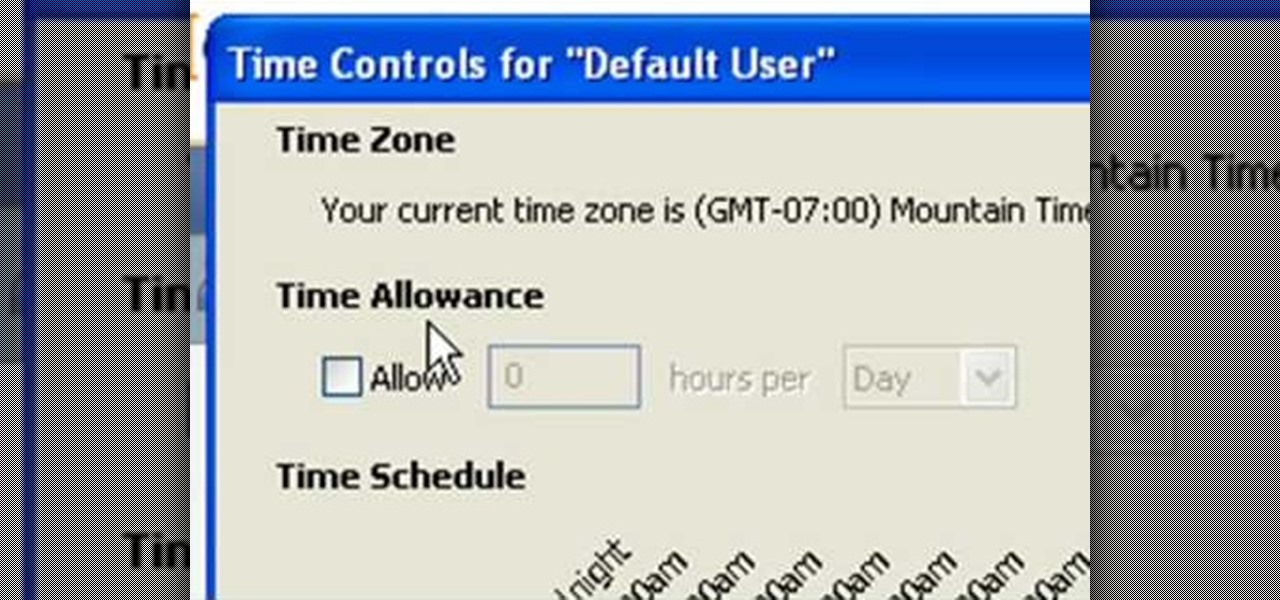
In this tutorial, Andy from TopTenReviews shows us how to restrict internet time usage with Net Nanny. First, open Net Nanny's dashboard and find where it says "time controls". You will see "internet usage", make sure you click on this. Now, a new window will pop up where you can choose time allowance, schedule times and blocks to your specific preferences. Once you pick these, click "ok" and your restrictions will be set and saved! This is a great way to control when your children and others...
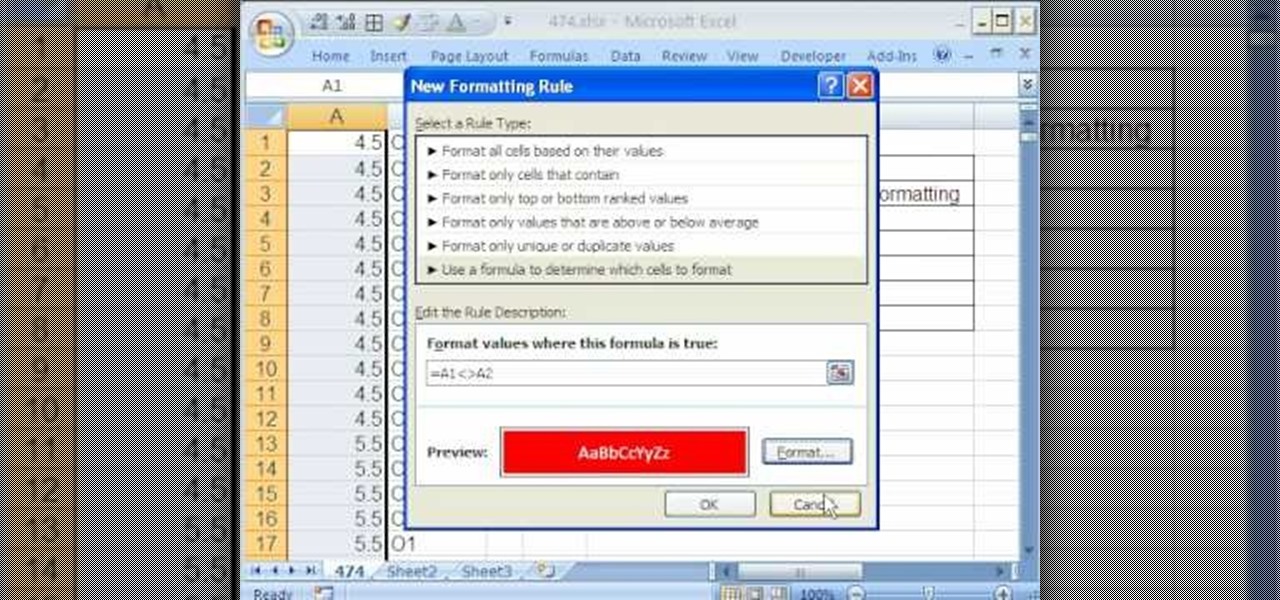
New to Excel? Looking for a tip? How about a tip so mind-blowingly advanced as to qualify as a magic trick? You're in luck. In this tutorial from ExcelIsFun, the 474th installment in their series of digital spreadsheet magic tricks, you'll learn how to conditionally highlight every last value in a data set or each value which differs from the value preceding it.
Enabling Telnet in Windows Vista is a little bit more difficult than its predecessors but it still can be done. This video will demonstrate exactly how to enable Telnet in Windows 7 and Vista.
In this Computers & Programming video tutorial you will learn how to make a simple CD / DVD cover in Google Picasa. Go to ‘Tools’ and select ‘Options’. In the box that opens up next, click on the ‘Printing’ tab and from the drop down menu, select ‘CD Cover Size’ and click OK. Then on the top left hand corner, go to ‘File’, select ‘Print’ from the drop down menu. On the next page, click on ‘CD cover size’ and you get the print preview. Then all you need to do is to just print that out and you ...
Open your first image and go to the rectangular marquee tool and select all of the image. Next click command or control C to copy image. Then go to your second image and click command or control V to paste the image. Select both the layers (hold down shift when clicking the layer), then go to edit, auto align layers and choose the top option then click ok. Last add a mask to your top layer, this is done by selecting the gradient tool (make sure its set black to white, the mode is normal and o...
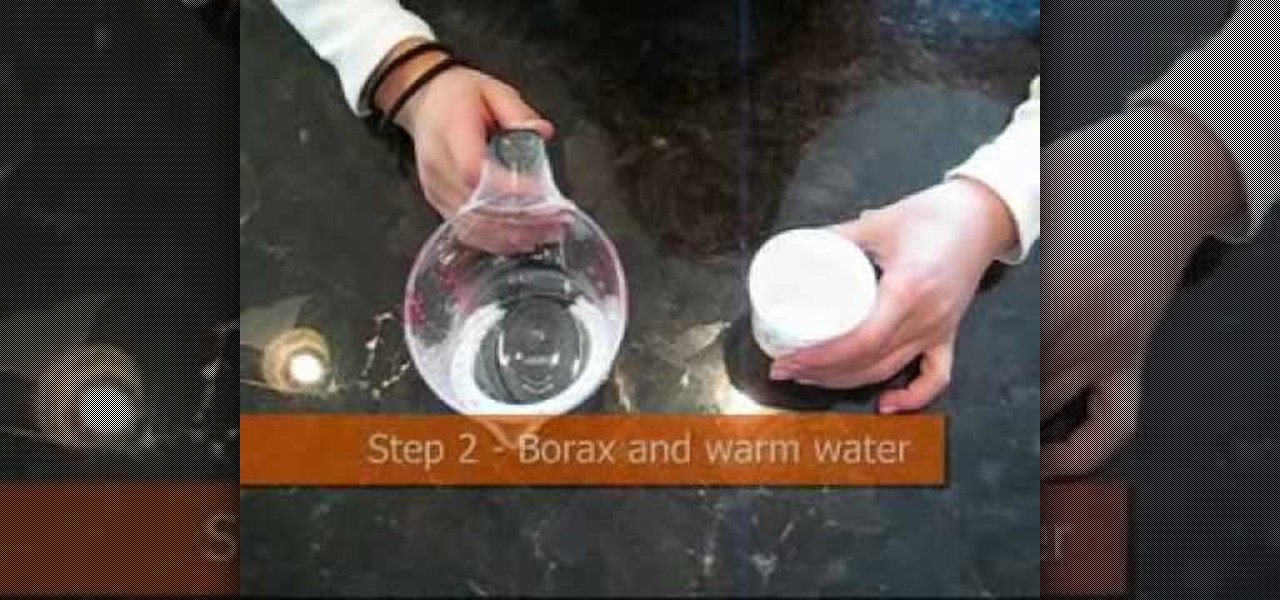
This video shows you how to make slime, flubber or goop. Take two ounces of glue and one quarter cup of water. Pour the water into the glue and stir the mixture. Pour in a few drops of paint and keep stirring. The more paint you add, the darker it will be. Take one quarter teaspoon of borax and one quarter cup of warm water. Add the borax powder into the warm water and mix together to dissolve the borax. It is ok if not all the borax is dissolved. Pour the borax mixture into the glue mixture ...
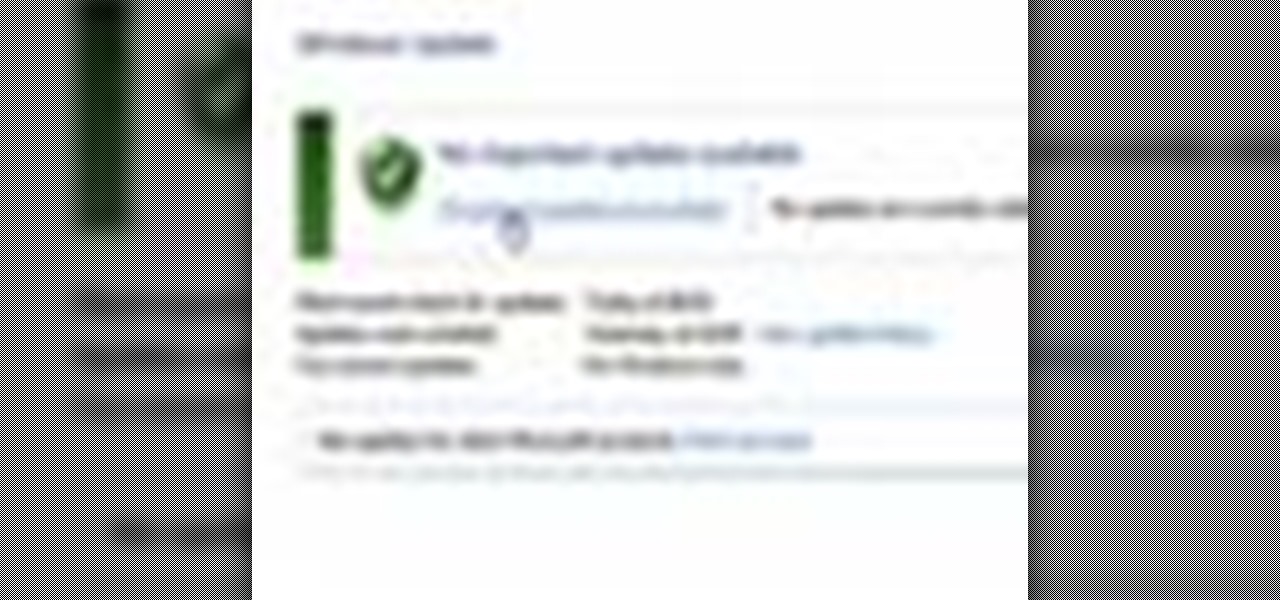
In this video you will learn how to update your version of Windows 7 and how to check the system settings for automatic updates. In order to do this you need to go in the Start Menu and then in the Control Panel. Then you need to click System and Security. The next step is to click Windows Update. A new window will pop-up and you will see two types of updates: Important Updates and Optional Updates. To install them just click on the blue link and then check the boxes. To check for updates you...
In this Computers and Programming video tutorial you will learn how to delete temporary internet files in Internet Explorer 8. The video is from FreeComputerRepair. Click on Start -> control panel ->network and internet connections -> internet options. Now the internet properties dialog box opens up. Here you go down to browsing history and click ‘Delete’ button. This will open up the Delete Browsing History window. Here you check all the data that you want to delete. If you don’t want to del...