Need an easy, efficient and inexpensive way to layout your garden beds? This how to video shows you how to use regular old kitchen flour and paint string to mark layout lines. Drawing layout lines with flour comes in handy when you run out of chalk and don't have time to run to the store.

In this Corel Draw X3 tutorial you will learn how to work with the line tools. This video is geared towards wood workers who use scroll saw and want to create designs in Corel Draw X3. No matter what your Corel Draw needs, if you are just learning and want to understand how to use the line tools, this tutorial will break them all down for you.

Watch this mixology how to video. Learn how to make a Line Dancer cocktail, which uses Akevitt, Chocolate liqueur, and fresh lemon juice. If you are interested in becoming a bartender, this cocktail mixing tutorial is helpful for novices. Watch this bartending video and mix a Line Dancer for your next cocktail party.
Learn how to do one of the most popular country western line dances, "Slap Leather" or "Slappin' Leather." This 40 count, 4 wall dance consists of heel-toe moves, the grapevine and the "Dorothy" step. This line dance is usually done to the songs "T-R-O-U-B-L-E" by Travis Tritt, "Redneck Girl" by The Bellamy Brothers and "Bible Belt" by Travis Tritt.

Tired of multiple lines of text not pasting correctly into a single line text field? Watch this video from Tekzilla and banish this irksome habit from FireFox for good.

Tim Carter shows a clever method that prevents tree roots from entering an underground sewer or septic line. Check for underground utilities before attempting this project.

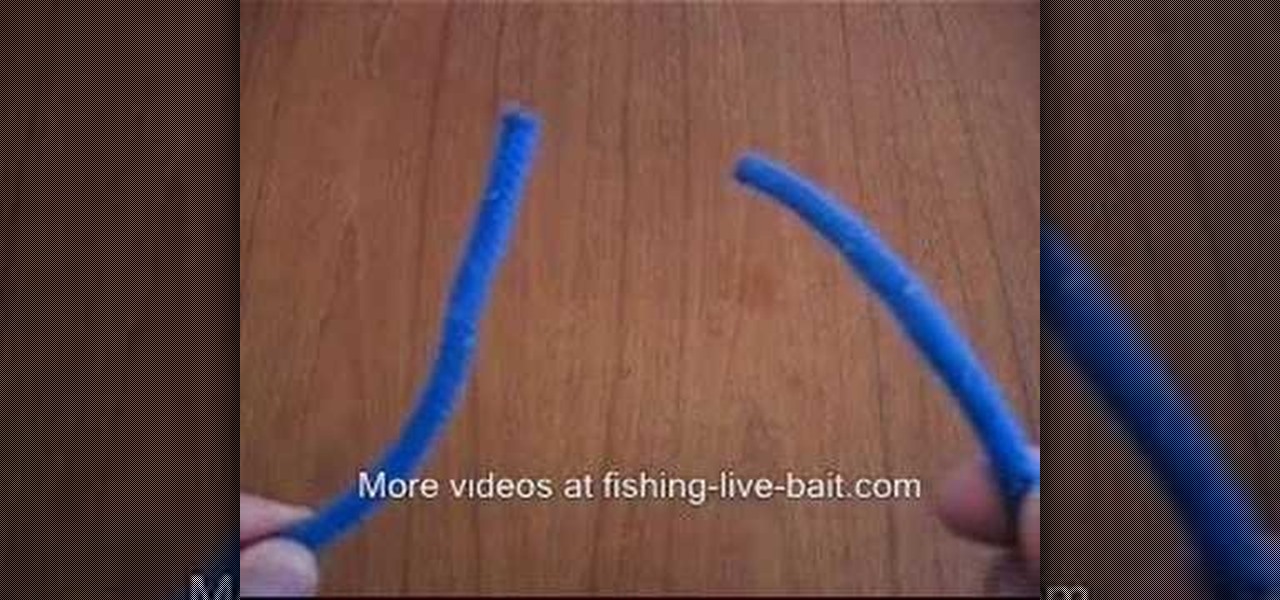
The dropper loop is a classic loop knot which is often used on multi-hook fishing lines and bait rigs. It can be created in the middle of the fishing line and forms a loop which is off to the side of the line.
No wireless router? There is a way to network your computers by using your existing power-line. This CNET video will show you how to set up a power-line network - it's not as sexy as a wireless network, but it's easy and reliable!
Of course, if it were a perfect form of currency, it would have become the standard by now. But it hasn't. Wanna know why? The story begins with the advent of agriculture, when humans had settled down under groups as units called villages, over 10,000 years ago.
Why did I write this when they're tons of scanning tools available.
Line breaks signify not only the ending of one line of thinking, but the beginning of another. We use them to emphasize points, to fragment information, to shift tone, and more. They're important in getting our message across properly, which is why I'm always disappointed when I can't insert a line break into my masterful Instagram caption.
Veering from common practice, XDA commenter, "the_commenter", discovered a changelog for the upcoming version of Android 4.4.3 tucked away on Google's servers.
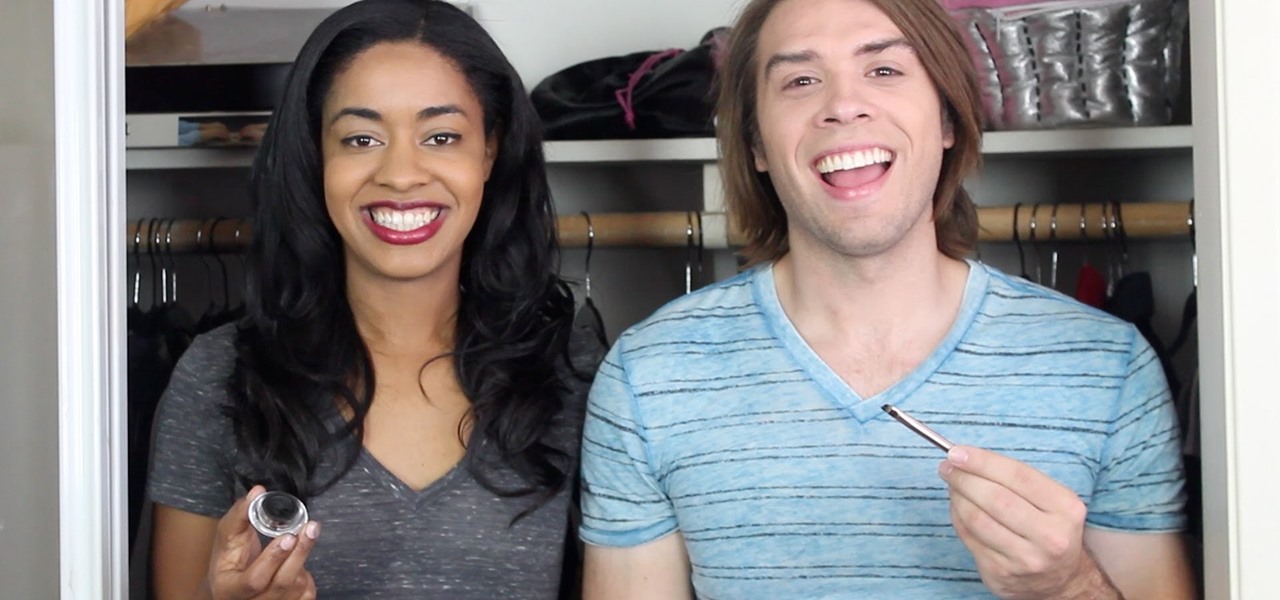
Want to use that great gel eyeliner. Don't Know how? Don't worry it is super easy. First pick a color of gel eyeliner that you like best. Then make sure you have and angled brush.
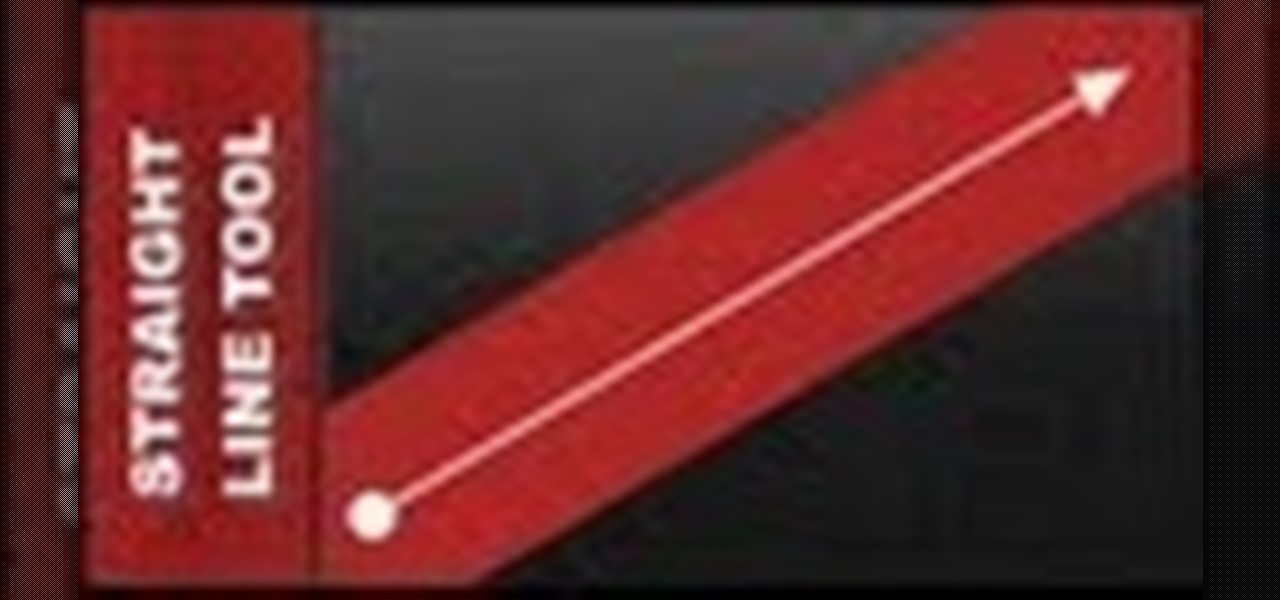
In this web design tutorial learn how to use the straight line tool. Although the straight line tool might seem like a useless tool I can tell you from experience it is very useful. Especially if you have ever attempted to draw a straight line with a tool other than the straight line tool. There are many ways you could use the straight line tool such as dividing content, design graphics, separating navigation menu headers and much more. My recommendation would be that you take a look at some ...
In this video we learn how to tie an easy fishing knot system. First, put the line through the hook and pull. Then, take the end of the line and make it come through the loop. Bring this over and then you will have a hole at the bottom of the string. Take the end of the line and put it through the hole around six to eight times to get a strong knot. Then, pull on the main line and you will see the knot glide up to the hook, To go lower, just pull it down. This creates a strong and efficient k...
Use 12 inches of fishing line and a fishing hook. Make a large loop, folding the fishing line in half and put the fishing hook through it about a quarter of the way down the fishing line. Take the loop under the hook, draw it through the hole that was created. Pull to tighten. Next, take the small, loose end of the loop and place it around the fish hook. Pull the fishing hook through. Pull the end of the fishing line tightly so that the knot is firm and secure. Watch the video for more inform...
In this video, we learn how to write numbers in calligraphy copperplate. To write the number five, you will simply make the shape of the number, but add in a thick edge to the bump and curved edges to the end. To write the six, use a thick line on the side of the number and a thin line for the circle in the middle. To make the seven, the top should be curved and thick, and the lower line should be very thick with a straight edge. To make the eight, draw the number so that the left edge is thi...
In this video, we learn how to write the letter "r" in calligraphy copperplate. Start out by dipping your calligraphy pen into ink, then creating a curved line with a dot at the end of it. Next, fill in the line so it is smooth and there are not ragged edges. Next, draw a large swirl on the left side next to the curved line, then draw it over to make the initial loop on the "r". After this, create a loop in the middle, then draw it back down to make the end hump of the "r". After this, draw i...
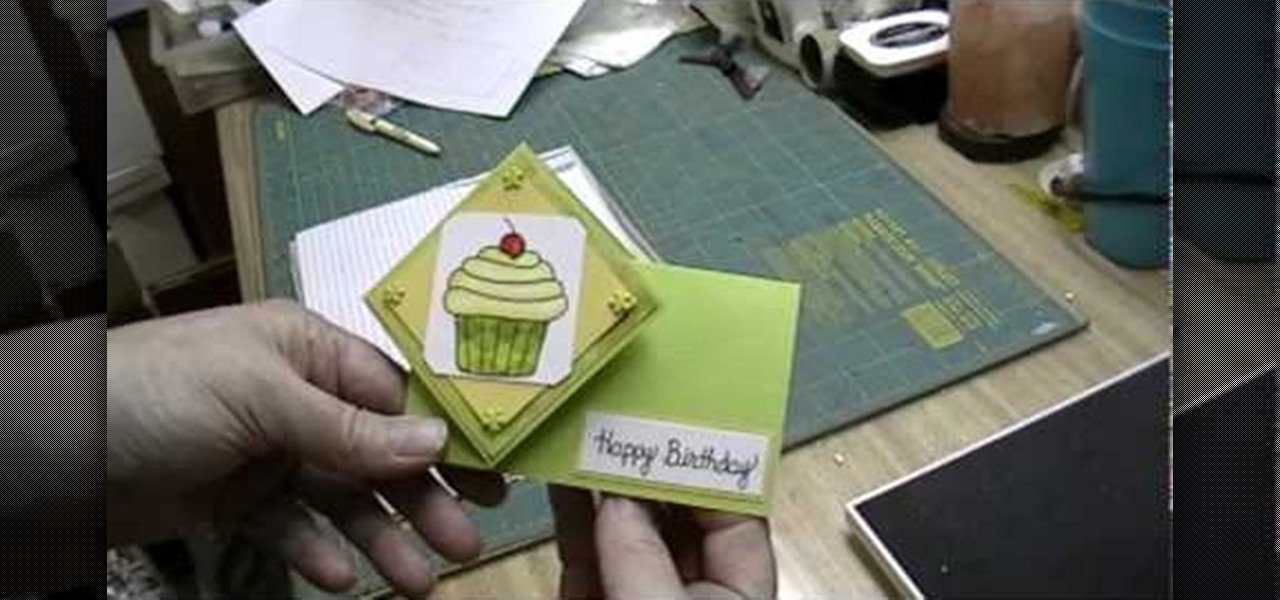
In this video, we learn how to make a twist turn style card. The card will open with a neat pop out image on the front of the card! First, get an 8 1/2 x 5 1/2 piece of card stock and then score it 2 and 3/4 inches from the left edge and 4 inches over from the left edge. Then, turn the card the other way and find the center, then score from the right end to the very first score line. Then flip the card over and score the rest of the center line up to the first line. Now, make a score line fro...
Shelley Lovett has some tips for helping a young child learn how to use scissors. The first thing you need to do is make sure you have paper and child size scissors available for the child to use. A full sheet cut in half is usually more manageable for a young child to work with. Have the child take the paper and just make cuts into the paper however they feel comfortable. Using colored paper can make it more interesting for them. After that very beginning practice stage has been accomplished...
In this Outdoor Recreation video tutorial you will learn how to ride a horse with some basic instructions. This video is from Livestrong. The first lesson is how to create a correct back position that enhances our ability to stay balanced in a saddle. You should create a straight line from ear to shoulder to hip to heel stay right in that position. If the leg moves too far forward, you will feel you are falling back from the saddle. There should be another simple line. From the elbow to the h...
This film from Woman's Weekly shows you how to line a round cake tin. First you take non stick baking parchment. Fold the paper to double thickness, then rest the tin on top and draw around it with a pencil. After that, then cut just inside the pencil line to compensate for the thickness of the tin. For the sides, you roll the tin on its edge, allowing some extra for overlap and a little extra height above the tin. Make a fold a couple of centimeters from the top and then make some cuts from ...
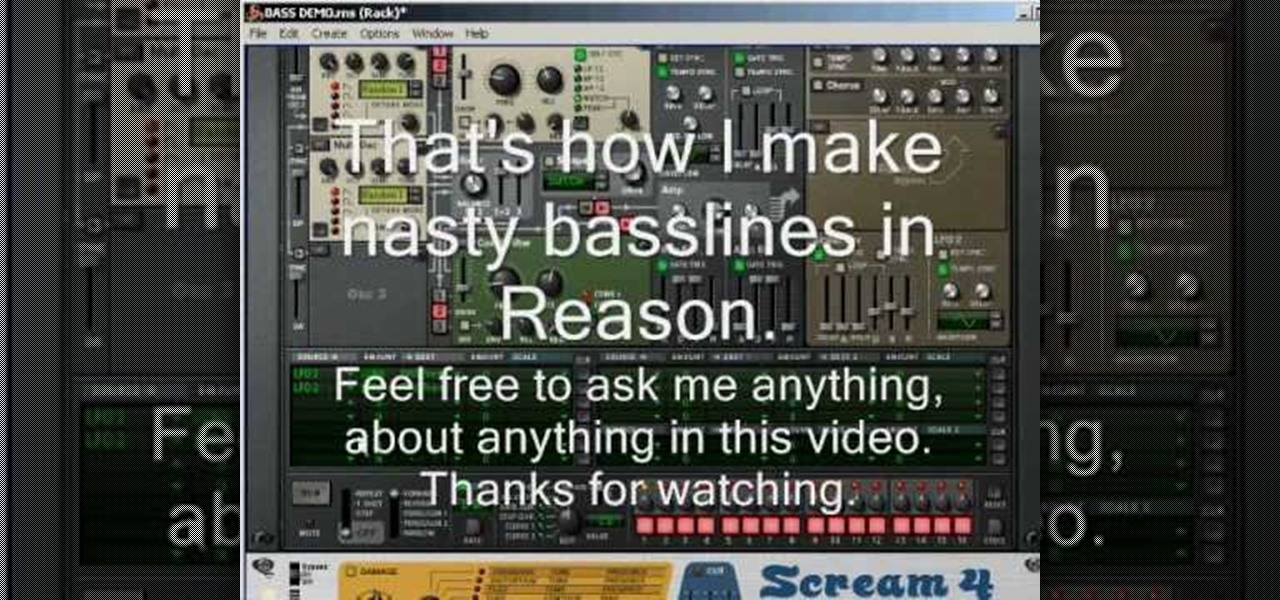
This video demonstrates how to design drum and bass lines in a Reason 4 program. This video does not have a speaker rather it shows you on the computer how you would make these lines. Music plays at sometimes but mostly it is various screens and demonstrations of making the base lines. There is text to help you out on the screen. If you follow the steps in this video, you'll be able to create a basic drum line using Reason 4.
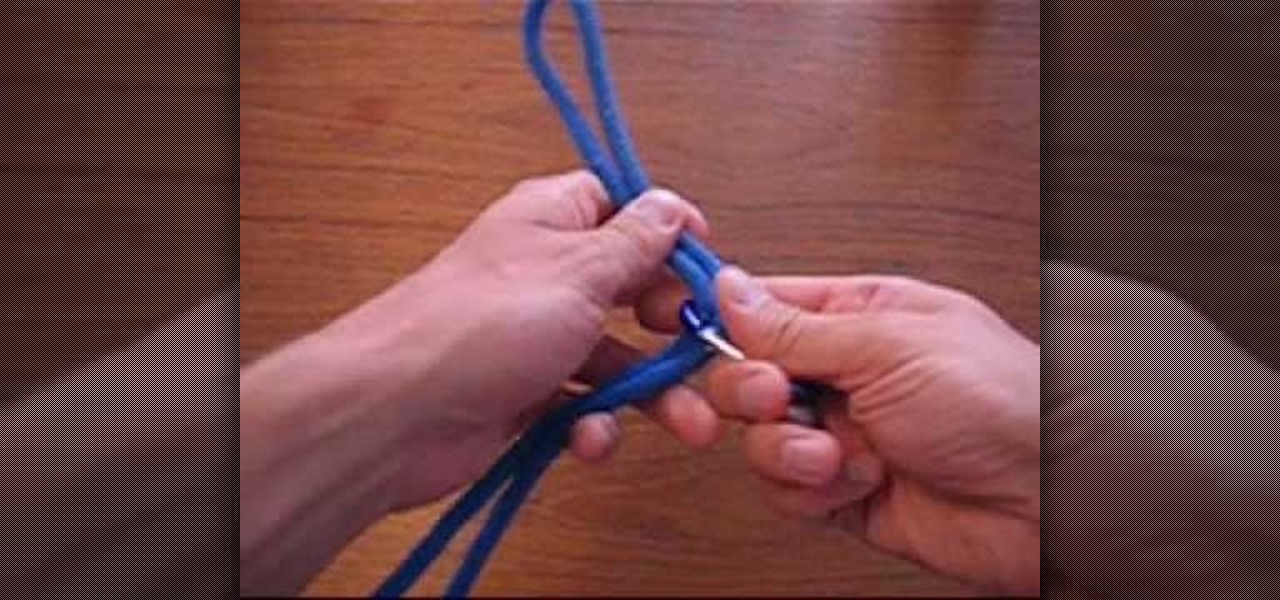
This video teaches how to tie the Dropper Loop fishing knot. The presenter explains the uses of the Dropper Loop, then begins the instructions. First, make a loop in your line, remembering that the size of this loop will affect the size of loop you have when the knot is tied and sizing accordingly. Take the end of the line and make another loop that goes inside of the big loop and then wraps around the line 4 times. Now you have a big loop, and a length of wrapped line with a hole in the midd...
In this video, Tom Leese, Director of Instruction at Angel Park Golf Club, gives pointers for your pre-shot routine in golf. Important in the transition from the practice range to real games, your pre-shot routine helps you get situated and ready to play real competitive golf. Tom explains, first, how to set your lines, taking a straight and purposeful line down course where you want your ball to go, and remaining fixed on it, as you approach your tee. Then, when positioned at your ball, he t...
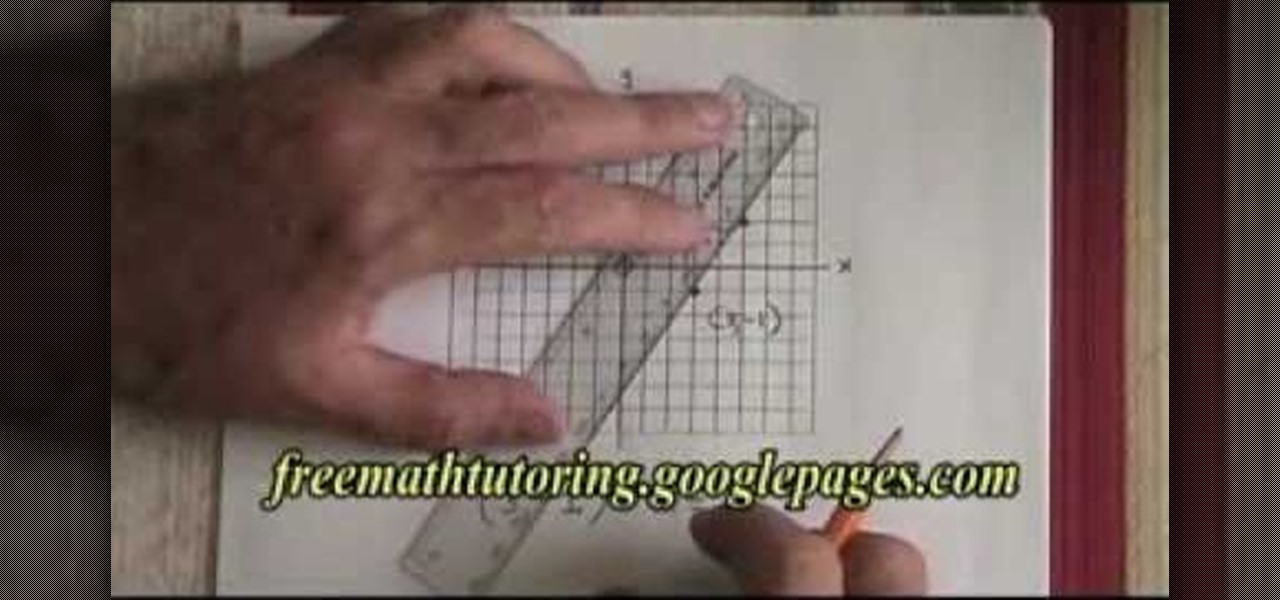
In this video the tutor shows how to graph a straight line using the rise over run method. The rise over run trick allows you to graph a straight line as long as you have a starting point and a slope value in the form of a fraction. The first step is to graph the starting point. In the second step he states that the numerator of the slope is rise and the denominator of the slope is run. He says that the rise is vertical and the run is horizontal and shows how do rise and run using those value...
Super Fly Life brings this iPhone, three-part, traveling video tutorial to teach you how to ease travel with iPhone travel apps. You could even double your dating experience with these time saving applications on the Apple iPhone. Some of them are free from the Apple Store and iTunes. These iPhone travel tips will help you live a Super Fly Life!
The first step in drawing a Christmas tree in Microsoft Paint is to open up the program and click on the line button on the left hand side of the toolbar. Start with where you want the top of your tree to be. Click and pull down the cursor about an inch and a half on a 45 degree angle. Click again. Now take the cursor and go to the right about an inch. Click again. Repeat three more times making each 45 degree angle line a little bit longer than the last. It should zigzag angling towards the ...
It’s not looking good for the Spanish banking system. Standard & Poor’s just slashed the credit ratings of five banks and said the country is headed into a double-dip recession. One of them, Bankia, just asked the government for 19 billion euros in aid - a roughly $23.8 billion boost.
Wow... look at those cash..Congratulations to the designers of the new Philippine Peso currency. Although only a small portion printed are in circulation I finally saw them thru a friend.They really look nice.. And so good to look at..Except for one major thing. The value didn't change. New look same value. For which I don't know how this could help alleviate the growing hunger of the Filipino people.I just wish our economy grows sooner.
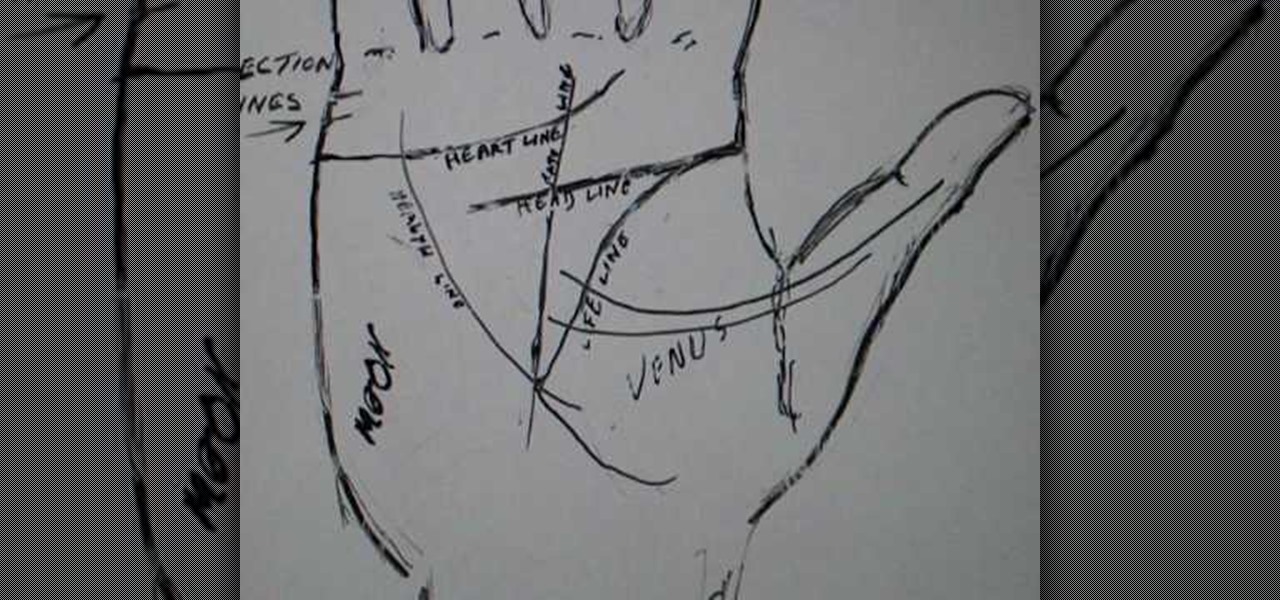
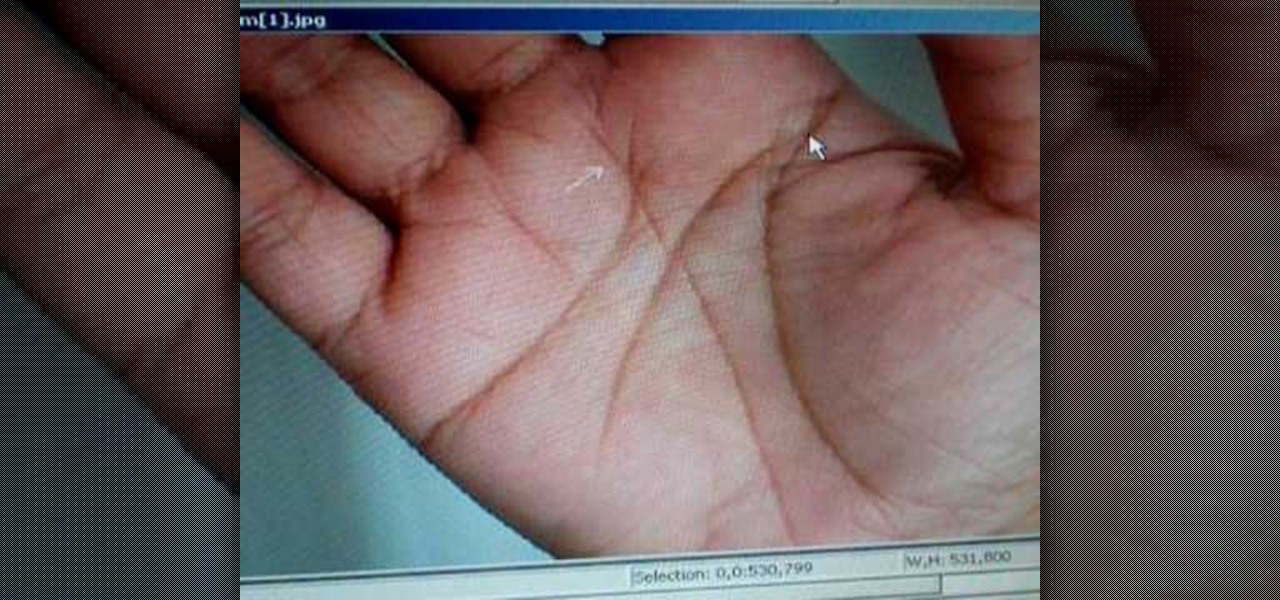
Many beginning students of palmistry erroneously believe that when the hand lines meet on the palm, it indicates death for the reading. Peter John rejects this notion and explains what connected lines really mean, and how to interpret each line individually.
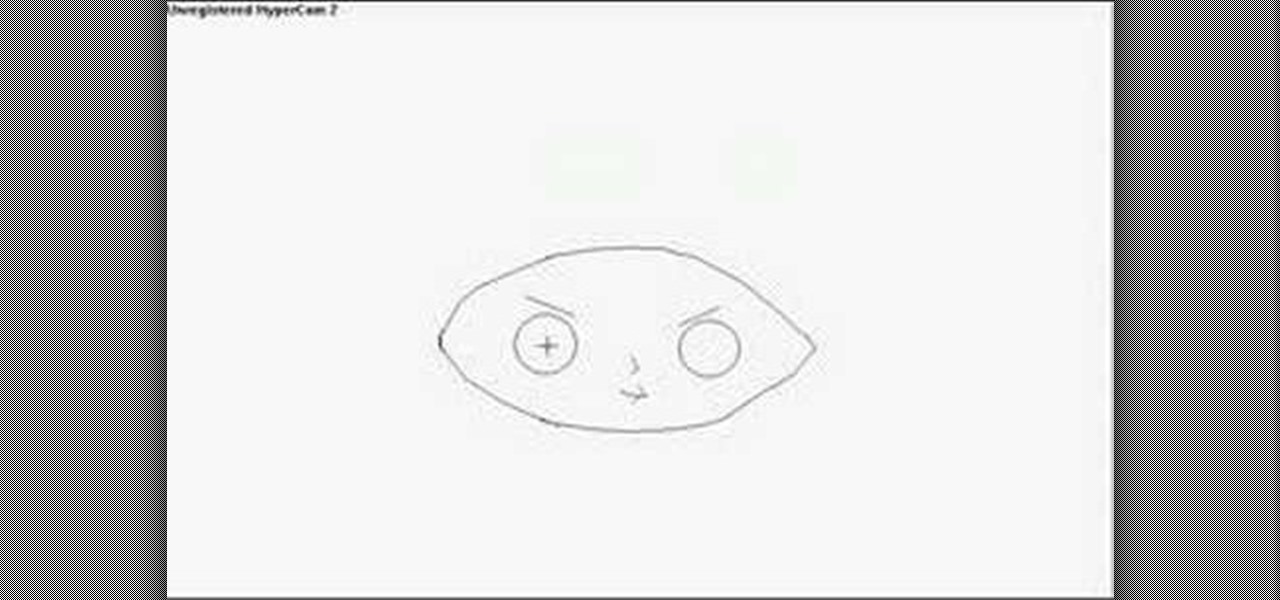
Drawing Stewie from The Family Guy on your computer is fairly easy. First you're going to make a horizontal oval, then draw what looks like a football shape just in between those lines. Now erase the excess lines outside of the head shape. Next, insert two circles-fairly far apart on the head-with a slanted line above both for the eyebrows. A small line in the middle pointed towards the right makes Stewie's nose, and a simple mouth is completed with a three small lines at the bottom. Draw two...
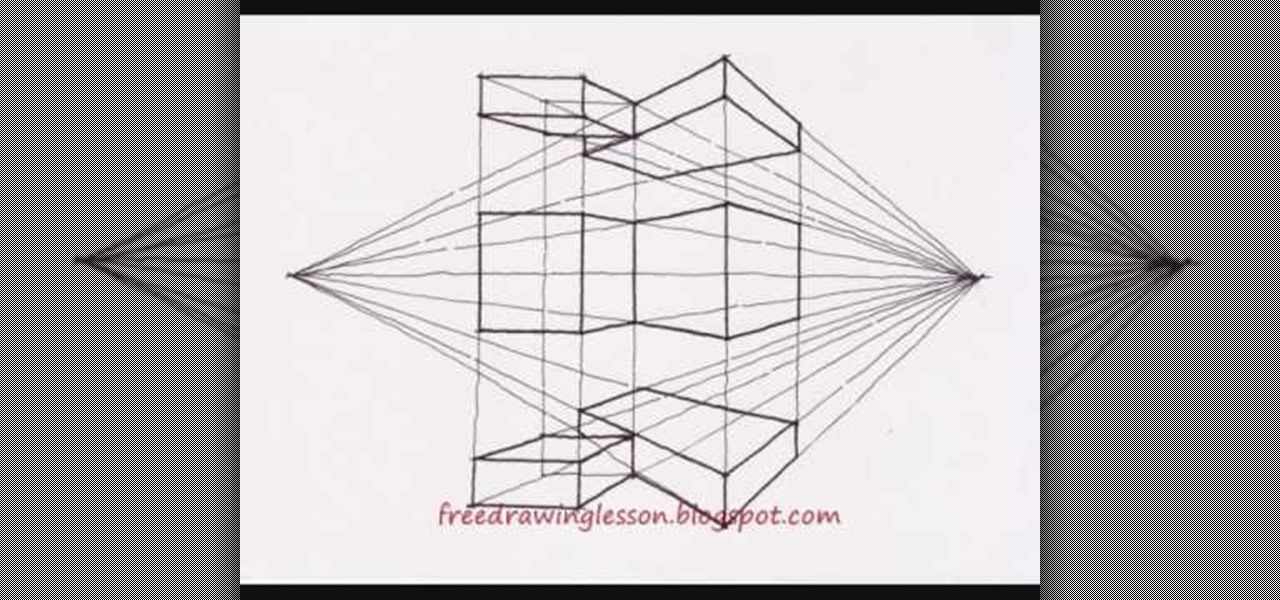
Miandza teaches you how to draw a two point perspective concept. You start with a horizontal line. Draw a vertical line in the middle and starting from that, create a rhombus. Add more vertical lines at equal distance from one another. Also create a smaller rhombus in the middle and add parallel lines to the diagonal ones. Start creating boxes when the lines intersect and use a darker color to make them visible. Continue to add parallel boxes in all directions, using the lines as help. In the...
The video shows how to draw a multi- point perspective by drawing it in easy to view steps. It shows how to draw the subject in the simplest form possible to achieve the finishing results. It starts out with a single horizontal line then the line is divided in half with a vertical line and the remaining lines drawn are on an angle and rectangles which are worked in to the video to achieve the final results of a multi- point perspective.
Teeing off sprinkler lines is something you'll probably have to do if you're trenching or pulling that plumbing pipe for your sprinklers underground. It allows you to run your main lines closer to the middle of your yard and then branch off to each individual head.
In this video, Peter John analyzes the right hand in palm reading. Once you have the hand turned over, you will see lines that are underneath the middle finger. The half line means that someone is emotional because the line arcs more than usual. The person also likes to show their emotion and have the emotions shown to them. Then bait line on the side of the hands should be slightly clear, which will tell how affectionate someone is and how much they show love. Right hand palm reading can be ...
In this tutorial, we learn how to draw Danzo. To start, you will draw the outline with the light touch of the pencil. After this, draw in the final outline darker and then erase the background lines. Next, you will add in the details around the character and then add in lines to show creases and make it look more realistic. From here, you will add in shading to make the drawing have some more depth. After this, you will finish up by cleaning any stray lines with an eraser. You can also use th...
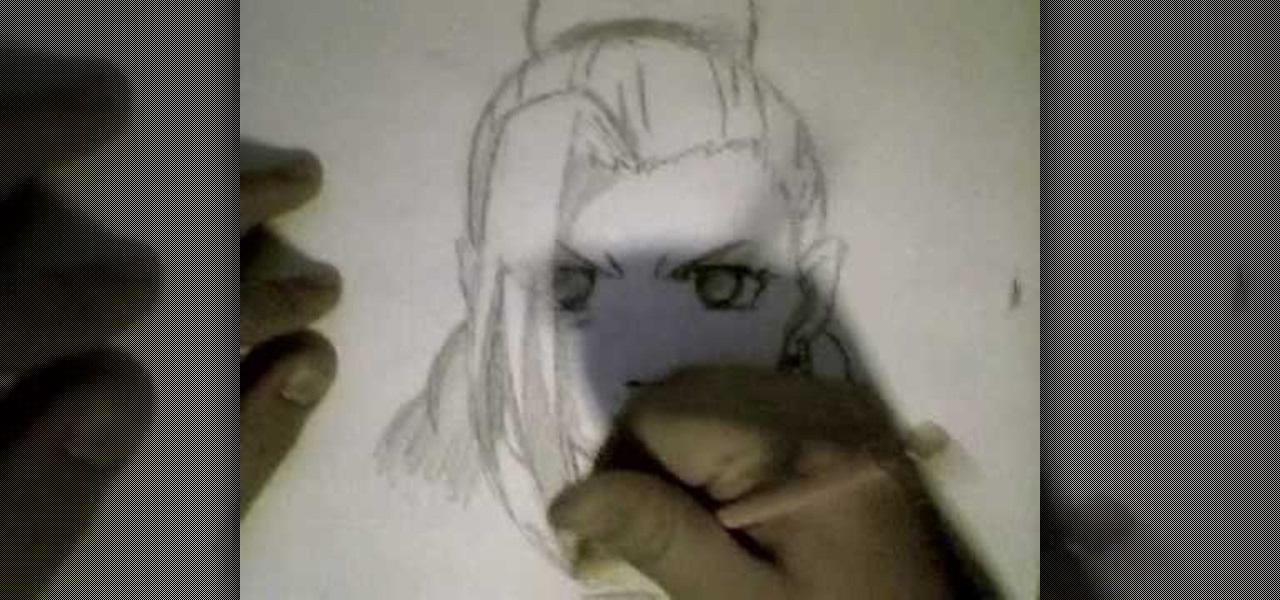
In this video, we learn how to draw Ino from Naruto. Start off by drawing a circle for the head, then drawing lines in the middle to create reference for where the facial features will go. After this, draw in the hair on the top of the head along with the eyes, eyebrows, and creases of the eye. Then, draw the jaw line around the face and erase the lines you used for reference. After this, add in additional lines and hair to make it look more realistic. Use shading around the face to show ligh...
In this tutorial, we learn how to draw skulls the easy way. First, draw a round circle on the page followed by a smaller one connected at the bottom. From here, draw in two sideways triangles on the middle of the large circle. Then, draw in lines on the face and create the section of the nose. After this, draw in large teeth on the skull and then connect lines around the circles to make the jaw line. After this, draw on lines around the skull to make it look like it has depth. Then, shade in ...
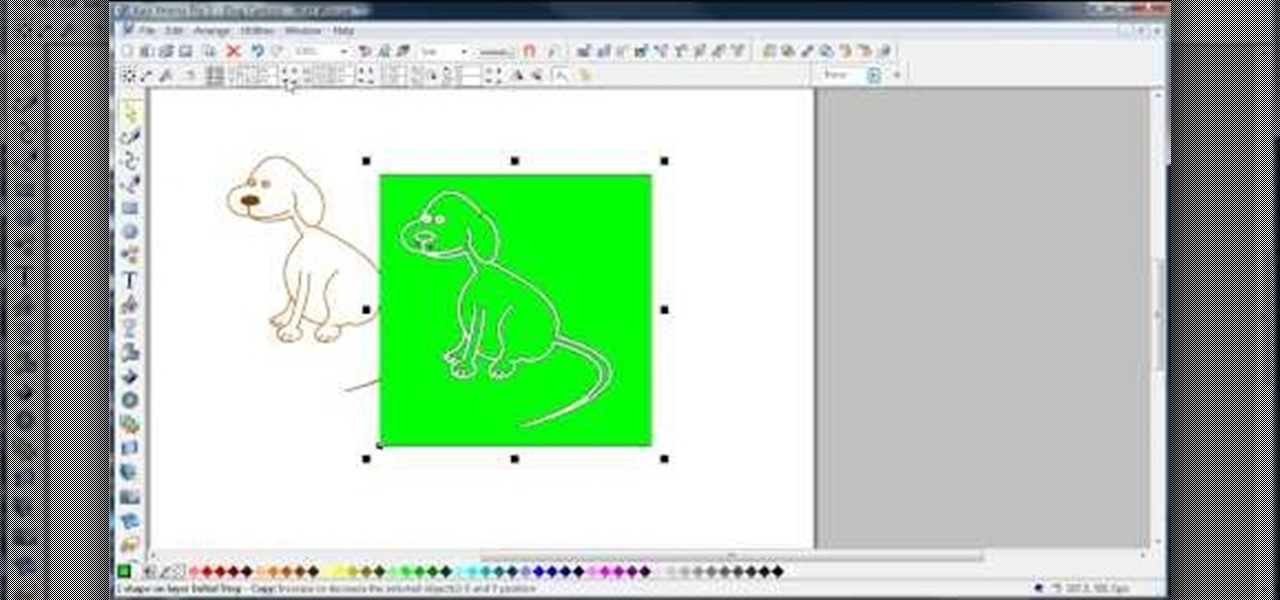
In this video, we learn how to join lines in Xara Xtreme. All the lines in this are independent, but they can be joined together to make an object. First, open up the object gallery and then duplicate the layer. After this, copy the image and increase the line size by four pixels. Then, go to "arrange" and "combine shapes". From here, the shapes will all combine together to make one total image. Make a rectangle around this and then select "subtract shapes". Combine the layers to finish, then...