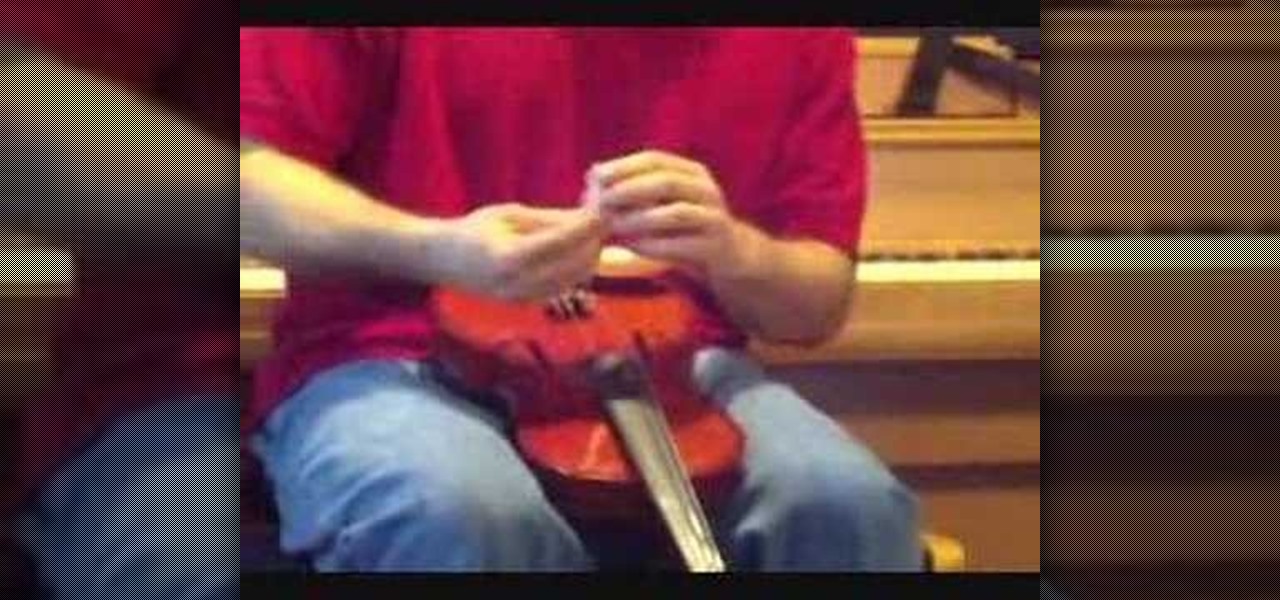
In this video, we learn how to install a violin bridge with Mike. First, loosen the tension of the strings, then take out the bridge from the violin. After this, pull the strings around so they are running straight. Tighten them, but not too much. You want a pinky worth of height in between the strings and the base. Now grab the bridge. The flat side will face the tail of the violin and the other side will face the opposite. The bridge should be place directly in between notches on the base o...
Think there's only one way to apply makeup? While it's true that the same general rules apply to shaping your brows and applying foundation, certain makeup tasks like putting on eyeshadow and blush vary in method depending on individual traits like the shape of your face and your eye color.
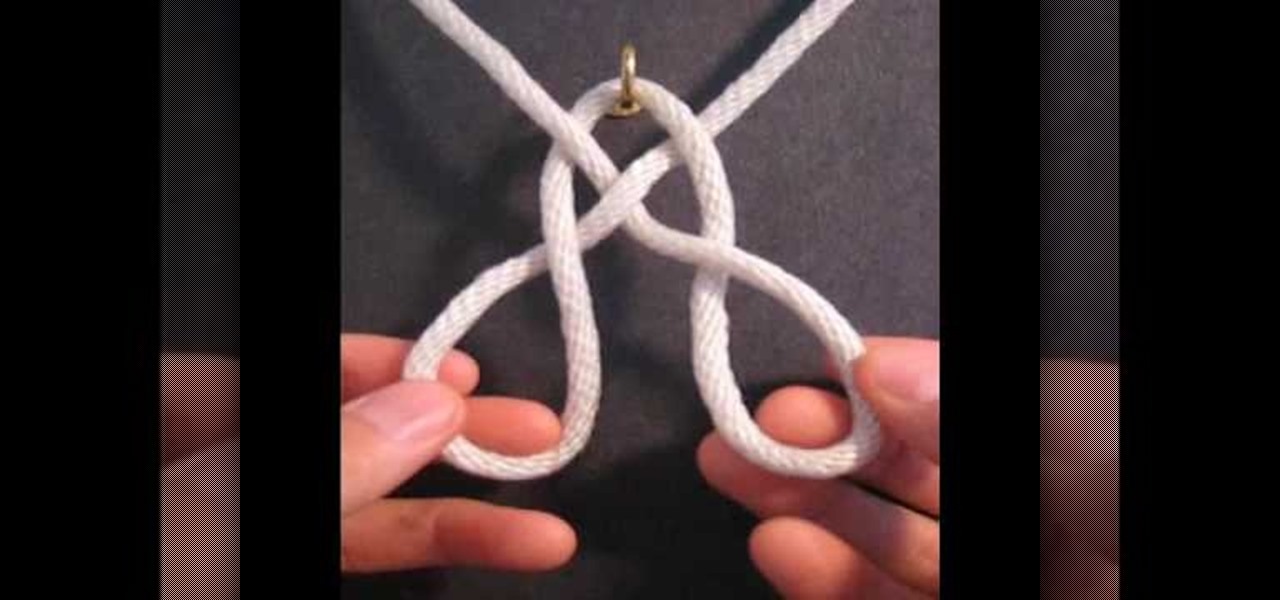
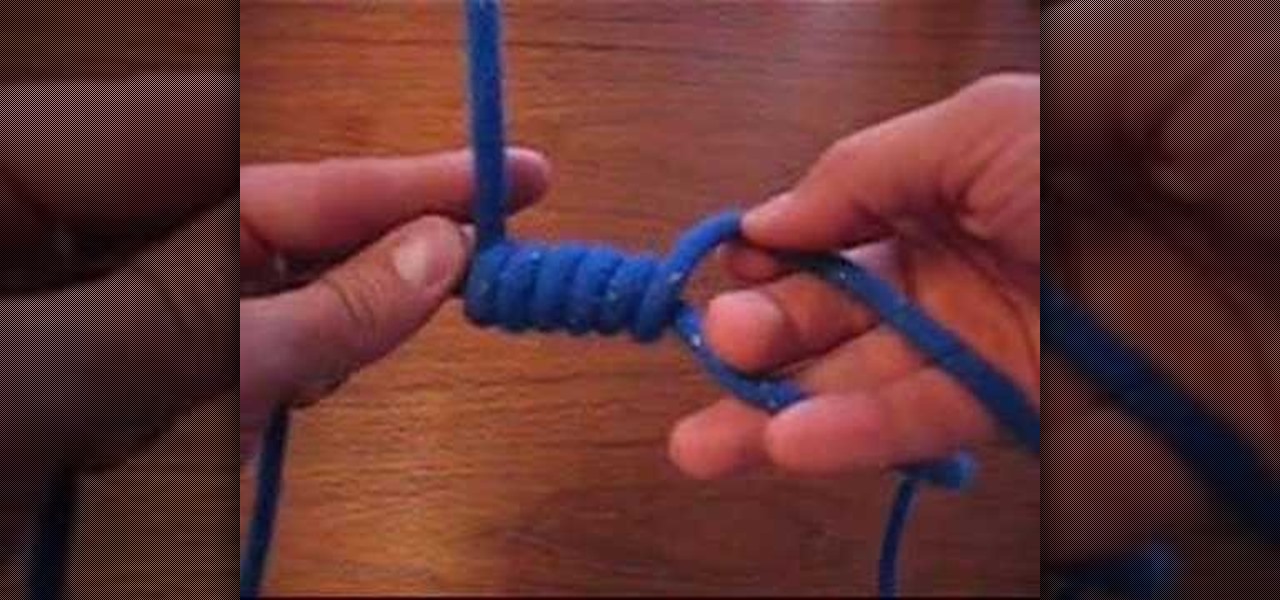
In this tutorial, we learn how to tie the Basket Weave decorative knot. First, hook your string to a hook, then tie a loop that is wide. After this, bring the strings to the top and make a heart shape. Now, twist the two loops on the side and twist them around each other. Now, bring the right string through the right loop and up through the left. Do this for the left string except using the opposite loops. When you are finished, pull on this tightly and release the string from the hook. Make ...
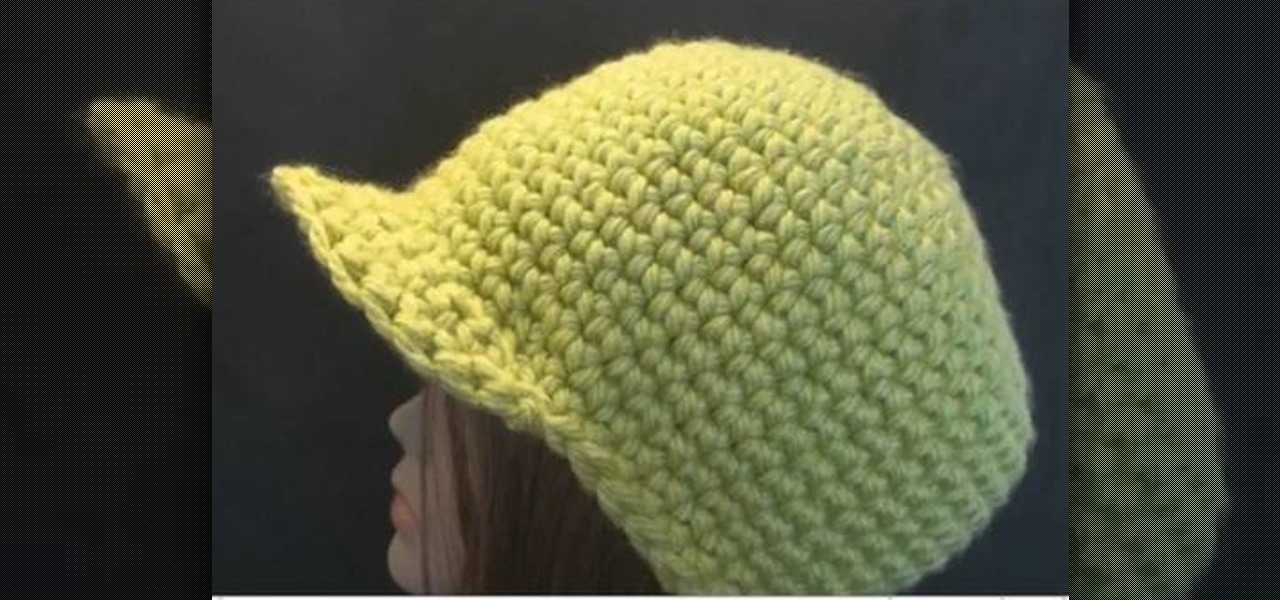
You usually don't hear the words "skater" and "crochet" in the same sentence, but these two rather opposite realms collide within this crochet tutorial. You've probably already seen newsboy caps before: lots of skaters don it because it's cool and also very comfortable. But did you know these skater hats can be made with yarn?
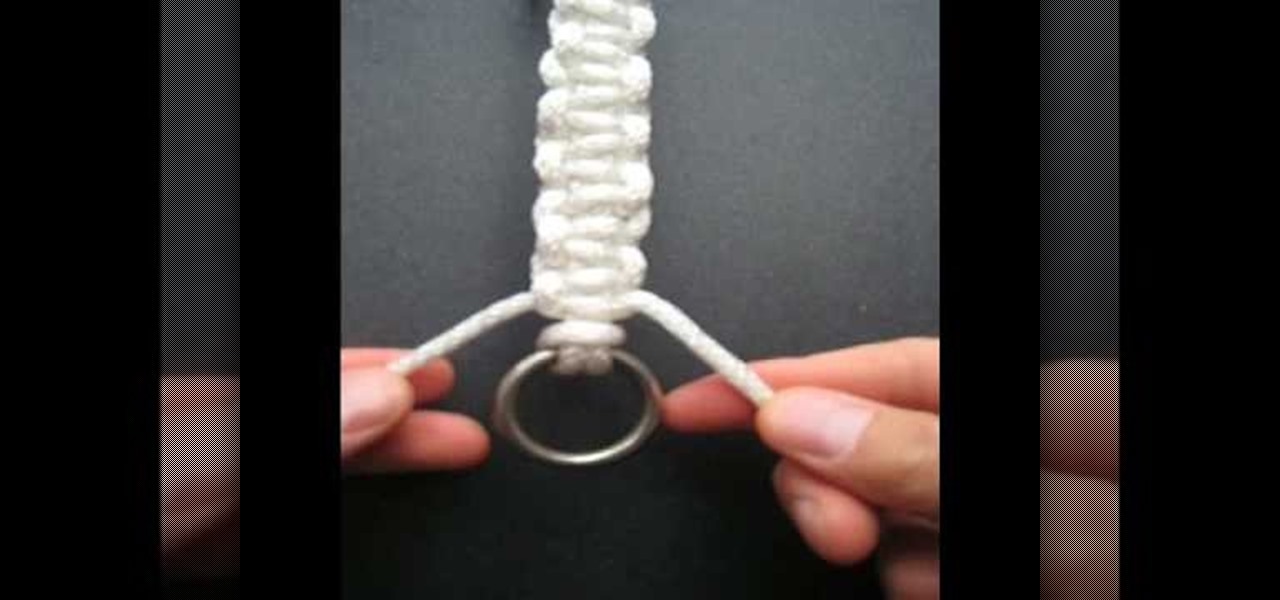
In this tutorial, we learn how to make a Solomon bar decorative knot. You will start by grabbing the ring at the end of the string, then tie it to an opposite ring. Fold the left side of the string to the right and bring the right over to the left. Pull the left into the loop to create a knot. Now, you will have two string that are more up and two that are more down. Next, tie the top strings into a knot, then bring the right knot behind the bottom two, and thread the left knot into the right...
In this tutorial, we learn how to make a paper Christmas tree. Start out with a square piece of paper, then fold corner to corner and open it, then fold it on the opposite corners and open it. Now, turn it over and fold it side to side on both sides. Now, the paper will automatically fold into it's shape because of the creases you made. Now take each of the four flaps and flatten them out with your finger. After this, cut your trunk out of your tree at the bottom, then cut slits on the side o...

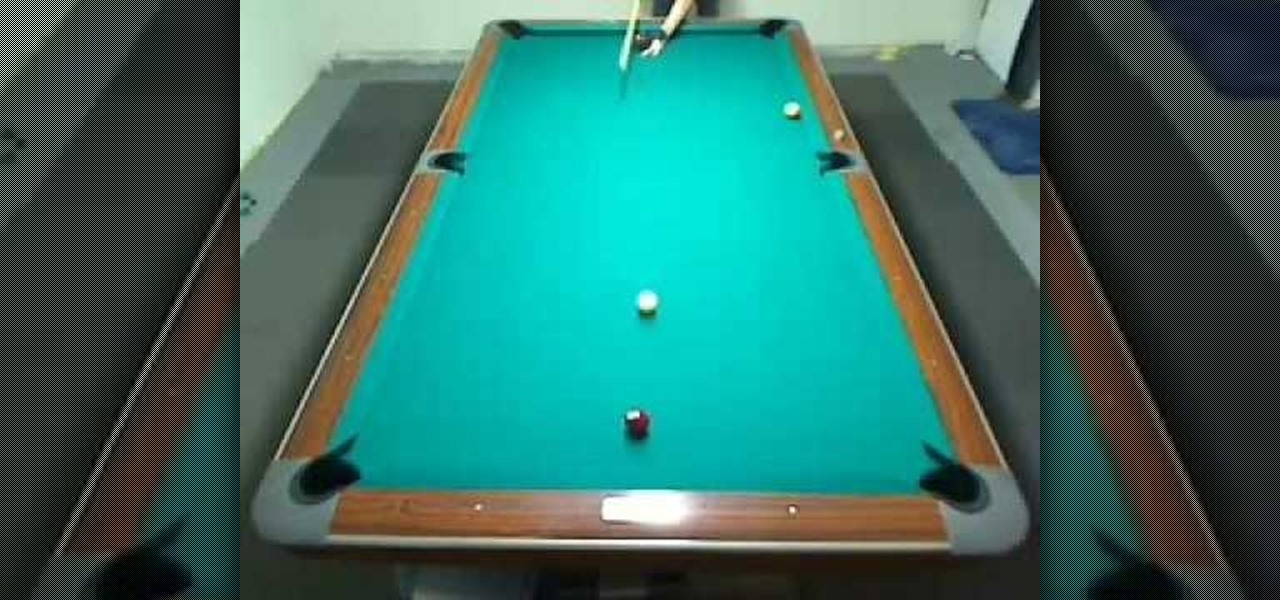
In this tutorial, we learn how to increase accuracy while playing pool. First, place the Q-ball on the head spot of the table, then you freeze an object on the opposite and shoot the Q-ball into the object ball and make the ball come back in the same path. You will want to ball to shoot directly back at you. This drill will help you develop accuracy and a better stroke. If you don't have a perfect shot it won't come back in the right path. Keep practicing this and in no time you will have inc...
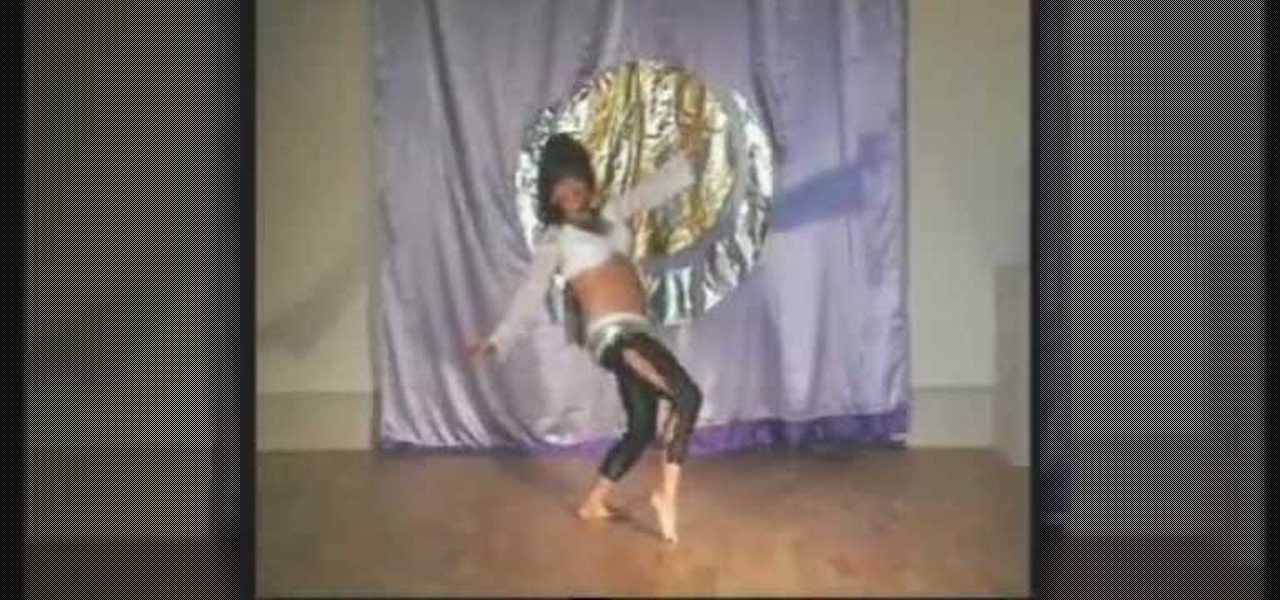
This video shows viewers who are interested in learning how to belly dance, focusing on the techniques of hip lifts and drops. After slowly shifting your weight from one hip to the other, make sure that your head stays at the same level by placing your hands on your head as your weight shifts. After making sure that you are now bouncing your head as you move, practice moving your arms in time with your motion. Your arms should move in opposite directions from each other, with one arm being lo...
Take a square piece of paper and fold in half. Open the paper crease from the other side and mark it as previously.
The way to wear hijab shown in this demonstration with a simple wrap around the head, securing the hijab with bobby pins at the back of the neck. The ends of the hijab are pulled forward to the chest. Then a thin scarf in a contrasting color can be wrapped around and tied at the nape of the neck as well. A portion of the hijab is pulled forward over it and pinned over the ear. Then one of the ends is pulled under the chin to the opposite ear and pinned to the head. The other end is wrapped ar...
This video demonstrates how to devein shrimp. In order to devein shrimp, you will need the following, raw shrimp and a knife. The first thing you will need to do is remove the head of the shrimp. Remove the head by placing one hand on the head and the other hand on the body. Grasp tightly. Twists hands in opposite directions. Discard the head.
This video shows the way to make a paper balloon. A square paper is taken. Two perpendicular folds are made down the diagonals of the square. Then an isosceles triangle is made by folding one side of the square towards its opposite side and the other two sides are tucked in. Now there are four isosceles-right triangular flaps. The flaps are folded along its middle to resemble isosceles triangular flaps. The edge of the flaps is folded towards the center. The free end of the flap is tucked int...
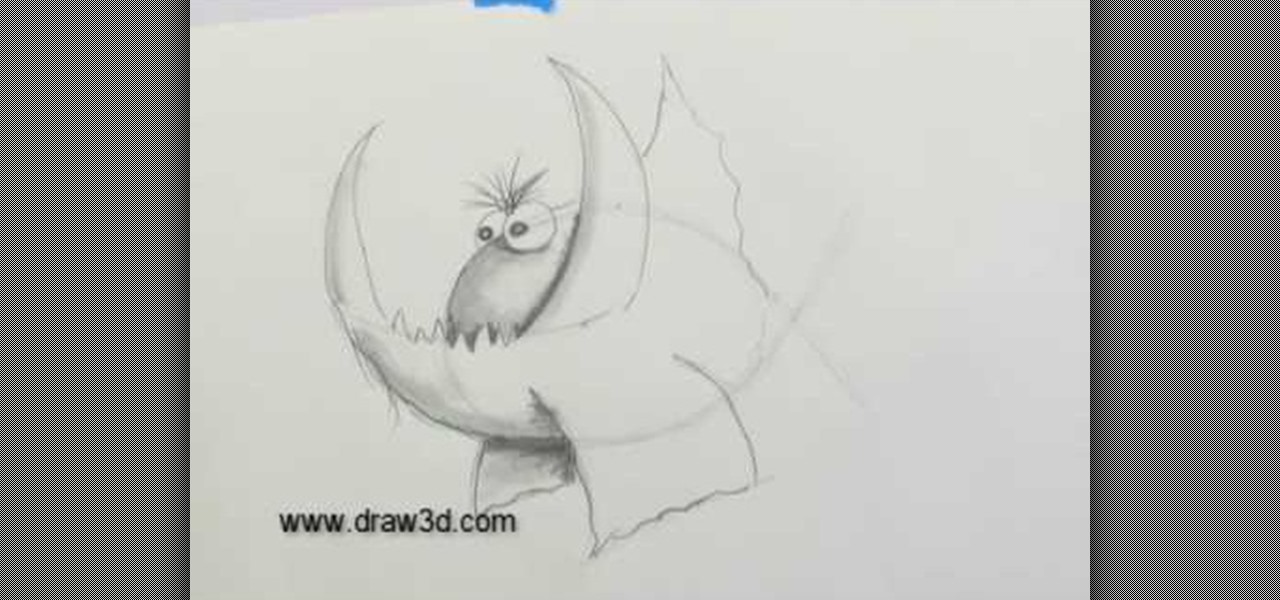
This video illustrate how to draw a 3D fanged fish. Here are the following steps.Step 1: Take a sheet of paper and pencil and start drawing a circle forming the face of the fish.Step 2: Now in the middle of the circle draw an wavy line showing the jaws of the fish.Step 3:Now draw two small circle on the boundary of the circle forming the eyes of the fish.Step 4: Now from the jaws draw two fins in opposite direction to each other.Step 5: Now draw Two fans beneath the face showing the back fins...
In this how-to video, you will learn how to replace a broken axle on a Volcano SV. First, take off the wheel. Next, remove the axle piece out with a hex wrench. To get it entirely out, use your hex wrench to move out the long screws. Make sure you take them out at about the same time, or you will break one of the screws. You can remove the screw to free the upper suspension arm. This will make it easier to remove the broken axle. Next, replace it with a new axle. Clean the axle before making ...
In this video tutorial, viewers learn how to make a plain paper clip into a spinner. The materials required for this spinner are a paper clip and a pair of pliers. Take the paper clip and straighten it. Now use the pliers to bend the tip of the clip at 90 degrees. Then bend it 90 degrees to left side and start bending the wire into a circular shape. The shape will look like a pretzel. Now bend the end tip of the wire 90 degrees to the opposite direction of the first bend. You should end up wi...
Take the clay, roll it out to make a pretty thin sheet. Take the square cutter and cut out two pieces from the clay sheet. Meet opposite corners of each square to form a triangular form but squishing only in the middle. Bend slightly outwards the unsquished corners of each triangle for decorative purposes. Place the triangles facing each other with the squished corner overlapping, pressing and joining them in one single piece. Take another little piece of clay and make a small ball with it. P...
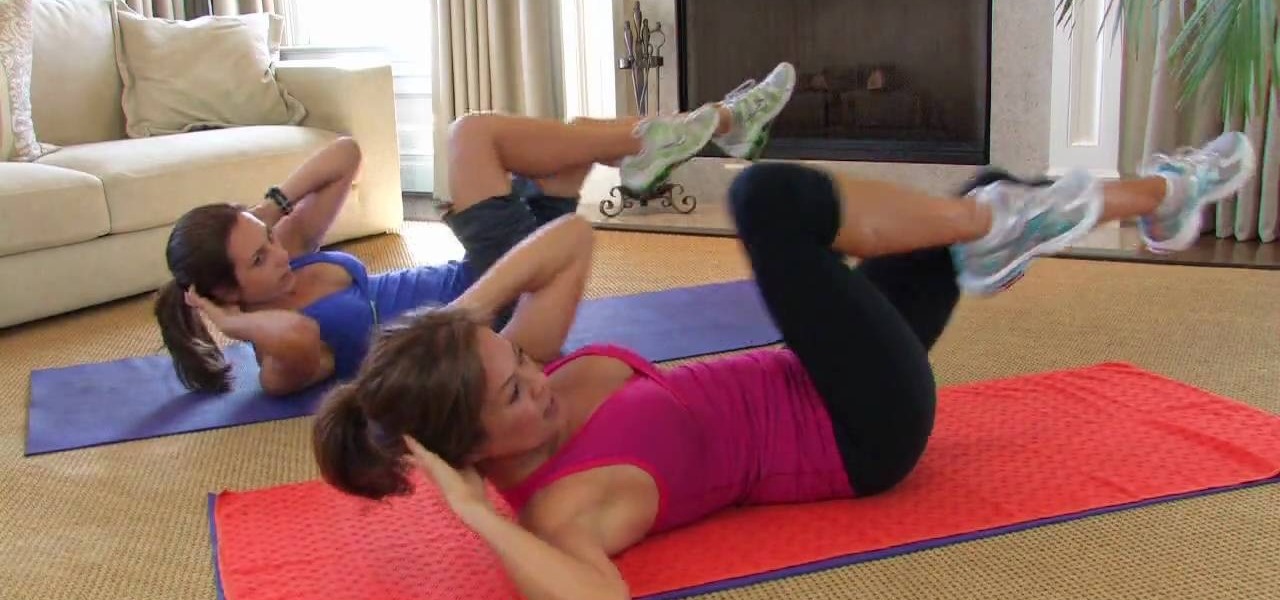
Bicycle crunches consist of lying flat on your back, your hand on the back of your head, knees bent to face the ceiling, feet flat on the floor. To perform the bicycle crunch bring one elbow up toward your opposite knee as you bring the knee toward your elbow. This will cause you to move part of your upper body and you should feel the workout in your abs. As you progressively get better at this move you can bring your legs straight up in to the air. 5 minutes of this 3 times a week should be ...
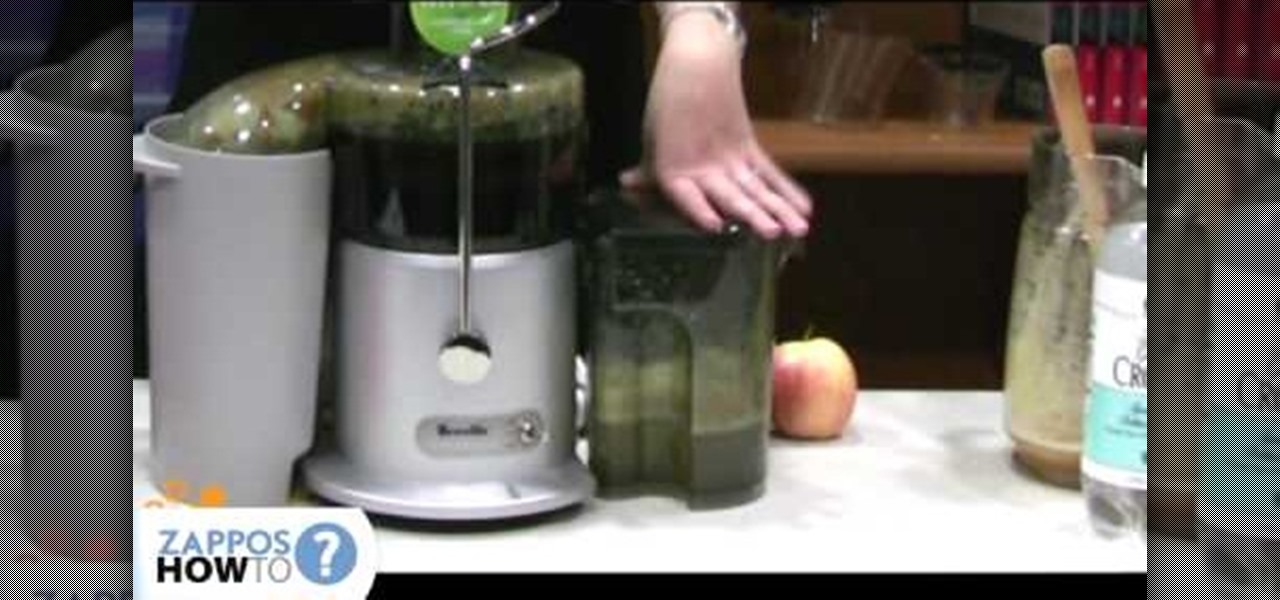
This video fully explains how to correctly use the Breville Juice Fountain. The product is 850 watts and has both a high and low setting for your convenience. Everything, except the motor itself, is dishwasher safe. One container collects all the juice, and another container on the opposite side collects all the skin from whatever it is you are juicing. Using a whole apple (with a sticker still on it) as an example, our demonstrator inserts an apple into the top of the machine, pushes down wi...
This humorous video teaches men how to iron a shirt just like Mom did. It walks you through the steps from setting up the ironing board and the iron, to the finished product with easy to follow directions.
This video teaches you how to tie a blood knot which is used to tie two lines together in a very strong knot. Fly fisherman use this knot for making their own fly leaders. Wrap the right line around the left line five times. Take the end of the right line and put it in between the left wrapped line and the back of the right line. Wrap the left line around the right line five times, repeating the earlier procedure. Make sure you bring the line up through the hole that is created in front of th...
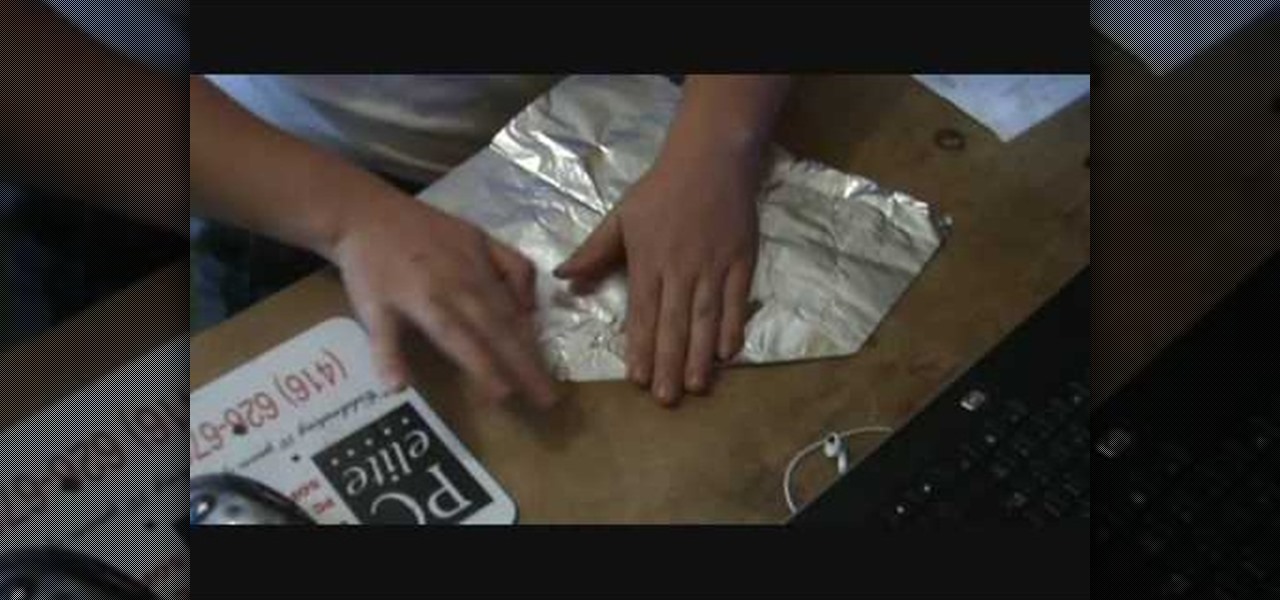
Learn how to make the perfect tinfoil airplane glider, every time. Obtain a rectangular sheet of tinfoil. Fold the shorter side of the rectangle foil in half and make a crease. Unfold the foil. Fold one of the corners into the middle crease. Fold the opposite corner into the middle crease. Fold the side into the middle crease. Fold the foil in half along the middle crease. Fold each side down so that it meets with the bottom crease and creates flaps. Press down on plane to strengthen the crea...
Dawn5377 teaches you how to make a twist box. Start with a piece of designer paper and fold it according to video specifications. Once done you will fold all the score lines, which are both horizontal and vertical. For the Xs you will fold in once one way and then the other. You will also crease the tiny line to the edge of the paper, using a sort of pinch motion. You punch three holes on each side - top and bottom. Fold the paper horizontally and glue it. Push the two ends opposite of each o...
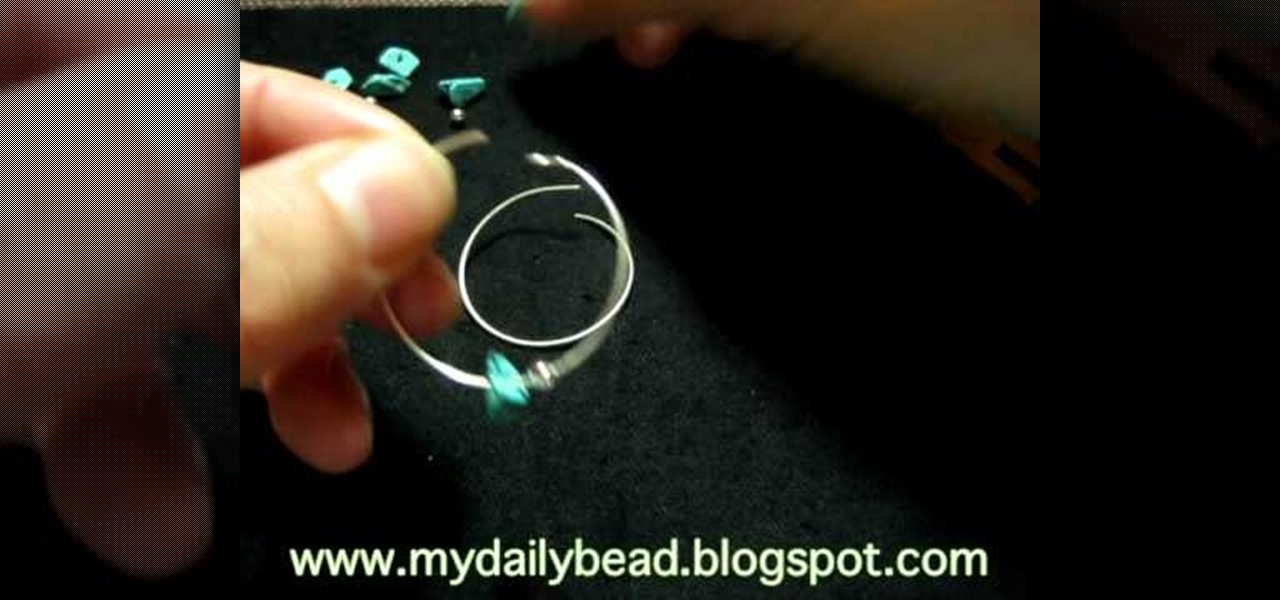
Watch this video to learn how to make simple turquoise hoop earrings. Start by taking some 20-22 gauge wire and wrap it around a soda bottle cap. Overlap the wire a little bit so that it forms a complete circle plus a little extra. Clip the wire off just a little bit past the overlap point. Do this twice so that you can make two earrings. In one end of the wire make a little loop and bend it back just a little. Put the beads that you want on the earring onto the wire loop. Put a slight bend i...
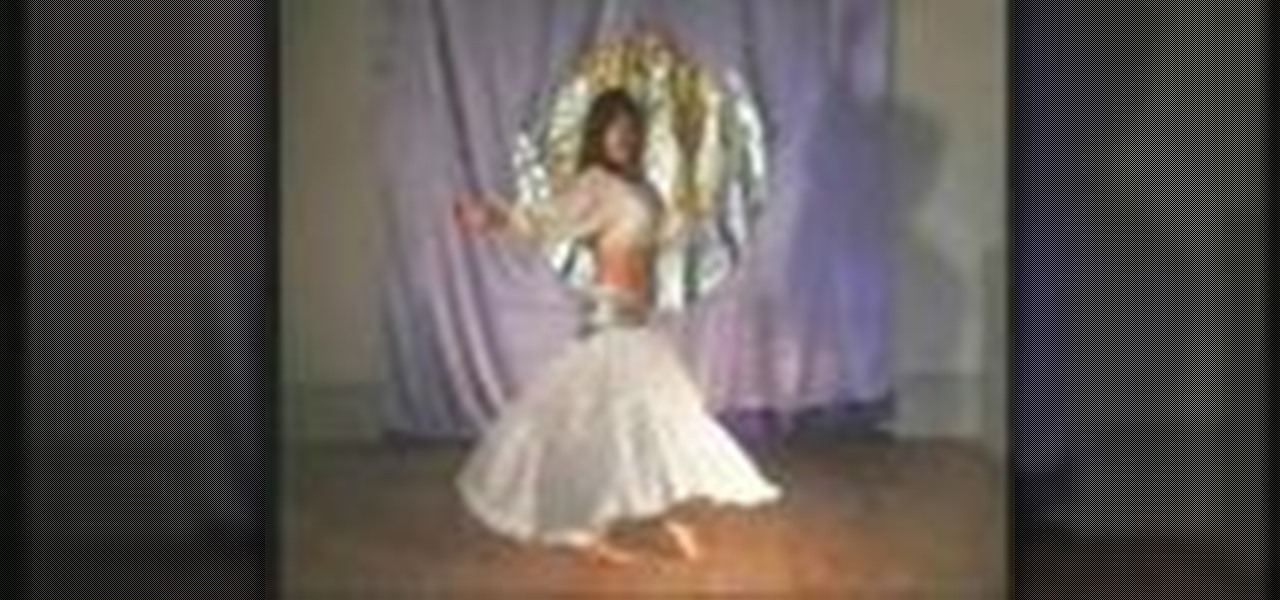
If you are new to belly dancing, this video shows how to do some basic steps and arm positions. The basic turn sequence is step, behind, in front, and close. You should practice this sequence of turns very slowly and then learn how to speed up your moves in time with the music. This sequence of steps is then followed by another sequence: step, step, step, and then lean slightly in the opposite direction. These two sequences can then also be repeated from the back (with one's back to the audie...
Join David Yzhaki as he makes learning piano music fundamentals fast and easy. In classical music, a measure that is in four four time (four quarter notes get the pulse) the first beat and third beat are naturally more accented than the second and fourth. Jazz, reggae, and pop music are entirely opposite because the natural accents occur on the second and fourth beat of each measure. Another type of accent is called a melodic accent. This happens when a note is accented because of its higher ...
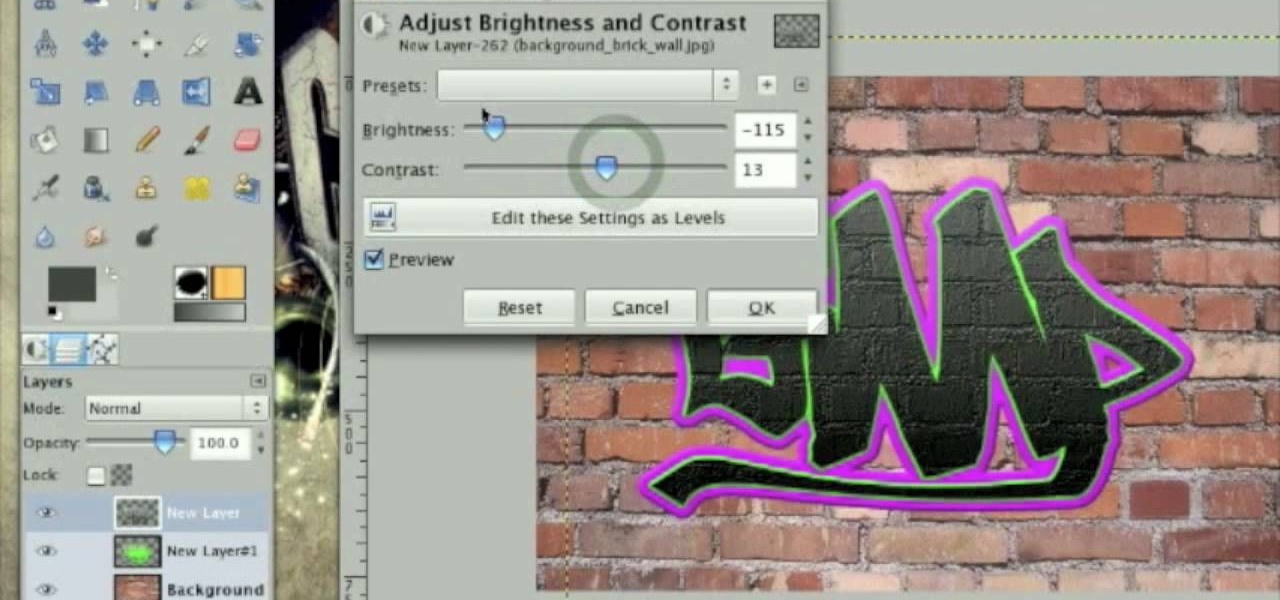
This tutorial describes how to create a realistic graffiti effect in a program called GIMP. You must first make sure that you have the font "writers original" installed on your computer. If not, you must download it to create this graffiti effect. Simply open a brick background on GIMP and put whatever text you want to have. Enhance the text by creating multiple layers and create a multi-dimensional image by creating contrast among those layers. Lowering brightness opposite layers and changin...
For all you women out there who do not fall into the normal categories, Anna Saccone offers some styling tips for both tall and petite women. For petite women, Anna suggests that you should wear just one color in order to elongate your body and fool people into thinking that you are taller. If it is not possible to wear simply one color, it is suggested that you have a 2 to 1 ratio of color in your outfit and that the colors do not clash too much, as this will seem to cut your body in half, e...
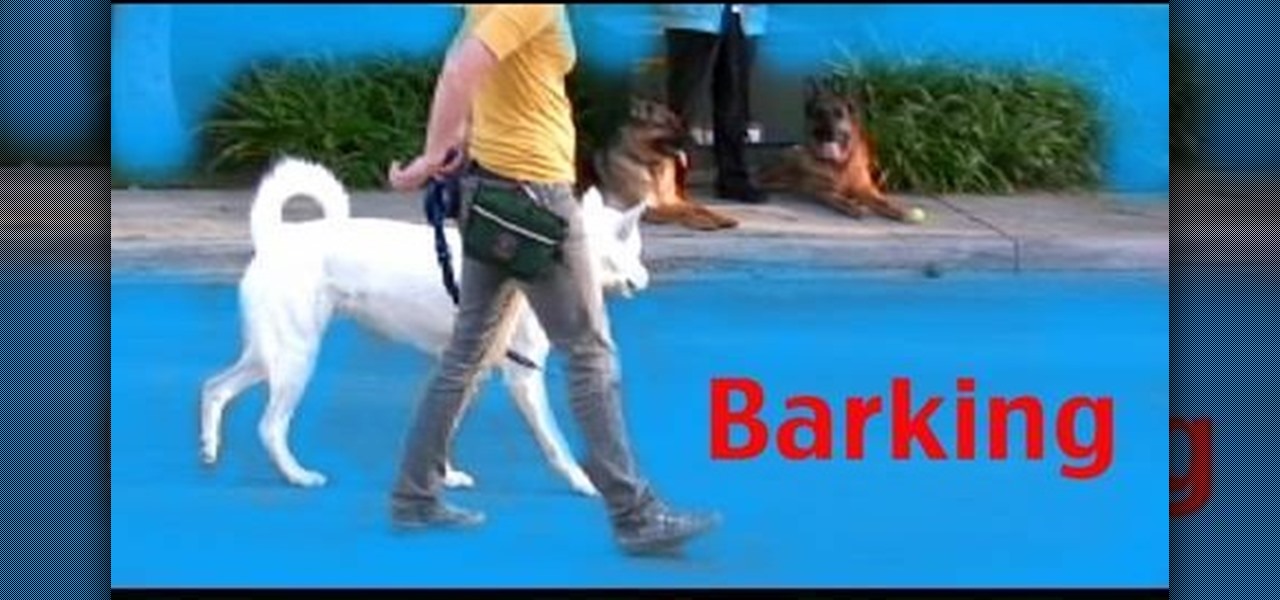
In this video by Dogmantics, dog trainer Emily Larlham goes over some beginning exercises on how to teach your dog not to bark while on a walk.
Love is the spice of life — it is also the microbes that couples share through sickness and in health, through the bathroom and in a hallway.
If you have some pet birds, but are unbeknownst of their gender, this farmland trick will help you determine if they're male or female birds. Use this technique for any kind of birds… parrots, pigeons, doves, chickens… any bird! You just need some copper wire, some string and a wine cork. See how it's done!
In this tutorial, we learn how to make a chicks pop-up card. First, draw a chick on the front of the card, with the beak in the very middle. After this, use your scissors to cut the beak in the middle around the top and bottom but not the sides. After this, bend the beak from side to side to make it pop out from the card. Then, open the card back up and fold it the opposite way. From here, color in the chick and then glue it to the inside of the card you're going to use and give to someone!
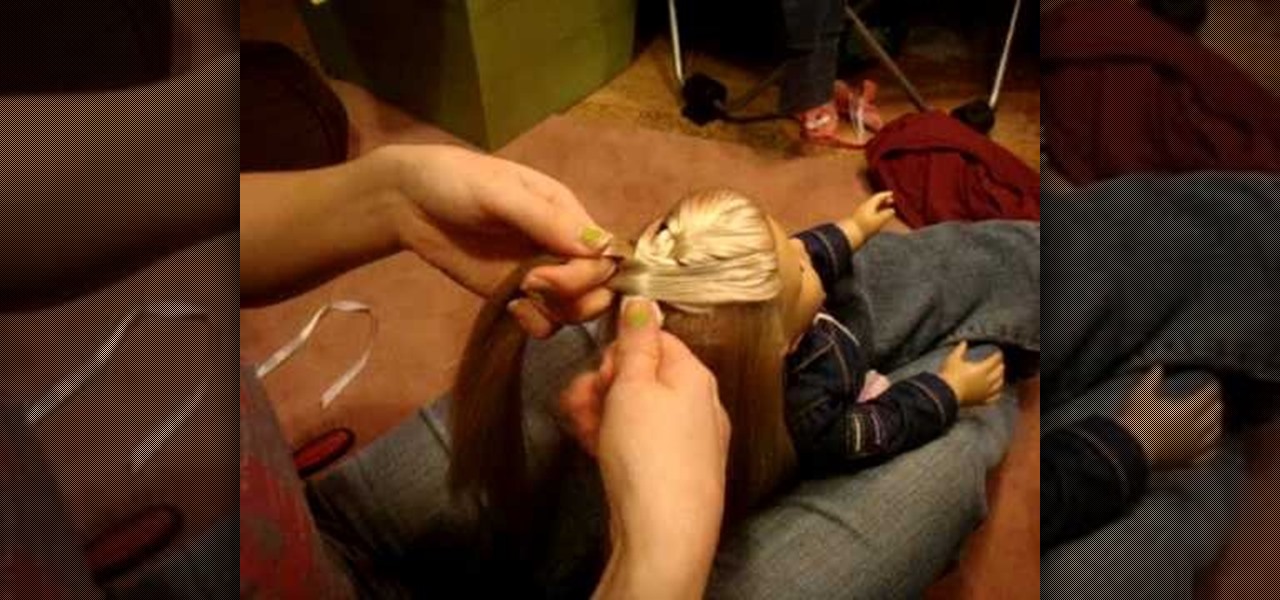
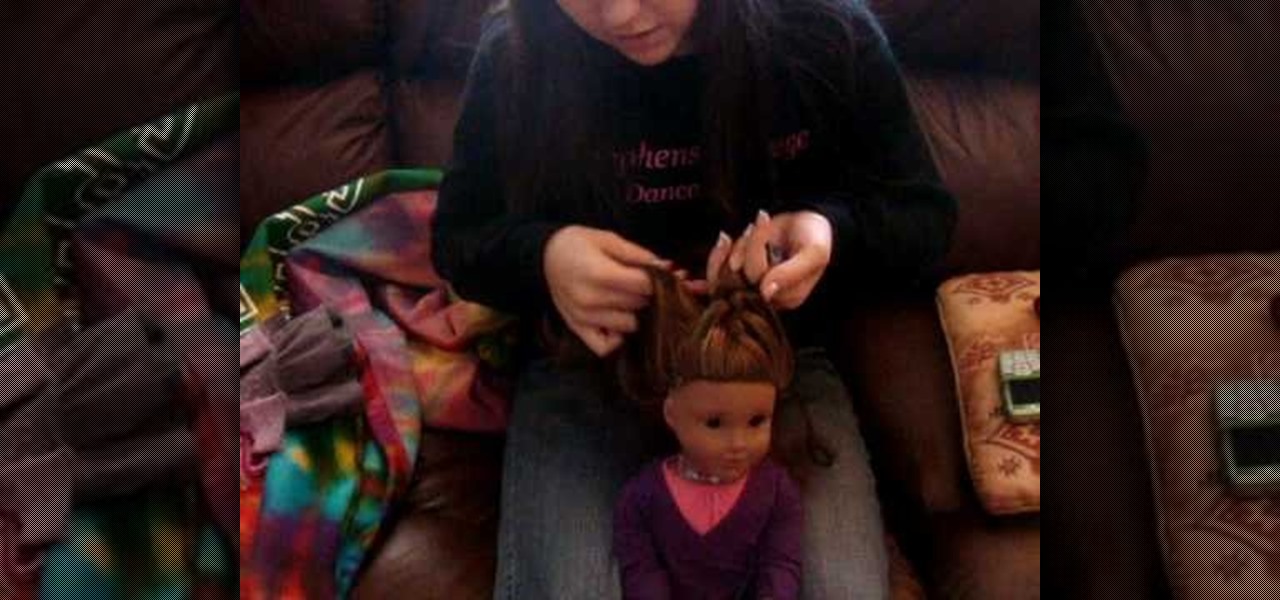
In this video, we learn how to do a hair headband on your American Girl doll. Brush the doll's hair out and then take a section from the bottom front of the hair. Twist this up and then do the same thing to the other side in the same spot. After you have twisted both sides, cross them both over to the opposite side of the head. After this, clip the side of the hair where the braid is left at. When finished, you will have a cute hairstyle on your doll! This work on any length of hair and only ...
In this video, we learn how to do a basic French braid on your American Girl doll. First, comb the hair back on the doll and then take the top section and split it into three. From here, you will start like a regular braid, going over three times. After this, you will take a little bit of the hair from one side and pick it up. Add this to the section that is closest and pull it over the middle piece. Continue to do this on the opposite side and then go back and forth. As you go down, you will...
In this video, we learn how to do a single French braid on your American Girl Doll. First, brush the doll's hair back and make sure it's smooth with no bumps. After this, grab a small section of hair at the top middle of the head. Split this into three pieces and then start braiding like normal. From here, grab some hair from one side of the head and braid the hair sections over each other. Then, grab hair from the opposite side and braid the sections over each other. Continue to do this, alt...
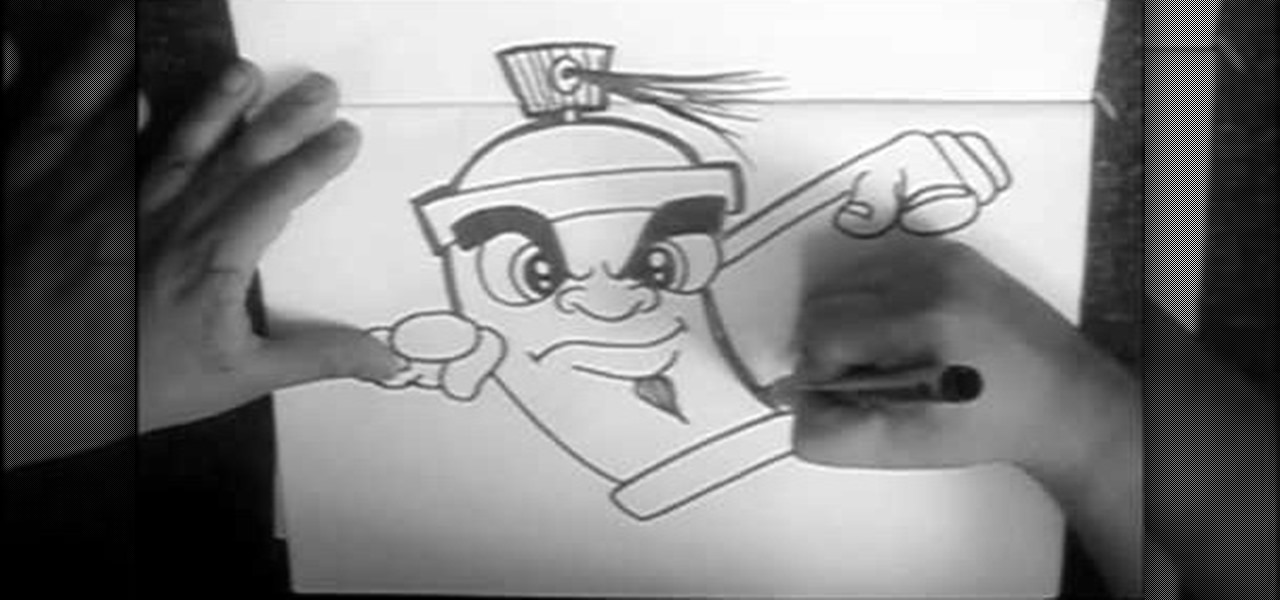
In this tutorial, we learn how to draw a cartoon spray can. Start off by drawing a round circle for the eyes, then fill in the pupil and draw the eyebrow above it. After this, draw in the nose and then draw the other eye opposite to the first. From here, draw in the mouth and the goatee on the face. Then, draw in the top, which will be a rectangle with a half circle on top of it. From here, draw a hand on the right side pointing straight out, then draw a top to the spray can showing the spray...
In this tutorial we learn how to make 303 acid using TS404. First, move the distortions around all the away around. After this, you will have a techno kind of beat. From here, you will change the oscillator one and two knobs all the way to the left. Once you have fine tuned these, play your audio to see how it sounds. Keep the filter in LP24 and move the resonance all the way to the right. LFO and Wave should be changed to the triangle pattern. Move the amount to the opposite. When finished, ...
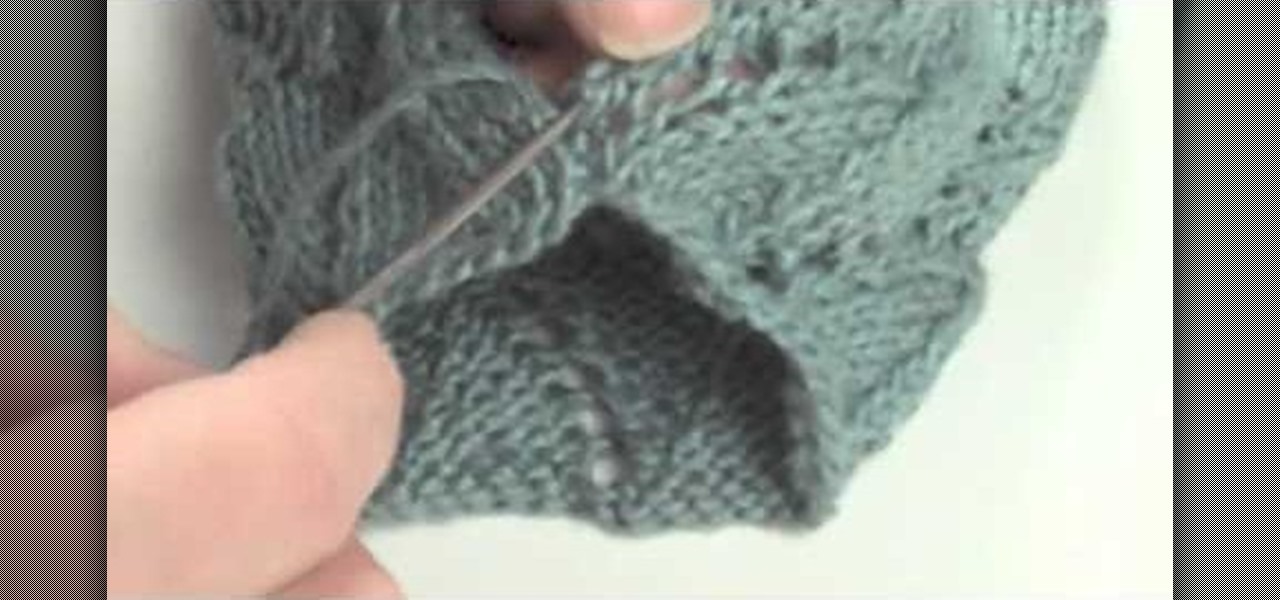
In this tutorial, we learn how to do the mattress stitch. First, lay the pieces flat and thread yarn tail onto the needle. Next, you will anchor the yarn to the bottom edge of the opposite piece. Then, go back through the side and find the tunnel of horizontal bars, one stitch in from the edge. Continue to do this around the stitches to combine them together. Keep alternating sides and just do one bar at a time to get the best results. You can do two bars at a time if you are comfortable with...
In this video, we learn how to do an orbit at an orbit light show. The light should spin clockwise in one and and counter clockwise in the other. You must pay close attention to keep these spinning back and for. Start out by winding the lights up and mastering this so you can produce different shapes. After you learn the wind up, learn how to make the stars with it by winding it up one direction and let the orbit in the middle unwind itself in the opposite way. Once you're comfortable, you wi...
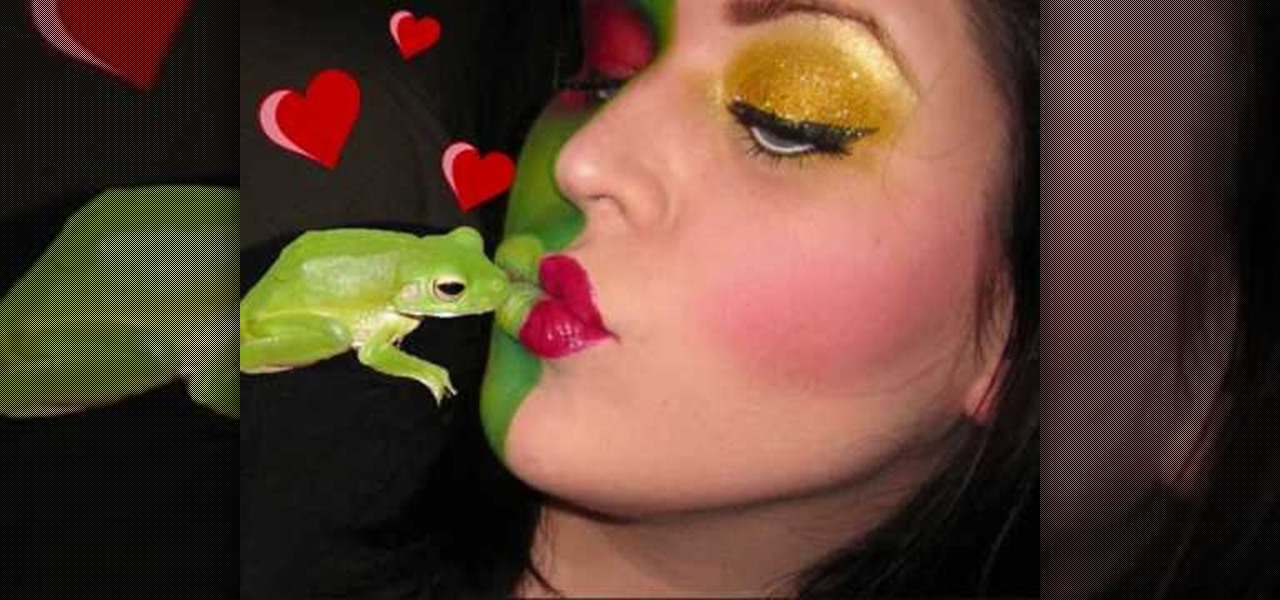
In this tutorial, we learn how to create a two faced fairy tale makeup look. First, apply green paint to half of the face. After this, apply yellow paint to the opposite eye and dab the same color throughout the green paint. Next, paint red shadow onto the eye and then darken the surrounding areas of the red eye. Create red circles on the side of the face with the green, then draw on a mouth to make it longer and smiling. To finish this, apply eyeliner and glitter to the yellow eye. Then, app...
In this tutorial, we learn how to make your own summer dress. First, take a tank to and measure it out on your chest. Then, mark the shirt and cut it. Then, take another color tank top and cut off the opposite area that you just cut on the other tank. Take another piece of fabric now and measure it out to fit your body. Then, attach this to the bottom of the dress and sew all of the pieces together with a sewing machine. Try it on when you are done and then enjoy wearing your new homemade sum...