Learn how to create a motion blur effect with Mental Ray in 3ds Max 2010 or 2011. See how to control the camera's shutter speed, the quality of motion blur, and how to decide if a single mesh has motion blur or the entire scene. You'll also take a look at fast motion blur option using Scanline Fast Rasterizer option. Whether you're new to Autodesk's popular modeling software or a seasoned 3D artist just looking to better acquaint yourself with the application, you're sure to be well served by...

In this video tutorial, viewers learn how to minimize or close multiple windows on a Mac computer. The technique shown in this video allows the user to simply close or minimize all the opened windows all at once. To close all the opened windows, hold down the Option key and Close button. To minimize all the open windows, hold down the Option key and Minimize button. This video will benefit those viewers who use a Mac computer, and would like to learn how to close or minimize all the opened wi...

In this tutorial, we learn how to erase cell phone information on a Blackberry 7290. First, go to the home page of your screen the scroll to "options" and hit okay. Now, go to "security options" and click okay again. Now, click on "general settings" and click okay, then click on okay once more, and click on "wipe handheld". You will now see a warning, and click "continue" and type in the word to confirm you want to wipe your information. It will now take a couple of minutes to wipe the inform...
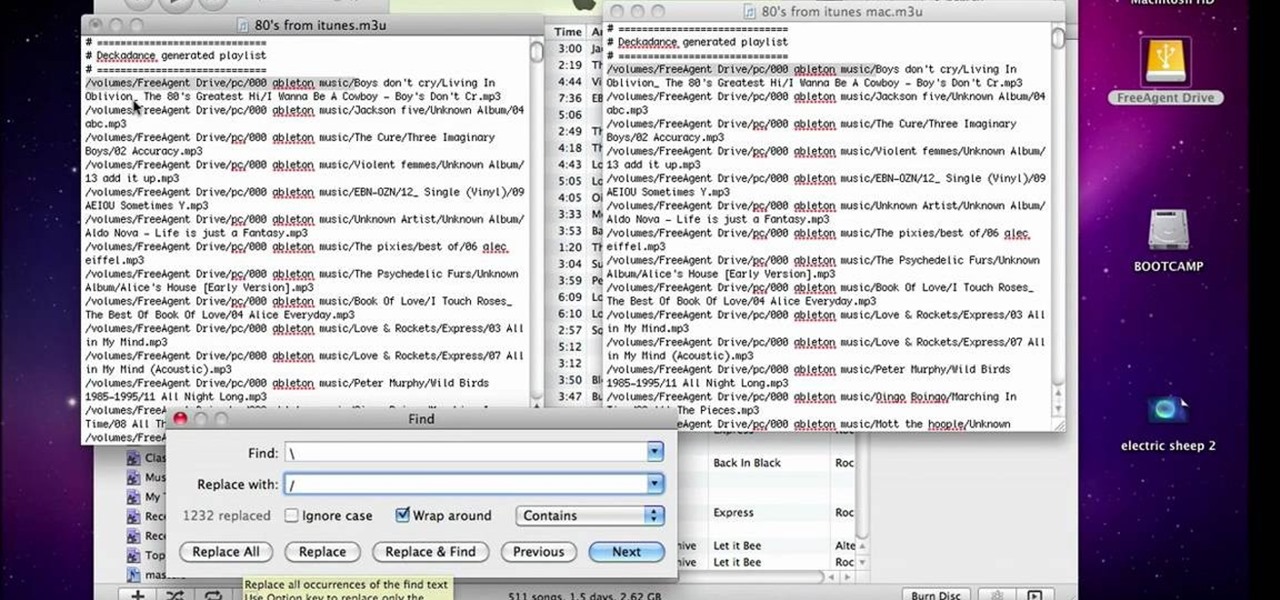
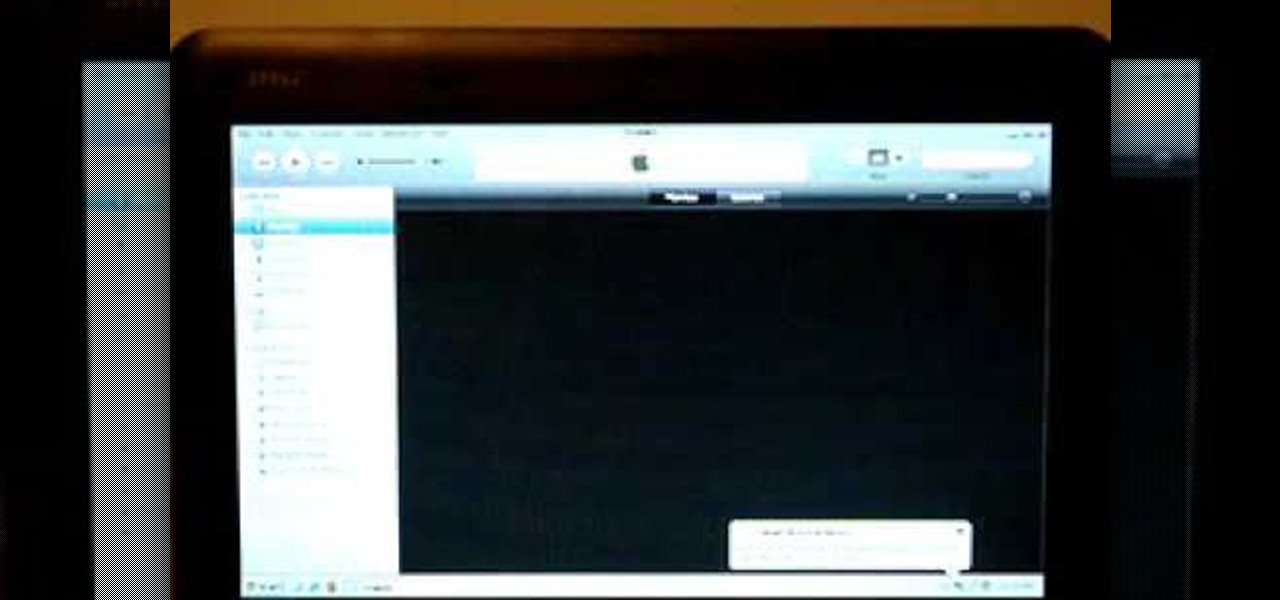
This video will show people who are switching from a PC to a Mac how to move your iTunes playlists to your new computer. From your PC, you should go to the File tab of iTunes and go to your library, choosing "Export Playlist". Next, go to your Mac and select the "Import Playlist" option on the drop down menu. On your Mac, open the file for the PC playlist and use the "Find" option from the Edit menu in order to replace the parts of the address which are different from that of the format which...
Check out this tutorial and make Windows 7 you're own by customizing the log in screen. This is fun to do and will, no doubt, make you feel more connected to your PC.
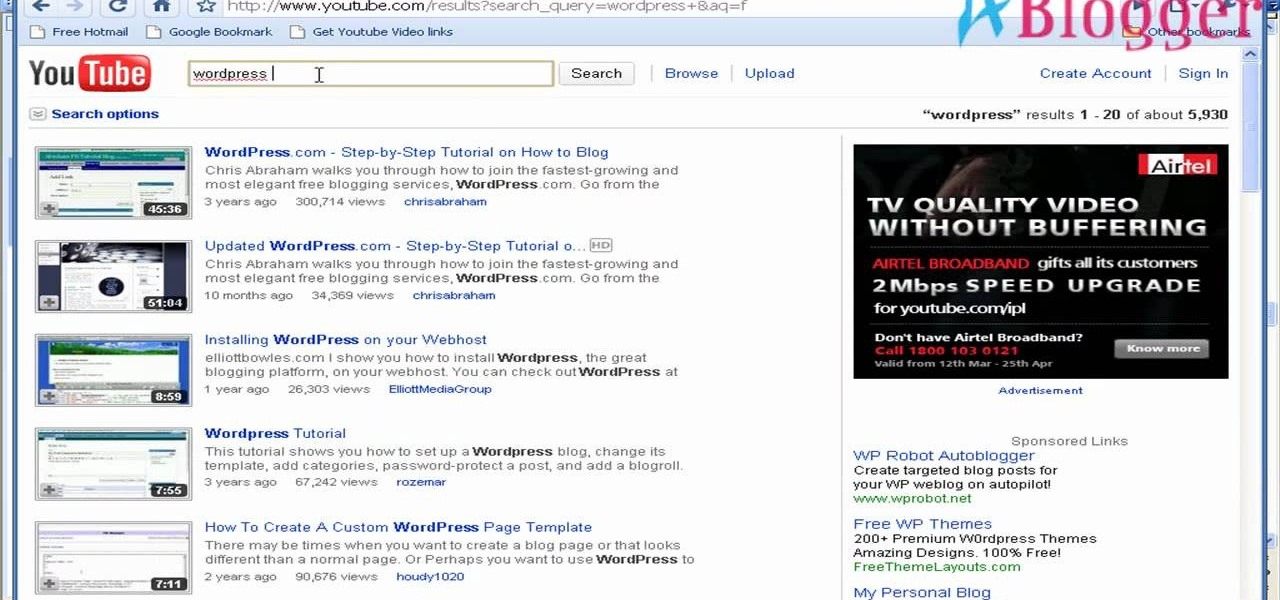
Searching YouTube is tough, because there's a plethora of content, so sometimes i's best to do an advanced search. This is not to be confused with the "search options" available during a YouTube search query, because those are limited to key features of YouTube, but not specific search terms. Much like Google, you can search YouTube via search operators. Many of the same search operators that work on Google work on YouTube also. Filter your results the way you want, not the way they want. You...

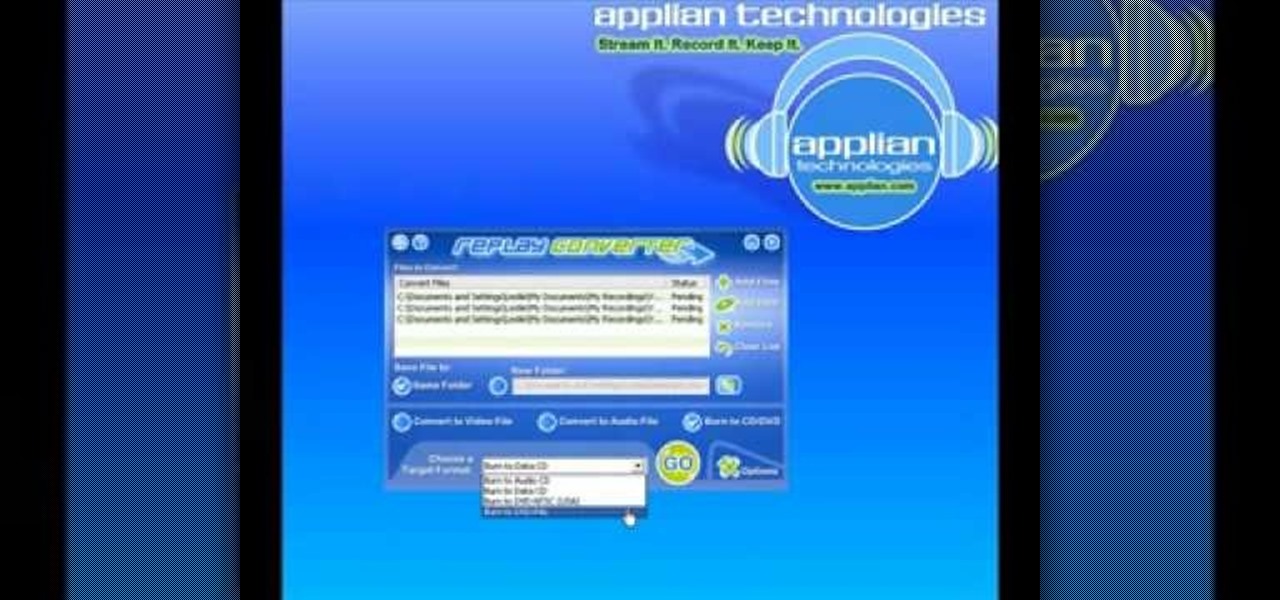
Most of the videos that you'll find on the internet from sites like youtube are probably flv format. There is now a handy new tool that you can use to convert those flv files and burn them onto a DVD, it's called Replay Converter. As the start the program up you'll see a button that says 'add file'. Using this you can add files to the program's queue. Put a blank DVD into your DVD burner beforehand. Now with the files in the queue, tick the 'Burn to CD/DVD' option. You will have the option to...
In this video tutorial, viewers learn how to use the Sticky Keys feature in a Mac OS X computer. The Sticky Keys feature is found in the Keyboard tab in the Universal Access menu. To turn on the sticky keys, check the On option. Underneath, users are able to set some options for how the modifier keys are treated. Sticky Keys will allow users to press the keys in a sequence, instead of all at once. This video will benefit those viewers who use a Mac computer and would like to learn how to conf...
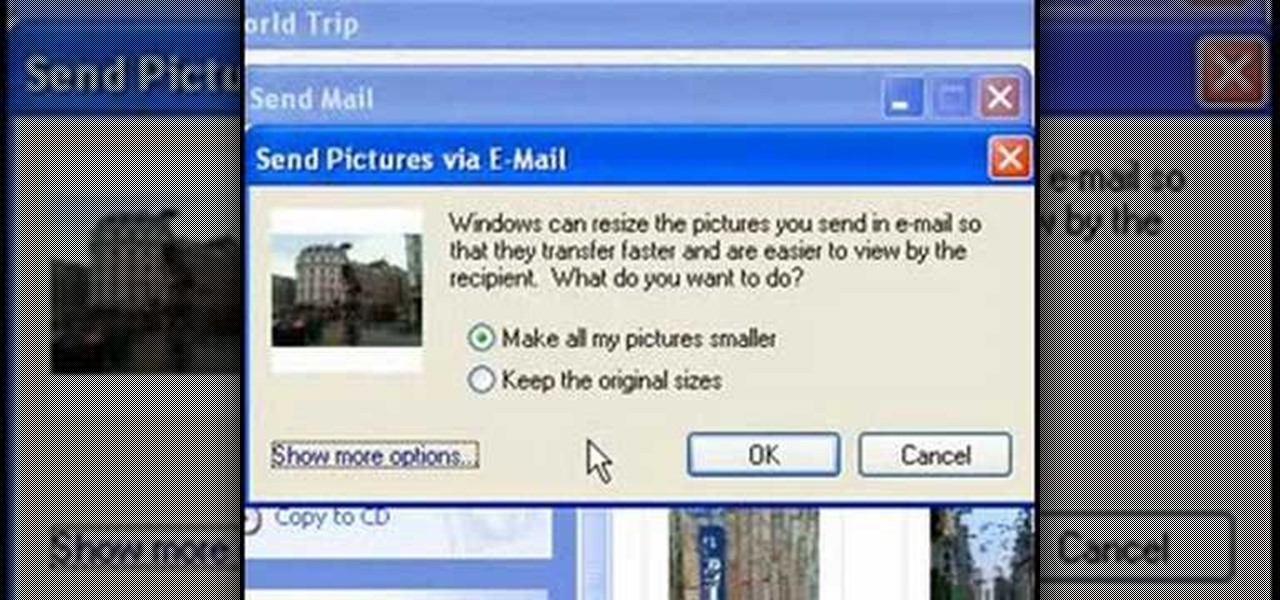
This video tutorial from easycomputercoach shows how to easily attach pictures to email addresses. In Windows XP you can send pictures resizing them in the process, in case you have large file sizes.
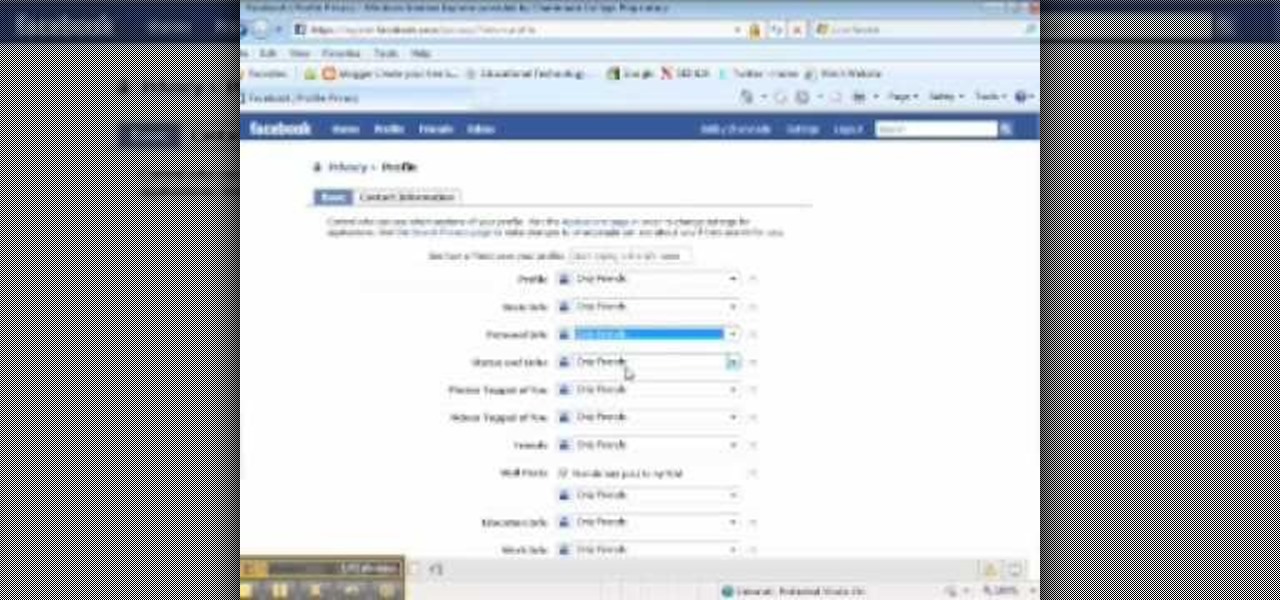
This video tutorial from ChaminadeENN shows how to set your Facebook account to private mode. First what you need to do is to sign in to your Facebook account.
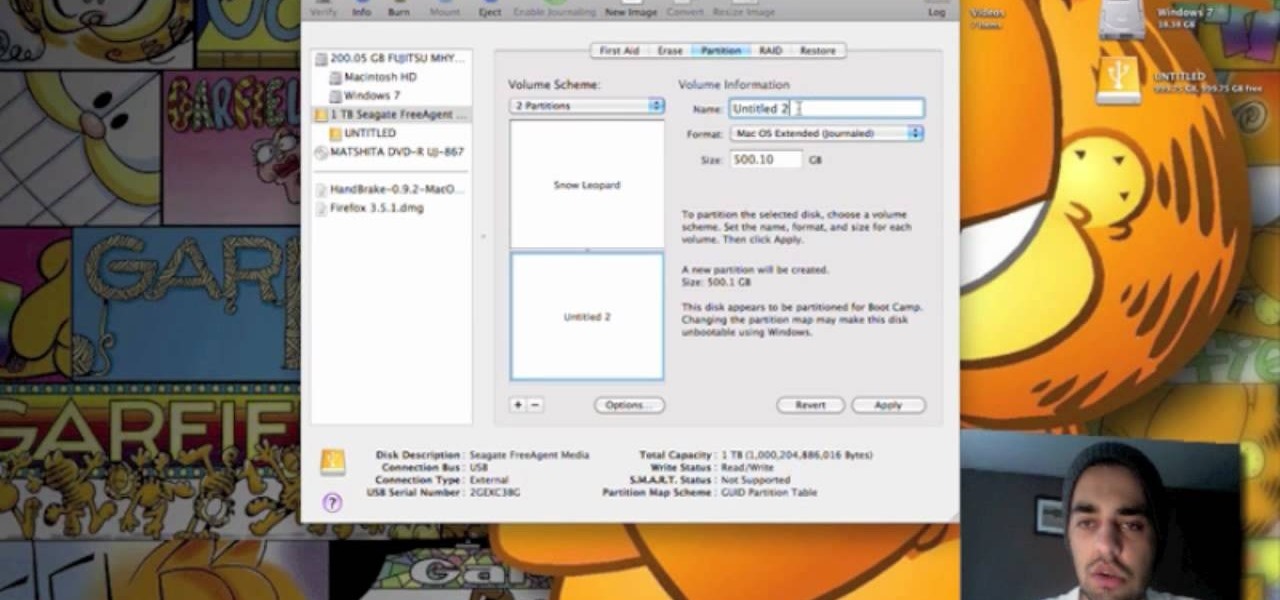
This video teaches us to partition a hard drive. Open 'Disk Utility' and go to 'Seagate FreeAgent Media'. Go to 'Partitions' and select '2 partitions' in the 'Volume Scheme'. Click on 'Untitled 1' and put the name of the partition, its format as Mac OS Extended (journaled) and Partition Table from 'Options'. Name the second partition and choose 'MS DOS (FAT)' in format. Choose 'Master Boot Record' in 'Options'. Click 'Apply' and 'Partition'. This creates the two partitions of the hard drive a...
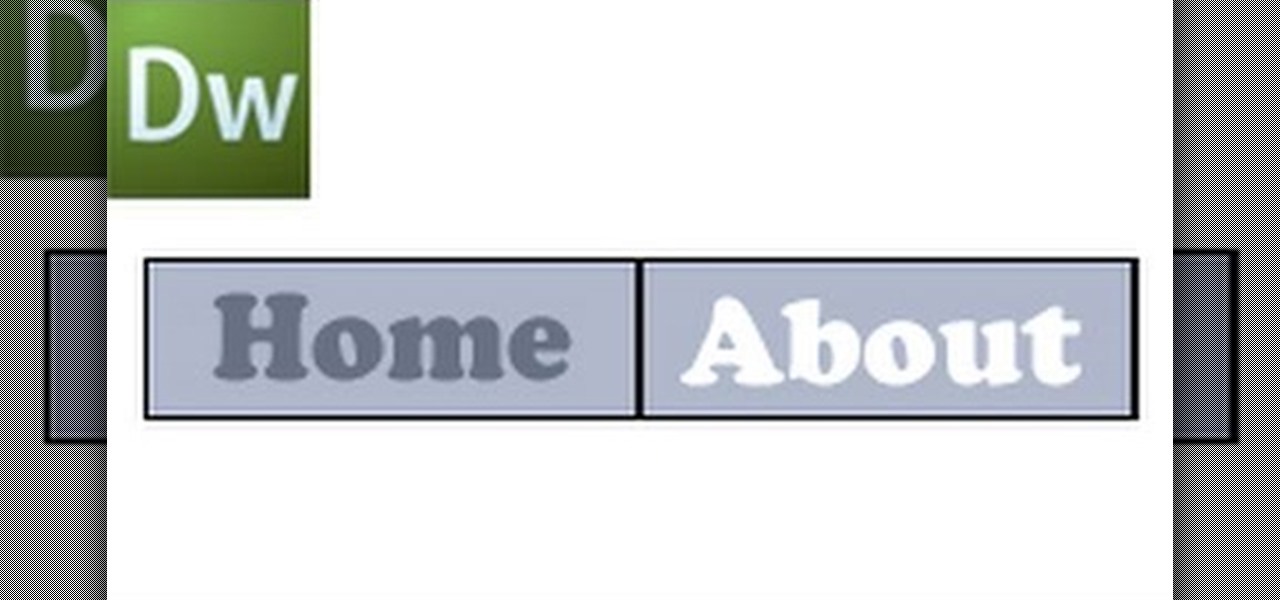
This video shows how to create a menu with rollover images in Dreamweaver. Open a new document and create a table with one row and one column. To add your rollover images, go to the "Image" tab and select “Rollover Image”. In the “Insert Rollover Image” box, give the image a name, then click “Browse” under “Original Image” to find your images. You can select your rollover images in the same window. Then enter your alternate text and click OK.
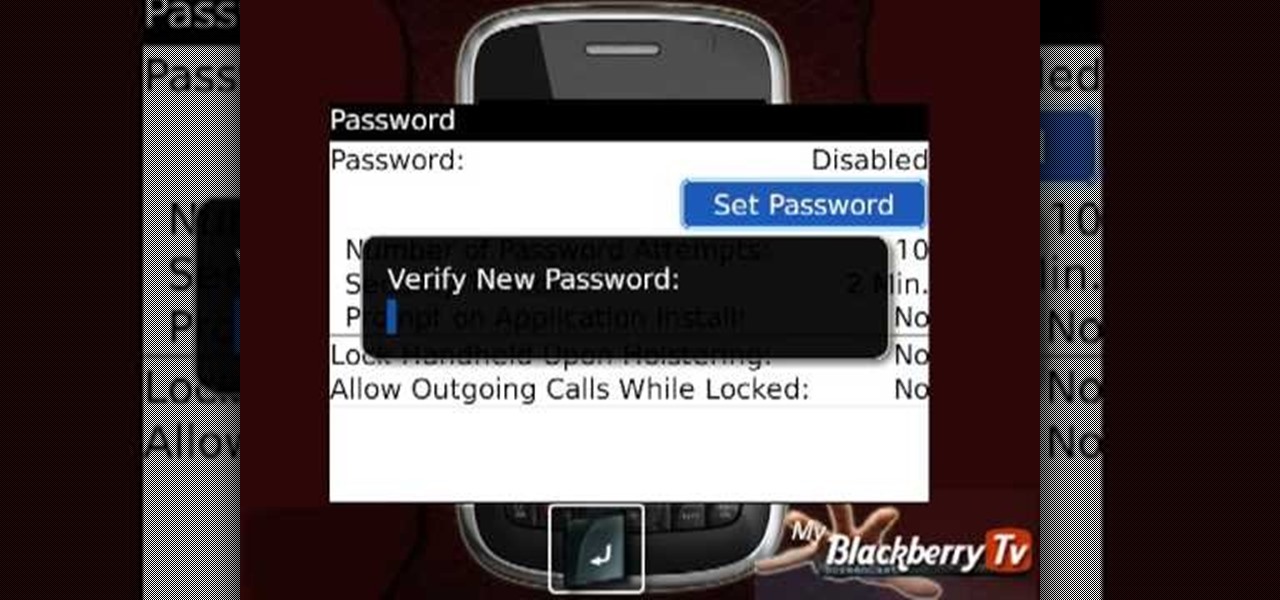
My Blackberry TV demonstrates how to protect your Blackberry device with a password. Protecting your Blackberry with a password will help to stop people from accessing your personal information on your device. From the home screen, press the Blackberry menu key. Then, select the options choice. Next, scroll down to the password choice on the options menu. Select password and then select the set password button on the password screen. Enter your desired password and then press the enter key. V...
This video is a tutorial on creating an Icon Logo in Photoshop Cs4. Go to File and open a new document. In the Layer option, set up a new layer and give it a name. Using the pen tool, create a shape for your logo, it can be anything you like. When you have the shape you want, right click and select Make Selection. Now you can fill the shape with a color. Press ctrl+U for the Hue/Saturation option to get the exact color that you want.
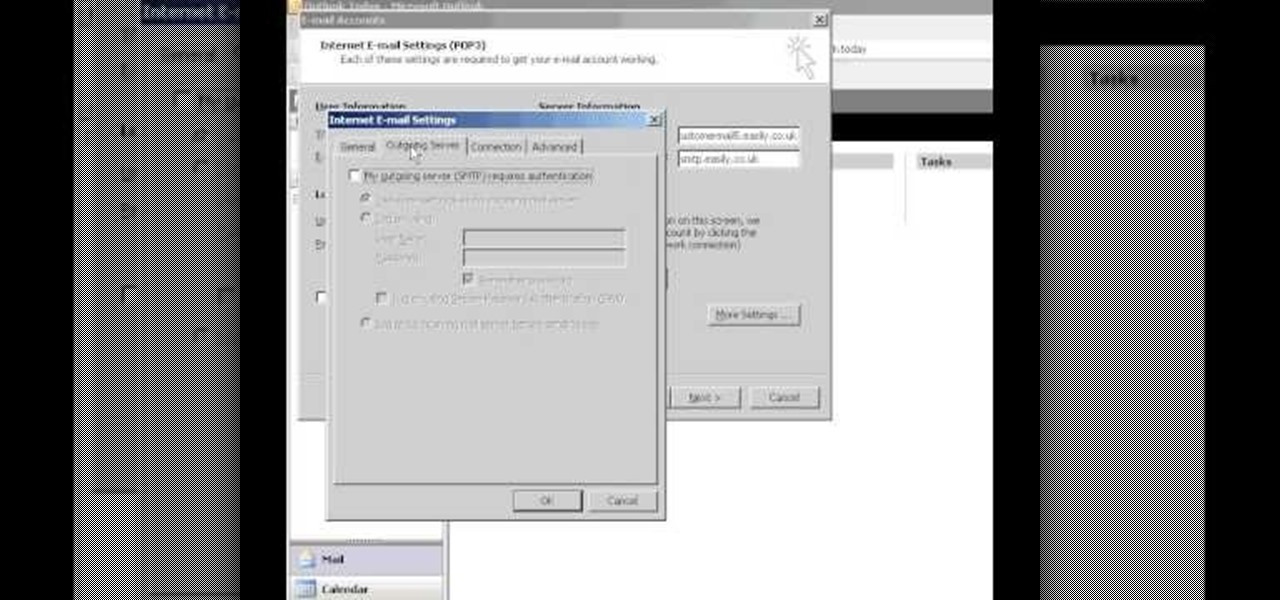
Easilycouk shows viewers how to set up an email account using MS Outlook. First, you should open up MS Outlook. Go to Tools and go to Email Accounts. Choose the option to add a new one. Click next and click the POP 3 option. Click next and Fill in your information such as name, the email address you are using and choose your log on information. Now, you need to fill in your Server information by copying and pasting your email into this. In the SMTP type smtp.easily. Go to internet email setti...
Clicks are made on "Image",then "Adjustments", followed by "Brightness/Contrast" ; contrast is set to 30 and brightness is set to 60 to add more light to the picture. "Adjustment", "Variations" are clicked in that order and both yellow and red are increased. "Filter", "Render", "Lightening Effects" are chosen in that order and a new window appears; within which the style is set to "Soft Omni". The brightness is decreased ;similar to the way it was increased, and contrast is increased to 60. T...
First create a new 800x600 document and fill it with black color. Then create a new Layer and add a white circle with the hard edge Brushtool Select the 'Eraser tool' and use the same brush (a bit smaller) to erase the inside of that circle. Rightclick an layer 1 and go to the blending options. Add a contour. Now you should have a simple ring. Create a new layer again, and drag a dark red/brown circle inside the ring. Open up the Apple Logo (download in discription). Resize/replace it. Rightc...
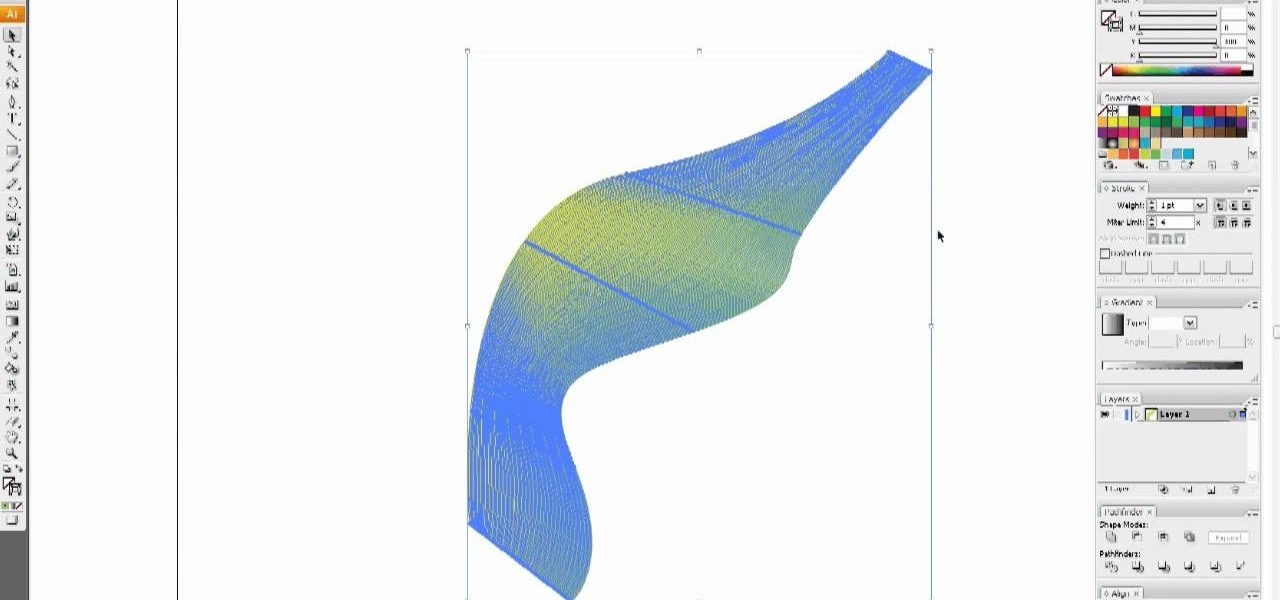
In this video tutorial, viewers learn how to use the blend tool in Adobe Illustrator. The blend tool will allow users to create objects between two strokes or filled objects. When you double-click on the blend tool, there will be 3 options to select from. Select the spacing and press OK. The three spacing options are: Smooth Color, Specify Steps and Specified Distance. Users are also able to select the amount strokes between the two objects. Now select the points of the two objects and it wil...
In this video tutorial, viewers learn how to use the Tile Visuals tool with the Voice Over application on a Mac OS X computer. This feature will dim the screen so that the user will be able to go over the Voice Over commands. To enable Voice Over, press the Command and F5 key. To tile the visuals, press the Command, Option and F10 key. Now when users navigate through the screen, only the contents over the Voice Over cursor can be visible. To return to the normal view, press the Control, Optio...
When it comes to displaying your own sense of style, there are so many different options to choose from. You can focus on the hair, hands, whole body, or even your toes. Either way, you can customize and create any stlye you can by easily choosing which jewelry to wear or how to wear your hair style. This video tutorial will help give you another great option to help achieve that personalized look. Find out how to make awire wrap ring easily. Enjoy!
ShowMeAcademy.com shows how to sort data in Excel 2007. Excel has many options for sorting data according to any given column. To sort your data, right click on a cell in the column that you want to sort by. A menu comes up where you will see the “Sort” option. Hold your mouse over “Sort” and another menu comes up showing the different ways to sort. For example, if you select “Sort Smallest to Largest” it will take all the data and sort it from the row that has the lowest figure u...
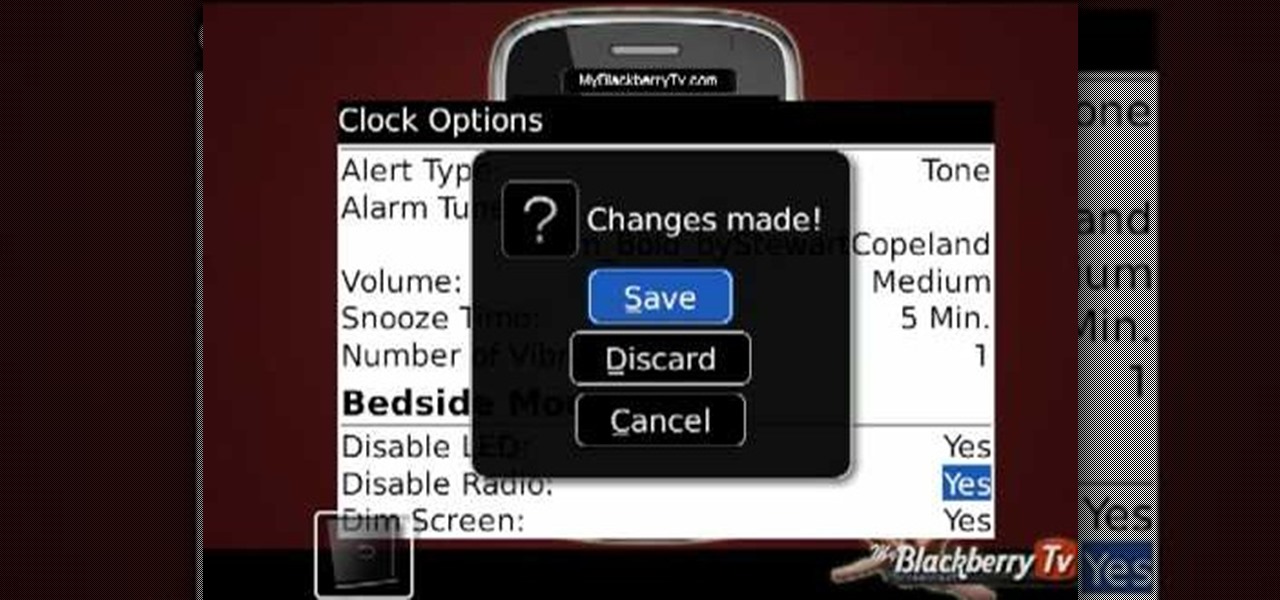
This video, by MyBlackberryTV.com, shows us how to put a Blackberry in "Bedtime Mode" to hold all of the messages while the user is asleep. This prevents the incessant "ding" when a message is received to the phone, thus allowing the owner to get a restful night's sleep.
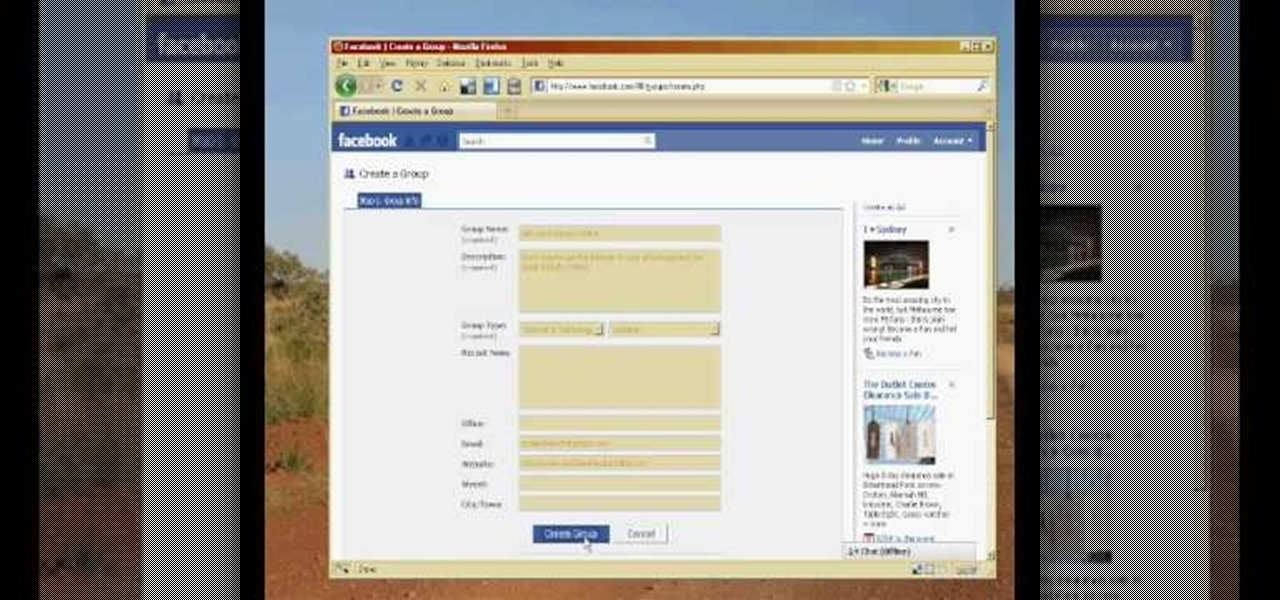
In the homepage at the left handside of the facebook account, a click is made on group. The name, description, group type,email address and website information of the group are filled in. A click is then made on the "create group" button. The security details which appear on the window appear after the "create group" option was selected and saved by clicking the "saved" option. The group is published to the facebook wall, after which the group is customized . The group can be personalized and...
In this tutorial, we learn how to make Firefox the default web browser. First, go to tools on your Firefox page and then click on options. Then, click on advanced and check that Firefox will be the start up browser. Click "ok" and then that window will disappear. You can now open up different windows and this will now make Firefox your default browser without having to change constantly with another browser. if you want to change this at any point, you can always go back to your advanced opti...
1.First download correct firmware for the iPhone or iPod Touch. And change the dot extension of the file before that open the explorer and select Tools menu then go to Folder options, open view tab and deselect "Hide extension for known file types" option and click ok.2.Now right click on the file and click rename and change the extension as ".ipsw". Now open the iTunes and make sure the iPhone is connected with the data cable to the system. Now press down the home and power button of the iPh...
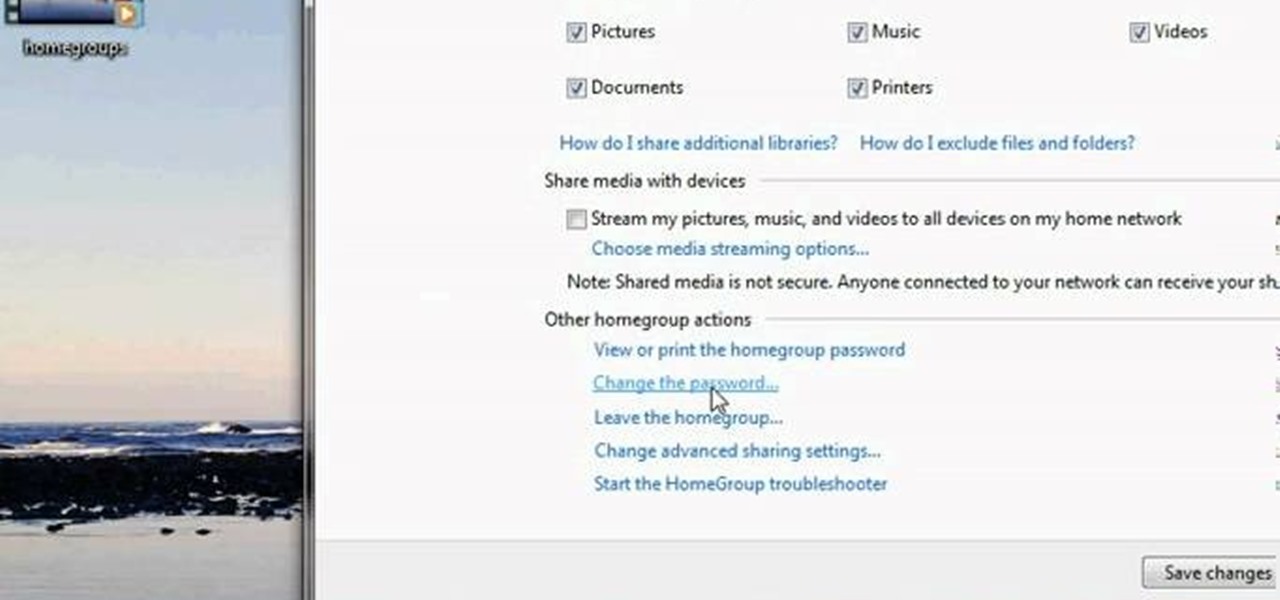
This video tutorial from pctechbytes presents how to quickly set up Homegroups in Microsoft Windows 7.This feature allows to easily share files between computers with Windows 7 operating system.Press Start button, select My Computer option. In the newly opened window select Homegroup from the list to the left. Select View Homegroup Settings link.In this window you can choose what types of documents you want to share with other Windows 7 operating system users.You can share pictures, documents...
This video tutorial from Magix presents how to burn (S)VCDs and DVDs using Magix Movie Edit Pro 15 application.First you need to group videos you want to burn.If you want to play movies using remote control you have to place chapter markers. You can set markers manually or choose automatic? marker setting which places markers before each new scene.Once all chapter markers are placed, click Burn button.Here you can choose Start Menu Templates. To change movie titles and chapter headings double...
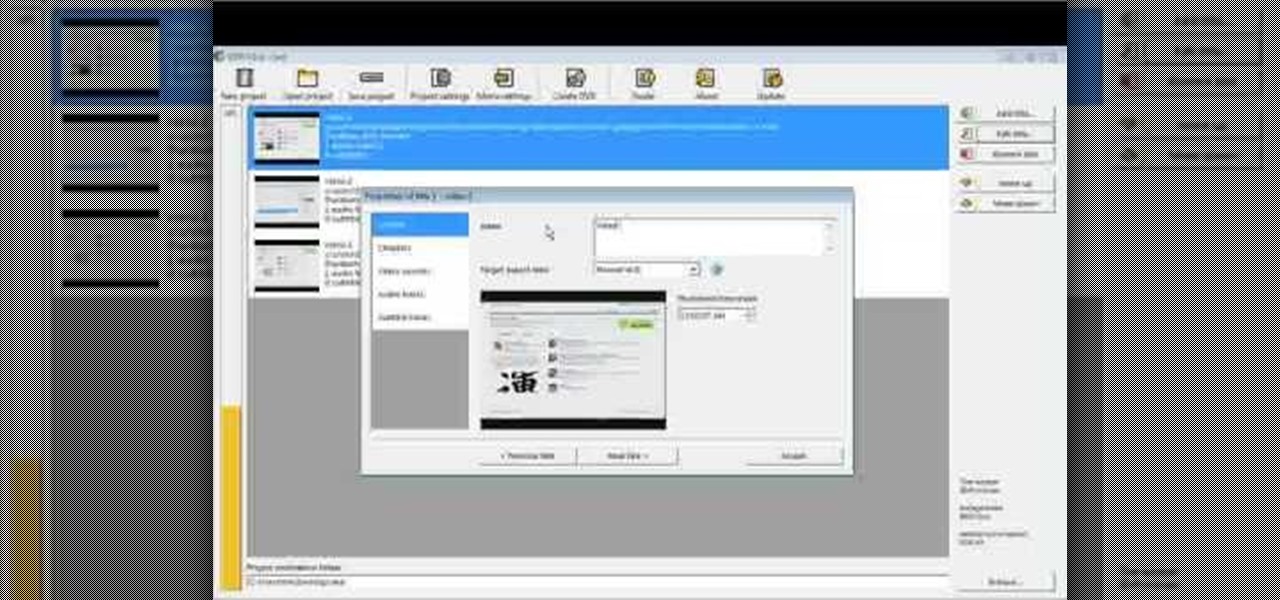
This video tutorial from Foreclosureresearch presents how to burn video files to a playable DVD using DVD Flick application.First you need to download and install free software called DVD Flick.You can find it at DVD Flick.Once it's installed, run the program. First thing to do is to set your Project Settings. Click Project Settings from top menu. From Project Settings window you can name the project, select Target size (size of your DVD), Encoder, Thread count, DVD format, bitrate, playback ...
This video tutorial from pirateskool presents how to enable screen share function in iChat application in Leopard operating system.Firstly, you need to ensure Screen Sharing function is enabled. From menu dock on your desktop, choose System Preferences option.In the opened window select Sharing. Make sure Screen Sharing is checked.Now you can close system preferences window.To establish screen sharing you need another user, who has Leopard operating system and iChat communication application....
Namuoc demonstrates how to create a line chart in Excel. To create a simple line chart in Excel 2007, first highlight the cells in your worksheet that you would like to include in the chart. Then, select the insert tab on the top of the worksheet toolbar. Next, click on the line option. Select the two dimensional line graph option from the given choices. Move the chart to a new sheet. Label the new sheet in the appropriate field and click the OK button. Your line chart will now be created usi...
Some data can be very confidential. In such case you need to encrypt the data so that it does not go into the wrong hands. There are lots of encryption software available to encrypt the data. But to use them first you need to install then and this can take lot of time. You can also use Windows built in compression client to encrypt information. To use this feature you need not install any software and it is a fairly simple process. So select a file that you want to encrypt, right click on it ...
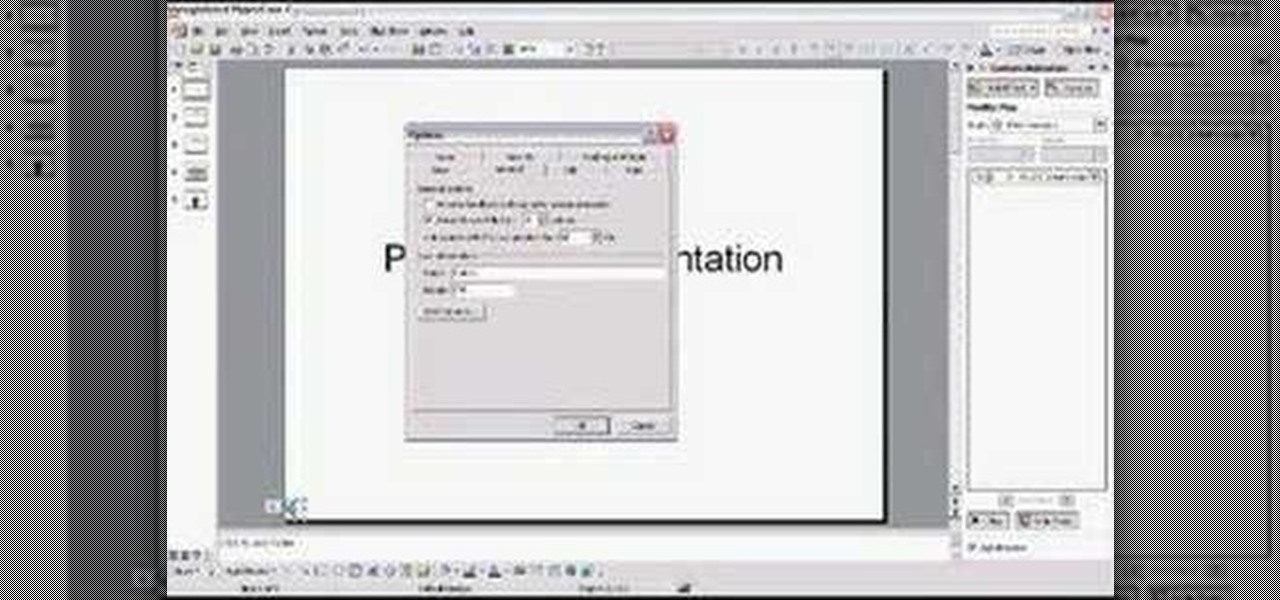
Microsoft PowerPoint is used to create presentations. These presentation can contain images and animations. You can even add sound to the presentation. To do this go to the insert and select movies and sounds. Select the sound file from it. Make sure that the file inserted is in .wma format. Go to the slide show and select custom animation. Right click the song in the animations window. Under the effect option in the effect tab, there is the stop playing partition. Select the number of slides...
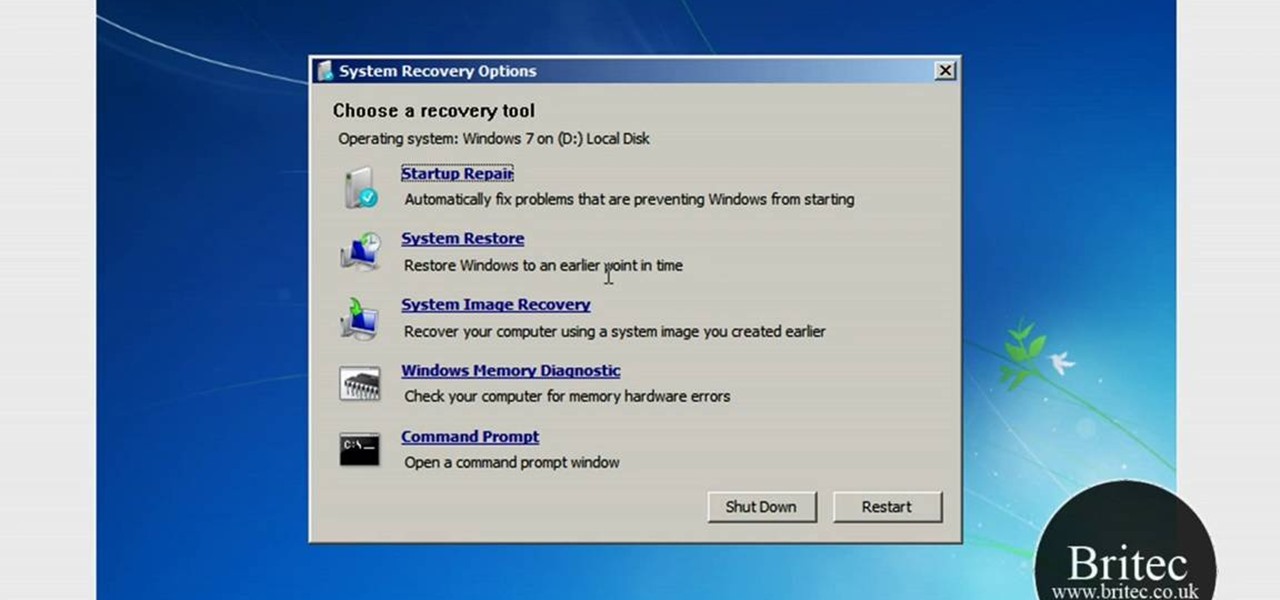
This video tutorial from Britec09 presents how to backup and restore Window 7 registry.First, press Start button and enter regedit command into Start Search area.Registry editor window will open, click File-Export.This option works on all Windows operating systems.Type file name - registrybackup and click Save. You can save it wherever you want, but in this video it was saved to Desktop.Next step is to reboot to Windows DVD. Insert you Windows DVD and reboot computer.Press any key to boot fro...
In this video, we learn how to remove our browsing history on Internet Explorer. First, click on "tools", then click on "delete browsing history". If you want to delete all of your browsing history, then click on that option. Most people are content with only deleting temporary internet files as well as browsing history. Getting rid of these will speed up your internet a bit. Another way is to go into "internet options", click under the "general" tab and choose which files you'd like to delet...
In this how-to video, you will learn how to use the zoom function in the Mac OSX. This will help if you are visually impaired. Next to the space bar, there are two keys. There is the command key and the option key. Hold them both of them down at the same and press the number eight key. Once this is done, the desktop will be zoomed in. To zoom in even further, press control, command and plus. Do the same except with the minus key to zoom out. Press option, command and the number 8 to reset the...
In this how-to video, you will learn how to turn off sticky keys in Windows XP. You will need a computer running Windows XP in order to perform this. First, go to the start menu and click control panel. Go to the accessibility icon and click it. A new window will open. From here, uncheck the option for sticky keys. You can make any further changes in this window. Once you are done, click okay on all the windows to save the new setting. Now you will not have sticky keys when using your compute...
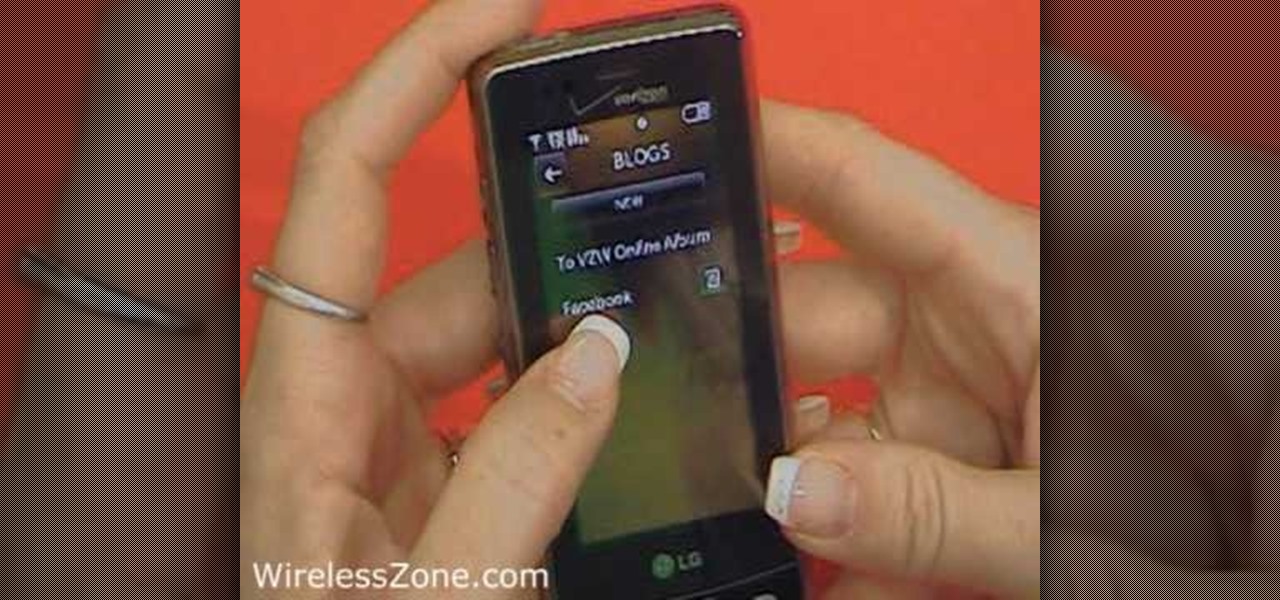
In this how-to video, you will learn how to upload photos and videos to Facebook or MySpace using your mobile phone. First, go to messaging and scroll down to blogs. Here, enter whichever blog you want to upload to. Next, go to message and create a new picture message. A new option called blog will be in this menu. Now, press the option and click on your blog of choice. From there, you can put in text and select your picture or video. Now you can press send. This will send the file or video t...
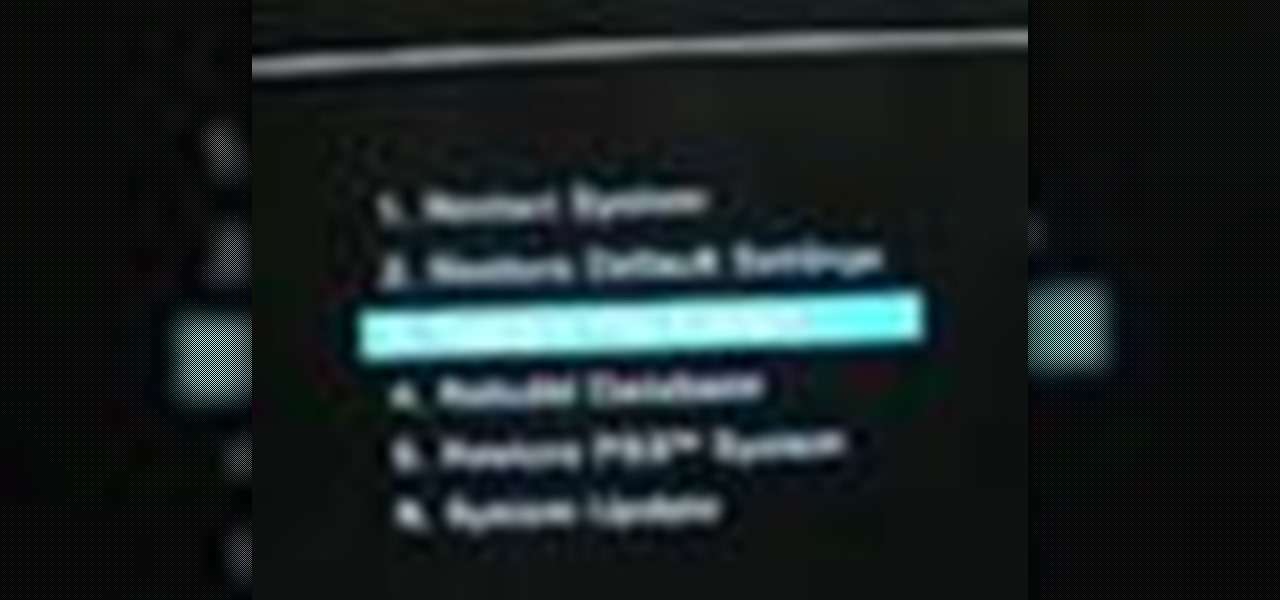
In this Video Games video tutorial you will learn how to fix a PS3 Black Screen of Death. For this you got to put the PS3 into stand by mode. Press down the button located at the top end of the console for 7-10 seconds and listen for 3 beeps. Repeat this step again. Then this message is flashed on the TV screen – ‘connect the controller using a USB cable etc’. Once you connect the USB cable, the trouble shooter prompt comes up displaying 6 options. You can use the 6 options to troubleshoot yo...
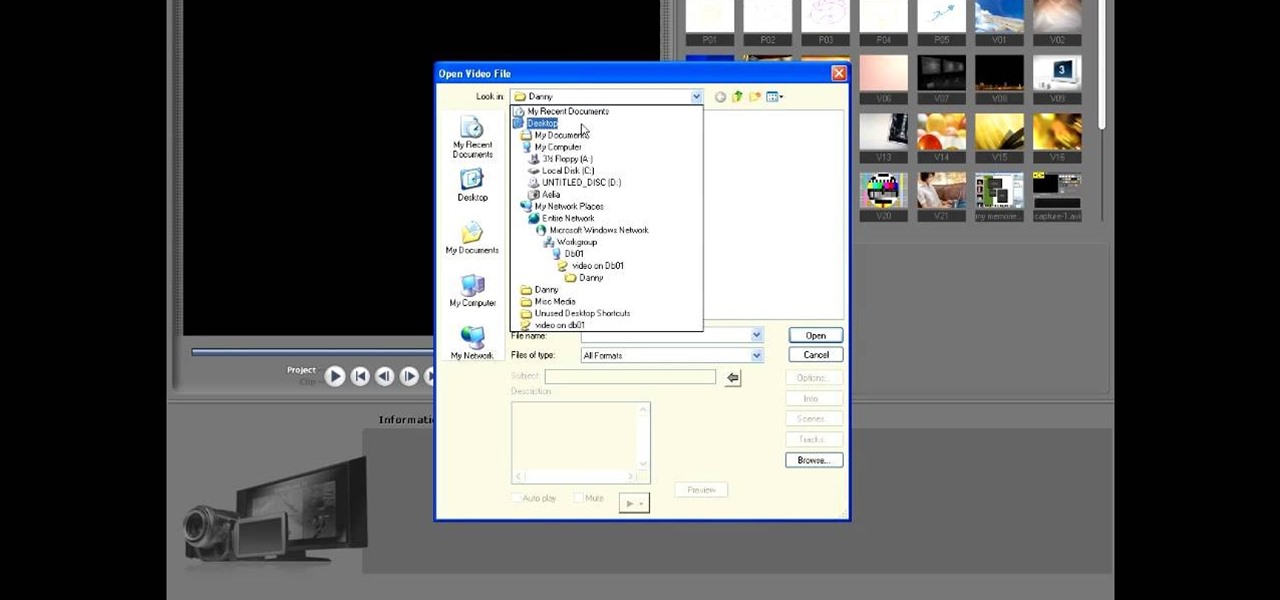
This video tutorial from toptenreviews presents how to import media from a hard drive into Corel Video Studio library.First you need to start the application.From top menu click on Capture tab. Normally you would select one of the four options to capture media: Capture video, DV quick scan, Import digital media, Import from mobile device.These options are below the library. But in this case you will need to click on the folder icon above the library.This action will bring up a dialogue box wh...
gjtfreak demonstrates a new free tip for the iPhone 3G on how to get free ringtones on a Windows Vista environment in this video. Firstly go into the start menu open control panel option and from that open folder option. Click on view and find a box that says hide extensions for known file types and unclick that box click apply and then OK. Secondly open up iTunes and pick the song you want to use and go into the preferences column at the top left of the iTunes window. Make sure that the ring...