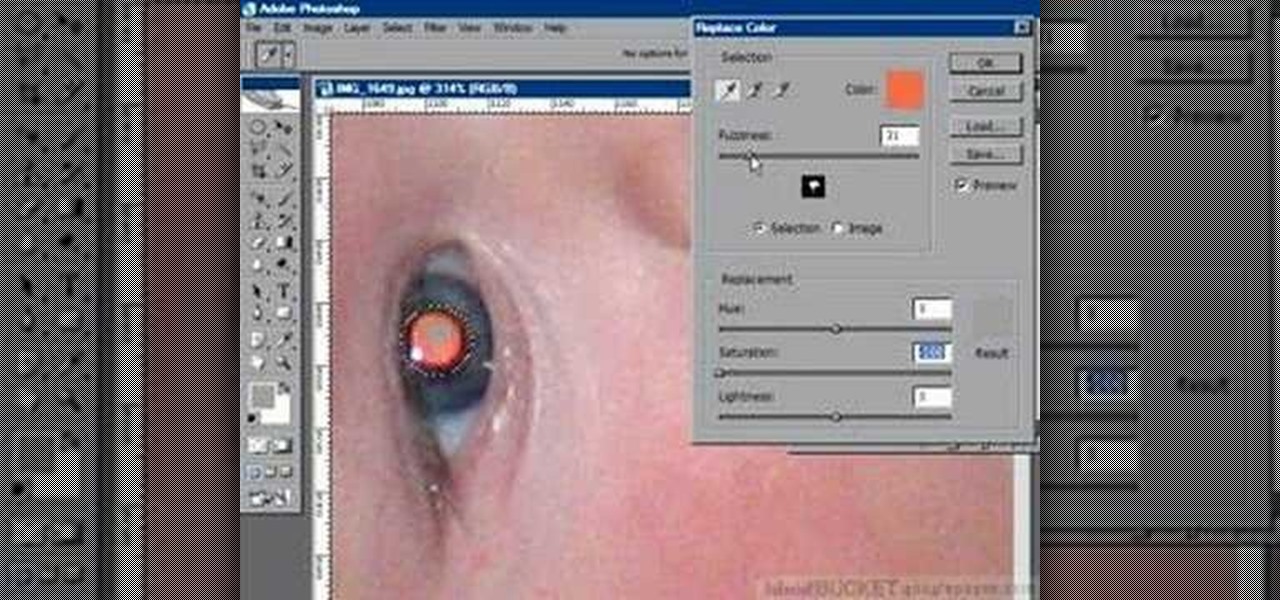
If you have a photograph with an extreme red eye problem, then you will have to take steps above and beyond using the built-in red eye reduction tool in Adobe Photoshop. In extreme cases, red eye will actually contain colors outside of the red spectrum of light. Since the red eye tool only works on this spectrum of light, you will have to manually fix extreme red eye by working on tools that are effective across all different wavelengths of light. The most effective tool at your disposal in t...
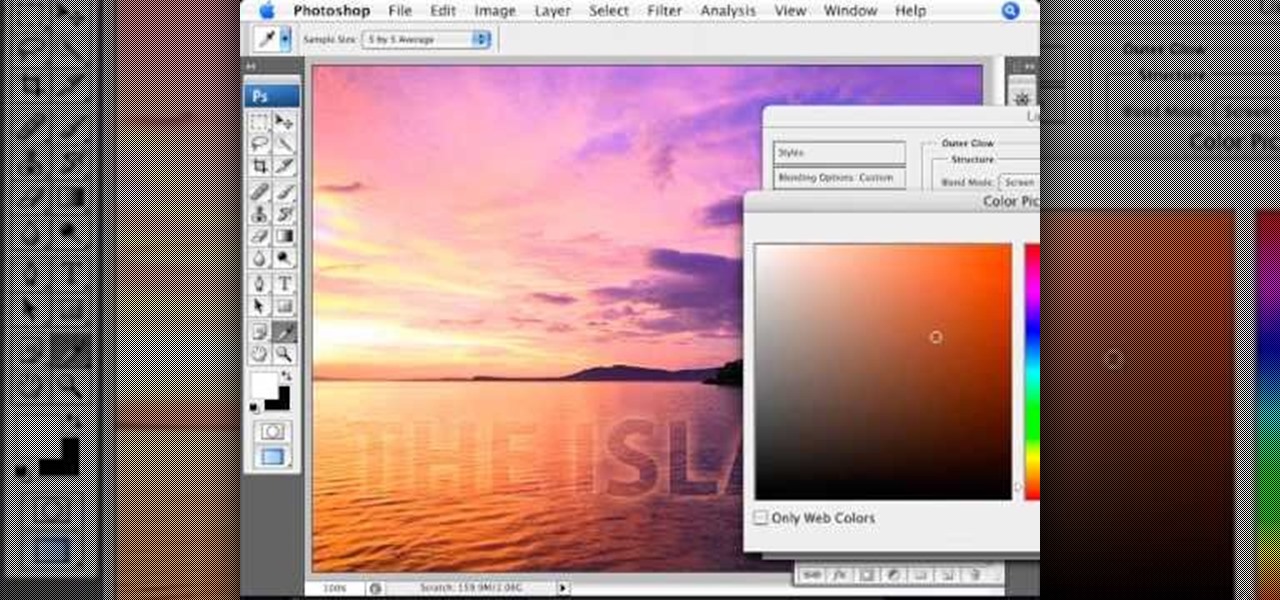
Learn how to create glowing text in Photoshop with this awesome video! 1. Write any text using text button T on the selected image as a background. Write a suitable text and place it somewhere. 2.Select the text and make it Bold. 3. right click and set Opacity and Fill options. Opacity changes the color of the text as well as its effect. Whereas Fill changes the color only . If you have set it to 0% then you can't see the text if its exist also. Set Opacity to 100%. 4. For glowing text select...
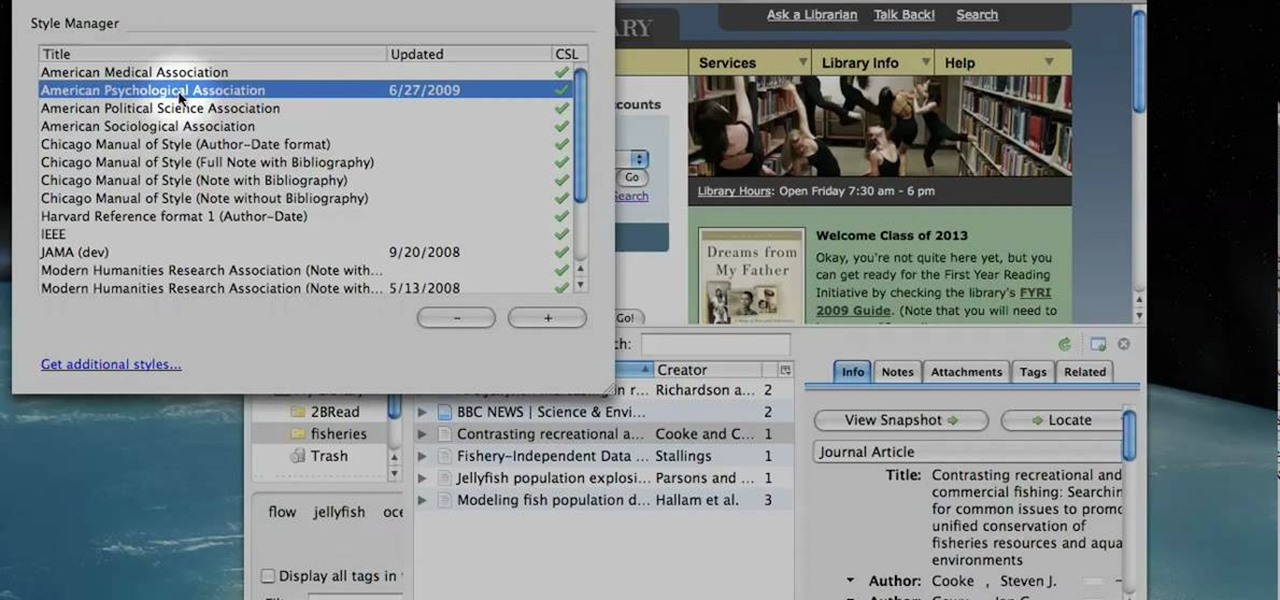
Learn to use Zotero to create bibliographies and citations with this tutorial. In addition, collect and organize information from all sources. So help correct the sources research paper. Before using the excitation features, make sure to select and prepare the style of your paper. If you are not sure ask your instructor. She has a preference style. You will select by clicking on the action button +preference then choose the style. It will include the number of most common style. You can downl...
In the following series of videos we will establish a particle stream that is then used to create a surface that evolves over time in Houdini 9 software.
Are you getting that nasty "Application access set to not allowed" error on your Nokia 5300 cell phone? Unfortunately, it's a problem for most Nokia 5300 owners, ones who wish to use 3rd party applications on certain carriers, like T-Mobile, who restricts the uses for branding.
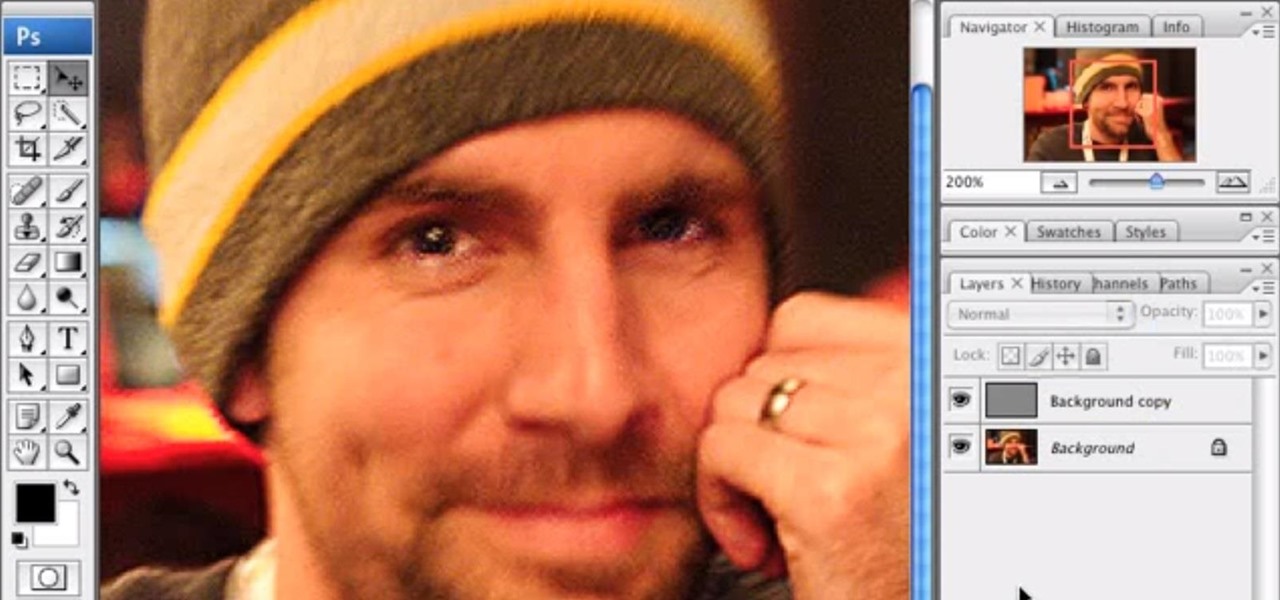
It's very easy to get a slightly blurry photograph due to a moving subject, camera shake, or just an incorrect auto-focus, but you don’t have to let that ruin an otherwise terrific picture. All it takes is a little finesse in Photoshop or another photo editing software. This guide covers sharpening a blurry image using Photoshop specifically.

You don’t have to eat meat to get all the iron you need. There are many very iron rich vegetables that can be eaten on their own or juiced and drank to make sure you have appropriate amount of minerals in your blood.
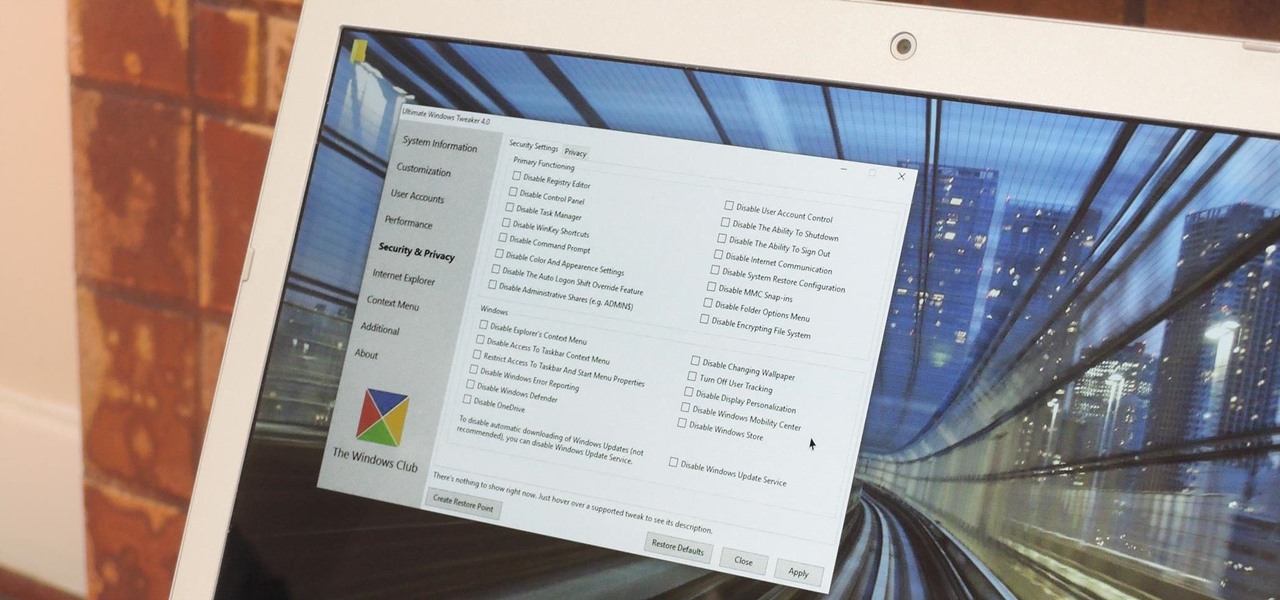
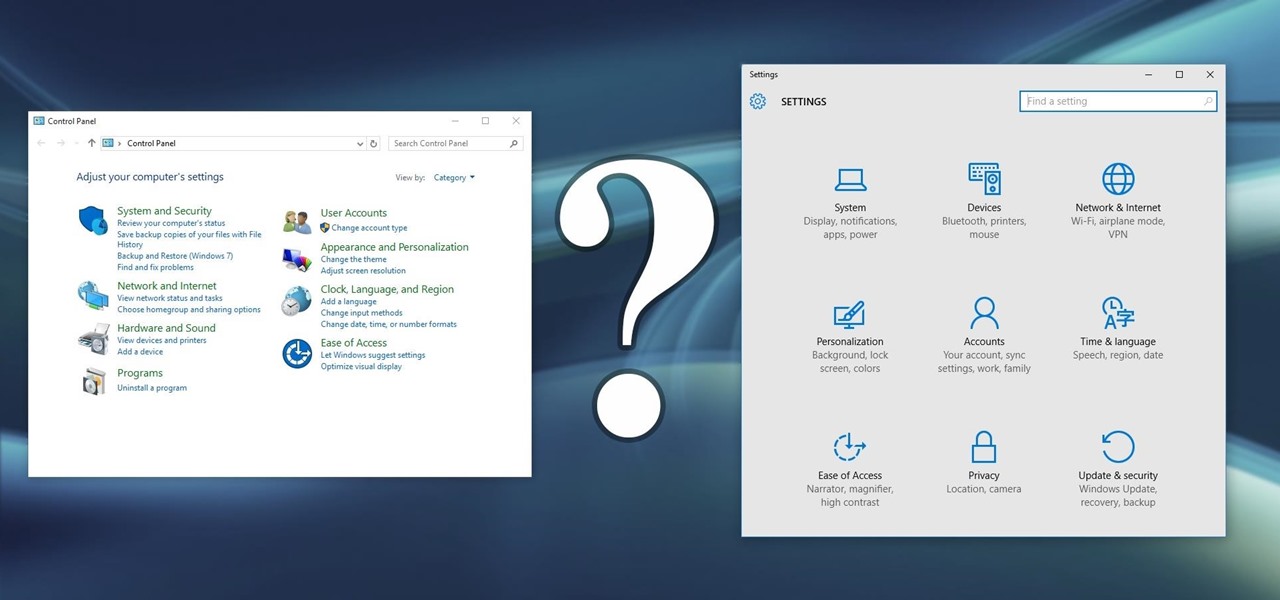
Every time Windows gets a significant update, the vast majority of existing tweaking utilities become obsolete. For every option that you fine-tuned with one of these tools on Windows 7 or 8, there's a change in the registry or system settings that cause your tweaks to now point to a dead end. This was definitely the case with Windows 10, since there were so many sweeping changes that very few existing options carried over.
Windows 7 uses several options to make it easier to change and locate the cursor on the screen. 1) To access these options select “Start” then click on “Control panel“from the menu.
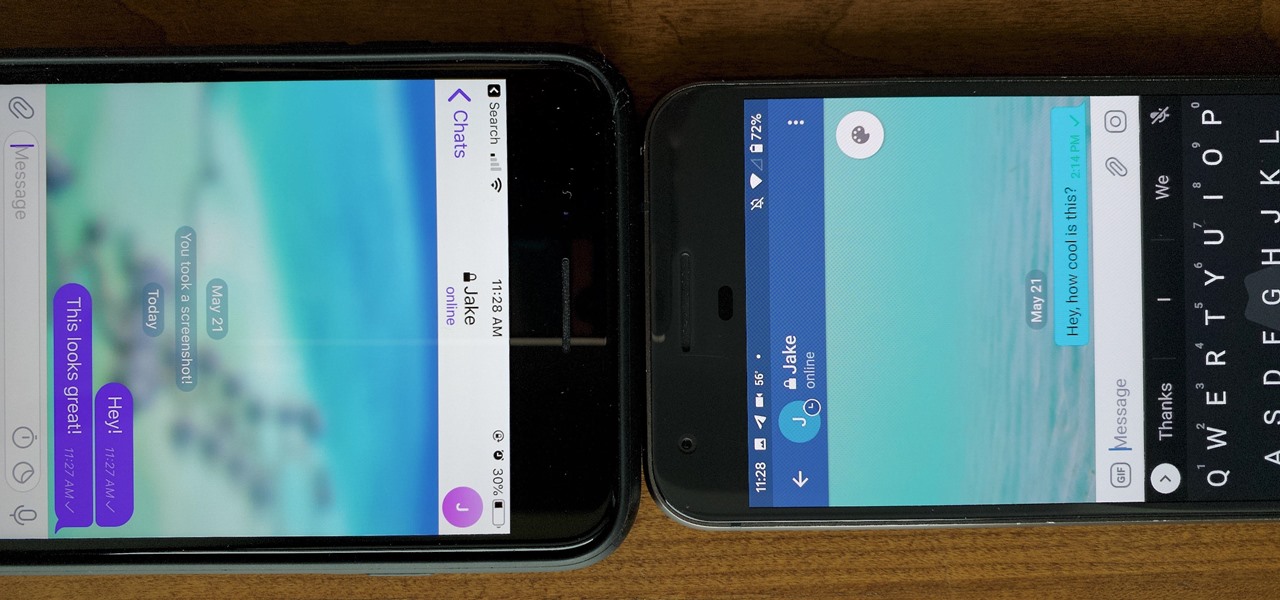
One of the more competitive aspects to chat apps these days is customizability. It seems every messenger wants to offer the largest number of options for users to make the app feel like a truly personal experience. Telegram is no stranger to this customizability, offering tools where you can select backgrounds and chat bubble colors.
Apple's iOS 13 has been available for beta testing since June, and the stable release pushed out to everyone on Thursday, Sept. 19. To help you make the most out of iOS 13 for iPhone, we've rounded up everything you'll want to know, whether a colossal feature, small settings change, interface update, or hidden improvement.
Slowly but surely, Microsoft is pushing more and more options out of the Control Panel and into a new menu simply called Settings. This new Settings menu debuted with Windows 8 and mainly focused on touchscreen-related options, but starting with Windows 10, you'll find quite a few general options residing here as well.
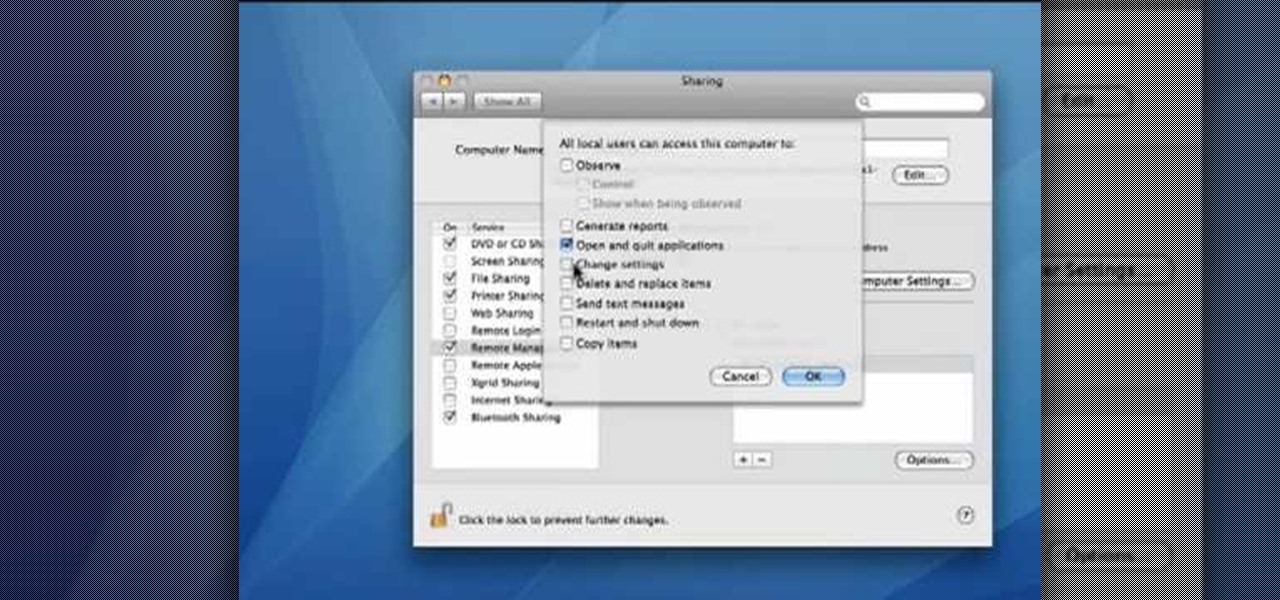
This video demonstrates how to set your Mac up to accept VNC connections.First we open up the "system preferences". Double click on Sharing and then go down to remote management and check this. We can see some options . Check the options Open and quit the application, Change settings, Delete and replace items, Send text messages, Restart and shutdown and Copy items. Then select "OK". Over here we can see "allow access for" and check "only these users". Remote management is now On. We can mana...
For that, first, click insert, select any shape from the given options. Take drawing tools from format option. In that, we can choose from the most used colors , like, black, blue and red. Also we have options like, fill color. In that, theme color can be used for different type of colors. Also there are options for gradient colors, color effects. We can make 3D effects of the shape we inserted 3D options in format option. In text wrapping option, we have edit wrap points.
In this video the instructor shows how to format tables in Microsoft Word 2007. To know how to format tables in Word, you will first have to know how to create them. This video assumes that you already know how to create tables. When you click inside a table in Word, a new tab label, Table Tools, appears above the Design tab in the tool bar. In the Design tab there are a lot of options available that can change the look of your table with just a click. To the extreme left there are three chec...
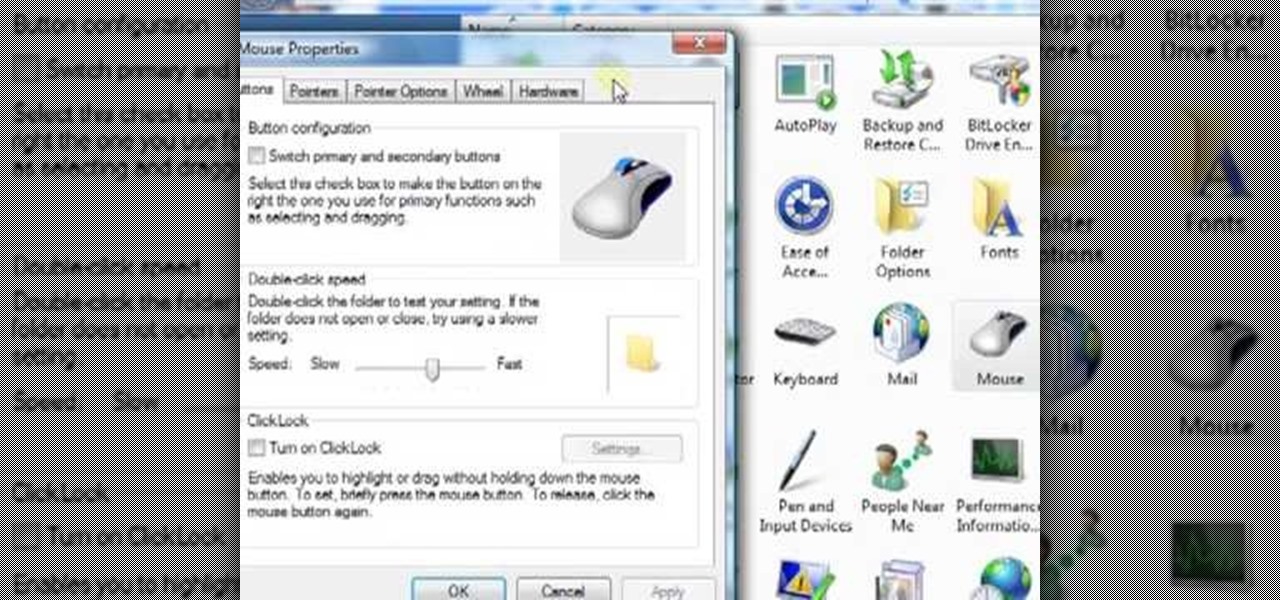
Clearinfo.com helps us how to change the keyboard and mouse settings in windows operating system. The video actually shows us the tutorial in windows vista but this can be applied also in windows xp. First go to Start button then click on control panel and on the Control panel Home view, select Hardware and Sound where you will get the mouse and keyboard setting options. Under the Classic view there will be keyboard and mouse option. Under the Keyboard options, it will show various settings a...
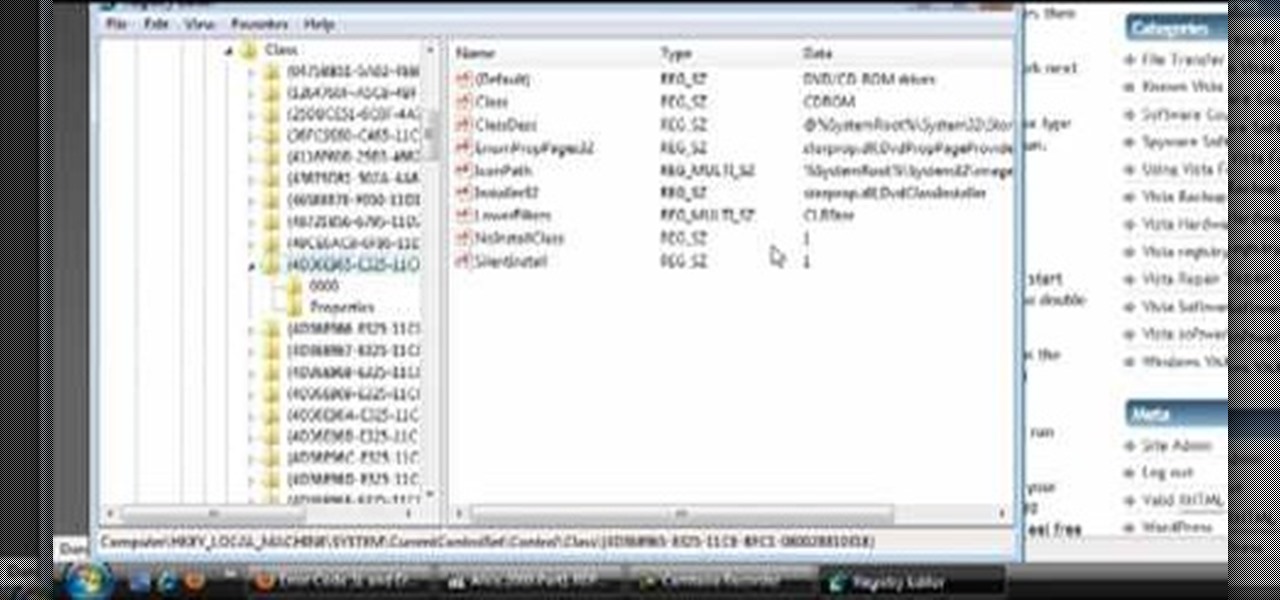
This how-to video explains how to fix DVD/CD player related issues with error code 31,32 or 19 in the computer that is having either Windows Vista or Windows 7 as their operating system.
This video is a tutorial on how to remove scroll bars, sheet tabs and objects in Excel. To remove scroll bars and sheet tabs, go to the Office button, then Excel Options. On the screen that comes up go to the Advanced tab and scroll down to “Display options for this workbook”, where you will see some check boxes. Uncheck the boxes for horizontal scroll bar, vertical scroll bar and sheet tabs. This will remove them from the current workbook. This feature only works with the current workbook.
Tired of being limited with your right-click options in Microsoft Windows? There's a program that could help you out, and it's called Right-Click Extender. Insert many different additional items to the right-click context menu.
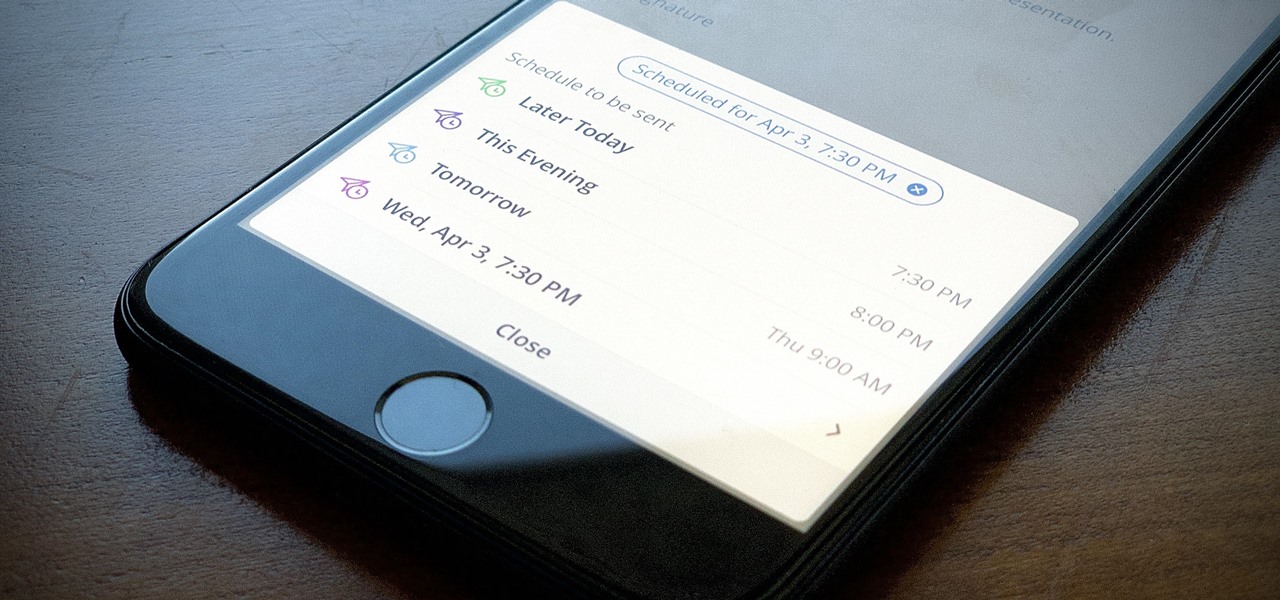
So you forgot to send that super important email to your boss, teacher, or another important contact. We've all been there. Spark makes these panic moments a thing of the past. With "Send Later," you can schedule emails to send at any time you want, even when you're not by your phone or computer. You just need to remember to write the email in the first place.
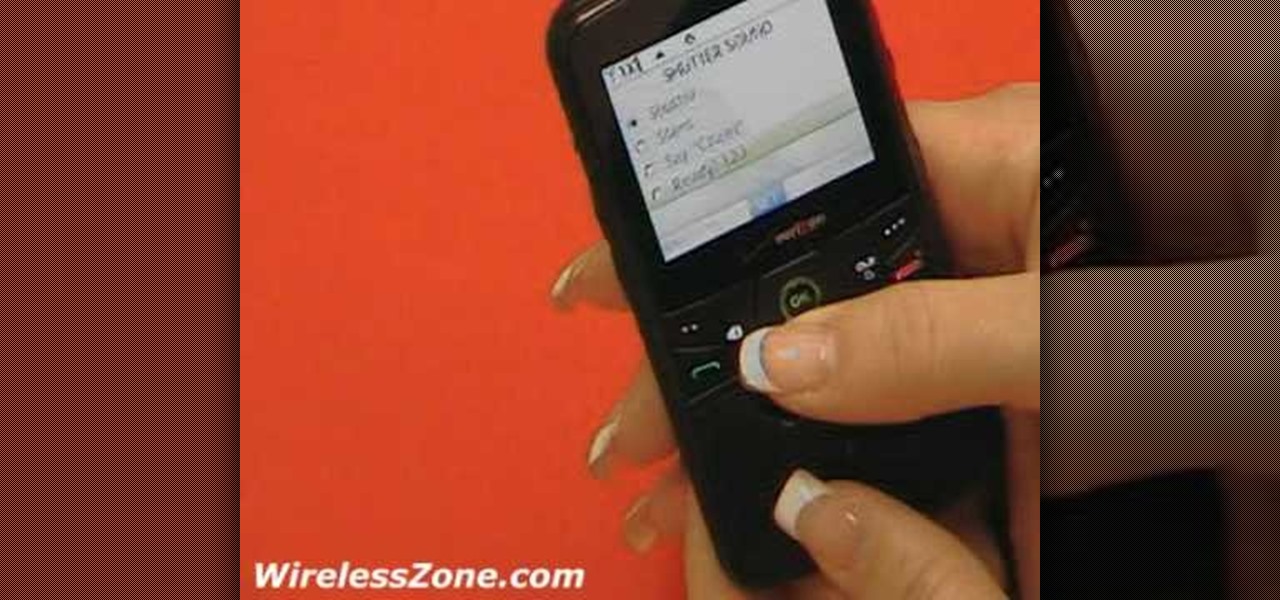
In this tutorial, we learn how to use the Verizon Wireless Razzle TXT8030 camera. This is 1.3 megapixels and has a self-portrait option on it as well. To access the camera, press the camera key on the side of the phone. Now, you will be able to view the gallery, take a picture, or see your options. The options will change the color effects, self timer, and other options for each of your pictures. Once you have chosen all of your options, face the camera at the subject, then press the middle "...
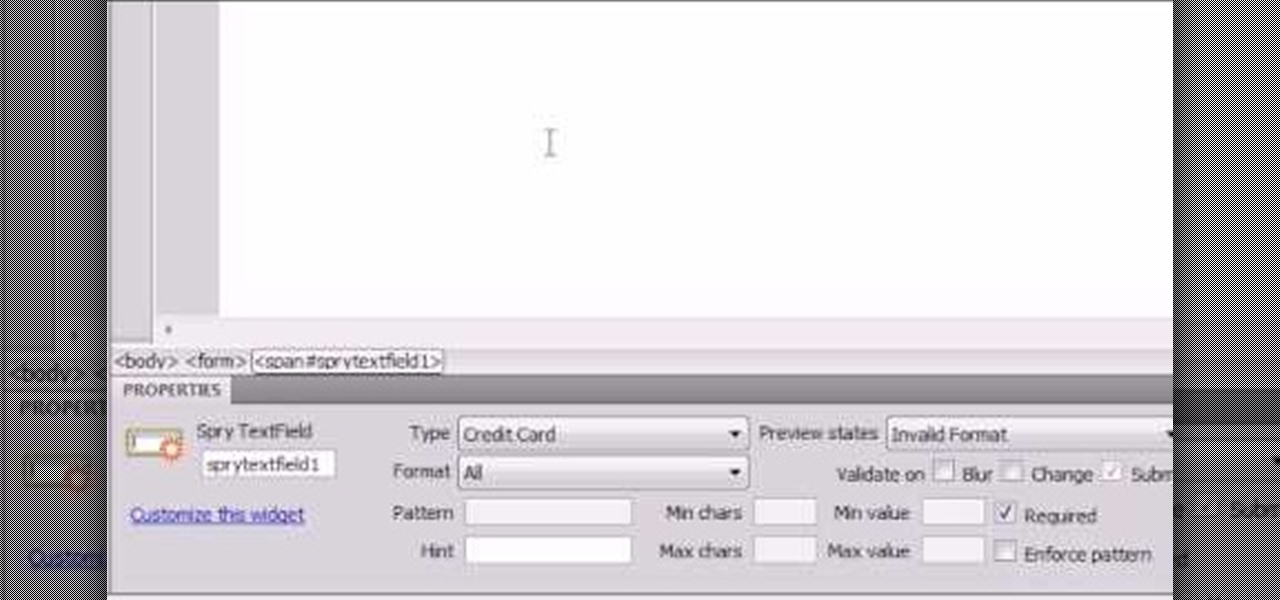
Here the New Boston shows you some tips about using the Spry Validation Text Field. To begin you will go to the Spry Validation Text Field, on Dreamweaver CS4. Looking at the bottom of the page notice the various options that are available for Properties. You find drop-down boxes for Type, Pattern, Minimum or Maximum values, Required, Enforce pattern, Format, Validate on, Blur or Change and Preview States. You can see the types of text available for validating by left mouse clicking the Type ...
Video is demonstrating a tutorial on how to tweak the settings in CamStudio. After downloading CamStudio there are a few things to be done. First Region option in the menu selected and in that full screen is selected. Then in the Options, Video Options is selected. In that both the frame rates are auto adjusted exactly to 30 frames per second. Now from the Options menu, Record audio from the microphone is selected. Now go to the Program Options, in that select minimize program on start record...
This video shows you how easy and convenient it is to use the Office clipboard in MS Word 2007. Go to the "Home" tab. Then click on the little
In this video the instructor shows how to use the Auto play feature in Windows 7. Auto play is an old feature which was also available in Windows XP and Windows Vista. When you insert any removable media into your computer like a CD, DVD or a USB thumb drive, Windows automatically pops up a Auto Play window where it gives you various options that can be performed on the recently inserted media. This feature is very helpful and helps you open your media very conveniently. The Auto play window ...
You can customize and select your preferred monitor settings to improve the clarity of your monitor display. First open the start menu and go to the Control panel. In the Control Panel select the Display link. In the Display option window to the right hand side there are a few options available. Select the screen resolution option from them. Now there are many options present in there like Display, resolution, orientation etc., Using the display option you can select the monitor you want to m...
This is a fantastic video, which guides us how to adjust auto play setting in our laptops. It shows systematic moving snapshot demonstration of the auto settings procedure of Windows 7. The speaker tells us to go to the start menu and then click on the control panel. Inside the Control Panel click on the Hardware and sound menu, which will open a new window, and then click on the Auto Play option? The window that opens now gives us several options to choose when we insert different types of d...
This video will demonstrate the process to implement page numbers in your Microsoft Word 2007 documents. The video starts out by showing the Insert Tab on the Microsoft Word 2007 Ribbon. On the Insert Ribbon, you will see an icon titled Page Number. All of the Page Number options are available when you click the down arrow directly beside the icon. The are many different position options such top of page, bottom of page, page margins, or current position. The customization options are as endl...
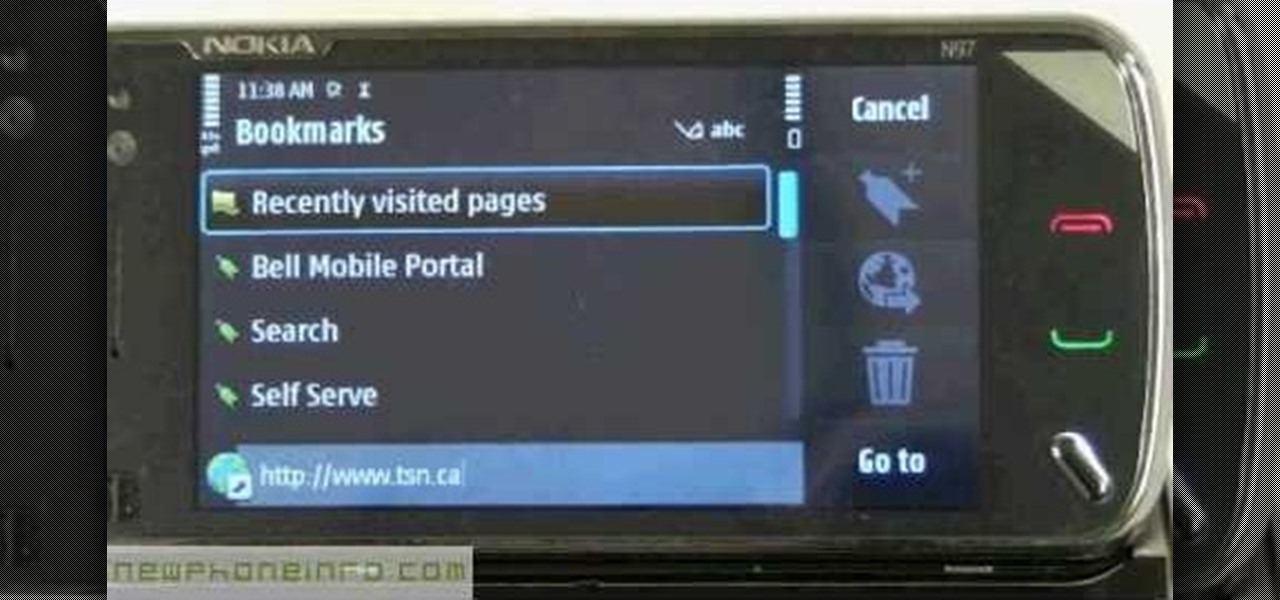
If you want to know how to use the web browser on your Nokia N97, you should watch this video. On the home screen, tap the Web icon. Bookmarks screen appears. On the right side of the screen there are icons present namely: Exit, Add Bookmark, Go to Web Address, Delete, and Options. Type in your desired URL and tap Go To after tapping the Go to Web Address icon and a URL textbox appears at the bottom. Wait for the webpage to load. If you want to display some options, tap the Expand Sidebar ico...
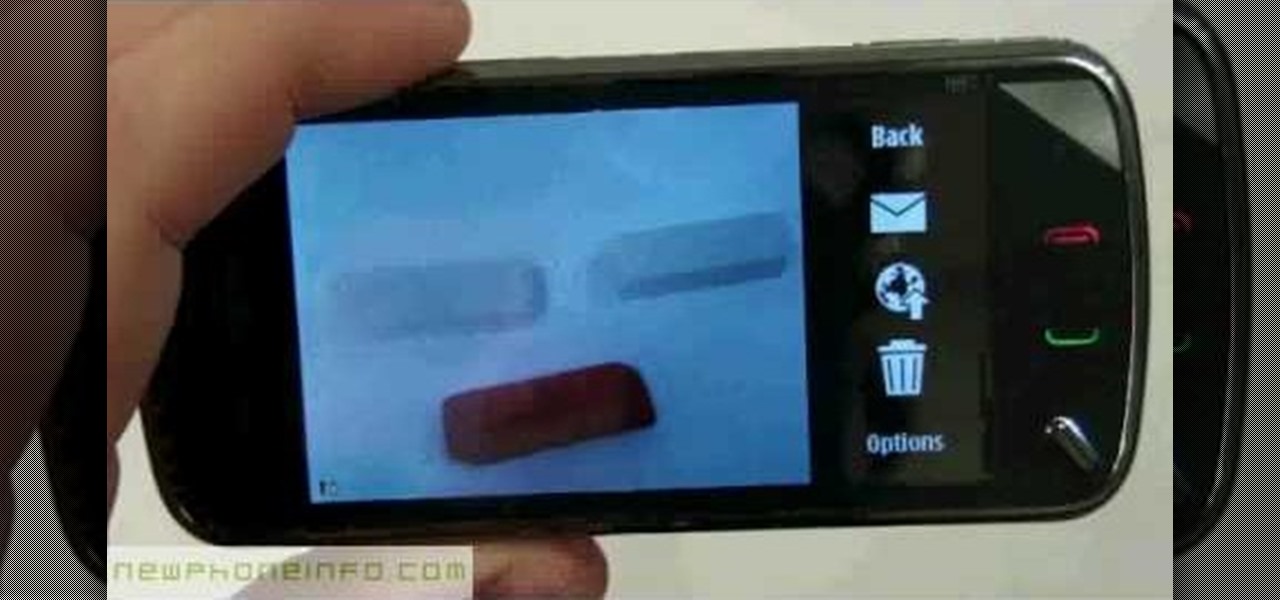
This video will show you how to use the camera of Nokia N97. To use the camera of Nokia N97: Turn on the camera and open the lens cover or press the Capture key. In your view finder, you can see: Exit icon, Camera icon, Flash icon ,Expand Toolbar and Options icon. Tap the screen to use the Zoom Slider. You can zoom in or out by scrolling the Zoom Slider. To take a photo, tap the Camera icon. Once a photo is taken, another icons appear: Back icon, Message icon, Email icon, Trash Can icon, and ...
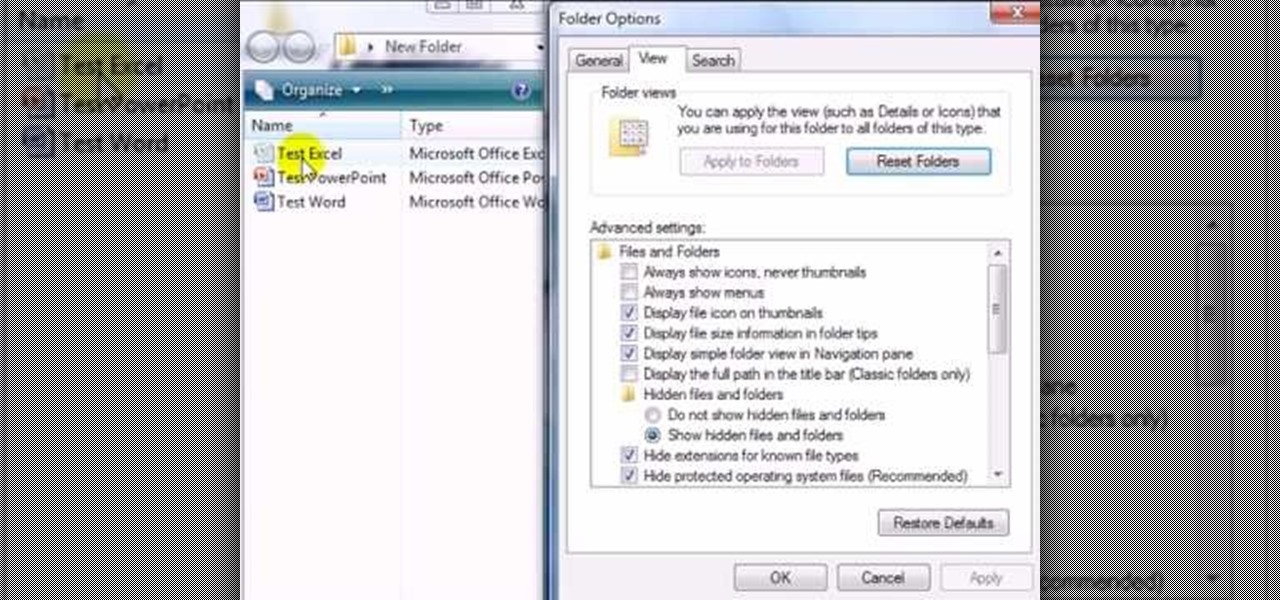
This video shows you how to easily hide or unhide files and folders and how to edit extensions of files. The first thing you have to do to hide or unhide files and folders is to open Control Panel and then open Folder Options. Next, click the View tab in the upper menu and check one of the following options: Do not show hidden files and folders or Show hidden files and folders. You can hide a file or a folder by making a right-click, then clicking properties and then check the Hidden File box...
This video explains how to delete cookies in Windows XP, Mozilla Firefox, Internet Explorer and Opera. To delete cookies in Mozilla Firefox, choose the "tools" option from the tool bar, then choose "options", then choose "privacy". Many options will be given under the "privacy" menu, but make sure to choose the following options- "accept cookies from site" and "accept third party cookies", then choose the option "I close Firefox option" under "keep until" then choose "ok" to delete the cookie...
For those of you who like to frequently change the icon shapes on your home screen, the process has changed in Android 10. The setting is buried and now applies to more than just home screen icons.
For people that like to get things done, Android's home screen widgets are almost indispensable. Rather than packing your launcher with a bunch of icons, you can utilize widgets to get quick information in a beautiful package or provide one-tap access to a particular functionality within your apps.
There are quite a few media devices going on inside a 2010 Ford head unit. In this video, you will learn how to manage and use all of the different options inside your head-unit and get started. This media player can be used for music, radio, phone and many more options. You will also learn how to rip music and add it to your head unit - you even get 10 GB of storage!
This web development software tutorial shows you how to create a custom left panel for a website using XSitePro 2. The options for XSitePro 2 have changed from XSitePro 1. Now, it's easy to change the right panel, but the options to change the left panel have been hidden. Watch as Jason shows you how to rebuild the template in XSitePro 2 to allow you to modify and customize the left panel.
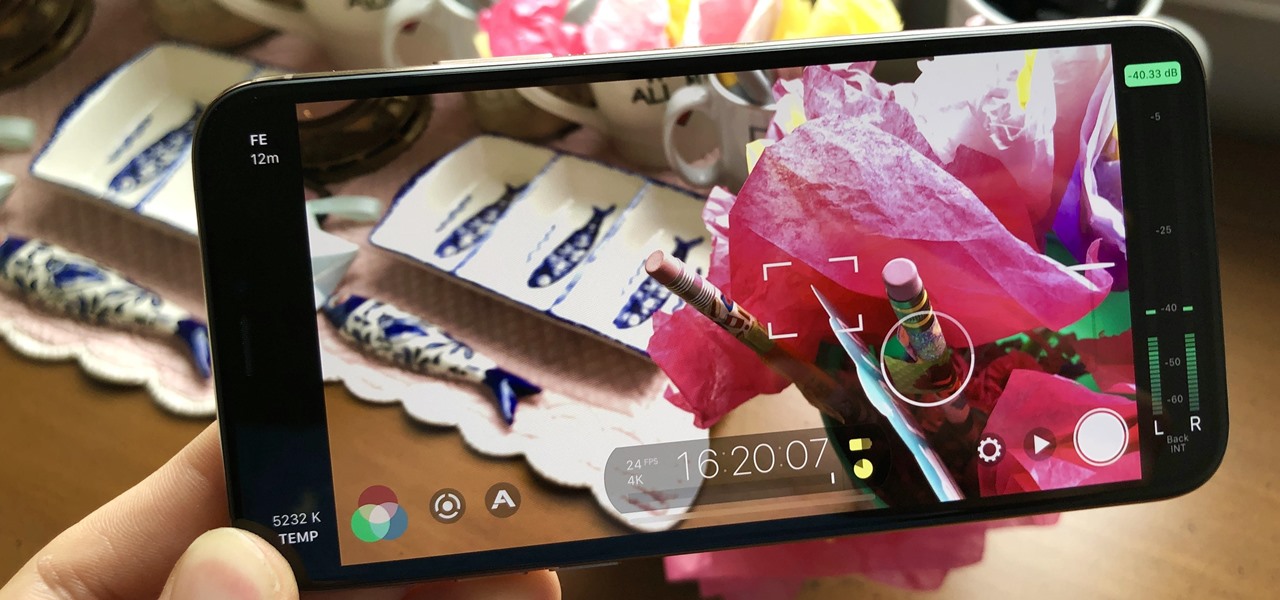
If you have a modern iPhone, you have an excellent video recorder at your disposal. Every iPhone since the 6S has the ability to shoot in 4K resolution, and each new iteration has brought new capabilities to the table. But even the best mobile shooter can use a little extra help. That's where these video recording apps come into play, to ensure the footage you capture is as good as can be.
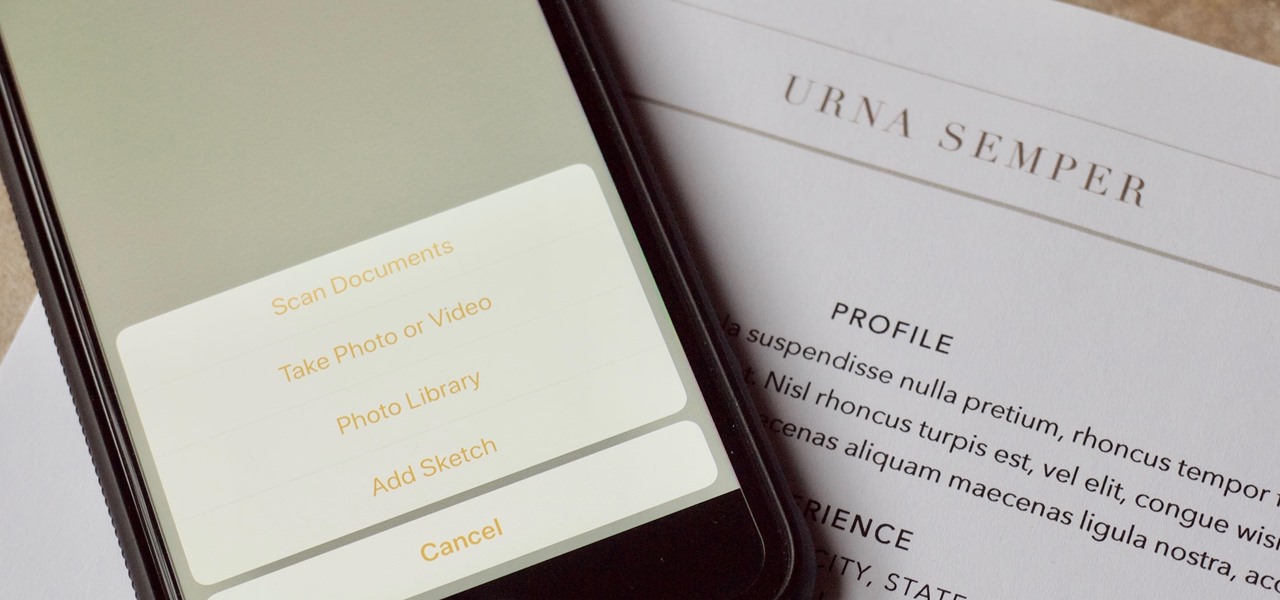
There are plenty of third-party apps for scanning documents on your iPhone, but they can all be tossed out the door since iOS 11 includes one by default now. Instead of a dedicated app, it's included as part of the Notes app, and it's fairly easy to use. After scanning, you can save it, print it, turn it into a PDF, add markup, and more.
Hi, gang! Time for another hack using Metasploit. We have exploited Windows XP (a very insecure operating system) and we have exploited Ubuntu and installed Meterpreter on a Linux system exploiting the Samba service. Several of you have asked for a hack on more modern Windows systems, so here goes.
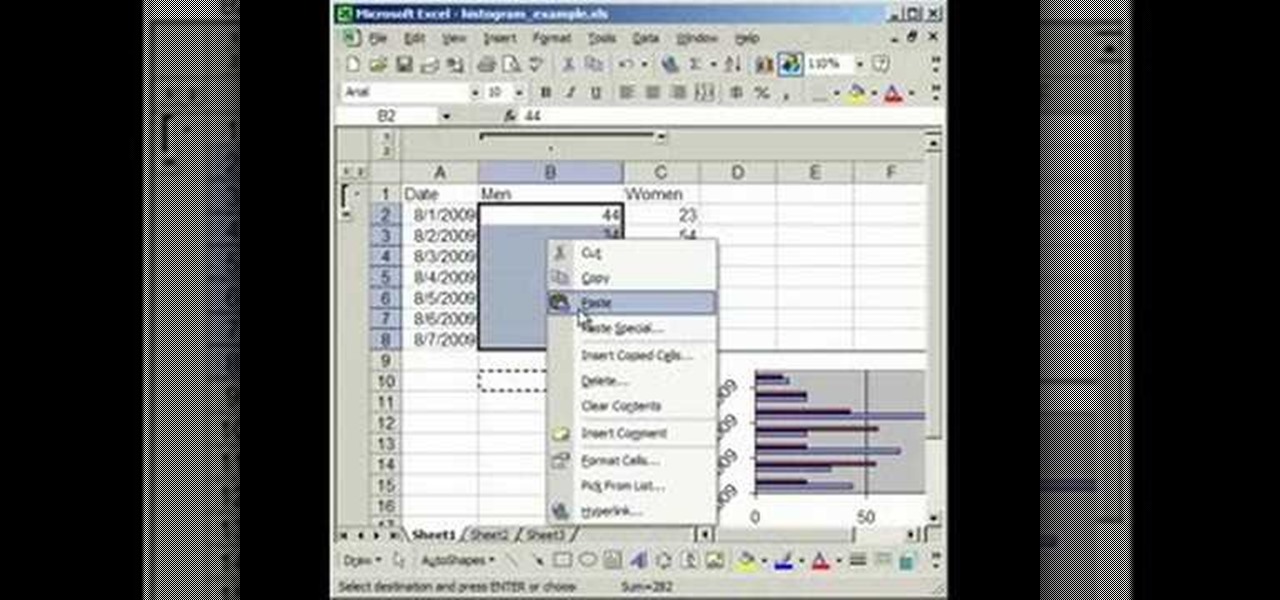
In this tutorial, we learn how to make a histogram chart in Excel. To create a vertical histogram, you will enter in data to the chart. Then, highlight all of the data and go to "insert", "chart", then choose a regular column chart. Grab a regular 2D column and then make sure your values are correct. Then, right click and go to "chart options", then take the legend off. Now, make these columns all touch each other by right clicking over the columns and formatting them. Go to "options" then ch...