Six Minute Style host Susan Doherty is on location in Montana at the Nine Mile School house with Kurt Seer who shows how to create a 3 dimensional wreath mobile. He uses birch as his base. You can use any wood you choose. Make a square out of four branches. Knot, tie and twist floral wire at cross sections of the wood frame. Leave a little tail for the decorations. Tie dried rosemary in the wire tail. Tie leaves and greenery around the frame using wire. Not only for Christmas, you can create ...
Preserve the beauty of your flowers by pressing them. One of the simplest ways in doing that is to press between pages of a book. It's wood, over cardboard, over absorbent paper. The flowers are placed between the paper and then held and pressed down by the cardboard and wood. It's then going to dry over time to preserve your flower. Now some flowers don't dry as well as others. What you can do is purchase some silica sand and burn the flower within it. It usually takes a couple weeks this wa...

In this video Phil teaches us how to use a good ball position when using irons and woods. He starts by saying you are going to want to the ball to be in different positions with different clubs because its going to make a difference. Starting with an iron it is important that you strike at a lower arc or descending hit. Its important that you're not too far forward because it will make it more difficult to hit the ball. Now when you're using a driver its different because the ball is up on a ...
For this project you will need 2 Wooden palettes (long as you can get), angle iron (coping made from steel), Sheet of ply (or any other wood will do fine) and the usual tools like nails, hammer and saw. Stick the two wooden palettes together using glue and make sure they're dry before using them. Cover them on all sides using the ply wood. Next, place the angle iron on the side of the top palettes, for grinding. Leave it all to dry and make sure it doesn't bend or break before using it.

In this video tutorial, viewers learn how to burn fat with a cable workout. These exercises will require a cable machine. There are four exercises in this workout. These four exercises are: cable wood chop, reverse wood chop, one arm cable row and exercise ball cable crunches. When performing these exercises, do not use a heavy weight. These exercises mainly target the abdominal and core muscles. They also target biceps, obliques and back muscles. This video tutorial will benefit those viewer...
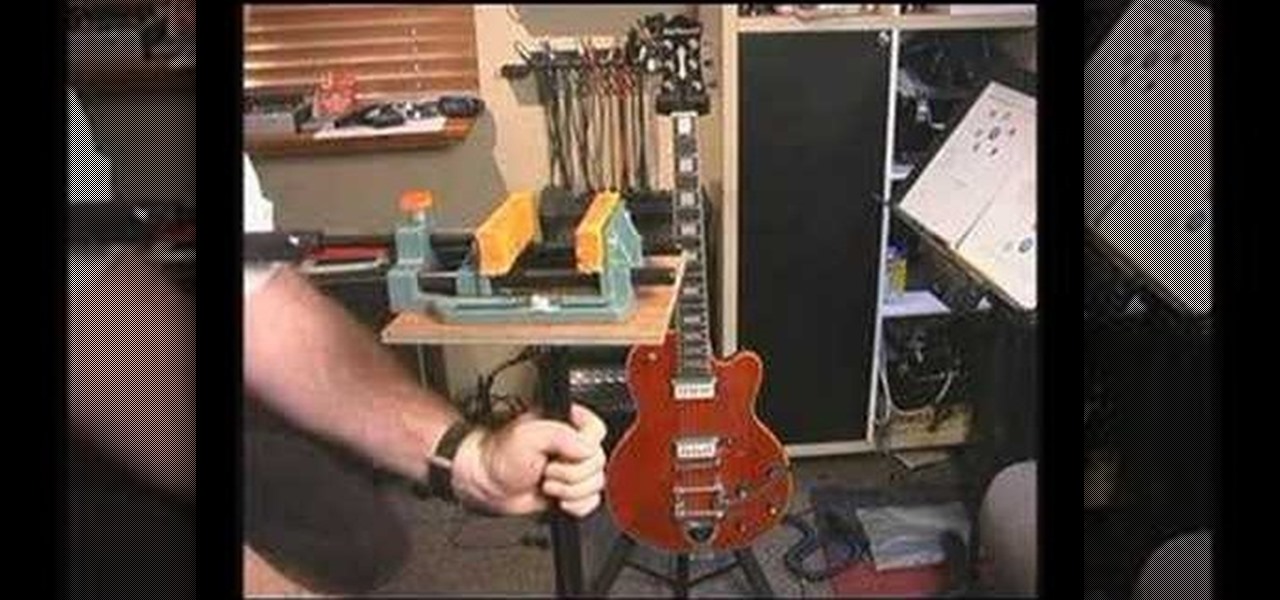
This video explains how to build your own guitar maintenance jack. This helps when you change a lot of strings and do other maintenance work. It starts with an old roller stand and uses the bracket to apply just a piece of wood. It is adjustable, which makes it very handy to adjust the height of your guitar. On top of the block of wood, attach a vice with corked pads and a layer of glued leather to get a grip on the guitar. This allows you to put your guitar at any angle by bracing either the...

This video teaches the secrets to sharpen a convex wood carving knife in simple steps. First find out how dull your knife is by cutting a paper or shaving hair on you hands. Now take a sand paper attached to a pad and start sharpening the ends by applying less pressure. Now try the sharpness of the knife, it will be better. Now take a double sided strop with sharpening compound and start rubbing the knife edge. After sharpening try the knife again, it should be good enough.
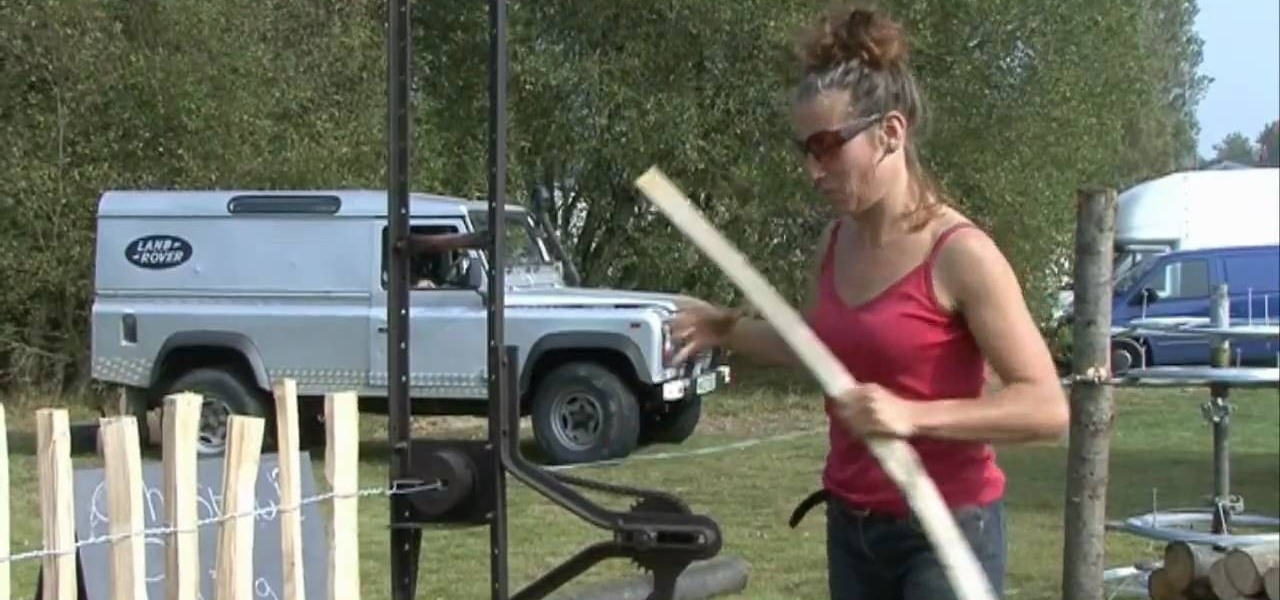
Learn how to make chestnut paling using a paling machine from Aly May in simple steps. First tie the strings up and down in a wooden pole according to the length you need. Start by placing the wood in between the strings upside down fitting perfectly. Now roll the machine to twist the strings and repeat the same till you get your desired length. You can also use wood with sharpened edges if you want to make a fence. It can be also used for some events but you have to change its length and dur...
Professional furniture makers have used pocket hole joinery for years... and for good reason. It's a simple way to achieve a strong, permanent joining of two pieces of wood.
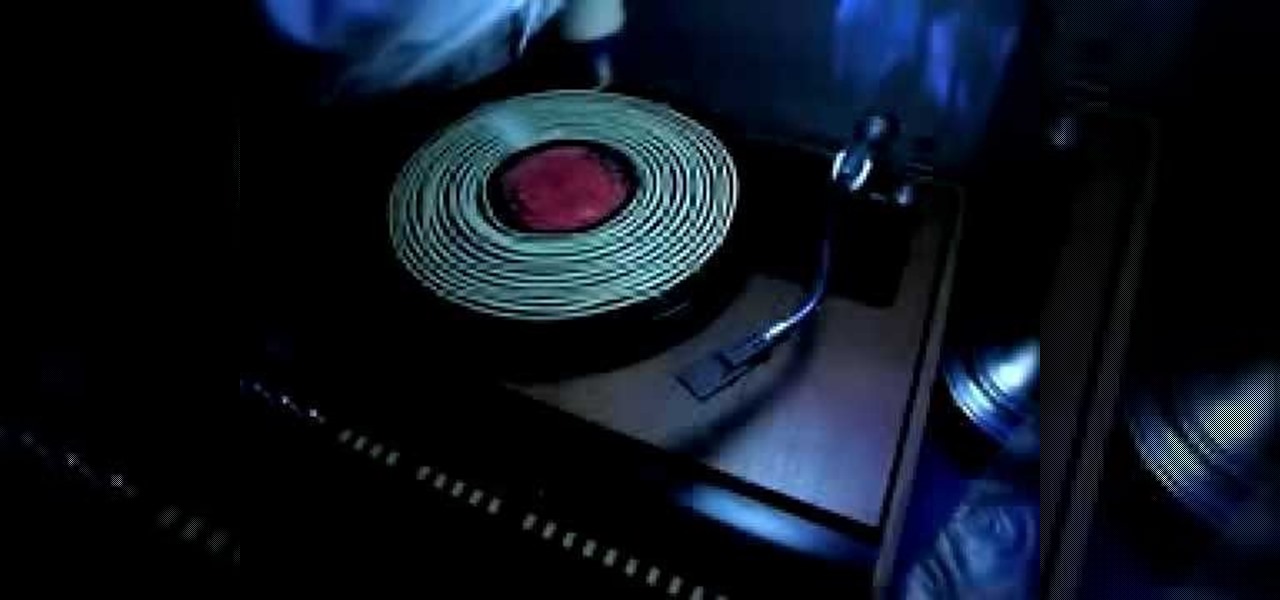
This video shows how to clean old records using Titebond II wood glue. He has the record turning slowly on the turntable, and while it's turning, slowly squeezes a line of glue around and around onto the surface of the record, starting from the middle. He explains that it takes between four and twelve hours for the glue to dry completely. After the glue is applied to the entire record, he takes an old credit card and spreads the glue evenly onto the record, all the way out to the edge. When t...
Hak5 isn't your ordinary tech show. It's hacking in the old-school sense, covering everything from network security, open source and forensics, to DIY modding and the homebrew scene. Damn the warranties, it's time to Trust your Technolust. In this episode, see how to turn a Fon+ wireless router into a network tap.
Whittling seems hard, but not with this video tutorial... watch to learn how to carve a teeny wooden mouse with a small knife, sander and drill.
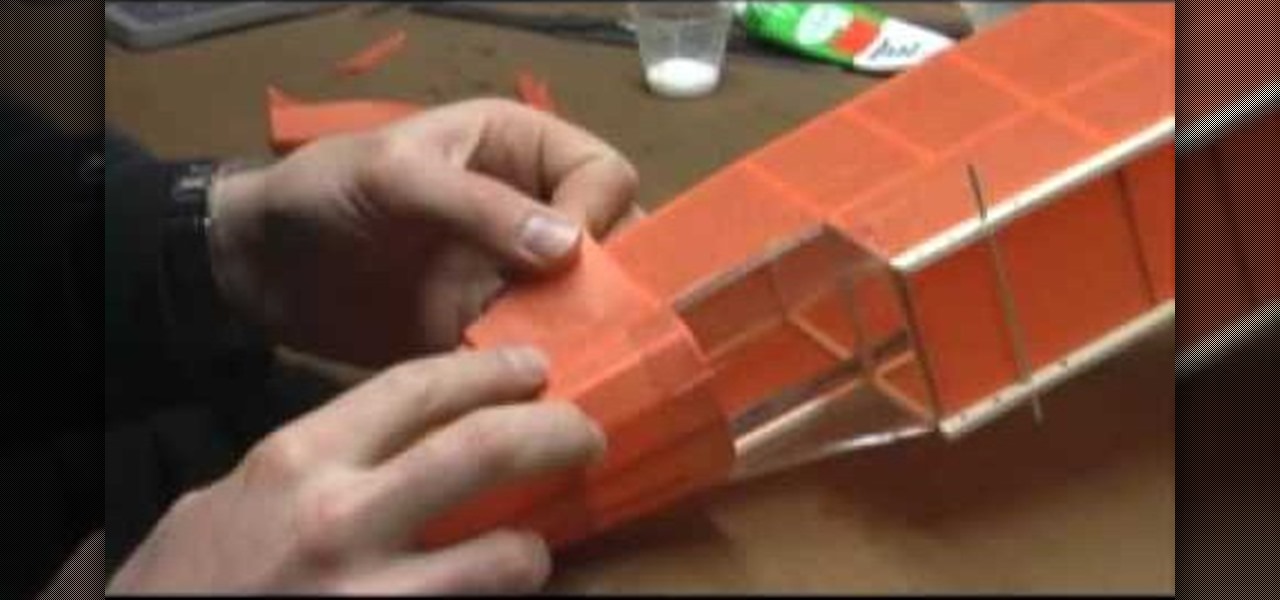
When you're flying your model airplanes, it's inevitable that it will eventually suffer some minor damages, like scuffs, breaks and bends. This video tutorial will help you alleviate and repair any damages to your flying model airplane to get you back in the skies again.
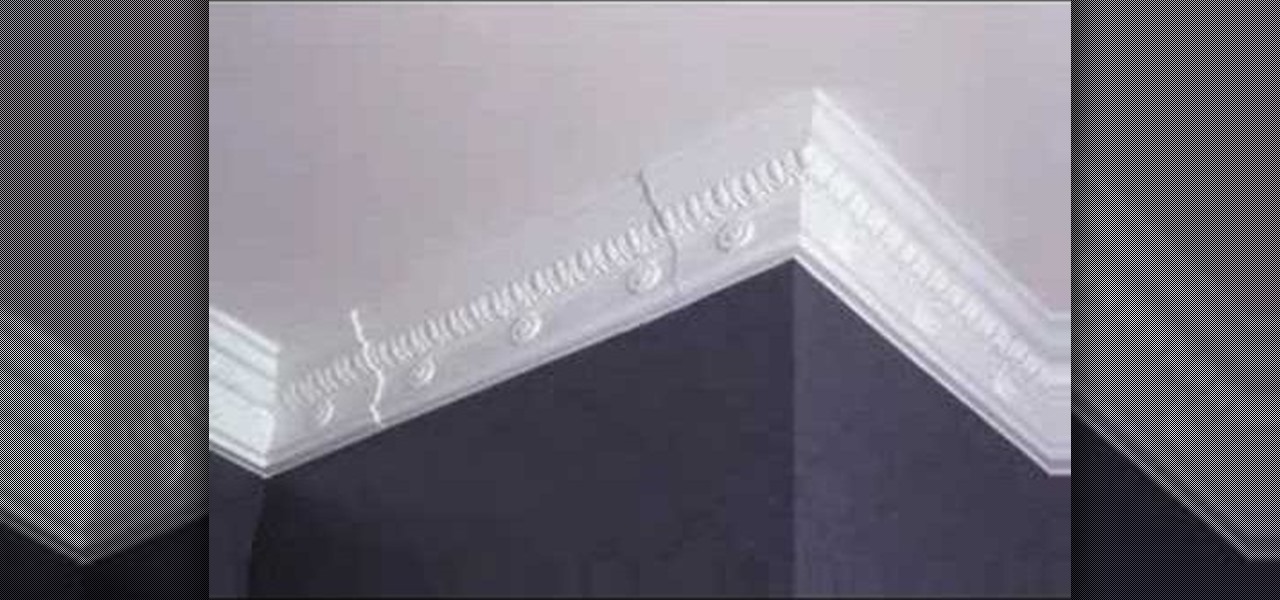
If you're looking to dress up an ordinary room, think about installing crown molding (also spelled moulding). Very few additions make a visual impact like crown molding, which gives a subtle yet elegant design element to any space. And with the proper tools and set up, installation can be easy. While wood is a common choice for crown molding, urethane is also a popular material. For a recent project we installed Fypon urethane crown molding, which is lightweight, flexible and looks like solid...
In this tutorial, you'll see how to rough out a natural edge bowl with a Ci1 Easy Rougher (using a suboptimal piece of wood). The wood used in the tutorial is "shinoki," which is a kind of oak, and the lathe is a Nova DVR 3000 wired for 200V. Watch this video to get started roughing out your own natural edge bowl.
In this tutorial from the Scrollsaw Workshop, Steve Good demonstrates how to cut a tall clock using a pattern available at Steve's blog, scrollsawworkshop.blogspot.com. For this project, you'll need a clock face, wood of your choice (two 5" by 10" pieces and two 3" by 10" pieces) and a piece of contrasting wood for use around the border. Make time for this time-making tutorial; you'll be glad you did.
Azaleas are relatively care free. To ensure they look their best they require adequate moisture. Make sure the roots in particular get plenty of water especially during the first year or so. Mulch is important, two or three inches of horticultural mulch like straw or pine bark will help protect their roots, which grow close to the top of the soil. They don't need to be pruned. If you want to shape or remove dead wood, wait until after they bloom. By doing it at this time the dead wood is easi...
To keep fungal pathogens at bay in their crowded homes, wood ants mix potions to create powerful protection for their nest and their young.
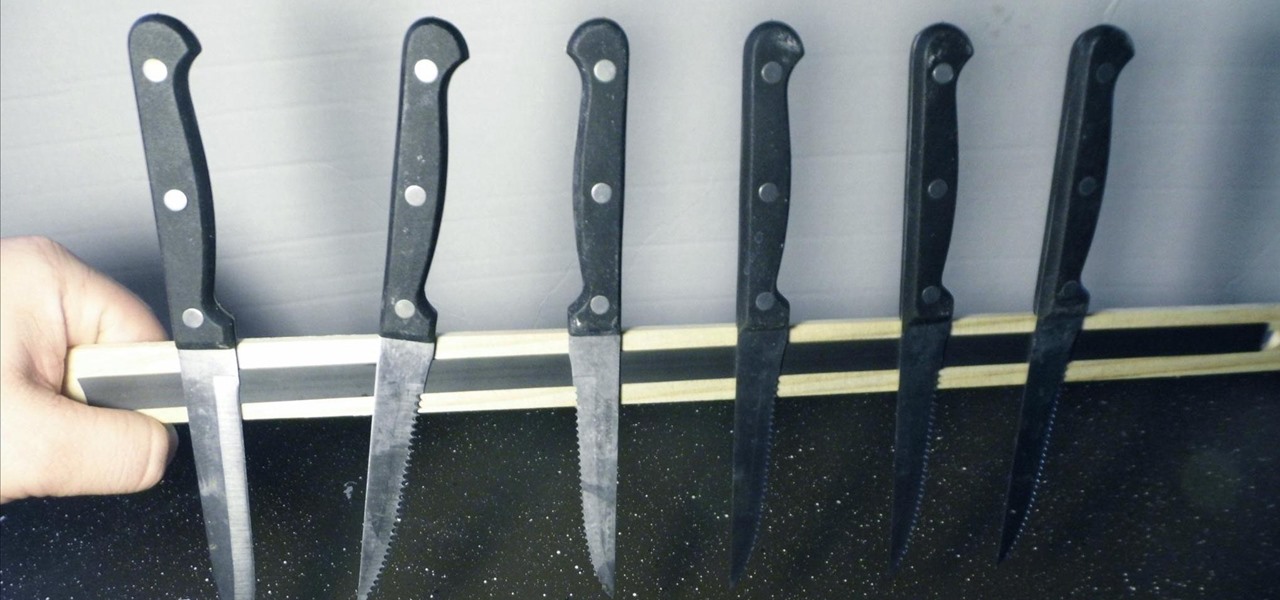
Magnetic knife strips are really handy. They allow for the removal of that huge knife block on your countertop, freeing up valuable counter space. They allow for easy access to your knives as you can mount them pretty much wherever you want. Plus, they look really cool, too!
Watch this instructional model making video to learn some of the pros and cons of making miniature game terrains out of wood. The wood models are certainly more durable, but they take a lot of work to build. The foam models go rather quickly and can take on more naturalistic contours. It's possile to coat wooden miniatures in plaster and texture for similar effects. Wooden miniatures are certainly more durable as outdoor and garden pieces.
Tim Carter demonstrates how to install a finish nail using a hammer and nail set. Tim also shows how to do it the fast way with a powered nail gun!
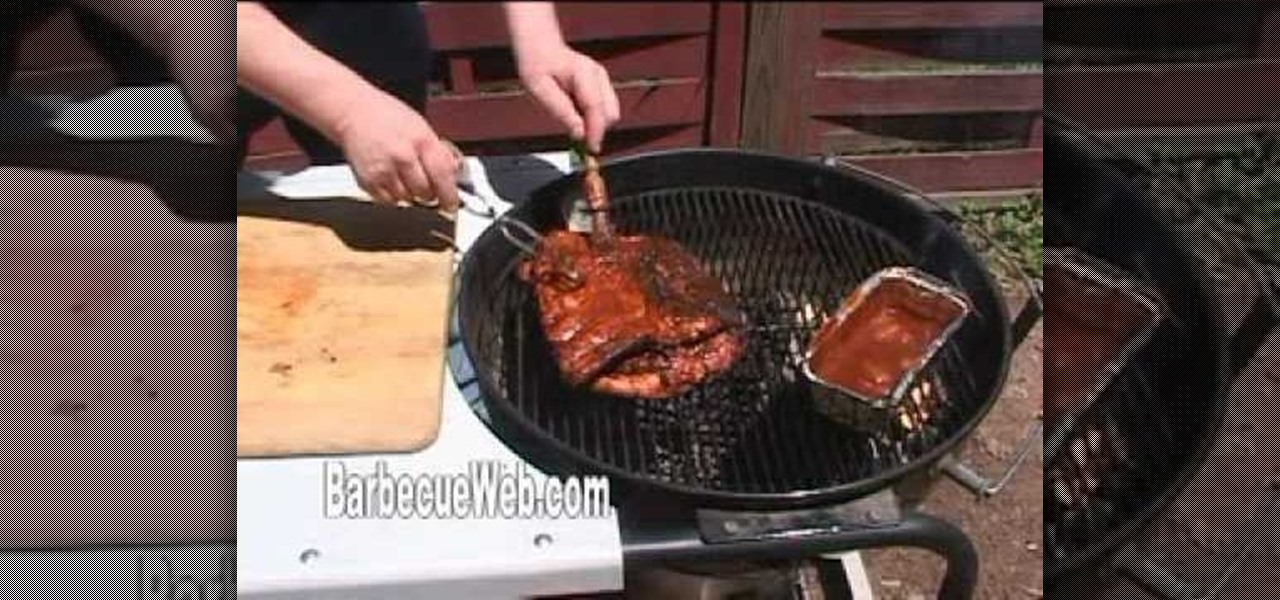
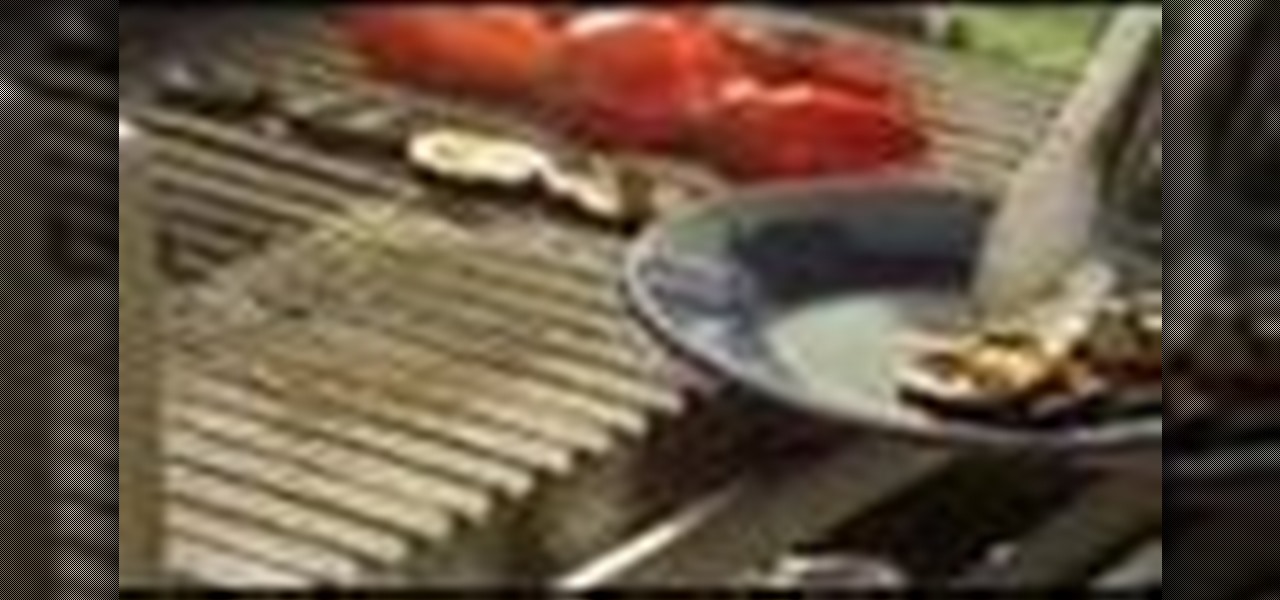
To make these BBQ ribs, start by collecting the necessary ingredients which include the pork back ribs, a dry rub, a sauce and a grill. Then get your fire started and raise the temperature up to 400-500 degrees so you can clean your grill. Next, prepare your ribs by cutting them up to the right length and cover all sides of the ribs with your favorite rub. Baste the ribs and stack them on the grill, cooking them at 225 degrees. You can also add wood chips such as hickory wood chips to give yo...
In this video, Steven Raichen demonstrates how to make a quick and delicious meal of Argentine "gaucho grilled" filet mignon with grilled eggplant and peppers. In his travels around the world, Raichen became fascinated with the rich, slightly smoky flavor of steak cooked in the traditonal Argentine method, and decided to find a way to replicate that flavor quickly and easily. To do this , Raichen uses a traditional wood-burning grill from Grillworks (to purchase, contact Grillworks at 202-758...
This video shows you how to make a tech deck quarter pipe. You will need the following materials: wood pieces, cardboard, a small metal bar, glue, and scissors. The first thing you will need to do is cut out the base, this requires cutting out three equal parts (as seen in the video). The base pieces are then glued onto a back board for support. Small slits are then cut in each base to allow space for the metal bar. Glue the bar onto the base, making sure that only the bottom of the bar gets ...
Graham Potter of Kaizen Bonsai shows Bonsai beginners how to make interesting trees from relatively available materials. He first details the history of the specific tree he will be working on. He points out that this specific specimen has small, compact foliage, branches that support itself, craggy bark, and a nice taper in the trunk. He begins to shape the tree by cutting the small amounts of foliage that are dead or weak as well as the foliage grows beneath the branches. He then uses hand ...
Start by putting tape around the area that you want to patch. This will keep the wood filler from getting all over the rest of the floor. If there is anything down in the floor like dog hair or crumbs make sure you get that stuff out before you put the wood filler in the area. Then take some wood filler in a plastic tube and put a line of filler in the hole. Use a putty knife to force it down into the area you are filling and then scrap the excess off. Do this until the hole is completely fil...
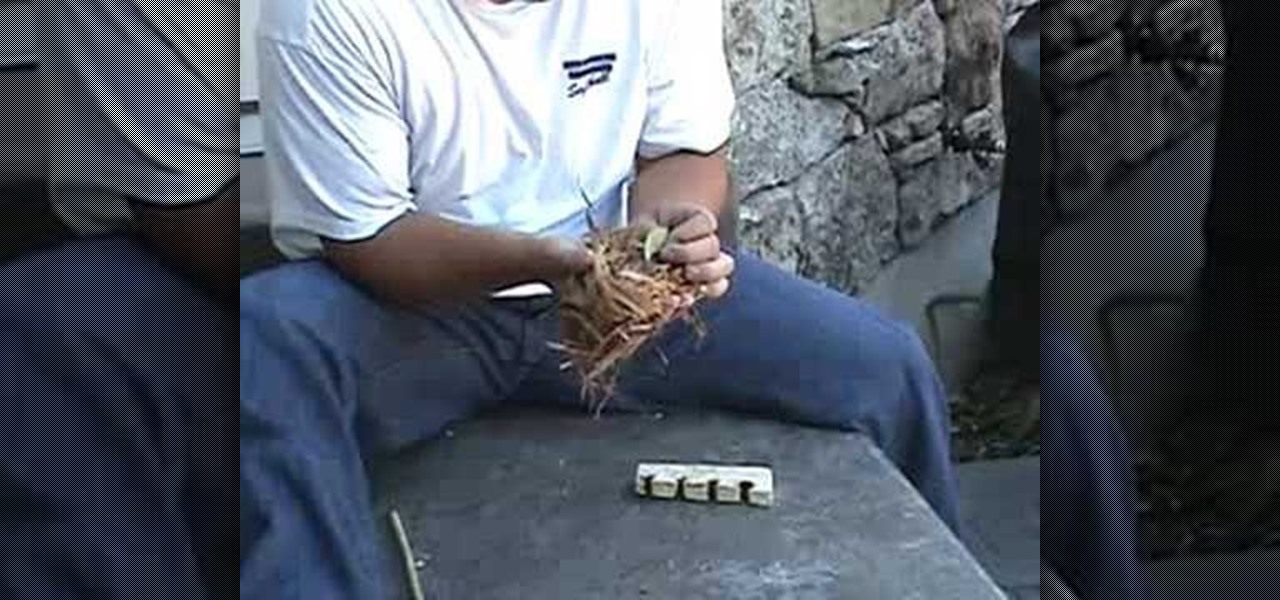
This video explains how to start a fire without matches through the use of a hand drill. To start the fire, the process consists of the use of a straight stick or weed such as goldenrod to be used as a hand drill. Hold the stick between both hands while holding it against a piece of wood which has a notch along the side. Press the hand drill stick against the wood near the notch and proceed to roll the stick between both hands. This action will result in the production of heated ash which wil...
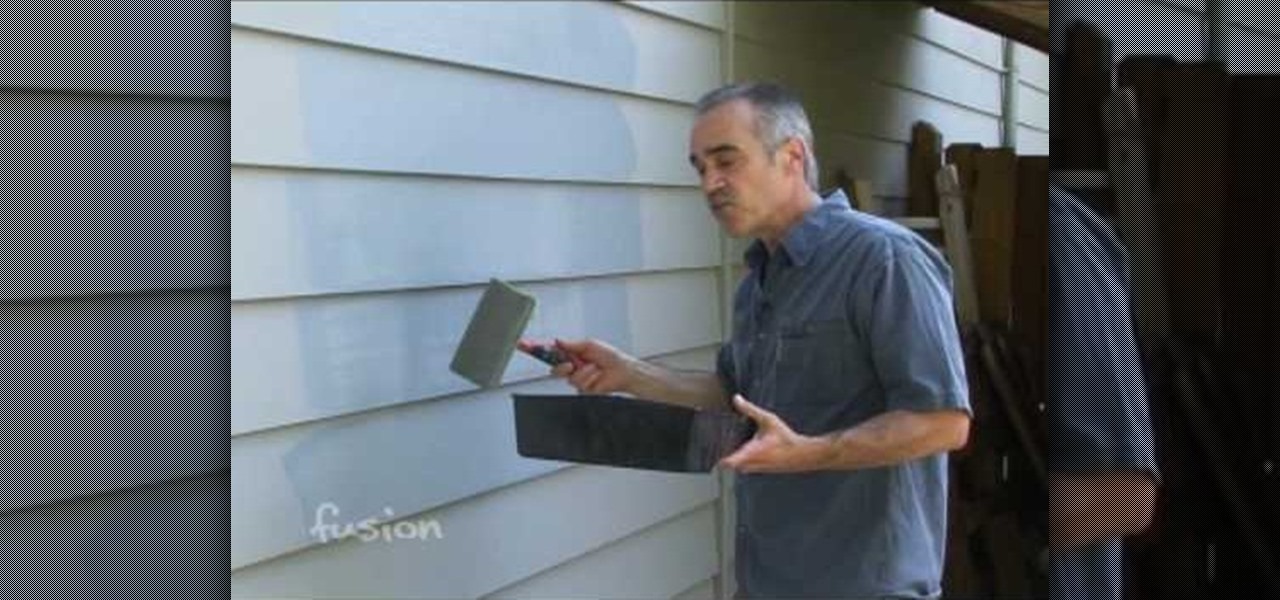
This video describes how to prepare for and execute painting your home. To begin, you should power wash your house to remove any dirt, dust, cobwebs, etc. These would prevent the paint from setting properly, unless it was new wood. If it is new wood, you should put on a beige coat first. However you begin, you should let either method dry before moving to the next step. After it dries, you should apply a weatherproof and paint-over caulk to the cracks to keep out moisture and insects. After t...
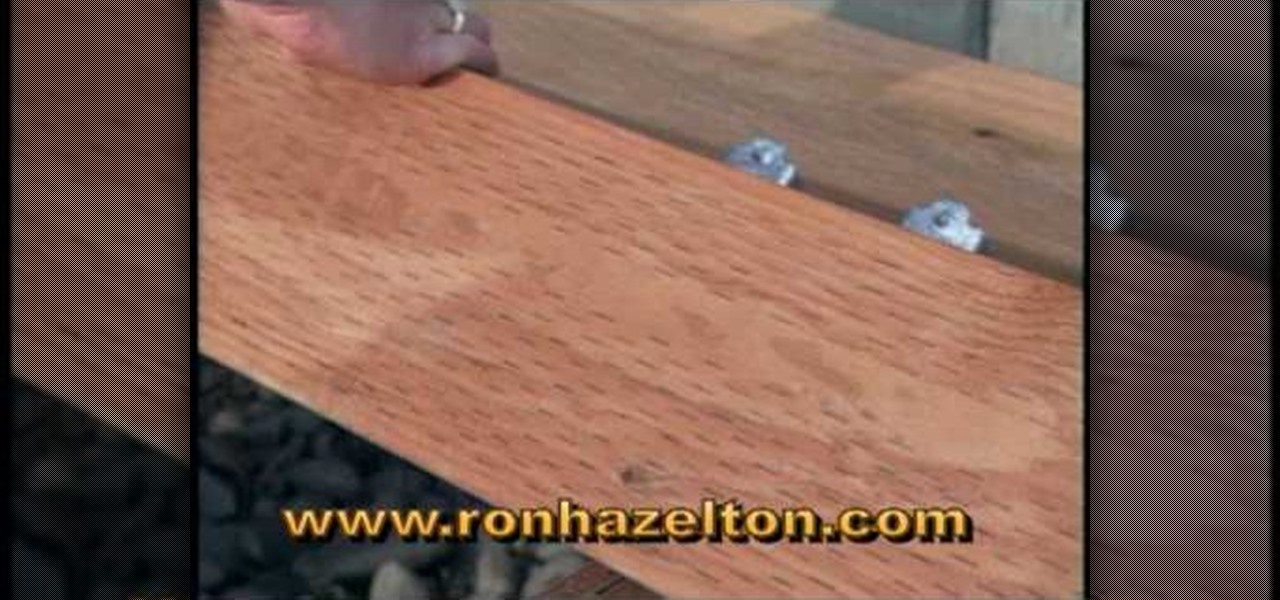
If your decking boards need to be replaced it is really not that difficult. Start by removing the facia or edge boards that hold the decking boards in place using a crowbar. Remove the decking boards from the joists. Check the joists for dry rot while you have the decking boards off by poking them with a screwdriver. If the wood is soft and the screwdriver sinks right into the joist then you may need to replace that joint because it is dry rotted. When replacing the decking boards it is best ...
Looking for a new DIY project? Follow the steps in this video to get a great view of big blooms and colorful posies with box planters hung beneath your windows.
Need a change? Brighten up your kitchen and give your cabinets a new look with a fresh coat of paint. In this tutorial, learn how to paint your kithcen cabinets a fast and efficient way.
Eagle Lake Woodworking, hosted by John Nixon, offers great do-it-yourself guides for building your own furniture, especially in the American Arts and Crafts style, and turning your garage into an amateur woodshop. Search Eagle Lake on WonderHowTo for more carpentry tutorial videos. From Eagle Lake Woodworking on this specific lesson:
Wash your window blinds with a minimum of mess. Howcast presents you with tips on how to effectively clean your window blinds. Blinds can be tricky to clean, so pay attention.
Plate joiners are wood working tools used to join two pieces of wood together with a wood biscuit, get expert tips and advice on using and maintaining a plate joiner in this free video series.
It looks like Snap's foray into augmented reality billboards last year was successful, as the company has returned with two more outdoor advertisements for its Snap Originals series.
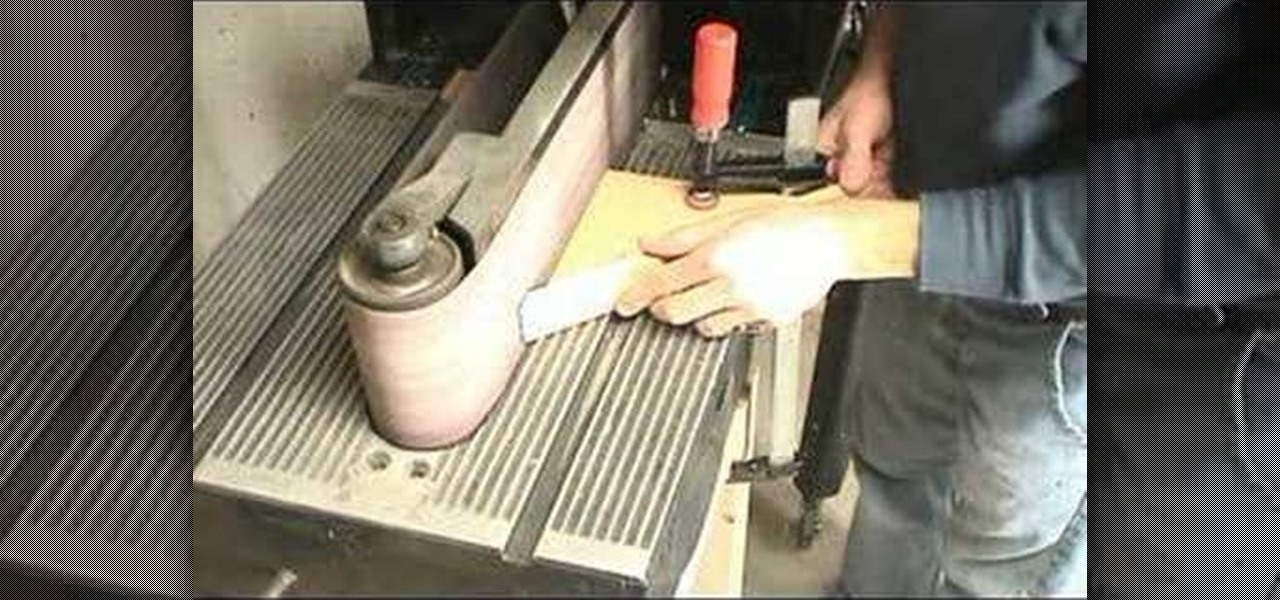
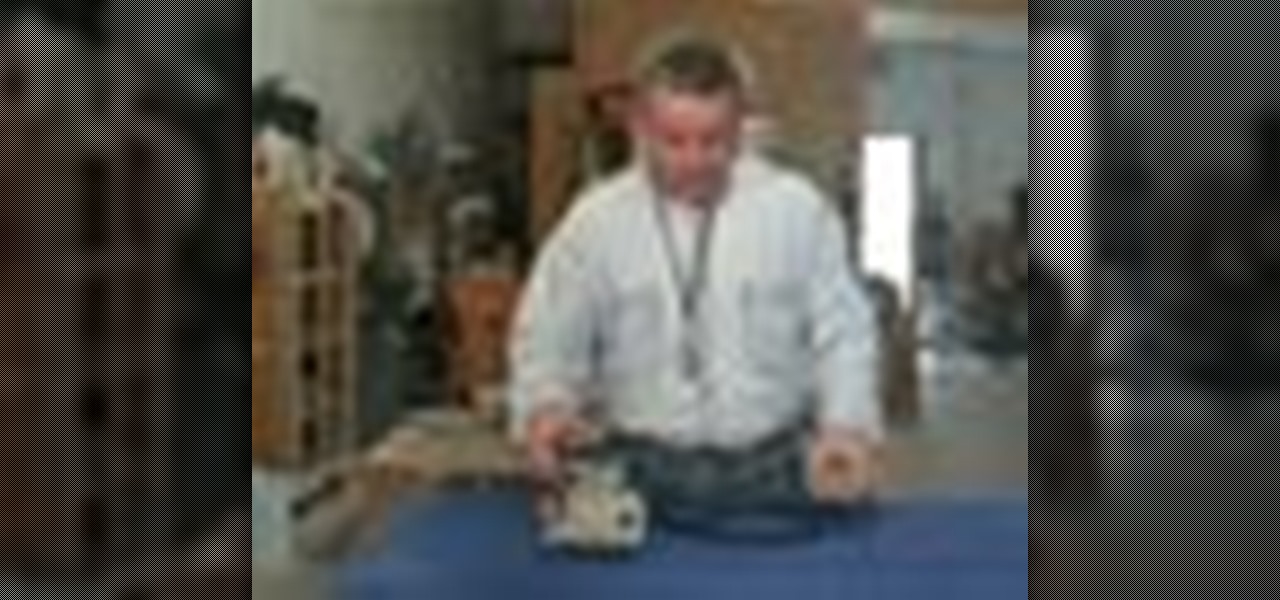
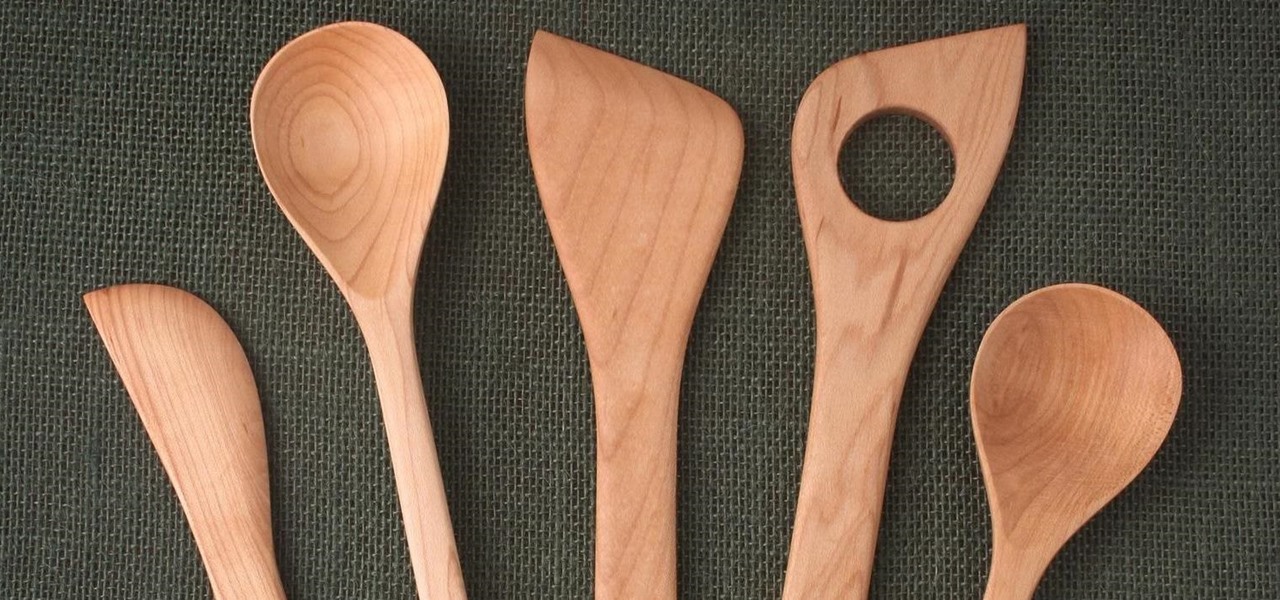
One of our favorite kitchen items, hands down, is a good old-fashioned wooden spoon. It's practical, versatile, and can last for decades if cared for properly. There are specific ways to nurture wooden utensils in order to keep them from cracking and to help them maintain their glossy sheen.
You've probably tried just about every method of hanging your holiday decorations: nails, thumbtacks, sticky hooks, and, in desperation, even tape. Each method can leave a host of complications when removed, though, from chipping paint to visible holes.
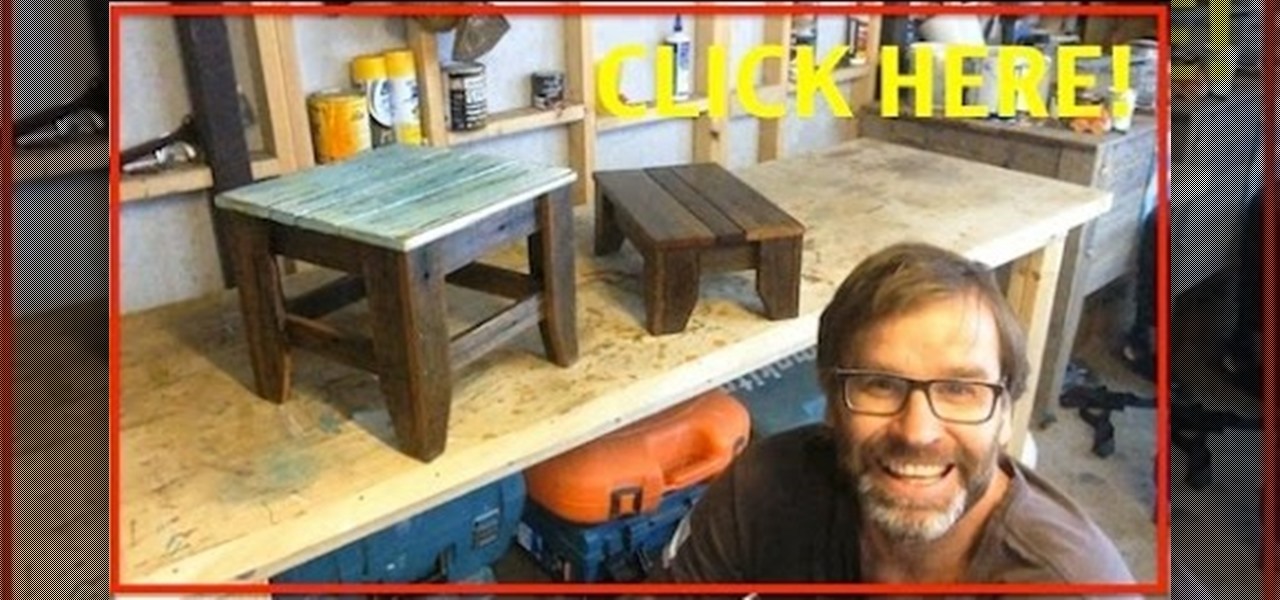
How to make a stool from recycled wood. The rustic wooden stool l'm making in this video is dual purposed. Initially it's for a child but it can also be used as a step stool. I made this stool from hardwood fence palings but you could also use pallet wood. It's a very simple stool to build and should only take a couple of hours or so to make.
Do you listen to a lot of music on your smartphone or MP3 player? Ever wished the built-in speaker was louder? You're in luck, because this simple amplifier can increase your volume by 14 decibels and make your device look totally steampunk while you're at it. What You'll Need
You can also make this person sized spiderweb out of chain for extra sturdiness. Aside from the rope or chain, you will also need a solid frame (either wood or metal wil work) and 24 eye bolts to run everything through.