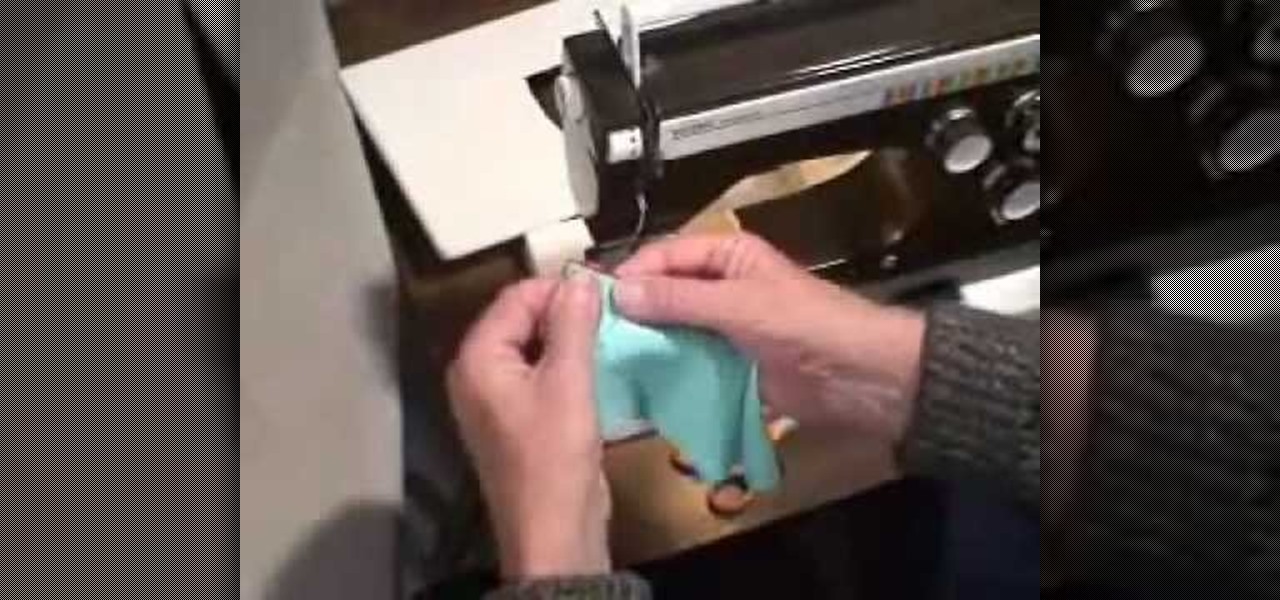
In this tutorial, we learn how to install a zipper into your knit. The first way you can do this is to take it to a tailor and they will do it for around $15. To do this by hand, grab your piece that needs a zipper and then steam the edges. After this, take a sewing needle and start to sew the zipper underneath both sides of the edges of the piece. You can also use pins to place into these so it stays in place. Do a backstitch also, to help make the zipper more sturdy and stay on longer.
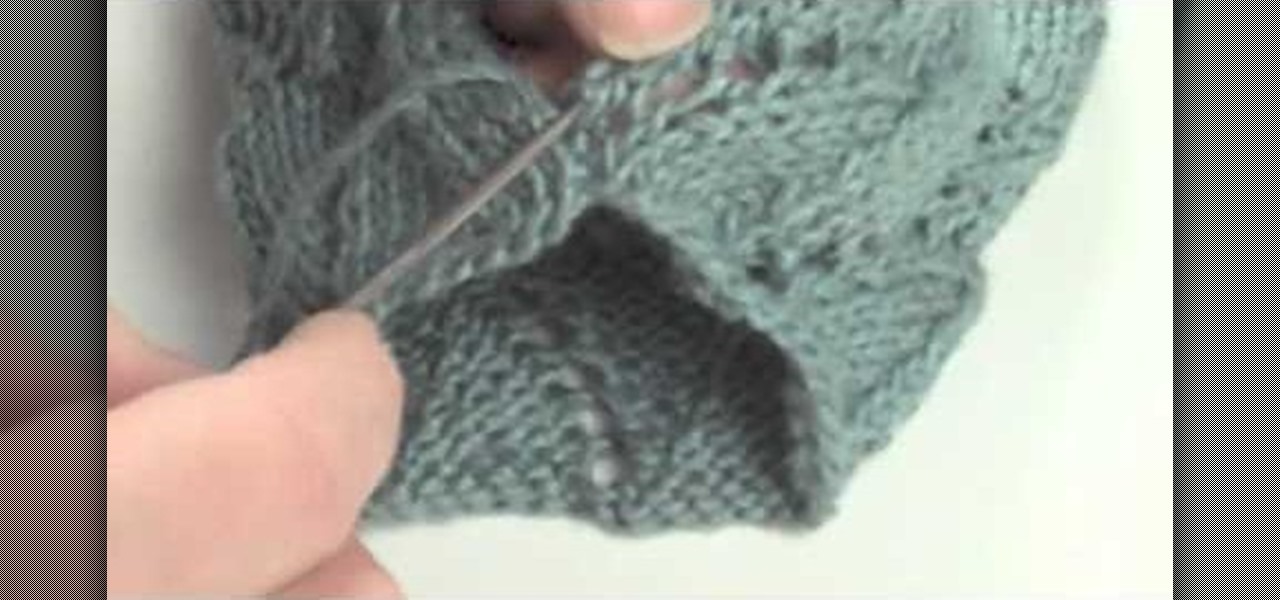
In this tutorial, we learn how to do the mattress stitch. First, lay the pieces flat and thread yarn tail onto the needle. Next, you will anchor the yarn to the bottom edge of the opposite piece. Then, go back through the side and find the tunnel of horizontal bars, one stitch in from the edge. Continue to do this around the stitches to combine them together. Keep alternating sides and just do one bar at a time to get the best results. You can do two bars at a time if you are comfortable with...
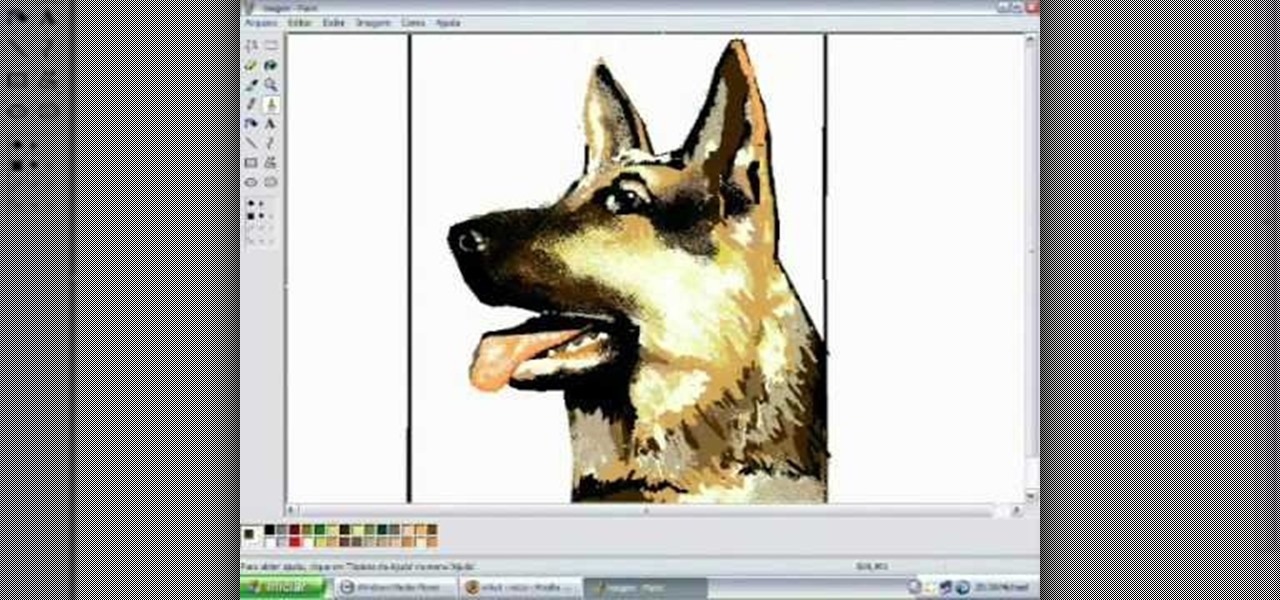
In this tutorial, we learn how to draw a dog in MS Paint. You will do this by using Paint and your mouse, not using a tablet or a pen on the PC. Start out by drawing the outline of the dog in the middle of the page. Next, fill in the nose, mouth, and eyes with black. Then, color the tongue and draw on the ridges of the teeth in the mouth. From here, you will spray paint the color of the dog onto the edges. Spray brown around the edges, then add in white, tan, black, and other colors to make t...

In this video we learn how to make a decorative paper rose. First, take a piece of paper and cut several heart shapes out of it, making them different sizes. Once these are cut out, curl the edge over with a toothpick, pencil, or by hand. Set these aside, then use a grab a green sheet of paper. Roll the edge of the paper up and then cut the rest of the paper from it. Create a leaf in this and then tape it all around. Now, twist this tightly and place the curled ends of the heart shapes away f...
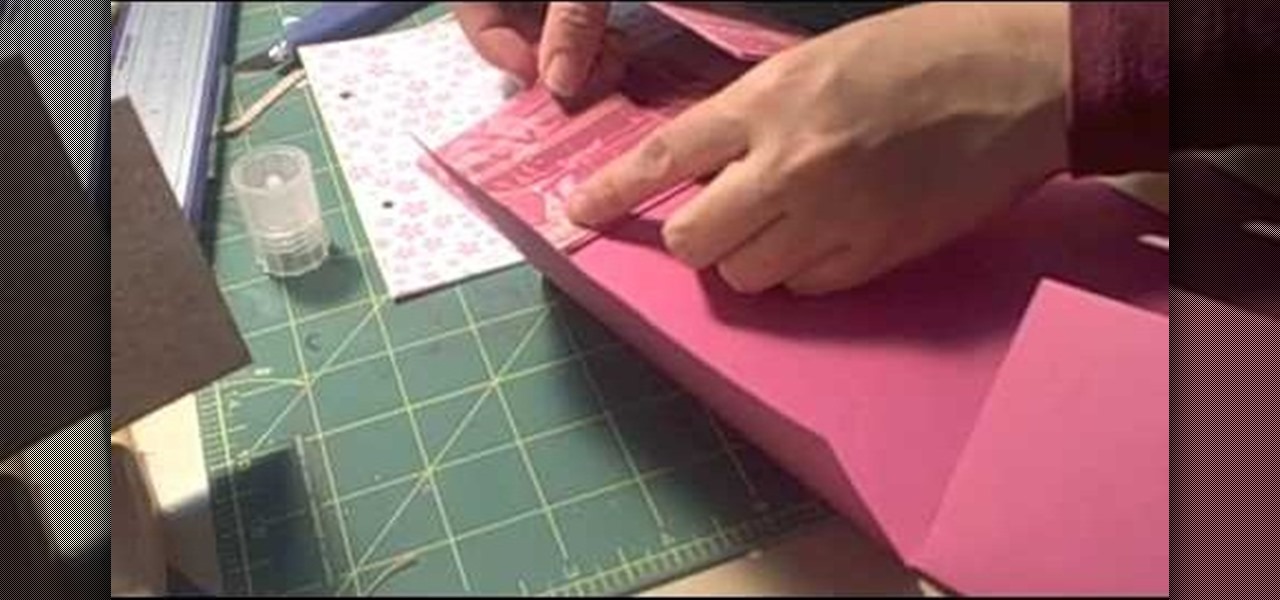
This video tutorial is in the Arts & Crafts category which will show you how to make a flip square album. Take a 12 x 12 inches square cardstock and make a score line at 3 inches on all 4 sides of the paper. Now cut along the score line at the top and bottom of the paper up to the 3 inch line. Next you fold along all the score lines inwards and you have all the flaps ready. Then mark along the edge of the center part of the sheet and punch two holes for tying the album as shown in the video. ...

In this tutorial, we learn how to draw bat/demon wings. Start out using a light pencil marking to make the outline of the wings. You will want to draw wispy lines and make them light to create a light effect on the ends. Once you have the outline finished, use a hard pencil mark to draw over it. Create large wings with hard edges and mark in lines along the middle and the edges of the wings. After you have done this, make sure there is another wing on the side of the wings and then shade to f...

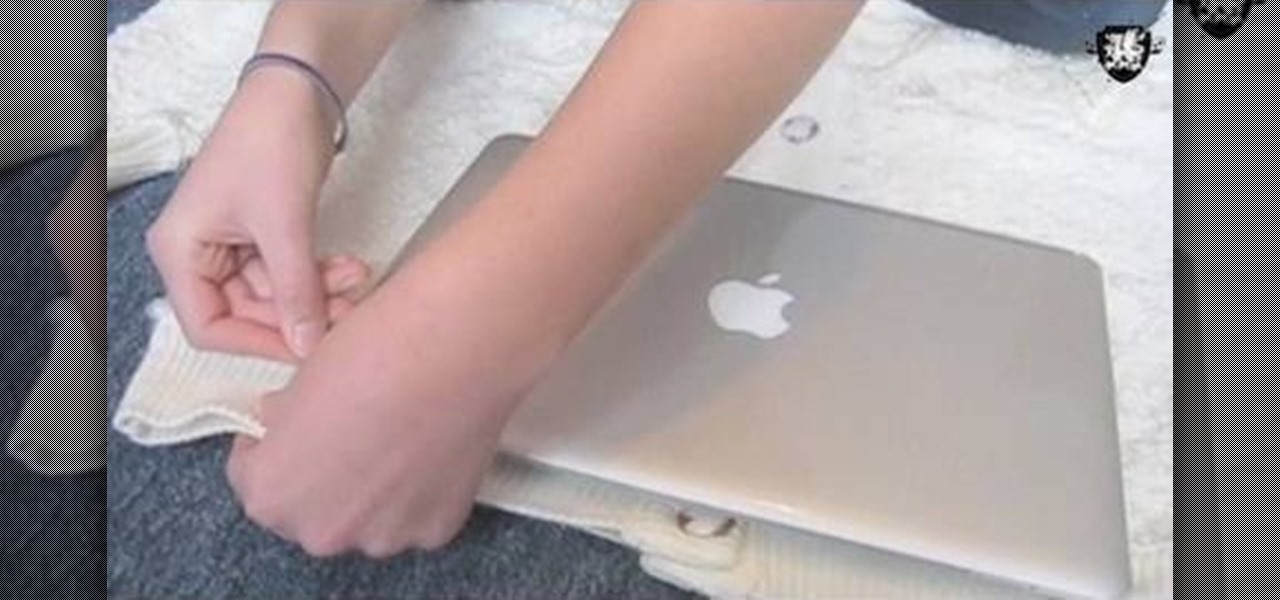
In this tutorial, we learn how to make a sweater for your laptop. First, grab an old large sweater and cut it out to the same size as your laptop. After this, set the rest of our sweater to the side and put the right sides of the sweater together. Then, pin and sew the three cut edges, but do not sew them closed. Sew with a zigzag stitch on the edge of the fabric. After you're finished sewing, use this on your laptop and use the rest of the fabric you have left over to make additional sweater...
In this tutorial, we learn how to paint with basic latex painting techniques with Lowe's. First, you will need to determine how much paint you need by figuring out the room size. Next, you will need to paint the ceiling and apply blue painter's tape to all the areas you don't want paint to touch. Make sure to stir the paint before you use it and open up windows and fans to circulate the air. Cut the edges by painting around 2" inside first. Once finished with the ceiling, start cutting the ed...
In this video, we learn how to quickly make an origami kusudama. This only requires six pieces of paper to make. First, fold one piece of paper into a triangle, then open it up and fold it in a triangle on the opposite side. Open this back up then flip over. Bend in the edges to make a new triangle, then press down the creases on the side. Bend the middle of the triangle up to the point on both sides. Bend these back down, then fold over the side and make a crease. Open up the bottoms where y...
In this video, we learn how to build a bionicle switchblade. Start with the piece of the blade that has holes inside of it. Then, start to connect the edges and the other pieces that go inside of it. Grab the piece for the blade, then lock it into place by attaching the elbow pieces that connect around it. Once you have connected these together, you will have one entire piece with the blade on the very edge of it. The end of it should be bendy, so grab a rubber band that is thick and wrap it ...
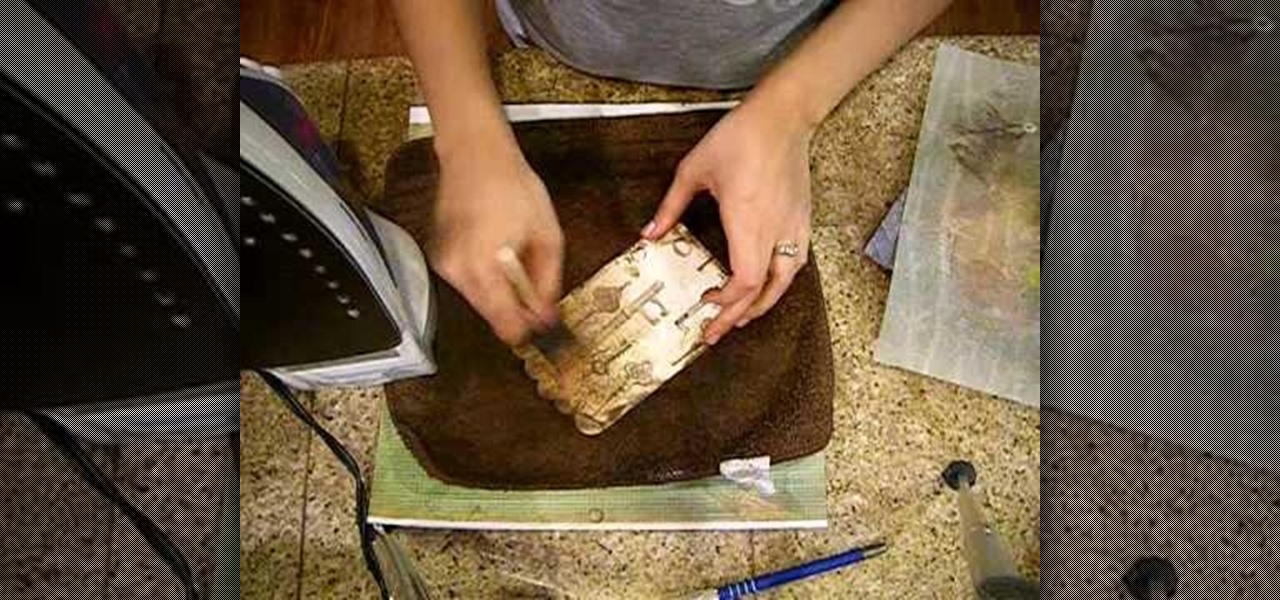
Crinkle top part and go over it with distress ink. Do edges front and back. Put extra ink on scallops. Spray with mustard seed and tattered jewels, olive vine and pine cone to add color. Place paper on pocket and iron on both sides. Spray with iridescent gold. Use brush to spread out. Iron again on both sides. This process makes it look aged. Take a film strip and spray with tattered leather. You want to use an iron when spraying grunge board with tattered jewels because it will make it seep ...
In this tutorial, we learn how to use Fiskars Decorative Edge scrapbook layout. First, you will need to pick out the templates, pictures, and paper that you want to use for this project. Now, place the stencil over the card stock and cut out the stencil shapes you want, stars work best if you are doing a fun child theme. Now, apply these to your base card stock, and arrange a frame over the background. Now, apply the picture to the page and add on the stencils you just cut out. Add in quotes ...
In this video, we learn how to make a box. First, fold the piece of paper into a triangle, then another triangle. Now, unfold the paper and fold all the sides into each other, making a square. After this, fold in the sides once more, making sharp creases on the edges. Now, open up the paper and do this again on the other sides, opening up again when finished. Now, fold the sides of the paper and turn it upside down. Follow the creases that you just made to fold the box up into a secure box. M...
In this tutorial, we learn how to edge finish with lingerie elastic. First, grab your elastic and place it onto your fabric. Line up the elastic so it matches in perfectly with the fabric. Use a sewing machine to sew the elastic onto the fabric. Go slowly while you are doing this and lift the elastic in your hand as you continue to sew it on the fabric. When you get to the end of the fabric, the elastic will be sewn on, and you will be able to wear it! This only takes a few minutes, just make...
In this video, we learn how to make a bow out of a Starburst wrapper. Now, place clear tape of the wrapper and fold down the edges. Now, fold the wrapper in half and then in half once more. Make it so you have an accordion design with three different peaks on the wrapper. Now, cut a small strip of tape out of the piece of tape and wrap it around the middle of the bow. After you do this, flare out the edges to make it look more like it has a bow shape. Now, take a bobby pin to the bottom of th...
In this tutorial, we learn how to use a stud finder to locate your wall studs. First, you will use your stud finder tool and place it against a wall. It will go off when it has found the edge of a stud. Place the finder against the wall then slowly move it until the red light on the top beeps. Move it around to make sure you know exactly where the stud would be located. The finder will go off wherever the edges of the studs are to help you pinpoint exactly where the stud is. You could get wro...
In this tutorial, we learn how to make mini paper square boxes. First, grab a piece of paper and fold two ends in so they touch in the middle. After this, fold the bottom up so it covers the triangles and they meet at the middle. Crease the edges, then cut down the edges on both sides where the crease is. Next, fold the sides in so you have a shape that looks like a sword. After this, fold the sides up, then fold the other sides in. When finished, push the creases in and you will form a box, ...
This video tutorial is in the Home & Garden category where you will learn how to install an interior door set on a pre-bored door. For this you will need a tube latch, straight plates, door plates, two knobs, two sets of ring guides and a spindle. You will also need a tape measure, ruler, screwdrivers, a drill and safety glasses. A pre-bored door has a face and an edge bore. First install the tube latch through the edge bore ensuring that the angle side of the tube face is towards the door ja...
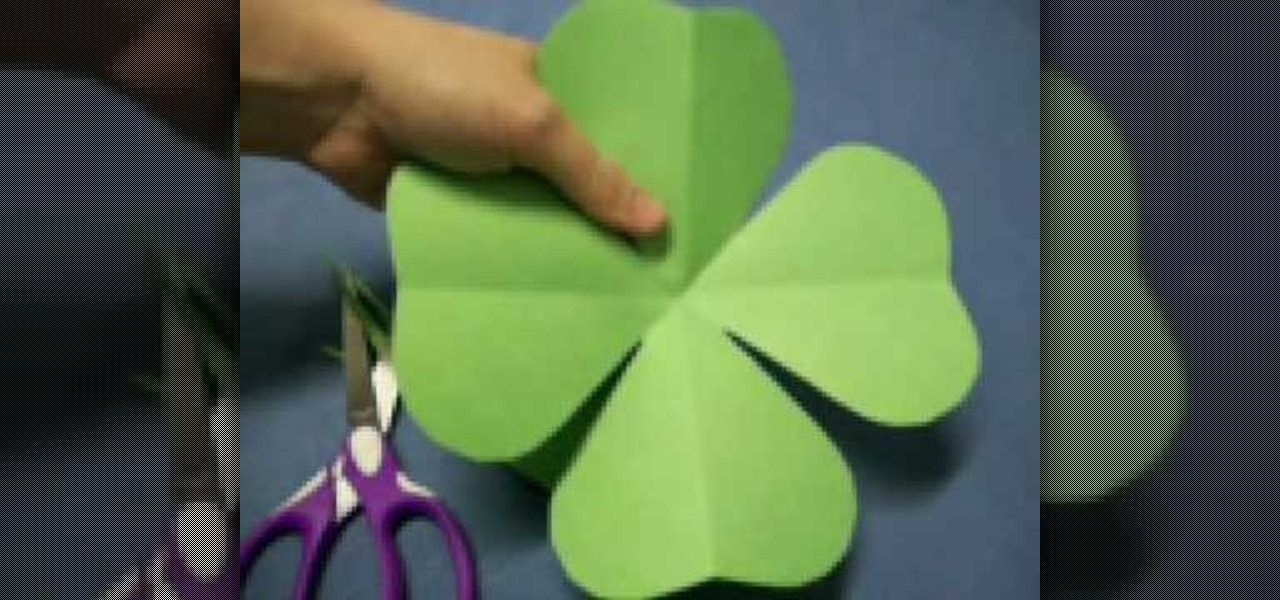
In this tutorial, we learn how to make a four leaf clover pattern. First, fold your paper in half, then fold it in half in the other direction. Next, fold the edges making a point and then cut a half an inch along the edge, making a cone shape. end the shape on the right side, making a heart shape. When you unfold, you will have a four leaf clover! You can use any size of paper to make this, just make sure you use green paper to keep the theme Irish. This is a great project for kids to learn ...
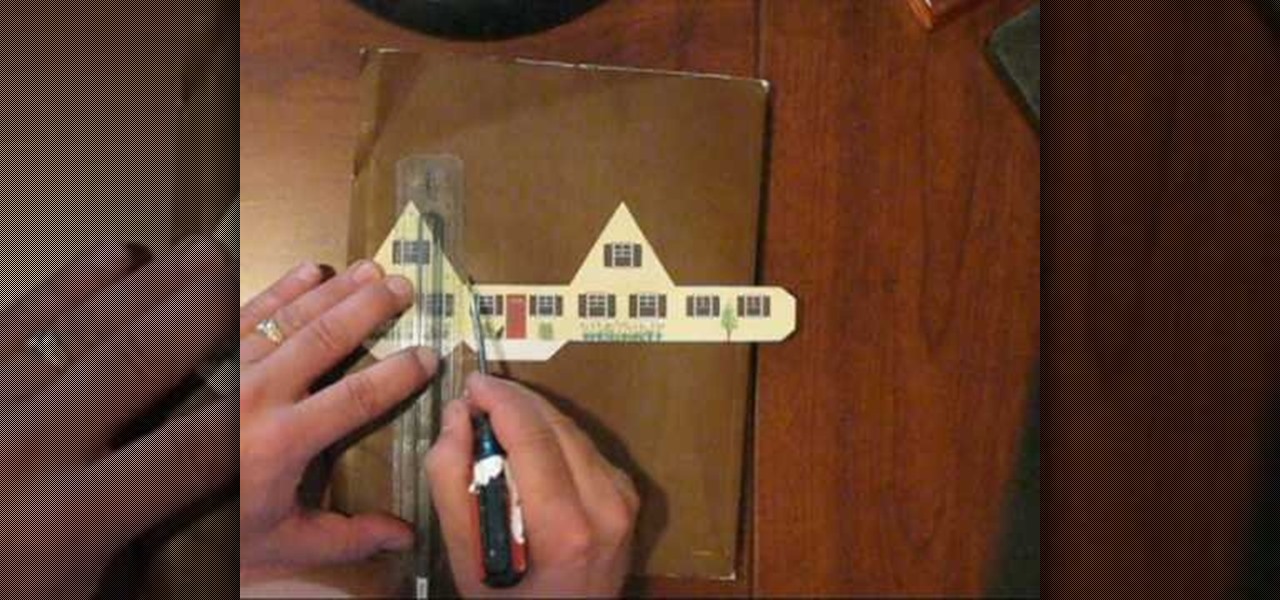
To make a Cottage Pop-Up Card, you will need the following: the printable pattern available at Victoria Norman Home , scissors, a ruler, cardstock, glue, and a flat head screwdriver.
To apply glaze putty to your car, after it has been damaged, you will need the following: 80 grit sandpaper, goggles, respiration mask, putty
In this tutorial, we learn how to make a paper snowflake. First, take a copy paper and fold a quarter of it over to the other edge. Next, cut off the excess paper so you have a triangle shape. Now, fold a corner to the next corner, and repeat so you have another triangle. You can now cut corners off so they are even and you have a rounded snowflake. Then, cut a triangle starting from your edge points that you just created. Now cut slits a quarter inch apart into the middle of the paper all th...
This is a demonstration of how to throw the frisbee the correct way.The idea of frisbee developed in a college campus in 1920 where students use to throw empty pie tins after eating the pie made by Frisbee Pie Company.Frisbees are available in the retail market for about $3.00.The convex side of the frisbee has ribs and edge is rounded.The frisbee is held in the palm with the thumb on top,over the ribbed portion,the index finger is kept along the edge and rest three fingers below into the con...
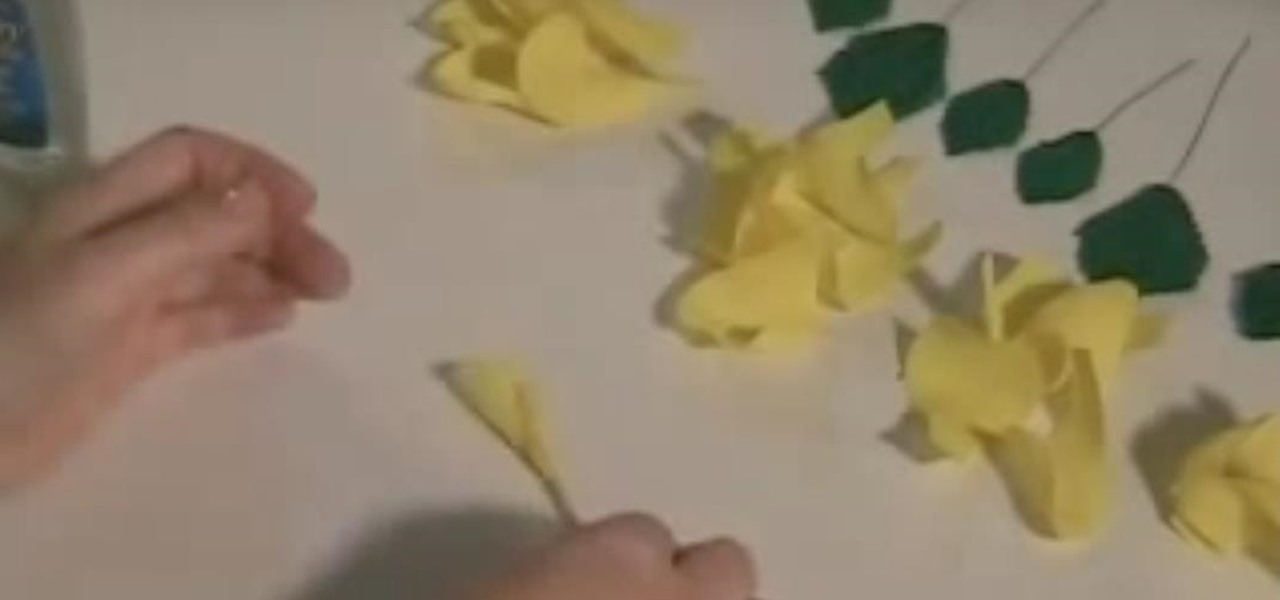
This video shows us how to make paper flower with ease. Here are the following steps: Step 1: Gather paper, glue, scissors.
You will use an old work glove to make the string. First cut the seems of the glove to the finger tips with scissors. Cut out the palm part of the clove. Remove the elastic off of the back with a knife. remove the hem with your scissors. Next, start cutting at the edge up around the shape of the glove. Keep going round until it starts turning into one long piece. Go back around the leather and trim up the rough edges and corners. He ends up with about seven foot of string. It's a cheep free w...
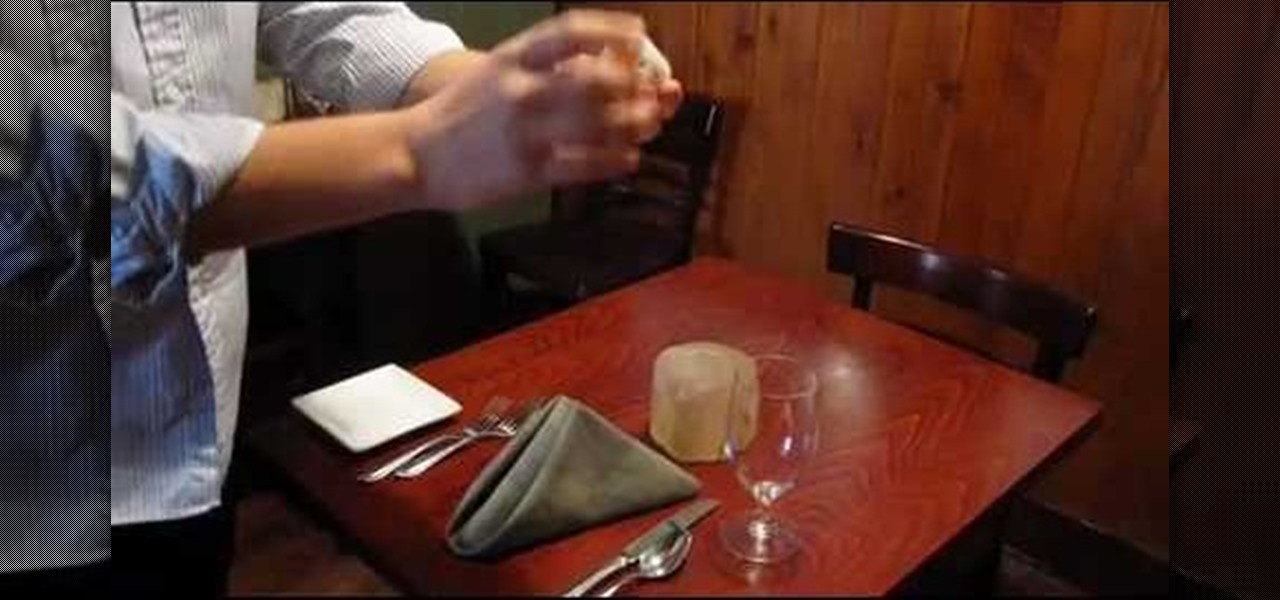
This video is a tutorial on how to set a table in a restaurant. The table should first be wiped thoroughly with a product called Thieves, a mixture of organic oils that contains no chemicals. Be sure it is dry before people are seated.
Tut Teacher shows that if you're going to edit alot of pictures, learning to change your eye color in Photoshop is helpful.Go to Photoshop and open "human eye", zoom in and it gives more room to work with. First, go to your lasso tool, hold down and click. You can click and drag or click along the outside edge. Set to 6 pixels, more or less depending on the image. Make sure you don't click on scanner..it'll make the image go crazy. Keep clicking along the edge there'll be a symbol on the circ...
Save some money on your energy bills by making an attic stairway box. For less than twenty five dollars, all you need is caulk, UL181 masking tape, insulated sheathing, and rubber foam sticky tape. Measure the width, the length, and the depth of the attic stairway opening. Lay the insulated sheathing down on the floor and get a straight edge. Take those measurements and create a rectangular box. Mark out six pieces to create the parts of the box – two large top pieces, and four shorter side p...
In this instructional video, the host will give you detailed instructions on how to sharpen your blades primarily using coarse, medium, and fine Arkansas sharpening stones. How to oil your stones, how many strokes on either side, and the different angles that can be used are just some of the helpful hints included in this short tutorial. The instructor also includes information on how to sharpen your knives in a pinch using any leather belt, how to align your blade's edge using a steel, and h...
In this video Pro Rider Matt Crowhurst talks about the wake jumps and what needs to be done to execute them. At the beginning of the video Matt says that in order to execute them one has to mater the perfect riding position, being in ease with moving left and right, inside and hillside edge, crossing and execute smooth turns. For executing wake jumps one has to concentrate on three major areas-1. Starting out wide, cruising along and a flat board.2.A progressive edge3.Holding that edge and po...
When measuring for borders on your quilt, begin by spreading your quilt out on your work surface making sure that it is laying flat but not pulled tight. With a tape measure, measure from one edge to the opposite edge across the length of the quilt. You should measure along two or three different seam lines and cut the border material to correspond with your longest measurement.If you would like a two-inch wide finished border then you should cut your border material two-and-a-half inches wid...
This is a USA fire and Rescue's favorite recipes segment. To make this quiche you begin by preheating the oven to 350 degrees Fahrenheit. After that you combine cheese, and flour (the thickener) in a mixing bowl and toss them until the cheese is lightly coated. Next, add beaten egg, and pepper. Mix again. Now you need to add cooked and drained broccoli, and drained mushrooms. Mix again. Pour into a pie shell and cook for about an hour, or until it sets. A good tip is to cover the edges with t...
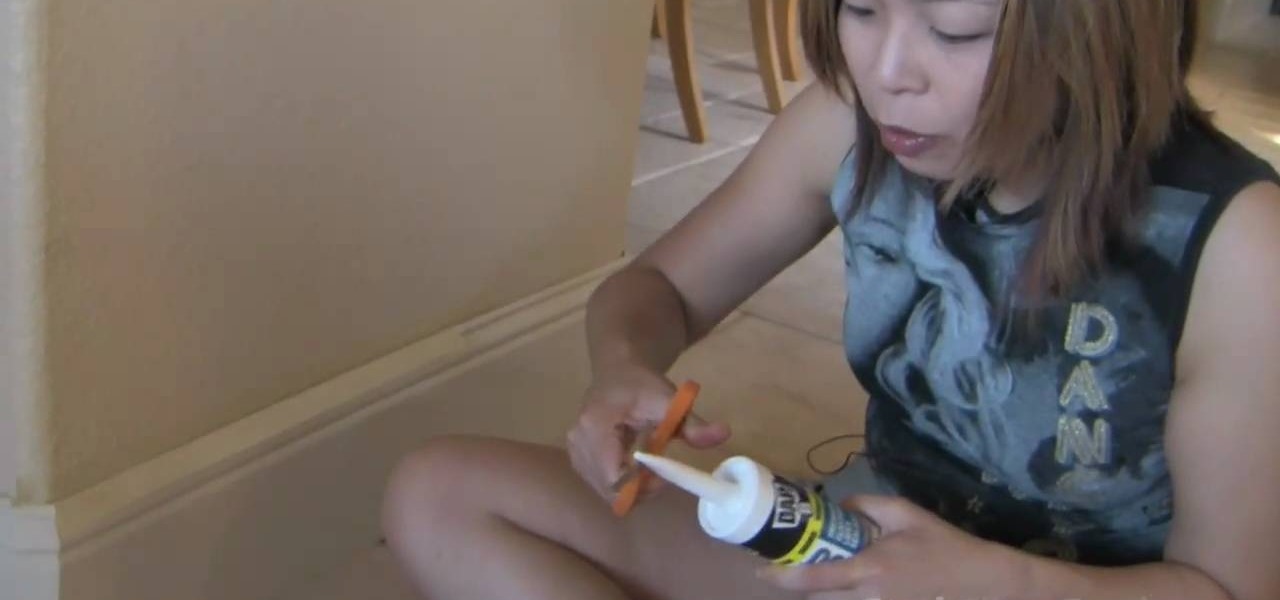
How to caulk the baseboards in your home
This tutorial will focus on how to use the fit image function within Adobe Photoshop. You will utilize this function when you want the pixel width to match between different sized photos in portrait and landscape. First you will select all the photos (you must create a batch action in Photoshop). Next select the fit image option in the file menu under automate. You will need to put the same number into length and width to constrain the proportions of your landscape and portrait photos have th...
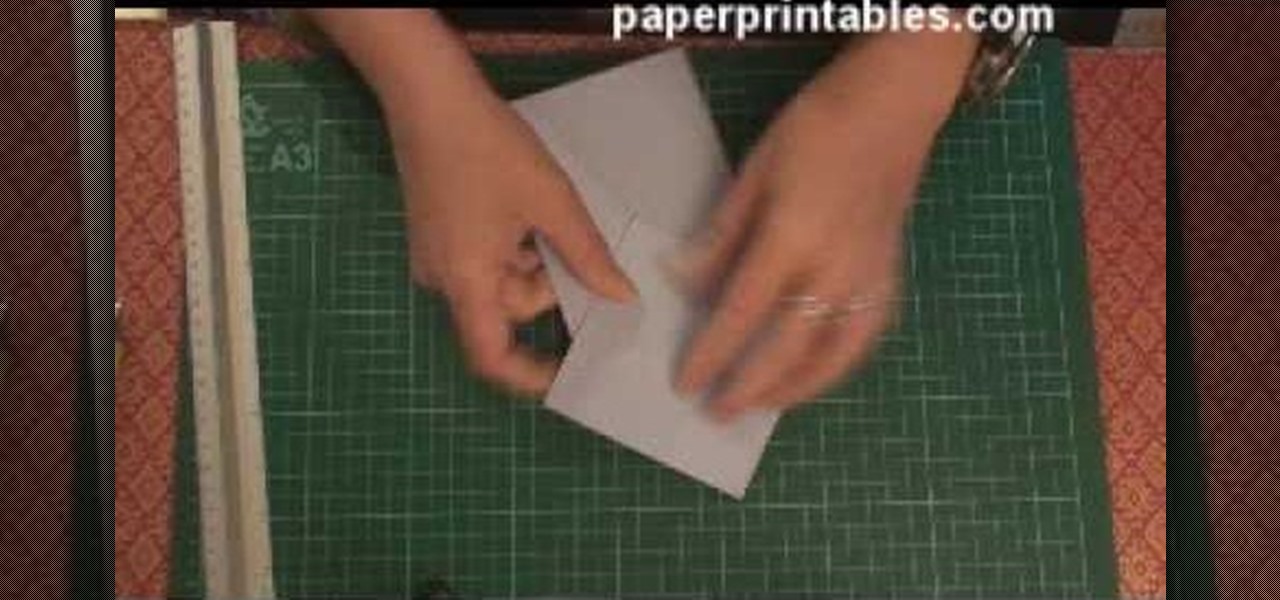
Watch this video to learn how to make a stunning diamond topped 3d card from a single sheet of A4 paper! 1. You'll need one A4 sheet of paper and some printed papers to decorate. 2. Score at 10. 5cm across length and 10. 5cm from one end. 3. Crease both scores in the same direction (mountain folds). 4. Turn card over mark 13cm from top on centre line an 17. 5cm from top on both edges. 5. Score from central 13cm mark to 17. 5cm mark on each edge. All printed papers used in this tutorial are av...
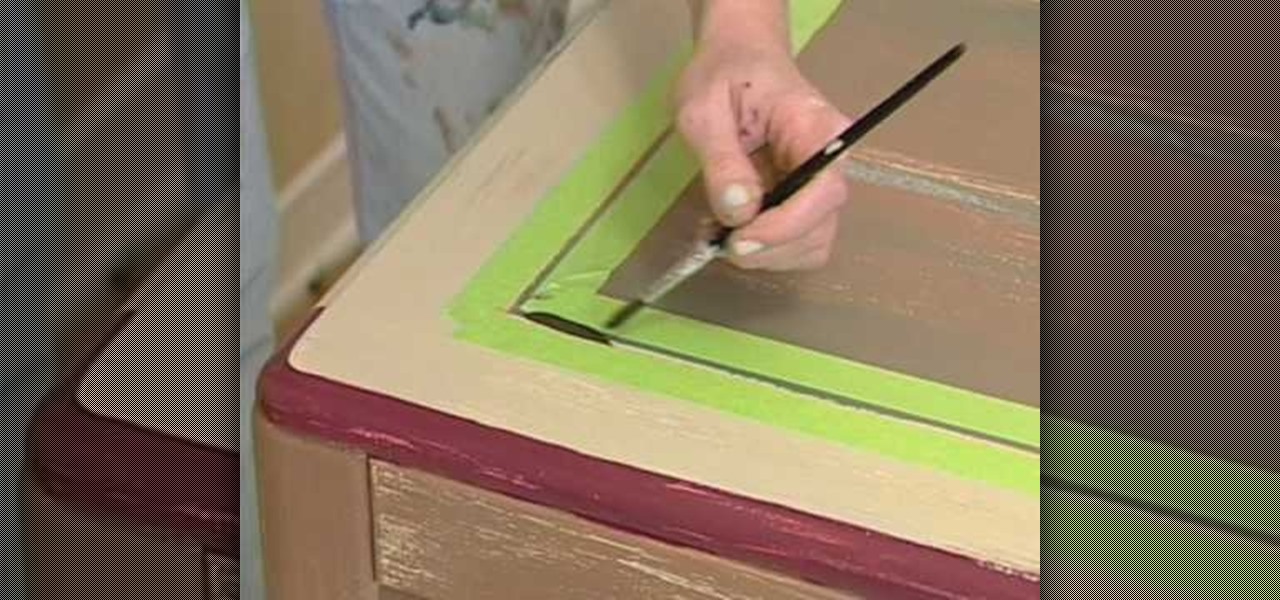
Using an antique distressing paint finish technique on furniture is a good way to revive a piece of furniture that other wise might just be discarded. This video is part of a series of videos taking viewers through the process of distressing furniture and focuses on accent technique. You’ll want to accent the select parts of the furniture you want to accentuate that distressed look. Our expert recommends painting the edges of this table. You’ll want to pick a complimentary color and when you ...
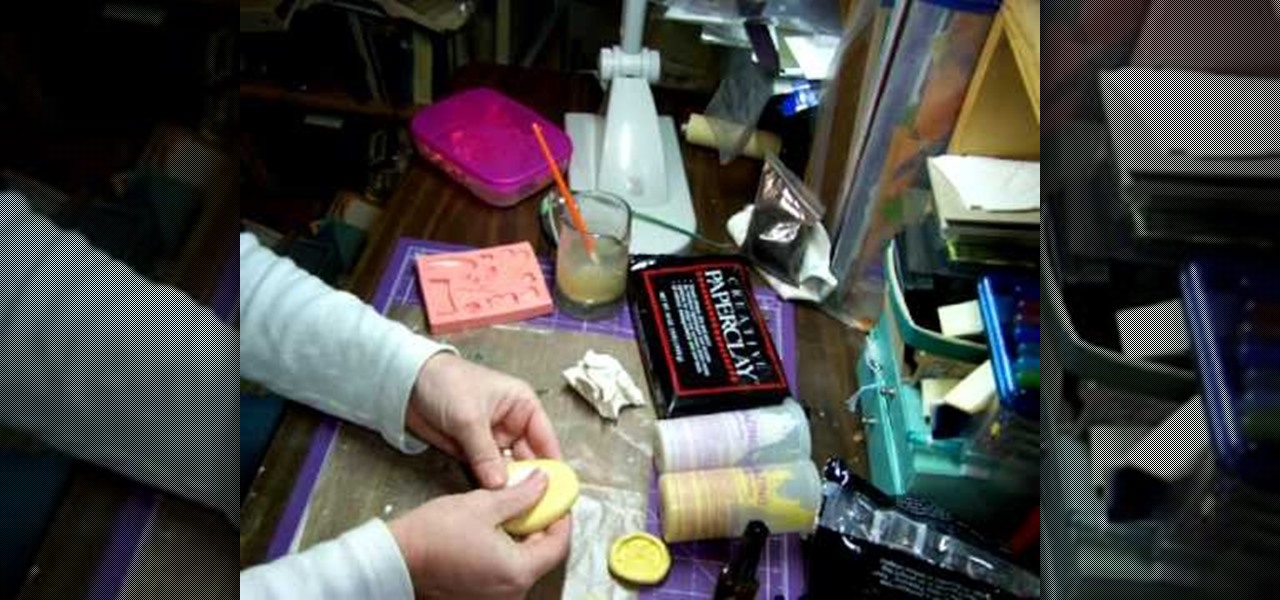
Terri Sproul shows you how to Work with Paperclay and Molds. Make a ball of paperclay and push it firmly into the center of the home-made or ready-made Mold. Make the surface of the Paperclay level with the surface of the Mold, adding more Paperclay if necessary, and removing any excess with your fingers. The molding putty that the Mold is made from is flexible, so hold the edges of the mold with your fingers and gently push the center of the Mold with your thumbs, this will push the molded P...
StampinMama1 demonstrates how to add ink texture effects to your scrapbook projects. When creating backgrounds for your scrapbook pages, you can use ink to both create texture and create interesting effects on the layout. Press the ink on the paper to use a direct to paper ink application technique. You can create cool effects like waves using this technique. Don't swipe the pad around or smudge it onto the paper. Instead, drag the ink pad in a motion of waves across the page. Start at one ed...
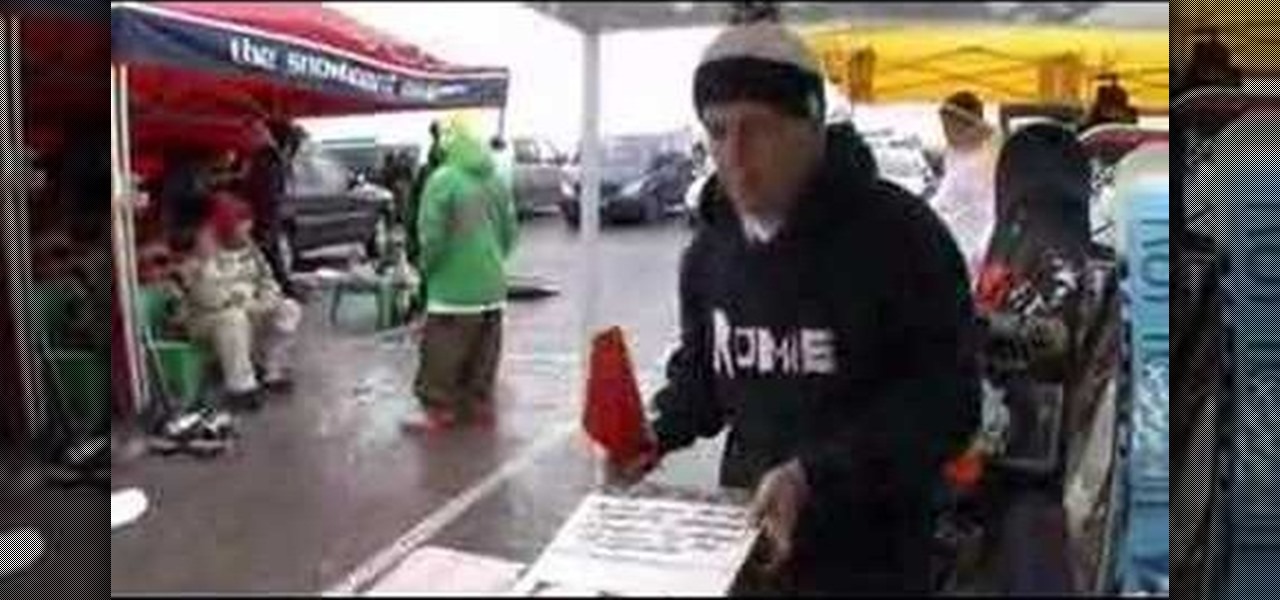
Scott Todd demonstrates waxing a snowboard, which is basic maintenance that assures good speed for a snowboarder. He starts by applying a thick, even layer of wax on the base of the snowboard using an old iron to melt it down. He sweeps the board with the iron to spread out the wax.
In this how-to video, you will learn how to make and decorate cookie pops and bright bouquet cookies. First, you must have your cookie already baked and ready for decoration. Take a star tip and decorate the cookie in a zig zag formation with the icing. Go around the edge until it is entirely complete. You can do a straight star if you want instead. Once that is done, fill in the inside for the center with another color. Fill in the empty area with the icing used for the edges in spots. Conti...