Antibiotics are one of our main weapons against infections. The problem is that many bacteria are becoming resistant to most of the antibiotics we use to treat them, and those 'superbugs' have created an urgent threat to our global health. A research group found a new way to hit a well known bacterial target and have developed a drug to hit it.

If you have stuck volume buttons, it can be a real pain to adjust sound levels since your only other option is to use the volume menu in Settings. But even if your volume rocker is working fine, it's still a little weird to have to click a mechanical button to control one of the most central aspects of an operating system that is otherwise entirely touch-based.

The Google Chrome browser for Android is packed with many great features, but it definitely has a bad rep for being slow and laggy on low-end or midrange devices. Without a top-notch processor, you'll likely notice some stutter with choppy scrolling, and pages can take too long to load in general.

If you're tired of Google tracking you, but love how Chrome works, CyanogenMod has you covered. Their browser is called Gello, which is based off Chromium, Chrome's open-source counterpart. It's basically a souped-up version of Chrome—without all of the intrusive Google stuff. So if you're uncomfortable with Google displaying personalized ads based on your browsing history, or using your location to bring the "Physical Web" to your phone, you won't have to worry about any of that with Gello.
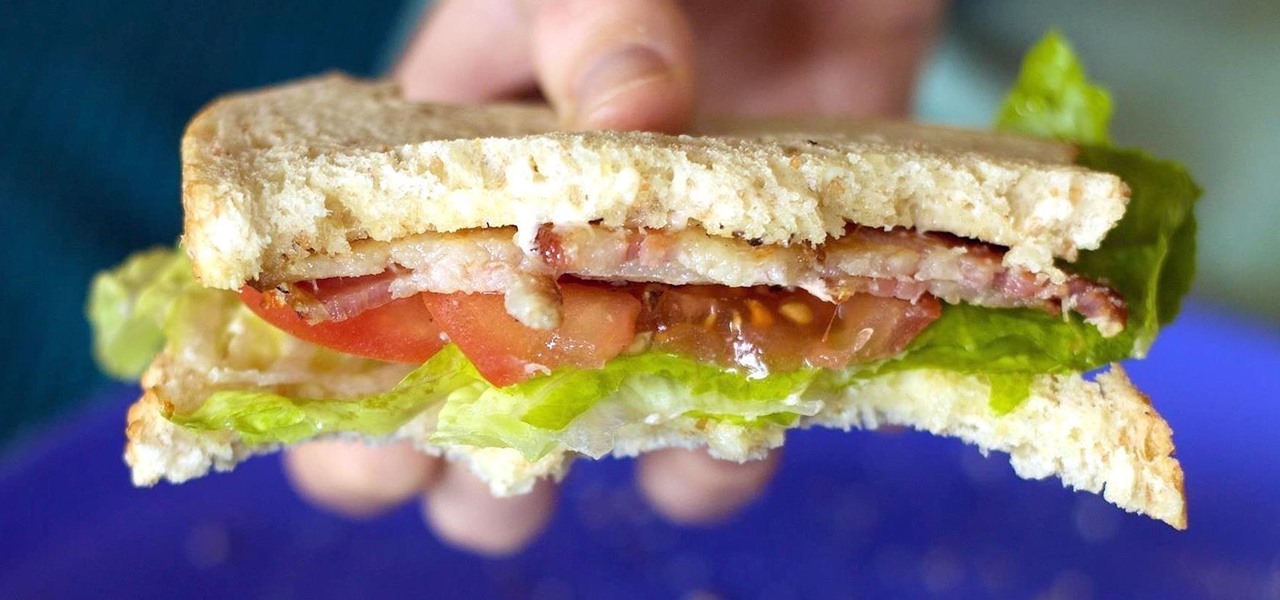
Bacon on burgers and sandwiches is truly a wonderful thing, though not when it slides out and lands on your plate. Or, even worse—the floor.

Say what you want about Samsung's TouchWiz UI being cluttered or overbearing, but one thing you can never complain about is a lack of features. In fact, it's been almost 8 months since I first took my Galaxy S6 Edge out of its box, but I'm still discovering features to this day.

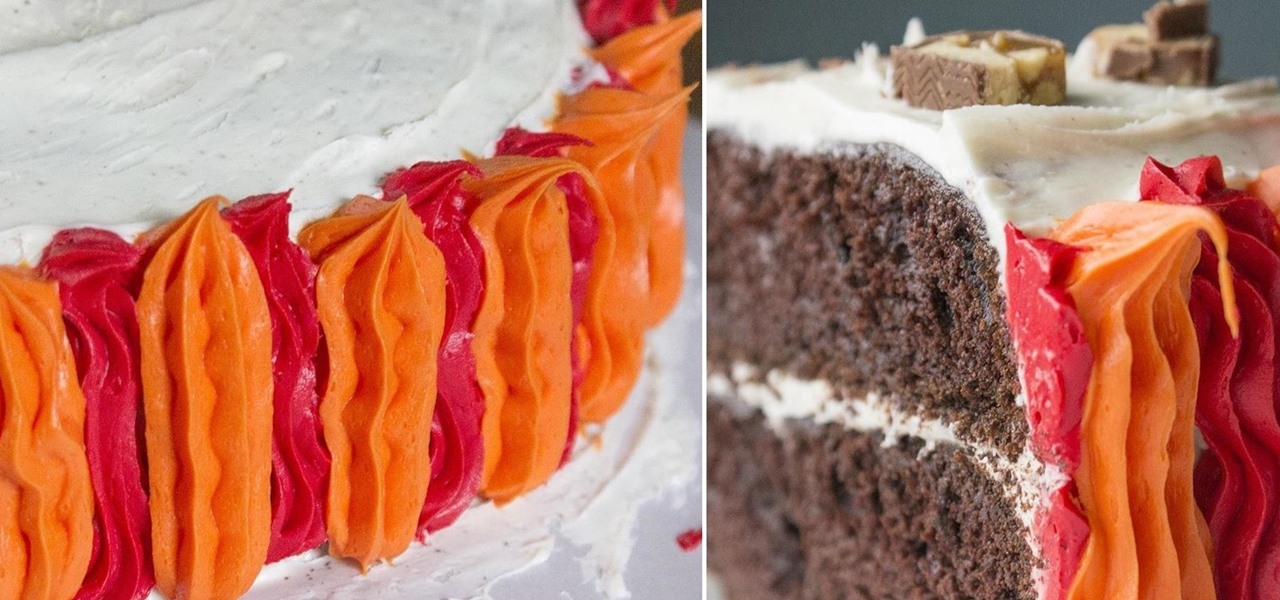
Cake decorating is one of those activities that used to leave my hands sticky and my spirits dampened. No matter what I seemed to do, the final result always ended up looking like a preschool art project.
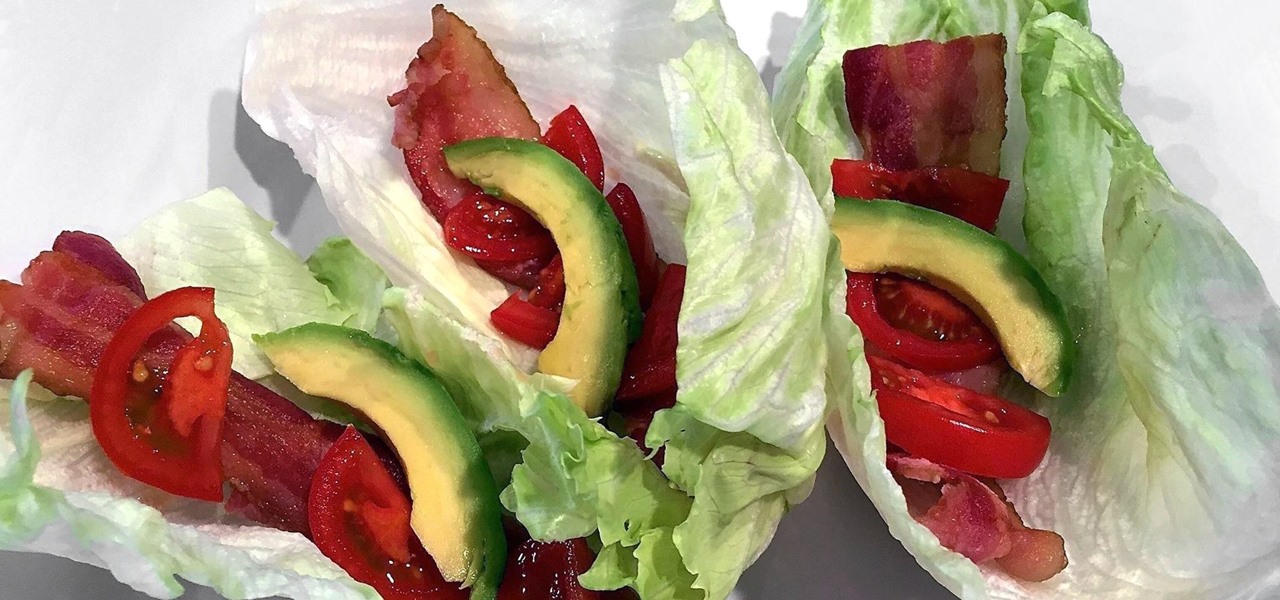
When I get struck by a craving for something SCJ (savory, crunchy, juicy), nothing fits the bill better than a BLT. But why settle for the sandwich form when there are so many other possibilities? Some of my favorite alternative ways to serve up a BLT are 1) as a salad, 2) in tomato cups, 3) in mini bread bowls, 4) as lettuce wraps, 5) as a dip, and 6) in bacon cups.
On the whole, Windows 10 is vastly different than its predecessors, but there's not any one big change that distinguishes it from Windows 7 or 8. On the contrary, it's a series of small tweaks and optimizations that makes this version such a departure from previous iterations.
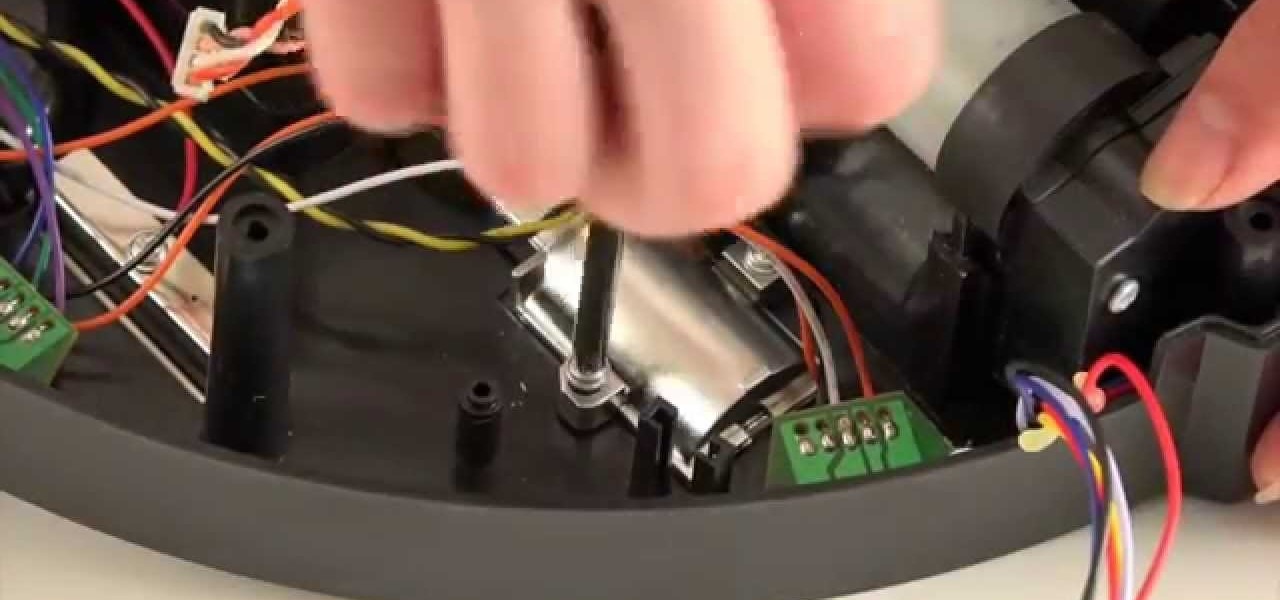
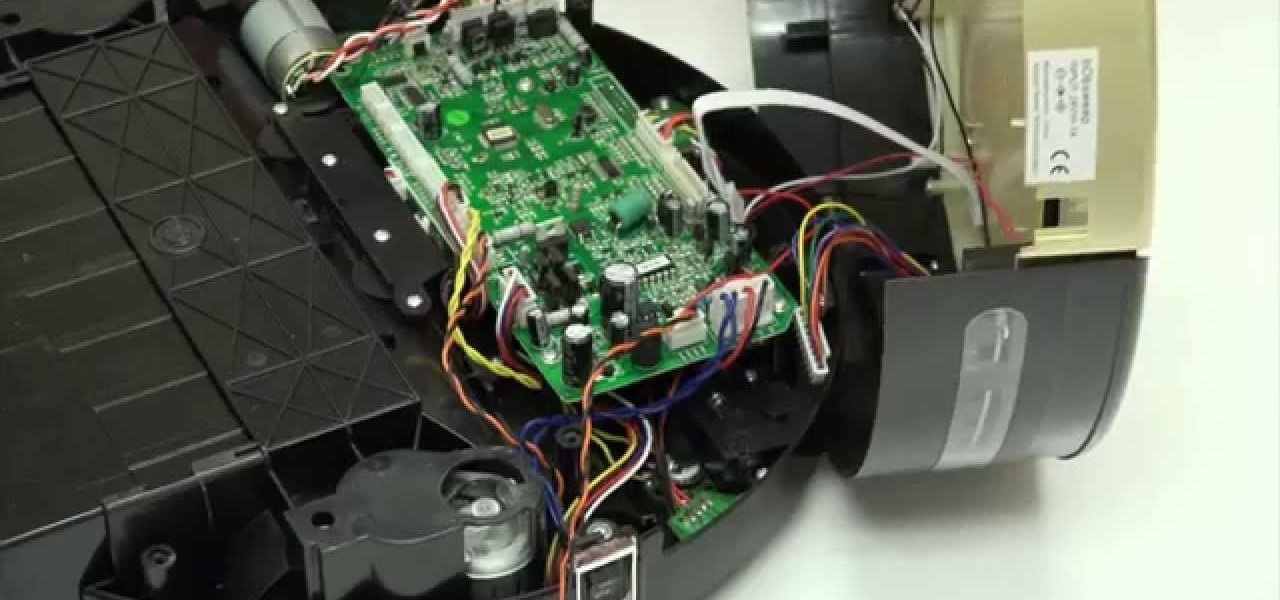
These instructions are applicable to both bObsweep models. Follow the video or text descriptions to replace the disinfecting UV lamp on your automatic vacuum.
Both bObsweep Standard and Pethair models have two bumper sensors inside their covers. Whenever Bob runs into an obstacle, the sensors tell Bob to back away.
On-screen navigation buttons offer many distinct advantages over physical buttons—they can change orientation along with your device, they're capable of visually morphing to indicate secondary functionality, and the user experience is more consistent when buttons and app elements require the same amount of force to press. Add to that the fact that they're far less likely to fail and can be themed or even switched out altogether, and it's hard to come up with an argument in favor of physical b...
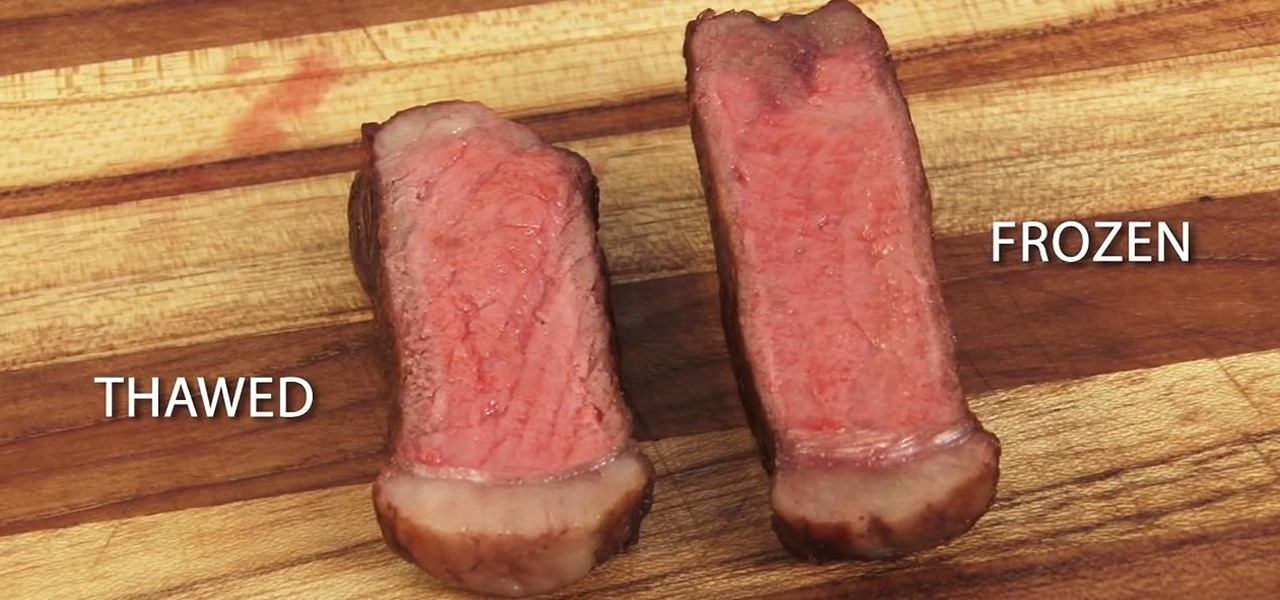
Can you cook a steak or salmon filet that's straight out of the freezer and get good results? Ordinarily, I would say no. Usually your steak ends up a sad grey mass fit only for the family dog and the fish is burned on the outside with an icy, undercooked center.
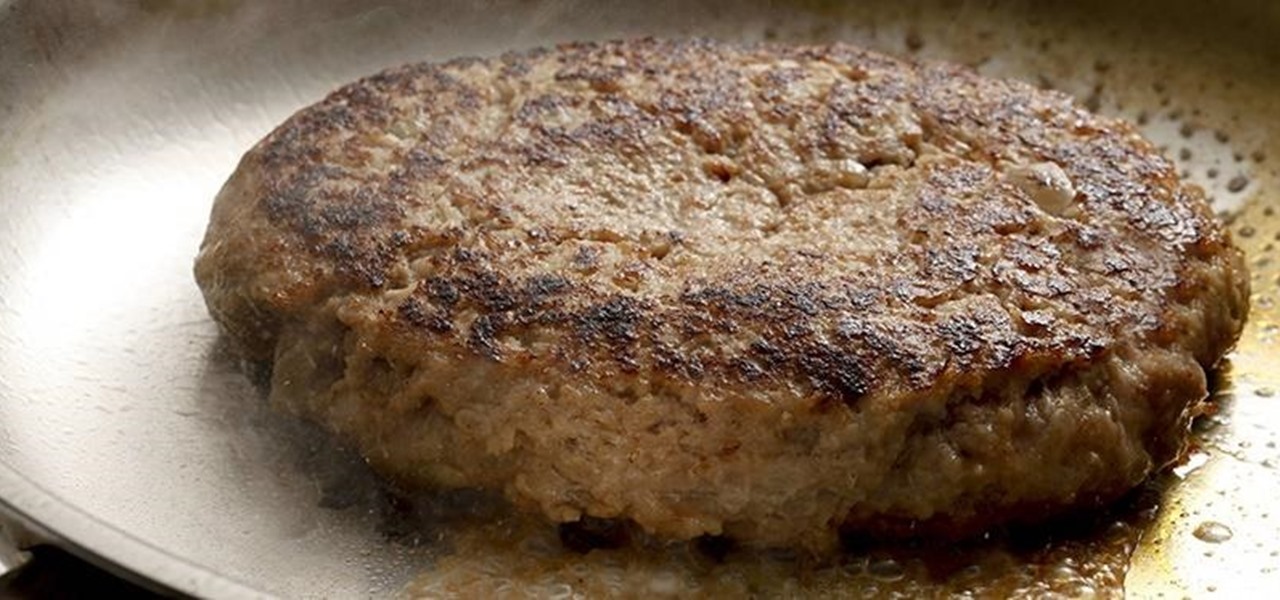
A homemade burger is a delicious thing, but it can be hard to load up with all the fixings. Why? Because said burger is usually wider in the middle and thinner around the edges, like so: Chances are that patty will still be delicious, but your lettuce, tomato, et al. are going to slide off the surface because of this patty's dome shape.
There's no shortage of reasons to love the One, yet a feature curiously omitted from the device, much to the chagrin of power users, is a multitasking button.
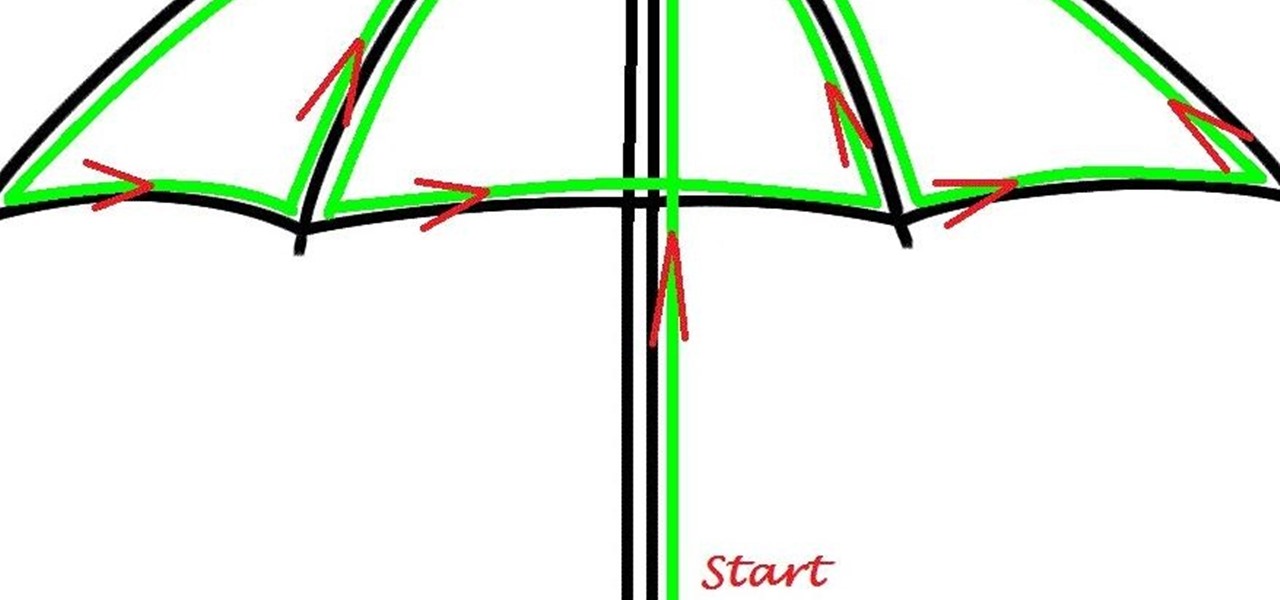
Here's a children's umbrella lined with neon green EL wire. It's definitely an easy and fun project for kids to do with their parents, and more importantly, it keeps the little mischiefs safer if they're out and about on rainy days.
Everyone knows that using your phone and driving is illegal, and rightfully so. Tons of people die on the road everyday due to careless people texting or calling someone. Everybody knows that it's wrong, yet everyone still does it anyway.
This guide makes beating the Widowmaker in Times Square easy enough, so picking up the 'In This Together' Resistance 3 trophy shouldn't be that hard either right? If you head to the location of the Chimera you kill at the beginning of the fight and then walk towards the edge of the map, you can actually fight the Widowmaker without it being able to hit you.
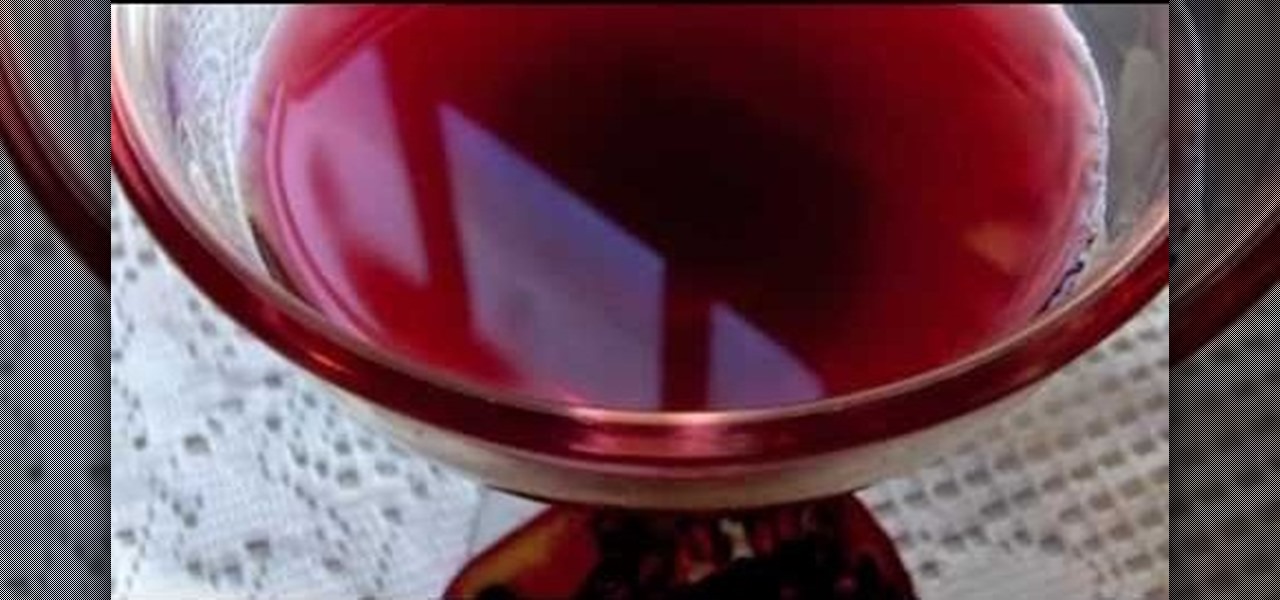
Take the edge off the holidays and feel lit up like a Christmas tree inside and out by swigging one of these bad boys. This sweet and tart pomegranate martini is so very tangy and delicious while giving you that perfect alcoholic kick.
In this video, Linnea Rose teaches us how to paint in a Norwegian folk style called "rosemaling". With this, you will double load your brush and do the strokes in the correct way. To double load your brush, first dip one corner into a color, then dip another color into the other color. After this, stroke again in between the two colors. Next, go to your canvas and simply stroke a looped shake on the paper. Firmly press down with your brush and as your curve around you lift it up to the chisel...
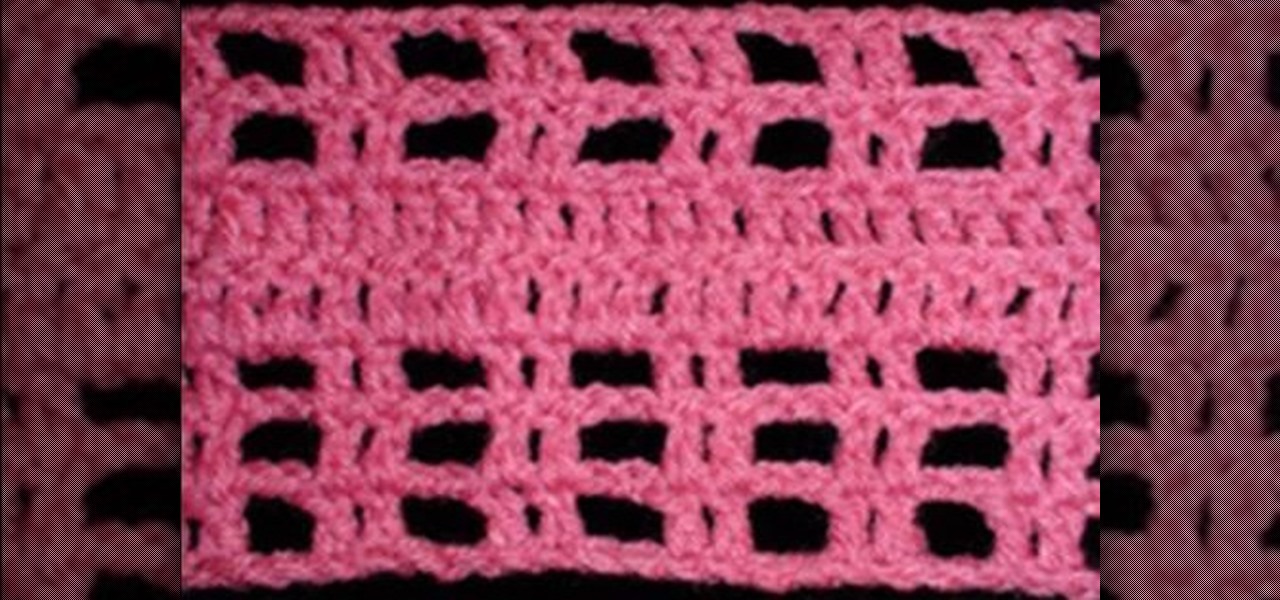
Are you looking for a new way to crochet while being left handed? Then watch this video, where we learn how to do a left handed mesh crochet pattern stitch. Start off with the first round, where you will double crochet in the fourth chain from the hook. Then, double crochet in the next chain and skip two chains. From here, you will do one double crochet in the next two chains and continue across from the start for the width, ending with two double crochets. For the next and last round, you wi...
Any medical student should be able to perform a basic cardiovascular exam. This medical how-to video tutorial outlines the guidelines to perform a basic cardiovascular exam. Always begin by by observing the patient from head to toe. Inspect the face for signs of cyanosis. Note visible scars or pulsations in the neck and edema in the feet. This video is intended for medical professionals only.
In this tutorial we learn how to toeside sideslip in snowboarding. Keep your head up and your eyes looking directly uphill. Bend your knees and maintain a straight upper body. Make sure to go slowly and take your time so you are more likely to get the feel of the hill. Apply pressure to your toe edge by driving your knees towards the snow. Also, maintain even weight on both feet with your arms to the side for more balance. Once you have these tips practiced and learned, you will become a bett...
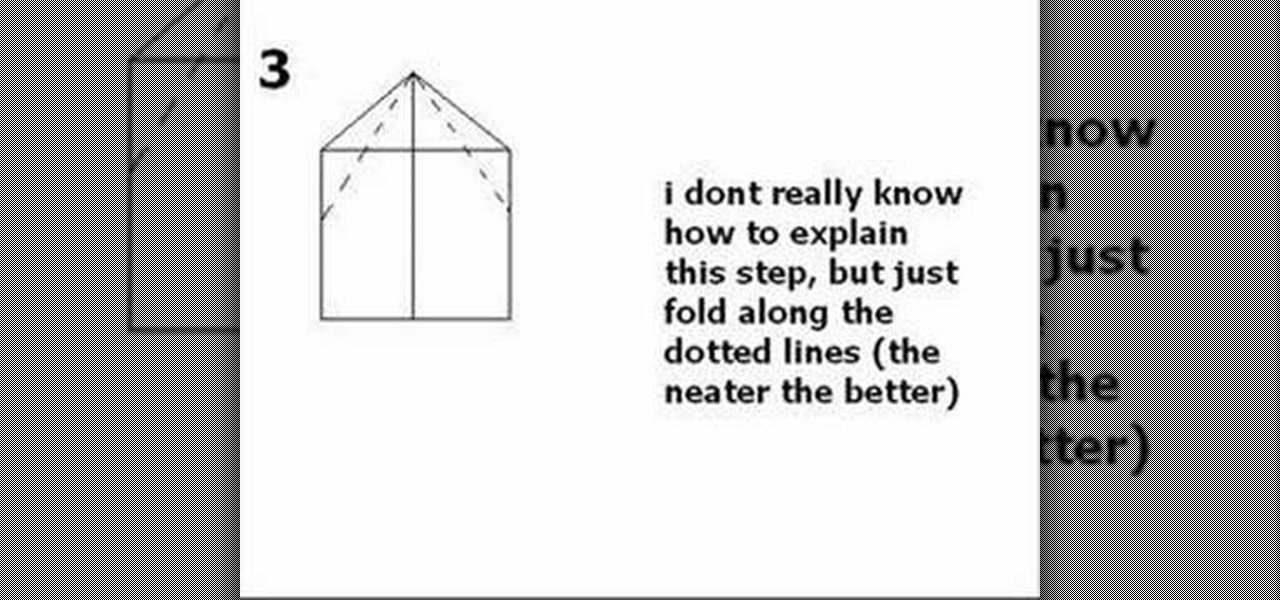
In this video we learn how to make a speedy paper airplane. First, fold the paper in half and make a crease in the middle. Next, fold the corners down on the top. After this, fold these into another triangle going half way down the paper. Then, fold the tip all the way down so it rests on the opposite side of where it started. Do one more fold like the ones you did in the second and third steps. Make sure you are making crisp creases in the folds that you make. After this, fold the tip to the...
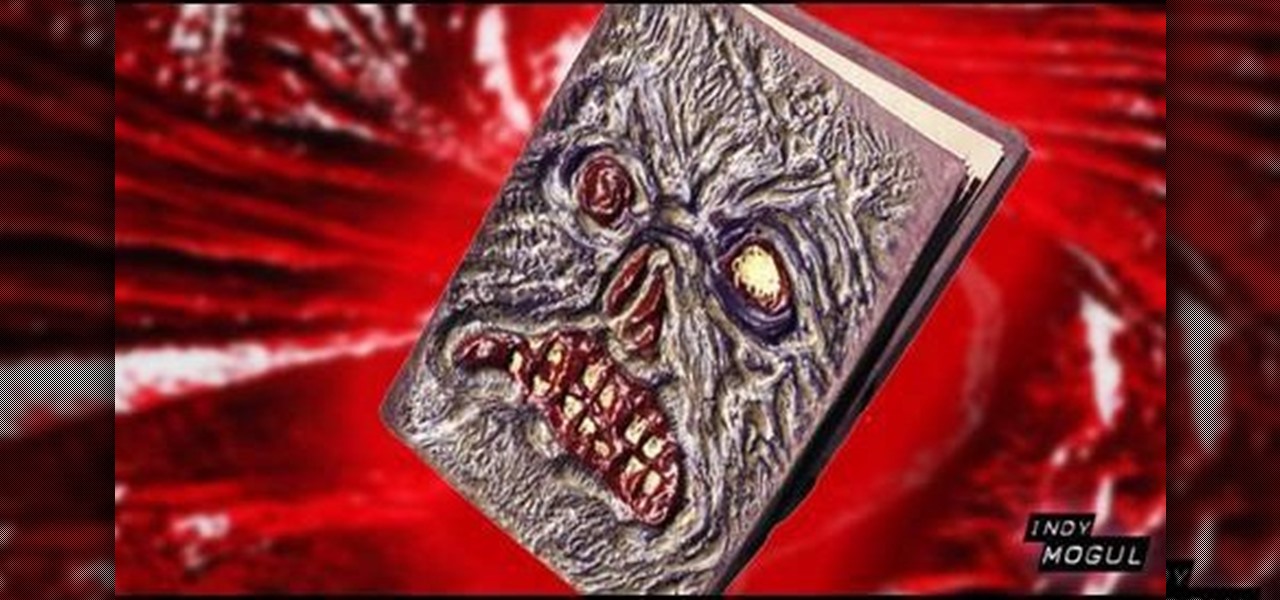
In this video, we learn how to make a Necronomicon prop from the "Evil Dead" series. First, gather all of your materials together so you can make this prop. After this, cut up piece of cardboard into the desired shape, then tape them and make sure it's able to open and close. Next, you will use tape to make it look like creases in the skin and create the face by rolling it together. Use masking tape to connect these and make it look like it's all part of the same skin. Next, mix red, yellow, ...
In this video we learn how to master basic mobility on your snowboard. Look and point in the direction you want to travel then transfer weight onto your back foot and slide the snowboard forward. Transfer weight onto your front foot to enable the board to glide forward. Change direction by lifting the snowboard and pivoting on the back of your feet. To climb, place your snowboard perpendicular to the fall line. Then, step your free foot over the snowboard and dig your toe edge into the snow. ...
In this video we learn how to do a heelside sideslipping in snowboarding. Keep your head up and your eyes looking straight ahead. Bend your knees and maintain a straight upper body. Apply pressure to your heel edge and pull up on your toes as you ride. Maintain even weight on both feet with your arms at the sides of your body. As you continue to learn the tips and tricks on how to ride better, you will get more comfortable while on the board. Try to relax and remember how to do all the moveme...
In this tutorial, we learn how to tile a shower floor and curb in your own bathroom. To start, you will need to apply the foundation of your tile with a smoothing tool from corner to corner of each of the corners. After the mortar is lied, grab your tile and press it down firmly onto the mortar. Use your hands to press down on all the corners of the tile, then place another one next to it and continue until you reach the end of the shower. Use a straight edge to cut tiles where the are too lo...
In this video, we learn how to make zebra and tiger prints with Ranger's alcohol inks. First, you will need some alcohol ink in black, gloss paper, a stamp, and felt. Now, take your felt and cut it into small strips. Make lines like a zebra or tiger would have. Next, push these strips onto the stamp bottom, arranging them to look like a zebra. After these are stuck on securely, trim off any edges and make some pointed. After this, you will squirt the black ink onto the bottom of the stamp on ...
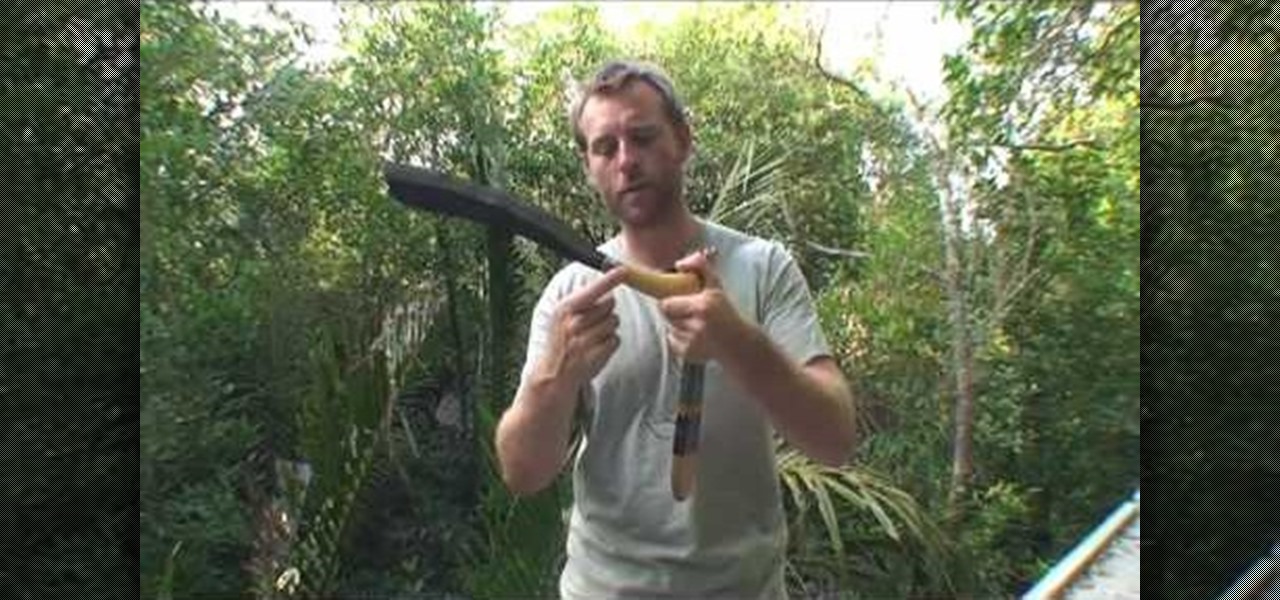
If you're ever stuck in the jungles of Southeast Asia, then your only hope for survival is the parang knife, which is a Malayan type machete. This is the ideal tool for the jungle, especially in Malaysia, where the typical vegetation is more woody, and needs something thicker for stronger chopping action. A parang has three different edges: the front is very sharp and used for skinning, the middle is wider and used for chopping, and the back end (near the handle) is very fine and used for car...
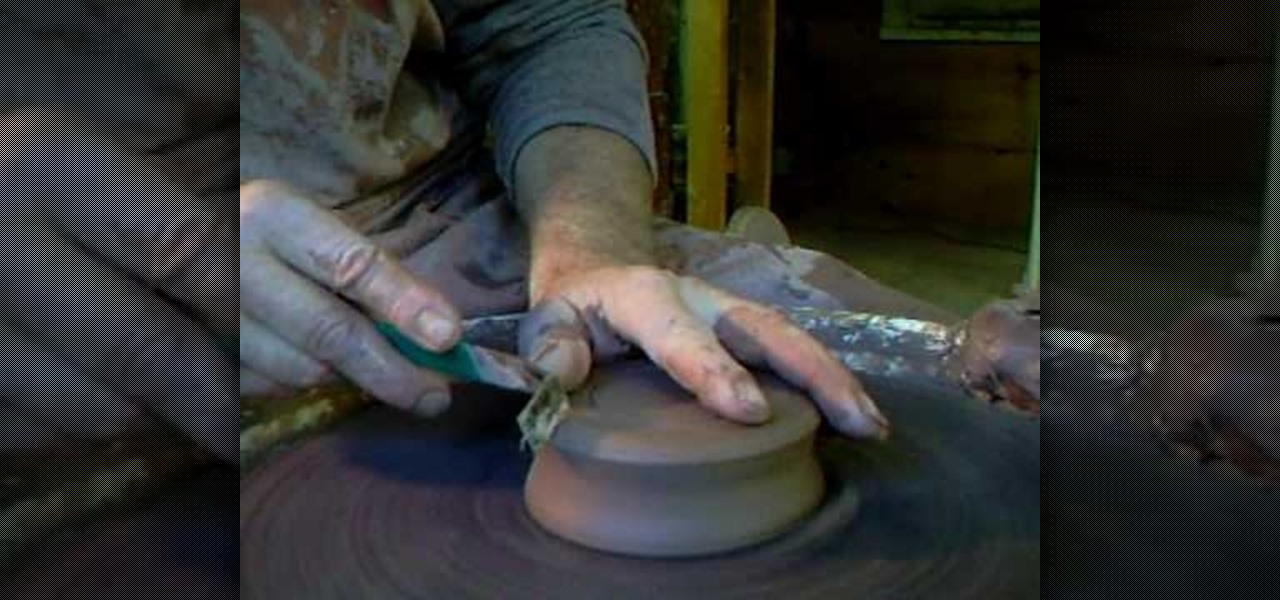
In this tutorial, we learn how to make simple pot stands. Start with your clay on the table and use water and your hands to start to shape it. Press down on the ball until it forms into a low bowl shape. Then, start to add more clay and water to the sides of the pot so that it's thicker on the edges. After this, place the pot stand onto a ceramic drying area, then you will be able to glaze it and fire it. Clean off your spinning table after you are finished, then enjoy your pot and pot stand!
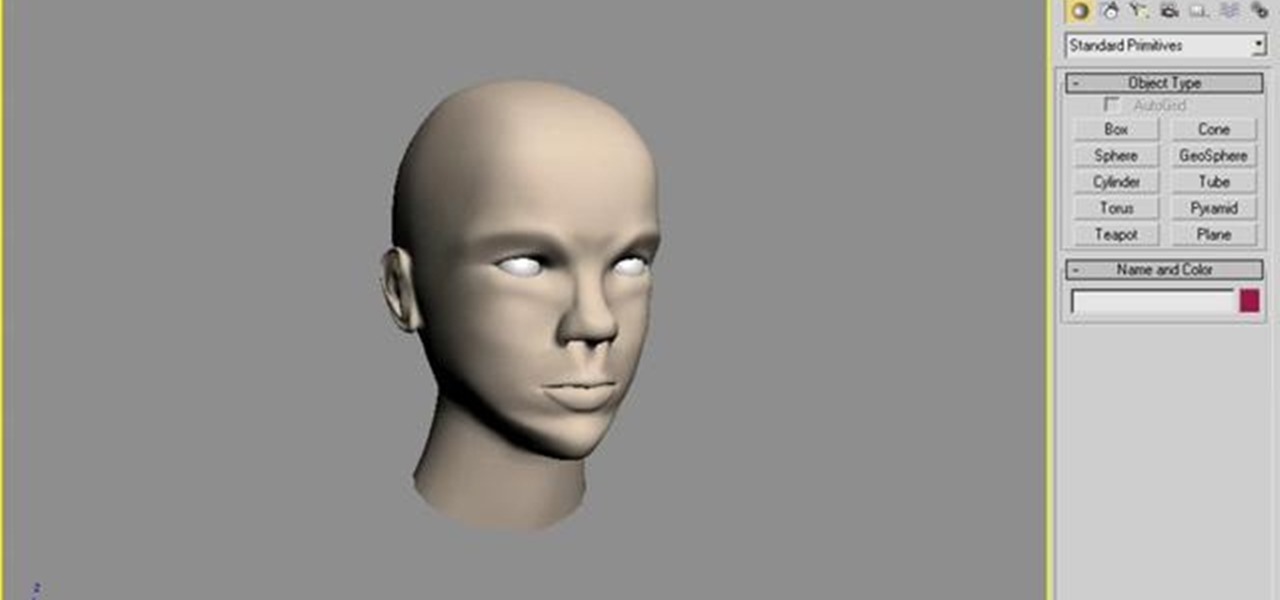
A polymodel head is being mapped. Keep the turbo smooth active to smooth out edges and seams. Use the relax tool to help even out the mesh and areas around the mouth, the ears and the neck as work proceeds. Use the stitch modifier to attach and combine the top and bottom of the head. To get all the seams and areas to match they must be moved, rotated and scaled. Use the weld tool on all the vertices and use the relax tool to get all the seams to match. Use the pelt map for the ears. Use the s...
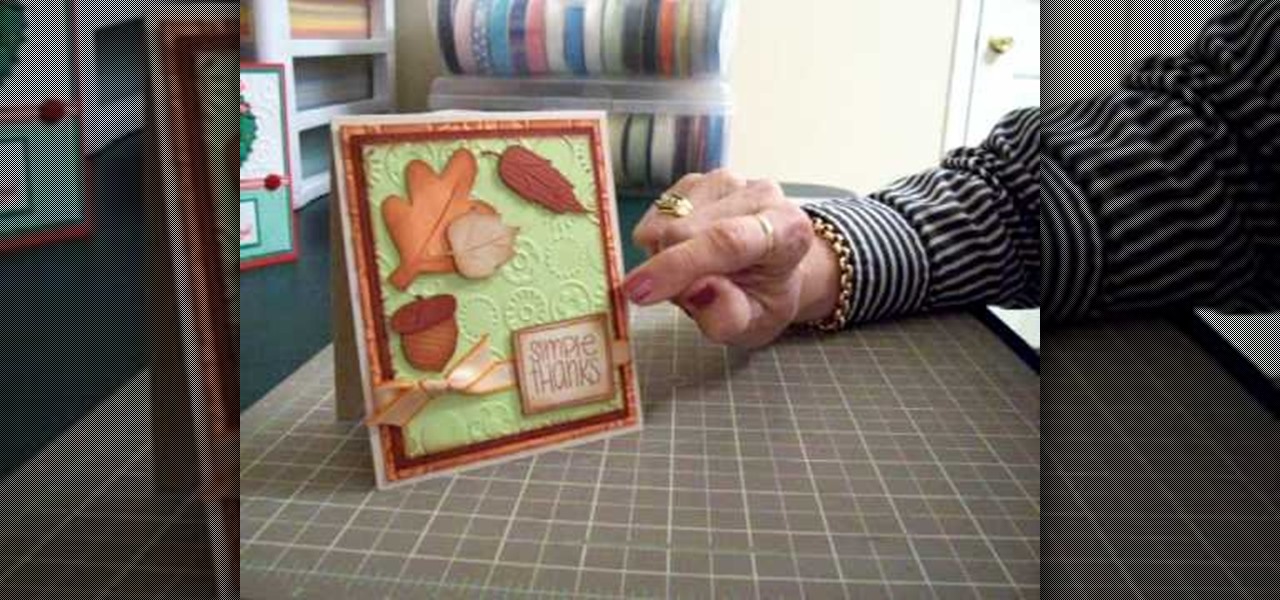
In this video, we learn how to make a thank you card using Cricut Doodle Charms and SYI. The card can be the size you choose. Layer orange, green, and brown mats, running the green and orange through the Cuttlebug using blue dots to give it texture. After this, ink around the edges with brown so the embossing shows up. Use the Cricut to cut the leaves and an acorn, using the Doodle Charms cartridge for one of the leaves cut at 2 1/4". You can also use the Stretch Your Imagination cartridge fo...
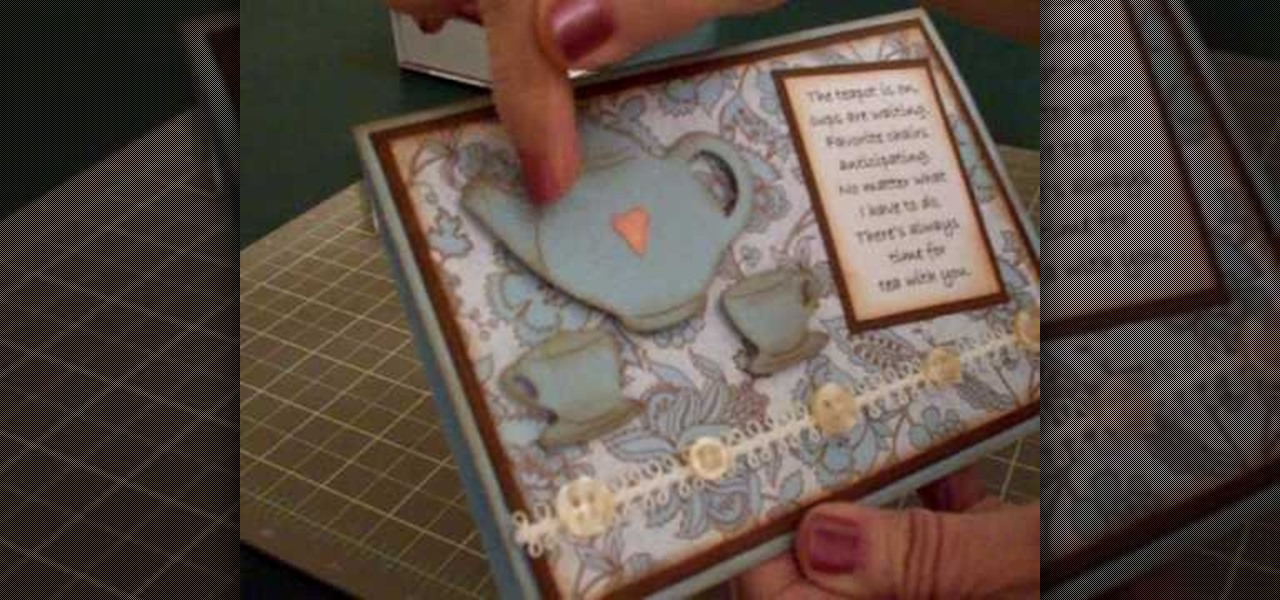
In this video, Mary shows us how to make a teapot card using Cricut everyday paper dolls. First, print out a sentiment that has to do with teapots and fade the edges of the paper. After this, cut out a teapot and cup from the everyday paper dolls on page 43. Cut the teapot and cut twice, then chop them so you can see the details of them. Place this on a paisley or flower background for the card, along with old buttons on the bottom of the paper. Make the card the size you would like, using yo...
In this video, we learn how to make a mosaic picture frame with ceramic micro tiles. First, glue on the four gemstones. These will go on all four corners of the frame. Next, place the square mosaics onto the base. You will place these around the edges of the frame that are perfectly square. After this, cut the other squares in half and glue them onto the entire frame in the middle of the squares on the frame. Next, let the frame dry for two hours, then mix the powder together with water and r...
This video tutorial is in the Arts & Crafts category which will show you how to make crumpled flowers for scrapbooking. Cut out three circles of 2", 1 1/2" and 1" diameter out of a sheet of paper. Then wet the pieces of paper lightly with water or colored ink and crumple them one by one as shown in the video. Then place the three pieces together and pin them up with a split pin. Now crumple the edges of the paper further to give them the look of a flower. Allow it to dry and your flower is re...
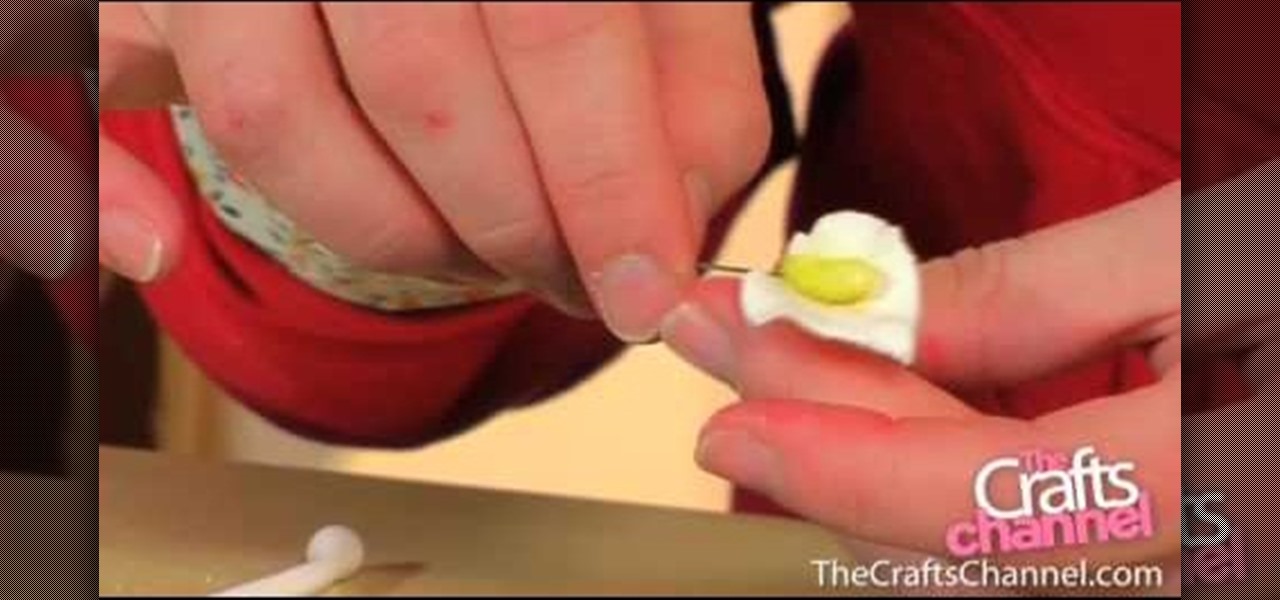
In this tutorial, we learn how to color a sugar crafted lily petal. Insert your paste onto a green wire, then cover the paste with clear edible glue. Then, place the piece into yellow sugar sprinkles. After this, create your petals out of gum paste and push down on the edges to create a petal shape and feeling. Next, apply the glue onto the center of the flower and add this onto the piece that you just made, wrapping it around. After this, wait for it to dry and you will have a beautiful lily...
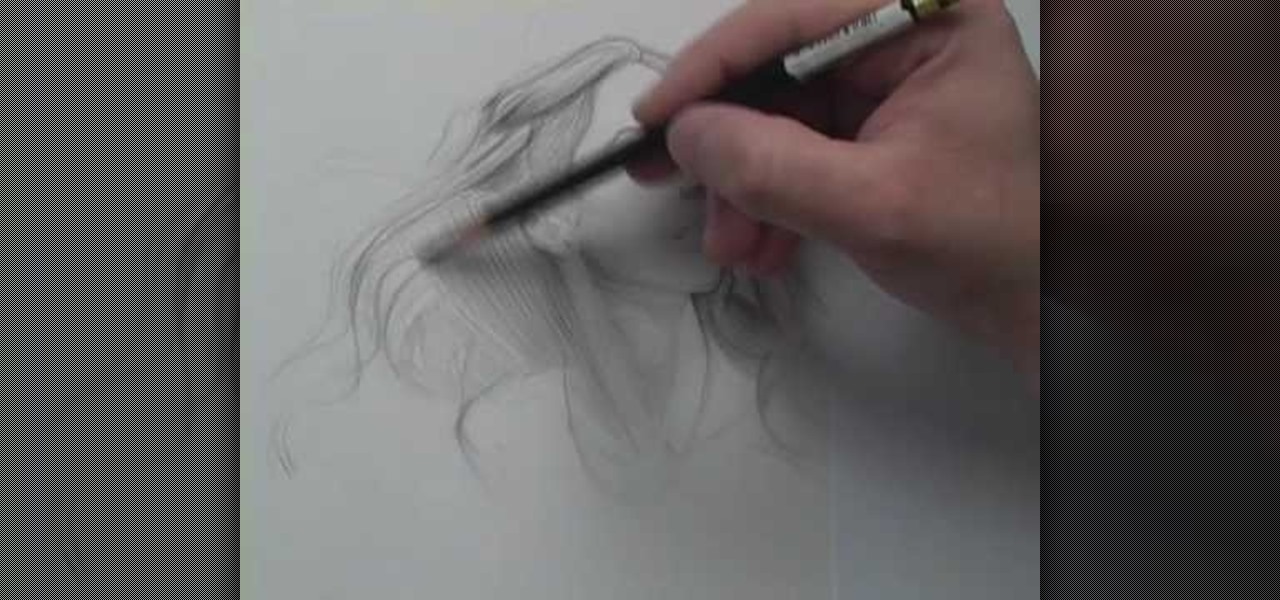
In this tutorial, we learn how to draw wispy hair with Matthew Archambault. When drawing these, you will first start off with a light pencil to make the hair look soft. After this, you will want to make the shapes of the strands look unique, then work from light to dark with the different strands. Use a harder pencil mark when you draw the outline of the hair. Make sure you don't do hard edges at all, everything needs to be soft. make sure you are drawing the hair outwards to make it look lik...
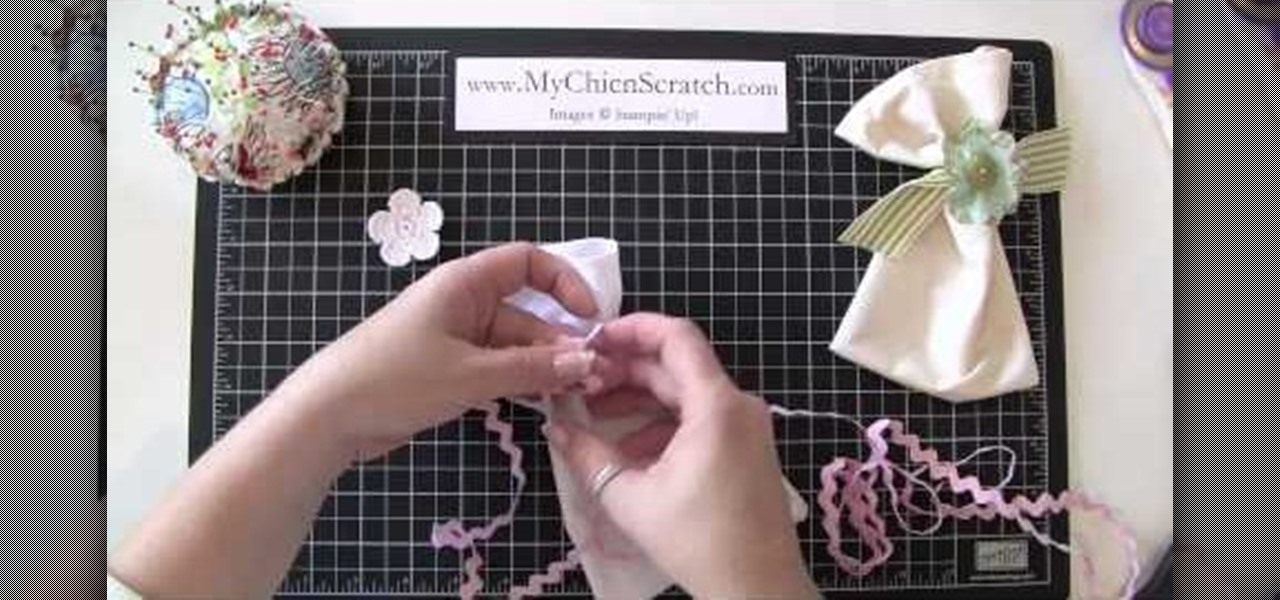
In this tutorial, we learn how to make a fabric gift bag for any occasion. First, you will need to grab any type of fabric with any design that you want the bag to be in. Next, you will fold in the edges of the fabric so it has a hemmed look, then sew them down. After you do this, sew the two sides of the bag together, then sew the bottom. Next, grab a piece of ribbon that you don't want and wrap it around the bag. Top it off with a felt flower and sew a button into the middle of it. Glue thi...
In this tutorial, we learn how to create Tyra's makeup look from "Ru Paul's Drag Race". First, apply eyeliner onto the eye, going from the inner crease out to the brow bone and making a rectangle around the crease of the eye. Next, make this line darker and smudge out the edges of it. Now, get gold sparkly eyeshadow and brush it onto the eyelid underneath the crease where the black liner is placed. After this, paint on silver shadow underneath the brow and then blend the black and silver toge...