In this video tutorial, viewers learn how to suture. Begin by lifting up the skin on the far side of the laceration with the tissue forceps and insert the needle with some distance far away from the wounded edge. Then lift up the skin with the near side laceration and mirror the course of the needle. Now move somewhat to the right of the subsection of this stitch, parallel to the incision line. Place the second subsection of the horizontal macro-suture like the first part. But this time from ...

In this video, we learn how to write the letter "r" in calligraphy copperplate. Start out by dipping your calligraphy pen into ink, then creating a curved line with a dot at the end of it. Next, fill in the line so it is smooth and there are not ragged edges. Next, draw a large swirl on the left side next to the curved line, then draw it over to make the initial loop on the "r". After this, create a loop in the middle, then draw it back down to make the end hump of the "r". After this, draw i...
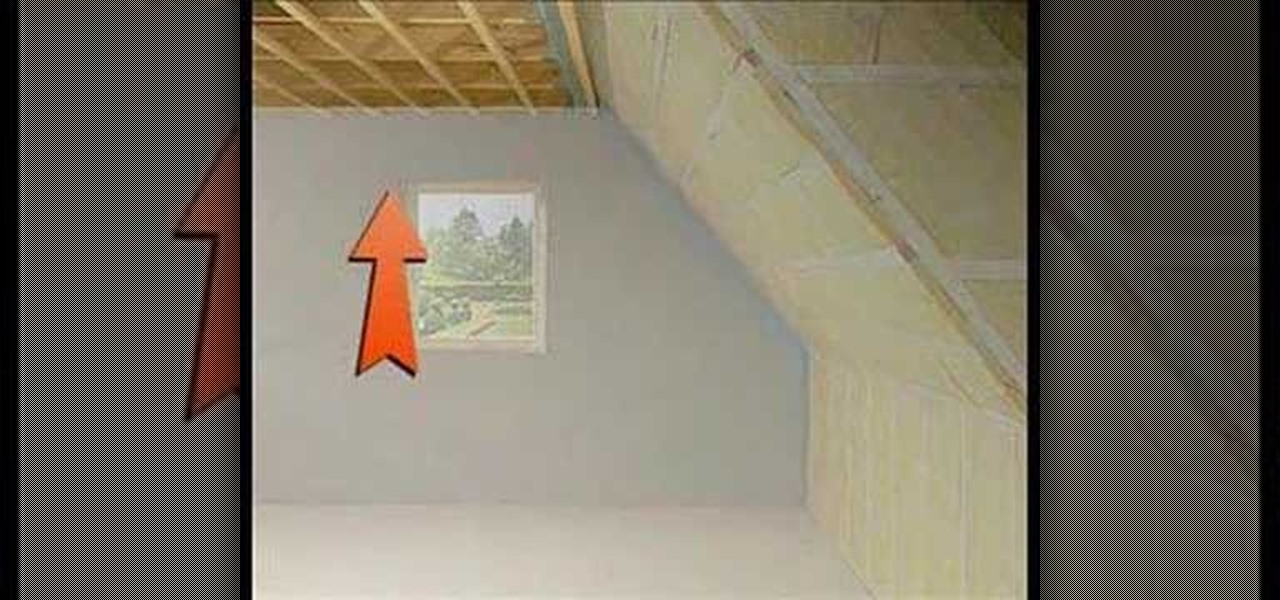
In this tutorial, we learn how to drywall your attic & loft with Fermacell. First, you need to consider the nature of your build and how much you will need to drywall. It is recommended that you install a film to ensure air tightness. You can place this down with a staple gun and tape it down as well. Large holes should be properly sealed as well, to enforce building regulations. Once you do this, you can add the boards on top of what has already been installed. Insulation will be now place o...
In order to stump drunk people with a cork trick, you will need the following: 2 corks per person. Tuck the cork between the thumbs and forefingers. The rules are that you have to switch out the corks without using any other fingers, besides the thumbs and forefingers, and the exchange must be simultaneous.
This video tutorial belongs to the Film & Theater category which is going to show you how to build a light diffuser to improve your film lighting. Joe Richardson explains how to do this. You will need four pieces of pine wood 1" x 2" x 8 feet long, framing nails, duct tape and light cloth material. Cut the wood at the edges at a 45 degree angle and lay them out on ground to make the frame and hammer in the framing nails. Now spread the cloth over the frame and start stapling it. Pull the clot...

In this tutorial, we learn how to create "viva la diva" lip art. First, prime your lips and blend it out with clean fingers. Next, take your favorite type of lipstick and then use lip liner on the edges. Blot the lipstick on the back of your hand, then apply the lipstick again. Next, grab rhinestones and apply them on your lips using a q-tip and Duo glue. When you are done with this, apply a clear lip gloss to the top of your lips. This will give you a glam look with beautiful rhinestones on ...

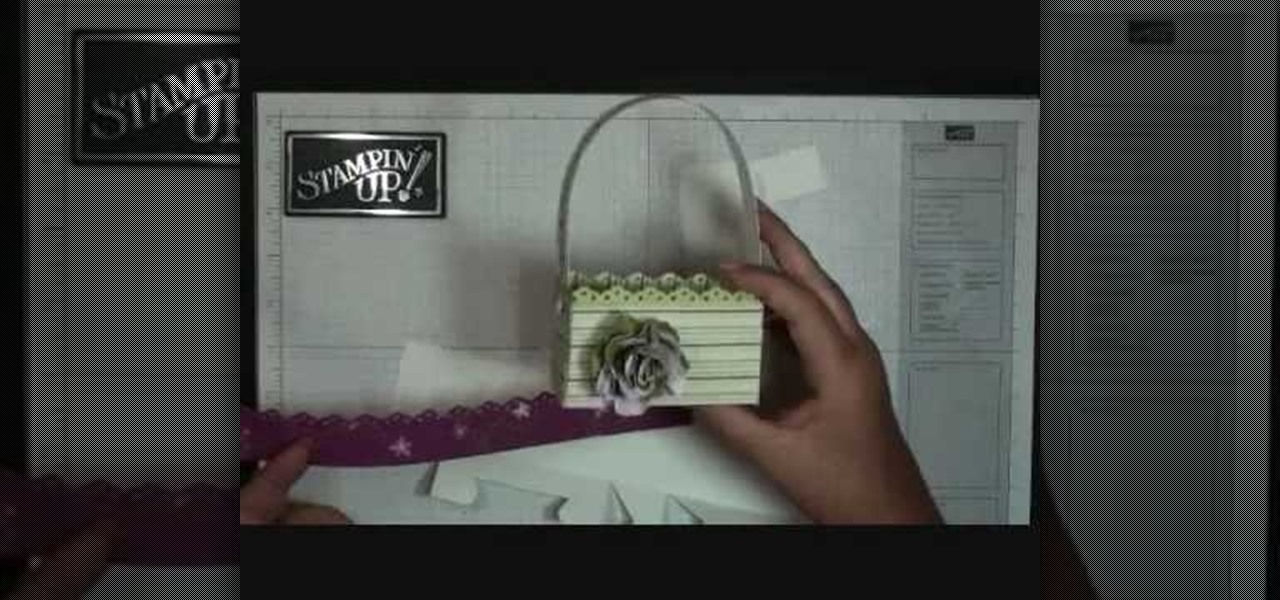
This video tutorial is in the Arts & Crafts category where you will learn how to make a mini Big Shot Box with Stampin' Up! For this you got to use the Bigz Die Box #2. Cut a Whisper white card stock at 6" x 11", place it on the die box and run it through the machine to get the box template. Cut off one edge of the template along the score line with scissors. This will be the top part of the open box. Now fold the bottom part of the box along the score line. Take a strip of cottage wall desig...
In this Family video tutorial you will learn how to craft felt frog puppets with your kids. The materials you will need for this are felt (pink, dark and light green), a piece of red lace, 2 large white pompoms, 2 small black pompoms, scissors, glue and marker. Take two layers of dark green felt and draw out the outline of half of the left palm. Fold the felts in half and cut out the outline. Stick the two pieces along the edges to make a glove. Next cut a rectangular piece out of the light g...
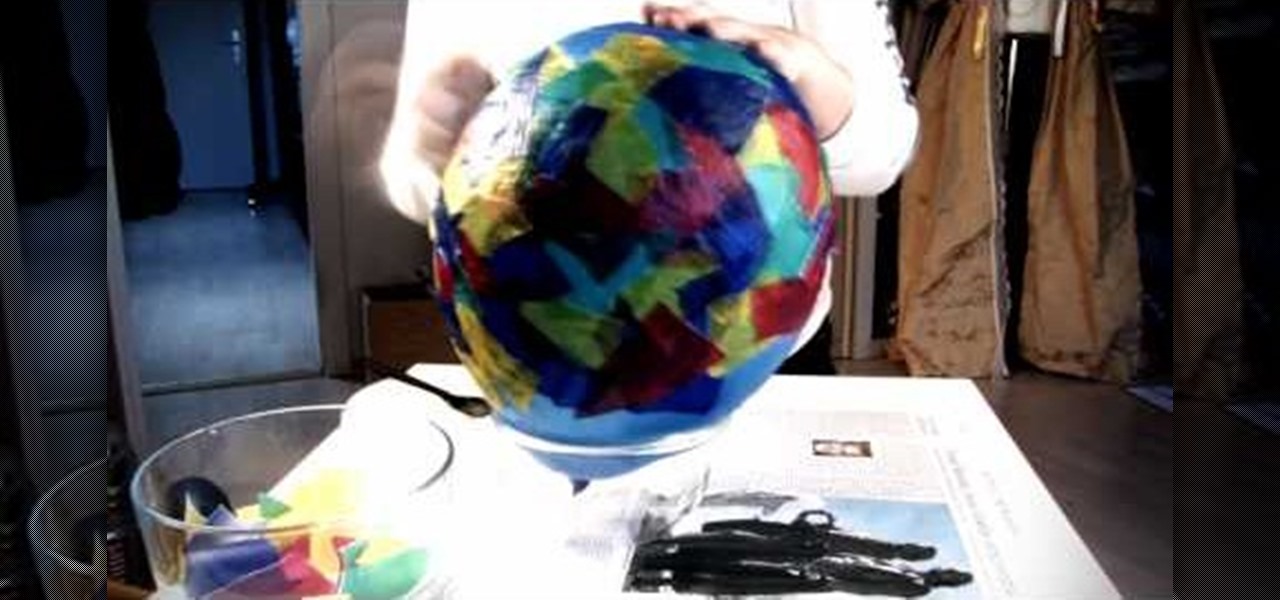
In this video tutorial, viewers learn how to make a balloon lantern. The materials required for this project are: balloons, lantern paper, wallpaper paste, bowl and scissors. Begin by ripping the paper into small pieces and place it into the bowl. Then shake the bowl and blow up a balloon. Now put some paste onto the balloon and layer it with the lantern paper pieces. Then let the paste dry and pop the balloon. Remove the balloon and cut off the lantern edges. Finish by hanging it and add a c...
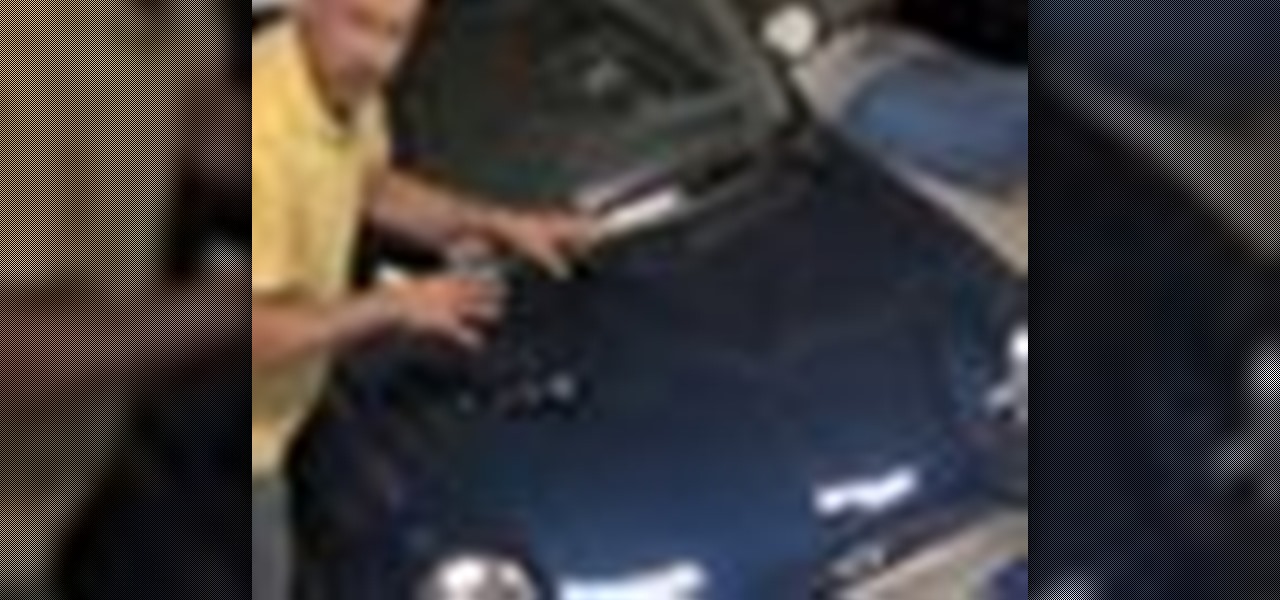
In this Autos, Motorcycles & Planes video tutorial you will learn how to inspect hail weather car damage. Paint loss dent repair is the most common method used for this purpose. The first thing to do is to count the number of dents based on half dollar, quarter, dime and nickel size. All you need to do is to place the coins over the dents and count how many dents are there of various sizes. Once you have this information, you are on your way to handle the hail loss assessment correctly. If th...
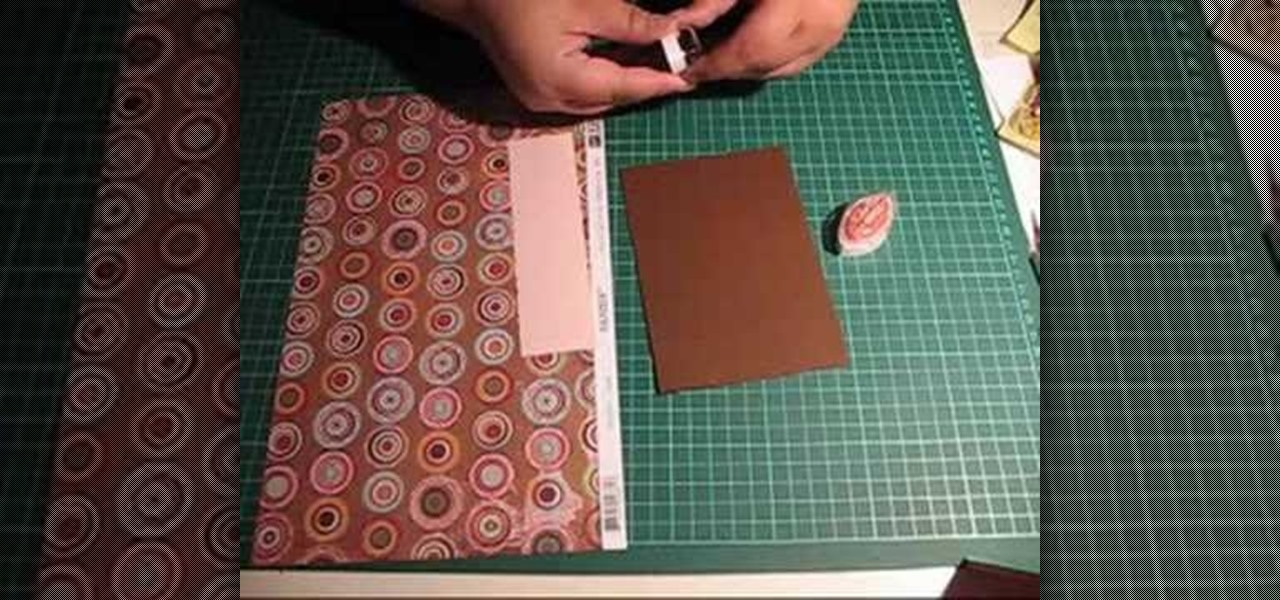
In order to make an accordion envelope, you will need the following: 6 envelopes, 4 pieces of 6x4 1/8 card stock, double sided tape, chalk, a square punch, and glue.
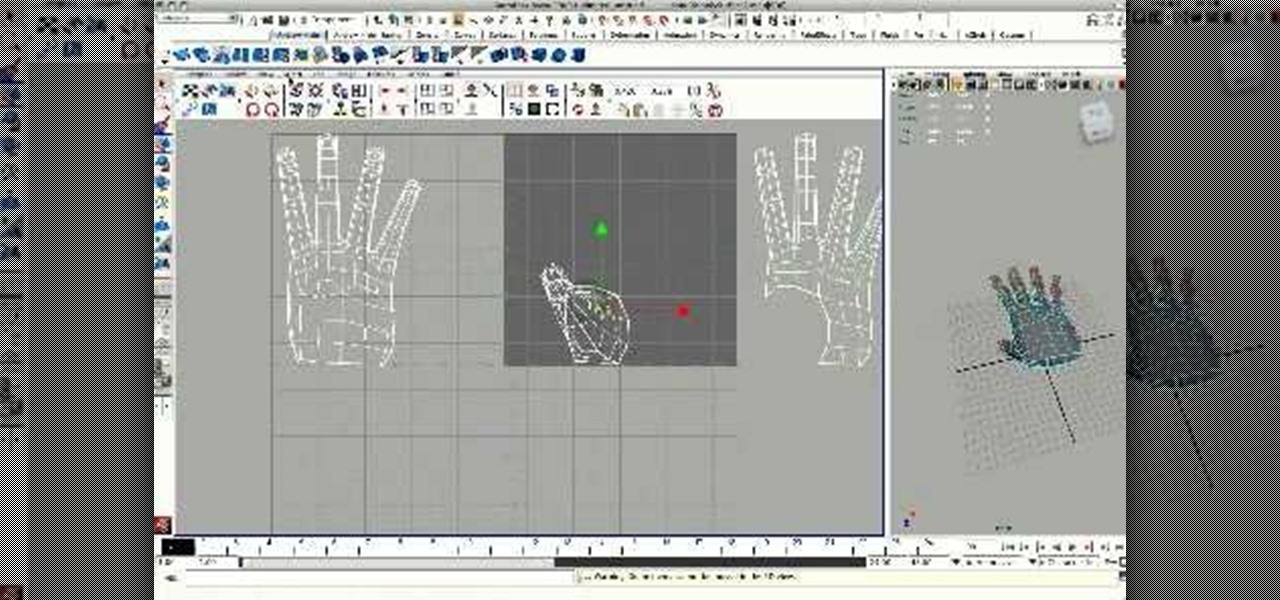
Maya 2009 introduced a lot of cool new UV tools to the already-powerful Maya 3D modeling software. This two-part video will teach you how to use some of these features to cut apart a 3D model of a hand by its UV edges. This technique is perfect for very fast organic UV unwraps, and should improve your skills and speed of modeling dramatically.
In this Arts & Crafts video tutorial you will learn how to sew a blind hem. Use a blind hem stitch when sewing the bottom hem of your Roman shade. It is very easy to do. For this you will need a sewing machine that has blind hem stitch already programmed in to it and a blind hem foot. Hem your fabric and pin it. Make sure the pointed ends of the pins are pointing outwards. Lay your fabric with the hemmed side facing up and the hemmed side towards the pressure foot. Then flip the hem upside so...
In this Arts & Crafts video tutorial, Ana Maria, Origami artist, will show you how to fold an origami paper pyramid. For this you will need a square piece of paper; preferably colored. Fold the paper in half, open it up and fold in half in the other direction. Open up and fold all corners to the center point of the paper. Now fold it in half in both directions. Open up the last fold and fold one of the edges inwards. Open up again, unfold the adjacent flap and lock the flap down as shown in t...
Summer is just around the corner, and though many of us are going to dash out of our schools in relief and joy and then head straight out the pool in our skimpy bikinis, we should be covering up with sunblock and hats to prevent noxious nasties like cancer.
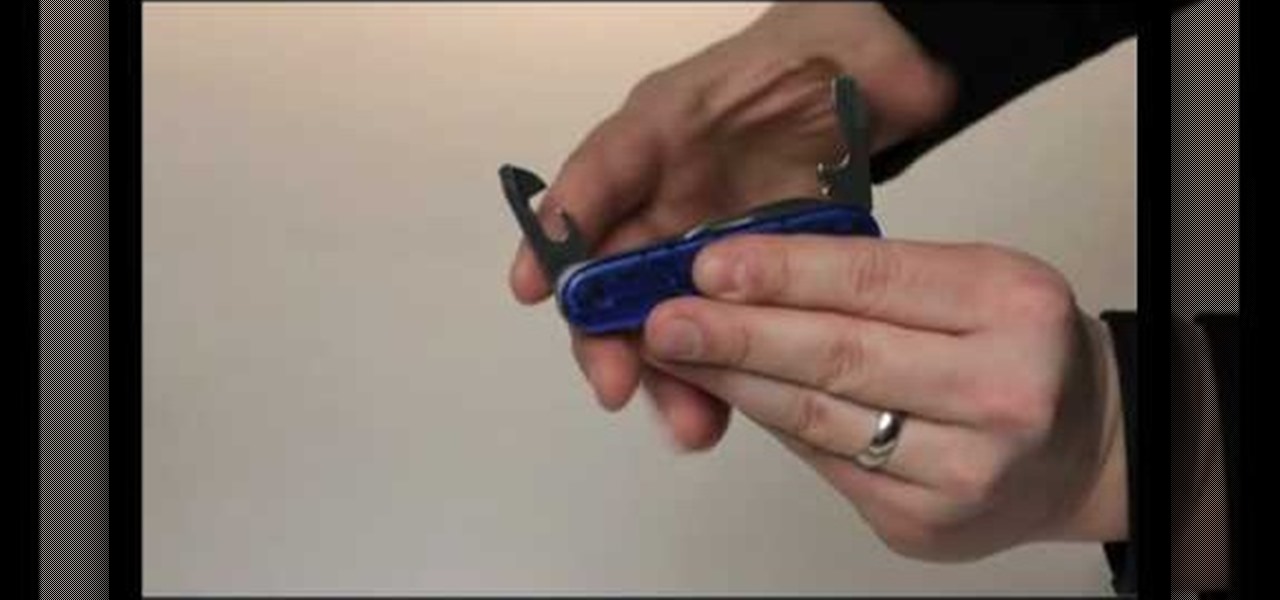
The Swiss army knife has a lifetime warranty and is the brand that MacGuyver used in his series so you know that it's good. The keychain side of the knife contains a bottle opener while the other side contains a can opener with a sharp cutting edge. The bottle opener has a flathead screwdriver on its top. You can use it to open bottles of ale when traveling through Europe by using a leverage technique. The top should then easily come off of your desired bottled beverage.
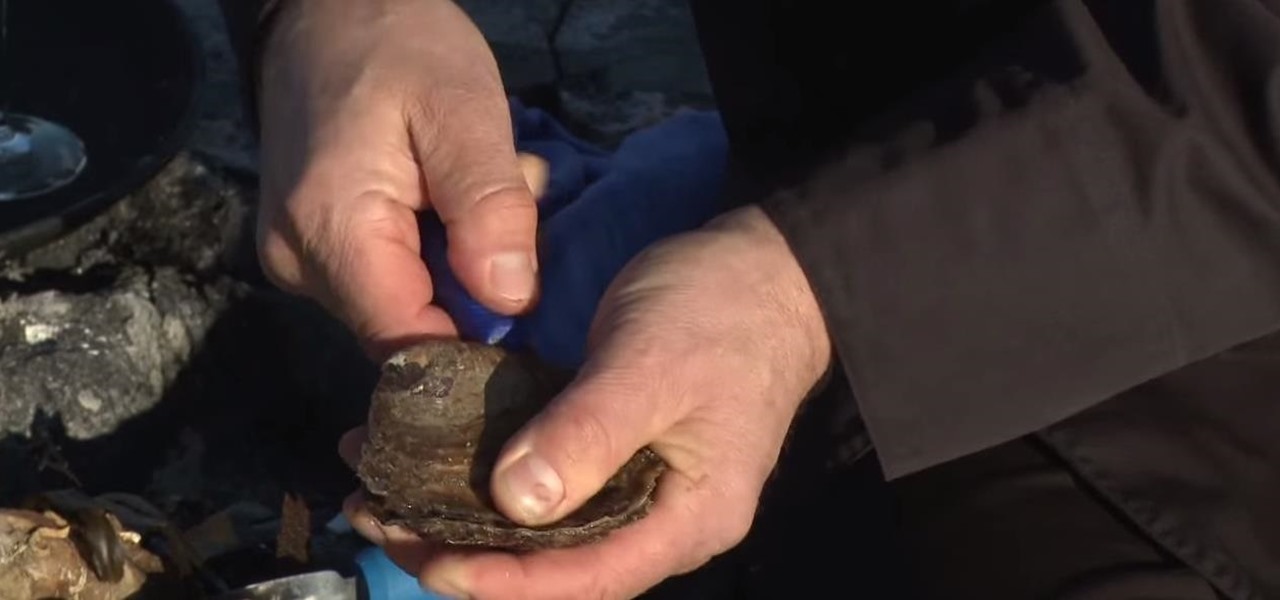
Following are the steps to describe how-to open and shuck the oyster properly: All you need is a good sharp knife to open the oyster.
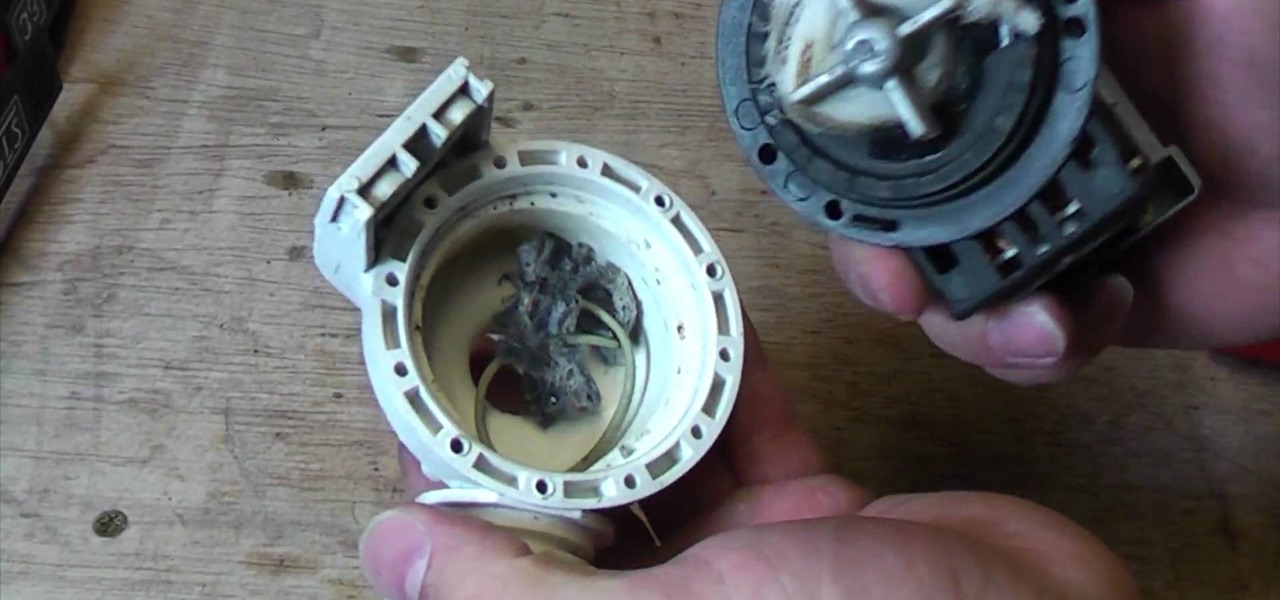
Ultimate Handyman demonstrates how to check a washing machine pump for blockages. First, disconnect the washing machine from the electricity source and remove the pump. The water sucks through the inlet and is pumped out of the outlet. Check to make sure that the pump doesn't have any open circuits by attaching the leads to the multimeter. Remove the screws to look inside the pump. Remove any debris that may be clogging the propellor. Make sure the O-ring around the edge creates the seal and ...
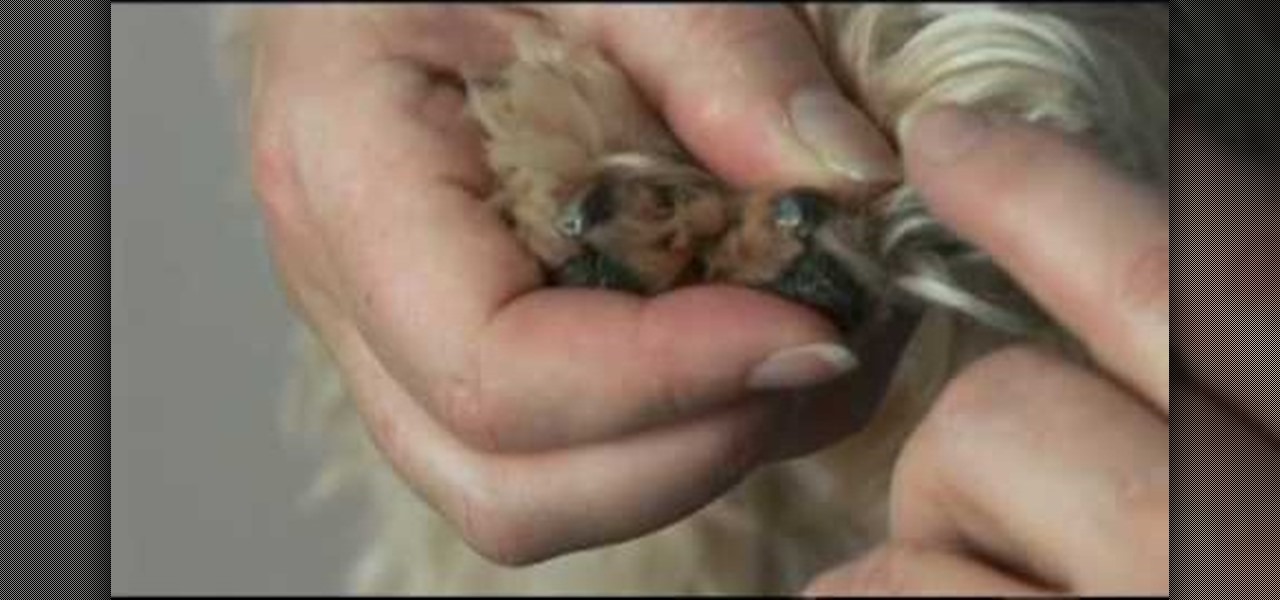
When it comes to trimming your dog’s toenails, there are several instruments you can use. In this video, Patrice introduces you to the toenail clipper and the toenail grinder. To begin trimming your dog’s nails, pull back the hair surrounding the toenails so you can get a better look at the nails. Then separate the toes so you can work with one toe at a time. Using a toenail clipper, cut the nail enough to where you can see the jelly-like substance. You will know when you haven’t cut en...
This video shows you how to use a Swiss Army knife can opener. It is easy to confuse the can opener with the bottle opener. The can opener has a small screwdriver tip and a sharper edge. Cans of spaghetti are good for a quick meal on the train. Put the bottom part of the can opener underneath the lip of the can. Use leverage to poke the top part of the opener through the lid of the can. Move the opener backwards a little and push through again. Keep doing this all the way round the top of the...
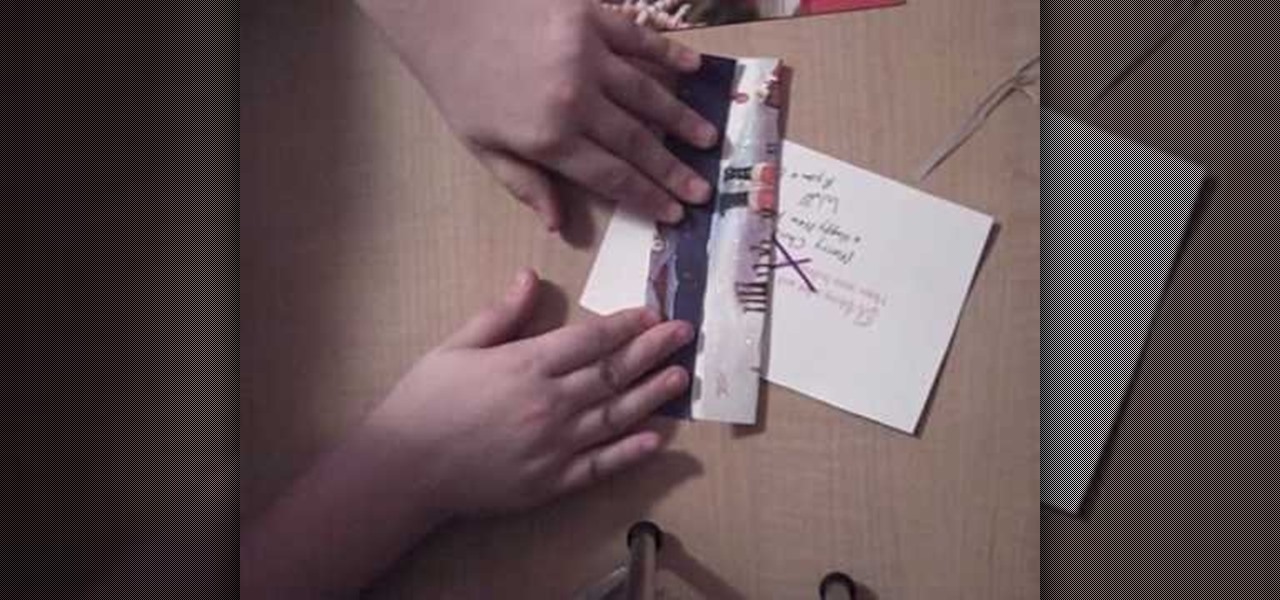
This video shows us how to make a homemade jewellery box out of a Christmas card.For that you need a pair of scissors,a tape,a christmas card,a marker and another card to draw your X with.First take the card and cut it straight down the middle into two pieces.Now take the back side piece of the card and cut off 1/4 of an inch from the left and the bottom portions.This will help to fit the cards together.Next use the extra card and trace an X on both sides of your card piece,in the middle.Take...
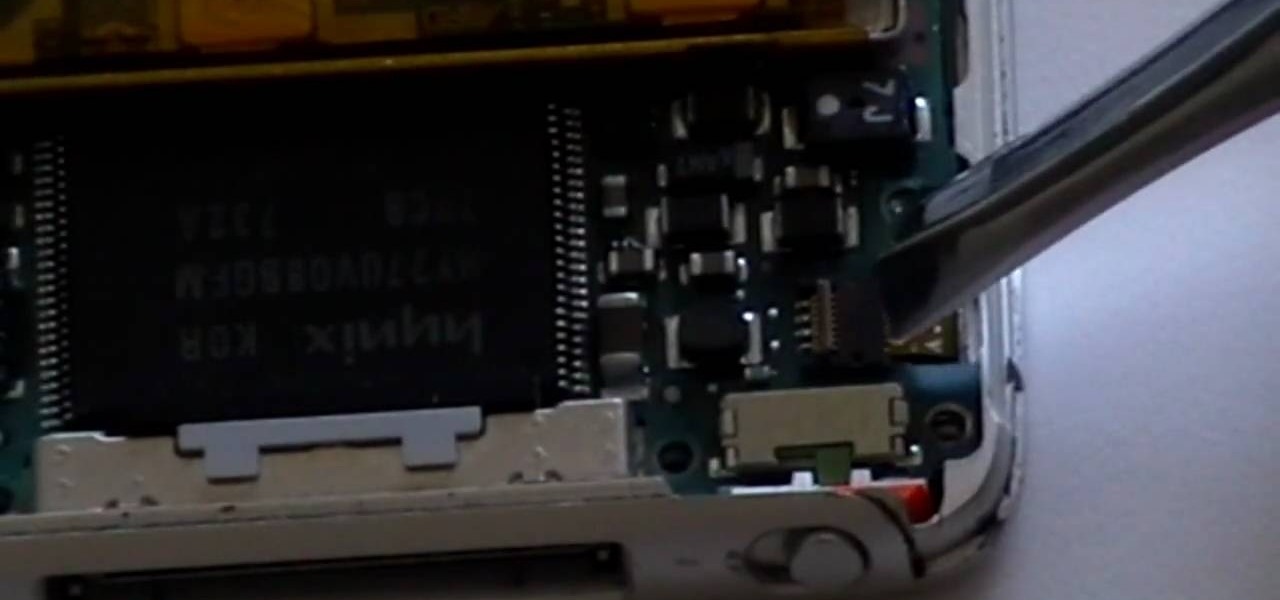
This video shows you how to replace the LCD screen on a third generation iPod nano. Using a plastic safe pry tool, run it along the edges of the iPod, releasing the clips. Once the clips have been released, you should be able to remove the back cover. There are six exposed screws on the bottom of the inside back cover, remove all of them. Next remove the click wheel ribbon cable from the jaw connector. To do this, use the pry tool to lift the connector. Use a pair of tweezers to gently remove...
This video shows the way to make a paper balloon. A square paper is taken. Two perpendicular folds are made down the diagonals of the square. Then an isosceles triangle is made by folding one side of the square towards its opposite side and the other two sides are tucked in. Now there are four isosceles-right triangular flaps. The flaps are folded along its middle to resemble isosceles triangular flaps. The edge of the flaps is folded towards the center. The free end of the flap is tucked int...
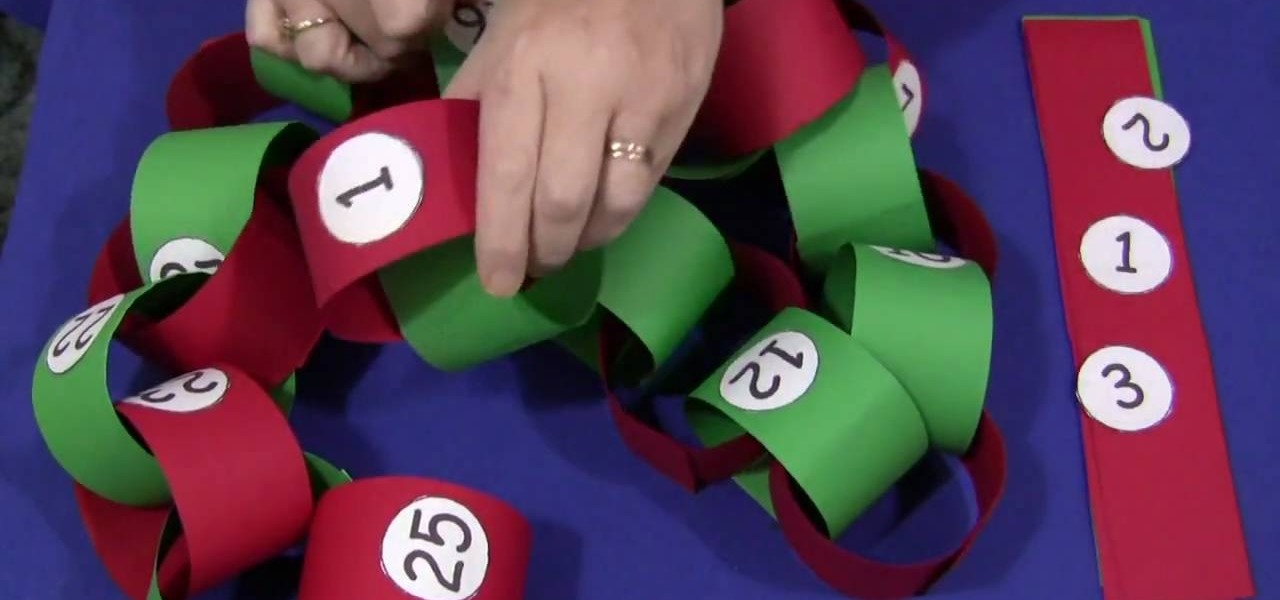
In this video tutorial, viewers learn how to make a Christmas countdown chain. The materials required for this craft are: construction paper, paper cut into small circles, glue and marker (optional). Begin by cutting the green and red construction paper into even strips. Users may choose to write out the numbers or print them out onto paper. Then cut out the numbers into small circles and glue them in the middle of the strips. Alternate the color of the strips each day. Then put the edges of ...
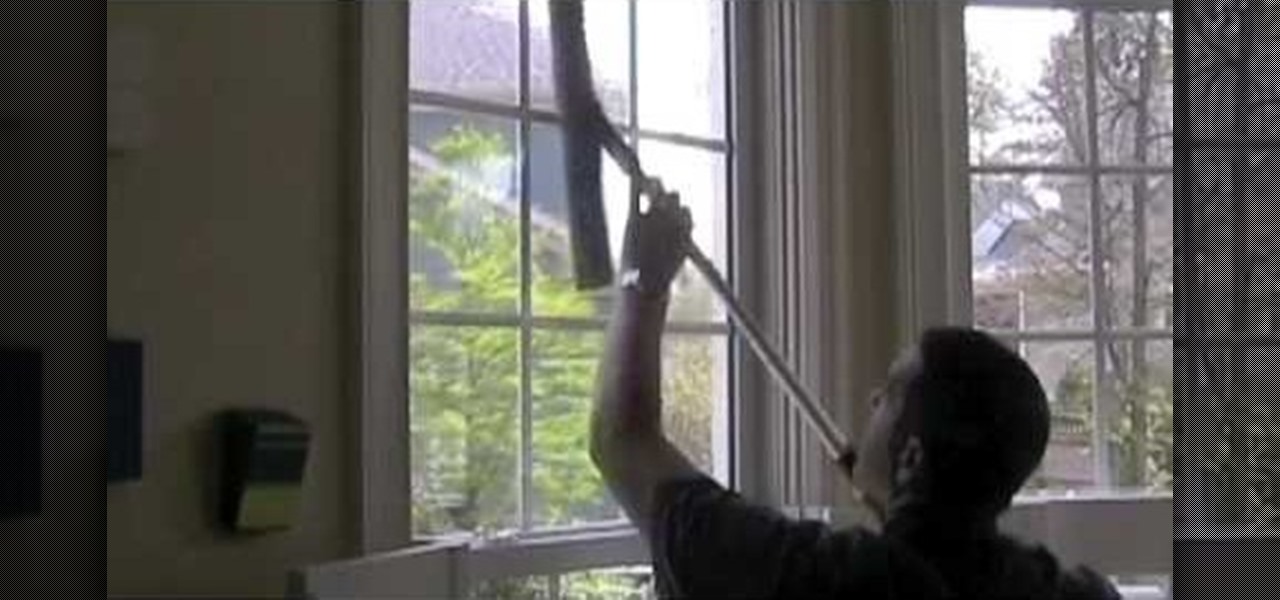
In this video, David teaches us how to clean the inside of windows easily and quickly. You don't need fancy tools, all you need is a terry cloth towel, a squeegee and dish washing detergent. First, put a little bit of the soap into a bucket and wash down the windows. Next, take a squeegee and wipe horizontally making clean lines. The excess water should drip down and you will catch it with your next squeegee wipe. If you have extra wetness on the edges, grab an old t-shirt and wipe the sides ...
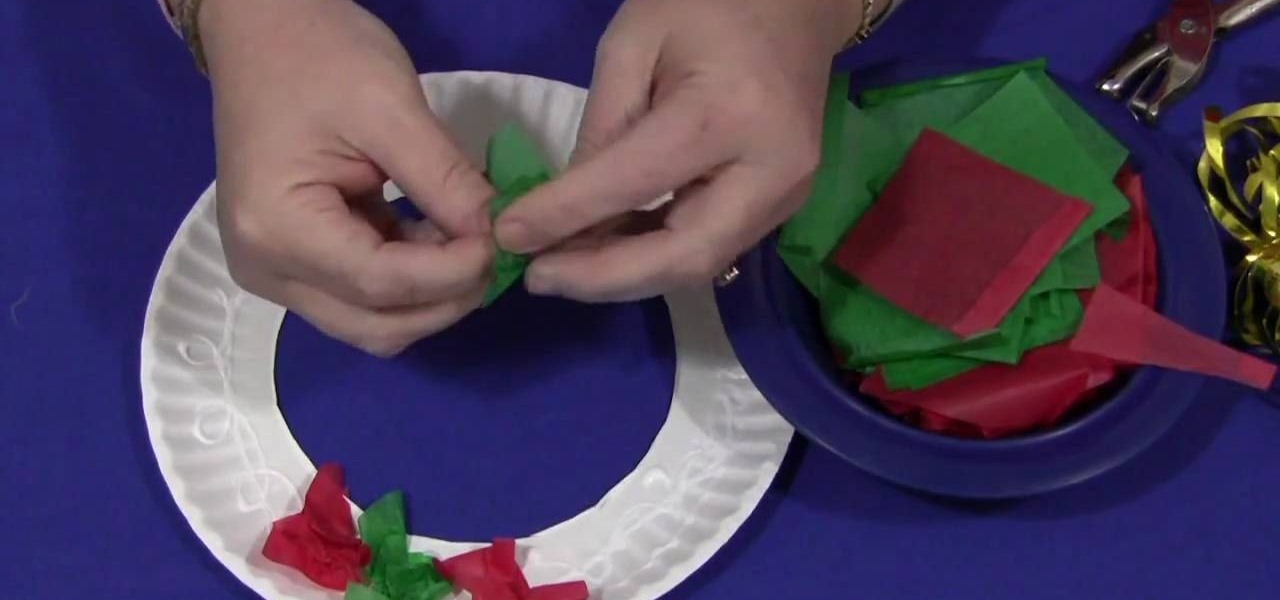
This is a demonstration of making a wreath with tissue paper. For this you will require tissue papers cut into squares, golden colored yarn, golden dust. For tools you require a pair of scissors, a hole punch, glue, paper dish. To start with cut the bottom of the paper dish neatly so that the uniform rim remains. Now apply glue to the rim in the form of spots and streaks. Now take each of the tissue paper pieces crush them and press on the glue. When the whole rim is covered with crushed tiss...
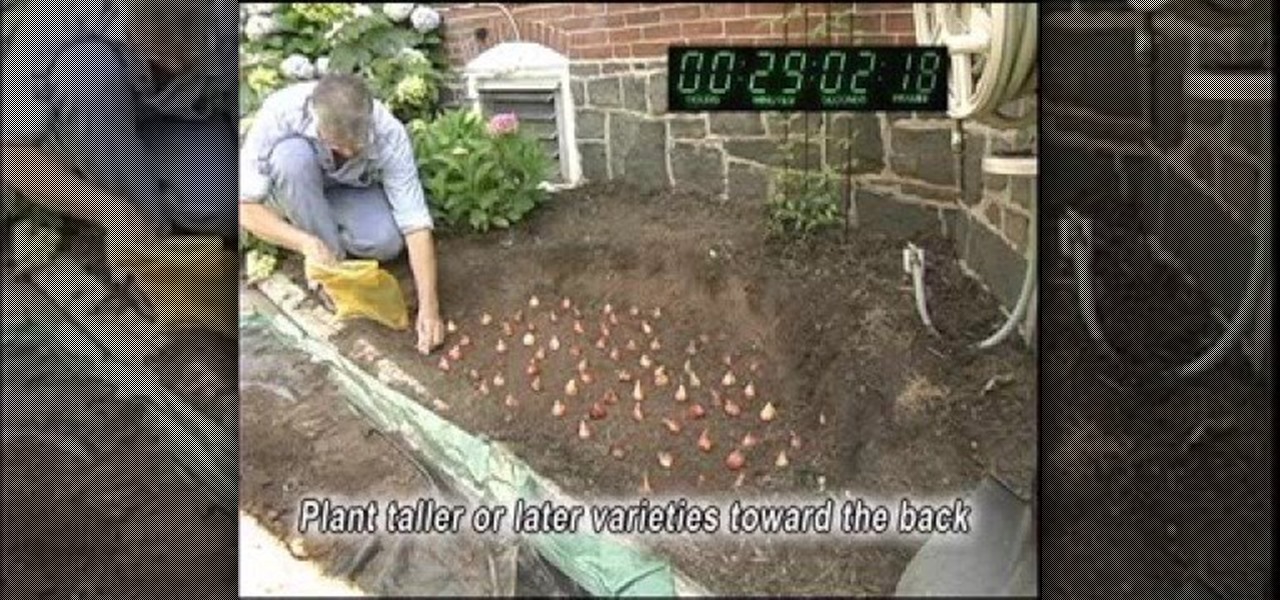
This video shows that it is possible to plant 100 tulip bulbs in less than 50 minutes, and it is easier and less expensive than you think.
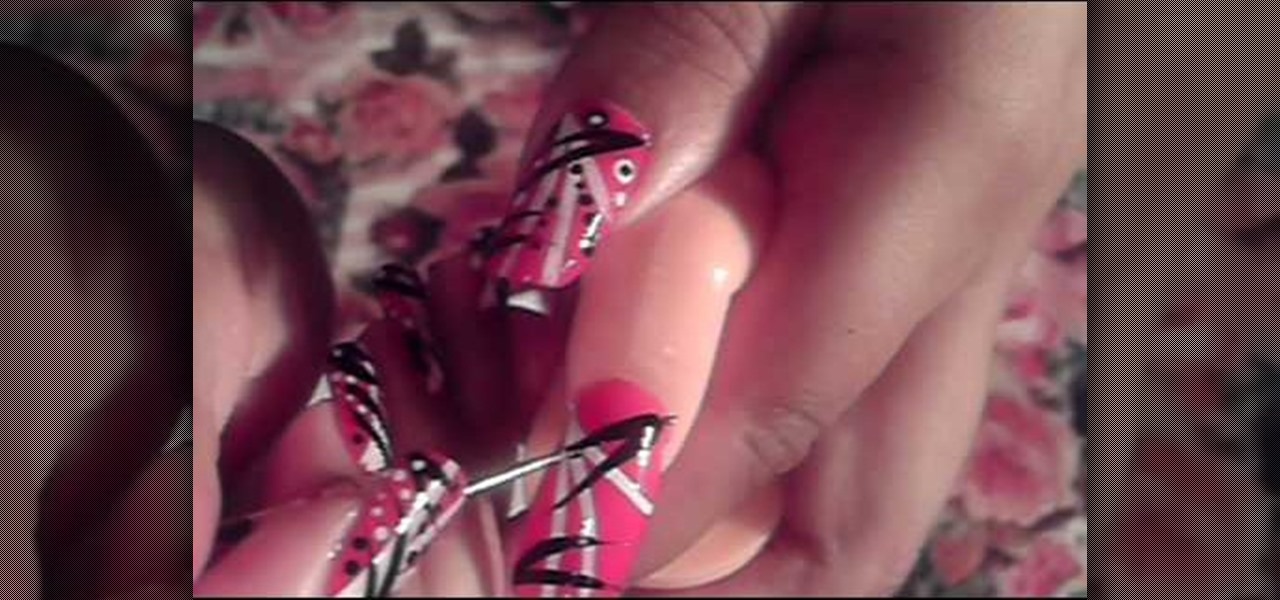
This video illustrate us how to create a sassy red, black and white nail design. Here are the following steps :step 1: First of all remove any previous nail paint.Step 2: Now apply some primer on the nails for long lasting effects of the nail paint.Step 3: Now take red nail paint and apply it all over the nails, let it dry.Step 4:Now take black nail paint and draw fine horizontal lines all over the nail.Step 5 : Now take white nail paint and apply polka dots on these lines as well as on the e...
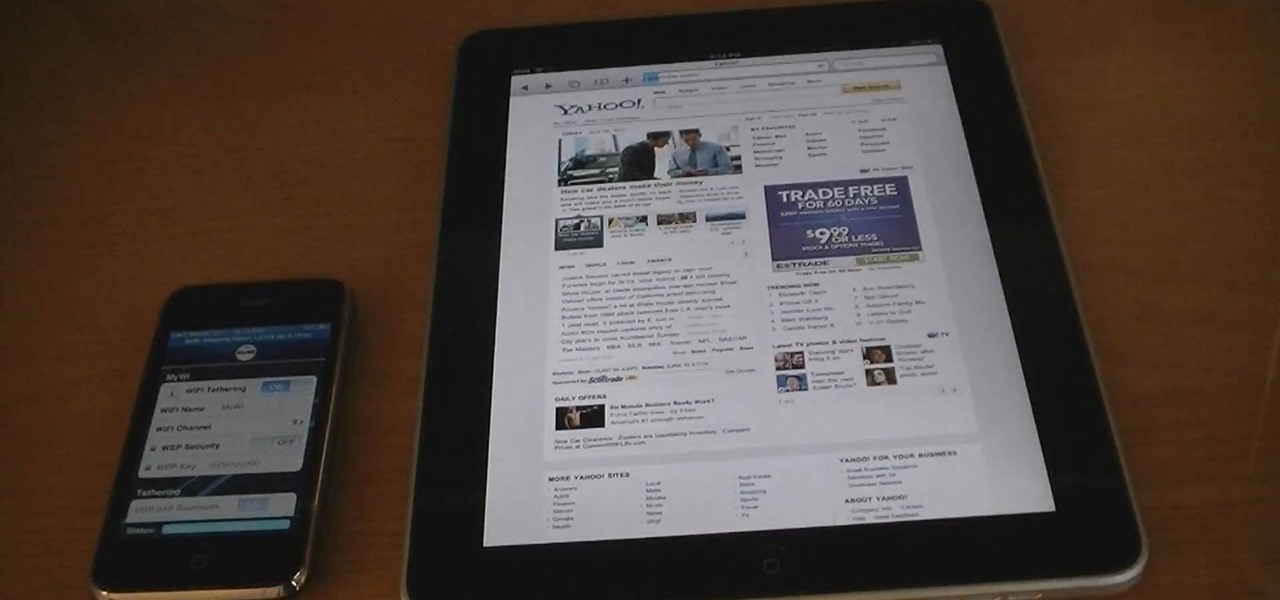
If you don't want to spend an extra $130 to get 3G for your iPad, you can use the app MyWi to tether your iPhone's 3G connection to your iPad. This video shows you the easy way to tether your iPhone's 3G or EDGE Data Connection to your iPad, or any other Wi-Fi enabled device. So skip paying the extra dough and get a 3G connection for free! Be careful, as this can drain your iPad's battery!
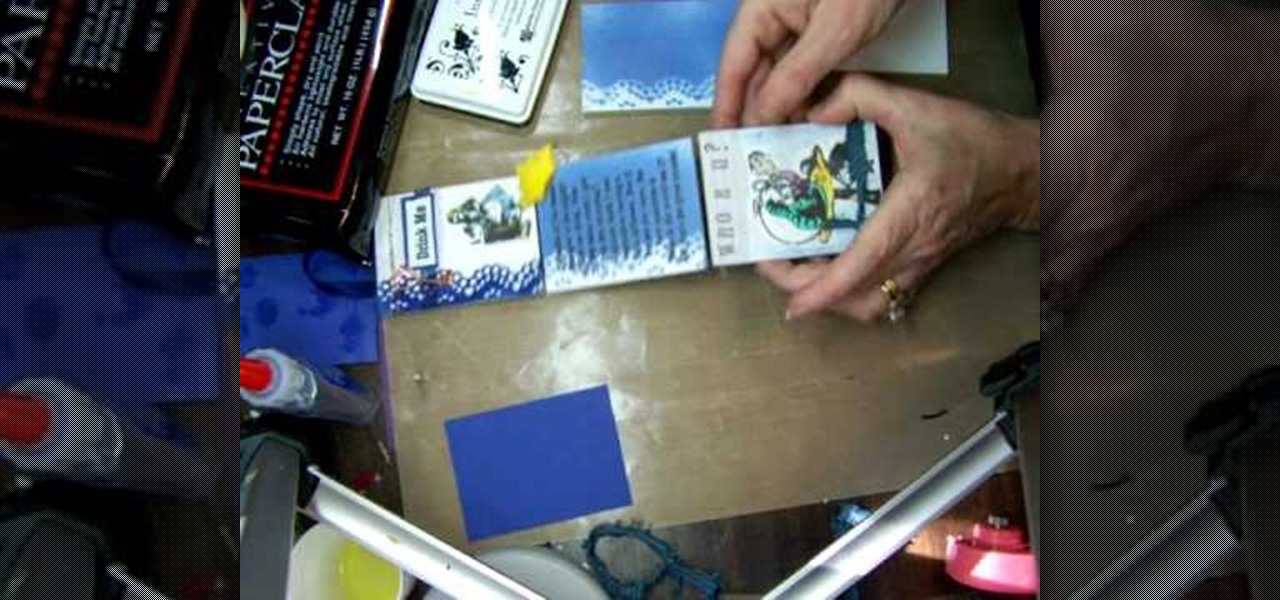
This video is about how to make a story board craft. In this case the story is about Alice in Wonderland. In this case 3 Eco art boards are taken of a suitable size of 2 1/2"X3 1/2" the left edge is decorated with a lace spray painted with Memorie mist spray, the rest of the card is also spray painted. Now from Queen Kat Designs the stampings are selected and stamped on each board as per the story. Whilst stamping Indian stamping ink is used as it does not smudges. For extra decoration paper ...
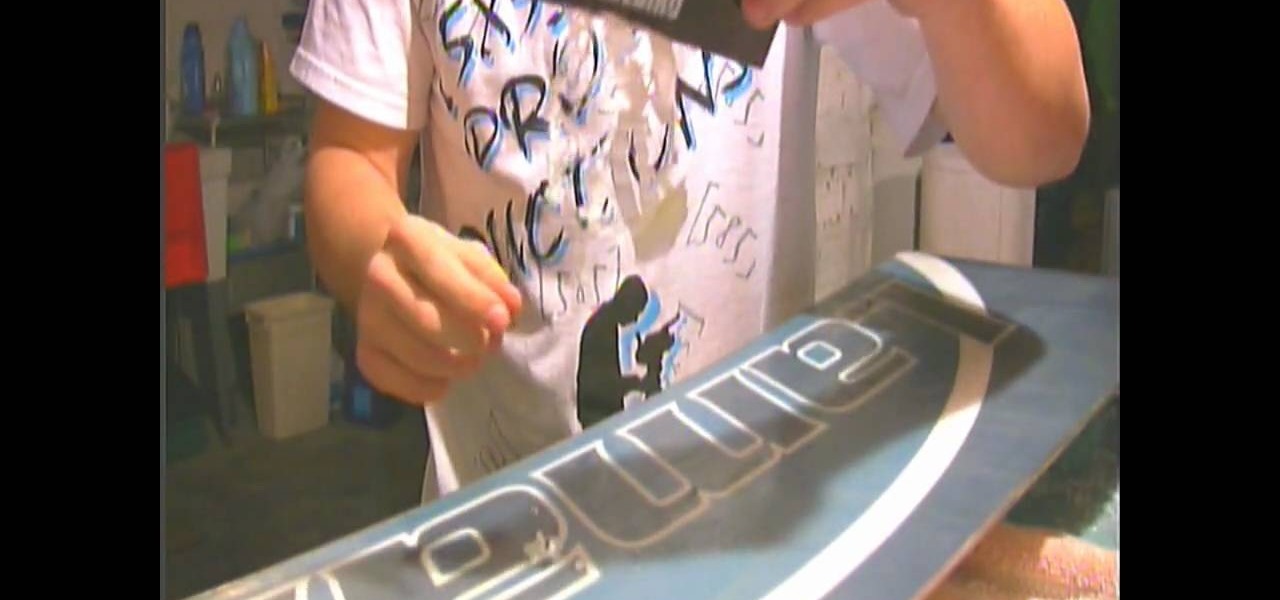
In this video by 585 Productions, Jake teaches you how to wax and scrape your snowboard. You will need an iron, a plastic, scraper, and a Scotch-Brite pad. Before you begin, loosen the bindings because heating the board with the screws tight can warp the base. First take the Scotch-Brite pad and wipe down the entire board in order to get all the grime, dirt, and old wax off of it. Next, using an iron that has temperature control, set it to get hot enough to melt the wax, but not so hot that t...
To decorate a fall flower centerpiece for your home, create a table centerpiece. Get some dry flowers with attractive colors of your choice. Take a metallic pot for centerpiece. Place a Styrofoam ring in the bottom of pot or vase. Carefully insert stems of dried flowers into the foam. The interior design technique is to be perfect to fall, so that it looks natural. Make sure to have the tallest flower at the center of the pot. Work from the center outwards applying more flowers and stems. Mak...
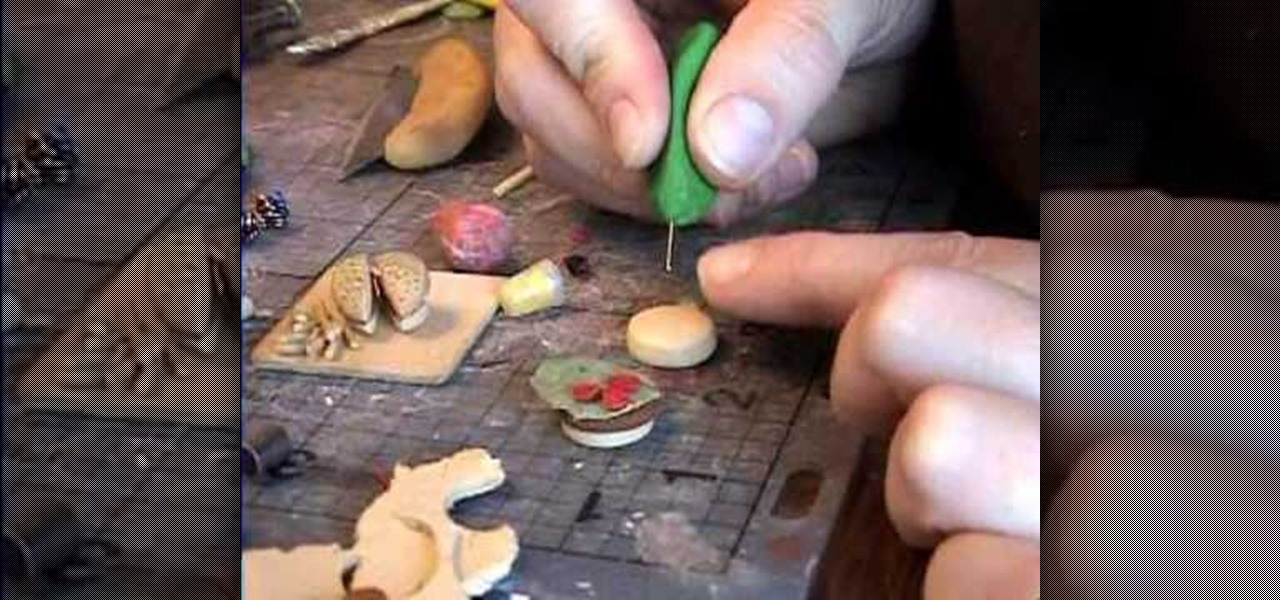
Using multiple layers of clay, garden of imagination shows how to make a hamburger and fries out of polymer clay. This decorative item would then be placed into a miniature dollhouse being displayed as a food item. She rolls a peppercorn on brown clay to give it the texture of meat. She mixes together green and whit clay for lettuce, and uses another piece of clay to ruffle the edges of the lettuce. She uses small round cuts of clay for tomatoes. Using an embroidery needle with a clay handle ...
In this video tutorial, viewers will learn how to do a blanket stitch. Begin by threading your needle. Then put the needle through only one side. Now run the needle through the other side, at the same place. Run another one through the same place to bind the edge. Now run the needle through the top bound stitches. Now run the needle from behind and go through. Put the needle through the loop of the thread and pull it tight. Continue this for this rest of the stitching. This video will benefit...
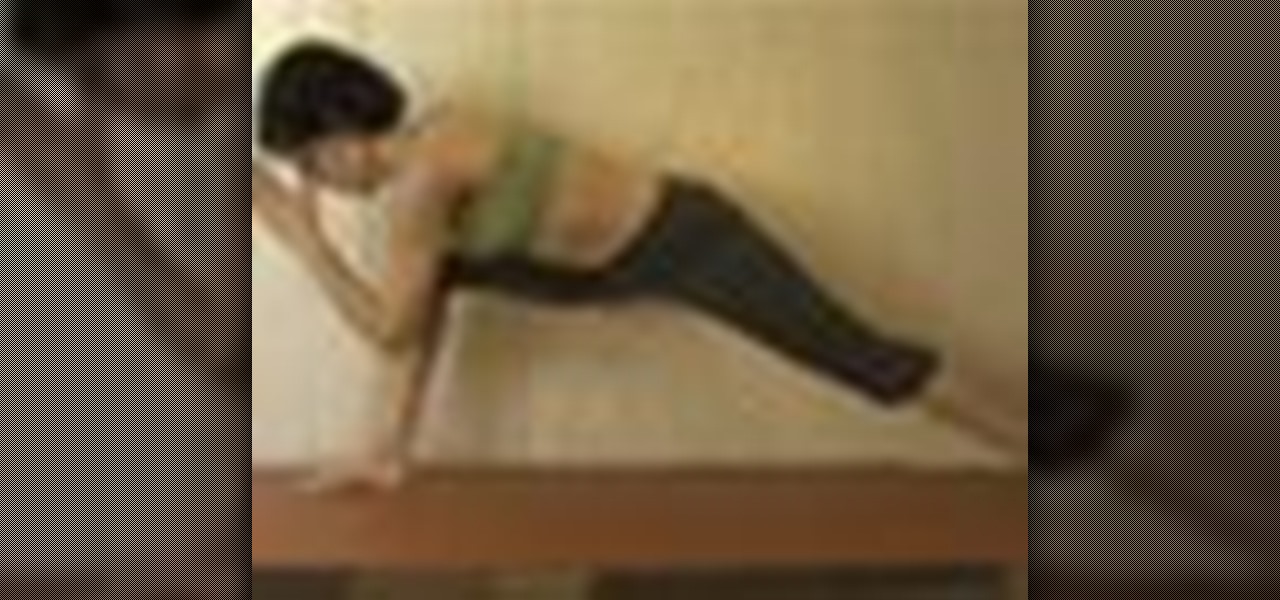
In this video from Shiva Rea we learn how to perform hip opening tiger stretches in yoga. Shiva oozes with sensuality and loves what she does. Coming forward into a lunge, take right arm in front of right shin, turn head to right side, and come back into the runner's stretch. Next time you come forward you can tuck the left toes under and turn to the left, a give a HA HA cough. And last, come forward, you can come to the edge of the right foot, turn head to the right, and get even lower, and ...
Here is another video by a woman named Angela on how to make a miniature Christmas log cake for a dollhouse. The first thing she does is roll out a sheet of brown clay with a pasta maker on a setting of 4. Then she rolls out a white sheet with smaller setting of 6. Use a razor blade and cut some straight edges. She layers the brown and white layer and rolls them together. Cutting off the ends she has now created a log cake. Use these ends for slices of the cake for dolls. She then uses a pepp...
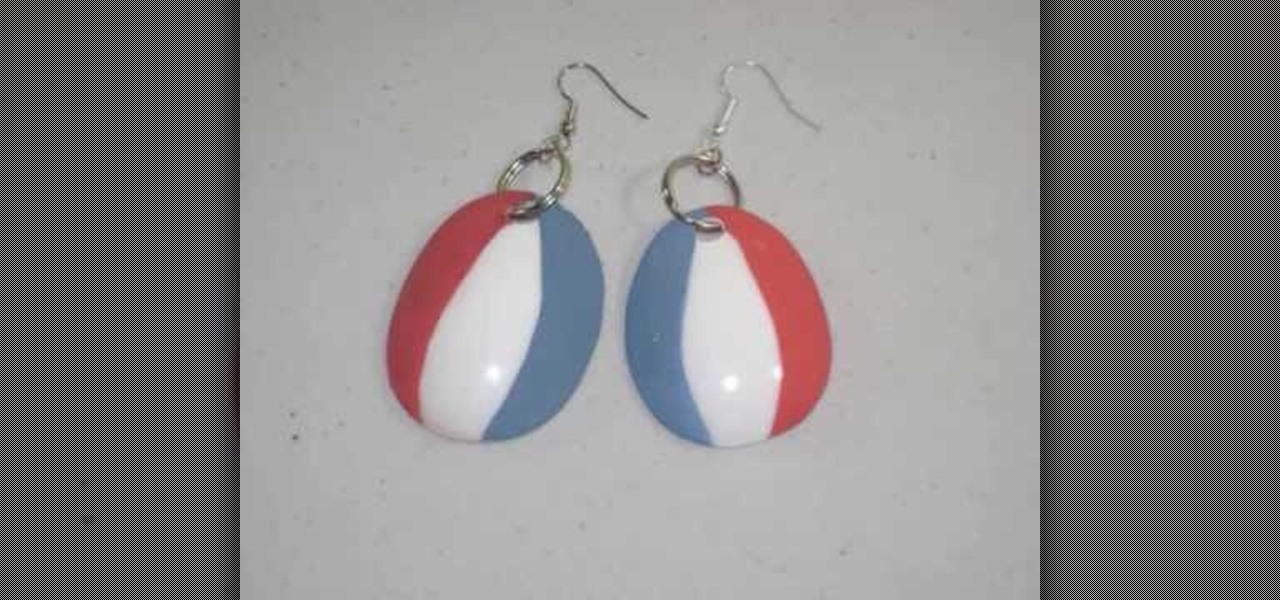
This video is about how to make earring from spoons. So to do this, just follow these simple steps. Things you'll need:
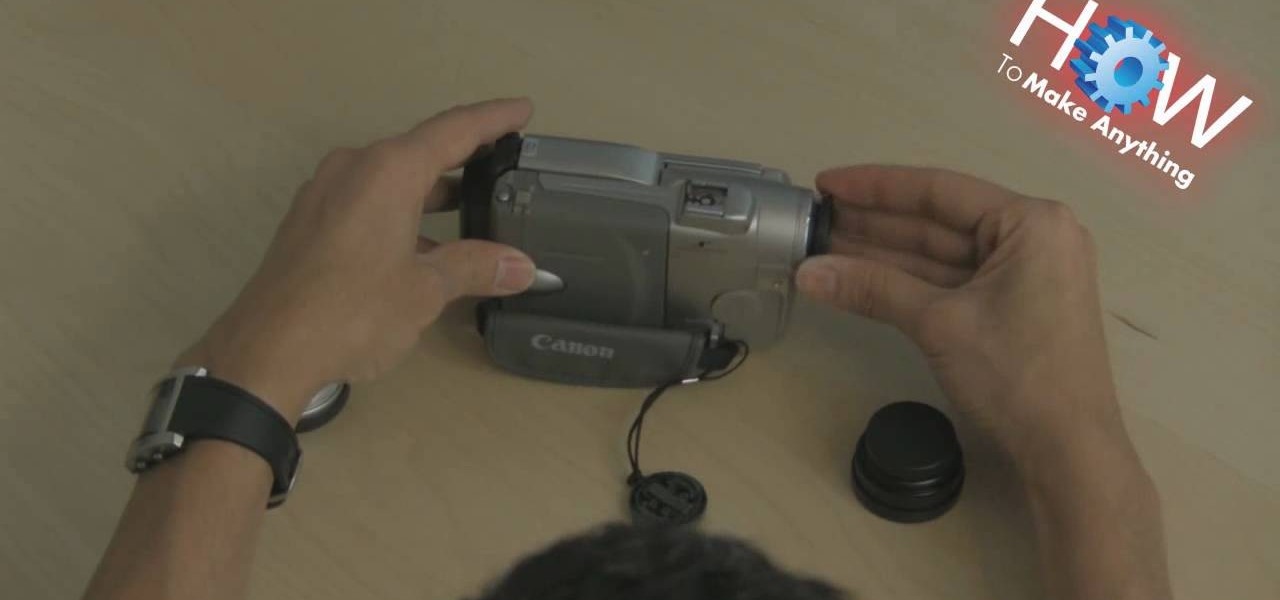
Make sure you have the appropriate lens for your digital camera. Look for markers on the lens that correspond with any mark on the camera body. Different brands have different markers. Some have square dots while some have red dots. Line these marks In one hand, hold your camera body firmly pointing to you. While holding it, push the lens button. Firmly hold the bottom of the lens (where the lens meets the camera body), and twist. Some cameras let you twist clockwise, others counterclockwise....
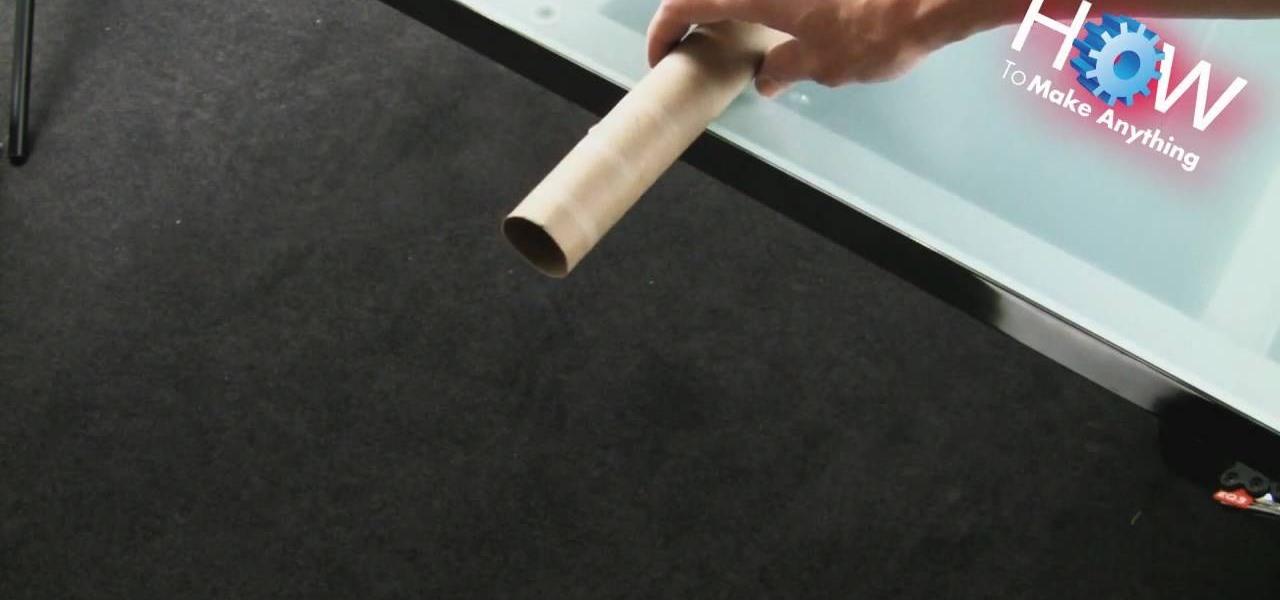
How to Make Anything demonstrates how to make a humane mouse trap from a paper towel tube. If you have a pesky mouse that you would like to catch alive, make a tube mouse trap in a few easy steps. First, put something delicious in the end of the tube. Then, balance the tube on the edge of the counter top. Below the tube, place a mouse catching receptacle like a trash can. The mouse will crawl into the tube to get the treat, tip the tube off the counter and be caught in the trash can. You can ...
Start with an eye pin. Place a gold bead and end cap on it. Now put on a piece called a stamp, or stamping. You want to find one that is curved like a lamp. Next put on a large crystal (8mm). In this video she uses a Swarovski crystal. Find some beads you like and place them on the pin. At the end, place on a large plastic back of an earring to secure the beads and hold the "lamp" upright. Now to make the little beaded fringe at the edge of the lamp, you take another eye pin and thread on som...