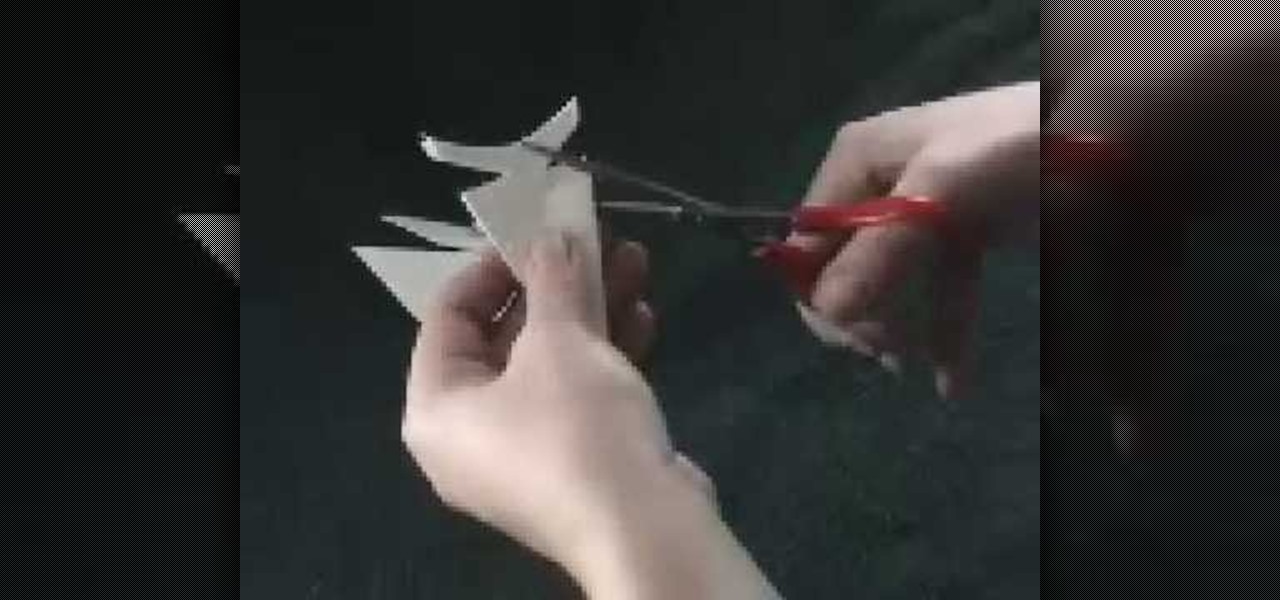
This video helps us learn how to make a well-balanced paper football. Get a square paper. Fold the paper in half. Fold it again in the same direction. Fold the paper diagonally to make a triangle. Flip the triangle up so the point lines up with the left edge. Continue folding triangles up the paper until you reach near the top. Fold the top corner down so that the two points meet, making a triangle in the opposite direction. Tuck the extra paper into the pocket. Now you have a paper football.

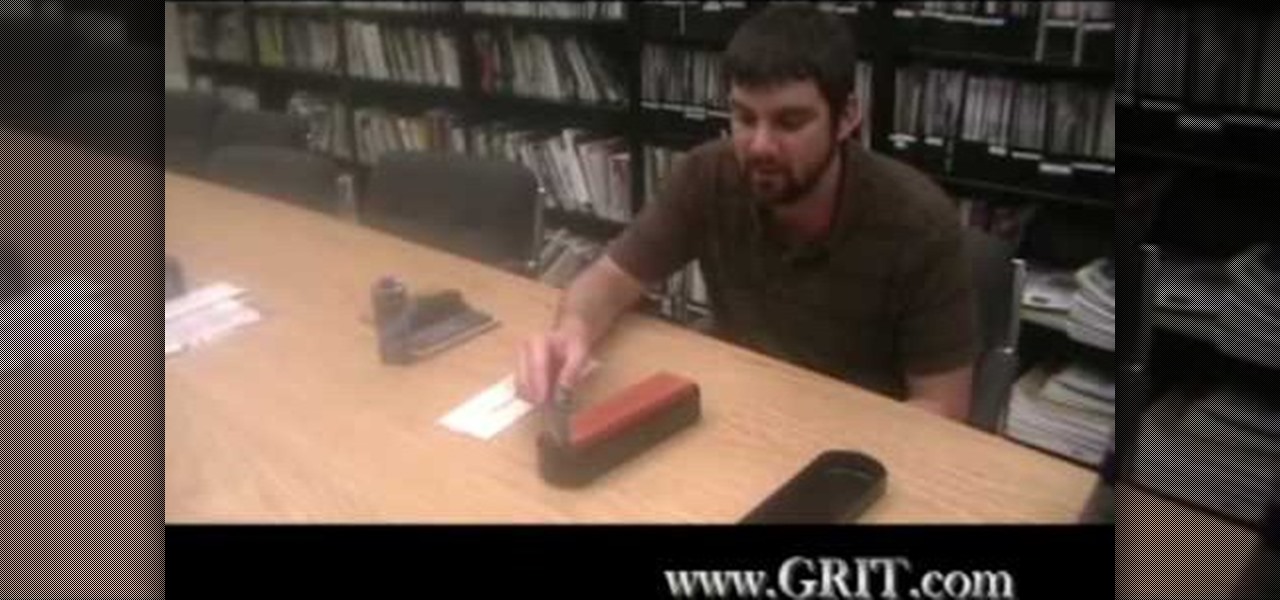
This video teaches the secrets to sharpen a convex wood carving knife in simple steps. First find out how dull your knife is by cutting a paper or shaving hair on you hands. Now take a sand paper attached to a pad and start sharpening the ends by applying less pressure. Now try the sharpness of the knife, it will be better. Now take a double sided strop with sharpening compound and start rubbing the knife edge. After sharpening try the knife again, it should be good enough.

This video will show you how your text can be the best using Fireworks! Your design will grab your viewers attention with these simple steps! Proper text size is very important. Using a thick font can make the biggest impression. Filling it with the gradient color with the right light adjustments will make it shine. Don't forget to texture it as well, a nice metallic galvanized finish is featured in the text. Sharp edges and shadowing will make it stand out to any internet surfer.
This video demonstrates how to create a dramatic purple Bollywood eye makeup look. She starts by applying white makeup to one half of her eye lid, closet to her nose. She then blends this with purple makeup on the second half of her eye lid. Next the presenter uses a pencil to put down a dark outline around the eye lid, which is then blended upwards by using the index finder. The blending continues up to the bottom of the eye brows. Finally some glitter liner and small jewels are applied to t...

Learn how to make a simple paper box with this short video. You will need some strong paper like construction paper or light cardboard, a pair of scissors, and tape. For a neater box you will also need a ruler. First you will draw the shape of the box, which looks like a plus sign. Use a ruler for straighter edges. Then you will need to cut out the shape and fold along the lines. Add decorations to your box if desired. Last, you will be taping it to form a box shape.
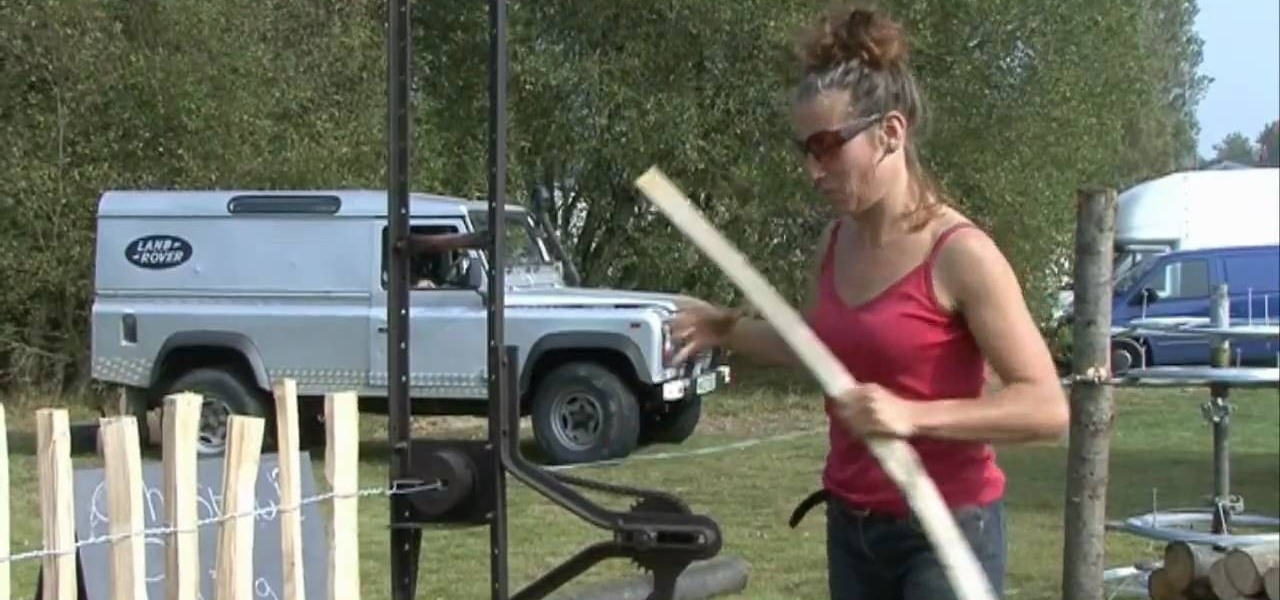
Learn how to make chestnut paling using a paling machine from Aly May in simple steps. First tie the strings up and down in a wooden pole according to the length you need. Start by placing the wood in between the strings upside down fitting perfectly. Now roll the machine to twist the strings and repeat the same till you get your desired length. You can also use wood with sharpened edges if you want to make a fence. It can be also used for some events but you have to change its length and dur...

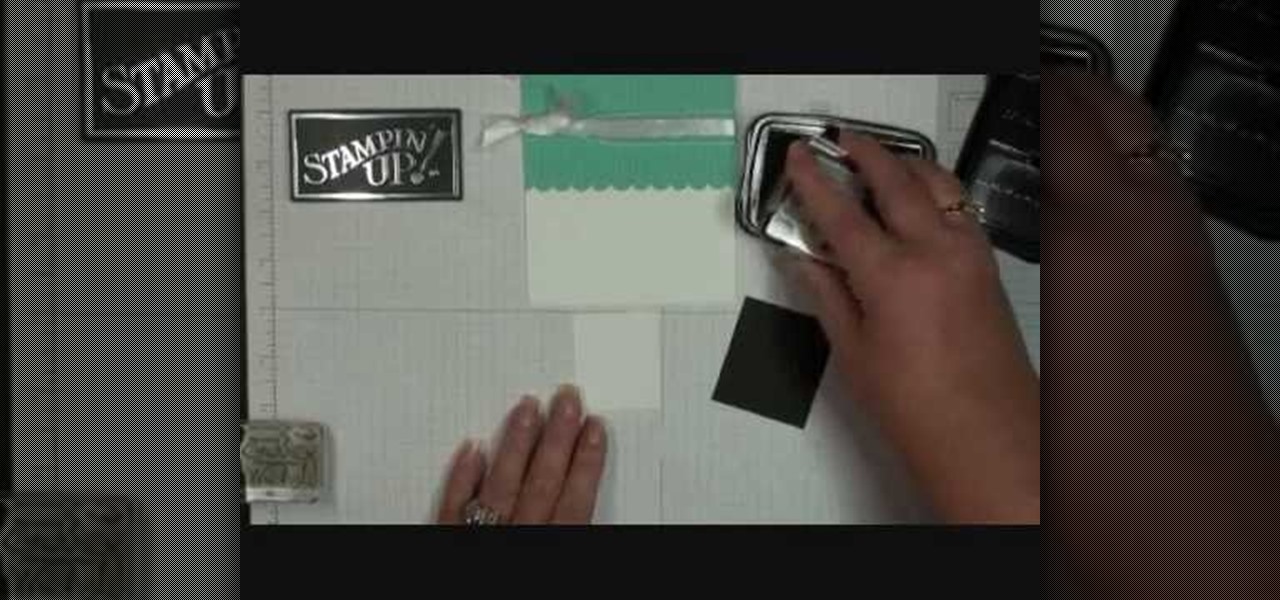
Demonstrator Dawn Griffith offers a short tutorial on how to make a simple and cute birthday card. First you will use white paper to make your base card. Then use a scallop edge punch to scallop some green designer paper, which you will glue to the top of your card. Tie some white ribbon around the top and trim for a clean look. Use a greeting stamp to stamp a message onto the bottom right front of your card. Create a center image by adhering white paper on black card stock, stamp the white p...
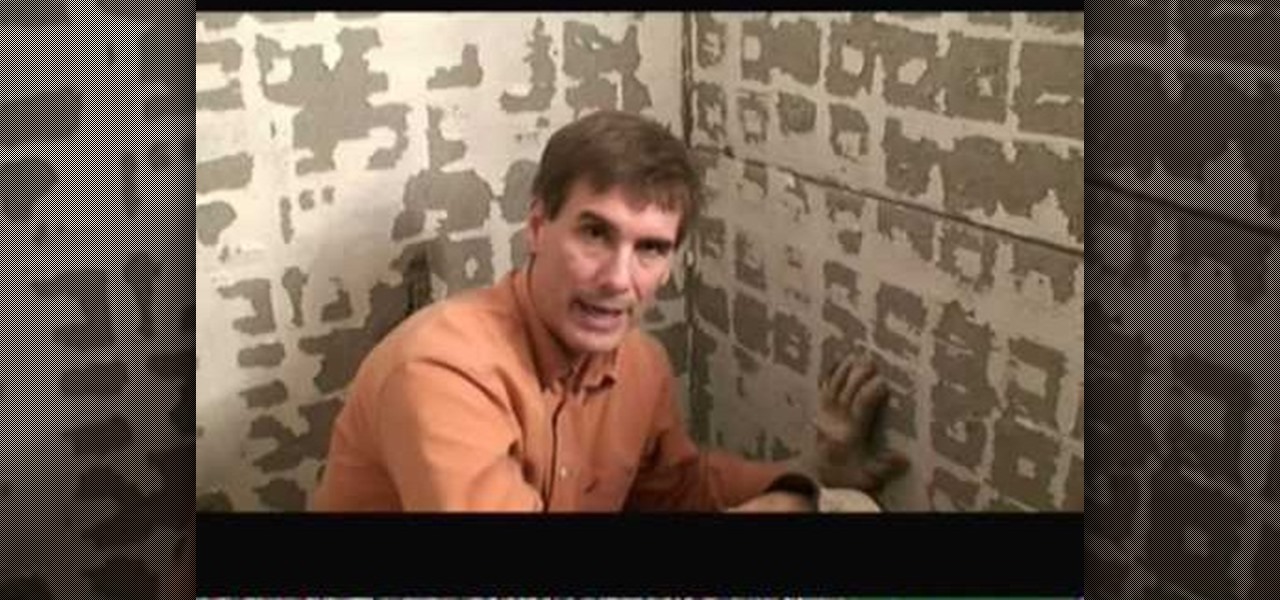
In this video tutorial from StudioMallory, learn how to take Mapei premixed adhesive and grout and turn it into a six-point star. Begin by cutting out the star shape in a piece of cardboard. You can use a stencil to make sure the shape is accurate. With your fingers, spread the grout onto the shape. After you are done shaping the grout, spray a little bit of water on the grout to help you smooth out any rough edges on your star. Set the star on a flat surface and allow it to dry overnight. Th...
First you take a glass, then put 3 ounces of your favorite gin into it. Then, choose 2 of your favorite tea bags (and tea leaves if you want) drop it in the gin. Let this fuse together for 2 to 2 1/2 hours. Gin will turn a dark gray color when done fusing together. Grab a lemon wedge with a slit in it and rim the edge of a martini glass, the dip the martini glass into the granulated sugar to make a fine rim of sugar. Then take 1 1/2 ounces of Tea Infused Gin, 1 1/2 ounce of lemon juice and 1o...
Cool tips and tricks on Facebook give you some extra edge on others. This trick will demonstrate that how to talk to your special loved ones that no one else can understand.
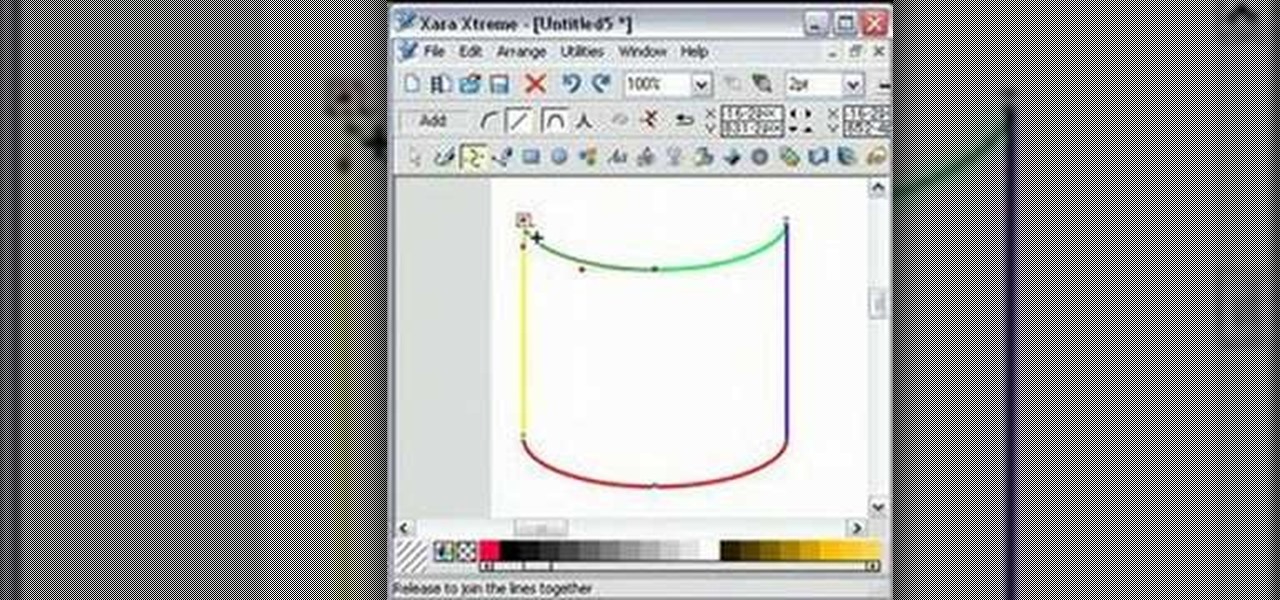
EggBram teaches you how to join separate lines, in order to create a shape, using Xara Xtreme. You start with four different lines. You go up to the menu and click the Shape Editor tool. Then you click on one line and go to the edge of it until it intersects another line. You will want to do this for each line that you have. Once you have done this four times, the lines will combine into a shape and you can change its color.
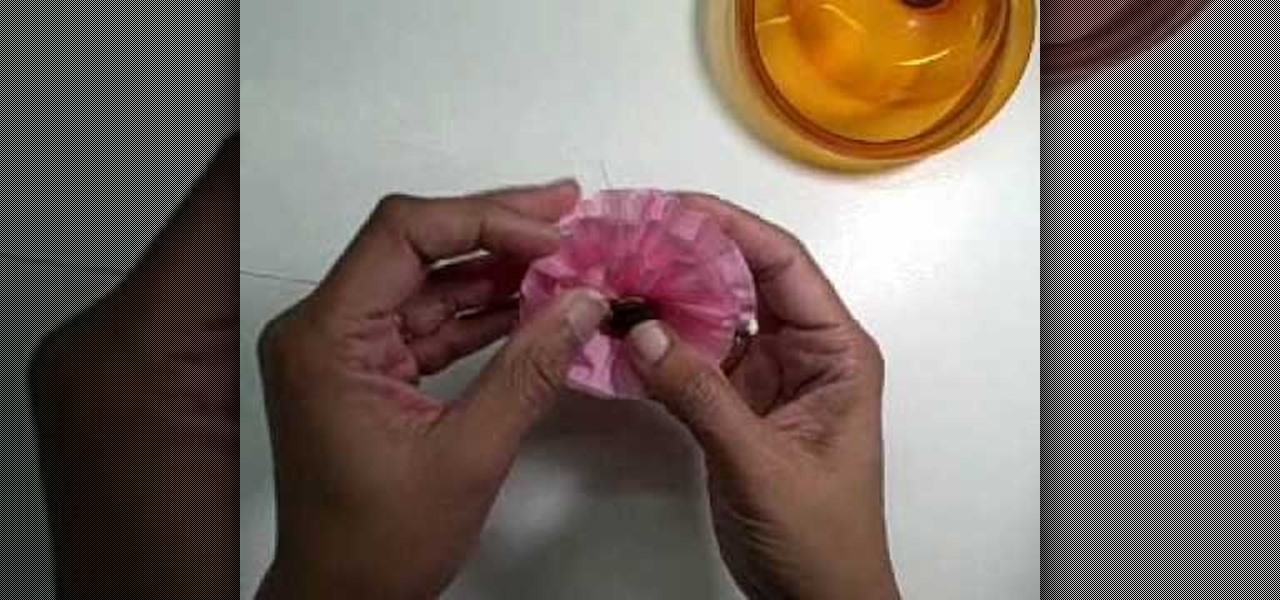
Becca from Amazing Paper Grace demonstrates how to make crepe paper flowers. The supplies needed are a roll of crepe paper, scissors, a ruler, and a sewing machine or needle and thread. Measure a yard of crepe paper and trim it narrower if you want a smaller flower. Use the sewing machine to sew a straight stitch along one edge with the longest stitches. Pull the thread to gather the paper so it curves around to form a flower shape. Layer the curves around in a spiral to form the flower. Feed...
This video give you a step by step in how to cut your mango cheeks, and owszat shows you how to do it. Using careful tactics on the mango, you can see a slight edge. Where you distinguish your mango's center point is where you will be cutting from. Tear off your stem to have a flat relying surface. Cutting about five millimeters from the center point on each side, making one slice that releases your cheek, and doing the same for the other side leaves you with two mango cheeks and the center p...
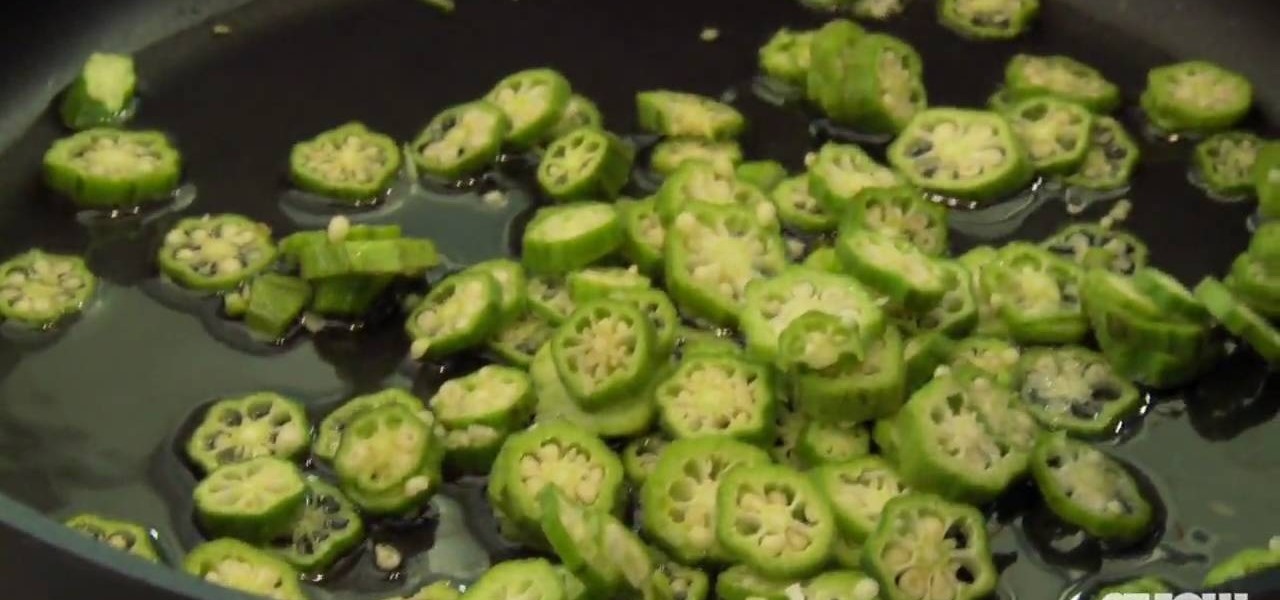
Poppy Tooker, author of the Crescent City Farmers Market Cookbook, says that the secret to preventing slimy okra is to slice it thinly and cook it in quick batches in very hot oil. Prepare your okra first by slicing it into thin pieces. Prepare a large frying pan with just a fine coating of oil. Put the frying pan on a stove and turn up the temperature so that the pan is hot. Once the pan is at the desired temperature, add your thinly sliced okra. Once the okra has a brown edge, you can stop ...
Emerald City Elegance Paper Crafting with Joann is really very interesting to watch. It takes us through the process of making a beautiful paper cup mini album. It explains us to properly cut the edges of the paper cup, to stick first the color page in the folded paper cup, making ready the plain album pages and punching it altogether. Finally embellishments are also done to add beauty to the mini album. Now the album is ready. After watching this video, any viewer develops the art of creativ...
This video demonstrates the proper way to sharpen knives with a steel. First, the blade of the knife should be held at about at 22 degree angle to the steel, Second, the knife should be slid along the steel in a sharpening motion. The steel should run along the blade of the knife from one edge to the other. Both sides of the blade should be sharpened in this manner. The steel has a guard to prevent the knife from accidentally cutting your hand, but if you are afraid of being cut, the steel ca...
India Galyean shows you how to make a buttermilk pie. Using 2 1/2 cups of flour, 2/3 cups of oil, 3 tablespoons of milk, and teaspoon and half of salt. Mix together. Then put it in a pie plate and flatten it out. You can do the edges however you like. Now use 1 1/2 cups of sugar, 1/2 cup of melted butter, 1/2 cup of buttermilk, teaspoon of flour and vanilla, and 4 eggs. Mix with blender till frothy. Preheat oven to 350 degrees, bake for about 45 minutes. It should be set in the middle.
Most paper snowflakes are not representative of the proper 6-sided shape of snowflakes. This tutorial will show you a method which will allow you to make a beautiful and symmetrical realistic six sided paper snowflake. You will need to start with a square piece of paper, which you will then fold over diagonally to make a triangle shape. Taking the inner edge towards yourself, you will then need to fold the paper over into thirds and cut off the excess on an angle. After this, proceed as you w...
Making this DIY album is easy and fun! This video will show you how to make an 8x10 photo album enclosed in ribbon. After cutting two pieces of cardboard to size, you can take the material you've chosen for the cover and cut a 9x11 piece so that you can fold over the edges. After that, it's as simple as gluing the material to the backs of the cardboard and taking an extra piece of material for the inside cover. Good luck!
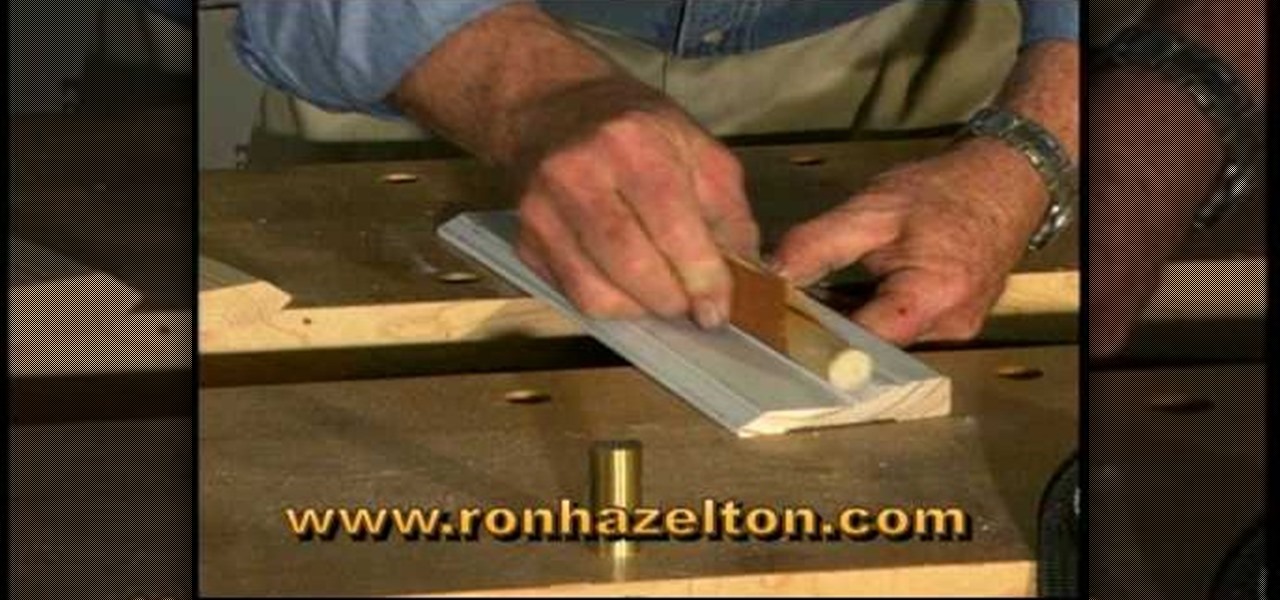
Sanding molding can be pretty challenging with all the curves and details. First for sanding curves try wrapping your sandpaper around a piece of dowel rod. Choose the proper sized dowel for the size of the curve that you have to sand. The larger the curve the larger the piece of dowel that you will need. To get into hard to reach crevices try folding the sandpaper several times and then use the edge of the sandpaper to sand down in the tight crevices.
To begin, you will need a pair of jeans, a cheese grater, a book, and sandpaper. Vigorously rub the sandpaper across the jeans where you want to rip them. Slide the book down the pant leg until it's between the fabrics of where you're working. Continue to sand like crazy. Then take your cheese grater and do the same thing that you did with the sandpaper. You will notice a lot of fading and a small hole will begin to emerge. Use your fingers to tear at the hole until it is the desired size. Th...
Take some eggs and whisk them in a measuring cup. Add a little pepper to the eggs. Pour the eggs into a pan that has been sprayed with non-stick spray and preheated. Tilt the pan to spread the omelette around the pan. Take a spatula and loosen up the edges all the way around the whole pan. Continue to tilt the pan several times to evenly spread the omelette around the pan. Put some cheese on the omelette and take a spatula and fold it in half. Flip the omelette over so that it is evenly cooked.
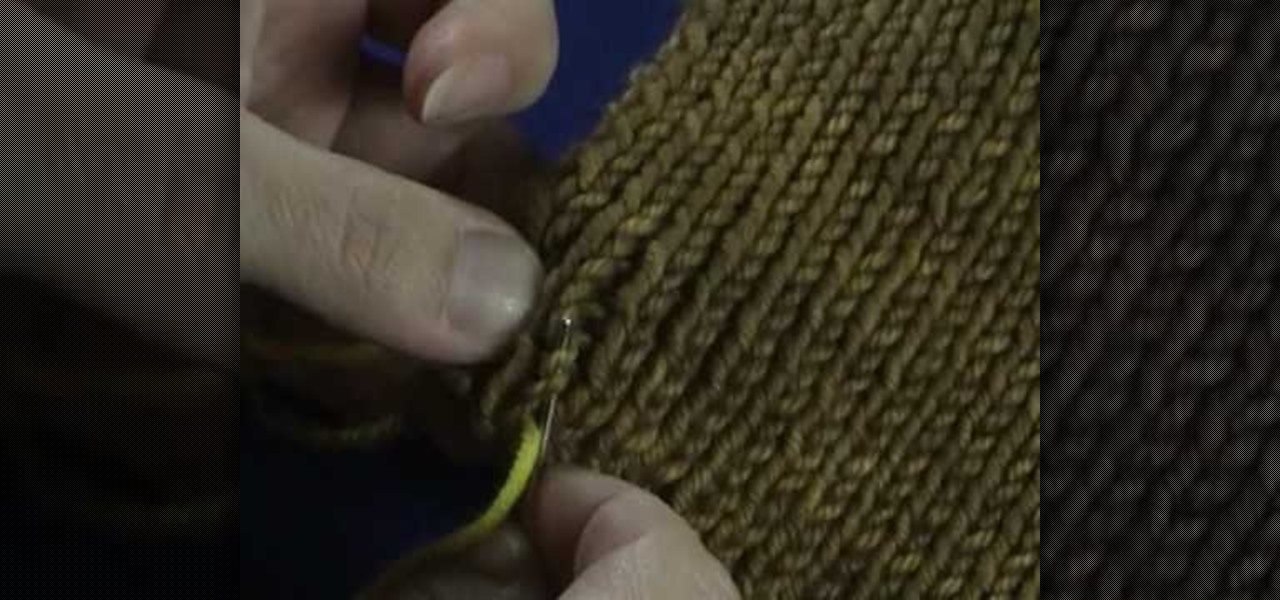
This video demonstrates a very simple method of weaving in the ends of the yarn that are hanging out after you have finished knitting your garment. With the end piece threaded into a needle, bring it in one or two rows so it's not right on the edge. Then working up the row, weave the thread in and out of each knit stitch for an inch or so. Pull the yarn tight, then go one stitch over and work the yarn down the other side in the same manner, weaving in and out of each knit stitch. This creates...
Having trouble with sharpening your serrated knives? Wayne Dolik, an expert sharpener from www.sandiegocutlery.com tells you how. In this video tutorial, Wayne explains the essential tools of serrated knife sharpening and where to get them. Wayne also offers great tips and advice on sharpening safety, how to minimize the chances of damaging your expensive knives, how to make the job as easy on yourself as possible, and how to get the best overall results. You don't have to struggle in the kit...
In this Adobe Photoshop tutorial the instructor shows how to make a torn image effect. He shows you a sample image of what it is going to look like after producing that effect. It basically looks like as if the photograph was torn to pieces and then put back together with the cracks visible. To do this first open the image in Photoshop. Now make a rough outline of the tear with the polygonal lasso. After generating the tear go to filter and in the distort sub menu choose the ripple. Now it ap...
PapaPodcast's Peter shows us how to calculate the Area and Circumference of a Circle. Area is the amount of square units used to cover a circle. Circumference is the units around the edge of a circle. To calculate these two units we must find a radius and diameter. Diameter is a segment that joins two points on a circle and passes through the center of the circle. Radius is half of this amount. Watch the rest of the video to figure out how to use the radius and diameter to get the Area and Ci...
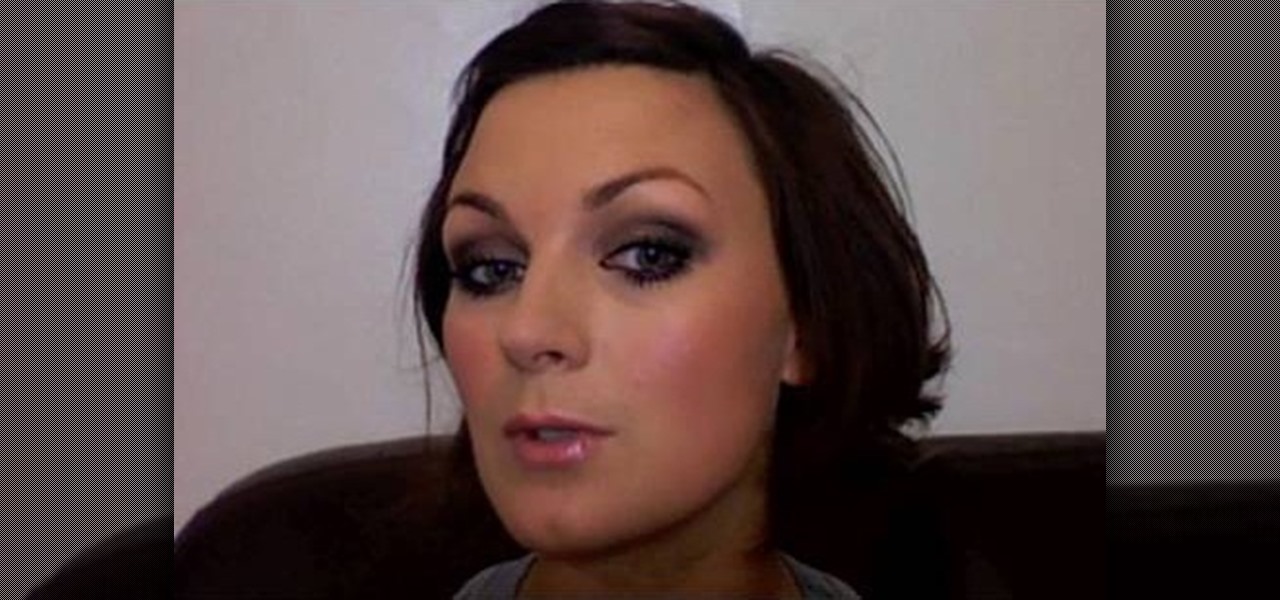
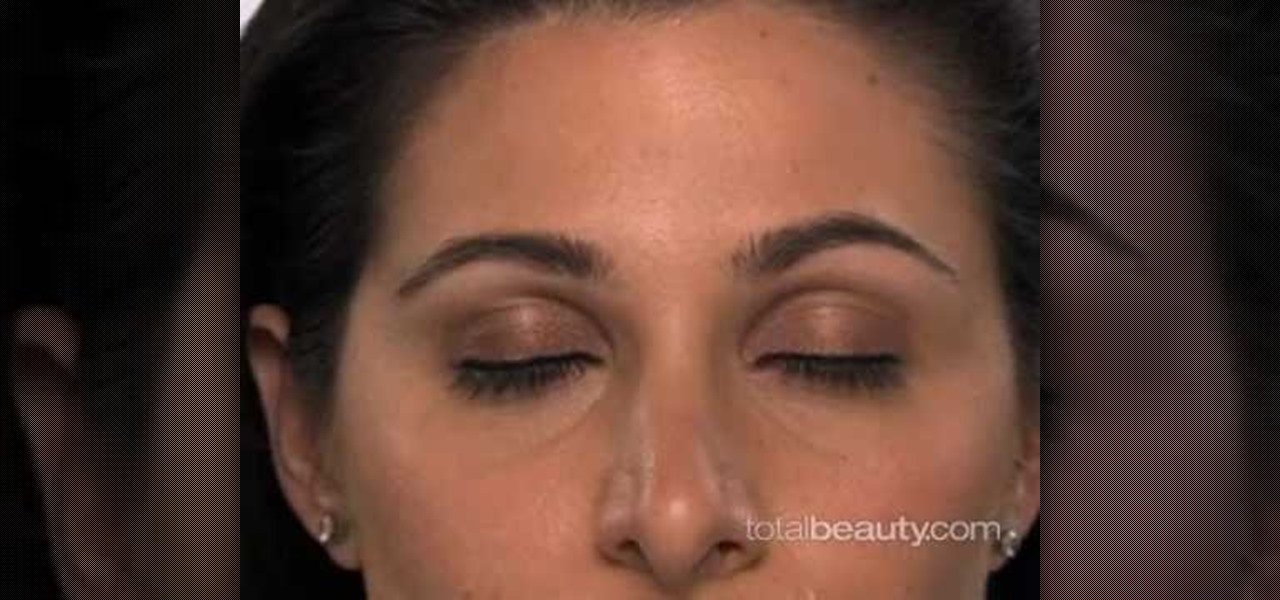
Ah! The smoky eye, one of the most popular styles of eye makeup today. But what about adding that extra touch? With our hostess, in this quick video, we learn to add a plum accent to your basic smoky eye. Along with recommendations on exact brands we may use, we are given a step by step look at the exact application. Starting with a base of pale purple, and blending toward grays, a metallic effect is achieved, leading out to the leading edge of the eye, then, with darker tint. Blacks, and dar...
This video is about how to make a paper snowflake. These are just amazing shapes made out of sheets of paper. They are used for decoration. We can make a paper snowflake in just 2 minutes. First take a plain paper sheet and fold the sheet to make a triangle out of it. Now just make 3 more triangles in similar fashion and after that make a half triangle and cut the extra edge from it. And now it is up to us how we to want design our snowflake. Open and see the nice and beautiful flake.
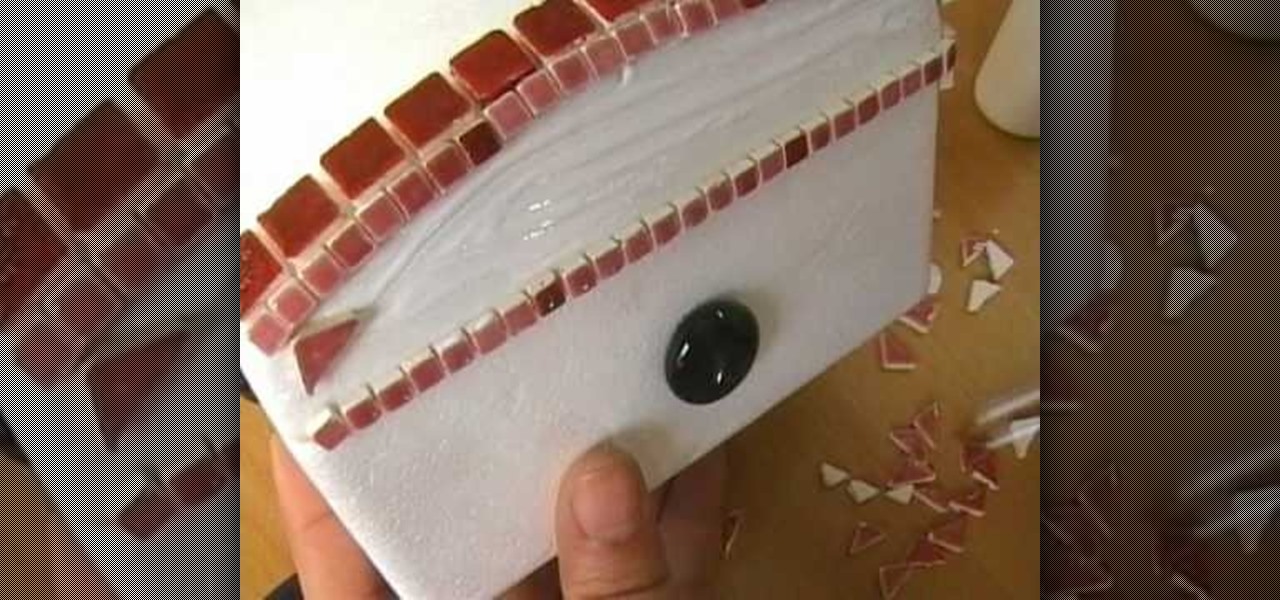
This video demonstrates making a mosaic jewelry box. A plain jewelry box is decorated using different shaped pieces of glass. First, round flat glass pieces are glued in the center of the top and sides. Then a ring of glue is put around the circle and rectangular pieces are glued around that. Square tiles are used around the top edge, and odd shaped pieces are used to fill in the rest of the surface area of the box. After it has dried for two hours, a glaze is applied to the entire box. This ...
In this video, Marion shows you how make your own custom buttons. She first picks-out a piece of scratch paper, a clear button, and glue (glassy accents). You then apply some of the glue onto the button and lay the button onto the paper and let it dry. Next you would cut the paper around the button as close as you can with precision scissors. You would now use a file to sand the edges of the paper down. That is how Marion shows you, how to make a customized button.
Thanks to technology, art savvy users can visually edit pictures with the click of a button. This video tutorial demonstrates how to color hair in Adobe Photoshop CS. In Quick Mask Mode, color over the hair area with a fairly large brush. Under Filter, select the Blur category and apply a Gaussian Blur to soften the edges of the mask. Revert back to Standard mode where the mask will appear as a selection, and under Select, choose the Inverse option. Finally, adjust the hue and saturation to s...
Wondering how to sharpen a kitchen knife?
Did you know that you can whip up some of your own buttermilk at home? Most people don't like taste of buttermilk alone but it can taste great when used as an ingredient in red velvet cake and many other recipes. Buttermilk actually doesn't contain any butter at all. It's a mixture of distilled vinegar and milk. It can give recipes a little edge that they wouldn't normally have without the kick of vinegar. A long time ago buttermilk used to be the milky liquid that is left after homemade butt...
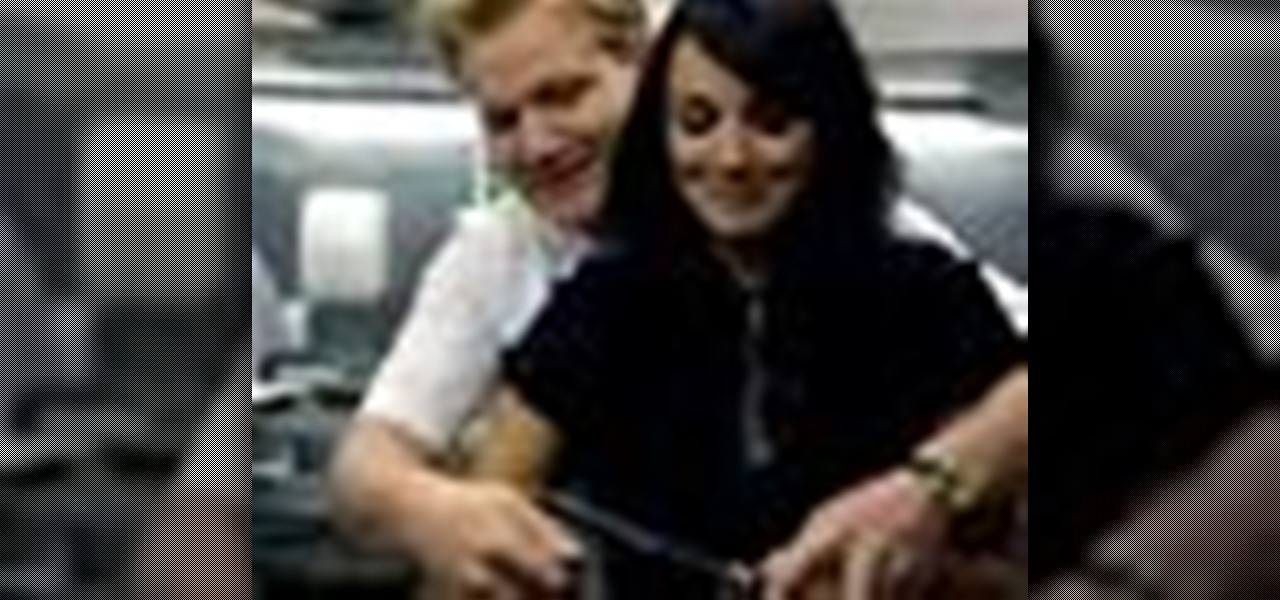
Chef Gordon Ramsay teaches a customer how to sharpen a kitchen knife. The lesson he gives here is little more than giving the knife an edge with a filing tool which is a short metallic rod the size of a knife. We frequently see chefs using sharpening knives this way although the motions are so fast that we don't know what they are actually doing. Ramsey, through teaching the customer slows the process down so that we can see what is going on and hence, how to do it.
Paul Ryan of the DIY Network shows how to make concrete countertops for the kitchen. Concrete is now available in a wide range of colors and textures. First build forms out of 3/4-inch melamine (a waterproof smooth material for easy casting), according to the blueprints. Use caulk to fill the seams and create a rounded corner to the concrete. Clean the form with rubbing alcohol. Mix the concrete according to the instructions, then fill the form with the concrete. Rub a power sander on the edg...
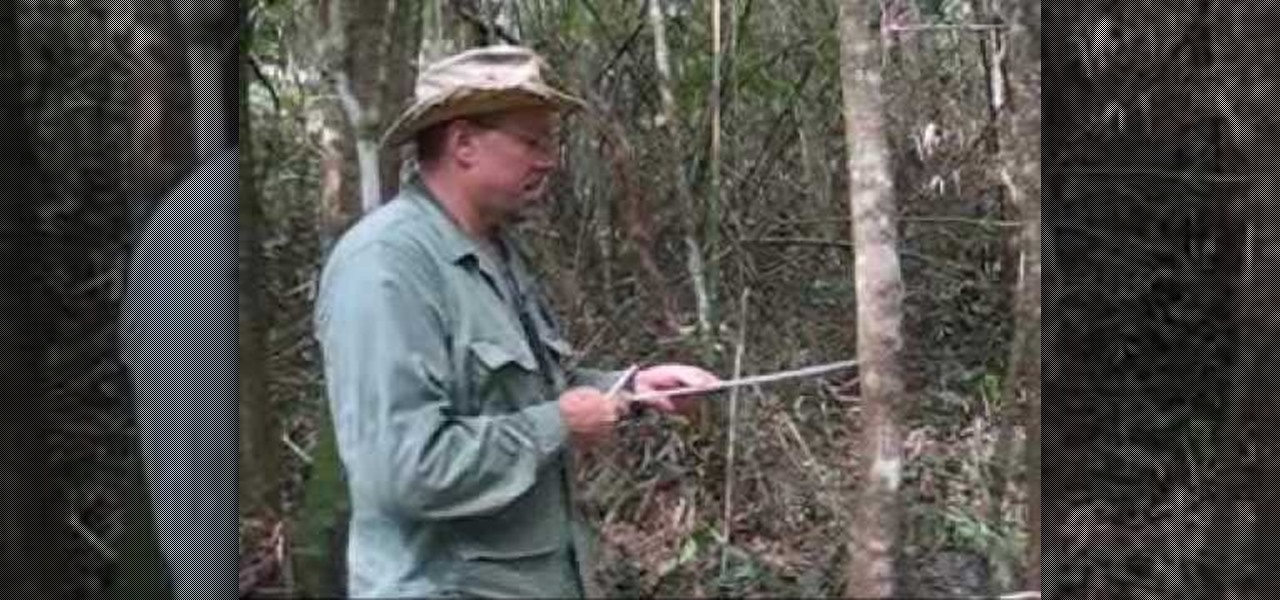
This video explains the Machete field sharpening. This sharpening method is very easy for sharpening the knives and blades. The man in the video is explaining a sharpening method using a new machine which uses microwave for sharpening thick and hard knives. By using a dynogram and adjusting the microwave the knife can be sharpened. The process of sharpening is by just touching the dynogram through the flattened edge of the knife. This is a very easy process for sharpening the knife. He is als...
This how to video describes how to download and install a free beta version of Microsoft Office. This video directs you to a Microsoft site that allows you to download the beta version of Office. The author warns you that this is the beta version of Office and that the software is still in the testing phase and is prone to many bugs and unknown problems and issues. This video is perfect for the penny pincher or those who want to be on the bleeding edge of technology.
In this video, Mark Donovan of Home Addition Plus shows you to remove ceramic tiles from a shower. Before you begin, remove the shower head and shower handle, leaving the walls bare. A lot of dust and debris will be produced so you should wear safety glasses and to protect the shower pan from damage, you should cover it up. Card board should suffice. Starting from the bottom, place the chisel on the edge of the tiles and tap it with a hammer. For the tiles in the middle, you can use a flat ba...
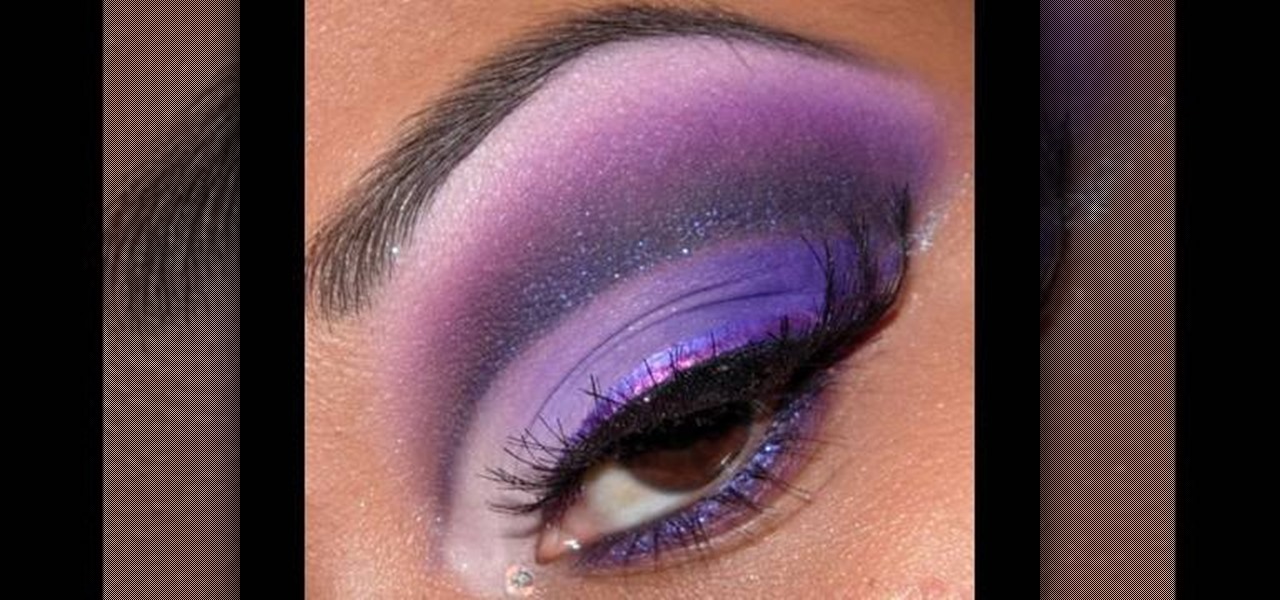
This tutorial is an in-depth look into how to make a purple smoky eye makeup look. Using various layers of eye shadow and fine-tuning, you will be able to add a blended purple eyeshadow look. Following the crease line of your eyelid and emphasizing them will be the highlight of your application, make sure to focus on this line when applying your makeup. Adding blackish-purple eyeshadow more heavily on the outside edges of your eye will make this purple smoky look more prominent, an interestin...
Liquid eyeliner, which can add a darker emphasis to your eyes, can be very successful and more defining if done properly. In this tutorial, we are shown how to properly apply liquid eyeliner. Pulling down on your eyelids, you should apply a line to the edge of your eyelid, making sure that the line is straight. If you cannot seem to make the line straight in one continuous motion, simply make a bunch of dashed lines and then connect them together. Use mascara to cover up any inconsistencies i...