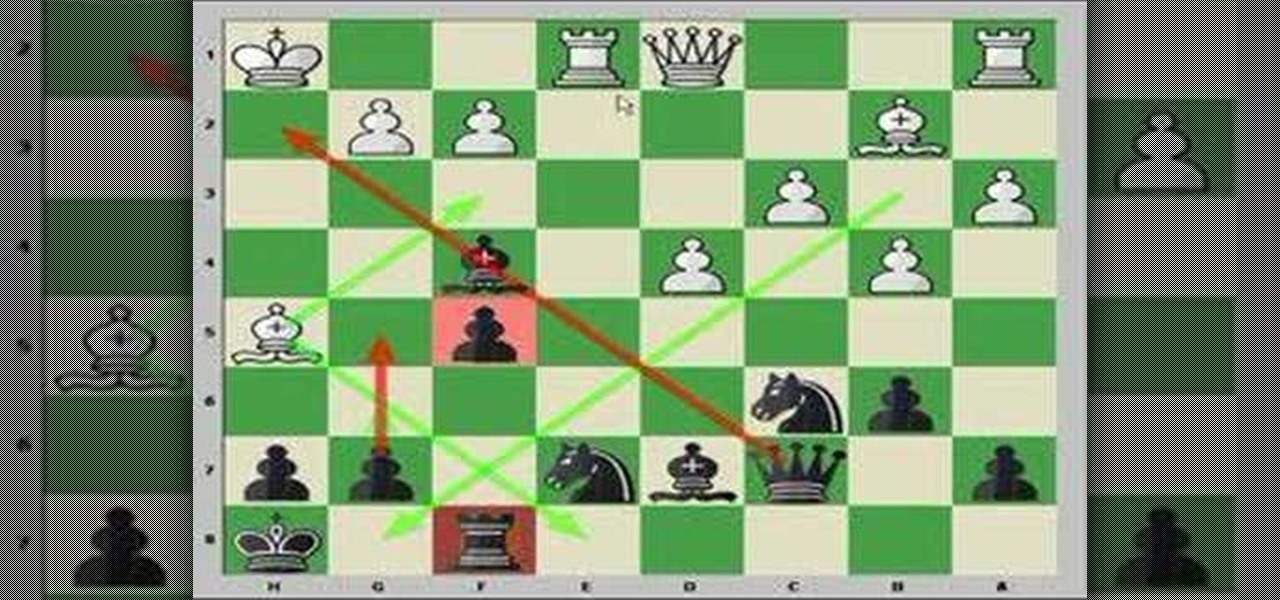
These two videos focus on analyzing chess positions, and generating candidate move orders from the position without moving the pieces or using computer analysis. The goal is to improve the ability to generate lines and variations mentally during a game, and to try to come up with a move that either maintains equality on the board, or paves the way for a slight positional edge.

In this video, we learn how to freehand embroider. Start by finding the image you want, then reduce it down to the size you want. After this, find dissolvable stabilizer and lay it over the drawing. After this, trace the picture with a Sharpie, then choose where you want the image to go on the fabric. Now, take blue Scotch tape and tape it over the edges onto the fabric. Now, grab a freehand stifling foot and place it on the fabric and start to sew the image around the outline. When you are f...

This three part tutorial shows you how to create artistic images that look like watercolor and ink drawings.
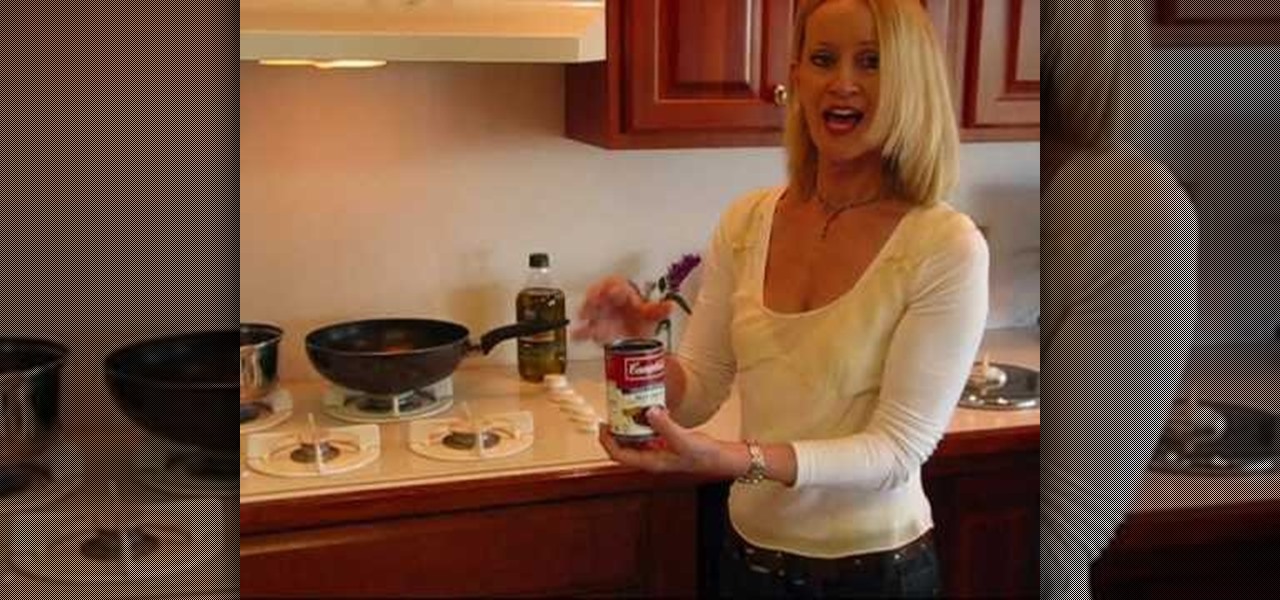
Stir fry is easy to make and always a lively dish to bring to the table. Join Betty as she makes her favorite sirloin steak stir fry recipe with asparagus and rice. It's delicious!
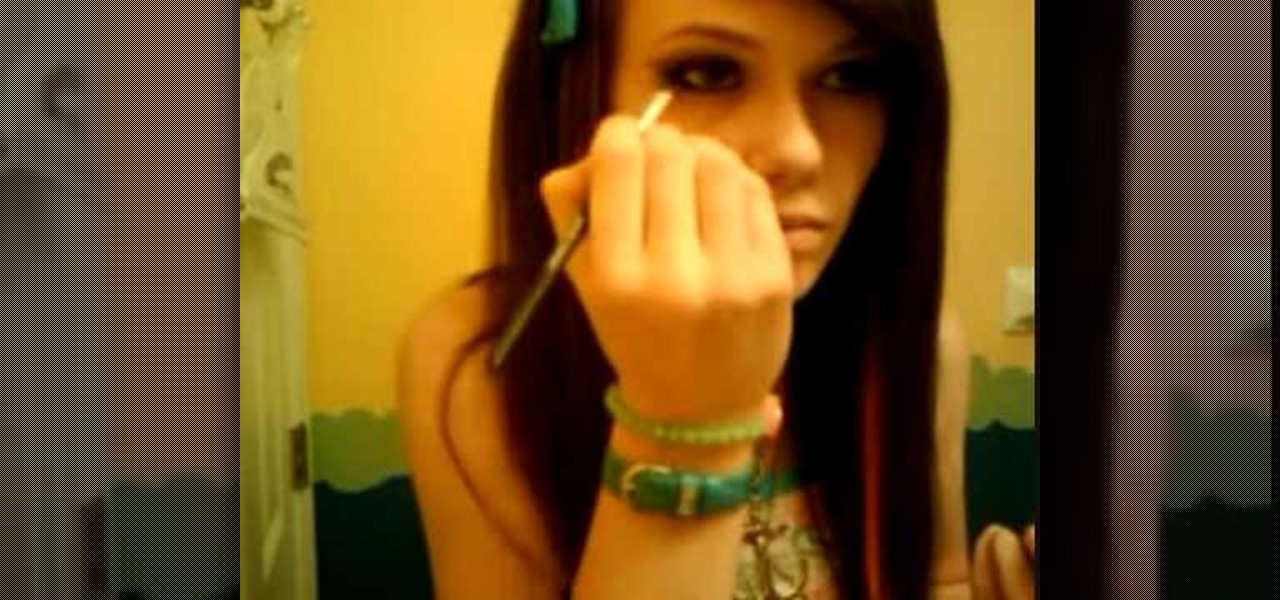
In this video from alyssaxabscission we learn how to apply emo makeup for a concert or a night out. Start with a primer on your eyelids. She uses orange-gold but any color can be used. Apply it to the inner corner up the upper lid. Use black and put it on the outer corner and crease of the eye. Make sharp wings on the outer corner like a cat. Next use a darker black to make it more defined. Now put black eyeliner on the upper and lower water line. Next line the top of the eyes very thin. Now ...
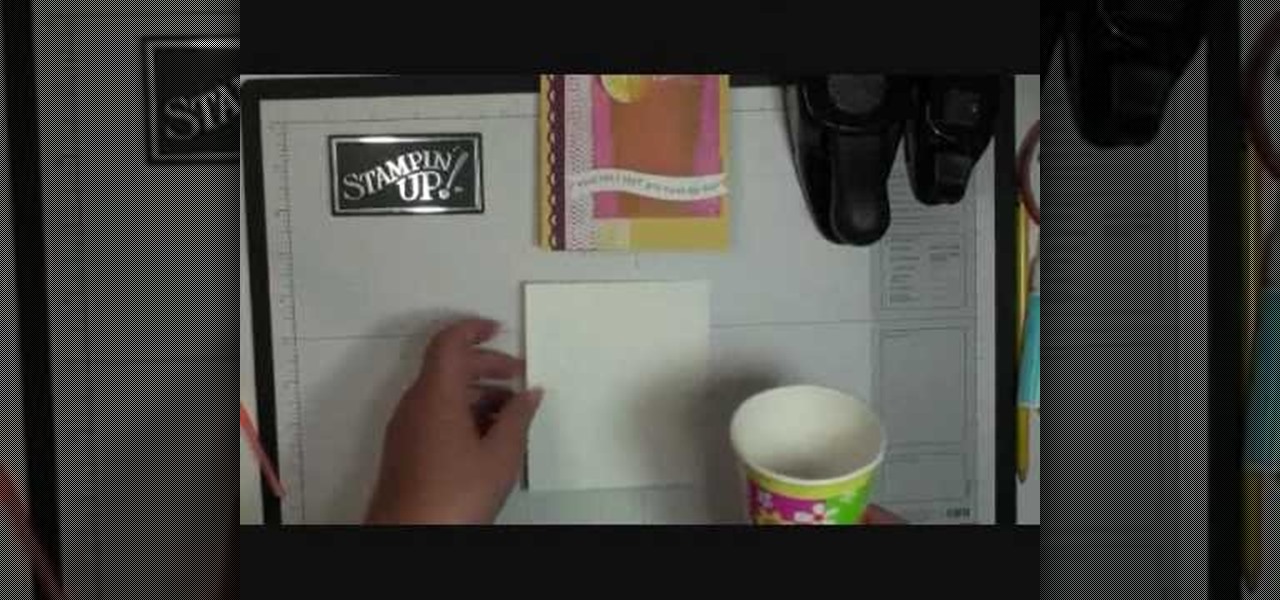
Dawn Griffith creates a cute card with a 3D lemonade glass embellishment from start to finish. Create a template by making a rough sketch of an 8 ounce paper cup onto a piece of white cardstock and cut it out. Take the template and either trace it onto a piece of vellum cardstock and cut it out, or use Dotto adhesive to attach the template directly to the vellum and then cut around the shape. Score each side at about 1/4", fold on the score lines and trim the overlap at the top. Apply sticky ...

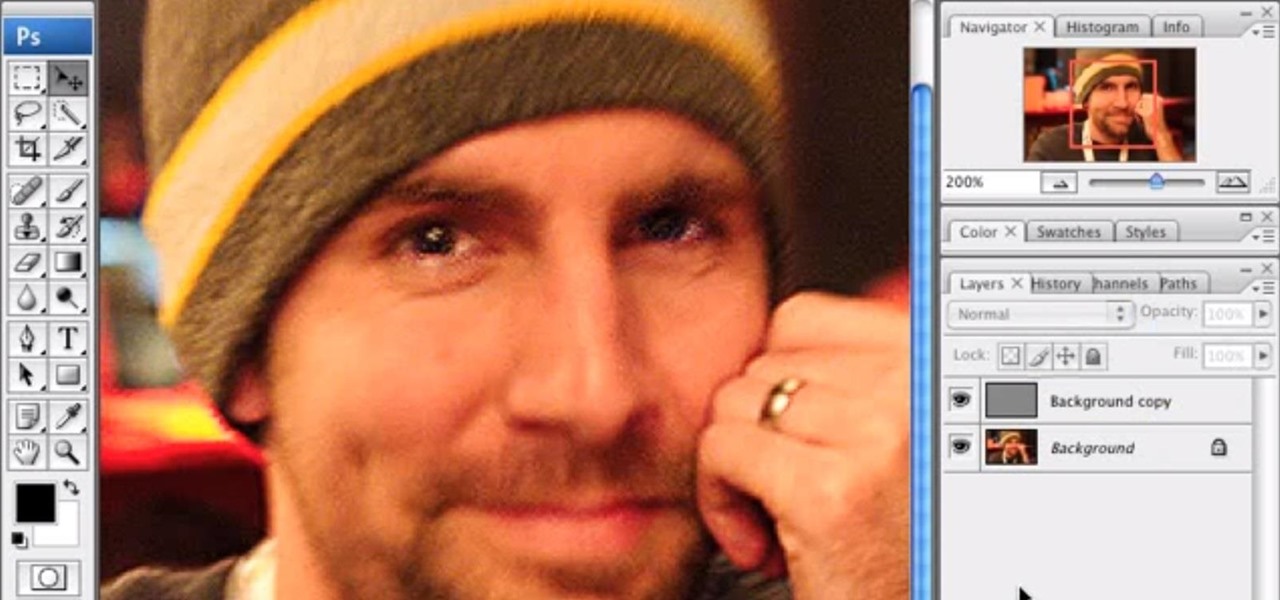
It's very easy to get a slightly blurry photograph due to a moving subject, camera shake, or just an incorrect auto-focus, but you don’t have to let that ruin an otherwise terrific picture. All it takes is a little finesse in Photoshop or another photo editing software. This guide covers sharpening a blurry image using Photoshop specifically.
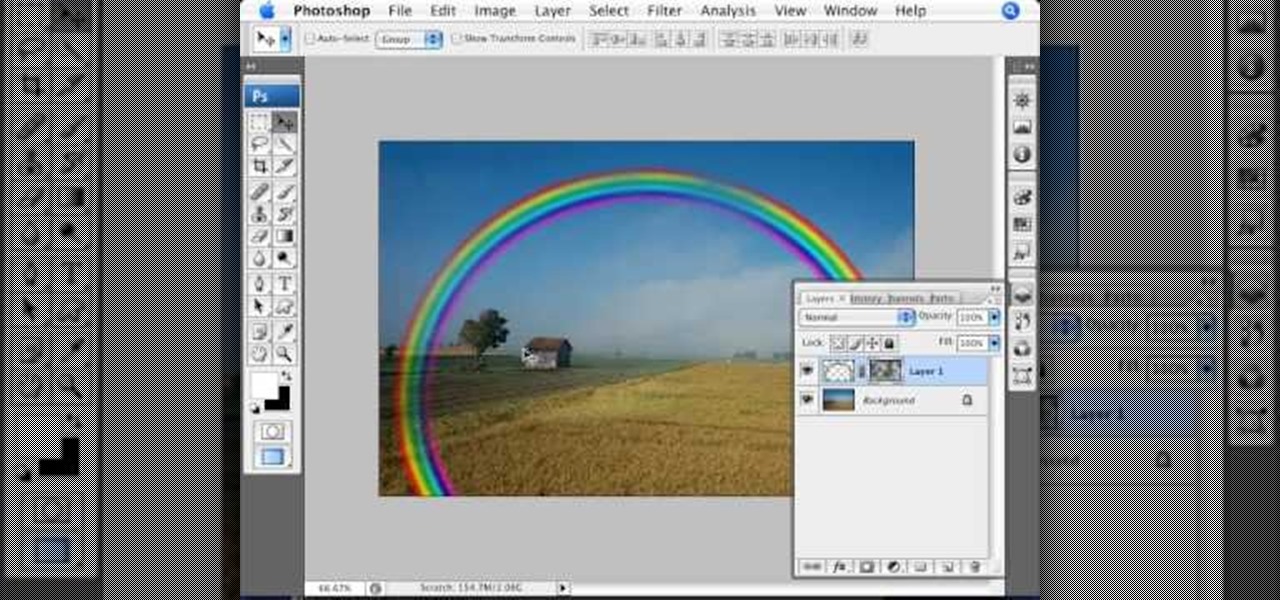
Open the picture you wish to place a rainbow within. A good scene has clouds that are receding into the distance and the light angle coming in from the front of the scene. A rainbow effect appears when by the sun is shining from behind you into the mist-filled air where it is refracted by raindrops.
Pixel Perfect is the "perfect" show to help you with your Photoshop skills. Be amazed and learn as master digital artist Bert Monroy takes a stylus and a digital pad and treats it as Monet and Picasso do with oil and canvas. Learn the tips and tricks you need to whip those digital pictures into shape with Adobe Photoshop and Illustrator. In this episode, Ben shows you how to create a magical enchanted dagger in Photoshop.
This video, by Garden of Imagination, shows you how to make a polymer clay pizza. To begin with, have a small piece of wood to act as a tray for your pizza. Take off-white clay for the crust and warm it up between your hands. Roll it out on your pasta machine on the number one setting. Using a circle cutter, push down on the clay to create a circle. Use an object that is a bit smaller of a circle to create the inside area of the pizza by pushing down. While doing that, blunt the edges of the ...
To make the Crust, mix the flour, sugar, baking powder and salt in a bowl. Cut in the butter and shortening with a knife or pastry blender until mixture resembles coarse breadcrumbs. Stir in the iced water, a little at a time while gathering the mixture to form a soft dough.
Materials Needed: - Use a Size K Crochet Hook - 2 strands of 4 Ply Yarn Round 1: Start with the Chain 4, then join and wrap. Pull a loop up. Work 12-Full Size Half Double loops through the loop. Then join in the beginning Half Double crochet. Round 2: Start with a chain (1 loop). then work 2-Half Double crochets, in each stitch around for a total of 24-Half Double crochet on round 2. At end of round 2 join in beginning Half Double crochet. Round 3: Start with a chain (1 loop). Do 1-Half Doubl...
In this tutorial, we learn how to draw a plan view. To start, you will draw a horizontal line with a point in the middle. After this, draw lines from the point where you want to draw the buildings in the picture. Then, draw boxes inside the lines that you drew out. Then, you will draw in vertical lines on the bottom of the page, which will act as the ground. Around this, draw circles with scalloped edges for the trees. From here, draw in the rest of the details for the buildings. Finish this ...
In this tutorial, we learn how to draw a plan view with art markers. First, you will draw a dot in the center of the paper and then draw lines out from here. After this, use the lines on the paper to create the proportions for the buildings. After this, draw in squares and lines to help create the ground and buildings. Then, you will add in details to the building and then draw in plants and grass around the edges. After this, erase any background lines from the drawing and then color it in. ...
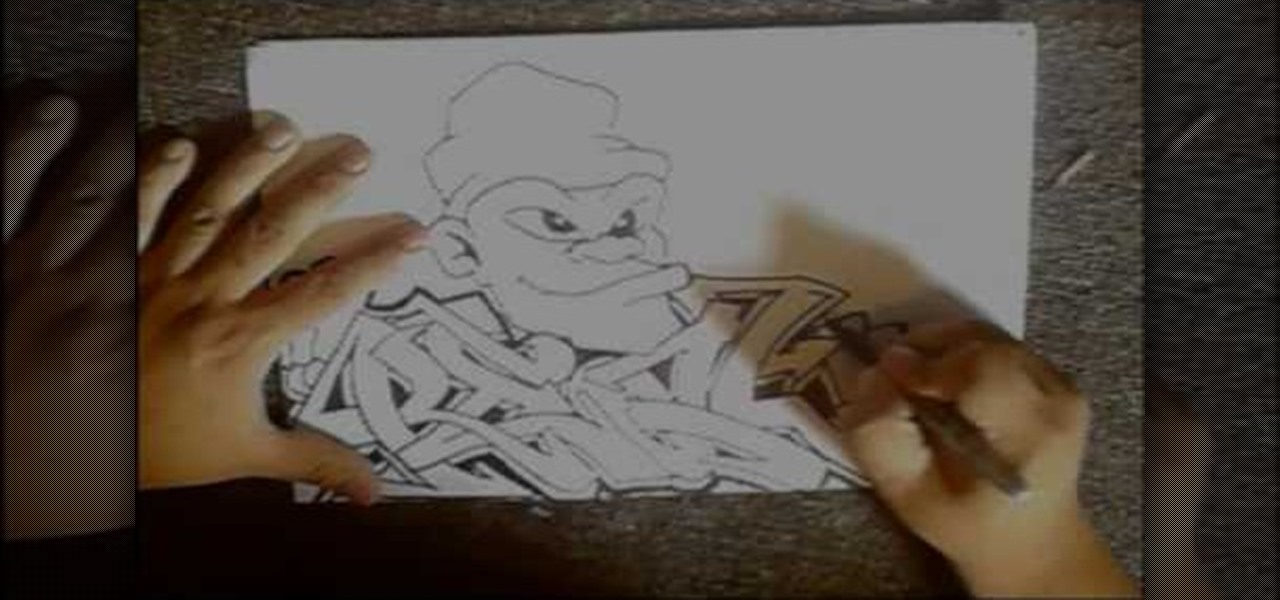
In this tutorial, we learn how to draw graffiti in pencil. Start out with a white piece of paper and a pencil. Then, draw your character's face, adding in the details of the face and the features of the face. Underneath this, shape out your letters that you want to write out. Cross the letters together, and make sure they are all touching each other. Shade in the areas next to the letters and add in lines and darker edges to the sides of them as well. Add in black in between each of the lette...
In this video, we learn how to make a pretty ribbon bow. First, take two pieces of ribbon that are the same size. After this, take one of them and fold it into the ribbon for breast cancer awareness. Then, fold the top down and hold it with your fingers. Then, bring the other ribbon in and fold it down where your fingers were holding the ribbon in place. Once you do this, you will end up with a cute ribbon that only takes a couple of minutes to make! You can pull down the edges on it and then...
In this tutorial, we learn how to draw a neighborhood using an imaginary box. First, draw a straight line and then the boxes should go around it. Continue to draw additional boxes around the line, then fill them in with the outline and further details. Draw in the roof, walls, windows, and doors. When you finish with the details, start to shade them in and then add in the street details. Make sure to give the ground some rough edges and also add in lights on the street. Add as many details as...
In this tutorial, we learn how to use the Stanley utility knife. This is a razor straight edge knife that has a very sharp point on it. The little slices in the bottom will help it go back into place and will help you sharpen it when it becomes dull. You can break off the points as well when they become dull so you have a brand new sharp one. The tool in the back has a storage area for another blade. To take this out, you just slide out the old one and insert the new one in the same exact way!
Much like Mac OS X's Dashboard, which contains Widgets, Windows 7 has developed their own uniqued version, which they call Gadgets. This quick tip video from Microsoft will help you understand where and what Gadgets are, and how to use them to best suit your needs.
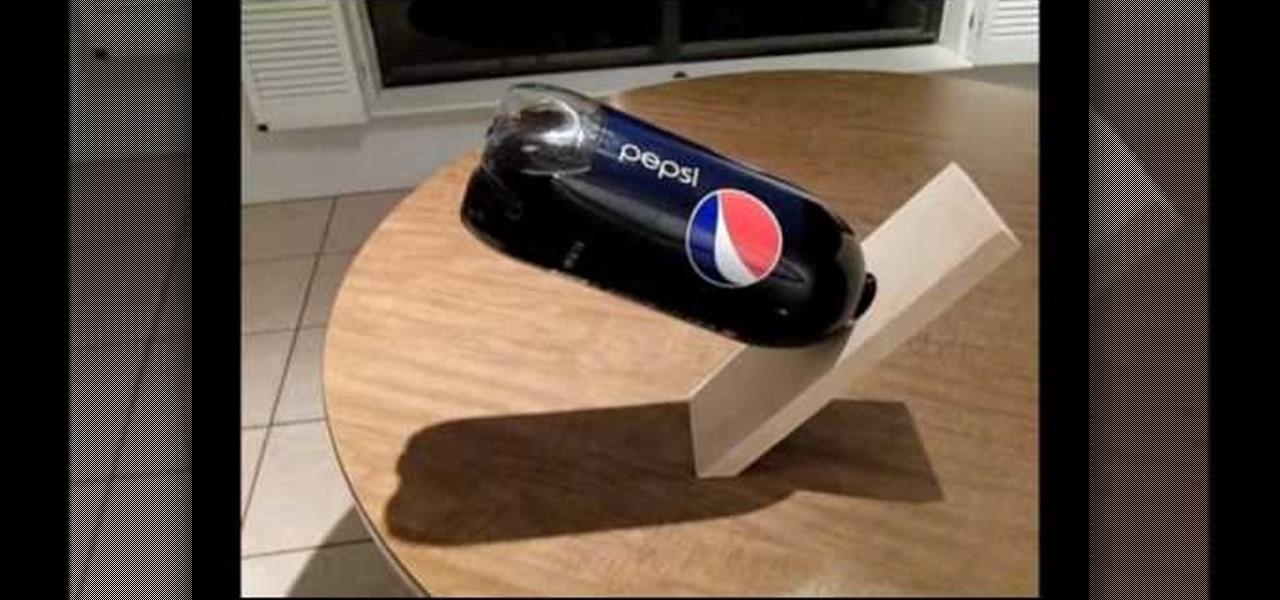
In this video, we learn how to make a wooden soda holder that defies gravity. First, cut a hole into a piece of wood that is large enough to fit the cap of a 2 liter bottle of soda. Now, with the bottle still full, place the bottle into the hole and raise the piece of wood up so it's sitting on the edge of a table. Now, the wood should stay there without you having to hold it. This will look like it's defying gravity, but it is just the soda and wood being positioned perfectly so it doesn't f...
In this video, we learn how to draw a cartoon dragon with a big head. First, draw the outline of the dragon, making the head much larger than the body. After this, add in small details to the dragon using the light pencil mark. Next, take a bold marker and trace over the pencil lines that you made, filling in the eyes, nose, teeth, wings, tail, ears, etc. After you do this, color the dragon completely green. Then, take a darker green color and apply it to the edges and where you want shadowin...
In this tutorial, we learn how to make a vintage inspired vest. First, measure yourself around the bust waist and hips. After this, write down what your measurements are, then mark them on a piece of fabric you want to use as your vest. Cut out the shape and then fold in the edges and sew the sides to hem them and reduce and frays. After this, add in any scrap pieces of fabric you have laying around and sew them to the vest to make your desired look. After this, sew on buttons to the front of...
In this tutorial, we learn how to make a cat-ear fleece hat. First, take fleece and combine two edges together to make two cat ears. Sew these together and then turn them inside out so you have the ears you like. Next, take a piece of fleece and sew it together so it becomes a hat. Turn it inside out so you can't see the marks on it. When you are finished, you will have a cute fleece hate perfect for anyone in the winter! You can jazz this up by using any type of material you would like and p...
In order to clean a DVD or a CD with alcohol, you will need the following: a CD or a DVD, alcohol, and cotton balls.
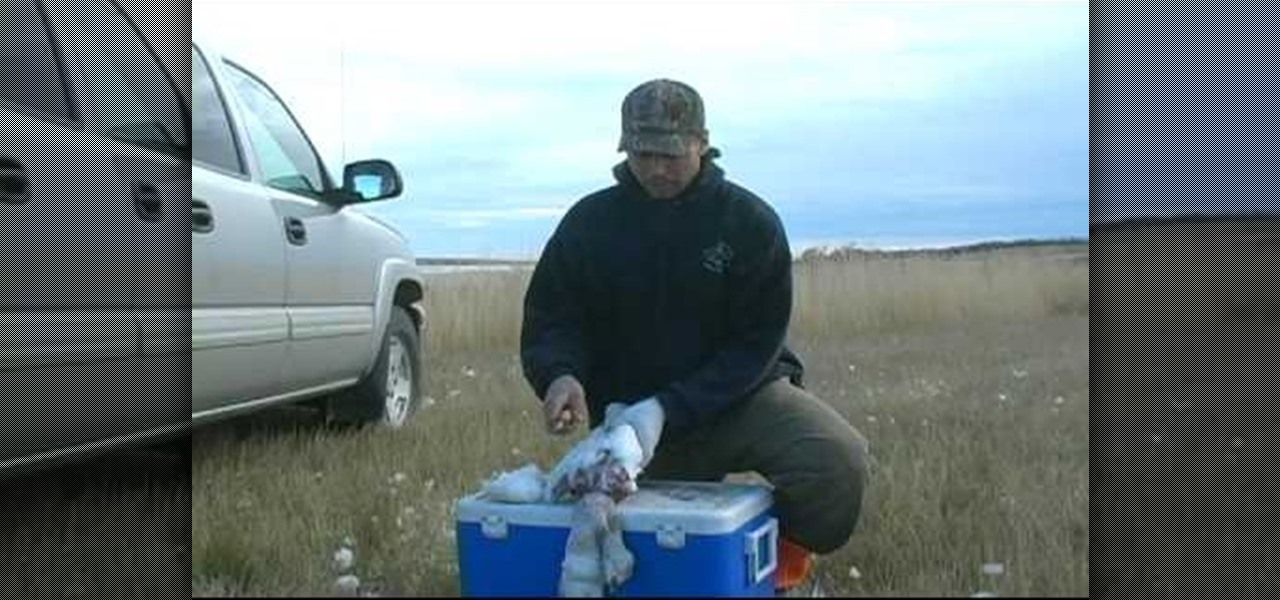
To clean fowl (ducks, geese, pheasant, etc) in the field, begin by turning it on its back. Lay it down on a flat surface. Grab a handful of flesh, underneath the head and neck and rip it away. Continue ripping the skin and feathers off around the torso. You will need to retain one wing for identification. Cut one wing off with clippers.
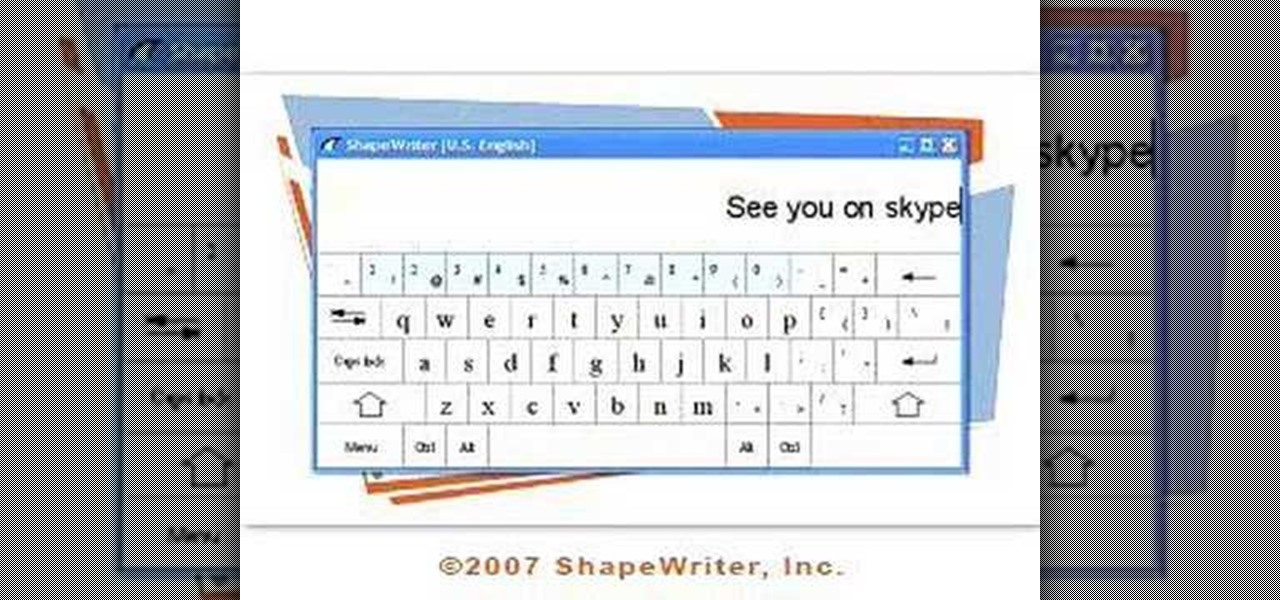
ShapeWriter is a quick typing program that is made for anything with a touch screen. You can use ShapeWriter on a tablet computer, PDA, cell phone or anything else where you have access to a touch sensitive screen.
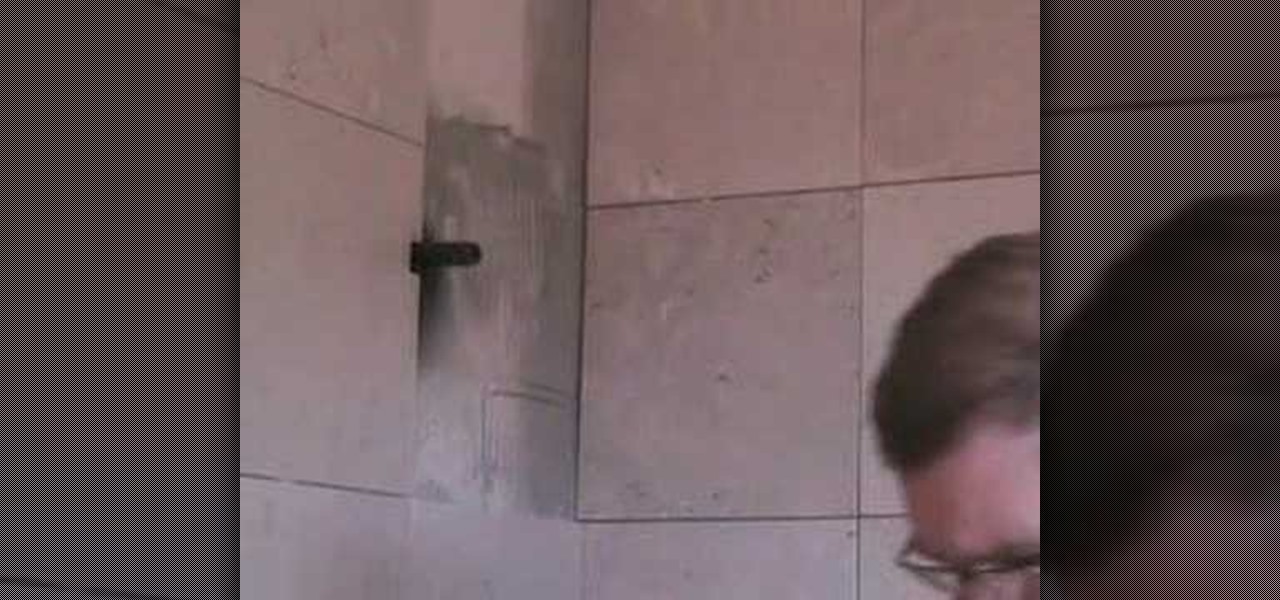
This video shows us how to install a ceramic soap dish in our bathroom shower. In this demonstration the instructor already had a slot in the shower tiles for the soap dish to go. Attach a long strip of masking tape on the edge of the soap dish. Mix some grout and place this on the part of the soap dish you are attaching. Be generous with the amount so you know it will stay. Place the soap dish in the slots and use the tape that you attached to be extra security that your dish will not fall. ...
This video shows you how to stencil a t-shirt with inks. Tape the t-shirt onto a piece of cardboard with masking tape. Lay the stencil on the t-shirt and tape some blank paper at the edges to ensure that there is no splashing on the sides. Some mist paint in blue Hawaiian is used. You do not need to apply a lot of it. Add some orange paint too. To make the print permanent, you must take out the cardboard put the t-shirt on the ironing board with the design uppermost. Cover the design with a c...
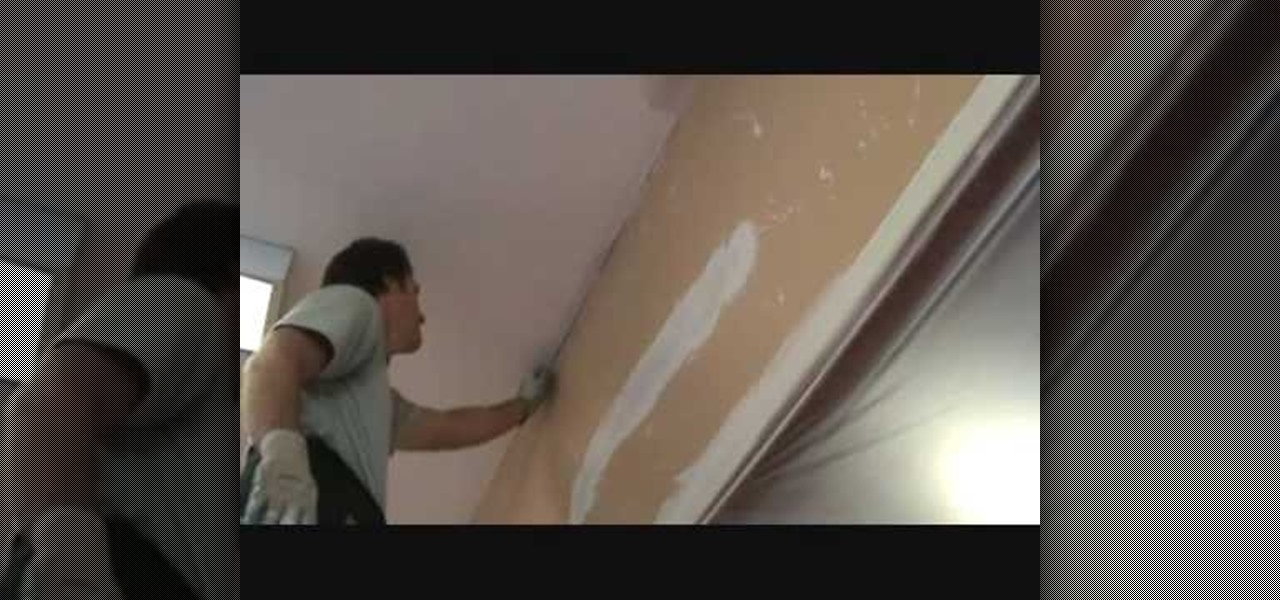
Video Joe Knows demonstrates how to install an inside corner ceiling patch when installing drywall. First, give the paper tape a definitive crease. Then, wipe quick set on the ceiling and the wall. Make sure you get enough material behind the paper tape. Have more quick set on than you need because you can wipe off the excess. Build it up on the edges using a three or four inch knife. Next, apply the tape by pushing it into the corners of the desired area. Finally, wipe off the excess quick s...
In this Home & Garden video tutorial you will learn how to make an accurate boomerang. Material required are 4-6mm thick ply wood or hard board or paper-mache, saw and some spray paint. Search for and download boomerang plans from the internet. The boomerang has three protrusions or handles equally spaced with each protrusion being 14cm long and the diameter of the circle at their ends being 4.5cm. Trace the plan on the plywood and cut it out with a ‘U’ shaped saw. Next draw out the line for ...
This video is specifically for people who want to learn how to whistle very quickly. The young guy in the video instructs you how to whistle by putting your two middle fingers in your mouth at the same time. First before blowing air through them, you must wet them with tongue or with water. Next step is you blow really hard and through the space in between the middle of your fingers which are placed at the edge of your mouth, next to your jaw. This will allow you to whistle very loudly. This ...
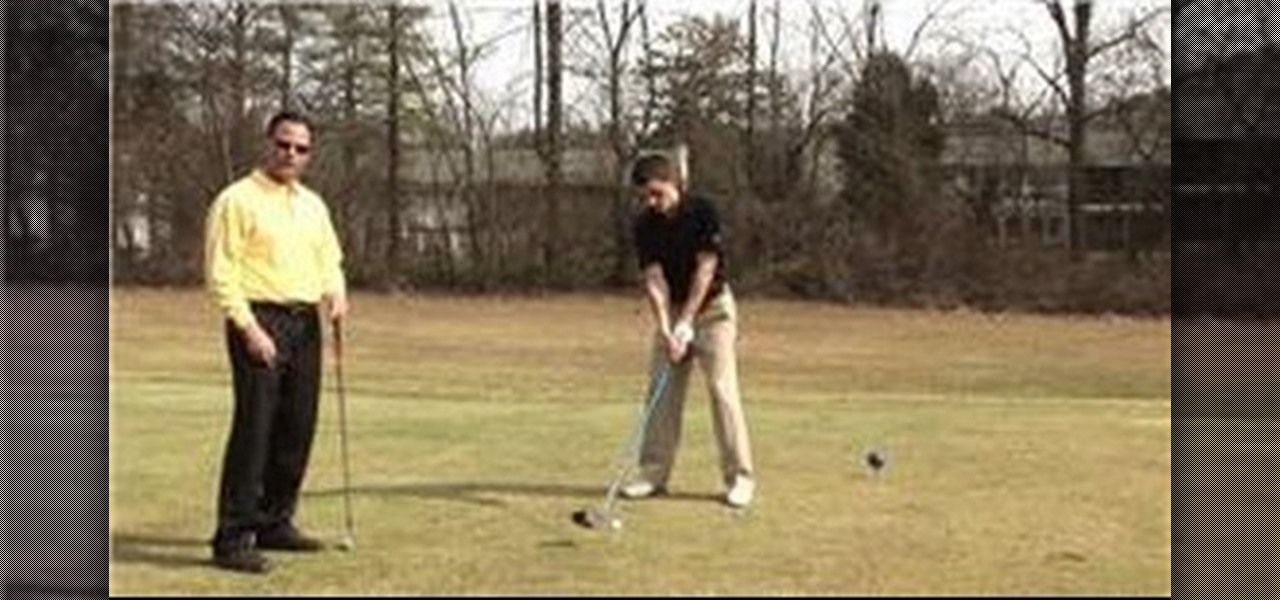
There are three components of hitting a 300 yard drive in golf. 1st component is make sure that the top edge of the club should be below the top of the golf ball. The second component is making a complete turn in the back swing. The shoulder here should turn more than 90 degrees. The third component is to swing with tempo so as to maintain the rhythm and balance of your body. This step of the tee consumes more than 80 % of the potential energy of your body. So using these 3 steps you automati...
This video from Your Teacher is one of a range of math solutions. (which is the measurement from the center to the edge when drawn in a straight line) and also the area of the circle, is the amount of total space within its perimeter. The circumference of this circle is 20 pi. The circumference is 2 pi r. So 20 pi is 2 pi r. Which factors down to show that 10 is the radius (10=r). The area is pi r squared. As we know the radius is 10, we can work out the area - 100 pi.
This video shows how to care for your cast iron pan. The guy explaining made some chicken the night before and was to tired to clean the pan. He says never to use soap on cast iron. Run some hot water over the debris that was left in the pan. He uses a scrub brush to get into the edges. Take some salt and pour it on, it's alright to put a lot on. Rub the salt around and rinse it out. Use a towel and wipe it dry. Then put it on the stove with medium high heat for five minutes. Every so often i...
You will need white glue, a paint brush, a ruler, scissors, medicinal gauze, self-adhesive foil, a utility knife and paper. First, using a paint brush, apply the white glue to the edge of a stack of paper that you would like to bind. Press the stack of paper down with a ruler. Let the glue dry. Unfold the gauze to fit the book and cut enough to cover the spine. Coat the spine with glue and paste the gauze to it, overlapping the sides of the book. Coat the gauze with glue and let it dry. Make ...
Do you need a Venetian mask but can't afford to buy a fancy one? This tutorial teaches you how to make a Venetian style mask by yourself with some basic supplies you can buy from a craft store. You'll need a blank mask or some plaster strips, decorations (like ribbons, crystals, feathers etc.) and basic construction tools like X-acto knives, scissors, and glue. First, you need to lay out the materials, add the trim with hot glue and attach the feathers to the top of the mask. The feathers wil...
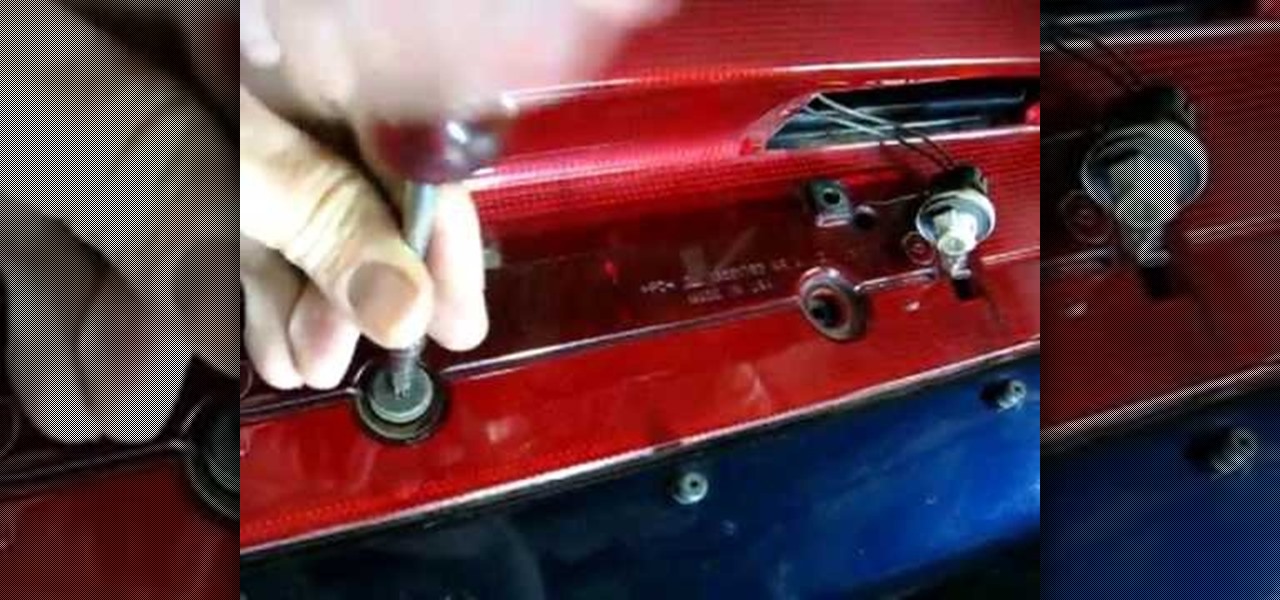
Learn how to remove a panel from the trunk lid of a Saturn. Start by removing the license plate and light holders. Remove the rear light bulbs Remove bolts from under the license plate. There are four additional screws on both edges, you'll need to remove those as well and lift the bottom of the panel out. Give it a bump to free it, feed out your light assemblies, and you're done. Follow these steps and you'll be able to remove your Saturn trunk panel yourself.
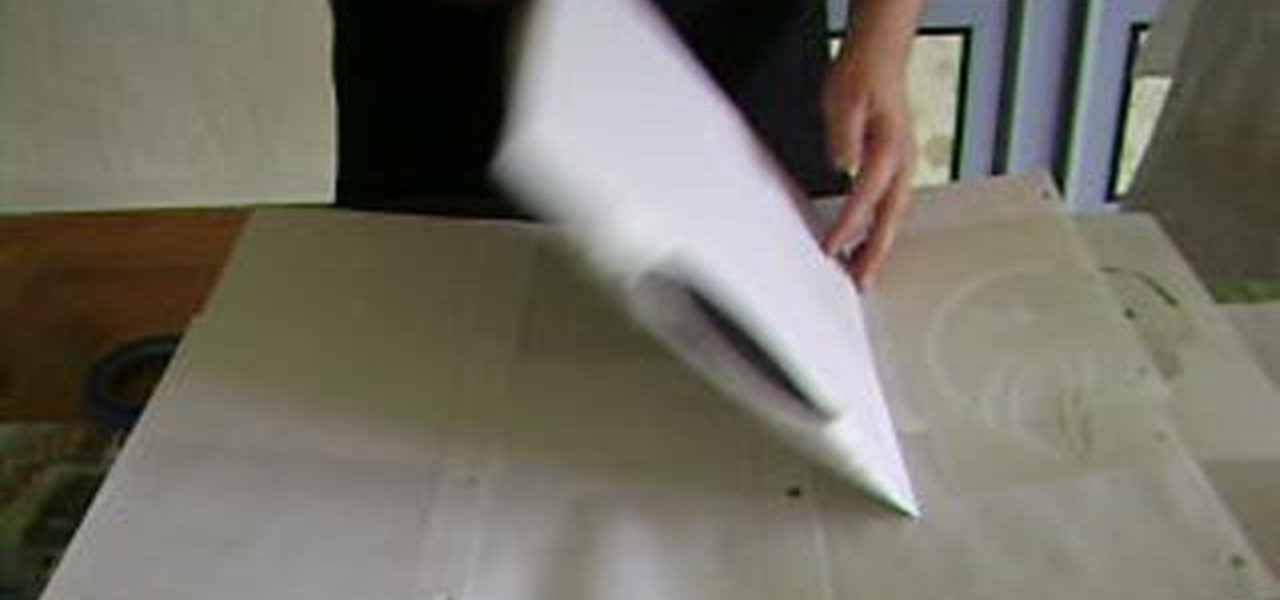
This video shows you how to wallpaper a switch plate. You should take a piece of paper and match it. You will need wallpaper, scissors, a razor knife and spray glue. Shake the glue and spray the backside of the paper and the front of the switch plate. Match the pattern to the wallpaper on the wall. Turn the switch plate over and trim off the excess on the corners. Fold the ends in. The switch plate is covered. Next you need to cut it out. Take the razor knife and run it along the edge of the ...
Want a tubed tire alternative for you bike? The answer is simple… tubeless tires. In this video from Excel Sports Boulder, you'll see exactly how to install a tubeless road tire on a bicycle.
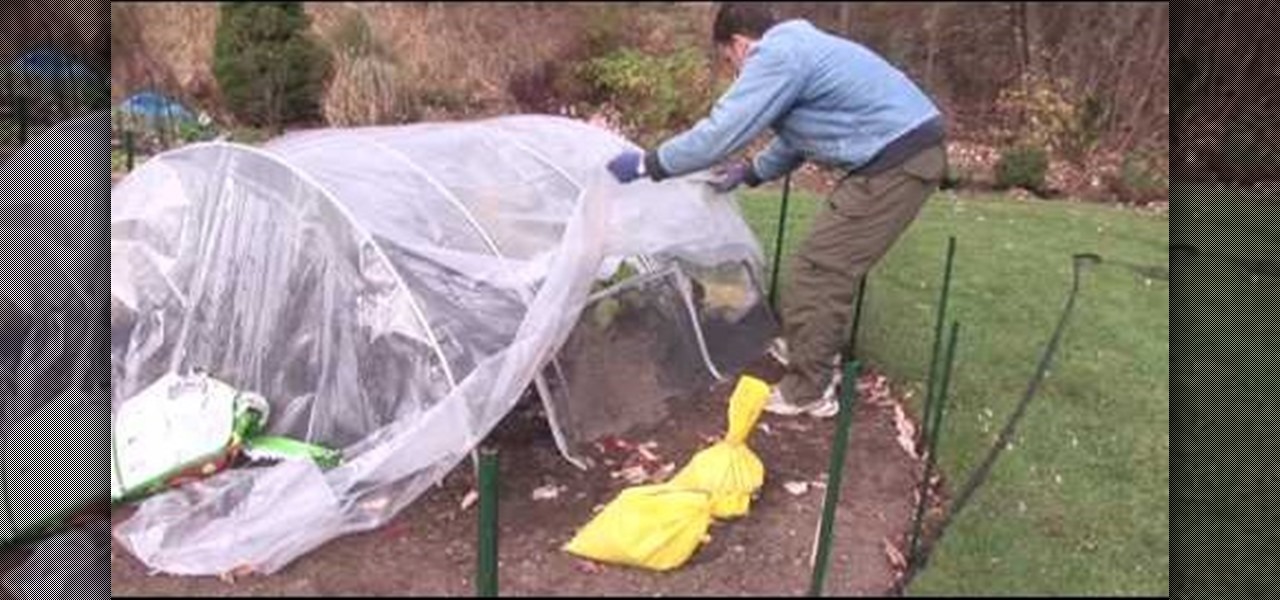
A low tunnel is a kind of mini-greenhouse for your garden. Growing vegetables in a low tunnel requires proper ventilation. In this tutorial, you'll learn how to provide the right ventilation for your low tunnel, keeping your plants happy and healthy.