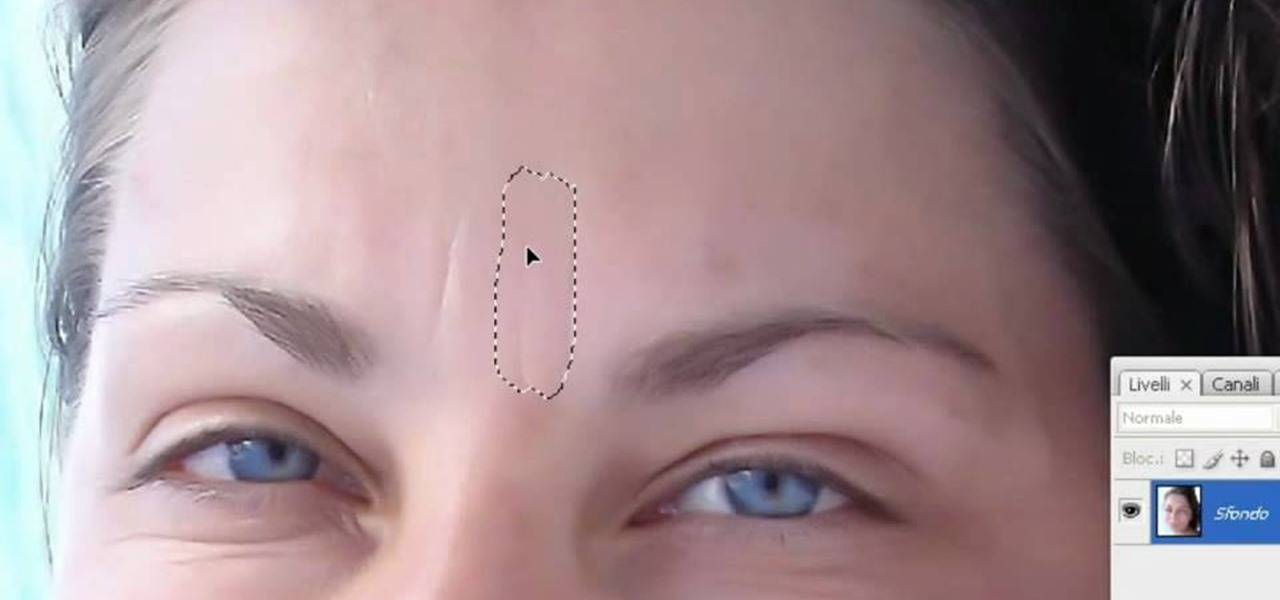
In this how to video, you will learn how to remove acne with Photoshop. First, open the image you want to edit in Photoshop. Go to the left column and select the healing brush. Next, set the brush size and find a part of the image that is clear. Hold alt and click. Next, start clicking on the areas that you want to remove. As you can see, the spots are replaced with the color that you chose earlier. Keep on doing this until the image has been completely healed. This video shows you just how e...
In this video tutorial, viewers learn how to smooth skin with noise-ware plug-in using Adobe Photoshop. Users will need to first download the plug-in to be able to use it from the menu of the filters. Now modify the values of Noise Level Adjustment and Noise Suppression. Max the Luminance and set the other values to 50%. Click on the preview from above to see the difference. Then use the filter a second time to make a stronger effect. Any small wrinkles can be eliminated with the patch tool. ...
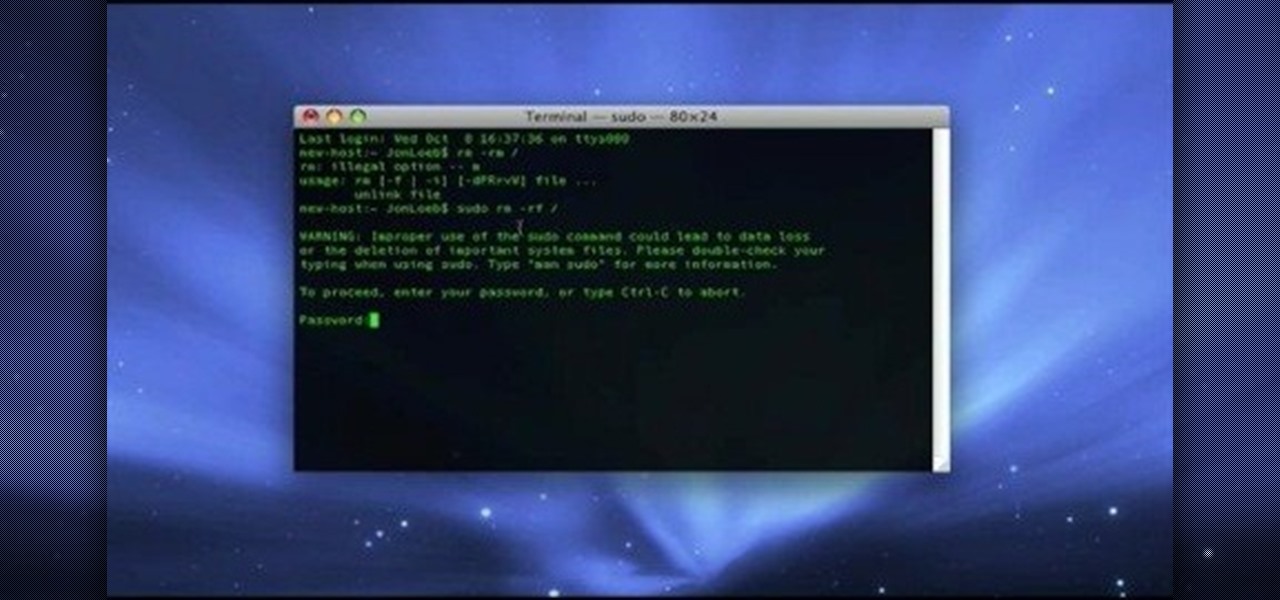
Macheads101 shows us a simple command to erase your entire hard drive in a MAC OS x terminal. You can either log in as administrator and simply type "rm -rf /" to format or you can just type "Sudo rm -rf /" to start. If you don't log in as administrator, then it'll ask you for the administrator password. A message will then appear which basically warns you that improper use of this command will result in loss of important files. Next type in "sudo mount -uw /" to edit the file command system....

In this how to video, you will learn how to change the home screen icons on an iPhone or iPod Touch. First, go to the website to download the icons you want. Once these are downloaded, download and install WinSCP. Open this program and select edit. Find your IP and wi-fi address and place your IP, user name, and password in. Log in and then go to your Applications folder. Go to mobile slide show and look for the icon files for the application you want to change. Drag and drop the new icon fil...

In this Software video tutorial you will learn how to make a copyright brush using Photoshop. Open up Photoshop and open a new document by clicking ctrl+N. Create a new text layer on the right side and type in your text. Right click on the text layer > rasterize type. On the left side select the ‘rectangular marqee tool’ and draw a rectangle around the text. Go to edit > define brush preset. In the next box, give it a name and click OK. Then go to file > open and select a picture on which...
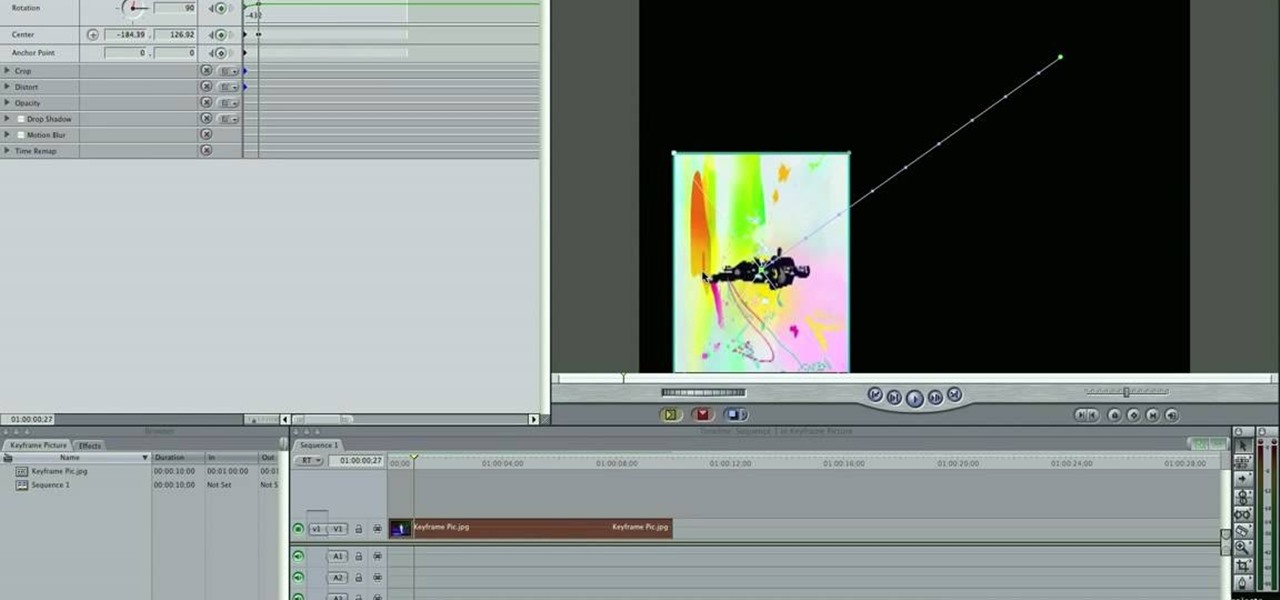
This video tutorial teaches you the basics of Keyframing using Final Cut Pro. A picture is used in this tutorial. You can also use video or picture for this example. The video shows the keyframe button and the different keyframing tools. The video then teaches a basic keyframing concept of how to add a motion to the clip using keyframing. You can also add rotation effect in the keyframe. When you add a keyframe and move the clip from one place to another, it adds a path along which the clip o...

In this video tutorial, viewers learn how to change the color of eyes using Adobe Photoshop. Begin by selecting the Magnetic Lasso tool and create a selection around the eye. To create a second selection without losing the first one, hold the Shift key. Now go to Image, click on Adjustments and select Hue/Saturation. Now adjust the hue and saturation of the eye to change the color. This video provides a visual demonstration for viewers to easily follow along. This video will benefit those vie...
This video describes how to use Adobe Photoshop CS4 software to create and manipulate text in animated .GIFs. GIF stands for Graphic Interchange Format, a type of image file which allows short animated sequences to be displayed. A preselected scene from a television show is opened as a GIF in Photoshop CS4. Animation window is opened by selecting window then animation. The text tool is selected and a textbox is drawn by clicking and dragging. Photoshop CS4 then applies the text to the frames ...
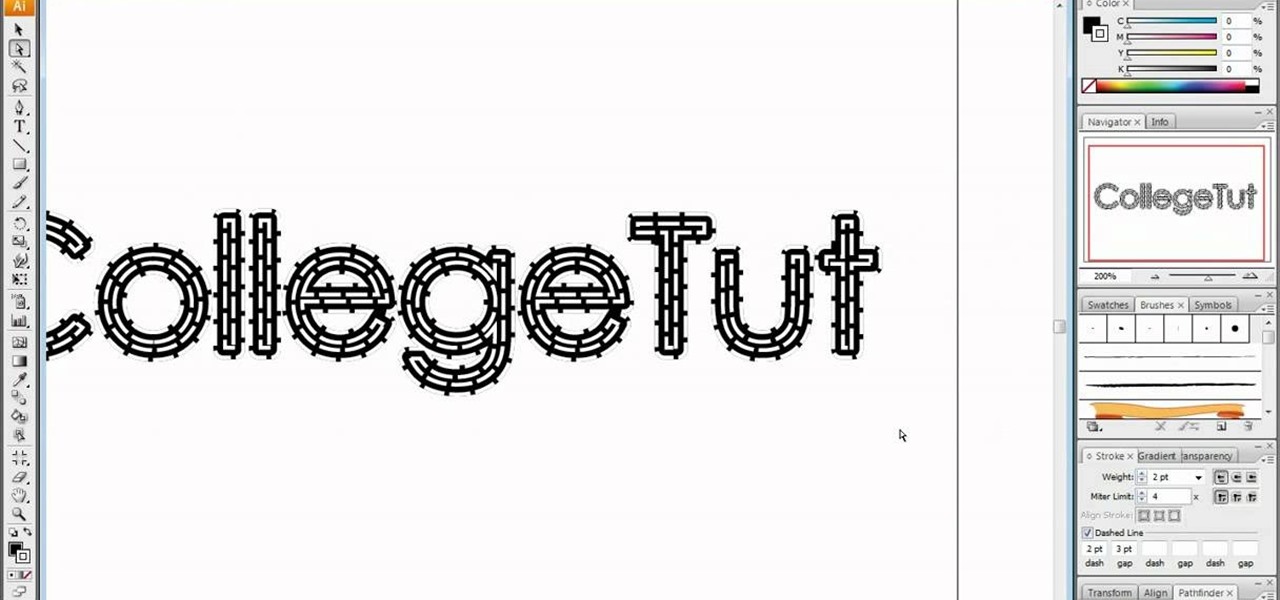
In this tutorial, user CollegeTut shows you how to customize the shapes of various fonts and text, essentially creating your own custom fonts, by converting the text of any font to outlines and then editing those outlines (bezier paths/strokes). You can modify the points on the path to create different shapes for the letters in your text, or you can manipulate the strokes of the text. You'll create some cool text effects such as text that looks like it's made of bricks, by converting the stro...
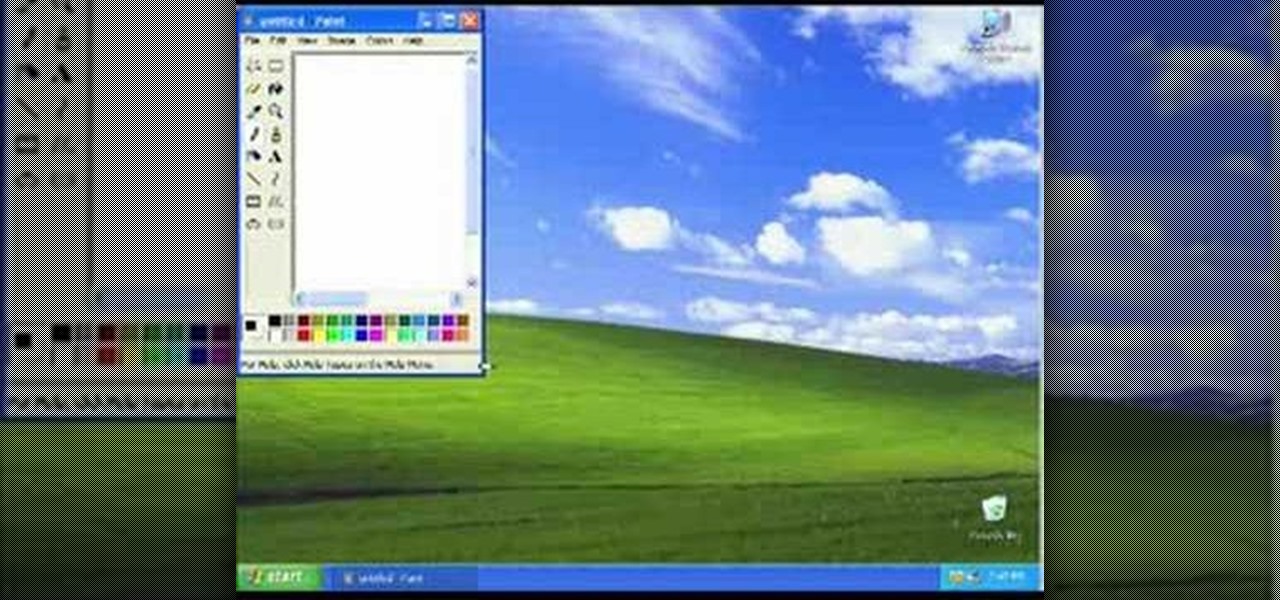
This is a video about how to use the printscreen button. You can take screenshots with the printscreen button on the keyboard. First you have to a pick an image whatever you want to save in your PC. In this video he is explaining about how to save the a picture about the animal description. Next press the printscreen button when you get the image. Next go to start button and next Accessories and next paint and open the new page on paint. Then go for paste in the edit. Then you will see the pi...
In this video tutorial, viewers learn how to tan an image using Adobe Photoshop. Begin by opening the image in the program and create a new layer. Then select the brush tool and select the tan color. Click OK and apply the color over the areas that are wanted to be tan. Then apply another layer with the same color to darken the image. Finish by configuring the Opacity to a lighter color and blend it to the image, This video will benefit those viewers who enjoy editing images to enhance them a...
Tut Teacher shows that if you're going to edit alot of pictures, learning to change your eye color in Photoshop is helpful.Go to Photoshop and open "human eye", zoom in and it gives more room to work with. First, go to your lasso tool, hold down and click. You can click and drag or click along the outside edge. Set to 6 pixels, more or less depending on the image. Make sure you don't click on scanner..it'll make the image go crazy. Keep clicking along the edge there'll be a symbol on the circ...
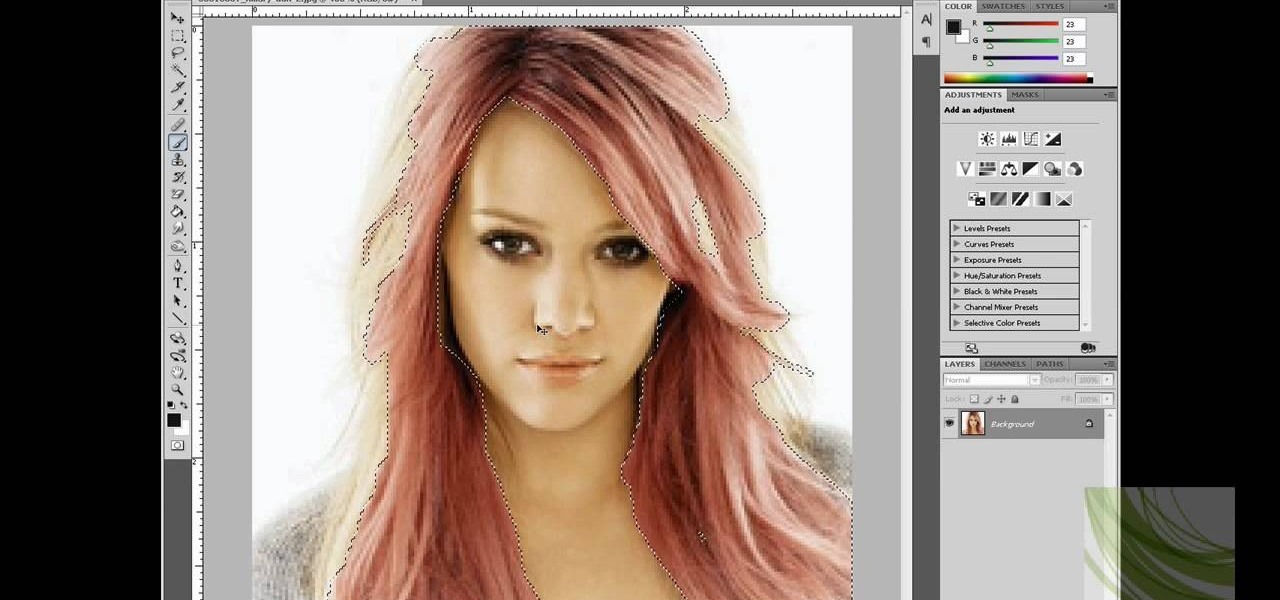
Photoshop is an amazing tool to use to edit your photos. If you would like to see what you or someone else would look like with a different hair color then Photoshop is the place to do it. Try out something realistic or add a funky color to your favorite celebrity’s style.
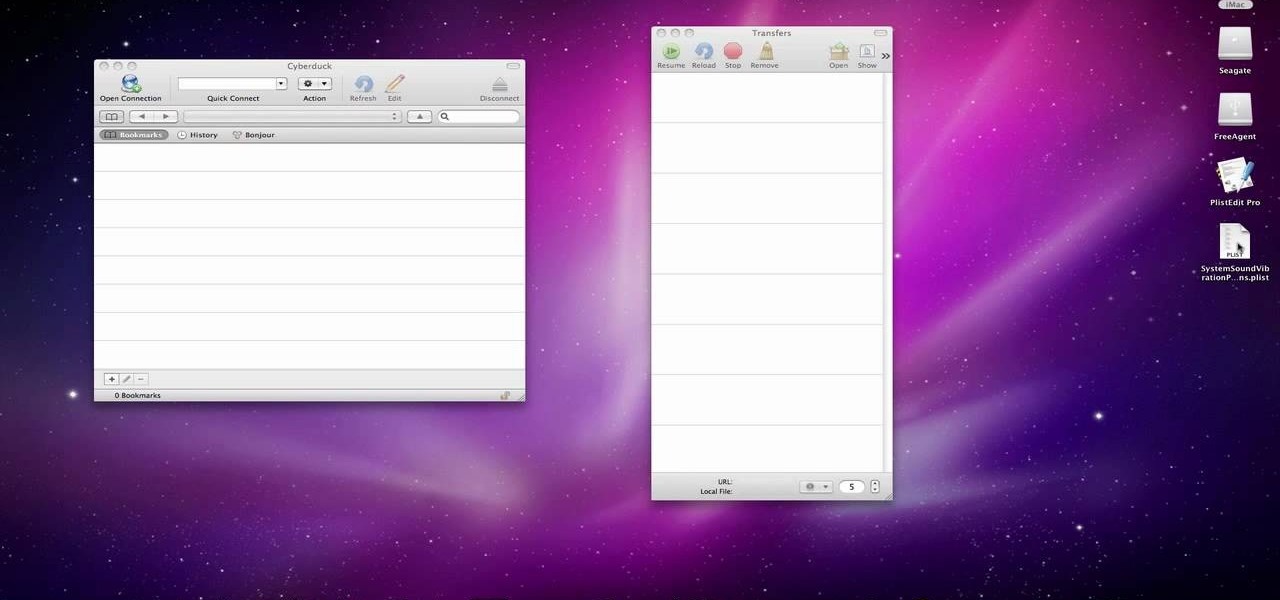
In this video we learn how to make your iPhone vibrate your notifications longer. For this you need an SSH program like cyberduck. You also need plist edit pro. Once you have SSH in your phone, go to system, library, private frameworks, celestial framework, then find vibration patterns. Double click that. Download it to the desktop. Open it. Open up the plist file. Go to default, look at total duration, click into that to change the time of the vibrate duration. Change the On Duration too. No...
In this video, the instructor shows us how to take a screen shot off of Windows XP. First, you will want to pull up the screen that you want to take a screen shot of. After you have this up, you will hit the "Alt" and "Prnt Scrn" button at the same time. Nothing will show up on your computer, but it will have saved the image. Next, open up the program "Paint" and click "edit" on the top toolbar, then click "paste". The image will then show up on your screen. To save, click "File -> Save As", ...
In this how-to video, you will learn how to record using Windows Audio Recorder. First, find and open the program. Go to Edit and select Audio Properties. From there, select which device you want to record from. Select okay and then press the record button. You have a limit of 60 seconds on this particular program. Press stop whenever you are done. Now, you can save the file as a .wav in any folder. You can also change the file type. Once this is done, you have completed the task. With this v...
In this video tutorial, viewers learn how to automatically play You Tube videos on My Space. Begin by going on the You Tube website and search for a video that you want. Then copy the embed code and paste it in a notepad document. There will be two URLs in the embed code in quotations. Type in "&autoplay=1" at the end of both URLs inside the quotations and then copy the embed code. Log into your My Space account and click on Edit Profile. Paste the embed code into the About Me section and cli...
Mione685 demonstrates how to automatically play a video in your YouTube channel using a glitch. To automatically play a video in your channel, first open up YouTube and go onto your channel. Then, click on your featured video. Then, edit your video with an annotation. Next, add the pause annotation. Make sure your video is on 0 minutes, 0 seconds, 0 one hundredths of a second. When you change the duration time, set it to one, one hundredth of a second. Then, watch your video on auto play. The...
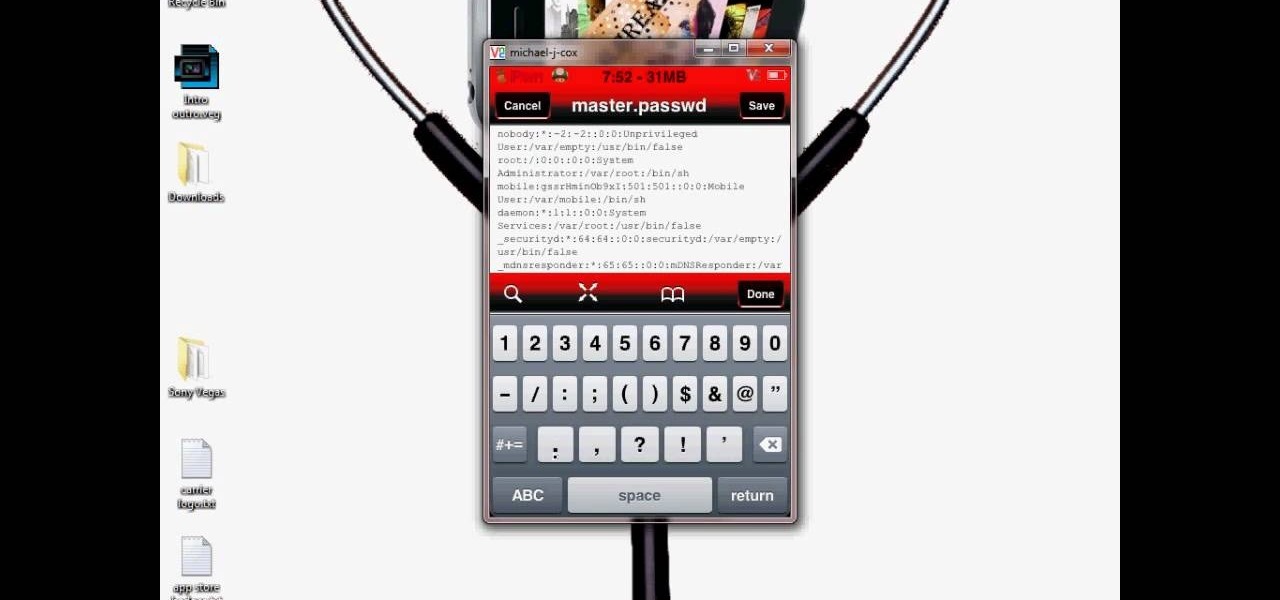
This video tutorial from DrJailbreak shows how to reset your SSH password on iPhone or iPod.If you changed your password through Rock with your Mobile Terminal and forgot it, this is what you are going to do to set your root and mobile password back to alpine.First you will need iFile application. Open Cydia and browse to http://repo.beyouriPhone.com. Navigate to Be Your iPhone Repo and scroll down to iFile. Download and install.Open iFile and navigate to /Private/etc.Scroll down and open mas...
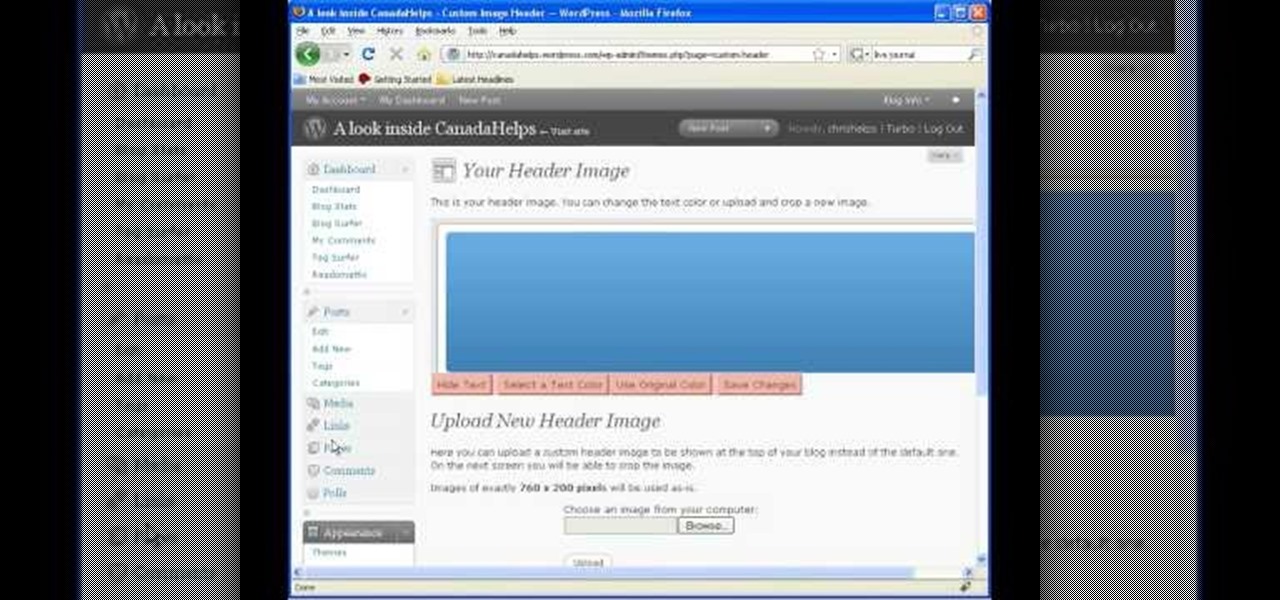
In this video tutorial, viewers learn how to start and set up a free blog. Viewers will learn how to setup a free blog for a charity, make a blog entry, edit and customize a blog and share a blog with their network. A blog is a online journal that provides the reader with regular posts on various topics. Three of the most popular blogging sites are: Blogger, Word Press and Live Journal. When creating a blog, keep the posts short and meaningful. Try to engage the reader. Update your blog regul...
In this how-to video, you will learn how to make a .gif animation from video footage. First, open Photoshop, click file and select import video frames to layers. Next, select the video you want to use and open it. Once this is done, you will see the amount of frames in the videos as layers in the video. Go to window and animation to open a new display for the animation. If you want to shrink the .gif image size, go to edit and image. Change the size to your liking. Now, just go to file and se...
To get autotune on Audacity, you will need to have the 1.3.10 beta version from Audacity's website. Verify that you have autotune or G-snap in the plug-ins. You may need to download G-snap from the internet. First, open up Audacity. Then, go to edit and select preferences. Go to effects and click rescan BST effects next time Audacity is started. Then, click the okay button. Close out of Audacity and then reopen it. The program will then import your new files. Your new files will then show up ...
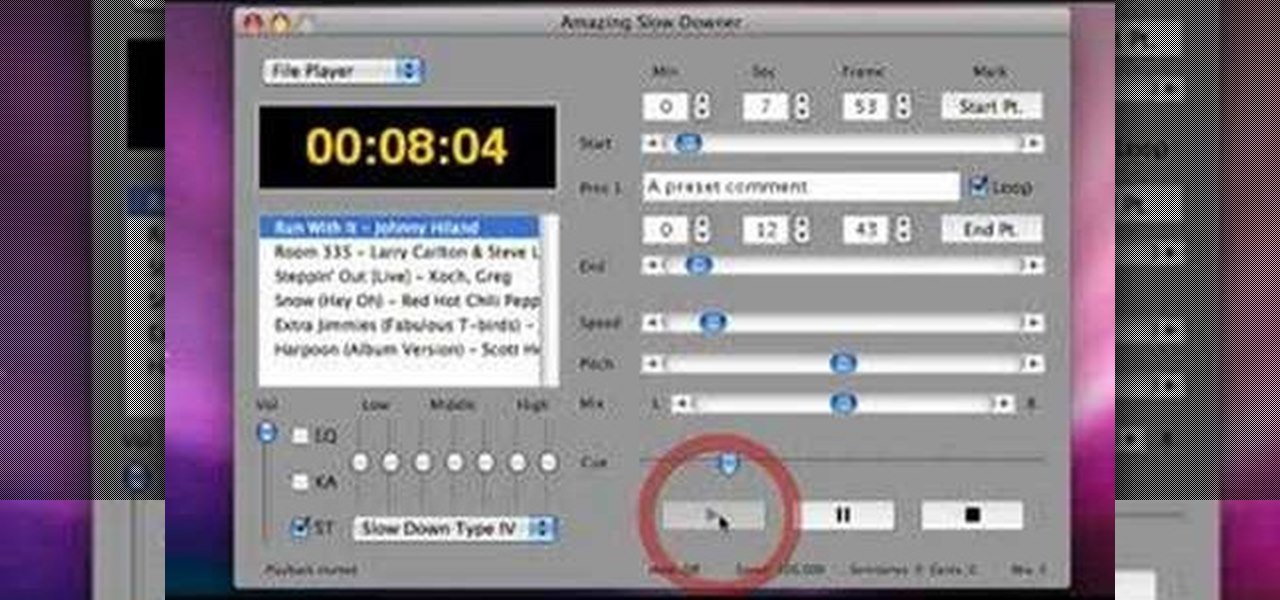
This is a software demo. This Mac software allows you to play a song or music or audio track and reduce its speed without affecting the pitch. Select a guitar riff or chord sequence, loop it, and speed up or slow down that loop so it runs faster or slower, without changing the pitch. The program has some sound editing functionality, like EQ, but is mainly a tool for changing a recording's speed. Import a track from iTunes, or directly from a CD, adjust the speed, apply the optional equalizer ...
In this video tutorial, viewers learn how to make an animated GIF file using Adobe Photoshop. Begin by opening the program. Then click on File and select New. Choose the size of your image and click OK. Now create your picture or text image. Once finished creating your image, click on Window and select Animation. Now click on the button on the right side of lower window and select Make Frames from Layers. change the time of each frame to 0.5 sec. Now edit it and save it. This video will benef...
This video tutorial from toptenreviews presents how to import media from a hard drive into Corel Video Studio library.First you need to start the application.From top menu click on Capture tab. Normally you would select one of the four options to capture media: Capture video, DV quick scan, Import digital media, Import from mobile device.These options are below the library. But in this case you will need to click on the folder icon above the library.This action will bring up a dialogue box wh...
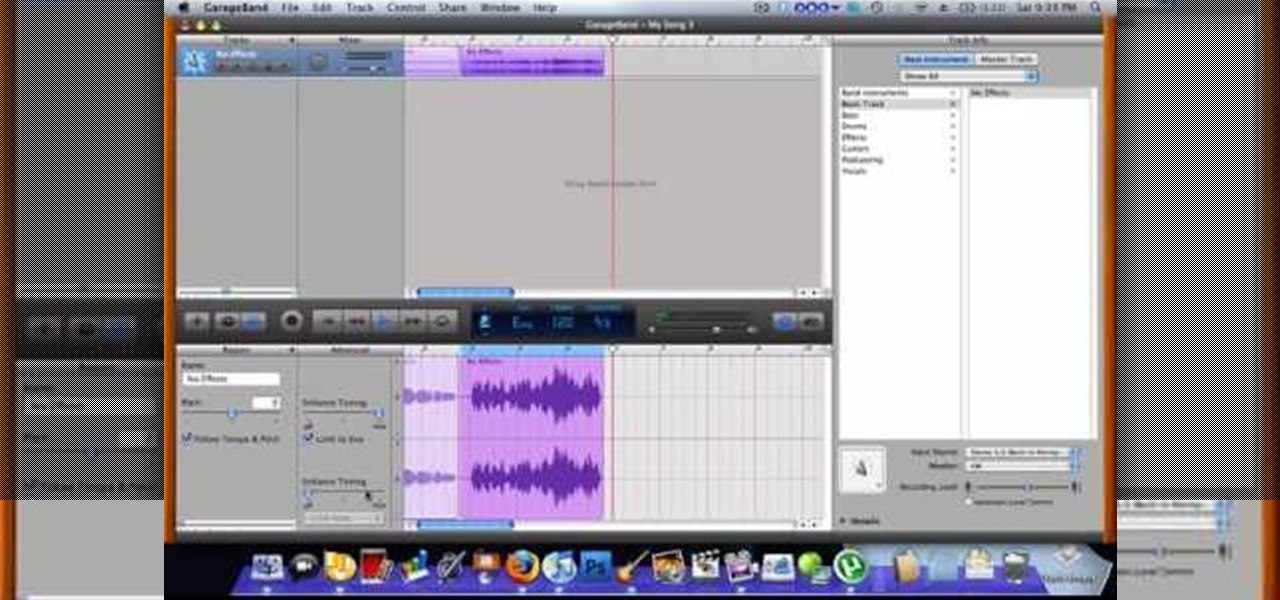
Use autotune on Garageband with your MacFirst, create a new track. Click on real instrumental track. Create. Record your voice. Listen to the recording. Go to view, hide track editor. Go to enhance tuning. You can bring it to max for the TPain effect or choose the enhance tuning setting that you want. If you choose limit key, the program will keep you in the same key as your vocal key. (That was determined by the software.) For vocal effects, record a new track. Choose real instrument track, ...
This video will show you how to make your essay appear longer then it actually is with just a few quick changes to your Microsoft word settings. First, you want to go to the "Edit" tab and click "Replace", from there in the replace with box put a period. Then click on format and click on font and change the size of the period from 12 pt font to 14 or 16 pt font and click replace all. The next change you want to make is with your margins and in the left and right margins change it from 1. 25 t...
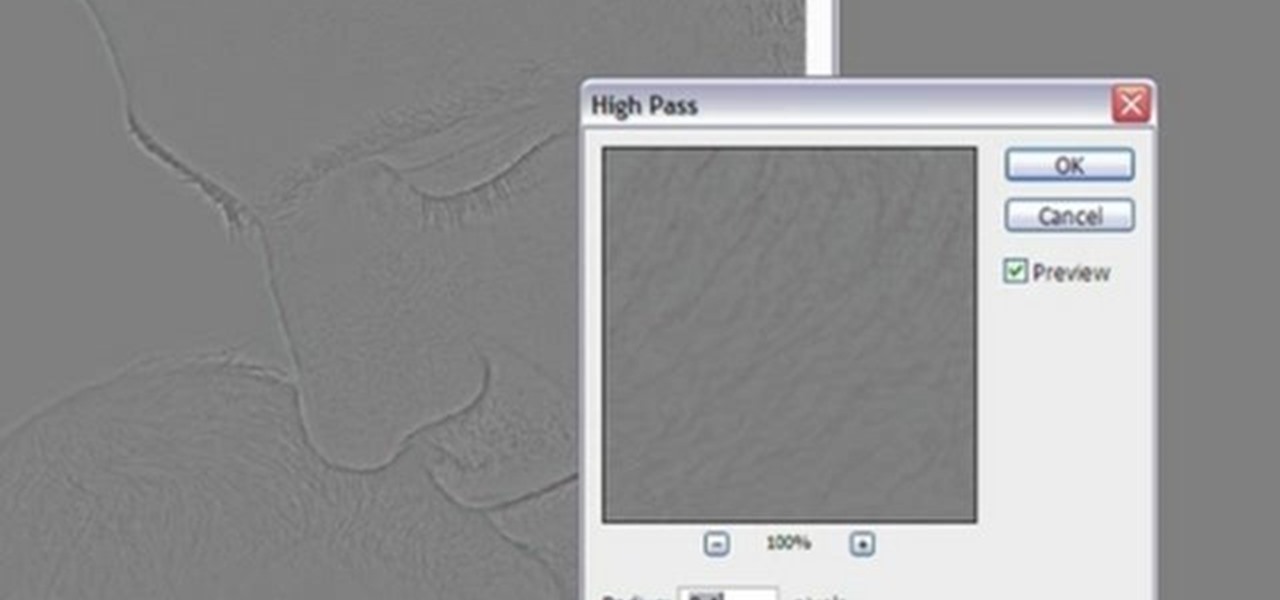
In this video tutorial, viewers learn how to sharpen photos in Adobe Photoshop CS3. Begin by opening the image in the program and duplicate the image layer. To duplicate, press the control and J button. With that images, go to Filter, choose Other and select High Pass. The images will now be covered entirely of gray. It is recommended to set the radius as 5-6 pixels and then press OK. Change the layer blending mode to overlay, soft light, hard light, vivid light or linear light. This video wi...
You don't need a camera to take a screen shot of your computer. In fact, a camera would probably give you an extremely blurry picture! There is a special button on your keyboard called Prnt Scrn. All you need to do is press that button. The screen shot of your desktop is then stored onto your clipboard. To get it off the clipboard, you need to paste it in paint. Open it up, go to edit and click paste. Then go to file and click save as to save your file. Choose where you want it to be saved, n...
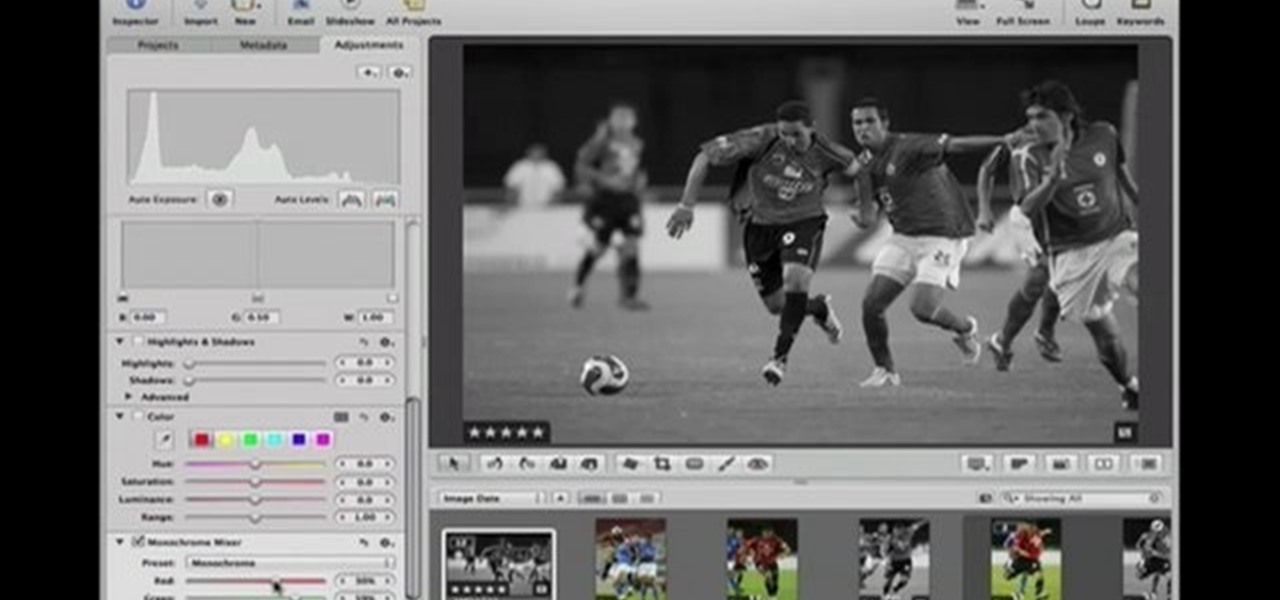
This Software video tutorial shows how to convert color images to black and white in Aperture. Scott Bourne presents this video. Open up ‘aperture’ program and select a color photo that you want to convert to black and white. Now move from the ‘projects’ page to the ‘adjustments’ page by clicking on it. Then click on the ‘+’ sign and select ‘Monochrome Mixer’. When you do this, the picture instantly turns to black and white. It’s as simple and easy as that. For editing the picture further, on...
This video shows you how to use Skype on a Nokia N900 cell phone. Skype can be activated from the Settings menu of the phone. You must scroll down to "VoIP and IM Accounts" and then select "Skype". After that, you must either log in to your Skype account or create a new one. If you don't have an account, then you must create one and you'll be able to sign in right away. Once you have logged in, you can create and edit contacts. Once that is done, you can use Skype to contact people. Skype set...
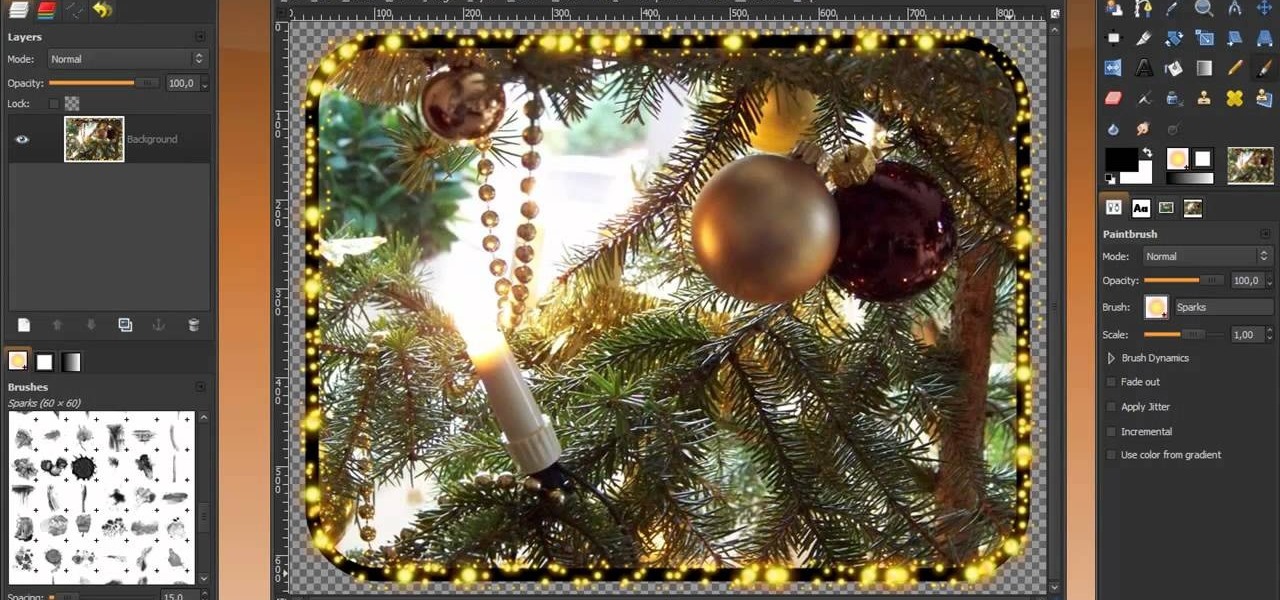
Learn how to make a fancy border in GIMP with this GIMP tricks video tutorial. This border can be used to frame images for YouTube videos or other things. Take your image, and go to Image and Canvas Size. The size should be made larger to allow room for your border and then click Center. On Layers, select All Layers. Then, click Resize. This allows you to make room for your Layer. On the far left side, right click on your layer and select Alpha to Selection. Go to Select, To Path, Select, and...
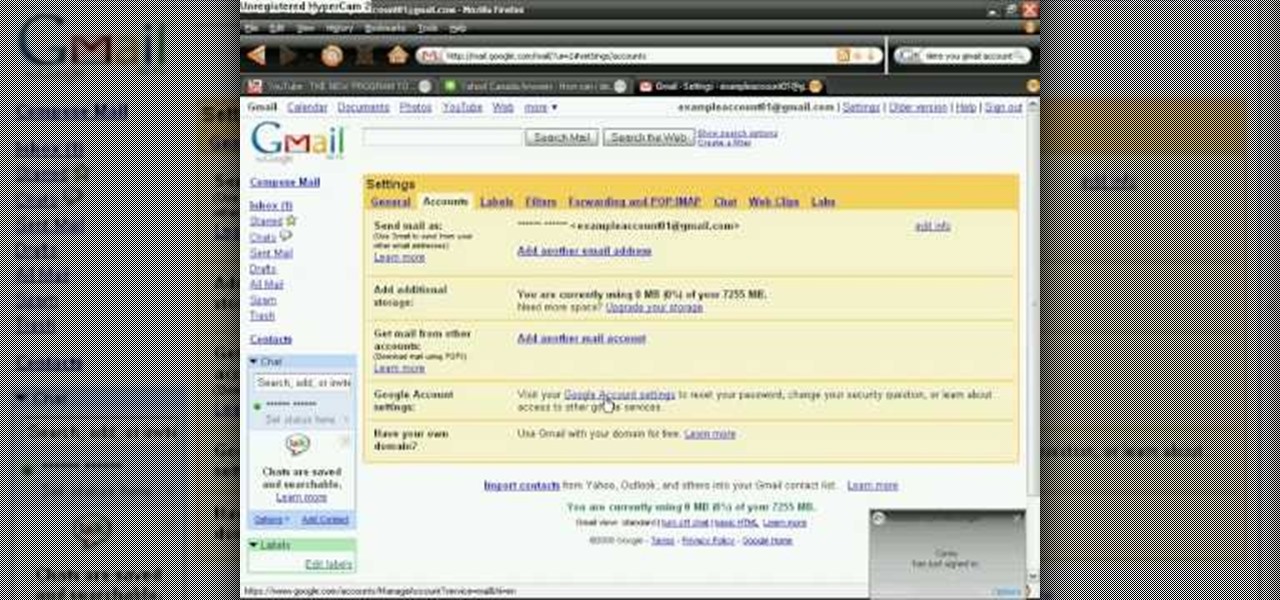
In order to delete a Gmail account, you have to log on to your e-mail. Once you are logged on, you click on the settings tab at the top right part of the page. Next, you have to click on the accounts tab on the page and then click on "view my Google accounts," which will take you to that page. Next to "my products," you have to click on edit and then click on "delete Gmail service." After that, you will be taken to the confirm delete page, where you must check the box to agree to deleting you...
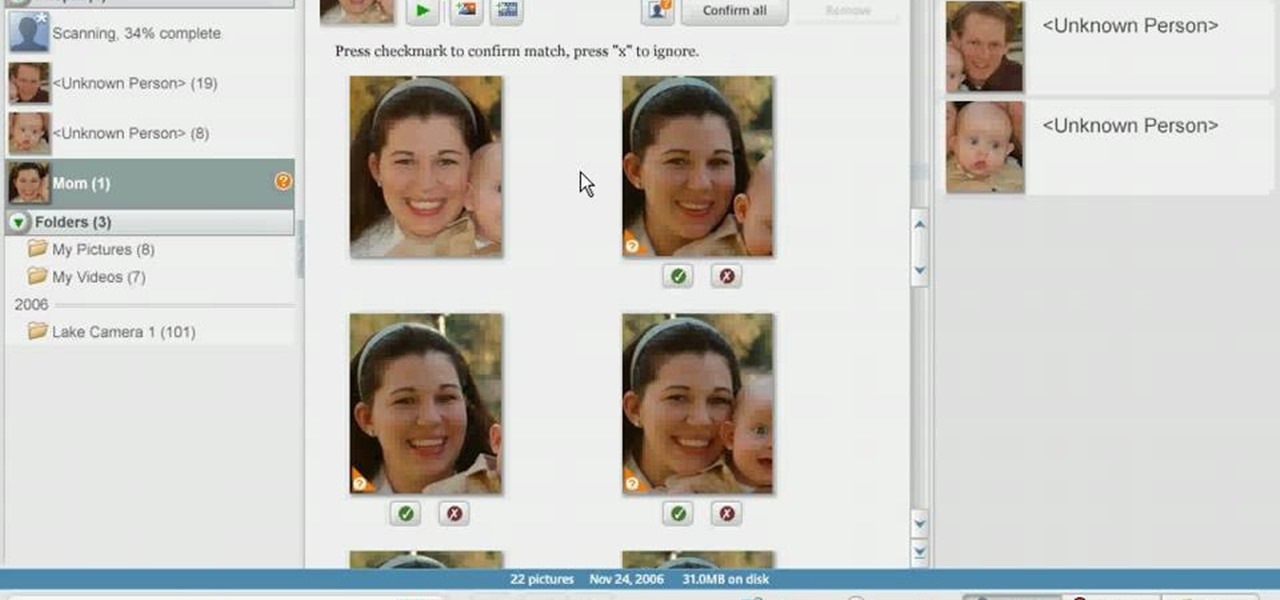
In order to use Picasa's face recognition feature double click on an image that you would like to edit. It will automatically identify each person. Then label the first person that it identifies. Then hit the enter key, and click on the new person button then click on the okay button. Now go back to your library and on the left hand side of your library you should see the label that you made for your first photo. Click on that label and Picasa will automatically find all of the photos that th...
In this video tutorial, viewers will learn how to create their own Apple Loops in Logic Pro 9. Logic Pro is a hybrid 32/64 bit digital audio workstation and MIDI sequencer software application. In this video, viewers will learn how to make any regular audio file into an Apple Loop that can be searched in Logic's Loops browser. This video focuses on setting up a workspace, recording with both live performers and digital instruments, editing and arranging, and mixing and mastering a composition...
This video by Architectus777 teaches us how to ink comic book pages. Inking is simply another term for outlining or black lining. This first step is to find an image in black in white. Following this, you may edit the image to be as light or dark as you wish. Afterwards, the shading is left up to your discretion. Moving on, Architectus777 shows other methods of inking, including using various other programs outside of Adobe Photoshop. We are then actually shown the inking process, in which Ar...
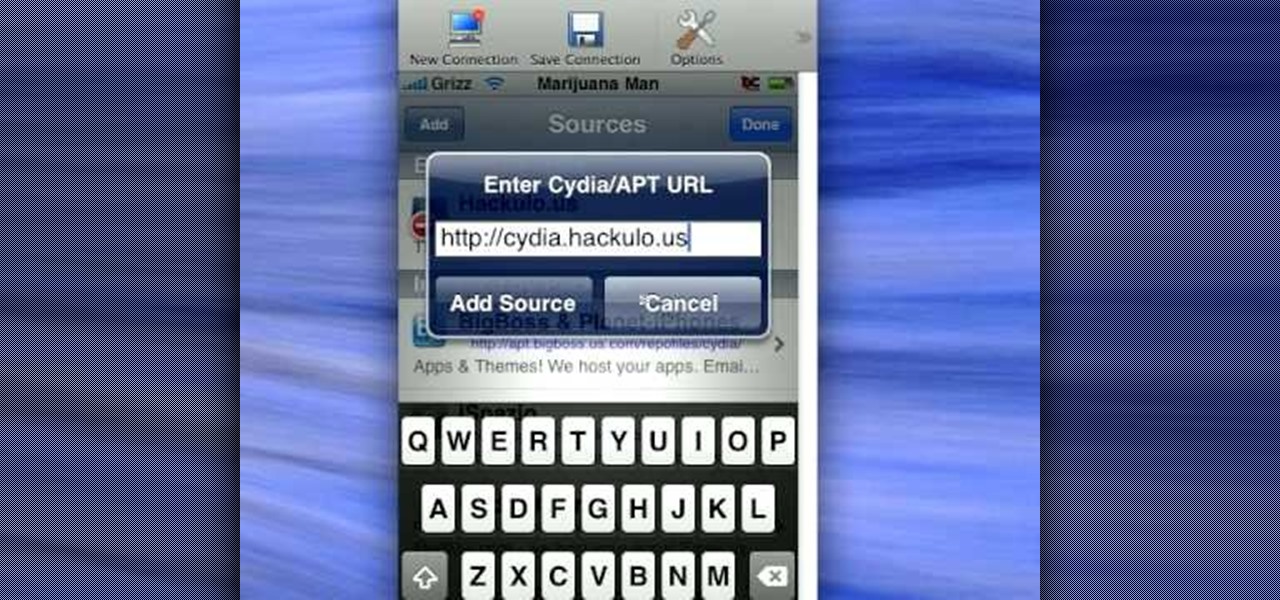
In this video from mez380 he shows how to install Installous which allows you to download any app store app for free for the iPhone. In Cydia you go to Manage, then click Sources. Now in the upper right click Edit, then Add. A box will pop up now asking for an address. Here you will type in cydia.hackulo.us and click add source. When it is done you will see Hackulo.us pop up. When you see it, click into it and scroll down. You should see Installous there in the list. Now you can press Install...
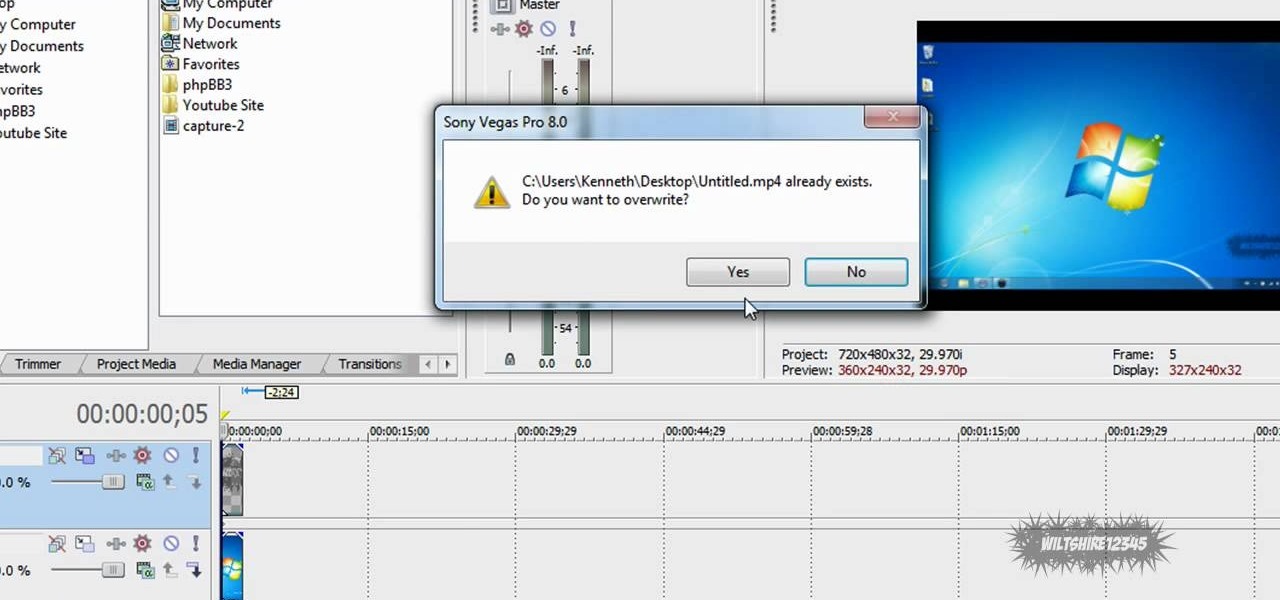
This video in the Software category will show you how to add a watermark to a video in Sony Vegas. This video tutorial is using Sony Vegas Pro8. Import a video into your timeline on which you want to put a watermark. Then go to the video layers on the left bottom, right click and select ‘insert video track’. This will create a blank video layer. Now find a picture that you want to use as a logo and drag and drop it into the blank layer. Edit it to the length of your video. Then go to ‘track m...
This video in the Education category will show you how to make any school paper look longer. Open the normal word document. Go to ‘edit’ and select ‘find’ and then to ‘replace’ tab. In the find what box type in ‘.’ (a full stop). Then, in ‘replace with’ box type in ‘.’. Now go to ‘format’ and click on ‘font’. In the box for font size select size 16 or 18 and click ‘replace all’. There you go, you have just made your paper longer without adding any text. In the video, a one and a half pages lo...
If street art is your thing, maybe you should make and print your own stickers to post around. Well this user shows us a pretty sweet way to do so. This video shows us how to make, import, edit, and then print our own stickers